Welcome, Guest
You have to register before you can post on our site.

Username
  

Password


Search Forums

(Advanced Search)

Forum Statistics
» Members: 20,946
» Latest member: blackopsdlc
» Forum threads: 22,007
» Forum posts: 22,974

Full Statistics

Online Users
There are currently 1609 online users.
» 0 Member(s) | 1603 Guest(s)
Applebot, Baidu, Bing, Facebook, Google, Yandex

Latest Threads
What is Celestial Codex i...
Forum: PC Discussion
Last Post: xSicKxBot

» Replies: 0
» Views: 1
[WoW Retail News] Xal'ata...
Forum: World of Warcraft
Last Post: xSicKxBot

» Replies: 0
» Views: 23
[Ubuntu News] Scaling And...
Forum: Linux, FreeBSD, and Unix types
Last Post: xSicKxBot

» Replies: 0
» Views: 16
[WoW Retail News] Comment...
Forum: World of Warcraft
Last Post: xSicKxBot

» Replies: 0
» Views: 18
How to unlock Maya Aguina...
Forum: PC Discussion
Last Post: xSicKxBot

» Replies: 0
» Views: 23
[Steam Release] The Unive...
Forum: New Game Releases
Last Post: xSicKxBot

» Replies: 0
» Views: 27
[DevBlog MS] Creating a m...
Forum: C#, Visual Basic, & .Net Frameworks
Last Post: xSicKxBot

» Replies: 0
» Views: 32
[WoW Retail News] Fixed C...
Forum: World of Warcraft
Last Post: xSicKxBot

» Replies: 0
» Views: 33
[PS.Blog] Fading Echo mak...
Forum: Sony Discussion
Last Post: xSicKxBot

» Replies: 0
» Views: 31
[Steam Release] Cowbots a...
Forum: New Game Releases
Last Post: xSicKxBot

» Replies: 0
» Views: 37

 
  PC - Warhammer 40,000: Chaos Gate - Daemonhunters
Posted by: xSicKxBot - 05-22-2022, 07:24 AM - Forum: New Game Releases - No Replies

Warhammer 40,000: Chaos Gate - Daemonhunters


Lead humanity's greatest weapon, the Grey Knights, in this fast-paced turn-based tactical RPG. Root out and purge a galaxy-spanning plague in a cinematic, story-driven campaign, using the tactics and talents of your own personalised squad of Daemonhunters. Forge Your Champions - Grey Knights are humanity's greatest weapon. A secretive yet supremely powerful chapter of Space Marines sworn to eradicate corruption, these legendary Daemonhunters are dedicated to combating the minions of Chaos. Lead your own personalised squad against a galaxy-wide plot to infect worlds with a cosmic plague, The Bloom.

Plan Your Strategy
Master a turn-based tactical game full of satisfyingly strategic action. Choose powerful classes, wield incredible weapons, use environments to your advantage, and target specific enemy weak points to hinder the advance of an ever-evolving and mutating threat.

Enter the 41st Millennium
Penned by acclaimed Black Library author Aaron Dembski-Bowden, immerse yourself in a compelling story set in the grimdark universe of Warhammer 40,000. Meet famous faces, engage iconic foes, and discover what it takes to lead a squad of elite warriors battling to prevent galaxy-wide destruction in the 41st millennium.

Publisher: Frontier Foundry

Release Date: May 05, 2022


https://www.metacritic.com/game/pc/warha...monhunters

Print this item

  News - Fortnite Obi-Wan Kenobi Skin Has The High Ground
Posted by: xSicKxBot - 05-22-2022, 07:24 AM - Forum: Lounge - No Replies

Fortnite Obi-Wan Kenobi Skin Has The High Ground

Fortnite's May The Fourth celebration is being extended for one more debut. We all heard the rumors, and it turns out they weren't just rumors after all--well, some of them, at least. Obi-Wan Kenobi himself is dropping down from a well-placed ledge to join the ranks of the Star Wars outfits currently in Fortnite, like Fennec Shand, Rey Skywalker, and Boba Fett.

Starting May 26 at 5 PM PT/8 PM ET, an assortment of Obi-Wan related cosmetics will be available as well as the outfit:

  • The Desert Essentials back bling (included along with the Outfit): An assortment of tools perfect for living an isolated existence on a remote desert planet.
  • Obi-Wan’s Blade pickaxe: An ol’ reliable partner. (Unfortunately, not a lightsaber…)
  • The Jedi Interceptor glider: Your new fighter has arrived.
  • Obi-Wan’s Message emote: An important transmission…
All of these items will be available in the Fortnite Item Shop starting May 26.

All of these items will be available to purchase in the item shop either individually or as a set in the Obi-Wan Kenobi bundle. The bundle will also include a bonus loading screen for anyone who does buy it as an added incentive.

Continue Reading at GameSpot

https://www.gamespot.com/articles/fortni...01-10abi2f

Print this item

  [Oracle Blog] The Advanced Management Console (AMC) 2.20 release has arrived!
Posted by: xSicKxBot - 05-21-2022, 08:01 AM - Forum: Java Language, JVM, and the JRE - No Replies

The Advanced Management Console (AMC) 2.20 release has arrived!

AMC 2.20 offers system administrators greater and easier control in managing Java version compatibility and security updates for desktops within their enterprise and for Independent Software Vendors (ISVs) with Java-based applications and solutions. The highlight of this release is the Containerized...

https://blogs.oracle.com/java/post/the-a...as-arrived

Print this item

  [Tut] How to Assign the Result of eval() to a Python Variable?
Posted by: xSicKxBot - 05-21-2022, 08:01 AM - Forum: Python - No Replies

How to Assign the Result of eval() to a Python Variable?

5/5 – (1 vote)

? Question: Say you have an expression you want to execute using the eval() function. How to store the result of the expression in a Python variable my_result?

Before I show you the solution, let’s quickly recap the eval() function:

Recap Python eval()


Python eval(s) parses the string argument s into a Python expression, runs it, and returns the result of the expression.


Related Tutorial: Python’s eval() built-in function

Without further ado, let’s learn how you can store the result of the eval() function in a Python variable:

Method 1: Simple Assignment


The most straightforward way to store the result of an eval() expression in a Python variable is to assign the whole return value to the variable. For example, the expression my_result = eval('2+2') stores the result 4 in the variable my_result.

Here’s a minimal example:

my_result = eval('2+2')
print(my_result)
# 4

This simple approach may not always work, for example, if you have a print() statement in the expression.

Read on to learn how to fix this issue next and learn something new!

Method 2: Redirect Standard Output


This method assumes you have a print() statement within the expression passed into the eval() function such as shown in the following three examples:

  • eval('print(2+2)')
  • eval('print([1, 2, 3, 4] + [5, 6])')
  • eval('print(2+2*0)')

To get the output and store it in a variable my_result, you need to temporarily redirect the standard output to the variable.

The following code shows you how to accomplish exactly this:

# Step 1: Import libraries StringIO and sys
from io import StringIO
import sys # Step 2: Keep stdout in temporary variable
tmp = sys.stdout # Step 3: Capture standard output using a StringIO object
my_result = StringIO() # Step 4: Assign Standard Output Stream to StringIO object
sys.stdout = my_result # Step 5: Print to the standard output
expression = 'print(2+2)' # any eval() expression here
eval(expression) # Step 6: Clean up by redirecting stdout to Python shell
sys.stdout = tmp # Step 7: Get and print the string from stdout
print('VARIABLE:', my_result.getvalue())
# hello world

If you need some assistance understanding this whole idea of redirecting the standard output, have a look at our in-depth guide on the Finxter blog.

? Related Article: 7 Easy Steps to Redirect Your Standard Output to a Variable (Python)

Note that this approach even works if you don’t have a print() statement in the original eval() expression because you can always artificially add the print() statement around the original expression like so:

  • eval('2+2') becomes eval('print(2+2)')
  • eval('2+2*0') becomes eval('print(2+2*0)')
  • eval('[1, 2, 3] + [4, 5]') becomes eval('print([1, 2, 3] + [4, 5])')

Even if it’s a bit clunky, after applying this short trick, you can redirect the standard output and store the result of any eval() expression in a variable.

Method 3: Use exec()


Using only Python’s eval() function, you cannot define variables inside the expression to be evaluated. However, you can define a variable inside the exec() function that will then be added to the global namespace. Thus, you can access the defined variable in your code after termination of the exec() expression!

Here’s how that works in a minimal example:

exec('my_result = 40 + 2')
print(my_result)
# 42

Variable my_result is only defined in the string expression passed into exec(), but you can use it in the code like it was part of the original source code.

Recap exec() vs eval()


Python’s exec() function takes a Python program, as a string or executable object, and runs it. The eval() function evaluates an expression and returns the result of this expression. There are two main differences:

  • exec() can execute all Python source code, whereas eval() can only evaluate expressions.
  • exec() always returns None, whereas eval() returns the result of the evaluated expression.
  • exec() can import modules, whereas eval() cannot.

You can learn more about the exec() function here:


Where to Go From Here?


Enough theory. Let’s get some practice!

Coders get paid six figures and more because they can solve problems more effectively using machine intelligence and automation.

To become more successful in coding, solve more real problems for real people. That’s how you polish the skills you really need in practice. After all, what’s the use of learning theory that nobody ever needs?

You build high-value coding skills by working on practical coding projects!

Do you want to stop learning with toy projects and focus on practical code projects that earn you money and solve real problems for people?

? If your answer is YES!, consider becoming a Python freelance developer! It’s the best way of approaching the task of improving your Python skills—even if you are a complete beginner.

If you just want to learn about the freelancing opportunity, feel free to watch my free webinar “How to Build Your High-Income Skill Python” and learn how I grew my coding business online and how you can, too—from the comfort of your own home.

Join the free webinar now!


https://www.sickgaming.net/blog/2022/05/...-variable/

Print this item

  (Indie Deal) FREE Dangerous Lands, Humongous Nostalgic Deals
Posted by: xSicKxBot - 05-21-2022, 08:01 AM - Forum: Deals or Specials - No Replies

FREE Dangerous Lands, Humongous Nostalgic Deals

FREE Dangerous Lands - Magic and RPG
[freebies.indiegala.com]
You are in Dangerous Lands, where monsters & magic can be found everywhere. Use your sword, combine it with magic & defeat all enemies.

https://www.youtube.com/watch?v=80ZyztIMKDs
Humongous Entertainment Publisher Sale, up to 60% OFF
[www.indiegala.com]
https://www.youtube.com/watch?v=NAMw22hSLl4
Stay Inside, Stay Safe and Enjoy Good Games.
Check out IndieGala on Twitter, YouTube & Facebook[www.facebook.com]


https://steamcommunity.com/groups/indieg...2659960728

Print this item

  PC - Best Month Ever!
Posted by: xSicKxBot - 05-21-2022, 08:01 AM - Forum: New Game Releases - No Replies

Best Month Ever!


Take part in a roller coaster of emotions with Louise embarking on a road trip of a lifetime through the late 1960s USA, trying to show her son Mitch how to navigate the often cruel modern world.

Each choice you make in the crucial few moments we all know may change our lives for good in a split of a second, influence what kind of person Mitch turns out to be and what values shall guide him once he becomes his own man.

Find clues as to why Louise's life is what it is today, take crucial decisions no other person would be strong enough to stomach, and show Mitch what he needs to see in order for him to become independent, suave, and brave enough to conquer the day.

Travel across the country and meet a plethora of characters that may help or may dissuade Louise from her goals - including the most controversial groups many thought long gone.

Publisher: Klabater

Release Date: May 05, 2022


https://www.metacritic.com/game/pc/best-month-ever!

Print this item

  News - TikTok Is Making "Major Push" Into Gaming - Report
Posted by: xSicKxBot - 05-21-2022, 08:01 AM - Forum: Lounge - No Replies

TikTok Is Making "Major Push" Into Gaming - Report

TikTok may be planning to make a big push into gaming. Reuters reports that the uber-popular video site is already conducting tests in Vietnam that allow users there to play games inside the app. This effort was described by Reuters as part of a "major push into gaming."

TikTok already has 1 billion monthly active users, and adding games to the platform would, in theory at least, increase a user's average time on the app and would drive more revenue from advertisements, the report said. TikTok is already a behemoth, recently surpassing YouTube by some metrics.

TikTok will expand its gaming tests to other parts of Southeast Asia in the time ahead, the report said, and this could happen as soon as Q3.

Continue Reading at GameSpot

https://www.gamespot.com/articles/tiktok...01-10abi2f

Print this item

  [Tut] 7 Easy Steps to Redirect Your Standard Output to a Variable (Python)
Posted by: xSicKxBot - 05-20-2022, 12:47 PM - Forum: Python - No Replies

7 Easy Steps to Redirect Your Standard Output to a Variable (Python)

5/5 – (1 vote)

? Question: How to redirect the standard output in Python and store it as a string in a variable?

This article will guide you through seven easy steps to solve this problem. As an overview, here’s the code in eight lines that stores the standard output in a variable my_result:

  1. from io import StringIO
  2. import sys
  3. tmp = sys.stdout
  4. my_result = StringIO()
  5. sys.stdout = my_result
  6. print('hello world') # output stored in my_result
  7. sys.stdout = tmp
  8. print(result.getvalue())

Let’s go over those steps one by one—we’ll examine the full code for copy&paste at the end of this article, so read on! ?

Step 1: Import libraries StringIO and sys


Import the two libraries StringIO and sys to access the standard output and store the string input-output stream.

from io import StringIO import sys

Both modules are part of the standard library, so there is no need to install them with pip!

Step 2: Keep stdout in temporary variable


We’ll overwrite the standard output to catch everything written to it. In order to reset your code to the normal state, we need to capture the original standard output stream by introducing a temporary variable.

tmp = sys.stdout

Step 3: Capture standard output using a StringIO object


Create a variable and assign a StringIO object to the variable to capture the standard output stream.

my_result = StringIO()

Now, this object can store everything printed to the standard output. But we have to connect it first to the stdout!

Step 4: Assign Standard Output Stream to StringIO object


Assign the StringIO object created in the previous step to the standard output that is captured with sys.stdout.

sys.stdout = my_result

Step 5: Print to the standard output


From this point onwards, anything that is printed using the print() statement by any function you call in your Python script is written in the StringIO object referred to by variable my_result.

The following exemplifies the print('hello world') statement but you can do anything here:

print('hello world')

? Note: No output appears on the screen anymore because the standard output is now redirected to the variable.

Step 6: Clean up by redirecting stdout to Python shell


Are you ready with capturing the output in the variable? Clean up by redirecting the standard output stream from the variable to the screen again.

sys.stdout = tmp

Step 7: Get and print the string from stdout


At this point, your string from the standard output is stored in the StringIO object in the my_result variable. You can access it using the StringIO.getvalue() method.

print(result.getvalue())

Full Code


Here’s the full code snippet for ease of copy&paste:

# Step 1
from io import StringIO
import sys # Step 2
tmp = sys.stdout # Step 3
my_result = StringIO() # Step 4
sys.stdout = my_result # Step 5
print('hello world') # Step 6
sys.stdout = tmp # Step 7
print('VARIABLE:', my_result.getvalue())
# hello world

You can also check this out on our interactive Jupyter notebook so you don’t have to try in your own shell:


? Try it yourself: Click to run in Jupyter Notebook (Google Colab)

References:

Are you ready to up your Python skills? Join our free email academy — we’ve cheat sheets too! ?


https://www.sickgaming.net/blog/2022/05/...le-python/

Print this item

  [Oracle Blog] Sharing the Code – Engagement from 25 Years of Java
Posted by: xSicKxBot - 05-20-2022, 12:47 PM - Forum: Java Language, JVM, and the JRE - No Replies

Sharing the Code – Engagement from 25 Years of Java

2020… what a year! December presents the perfect opportunity to take a look back at so much that transpired in the world of Java during the course of 2020. One of the biggest stories is that Java turned 25 on May 23 of this year. Global in-person celebration plans were transformed into a series of o...

https://blogs.oracle.com/java/post/shari...rs-of-java

Print this item

  [Tut] How to Create a WordPress Woocommerce Contact Form
Posted by: xSicKxBot - 05-20-2022, 12:47 PM - Forum: PHP Development - No Replies

How to Create a WordPress Woocommerce Contact Form

by Vincy. Last modified on May 19th, 2022.

A contact form is an important component of an eCommerce site. It is for letting the customers connect to the sellers. It allows customers to enquire and send their queries on the order and engage with the seller.

The WordPress WooCommerce plugin helps to create your online shop in a few minutes. It is very easy to create a contact form in the WordPress eCommerce shop.

There are plugins available in the market to customize the WooCommerce contact form. All of them give a shortcode or an option to embed forms into a page.

We can also build a custom solution to render the form into a WooCommerce page.

There are many ways to render the WooCommerce contact form in the template files. For example,

  1. by creating a shortcode with theme’s funtions.php
  2. by using custom or existing WordPress plugins.
  3. by creating a widget for displaying the contact form.

This article shows some of the available plugins to integrate a WooCommerce contact form. It also describes how to configure these plugins to render the form in the shop pages.

Reasons for having a contact form in a WooCommerce store


A WooCommerce contact form is essential for the following reasons.

  1. To let customers raise queries, and support tickets.
  2. To allow discussion about purchases.
  3. To encourage customers to add feedback and comments for improving sales.
  4. To enquire about products and orders.

List of Woocommerce contact form plugins


These are the list of WordPress plugins used to create a WooCommerce contact form. Most of them have the free version and are simple to integrate.

Contact form plugin Number of installations Last updated
WPForms 5+ million 2 weeks ago
Contact Form 7 (CF7) 5+ million 3 month ago
Ninja Forms 1+ million 2 months ago
Formidable Pro 300000+ 2 days ago
Simple Basic Contact Form 10000+ 2 months ago
Contact Form by BestWebSoft 80000+ 2 months ago
Gravity Forms 20000 20000+ 2 weeks ago

Install and activate the WooCommerce plugin to turn a WordPress site into an online shop.

Then, integrate any one of the above plugins to render a WooCommerce contact form on the shop.

In the upcoming sections, we will see the usage mechanism of the free plugins among the above list.

Before that, install WordPress and download the WooCommerce plugin to be installed and activated.

How to create a contact form using WPForms?


The WPForms plugin helps to create a WooCommerce contact form in 5 minutes.

There are two steps to display a contact form on a WordPress WooCommerce page.

  • Customize a contact form using WPForms settings.
  • Embed the WooCommerce contact form into an existing or new page.

For customizing the contact form, follow the below steps with the WordPress admin

  • Go to WpForms -> All Forms via the left menu.
  • Choose the contact form title and the template.
  • Construct the form by drag and drop field tools and save the form.
  • Embed the form into an existing or a newly created page.

Embedding the WooCommerce contact form into the shop template is very easy.

  • Choose the contact form to be embedded.
  • Click the “Embed” option above the form editor which is next to the “Save” button.
  • Choose one among the three ways provided as shown below to embed a WooCommerce contact form.
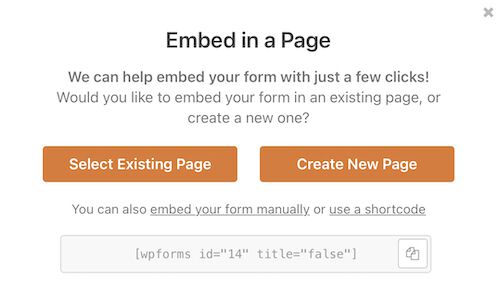
Embed WooCommerce Contact Form

How to create a WooCommerce contact form using CF7?


Contact form 7 is one of the heavily installed forms customization plugins. It helps to customize a WooCommerce contact form in the following aspects.

Install and activate to build a contact form with a wizard-like customization process.
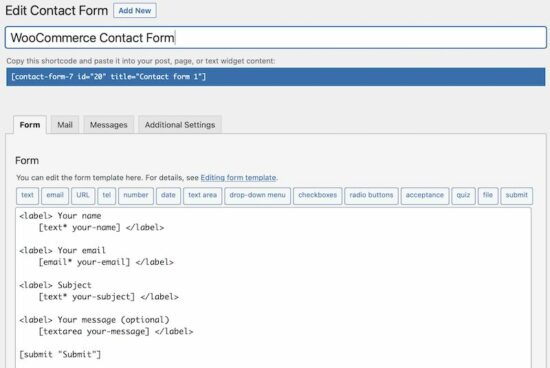
WooCommerce Contact Form7

Step 1: Customize the form template


It covers all possible form fields to be rendered onto a form template. It has these selectable options above the rich-text editor of the form edit window.

Step 2: Customize the email template


Then, it allows for designing an email template. In this, it has the option to build the email header and the body with the subject and other details.
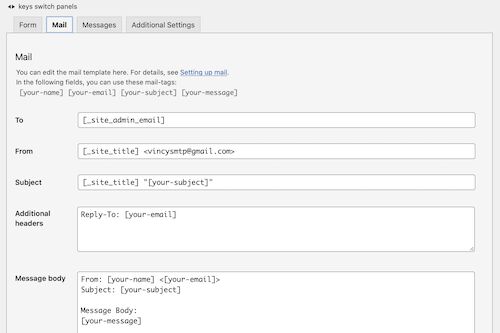
CF7 Mail Template Customization

Step 3: Configuring the acknowledgment message


The acknowledgment messages guide the end-users. It helps to complete submitting the WooCommerce contact form easily. It is for the following purposes.

  • To respond with a success or failure message.
  • To show a help text on entering wrong formatted data into the form.
  • To alert users to enter all mandatory fields.
  • To alert users to accept conditions or select form content if any.

After successful configurations, save the form template. Then, copy the shortcode for rendering this WooCommerce contact form in the front end.

The shortcode is displayed below the contact form title in the editor window. Put this shortcode in the right template where the contact form is expected to be displayed.

Creates forms with WordPress Ninja Forms plugin


Install the Ninja Forms plugin to deploy a contact form template on a WooCommerce page.

After activating the plugin, the WordPress admin will show the menu. Go to Ninja Forms -> Add New to choose the contact form template.

It also allows extensive customization of a WooCommerce contact form. It slides in a panel of form fields with a drag and drops option.
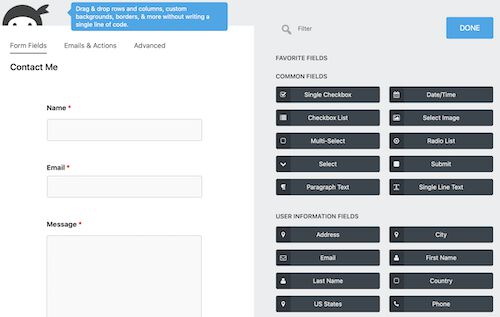
ninja form builder

There are 4 options to set up emails & actions to be performed on submitting the form.

  1. Record submission: Database storage of the submitted form fields.
  2. Email confirmation: Confirmation message to the customer about the message received status.
  3. Email Notification: Notify the admin about the customer’s attempt to contact him or her.
  4. Success message: Acknowledge the customers via the form UI.
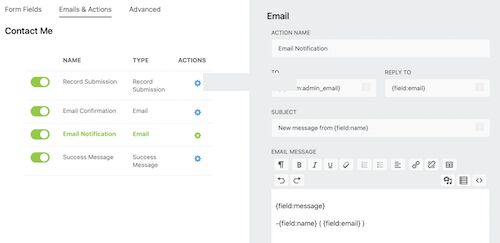
form actions setting

Each action has configurable directives to set the following.

  • It allows configuring the confirmation and notification mails’ subject, body and header.
  • It allows setting the acknowledgment message displayed in the UI.
  • It has options to mark some form fields excluded from storing in the database.

It also contains advanced features to restrict users not logging in. Also, it restricts the number of form submissions with a configured limit.

‘Formidable Pro’ form in a WordPress eCommerce website


It has various FREE or PRO templates of WordPress contact forms.

It gives blank forms to customize form templates without subscription or payment.

It is free and capable of customizing the flow by settings the form title, description and the fields.
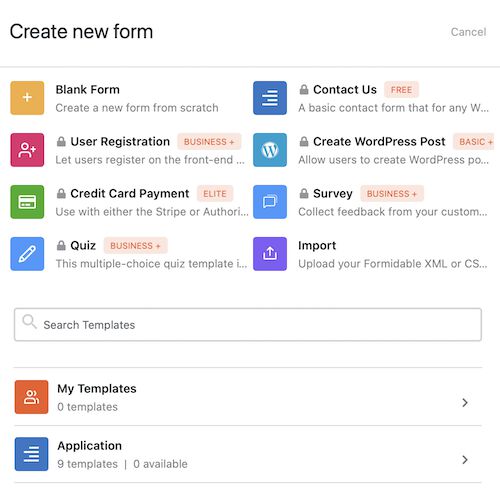
formidable pro contact form

Like other contact form plugins, this also has the form builder to drag and drop fields.

It has enough free features to build a WooCommerce contact form. Those are,

  • Enable or disable displaying the form title and description above the form fields.
  • Configuring the after-submit behavior. It can be any one of the following.
    • A response text to display a success or error message.
    • A HTML response from a WordPress page.
    • Redirect to a separate page after submission.
  • Enabling Honey pot integrations to safeguard the form from bots and malicious users.
  • Enabling/disabling spam checking with respect to the on-submit token uniqueness using JavaScript.
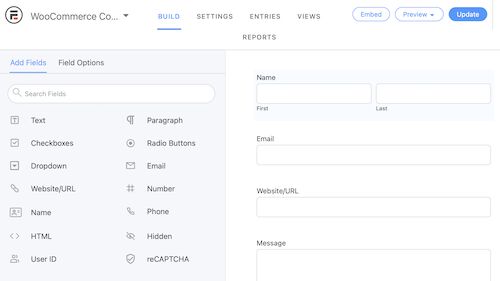
woocommerce contact form builder formidable pro

After building the WooCommerce contact form, click update to save the changes.

It is also having the “Embed” option to put the form into a WordPress page. The above image shows the “Embed”, “Preview” and “Update” options in the top right corner.

How to use the Simple Basic Contact Form plugin on a WooCommerce page?


The “Simple Basic Contact Form” is too simple to integrate as it is named. Unlike all the above plugins, it has a single-page setting to configure.

Though it doesn’t have a form builder, it provides a long scrollable list of configurations. These are more than enough to set up a useful WooCommerce contact form.

It includes place holder to include additional contents additional with the form fields. Those are,

  • Form description above and below the fields.
  • Help text above the submit button to guide the customers.
  • Markup of the success or failure responses.
  • Custom CSS to let the WooCommerce contact form be in the theme of the shop.
  • Enable captcha or question challenge.
  • Include stop words.

This settings page contains all minimal form fields required for a contact form. These are like Name, Email, Label, Text and more.

After configuring, add the shortcode [simple_contact_form] into a shop page template. It will render the corresponding form UI to allow customers to convey their doubts about the order placed.

Conclusion


With the use of any one of the above plugins, creating a WooCommerce contact form must be easy. It will enable your shop to let your customer enquire about the placed orders and product customization.

These choices help to choose one among them based on the need of your WooCommerce site.

These plugins have a volume of placeholders to configure. Sometimes, there will be a simple form expected to allow customers to enquire.

If you want a sleek solution instead of these complex configurations, then a custom code is best. Let us see how to create a WooCommerce contact form plugin in the next article.

↑ Back to Top


https://www.sickgaming.net/blog/2022/05/...tact-form/

Print this item