Welcome, Guest
You have to register before you can post on our site.

Username
  

Password


Search Forums

(Advanced Search)

Forum Statistics
» Members: 20,946
» Latest member: blackopsdlc
» Forum threads: 21,997
» Forum posts: 22,964

Full Statistics

Online Users
There are currently 1349 online users.
» 1 Member(s) | 1343 Guest(s)
Applebot, Baidu, Bing, Facebook, Google, SickProdigy

Latest Threads
[DevBlog MS] Creating a m...
Forum: C#, Visual Basic, & .Net Frameworks
Last Post: xSicKxBot

» Replies: 0
» Views: 1
[WoW Retail News] Fixed C...
Forum: World of Warcraft
Last Post: xSicKxBot

» Replies: 0
» Views: 8
[PS.Blog] Fading Echo mak...
Forum: Sony Discussion
Last Post: xSicKxBot

» Replies: 0
» Views: 9
[Steam Release] Cowbots a...
Forum: New Game Releases
Last Post: xSicKxBot

» Replies: 0
» Views: 13
[Dev News] September Free...
Forum: Game Development
Last Post: xSicKxBot

» Replies: 0
» Views: 10
Marvel Rivals Venom guide...
Forum: PC Discussion
Last Post: xSicKxBot

» Replies: 0
» Views: 15
[WoW Retail News] Midnigh...
Forum: World of Warcraft
Last Post: xSicKxBot

» Replies: 0
» Views: 21
[Steam Release] Kodon
Forum: New Game Releases
Last Post: xSicKxBot

» Replies: 0
» Views: 21
[WoW Retail News] Downloa...
Forum: World of Warcraft
Last Post: xSicKxBot

» Replies: 0
» Views: 18
[PS.Blog] (For Southeast ...
Forum: Sony Discussion
Last Post: xSicKxBot

» Replies: 0
» Views: 17

 
  (Free Game Key) Runbow and The Drone Racing League Simulator - Free on Epic Games
Posted by: xSicKxBot - 10-01-2022, 09:43 AM - Forum: Deals or Specials - No Replies

Runbow and The Drone Racing League Simulator - Free on Epic Games

Grab these games on the Epic Games Store

❤️ Runbow
Store Page[store.epicgames.com]

❤️ The Drone Racing League Simulator
Store Page[store.epicgames.com]

The games is free to keep until Thursday, September 22nd, 2022 15:00 UTC.


There is another game on GOG dont forget to claim it


We are welcoming everyone to join our discord[discord.gg]. We are more active there on finding giveaways, small or large, and there are daily raffles you can participate.

?GrabFreeGames.com ?Twitter ?Steam Curator ?Facebook[fb.me]?Discord[discord.gg]
❤️Support us: HumbleBundle Partner[www.humblebundle.com] Fanatical Affiliate[www.fanatical.com]


https://steamcommunity.com/groups/GrabFr...9931434246

Print this item

  News - Horror And Romance Come Together In Bones And All First Trailer
Posted by: xSicKxBot - 10-01-2022, 09:43 AM - Forum: Lounge - No Replies

Horror And Romance Come Together In Bones And All First Trailer

Camille DeAngelis' 2015 novel Bones and All tells a romantic horror story between Lee and Marlene as they make their way through a road trip in Reagan-era America. Timothée Chalamet and Taylor Russell star in the adaptation as the bloody lovers, directed by Luca Guadagnino (2018's Suspiria). The first teaser was released Thursday and didn't give too much of the plot away, but will leave viewers with some visceral imagery.

Bones and All had its world premiere at the 79th Venice International Film Festival in early September, receiving a 10-minute standing ovation. You can check out the teaser below.

While it's a quick teaser, we can see Maren struggle with her appetite and desires and Lee's rage throughout it, and something very different from what we've seen from Chalamet in past years. Joining Russell and Chalamet are Mark Rylance, Michael Stuhlbarg, André Holland, Chloë Sevigny, Jessica Harper, and David Gordon Green. Chalamet is co-producing the feature.

Continue Reading at GameSpot

https://www.gamespot.com/articles/horror...01-10abi2f

Print this item

  PC - Judgment
Posted by: xSicKxBot - 10-01-2022, 09:43 AM - Forum: New Game Releases - No Replies

Judgment


From the makers of the acclaimed Yakuza series, Ryu Ga Gotoku Studio, Judgment is the dramatic tale of a disgraced lawyer seeking redemption in a world rife with corruption and despair. Investigate the seedy Red Light District of Kamurocho by stepping into the mind of private detective Takayuki Yagami and utilize innovative investigation systems to uncover the secrets that lie deep within Kamurocho's corrupt underbelly. Experience visceral combat with two unique combat styles. Take down groups of thugs with sweeping blows in Crane Style, then switch to Tiger to overwhelm a single foe with a series of powerful strikes. Practice mixing-and-matching styles in combat in conjunction with a wide variety of skills, weapons, and powerful (and hilarious) EX Actions to unlock a whole new dimension in combat.

Publisher: SegaSoft

Release Date: Sep 15, 2022


https://www.metacritic.com/game/pc/judgment

Print this item

  [Tut] How to Retrieve a Single Element from a Python Generator
Posted by: xSicKxBot - 09-30-2022, 11:20 AM - Forum: Python - No Replies

How to Retrieve a Single Element from a Python Generator

5/5 – (2 votes)

This article will show you how to retrieve a single generator element in Python. Before moving forward, let’s review what a generator does.

Quick Recap Generators


? Definition Generator: A generator is commonly used when processing vast amounts of data. This function uses minimal memory and produces results in less time than a standard function.

? Definition yield: The yield keyword returns a generator object instead of a value.

? Definition next(): This function takes an iterator and an optional default value. Each time this function is called, it returns the next iterator item until all items are exhausted. Once exhausted, it returns the default value passed or a StopIteration Error.

Problem Formulation and Solution Overview


? Question: How would we write code to retrieve and return a single element from a Generator?

We can accomplish this task by one of the following options:


Method 1: Use a Generator and random.randint()


This example uses a Generator and the random.randint() function to return a random single element.

Let’s say we want to start a weekly in-house lottery called LottoOne (yeah — the lottery naming doesn’t care about Python’s naming conventions ?).

The code below will generate and return one (1) random element (an integer): the winning number for the week.

import random def LottoOne(): num = random.randint(1, 50) yield print(f'The Winning Number for the Week is: {num}!') gen = LottoOne()
next(gen)

The first line in the above code imports the random library. This library allows the generation of random numbers using the random.randint() function.

On the following line, an instance of LottoOne is instantiated and saved to the variable gen. If output to the terminal, an object similar to that shown below will display.


<generator object LottoOne at 0x00000236B9686880>

Since we only want the first randomly generated number, the code calls the next() function once and passes it one (1) argument, the object gen. The results are output to the terminal.


The Winning Number for the Week is: 44

YouTube Video

? Recommended Tutorial: An Introduction to Python Classes


Method 2: Use a Generator and islice()


This example uses a generator and the itertools.islice() function to return a single element.

If you know what number you need to return from a generator, it can be referenced directly, as shown in the code below.

import itertools
from itertools import islice gen = (x for x in range(1, 50))
res = next(itertools.islice(gen, 2, None))
print(res)

The first two (2) lines in the above code import the itertools library and its associated function islice() needed to achieve the desired result.

The following line creates a generator comprehension using the range() function and passing it a start and stop position (1, 50-1). The results save to gen as an object.

If output to the terminal, an object similar to that shown below will display.


<generator object at 0x00000285D4DB68F0>

Then, the next() function is called and passed one (1) argument, itertools.islice().

This function is then passed three (3) arguments:

  1. An iterator. In this case, gen.
  2. The value to return, idx.
  3. The default value. In this case, the keyword None. Passing a default value prevents a StopIteration error from occurring when the end of the iterator has been reached.

The results save to res and are output to the terminal.


3

The value of 3 can be found at index 2 in gen.

YouTube Video


Method 3: Use a List, Generator Comprehension and slicing


This example uses a list, generator comprehension and slicing to return a single element.

gen = (i for i in range(1, 50))
res = list(gen)[3]
print(res)

The first line in the above code creates a Generator Comprehension using the range() function and passing it a start and stop position (1, 50-1). The results save to gen as an object.

If output to the terminal, an object similar to that shown below will display.


<generator object at 0x00000295D4DB78F0>

The following line converts the object to a list. Slicing is then applied to retrieve the list element at position three (3).

The results save to res and are output to the terminal.


4

The value of 4 can be found at index 3 in gen.

YouTube Video


Method 4: Use a Generator and a For Loop


This example creates a Generator whose content is output to the terminal until a specific number is found.

def my_func(): yield 10 yield 20 yield 30 gen = my_func() for item in gen: if item == 20: print(item) break

This first line of the above code declares the function my_func(). This function will return, via a yield statement, a number (one/iteration).

Next, an object is declared and saved to gen.

If output to the terminal, an object similar to that shown below will display.


<generator object my_func at 0x0000022DE93D59A0>

The following line instantiates a for loop. This loop iterates through each yield statement in gen until the item contains a value of 20.

This value is output to the terminal, and the loop terminates via the break statement.


20


Summary


This article has provided four (4) ways to retrieve a single element from a Generator to select the best fit for your coding requirements.

Good Luck & Happy Coding!


Programming Humor – Python


“I wrote 20 short programs in Python yesterday. It was wonderful. Perl, I’m leaving you.”xkcd


https://www.sickgaming.net/blog/2022/09/...generator/

Print this item

  [Tut] Amazon like Product Category Tree
Posted by: xSicKxBot - 09-30-2022, 11:19 AM - Forum: PHP Development - No Replies

Amazon like Product Category Tree

by Vincy. Last modified on September 29th, 2022.

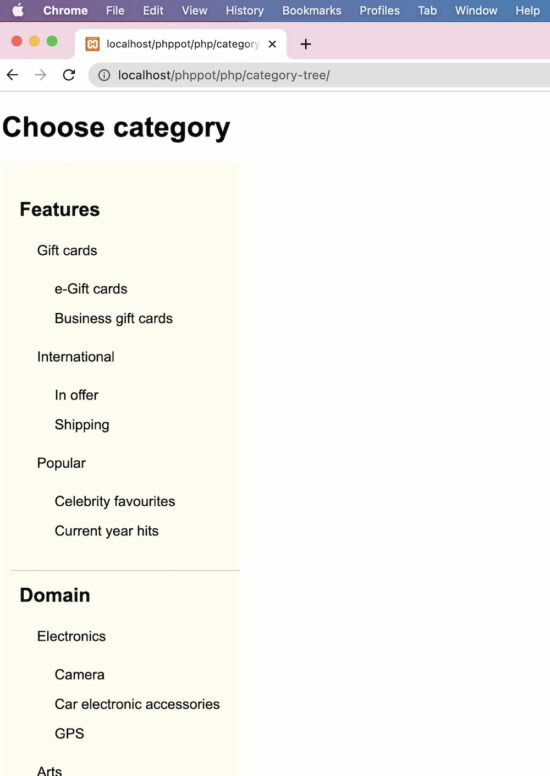
This PHP script will help if you want to display an Amazon-like product category tree. It will be useful for displaying the category menu in a hierarchical order, just like a tree.

The specialty of this PHP code is that it builds a multi-level category tree with infinite depth. It uses the recursion method to obtain this.

In a previous tutorial, we have to see a multi-level dropdown menu with a fixed depth.

Let’s look into the upcoming sections to see how the code is built to display the category tree in a page.

category tree

Category Database


This script contains the category database with data. The insert query creates category records which are mapped with its parent appropriately.

The category records containing parent=0 are known as the main category. Each record has the sort order to set the display priority on the UI.

structure.sql

CREATE TABLE `category` ( `id` int(10) UNSIGNED NOT NULL, `category_name` varchar(50) COLLATE utf8mb4_unicode_ci NOT NULL, `parent` int(10) UNSIGNED NOT NULL DEFAULT 0, `sort_order` int(11) NOT NULL DEFAULT 0
); --
-- Dumping data for table `category`
-- INSERT INTO `category` (`id`, `category_name`, `parent`, `sort_order`) VALUES
(1, 'Features', 0, 0),
(2, 'Domain', 0, 1),
(3, 'Digital', 0, 2),
(4, 'Gift cards', 1, 0),
(5, 'International', 1, 1),
(6, 'Popular', 1, 2),
(7, 'e-Gift cards', 4, 0),
(8, 'Business gift cards', 4, 1),
(9, 'In offer', 5, 0),
(10, 'Shipping', 5, 1),
(11, 'Celebrity favourites', 6, 0),
(12, 'Current year hits', 6, 1),
(13, 'Electronics', 2, 0),
(14, 'Arts', 2, 1),
(15, 'Gadgets', 2, 2),
(16, 'Camera', 13, 0),
(17, 'Car electronic accessories', 13, 1),
(18, 'GPS', 13, 2),
(19, 'Handcrafted', 14, 0),
(20, 'Gold enameled', 14, 1),
(21, 'Jewelry', 14, 2),
(22, 'Fabric', 19, 0),
(23, 'Needle work', 19, 1),
(24, 'PSP', 15, 0),
(25, 'Smart phones', 15, 1),
(26, 'Apps', 3, 0),
(27, 'Music', 3, 1),
(28, 'Movies', 3, 2),
(29, 'Dev apps', 26, 0),
(30, 'App Hardwares', 26, 1),
(31, 'Podcasts', 27, 0),
(32, 'Live', 27, 1),
(33, 'Recently viewed', 28, 0),
(34, 'You may like', 28, 1),
(35, 'Blockbusters', 28, 2); --
-- Indexes for dumped tables
-- --
-- Indexes for table `category`
--
ALTER TABLE `category` ADD PRIMARY KEY (`id`); --
-- AUTO_INCREMENT for dumped tables
-- --
-- AUTO_INCREMENT for table `category`
--
ALTER TABLE `category` MODIFY `id` int(10) UNSIGNED NOT NULL AUTO_INCREMENT, AUTO_INCREMENT=36;

Category menu rendering in HTML


This is an initiator that calls the PHP recursive parsing to get the Category Tree HTML. In the PHP ZipArchive post, we used the same recursion concept to compress the contents of the enclosed directories.

Also, it has a UI holder to render the HTML hierarchical category menu.

A PHP class CategoryTree is created to read and parse the category array from the database.

index.php

<!DOCTYPE html>
<html lang="en">
<head>
<meta name="viewport" content="width=device-width, initial-scale=1.0">
</head>
<body>
<?php
require_once __DIR__ . '/CategoryTree.php';
$categoryTree = new CategoryTree();
$categoryResult = $categoryTree->getCategoryResult();
?>
<h1>Choose category</h1> <div class="category-menu">
<?php
echo $categoryTree->getCategoryTreeHTML($categoryResult);
?>
</div>
</body>
</html>

This styles gives the category tree a pleasing look. Since it displays an infinite level of child categories, this CSS will help to rectify the default UI constraints.

body { font-family: Arial; margin-left: 10px; margin-right: 20px;
} ul.category-container li { list-style: none; padding-left: 10px; width: 100%;
} .category-container a { text-decoration: none; color: #000;
} .parent-depth-0 { font-size: 22px; font-weight: bold; border-bottom: #ccc 1px solid; padding: 15px 0px 15px 0px;
} .parent-depth-all { font-size: 16px; padding-top: 15px; font-weight: normal;
} .no-child { font-size: 16px; font-weight: normal; padding: 15px 0px 0px 0px;
} .category-menu { width: 270px; overflow-y: scroll; max-height: 800px; background: #fffcf2; padding: 0px;
} ul.category-container { padding: 10px;
}

Read category data and build in tree format


This is the main PHP class that reads the dynamic categories from the database.

The getCategoryTreeHTML the function parses the category result array. It recursively calls and parses the levels of category by its parent.

In WordPress, there is a category walker to parse the terms and taxonomies. We have created a custom WordPress walker to parse categories efficiently.

It sets the argument parent=0 to build parent-level category menu items.

The resultant category tree HTML will be a nested UL-LI list to show the multi-level menu.

CategoryTree.php

<?php class CategoryTree
{ private $connection; function __construct() { $this->connection = mysqli_connect('localhost', 'root', '', 'db_category_tree'); } function getCategoryTreeHTML($category, $parent = 0) { $html = ""; if (isset($category['parentId'][$parent])) { $html .= "<ul class='category-container'>\n"; foreach ($category['parentId'][$parent] as $cat_id) { if (! isset($category['parentId'][$cat_id])) { $child = ""; if ($category['categoryResult'][$cat_id]['parent'] != 0) { $child = "no-child"; } $html .= "<li class= '$child " . "parent-" . $category['categoryResult'][$cat_id]['parent'] . "' >\n" . $category['categoryResult'][$cat_id]['category_name'] . "</li> \n"; } if (isset($category['parentId'][$cat_id])) { $parentDepth0 = "parent-depth-all"; if ($category['categoryResult'][$cat_id]['parent'] == 0) { $parentDepth0 = "parent-depth-0"; } $html .= "<li class= '$parentDepth0 " . 'parent-' . $category['categoryResult'][$cat_id]['parent'] . "'>\n " . $category['categoryResult'][$cat_id]['category_name'] . " \n"; $html .= $this->getCategoryTreeHTML($category, $cat_id); $html .= "</li> \n"; } } $html .= "</ul> \n"; } return $html; } function getCategoryResult() { $query = "SELECT * FROM category ORDER BY parent, sort_order"; $result = mysqli_query($this->connection, $query); $category = array(); while ($row = mysqli_fetch_assoc($result)) { $category['categoryResult'][$row['id']] = $row; $category['parentId'][$row['parent']][] = $row['id']; } return $category; }
}
?>

Where category tree code can be used?


The category tree is used in many places. For example, most shopping cart websites have a category filter or menu to classify the showcase products.

The Amazon shop’s category menu ads value to the end user to narrow down the vast area to find their area of interest.

Also, tutorial websites display the table of contents in the form of a tree order.

Download

↑ Back to Top


https://www.sickgaming.net/blog/2022/09/...gory-tree/

Print this item

  (Free Game Key) Master of Magic Classic - Free GOG Game
Posted by: xSicKxBot - 09-30-2022, 11:19 AM - Forum: Deals or Specials - No Replies

Master of Magic Classic - Free GOG Game

This giveaway is on gog.com gog is a platform for games that is dedicated to drm-free games (those are games that do not require login or registration to play the game)

How to grab Master of Magic Classic
- Go to the home page of https://gog.com
- Login and Register
- Go to the home page again
- Wait for 10 seconds then start searching for Master of Magic Classic
- on the home page look for "Deal of the Day" (above it there should be a banner)
- on the banner there is a button "Yes, and claim the game" click it
- Thats it


GOG Store link: https://www.gog.com/en/game/master_of_magic_classic
Auto-claim link: https://www.gog.com/giveaway/claim
This game is free to claim for less than 48 hours until Sunday, October 2, 2022 4:00 PM

We are welcoming everyone to join our discord[discord.gg]. We are more active there on finding giveaways, small or large, and there are daily raffles you can participate.

?GrabFreeGames.com ?Twitter ?Steam Curator ?Facebook[fb.me]?Discord[discord.gg]
❤️Support us: HumbleBundle Partner[www.humblebundle.com] Fanatical Affiliate[www.fanatical.com]


https://steamcommunity.com/groups/GrabFr...9931429072

Print this item

  PC - Blind Fate: Edo no Yami
Posted by: xSicKxBot - 09-30-2022, 11:19 AM - Forum: New Game Releases - No Replies

Blind Fate: Edo no Yami


It's a new, dark and machine-filled Edo period, and the Shogunate rules over Japan with its just, but pitiless hand: you.

You follow orders. You obey. You kill.

Until your sight is taken from you, and you must learn to "feel" the world anew...

Dive into a world that mixes Sci-Fi and ancient tradition. Slash through robots with a trusty katana, use hi-tech implants to navigate the surroundings, dodge enemy attacks, and land devastating finishers. Reclaim the past following the way of the Japanese samurai in the fantastic period of New Edo.

Publisher: 101XP

Release Date: Sep 15, 2022


https://www.metacritic.com/game/pc/blind...do-no-yami

Print this item

  [Oracle Blog] JavaOne Update Series: Run of Show
Posted by: xSicKxBot - 09-29-2022, 05:12 AM - Forum: Java Language, JVM, and the JRE - No Replies

JavaOne Update Series: Run of Show

JavaOne is nearly upon us and we’ve been working hard to fill out the list of final activities. Here’s a high-level Run of Show to give you a sense for what you can expect from the first JavaOne in 5 years. Note that the JavaOne conference is co-located with CloudWorld, so I will mix in a few notable things like the CloudWorld keynotes and the Steve Miller Band. Rock on!

https://blogs.oracle.com/java/post/javao...un-of-show

Print this item

  [Tut] How to Stop a For Loop in Python
Posted by: xSicKxBot - 09-29-2022, 05:12 AM - Forum: Python - No Replies

How to Stop a For Loop in Python

Rate this post

Python provides three ways to stop a for loop:

  1. The for loop ends naturally when all elements have been iterated over. After that, Python proceeds with the first statement after the loop construct.
  2. The keyword break terminates a loop immediately. The program proceeds with the first statement after the loop construct.
  3. The keyword continue terminates only the current loop iteration, but not the whole loop. The program proceeds with the first statement in the loop body.

You can see each of these three methods to terminate a for loop in the following graphic:

How to Stop a For Loop in Python

Let’s dive into each of those three approaches next!

Method 1: Visit All Elements in Iterator


The most natural way to end a Python for loop is to deplete the iterator defined in the loop expression for <var> in <iterator>. If the iterator’s next() method doesn’t return a value anymore, the program proceeds with the next statement after the loop construct. This immediately ends the loop.

Here’s an example that shows how the for loop ends as soon as all elements have been visited in the iterator returned by the range() function:

s = 'hello world' for c in range(5): print(c, end='') # hello

? Recommended Tutorial: Iterators, Iterables, and Itertools

Method 2: Keyword “break”


If the program executes a statement with the keyword break, the loop terminates immediately. No other statement in the loop body is executed and the program proceeds with the first statement after the loop construct. In most cases, you’d use the keyword break in an if construct to decide dynamically whether a loop should end, or not.

In the following example, we create a string with 11 characters and enter a for loop that ends prematurely after five iterations — using the keyword break in an if condition to accomplish that:

s = 'hello world' for i in range(10): print(s[i], end='') if i == 5: break # hello

As soon as the if condition evaluates to False, the break statement is executed—the loop ends.

? Recommended Tutorial: How to End a While Loop?

Method 3: Keyword “continue”


The keyword continue terminates only the current loop iteration, but not the whole loop. The program proceeds with the first statement in the loop body. The most common use of continue is to avoid the execution of certain parts of the loop body, constrained by a condition checked in an if construct.

Here’s an example:

for i in range(10): if i == 5: break else: continue print('NEVER EXECUTED')

Python iterates over an iterator with 10 elements. However, in each iteration, it either ends the loop using break or continues with the next iteration using continue.

However, the remaining loop body that actually does something such as printing 'NEVER EXECUTED' is, well, never executed.

Python Keywords Cheat Sheet


You can learn about the most important Python keywords in this concise cheat sheet—if you’re like me, you love cheat sheets as well! ⤵

Python Cheat Sheet Keywords

You can download it here:

Summary


You’ve learned three ways to terminate a while loop.

  • Method 1: The for loop terminates automatically after all elements have been visited. You can modify the iterator using the __next__() dunder method.
  • Method 2: The keyword break terminates a loop immediately. The program proceeds with the first statement after the loop construct.
  • Method 3: The keyword continue terminates only the current loop iteration, but not the whole loop. The program proceeds with the first statement in the loop body.

Thanks for reading this tutorial—if you want to boost your Python skills further, I’d recommend you check out my free email academy and download the free Python lessons and cheat sheets here:

Join us, it’s fun! ?

Programmer Humor


❓ Question: How did the programmer die in the shower? ☠

Answer: They read the shampoo bottle instructions:
Lather. Rinse. Repeat.


https://www.sickgaming.net/blog/2022/09/...in-python/

Print this item

  [Tut] Datatrans Payments API for Secure Payment
Posted by: xSicKxBot - 09-29-2022, 05:12 AM - Forum: PHP Development - No Replies

Datatrans Payments API for Secure Payment

by Vincy. Last modified on September 28th, 2022.

Datatrans is one of the popular payment gateway systems in Europe for e-commerce websites. It provides frictionless payment solutions.

The Datatrans Payment gateway is widely popular in European countries. One of my clients from Germany required this payment gateway integrated into their online shop.

In this tutorial, I share the knowledge of integrating Datatrans in a PHP application. It will save the developers time to do research with the long-form documentation.

There are many integration options provided by this payment gateway.

  1. Redirect and lightbox
  2. Secure fields
  3. Mobile SDK
  4. API endpoints

In this tutorial, we will see the first integration option to set up the Datatrans payment gateway. We have seen many payment gateway integration examples in PHP in the earlier articles.

A working example follows helps to understand things easily. Before seeing the example, get the Datatrans merchant id and password. It will be useful for authentication purposes while accessing this payment API.

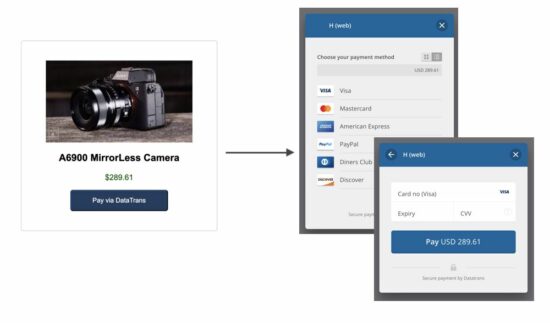
datatrans api payment

Get Datatrans merchant id and password


The following steps lead to getting the merchant id and password of your Datatrans account.

    1. Open a Datatrans sandbox account and verify it via email.
    2. Set up your account by selecting the username, group name(Login) and password.
    3. After Set up it will show the following details
      • Login credentials.
      • Sandbox URL of the admin dashboard.
      • Datatrans Merchant Id for Web, Mobile SDK.
    4. Visit the sandbox URL and log in using the credential got in step 3.
    5. Click Change Merchant and Choose merchant to see the dashboard.
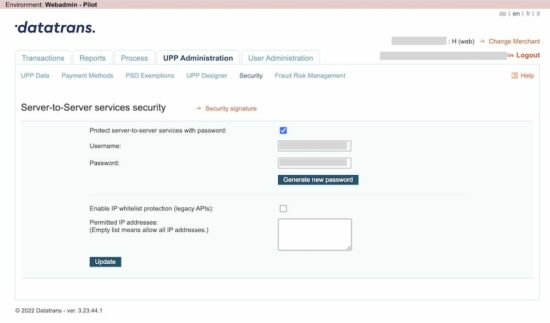
    6. Go to UPP Administration -> Security to copy the (Marchant Id)Username and Password for API access.

When we see CCAvenue payment integration, it also listed a few steps to get the merchant id from the dashboard.

datatrans merchant account credentials

Application configuration


This config file is created for this example to have the API keys used across the code.

It configures the URL that has to be called by the DataTrans server after the payment.

Config.php (Configure Datatrans authentication details)

<?php
class Config { const WEB_ROOT = 'http://localhost/pp-article-code/data-trans/'; const MERCHANT_ID = 'YOUR_MERCHANT_ID'; const PASSWORD = 'YOUR_MERCHANT_DASHBOARD_PASSWORD'; const SUCCESS_URL = Config::WEB_ROOT . 'return.php'; const CANCEL_URL = Config::WEB_ROOT . 'return.php?status=cancelled'; const ERROR_URL = Config::WEB_ROOT . 'return.php?status=error';
}
?>

Show the “Pay now” option


First, a landing page shows a product tile with a payment option. It will show a “Pay via DataTrans” button in the browser.

On clicking this button, it will call the AJAX script to get the transaction id.

This page includes the Datatrans JavaScript library to start payment with the transaction id.

index.php (Product tile with pay button)

<HTML>
<HEAD>
<TITLE>Datatrans Payments API for Secure Payment</TITLE>
<link rel="stylesheet" type="text/css" href="css/style.css">
<script src="https://code.jquery.com/jquery-3.6.0.min.js" integrity="sha256-/xUj+3OJU5yExlq6GSYGSHk7tPXikynS7ogEvDej/m4=" crossorigin="anonymous"></script> </HEAD>
<BODY> <div class="container"> <h1>Datatrans Payments API for Secure Payment</h1> <div class="outer-container"> <img src="image/camera.jpg" alt="camera image"> <div class="inner-container"> <p class="text-style">A6900 MirrorLess Camera</p> <p class="price-color-align"> $289.61<input type="hidden" name="amount" id="amount" value="289.61" /> </p> <input type="button" id="pay-now" class="pay-button" value="Pay via DataTrans" on‌Click="initiate()" /> </div> </div> </div> <script src="https://pay.sandbox.datatrans.com/upp/payment/js/datatrans-2.0.0.js"></script>
</BODY>
</HTML>

Get transaction id and proceed with payment via API


The initiate() function posts the amount to the PHP file to initiate Datatrans payment.

As the result, the PHP will return the transaction id to process the payment further.

The proceedPayment() function calls the Datatrans JavaScript API to start the payment. It will show a Datatrans overlay with card options to choose payment methods.

index.php (AJAX script to call Datatrans initiation)

function initiate() { $.ajax({ method: "POST", url: "initialize-datatrans-ajax.php", dataType: "JSON", data: { "amount": $("#amount").val() } }) .done(function(response) { if (response.responseType == 'success') { proceedPayment(response.transactionId); } else { alert(response.responseType + ": " + response.message); } }); }; function proceedPayment(transactionId) { Datatrans.startPayment({ transactionId: transactionId, 'opened': function() { console.log('payment-form opened'); }, 'loaded': function() { console.log('payment-form loaded'); }, 'closed': function() { console.log('payment-page closed'); }, 'error': function() { console.log('error'); } });
}

Initiate payment transaction to get the Datatrans payment transaction id


This file is the PHP endpoint called via AJAX script to get the Datatrans transaction id.

It invokes the DatatransPaymentService to post the cURL request to the Datatrans API. It requested to initiate the payment and receives the transaction id from the Datatrans server.

This output will be read in the AJAX success callback to start the payment via the JavaScript library.

initialize-datatrans-ajax.php

<?php
require_once 'DatatransPaymentService.php';
$dataTransPaymentService = new DatatransPaymentService();
$amount = $_POST["amount"];
$orderId = rand();
$result = $dataTransPaymentService->initializeTransaction($amount, $orderId);
print $result;
?>

Datatrans payment transaction service to call API via PHP cURL


This service call contains the initializeTransaction() method which prepares the cURL request in PHP to the Datatrans API.

It passed the amount, currency and more details to the API endpoint to request the transaction id.

DatatransPaymentService.php

<?php class DatatransPaymentService
{ public function initializeTransaction($amount, $orderId) { $url = 'https://api.sandbox.datatrans.com/v1/transactions'; require_once __DIR__ . '/Config.php'; $amount = $amount * 100; $postFields = json_encode(array( 'amount' => $amount, 'currency' => "USD", 'refno' => $orderId, 'redirect' => [ 'successUrl' => Config::SUCCESS_URL, "cancelUrl" => Config::CANCEL_URL, "errorUrl" => Config::ERROR_URL ] )); $key = Config::MERCHANT_ID . ':' . Config::PASSWORD; $keyBase64 = base64_encode($key); $ch = curl_init(); curl_setopt_array($ch, array( CURLOPT_URL => $url, CURLOPT_RETURNTRANSFER => true, CURLOPT_CUSTOMREQUEST => "POST", CURLOPT_POSTFIELDS => $postFields, CURLOPT_HTTPAUTH => CURLAUTH_BASIC, CURLOPT_HTTPHEADER => array( "Authorization: Basic " . $keyBase64, "Content-Type: application/json" ) )); $curlResponse = curl_exec($ch); $curlJSONObject = json_decode($curlResponse); if (empty($curlResponse)) { $curlError = curl_error($ch); } else if (! empty($curlJSONObject->error)) { $curlError = $curlJSONObject->error->code . ": " . $curlJSONObject->error->message; } curl_close($ch); if (empty($curlJSONObject->transactionId)) { $result = array( 'responseType' => "Error", 'message' => $curlError ); } else { $result = array( 'responseType' => "success", 'transactionId' => $curlJSONObject->transactionId ); } $result = json_encode($result); return $result; }
}
?>

Call application URL after payment


return.php

<HTML>
<HEAD>
<TITLE>Datatrans payment status notice</TITLE>
</HEAD>
<BODY> <div class="text-center">
<?php
if (! empty($_GET["status"])) { ?> <h1>Something wrong with the payment process!</h1> <p>Kindly contact admin with the reference of your transaction id <?php echo $_GET["datatransTrxId"]; ?></p>
<?php
} else { ?> <h1>Your order has been placed</h1> <p>We will contact you shortly.</p>
<?php
}
?>
</div>
</BODY>
</HTML>

Download

↑ Back to Top


https://www.sickgaming.net/blog/2022/09/...e-payment/

Print this item