Welcome, Guest
You have to register before you can post on our site.

Username
  

Password


Search Forums

(Advanced Search)

Forum Statistics
» Members: 20,944
» Latest member: NeroSx
» Forum threads: 21,958
» Forum posts: 22,925

Full Statistics

Online Users
There are currently 2033 online users.
» 0 Member(s) | 2028 Guest(s)
Applebot, Baidu, Bing, Facebook, Google

Latest Threads
[WoW Retail News] Season ...
Forum: World of Warcraft
Last Post: xSicKxBot

» Replies: 0
» Views: 8
[DevBlog MS] Build Your O...
Forum: C#, Visual Basic, & .Net Frameworks
Last Post: xSicKxBot

» Replies: 0
» Views: 11
[Steam Release] Killsquad...
Forum: New Game Releases
Last Post: xSicKxBot

» Replies: 0
» Views: 7
How to play Squirrel Girl...
Forum: PC Discussion
Last Post: xSicKxBot

» Replies: 0
» Views: 11
[WoW Retail News] Paladin...
Forum: World of Warcraft
Last Post: xSicKxBot

» Replies: 0
» Views: 14
[Steam Release] Rec Room
Forum: New Game Releases
Last Post: xSicKxBot

» Replies: 0
» Views: 17
[DevBlog MS] Share your ....
Forum: C#, Visual Basic, & .Net Frameworks
Last Post: xSicKxBot

» Replies: 0
» Views: 21
[Steam Release] Clone Dro...
Forum: New Game Releases
Last Post: xSicKxBot

» Replies: 0
» Views: 18
[WoW Retail News] Noctina...
Forum: World of Warcraft
Last Post: xSicKxBot

» Replies: 0
» Views: 24
[DevBlog MS] Use C# union...
Forum: C#, Visual Basic, & .Net Frameworks
Last Post: xSicKxBot

» Replies: 0
» Views: 26

 
  Easy Anime Character Creation with VRoid Studio and Blender
Posted by: xSicKxBot - 09-05-2023, 03:13 PM - Forum: Game Development - No Replies

Easy Anime Character Creation with VRoid Studio and Blender

Creating anime characters for game development has never been easier with tools like VRoid Studio and Blender. In this tutorial we showcase using VRoid Studio, a free tool for creating textured and animated anime avatars. If VRoid Studio sounds familiar, we featured this tool as recently as 2019.

In the video below we walk through the following processes:

  • Using VRoid Studio
  • Exporting VRM files
  • Importing VRM into Blender
  • Creating a simple animation
  • Exporting from Blender in GLB/GLTF format
  • Importing GLB formats into the Godot game engine
  • Exporting VRoid characters to Mixamo for animting

In addition to VRoid Studio you need the VRM importer for Blender. If you are using the Unity game engine, there is a Unity importer for VRM files available as well, although we wont be covering it in the video below.

One area of importance with any tool, especially free tools, are what the license terms are. You can see the list of appropriate uses here, which specifically includes “Selling video games and other products featuring characters created with VRoid Studio”. Once you have all the appropriate tools, check out the video below for step by step instruction son how to create an animated anime character for use in Godot using VRoid Studio and Blender.


https://www.sickgaming.net/blog/2020/12/...d-blender/

Print this item

  Mobile - Today’s Coin Master free spins August 2023
Posted by: xSicKxBot - 09-05-2023, 03:12 PM - Forum: New Game Releases - No Replies

Mobile - Today’s Coin Master free spins August 2023

Are you wondering how to get Coin Master free spins? You’ve come to the right place. This mobile game combines the thrill of playing slots with the social battling of Clash of Clans to create something that you just can’t put down; in a good way. The problem is, you so often have to put it down if you’re not willing to fork out the cash for regular spins.

In this Coin Master blog, we’re going to provide you with all of the ways you can get your hands on a few free spins and a Coin Master bonus here and there. We also recommend you check out our Coin Master free cards and Coin Master free coins guides to get even more rewards, and our Pet Master free spins guide if you fancy checking out Moon Active’s latest game.

Make sure you click the notification button above to be alerted whenever we add new Coin Master free spin and coin links!

Coin Master free spins today:

  1. 25 spins
  2. Ten spins and one million coins
  3. 25 spins
  4. 25 spins
  5. 25 spins

Coin Master free spins August 24:

  1. Ten spins and one million coins
  2. Ten spins and one million coins
  3. 25 spins

Coin Master free spins August 23:

  1. 25 spins
  2. Ten spins and one million coins
  3. 25 spins
  4. 25 spins
  5. 25 spins
  6. 25 spins
  7. Ten spins and one million coins

Coin Master free spins August 22:

  1. 25 spins
  2. 25 spins
  3. 25 spins
  4. 25 spins
  5. 25 spins
  6. 25 spins

Coin Master free spins August 21:

  1. 25 spins
  2. 25 spins
  3. Ten spins and one million coins
  4. 25 spins
  5. Ten spins and one million coins
  6. Ten spins and one million coins
  7. 25 spins

How can I get Coin Master free spins?


Here are a bunch of tips to help you get even more free spins in Coin Master.

Follow Coin Master on social media


Each day, Moon Active, Coin Master’s developer, provides a bunch of links that you can follow to get your hands on Coin Master free spins. If you keep on top of this, you can get a steady stream of free stuff for very little effort. You can follow Coin Master on Facebook or Twitter.

Want more? Check out CodesDb for a powerful, searchable database of the latest game codes.

Sign up for email gifts


If you sign up for email gifts, you can get yourself a handful of Coin Master free spins every single day just by following a link on your phone. We haven’t encountered any spam from signing up so far either, so it’s a quick and easy method of getting yourself some tasty free spins.

Invite friends


Each time you invite a friend who successfully joins Coin Master through Facebook, you’ll get 40 Coin Master free spins, which is considerable. They don’t even have to actually play the game; they simply have to download it and log in via their Facebook account to get you the free spins. Of course, it’s in both your interests to actually play it, which brings us nicely to our next point.

Request spins as gifts


You can get up to 100 Coin Master free spins per day from friends, though to get to those heights you’ll need 100 active friends who are kind enough to send you a gift each day. Each gift consists of a single free spin.

Unless you’re incredibly popular, it’s highly unlikely that you’ll have 100 friends; let alone 100 that will actually deign to play a game with you. We recommend heading on over to the official Reddit community or Facebook communities to try and find people willing to play with you.

Watch video ads


You can get a limited number of Coin Master free spins per day by watching a video ad. Simply scroll to the slot machine and tap on the spin energy button on the bottom right. If it’s not there, you’ve run out of free spins you can get through this method for the day, but if it is, simply tap on it and you’ll watch an ad.

Spin


Ironically, you can actually get a ton of Coin Master free spins by, well, spinning. If you get three spin energy symbols in a row, you’ll get a bunch of free spins. Pick up a chain of them and you can spin for ages before you run out.

Level up your village


Each time you level up your village, you’ll get a bunch of Coin Master free spins. It’s not easy though, as it costs a considerable amount of gold to purchase new buildings and improve them, and you have to purchase every single one of them, including improvements, to level up. That’s going to cost a lot of spins, as it is.

Looking for a new game? Take a look at our Honkai Star Rail codes, Honkai Star Rail tier list, or even our Pokédex!

Participate in events


There’s almost always at least one event happening in Coin Master, and it can absolutely shower you with free spins. While viewing the slot machine, look at the top right of the screen. Any virtual buttons that you can see beneath the menu (which is displayed as three lines) are an event. Tap on one and you’ll see what each event involves.

Take advantage of these events and you can get yourself a lot more Coin Master free spins than usual.

Wait


This is an obvious suggestion, but it’s actually worth taking into consideration. You get five free spins every single hour, and you can only hold a maximum of 50 spins at any one time. That means every ten hours you’ll hit the maximum number of spins, and any Coin Master free spins you would have earned after that will cease to exist.

So, we recommend setting a reminder to visit Coin Master every ten hours at least to spend your spins so you are always earning more. You’ll actually end up earning a huge number of extra spins if you’re dedicated, so it’s totally worth doing.

YouTube Thumbnail

Coin Master free spin FAQ


Now, we’ll answer a bunch of questions you may have regarding getting Coin Master free spins.

Do Coin Master free spins links expire?


Yes, the daily links that we include at the top of this page expire after three days, which is why we only include those from today and the two days prior.

Can I get 50 Coin Master free spins?


Coin Master 50 spin rewards most commonly appear during in-game events, like those that reward you for raiding or battling other players. There’s also a small chance to get this number from daily links, so bookmark this page and check back often.

Can I get 60 Coin Master free spins?


Yes, though it doesn’t appear to happen often from daily links. We’d recommend playing often and participating in events, and following the social media channels to find out what’s happening soon.

Can I get 70 Coin Master free spins?


We’ve never seen a Coin Master 70 spin reward appear as part of the daily links, but it has been known to appear as part of special events.

To get your hands on this rare reward, we would recommend playing on a daily basis and following social media channels to get an indication of when the next big event will take place.

Can I get 100 Coin Master free spins?


Yes, though not from the daily links. We’ve seen this number of free spins appear often during in-game events, most notably for those that reward you for raiding and participating in PvP battles.

Play often and follow the social media channels for events to keep an eye out for this.

Can I get 50,000 Coin Master free spins?


Again, 50,000 Coin Master spin rewards don’t seem to appear as part of the daily rewards cycle, but have been known to crop up during events. Follow the socials and play regularly to get the best chance at this reward.

And that will just about do it for our Coin Master free spins guide. For something a little different, why not take a look at our guide to answers for Wordle today? And if you’re looking for something new to play, check out our best mobile games list, or head over to our Honkai Star Rail tier list and Genshin Impact tier list.


https://www.sickgaming.net/blog/2023/08/...gust-2023/

Print this item

  ASP.NET Core updates in .NET 5 Release Candidate 1
Posted by: xSicKxBot - 09-05-2023, 03:12 PM - Forum: C#, Visual Basic, & .Net Frameworks - No Replies

ASP.NET Core updates in .NET 5 Release Candidate 1

Daniel Roth

Daniel

.NET 5 Release Candidate 1 (RC1) is now available and is ready for evaluation. Here’s what’s new in this release:

  • Blazor WebAssembly performance improvements
  • Blazor component virtualization
  • Blazor WebAssembly prerendering
  • Browser compatibility analyzer for Blazor WebAssembly
  • Blazor JavaScript isolation and object references
  • Blazor file input support
  • Custom validation class attributes in Blazor
  • Blazor support for ontoggle event
  • Model binding DateTime as UTC
  • Control Startup class activation
  • Open API Specification (Swagger) on-by-default in ASP.NET Core API projects
  • Better F5 Experience for ASP.NET Core API Projects
  • SignalR parallel hub invocations
  • Added Messagepack support in SignalR Java client
  • Kestrel endpoint-specific options via configuration

See the .NET 5 release notes for additional details and known issues.

Get started


To get started with ASP.NET Core in .NET 5 RC1 install the .NET 5 SDK. .NET RC1 also is included with Visual Studio 2019 16.8 Preview 3.

You need to use Visual Studio 2019 16.8 Preview 3 or newer to use .NET 5 RC1. .NET 5 is also supported with the latest preview of Visual Studio for Mac. To use .NET 5 with Visual Studio Code, install the latest version of the C# extension.

Upgrade an existing project


To upgrade an existing ASP.NET Core app from .NET 5 Preview 8 to .NET 5 RC1:

  • Update all Microsoft.AspNetCore.* package references to 5.0.0-rc.1.*.
    • If you’re using the new Microsoft.AspNetCore.Components.Web.Extensions package, update to version 5.0.0-preview.9.*. This package doesn’t have an RC version number yet because we expect to make a few more design changes to the components it contains before it’s ready to ship.
  • Update all Microsoft.Extensions.* package references to 5.0.0-rc.1.*.
  • Update System.Net.Http.Json package references to 5.0.0-rc.1.*.

In Blazor WebAssembly projects, also make the follwowing updates to the project file:

  • Update the SDK from “Microsoft.NET.Sdk.Web” to “Microsoft.NET.Sdk.BlazorWebAssembly”
  • Remove the <RuntimeIdentifier>browser-wasm</RuntimeIdentifier> and <UseBlazorWebAssembly>true</UseBlazorWebAssembly> properties.

That’s it! You should be all ready to go.

See also the full list of breaking changes in ASP.NET Core for .NET 5.

What’s new?


Blazor WebAssembly performance improvements


For .NET 5, we’ve made significant improvements to Blazor WebAssembly runtime performance, with a specific focus on complex UI rendering and JSON serialization. In our performance tests, Blazor WebAssembly in .NET 5 is 2-3x faster for most scenarios.

Runtime code execution in Blazor WebAssembly in .NET 5 is generally faster than Blazor WebAssembly 3.2 due to optimizations in the core framework libraries and improvements to the .NET IL interpreter. Things like string comparisons, dictionary lookups, and JSON handling are generally much faster in .NET 5 on WebAssembly.

As shown in the chart below, JSON handling is almost twice as fast in .NET 5 on WebAssembly:

Blazor WebAssembly 1kb JSON handling

We also optimized the performance of Blazor component rendering, particularly for UI involving lots of components, like when using high-density grids.

To test the performance of grid component rendering in .NET 5, we used three different grid component implementations, each rendering 200 rows with 20 columns:

  • Fast Grid: A minimal, highly optimized implementation of a grid
  • Plain Table: A minimal but not optimized implementation of a grid.
  • Complex Grid: A maximal, not optimized implementation of a grid, using a wide range of Blazor features at once, deliberately intended to create a bad case for the renderer.

From our tests, grid rendering is 2-3x faster in .NET 5:

Blazor WebAssembly grid rendering

You can find the code for these performance tests in the ASP.NET Core GitHub repo.

You can expect ongoing work to improve Blazor WebAssembly performance. Besides optimizing the Blazor WebAssembly runtime and framework, the .NET team is also working with browser implementers to further speed up WebAssembly execution. And for .NET 6, we expect to ship support for ahead-of-time (AoT) compilation to WebAssembly, which should further improve performance.

Blazor component virtualization


You can further improve the perceived performance of component rendering using the new built-in virtualization support. Virtualization is a technique for limiting the UI rendering to just the parts that are currently visible, like when you have a long list or table with many rows and only a small subset is visible at any given time. Blazor in .NET 5 adds a new Virtualize component that can be used to easily add virtualization to your components.

A typical list or table-based component might use a C# foreach loop to render each item in the list or each row in the table, like this:

@foreach (var employee in employees)
{ <tr> <td>@employee.FirstName</td> <td>@employee.LastName</td> <td>@employee.JobTitle</td> </tr>
}

If the list grew to include thousands of rows, then rendering it may take a while, resulting in a noticeable UI lag.

Instead, you can replace the foreach loop with the Virtualize component, which only renders the rows that are currently visible.

<Virtualize Items="employees" Context="employee"> <tr> <td>@employee.FirstName</td> <td>@employee.LastName</td> <td>@employee.JobTitle</td> </tr>
</Virtualize>

The Virtualize component calculates how many items to render based on the height of the container and the size of the rendered items.

If you don’t want to load all items into memory, you can specify an ItemsProvider, like this:

<Virtualize ItemsProvider="LoadEmployees" Context="employee"> <tr> <td>@employee.FirstName</td> <td>@employee.LastName</td> <td>@employee.JobTitle</td> </tr>
</Virtualize>

An items provider is a delegate method that asynchronously retrieves the requested items on demand. The items provider receives an ItemsProviderRequest, which specifies the required number of items starting at a specific start index. The items provider then retrieves the requested items from a database or other service and returns them as an ItemsProviderResult<TItem> along with a count of the total number of items available. The items provider can choose to retrieve the items with each request, or cache them so they are readily available.

async ValueTask<ItemsProviderResult<Employee>> LoadEmployees(ItemsProviderRequest request)
{ var numEmployees = Math.Min(request.Count, totalEmployees - request.StartIndex); var employees = await EmployeesService.GetEmployeesAsync(request.StartIndex, numEmployees, request.CancellationToken); return new ItemsProviderResult<Employee>(employees, totalEmployees);
}

Because requesting items from a remote data source might take some time, you also have the option to render a placeholder until the item data is available.

<Virtualize ItemsProvider="LoadEmployees" Context="employee"> <ItemContent> <tr> <td>@employee.FirstName</td> <td>@employee.LastName</td> <td>@employee.JobTitle</td> </tr> </ItemContent> <Placeholder> <tr> <td>Loading...</td> </tr> </Placeholder>
</Virtualize>

Blazor WebAssembly prerendering


The component tag helper now supports two additional render modes for prerendering a component from a Blazor WebAssembly app:

  • WebAssemblyPrerendered: Prerenders the component into static HTML and includes a marker for a Blazor WebAssembly app to later use to make the component interactive when loaded in the browser.
  • WebAssembly: Renders a marker for a Blazor WebAssembly app to use to include an interactive component when loaded in the browser. The component is not prerendered. This option simply makes it easier to render different Blazor WebAssembly components on different cshtml pages.

To setup prerendering in an Blazor WebAssembly app:

  1. Host the Blazor WebAssembly app in an ASP.NET Core app.
  2. Replace the default static index.html file in the client project with a _Host.cshtml file in the server project.
  3. Update the server startup logic to fallback to _Host.cshtml instead of index.html (similar to how the Blazor Server template is set up).
  4. Update _Host.cshtml to use the component tag helper to prerender the root App component:

    <component type="typeof(App)" render-mode="WebAssemblyPrerendered" />

You can also pass parameters to the component tag helper when using the WebAssembly-based render modes if the parameters are serializable. The parameters must be serializable so that they can be transferred to the client and used to initialize the component in the browser. If prerendering, you’ll also need to be sure to author your components so that they can gracefully execute server-side without access to the browser.

<component type="typeof(Counter)" render-mode="WebAssemblyPrerendered" param-IncrementAmount="10" />

In additional to improving the perceived load time of a Blazor WebAssembly app, you can also use the component tag helper with the new render modes to add multiple components on different pages and views. You don’t need to configure these components as root components in the app or add your own marker tags on the page – the framework handles that for you.

Browser compatibility analyzer for Blazor WebAssembly


Blazor WebAssembly apps in .NET 5 target the full .NET 5 API surface area, but not all .NET 5 APIs are supported on WebAssembly due to browser sandbox constraints. Unsupported APIs throw PlatformNotSupportedException when running on WebAssembly. .NET 5 now includes a platform compatibility analyzer that will warn you when your app uses APIs that are not supported by your target platforms. For Blazor WebAssembly apps, this means checking that APIs are supported in browsers.

We haven’t added all of the annotations yet to the core libraries in .NET 5 to indicate which APIs are not supported in browsers, but some APIs, mostly Windows specific APIs, are already annotated:

Platform compatibility analyzer

To enable browser compatibilty checks for libraries, add “browser” as a supported platform in your project file (Blazor WebAssembly projects and Razor class library projects do this for you):

<SupportedPlatform Include="browser" />

When authoring a library, you can optionally indicate that a particular API is not supported in browsers by applying the UnsupportedOSPlatformAttribute:

[UnsupportedOSPlatform("browser")]
private static string GetLoggingDirectory()
{ // ...
}

Blazor JavaScript isolation and object references


Blazor now enables you to isolate your JavaScript as standard JavaScript modules. This has a couple of benefits:

  1. Imported JavaScript no longer pollutes the global namespace.
  2. Consumers of your library and components no longer need to manually import the related JavaScript.

For example, the following JavaScript module exports a simple JavaScript function for showing a browser prompt:

export function showPrompt(message) { return prompt(message, 'Type anything here');
}

You can add this JavaScript module to your .NET library as a static web asset (wwwroot/exampleJsInterop.js) and then import the module into your .NET code using the IJSRuntime service:

var module = await jsRuntime.InvokeAsync<JSObjectReference>("import", "./_content/MyComponents/exampleJsInterop.js");

The “import” identifier is a special identifier used specifically for importing a JavaScript module. You specify the module using its stable static web asset path: _content/[LIBRARY NAME]/[PATH UNDER WWWROOT].

The IJSRuntime imports the module as a JSObjectReference, which represents a reference to a JavaScript object from .NET code. You can then use the JSObjectReference to invoke exported JavaScript functions from the module:

public async ValueTask<string> Prompt(string message)
{ return await module.InvokeAsync<string>("showPrompt", message);
}

JSObjectReference greatly simplifies interacting with JavaScript libraries where you want to capture JavaScript object references, and then later invoke their functions from .NET.

Blazor file input support


Blazor now offers an InputFile component for handling file uploads, or more generally for reading browser file data into your .NET code.

The InputFile component renders as an HTML input of type “file”. By default, the user can select single files, or if you add the “multiple” attribute then the user can supply multiple files at once. When one or more files is selected by the user, the InputFile component fires an OnChange event and passes in an InputFileChangeEventArgs that provides access to the selected file list and details about each file.

<InputFile On‌Change="OnInputFileChange" multiple /> <div class="image-list"> @foreach (var imageDataUrl in imageDataUrls) { <img src="@imageDataUrl" /> }
</div> @code { IList<string> imageDataUrls = new List<string>(); async Task OnInputFileChange(InputFileChangeEventArgs e) { var imageFiles = e.GetMultipleFiles(); var format = "image/png"; foreach (var imageFile in imageFiles) { var resizedImageFile = await imageFile.RequestImageFileAsync(format, 100, 100); var buffer = new byte[resizedImageFile.Size]; await resizedImageFile.OpenReadStream().ReadAsync(buffer); var imageDataUrl = $"data:{format};base64,{Convert.ToBase64String(buffer)}"; imageDataUrls.Add(imageDataUrl); } }
}

To read data from a user-selected file, you call OpenReadStream on the file and read from the returned stream. In a Blazor WebAssembly app, the data is streamed directly into your .NET code within the browser. In a Blazor Server app, the file data is streamed to your .NET code on the server as you read from the stream. In case you’re using the component to receive an image file, Blazor also provides a RequestImageFileAsync convenience method for resizing images data within the browser’s JavaScript runtime before they’re streamed into your .NET application.

Custom validation class attributes in Blazor


You can now specify custom validation class names in Blazor. This is useful when integrating with CSS frameworks, like Bootstrap.

To specify custom validation class names, create a class derived from FieldCssClassProvider and set it on the EditContext instance.

var editContext = new EditContext(model);
editContext.SetFieldCssClassProvider(new MyFieldClassProvider()); // ... class MyFieldClassProvider : FieldCssClassProvider
{ public override string GetFieldCssClass(EditContext editContext, in FieldIdentifier fieldIdentifier) { var isValid = !editContext.GetValidationMessages(fieldIdentifier).Any(); return isValid ? "legit" : "totally-bogus"; }
}

Blazor support for ontoggle event


Blazor now has support for the ontoggle event:

<div> @if (detailsExpanded) { <p>Read the details carefully!</p> } <details id="details-toggle" @ontoggle="OnToggle"> <summary>Summary</summary> <p>Detailed content</p> </details>
</div> @code { bool detailsExpanded; string message { get; set; } void OnToggle() { detailsExpanded = !detailsExpanded; }
}

Thank you Vladimir Samoilenko for this contribution!

Model binding DateTime as UTC


Model binding in ASP.NET Core now supports correctly binding UTC time strings to DateTime. If the request contains a UTC time string (for example https://example.com/mycontroller/myactio...4.0576719Z), model binding will correctly bind it to a UTC DateTime without the need for further customization.

Control Startup class activation


We’ve provided an additional UseStartup overload that lets you provide a factory method for controlling Startup class activation. This is useful if you want to pass additional parameters to Startup that are initialized along with the host.

public class Program
{ public static async Task Main(string[] args) { var logger = CreateLogger(); var host = Host.CreateDefaultBuilder() .ConfigureWebHost(builder => { builder.UseStartup(context => new Startup(logger)); }) .Build(); await host.RunAsync(); }
}

Open API Specification On-by-default


Open API Specification is a industry-adopted convention for describing HTTP APIs and integrating them into complex business processes or with 3rd parties. Open API is widely supported by all cloud providers and many API registries, so developers who emit Open API documents from their Web APIs have a variety of new opportunities in which those APIs can be used. In partnership with the maintainers of the open-source project Swashbuckle.AspNetCore, we’re excited to announce that the ASP.NET Core API template in RC1 comes pre-wired with a NuGet dependency on Swashbuckle, a popular open-source NuGet package that emits Open API documents dynamically. Swashbuckle does this by introspecting over your API Controllers and generating the Open API document at run-time, or at build time using the Swashbuckle CLI.

In .NET 5 RC1, running dotnet new webapi will result in the Open API output being enabled by default, but if you prefer to have Open API disabled, use dotnet new webapi --no-openapi true. All .csproj files that are created for Web API projects will come with the NuGet package reference.

<ItemGroup> <PackageReference Include="Swashbuckle.AspNetCore" Version="5.5.1" />
</ItemGroup>

In addition to the NuGet package reference being in the .csproj file we’ve added code to both the ConfigureServices method in Startup.cs that activates Open API document generation.

public void ConfigureServices(IServiceCollection services)
{ services.AddControllers(); services.AddSwaggerGen(c => { c.SwaggerDoc("v1", new OpenApiInfo { Title = "WebApplication1", Version = "v1" }); });
}

The Configure method is also pre-wired to enlist in the Swashbuckle middleware. This lights up the document generation process and turns on the Swagger UI page by default in development mode. This way you’re confident that the out-of-the-box experience doesn’t accidentally expose your API’s description when you publish to production.

public void Configure(IApplicationBuilder app, IWebHostEnvironment env)
{ if (env.IsDevelopment()) { app.UseDeveloperExceptionPage(); app.UseSwagger(); app.UseSwaggerUI(c => c.SwaggerEndpoint("/swagger/v1/swagger.json", "WebApplication1 v1")); } // ...
}

Azure API Management Import


When ASP.NET Core API projects are wired to output Open API in this way, the Visual Studio 2019 version 16.8 Preview 2.1 publishing experience will automatically offer an additional step in the publishing flow. Developers who use Azure API Management have an opportunity to automatically import their APIs into Azure API Management during the publish flow.

Publising APIs

This additional publishing step reduces the number of steps HTTP API developers need to execute to get their APIs published and used with Azure Logic Apps or PowerApps.

Better F5 Experience for Web API Projects


With Open API enabled by default, we were able to significantly improve the F5 experience for Web API developers. With .NET 5 RC1, the Web API template comes pre-configured to load up the Swagger UI page. The Swagger UI page provides both the documentation you’ve added for your API, but enables you to test your APIs with a single click.

Swagger UI page

SignalR parallel hub invocations


In .NET 5 RC1, ASP.NET Core SignalR is now capable of handling parallel hub invocations. You can change the default behavior and allow clients to invoke more than one hub method at a time.

public void ConfigureServices(IServiceCollection services)
{ services.AddSignalR(options => { options.MaximumParallelInvocationsPerClient = 5; });
}

Added Messagepack support in SignalR Java client


We’re introducing a new package, com.microsoft.signalr.messagepack, that adds messagepack support to the SignalR java client. To use the messagepack hub protocol, add .withHubProtocol(new MessagePackHubProtocol()) to the connection builder.

HubConnection hubConnection = HubConnectionBuilder.create("http://localhost:53353/MyHub") .withHubProtocol(new MessagePackHubProtocol()) .build();

Kestrel endpoint-specific options via configuration


We have added support for configuring Kestrel’s endpoint-specific options via configuration. The endpoint-specific configurations includes the Http protocols used, the TLS protocols used, the certificate selected, and the client certificate mode.

You are able to configure the which certificate is selected based on the specified server name as part of the Server Name Indication (SNI) extension to the TLS protocol as indicated by the client. Kestrel’s configuration also support a wildcard prefix in the host name.

The example belows shows you how to specify endpoint-specific using a configuration file:

{ "Kestrel": { "Endpoints": { "EndpointName": { "Url": "https://*", "Sni": { "a.example.org": { "Protocols": "Http1AndHttp2", "SslProtocols": [ "Tls11", "Tls12"], "Certificate": { "Path": "testCert.pfx", "Password": "testPassword" }, "ClientCertificateMode" : "NoCertificate" }, "*.example.org": { "Certificate": { "Path": "testCert2.pfx", "Password": "testPassword" } }, "*": { // At least one subproperty needs to exist per SNI section or it // cannot be discovered via IConfiguration "Protocols": "Http1", } } } } }
}

Give feedback


We hope you enjoy this release of ASP.NET Core in .NET 5! We are eager to hear about your experiences with this latest .NET 5 release. Let us know what you think by filing issues on GitHub.

Thanks for trying out ASP.NET Core!



https://www.sickgaming.net/blog/2020/09/...ndidate-1/

Print this item

  AppleInsider - How to install Apple’s Game Porting Toolkit via a third-party insta
Posted by: xSicKxBot - 09-05-2023, 03:12 PM - Forum: Apples Mac and OS X - No Replies

AppleInsider - How to install Apple’s Game Porting Toolkit via a third-party insta

Apple’s Game Porting ToolKit can be a bit tricky to install onto macOS. Now there’s a third-party installer that makes the process much simpler.

At WWDC ’23 Apple introduced the Apple Game Porting Toolkit (AGPT) – a new SDK which allows game developers to port existing Windows-based DirectX games to the Mac via a translation layer.

Our original article on how to install the Game Porting ToolKit showed you how to install the AGPT using the macOS Terminal, but for many users the process is complex and error-prone.

Now InstallAware – traditionally a maker of Windows installer tools – has created a macOS installer for AGPT which allows you to install the software with just a few clicks from a traditional macOS installer.

Below we’ll walk you through how to use InstallAware’s installer for AGPT.

Getting started


This walkthrough assumes you already have the git source code control system installed on your Mac. If not, get the installer from git-scm.com and run it to install git.

First, you’ll want to gather all the pieces for the installer from InstallAware’s GitHub repository: the sources, the .dmg, and the installer which is contained on the .dmg.

To do so, make a local folder to hold all the files on your Mac’s drive where you would normally keep all your downloads and sources. We’ll use the working name “AGPT” for the folder.

Next, open the Terminal app in the Utilities folder on your Mac. Change the directory to the folder you just created using the cd command followed by a space, then drag the new AGPT folder into the Terminal window to add the path.

Press Return. This changes your present working directory in Terminal to the AGPT folder.

Next, go to InstallAware’s AGPT GitHub page and click the Code button, then the small clipboard icon button to copy the URL to clone the repository into the new AGPT folder:

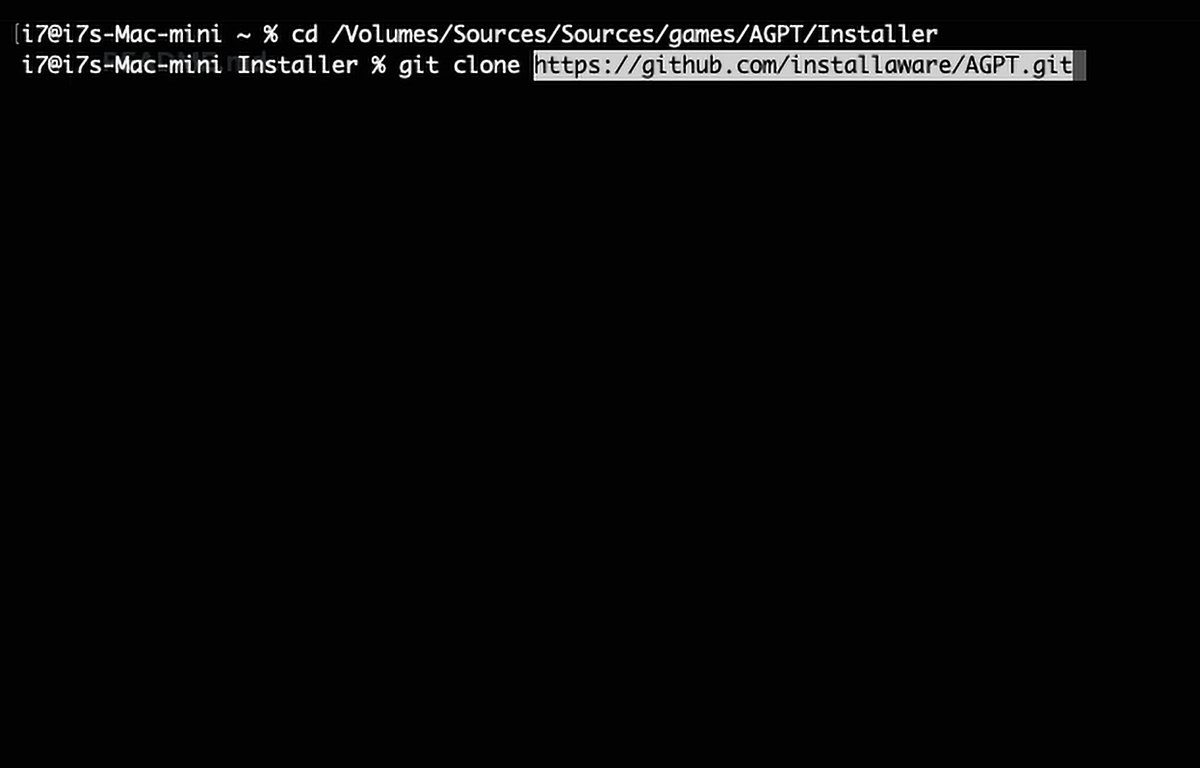
Back in Terminal, on a new line type git clone, a space, then paste in the GitHub repo line you copied above.

Use the git clone command.

Press Return.

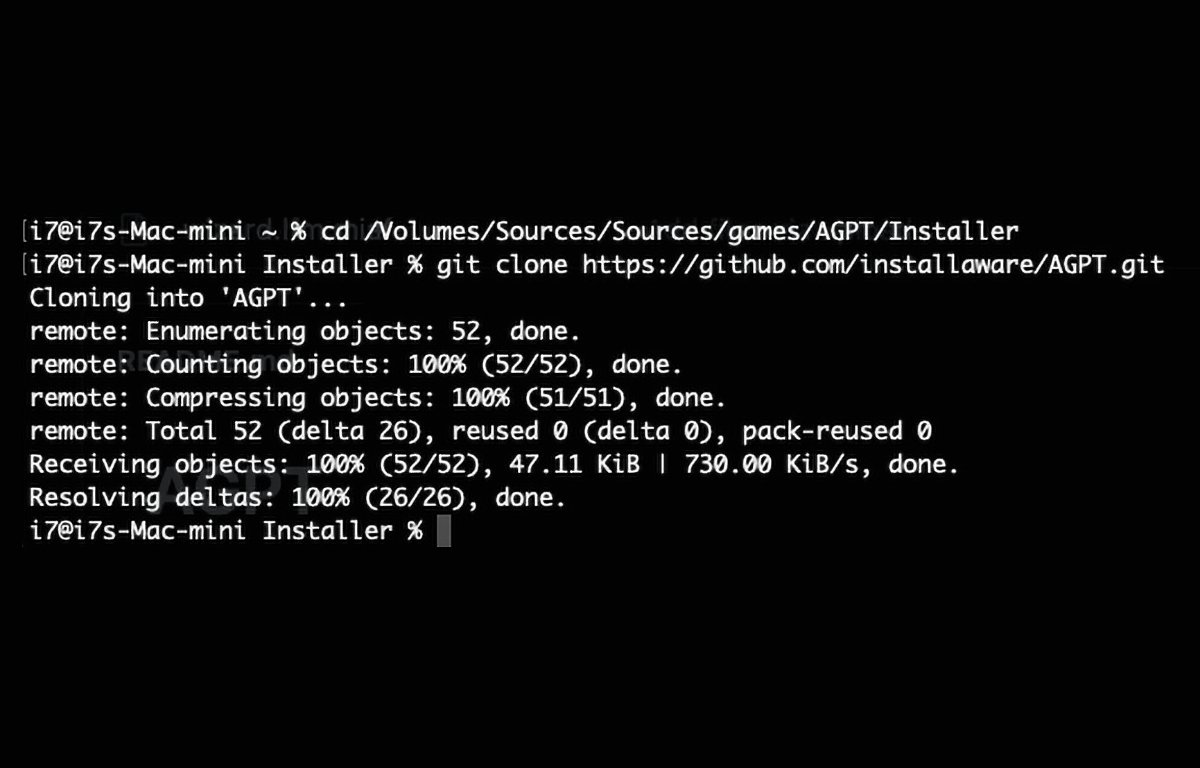
If all goes well, git will fetch the AGPT remote repo into your AGPT folder on your Mac’s drive. This leaves you with the contents of the remote repository for the InstallAware installer in the AGPT folder you created.

The git clone command completes.

The git clone command completes.

Get the installer


Next, scroll down the GitHub repo’s page a bit to just above the screenshot and click the link to get the installer’s .dmg file from www.installaware.com/iamp/agpt.dmg

Once downloaded, in Finder manually drag the .dmg file into the AGPT folder you made. Now double-click it in Finder to open the .dmg.

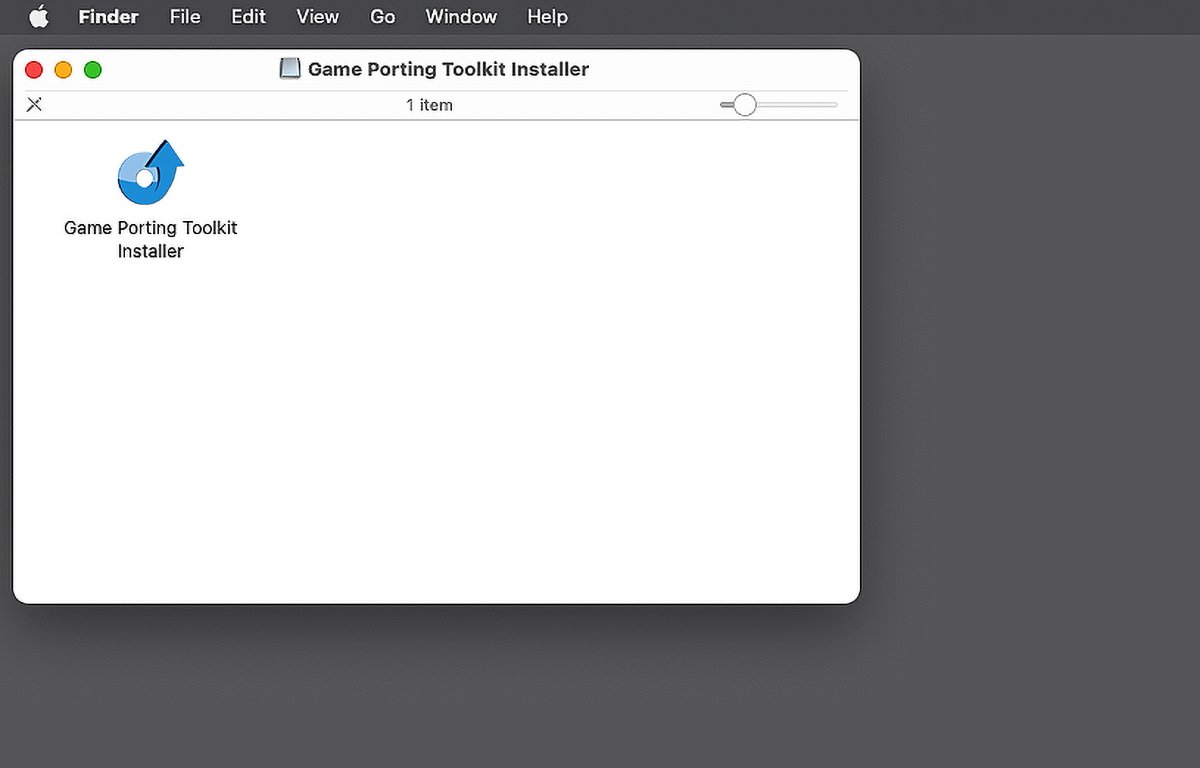
If you like, you can also copy the installer into the AGPT folder to copy it to your Mac’s drive, or just double-click it from the .dmg to open it:

The InstallAware installer.

The InstallAware installer.

If you get a warning about “Game Porting Toolkit Installer” being an app you downloaded from the internet, just click “Open” to open it anyway.

Run the installer


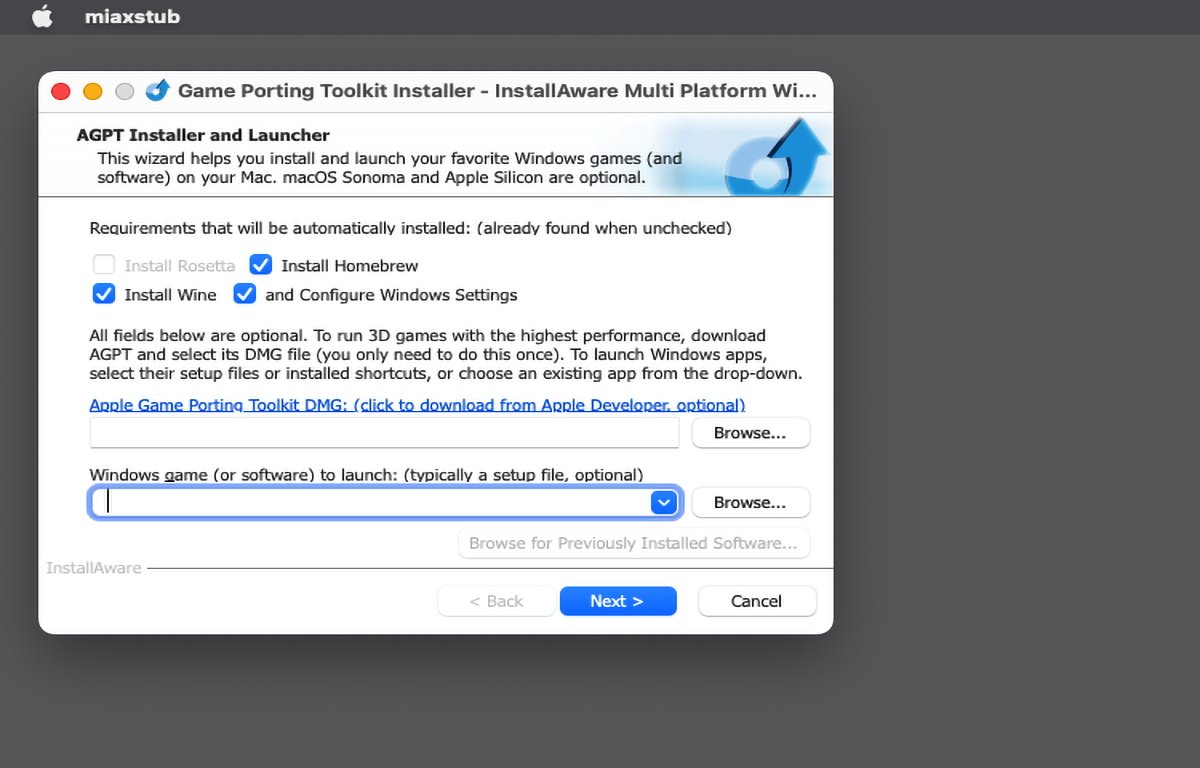
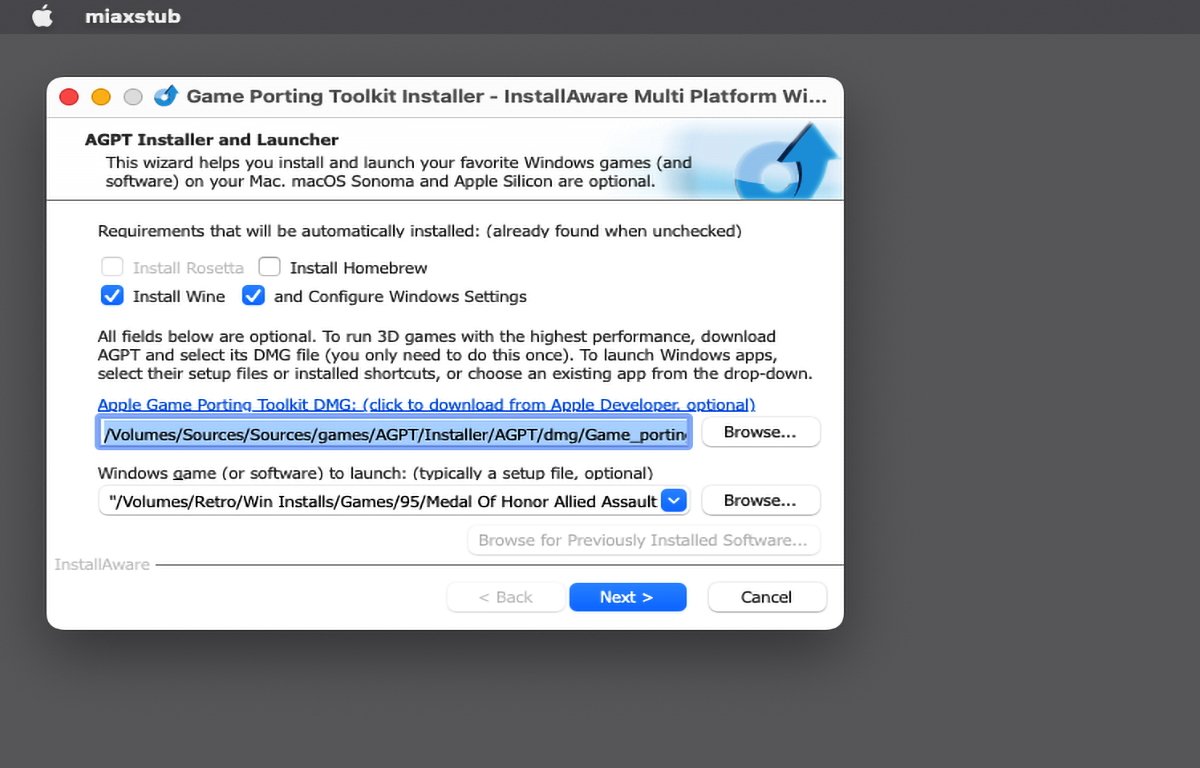
Once you double-click the installer you get a window with several options (several of which the installer says are optional).

At the top are options to install the Homebrew package manager, the Wine translation layer, and configure Windows settings. The installer says it auto-detects if these options are already installed, but on our Mac, it didn’t uncheck the Homebrew option even though we already had it installed.

If this happens, and you already have Homebrew installed, go ahead and uncheck that option.

In the field below, you have the option to select which Apple Game Porting Toolkit .dmg the installer will use by clicking the Browse button – if you’ve already downloaded one from Apple, but this step is optional. The installer knows how to find the Apple Game Porting Toolkit .dmg on the internet on its own.

If you don’t already have the .dmg for the Apple Game Porting Toolkit downloaded to your Mac, click the small link above the top text field to download it:

Click the text link to download Apple's game Porting Toolkit.

Click the text link to download Apple’s game Porting Toolkit.

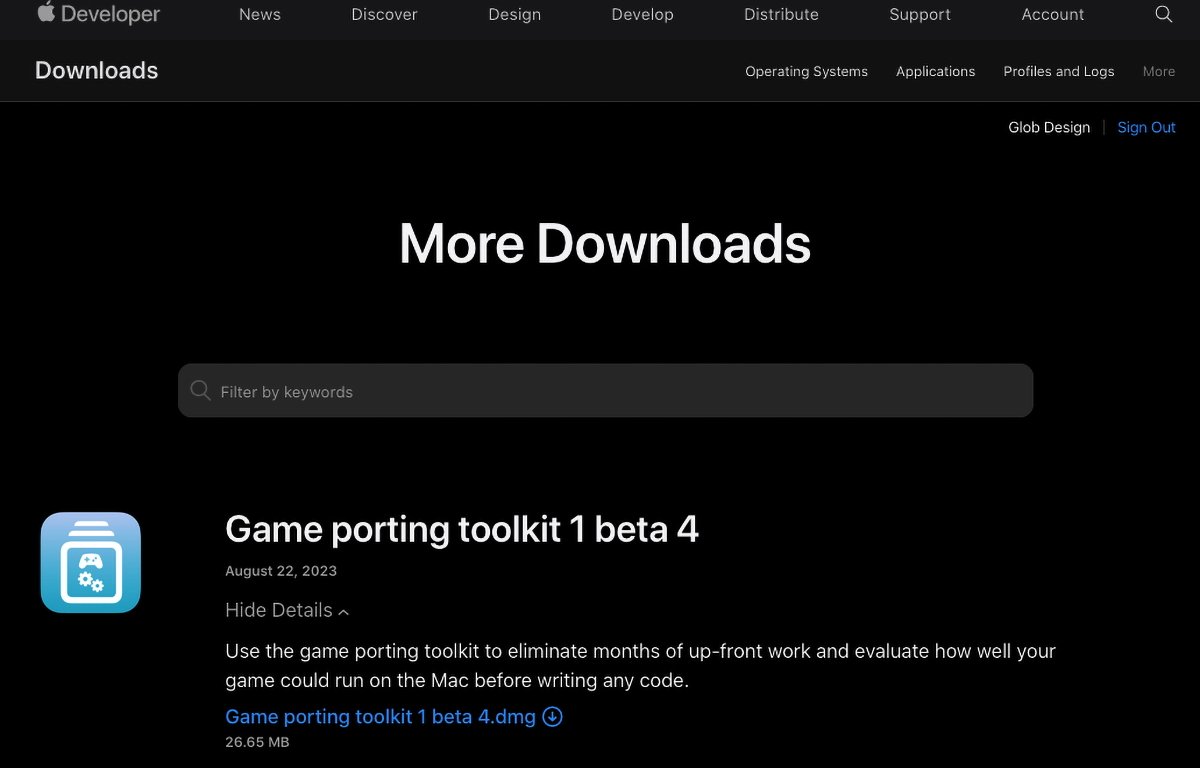
This will open the More Downloads section on Apple’s Developer website, but you’ll first need to sign in with your Apple ID.

Once signed in, expand the Game Porting Toolkit item by clicking the View Details link, then click the .dmg download button. This will download Apple’s Game Porting Toolkit .dmg to your Mac:

Download Game Porting Toolkit from Apple's website.

Download Game Porting Toolkit from Apple’s website.

Once downloaded, the .dmg should auto-mount on your Mac’s desktop, but go ahead and copy it to your AGPT folder for future reference.

Now head back to the InstallAware installer app, which should still be running, and click the Browse button next to the text field. Navigate to Apple’s Game Porting Toolkit .dmg you downloaded and select it by clicking the Open button.

Set a Windows app to install


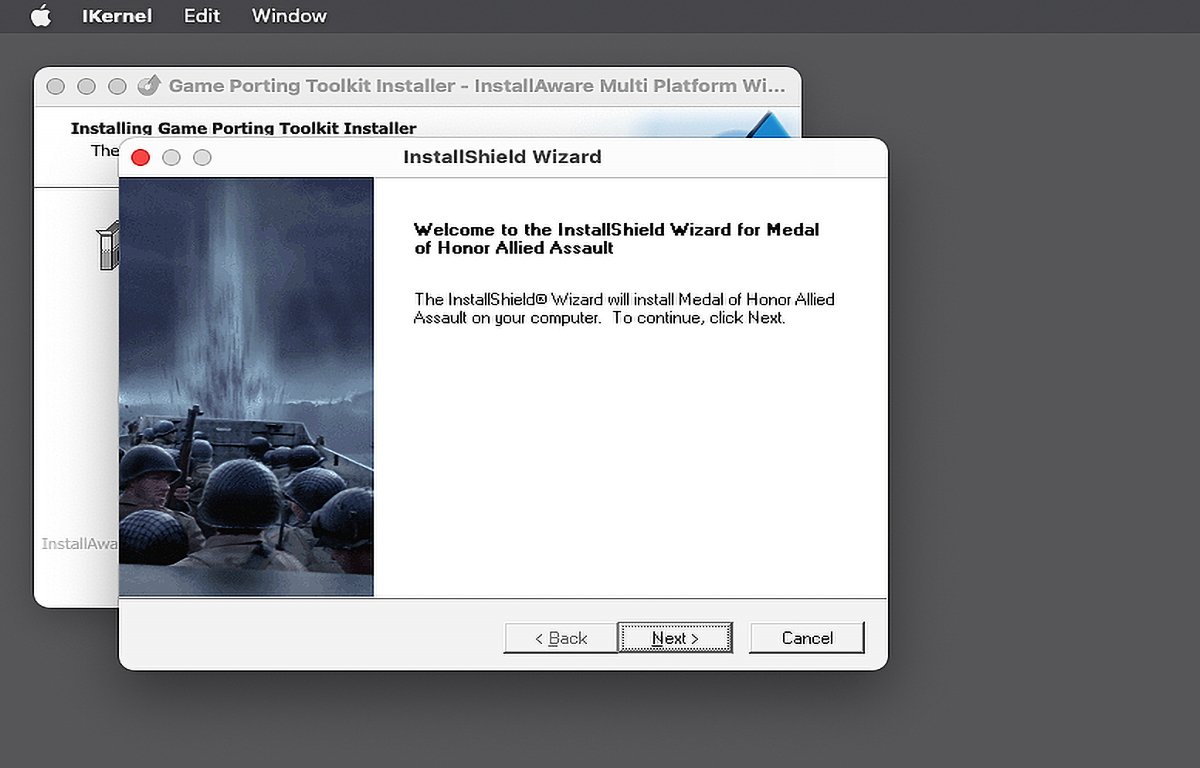
The next step is optional but if you also want to set up a Windows app while installing the Game Porting ToolKit, click the second Browse button below the first one, and select any compatible Windows .exe setup file from disk. In this example we’ll install Medal of Honor: Allied Assault:

Select a third-party app to install.

Select a third-party app to install.

Now you’re finally ready to install everything. Click the Next button to start the installation.

If you get the error “Tapping Apple Homebrew Failed!” with Error code -1, you’ll need to either turn on the Homebrew option at the top of the original installer window or else manually tap the Apple Homebrew formula in Terminal with:

And press Return.

But as we stated in our original article, this may take a long time – up to an hour on an Apple Silicon machine. So you may just want to check the Homebrew option in InstallAware’s installer and try again.

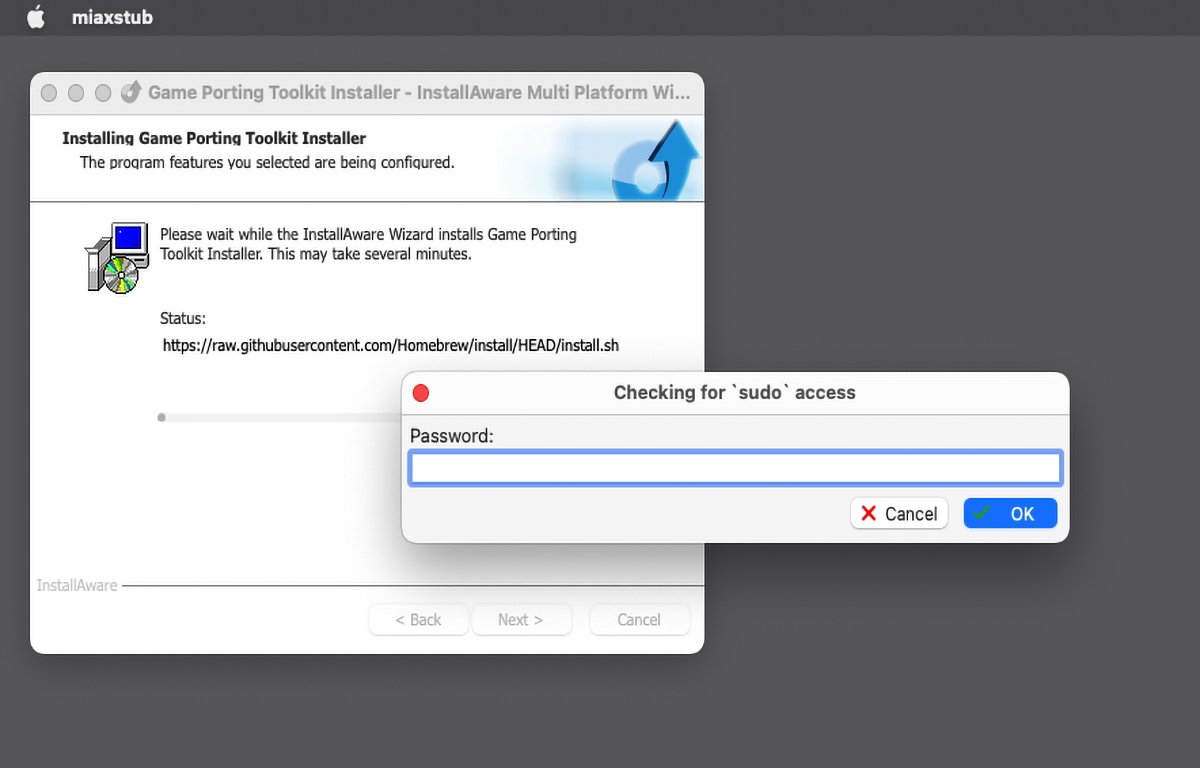
As the installer starts running, it will ask you for your Mac’s admin password with a “Checking for sudo access” prompt. You’ll need to enter an admin password for your Mac to proceed:

Enter an admin password.

Enter an admin password.

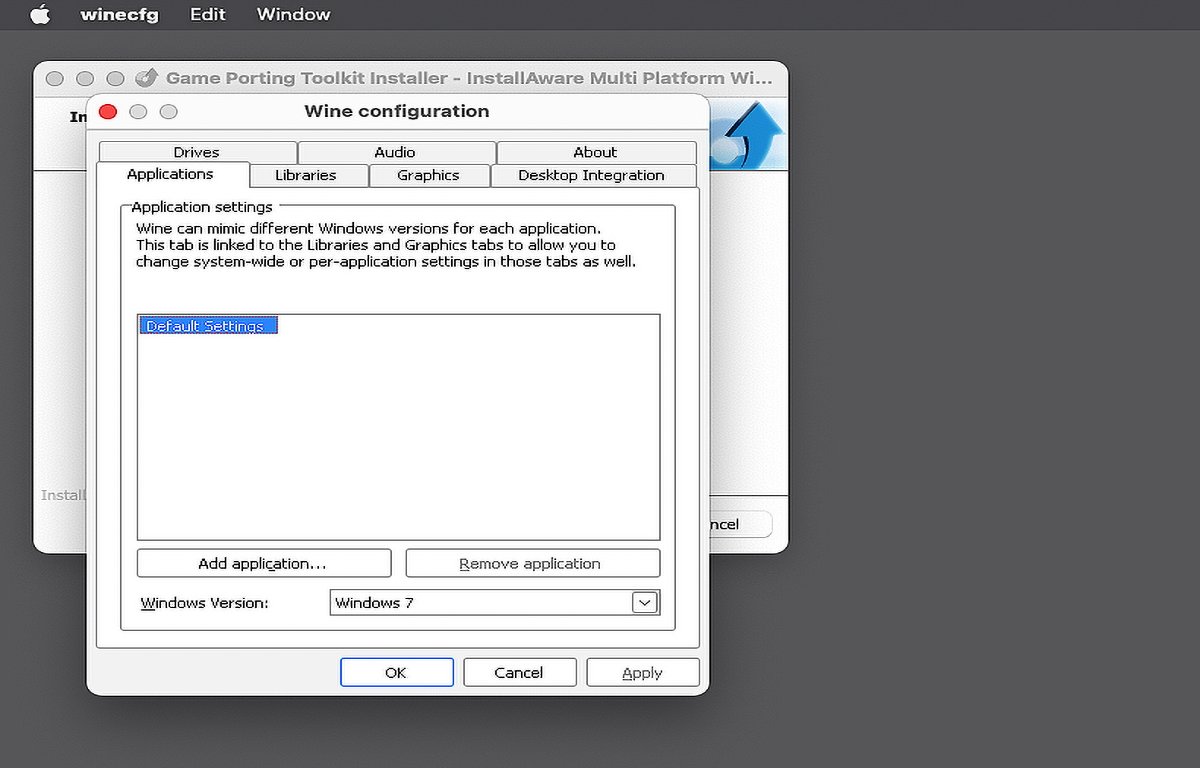
You won’t see any progress indicators, so it’s best just to let the installer run which can take quite a while. When done you’ll be prompted for Wine and other settings. Just use the defaults:

Prompt for optional settings' change.

Prompt for optional settings’ change.

Finally, if you selected any third-party software to install, the installer will run that installer last and you’ll need to step through it. If you’re installing commercial software, you’ll need a serial number for your installer:

Game installer running.

Game installer running.

Once any third-party installer finishes, you’re done. Click the Done or Finish button and you’re finished.

We’ve already covered how to run third-party games in Game Porting Toolkit in our previous article, so check out that article for instructions.

InstallAware’s installer does make installing the Game Porting Toolkit easier with far fewer steps and far fewer commands in the Terminal – even if it does seem to have a few glitches or idiosyncrasies here and there.


https://www.sickgaming.net/blog/2023/08/...installer/

Print this item

  Microsoft - There’s no question we are creating massive new opportunity across our
Posted by: xSicKxBot - 09-05-2023, 03:12 PM - Forum: Windows - No Replies

Microsoft - There’s no question we are creating massive new opportunity across our

I have interacted with this man countless number of times. He is one of India’s largest finance creators with 1.7 M+ subscribers on YouTube. But what I have always admired the most about him is his mission to teach and impact lives. I first got to interact with Akshat Shrivastava almost 5 years back, while working at his startup- Cases Over Coffee as a content and research intern. During that time, I was not sure as to what I would go on to do later on and was just exploring various opportunities that came my way. I had never written on social media before and it was only due to this internship, that I started to get a hang of writing online. Although, I used to write quite extensively earlier, while taking notes for my school exams and while jotting down summaries of various articles that I read, but never did I follow a structured approach to writing. Starting to write online allowed me to- ✅Think clearly. ✅Hire people from 4 countries for my first startup. ✅Build a community of 40+ international relations and economics enthusiasts on whatsapp. ✅Foster strong and meaningful connections with some of the country’s top minds. ✅Know the difference between what is needed in a writeup vs what was extra. Over the years, just writing online has helped me so much and Akshat was one of the first people who pushed me to write online. Although my tenure at the firm was short, it was one of the most fruitful ones that shaped me as a person and helped me go well beyond the traditional wisdom and acquire some modern wisdom. So, when I was recently in Goa, I decided to meet him, no matter how far he was. Well, turns out, he actually was very far from where I stayed, close to 80 KM, but I still decided to rent a scooty and go all the way to catch hold of him (pun intended), whilst enjoying the windy weather. When we met, we both enjoyed some Nachos, sandwiches and coffee together and sipped our way through the conversation, recalling our work, new age media and offcourse finance.
.
Akshat– I wanted to write this post for long but your recent initiative of “Finance for Kids” and imparting financial literacy to kids for free, inspired me and actually got me into action. This post is a reminder for anyone who hasn’t started writing online, yet. ?Have you started writing online? If yes, what have you learnt from it? LinkedIn for Creators #storytelling #consulting #internship #writing #growth


https://www.sickgaming.net/blog/2023/07/...msinspire/

Print this item

  NVIDIA Publishes GPU Hardware Documentation
Posted by: xSicKxBot - 09-05-2023, 03:12 PM - Forum: Linux, FreeBSD, and Unix types - No Replies

NVIDIA Publishes GPU Hardware Documentation

NVIDIA is releasing freely-available hardware interface documentation to assist in the development of the open-source NVIDIA Linux driver (Nouveau). The documentation made public at this point primarily covers Maxwell, Pascal, Volta, and Kepler generations of NVIDIA graphics as more is being worked on — obviously the latest-generation Turing we’d certainly like to see sooner rather than later. When asking about open-source Turing documentation, I hear it’s a work-in-progress. (Source: Phoronix)

Click Here!


https://www.sickgaming.net/blog/2019/08/...mentation/

Print this item

  Fedora - Fedora Linux Flatpak cool apps to try for August
Posted by: xSicKxBot - 09-05-2023, 03:12 PM - Forum: Linux, FreeBSD, and Unix types - No Replies

Fedora - Fedora Linux Flatpak cool apps to try for August

This article introduces projects available in Flathub with installation instructions.

Flathub is the place to get and distribute apps for all of Linux. It is powered by Flatpak, allowing Flathub apps to run on almost any Linux distribution.

Please read “Getting started with Flatpak“. In order to enable flathub as your flatpak provider, use the instructions on the flatpak site.

Authenticator


Authenticator is a simple app that allows you to generate Two-Factor authentication codes. It has a very simple and elegant interface with support for a a lot of algorithms and methods. Some of its features are:

  • Time-based/Counter-based/Steam methods support
  • SHA-1/SHA-256/SHA-512 algorithms support
  • QR code scanner using a camera or from a screenshot
  • Lock the application with a password
  • Backup/Restore from/into known applications like FreeOTP+, Aegis (encrypted / plain-text), andOTP, Google Authenticator

You can install “Authenticator” by clicking the install button on the site or manually using this command:

flatpak install flathub com.belmoussaoui.Authenticator

Secrets


Secrets is a password manager that integrates with GNOME. It’s easy to use and uses the KeyPass file format. Some of its features are:

  • Supported Encryption Algorithms:
    • AES 256-bit
    • Twofish 256-bit
    • ChaCha20 256-bit
  • Supported Derivation algorithms:
    • Argon2 KDBX4
    • Argon2id KDBX4
    • AES-KDF KDBX 3.1
  • Create or import KeePass safes
  • Add attachments to your encrypted database
  • Generate cryptographically strong passwords
  • Quickly search your favorite entries
  • Automatic database lock during inactivity
  • Support for two-factor authentication

You can install “Secrets” by clicking the install button on the site or manually using this command:

flatpak install flathub org.gnome.World.Secrets

Flatsweep


Flatsweep is a simple app to remove residual files after a flatpak is unistalled. It uses GTK4 and Libadwaita to provide a coherent user interface that integrates nicely with GNOME, but you can use it on any desktop environment.

You can install “Flatsweep” by clicking the install button on the site or manually using this command:

flatpak install flathub io.github.giantpinkrobots.flatsweep

Solanum


Solanum is a time tracking app that uses the pomodoro technique. It uses GTK4 and it’s interface integrates nicely with GNOME.

You can install “Solanum” by clicking the install button on the site or manually using this command:

flatpak install flathub org.gnome.Solanum


https://www.sickgaming.net/blog/2023/08/...or-august/

Print this item

  News - This Week In Destiny – 06/15/2023
Posted by: xSicKxBot - 09-05-2023, 03:12 PM - Forum: - No Replies

[b]News - This Week In Destiny – 06/15/2023[/b]

You’ve got sandbox questions, we’ve got answers. And some solid drip, as a treat.


https://www.sickgaming.net/blog/2023/06/15/this-week-in-destiny-06-15-2023/

Print this item

  News - Patch 2.6.5 PTR Preview
Posted by: xSicKxBot - 09-05-2023, 03:12 PM - Forum: - No Replies

[b]News - Patch 2.6.5 PTR Preview[/b]


https://www.sickgaming.net/blog/2019/03/29/patch-2-6-5-ptr-preview/

Print this item

Information News - Minecraft 1.19.4 Release Candidate 1
Posted by: xSicKxBot - 09-05-2023, 03:12 PM - Forum: Minecraft - No Replies

News - Minecraft 1.19.4 Release Candidate 1

Changes to display entity interpolation:

  • interpolation always starts at the beginning on client tick
  • field interpolation_start is replaced with start_interpolation, with a different meaning
  • start_interpolation describes amount of ticks from the start of next client tick after receiving an update to start of interpolation
    • for example value 0 means that interpolation will start at the beginning of next client tick after receiving the update
  • start_interpolation is not stored in entity data
    • when using data commands, if interpolated value is updated, but start_interpolation is not present in modified tag, interpolation will continue from the time of previous update, but with new values
  • MC-260857 – Display entities summoned with initial transformation interpolate incorrectly from default transformation during next transformation

Release Candidate are available for Minecraft: Java Edition. To install the Release Candidate, open up the Minecraft Launcher and enable snapshots in the “Installations” tab.

Testing versions can corrupt your world, so please backup and/or run them in a different folder from your main worlds.

Cross-platform server jar:

Report bugs here:


https://www.sickgaming.net/blog/2023/03/...ndidate-1/

Print this item