Posted on Leave a comment

Agile Software Development with Scrum

đź’ˇ Abstract: Is Agile software development with Scrum effective for businesses and tech companies? Here are the benefits of Scrum methodology and everything you should know about it! 


In the field of software development, agile software development with Scrum is one of the most popular methodologies. Flexible and low-cost, Agile Scrum is a powerful project management framework to increase teamwork and break down tasks, maximizing quality results.

Already in 2018, 94% of developers were using or used Scrum in their agile practice – of which, 78% use it with other frameworks, and 16% only work with it. 

But what is Scrum in Agile methodology? Here is an overview of the Scrum framework, including methods, benefits, and practices to know.

What Is Scrum?

Scrum is an Agile lifecycle subset method. The lightweight framework focuses on maximizing productivity while ensuring teamwork. Scrum teams work in collaborative environments with effective communication processes. 

The term Scrum was inspired by the passage of play in rugby that sees the whole team combine their collective strength in an attempt to gain ground, which is the perfect metaphor for the approach.

Scrum methodology enables last-minute adjustments and rapidly-changing requirements, increasing deliverables qualities and market trends compared to traditional waterfall processes. It’s an effective and low-cost solution for startups and small teams of 7-9 people. 

Benefits of Agile Software Development With Scrum

The main benefit of Scrum methodologies is flexibility. The team can adjust their workflow on the go based on market trends and users’ needs. Because of its nature, this methodology isn’t the most efficient option for plan-driven approaches or large and complex projects. However, it’s an efficient and valuable solution for startups and team environments, facilitating collaborative tasks and innovative solutions to improve products and services. 

Here are the core benefits of Agile software development with Scrum:  

  • Flexible and Adaptable: Scrum framework is one of the most effective solutions for new projects and startups. This Agile development methodology allows changes and edits on the go, without effective output. For this reason, it’s one of the most effective solutions for projects for companies in analyzing their customers’ requirements or improving their services over time. 
  • Time to Market: Scrum Agile methodologies require a short setup time, ensuring a fast and quality delivery to break into the market with new products and services. 
  • Lower Costs: Agile Scrum reduces a company’s costs because of automated documentation and control processes and increased productivity in the workflow. 
  • Transparency: Scrum methodology increases transparency between clients and the company. Any minor change is visible to all members, enforcing trust among consumers. 
  • Increase productivity: Agile Scrum provides a set system for deadlines and performance indicators. In addition, team members get rewards when meeting KPIs and quality checks, increasing team motivation and productivity. 
  • Feedback system: This methodology requires daily check-in and feedback for progress reports, ensuring a smoother and more efficient workflow in the long run.

Scrum Methodologies and Processes

As a part of Agile development methodologies, the Scrum framework consist of iterative processes to ensure teamwork and communication during the process. 

To put it simply, Scrum methods break the waterfall process delivery into smaller cycles. As a result, product teams and the end-customer can review the working software to ensure quality requirements at each stage – for the business and clients alike. 

In short, Agile Scrum method consists of Scrum roles, events, and artifacts: 

Roles  Artifacts Events 
Product owner Development team Scrum master  Increment Product backlogSpring backlog Sprint planning Sprint review Sprnt retrospective Daily Scrum 

Let’s have a closer look at the meaning and function elements in Agile software development with Scrum. 

Agile Software Development With Scrum: Roles 

In the Scrum framework, team members work to improve the software quality based on the product’s characteristics and business requirements. 

In general, a Scrum team consists of three leading roles: 

  • Scrum Master: This role guides the team in complying with rules and method processes. A Scrum master monitor bugs and development process to reduce obstacles and maximize the ROI with the Product Owner. In addition, this role takes care of Scrum updates while coaching, mentoring, and training the team for better results. 
  • Product owner (PO): The Product owner represents stakeholders and customers using the software. The focus is on the business requirements and the project ROI for this role. In short, they support the dev team in translating the project vision into a compelling product and service. 
  • Team: The team consists of professionals combining their tech knowledge to improve and implement the product during several cycles and stages. 

Agile Software Development With Scrum: Events 

Events in Scrum are a series of cycles (usually 2/3 weeks). Called Sprints, these cycles are a timebox to complete a set amount of tasks. The Scrum team combines multiple Sprints before the final Release, when the software enters the market and the product arrives at customers. 

Usually, the Product Owner breaks down the whole product functionality into smaller Epics or User Stories features. Prioritizing different stories helps the team monitor and test demos and prototypes and ensure the product’s complete functionality. 

Any Scrum event aims to simplify the adaptation and implementation of the process, the product, progress, or relationships. 

Here are the main Sprint in Agile software development with Scrum:

  • Sprint is the basic work unit for a Scrum team. It is the main feature that marks the difference between Scrum and other models for agile development.
  • Sprint Planning aims to define what and how it will be done during the current Sprint. Meeting at the beginning of each Sprint, the Scrum Master and team plan and determine how to approach the project coming from the Product Backlog stages and deadlines.
  • Daily Scrum concerns the project evaluation and trend until the end of the Sprint. In addition, the team synchronizes activities and creates a plan for the following 24 hours. 
  • Sprint Review aims to provide an overview of what has been done about the product backlog for future deliveries. At the end of each Sprint, team members report obstacles and implementation to the client. 
  • During the Sprint Retrospective, the team reviews goals analyzing positive and negative input. This stage aims to identify improvement steps and generate an effective plan for the next cycle. 

Agile Software Development With Scrum: Artifacts

Finally, Scrum Artifacts ensures transparency decision making and key information between customers and stakeholders: 

  • Product Backlog (PB): It is the process of listing what a product needs to satisfy potential customers. The Product Owner prioritizes what is important for the business, indicating what should be done to achieve requested quality standards for the product. 
  • Sprint Backlog (SB): As a subset of product backlog items, the team selects which type of tasks to perform during the Sprint, establishing the duration of the cycle and final goals on a shared Scrum board.
  • Increment: This Scrum artifact sums up tasks, user cases and stories, product backlogs, and any relevant element, and it makes them visible to software end-users.

Conclusion 

Agile software development with Scrum ensures a transparent and efficient workflow in mid-sized development teams. This framework allows breaking the whole development cycle in smaller breaks, simplifying the implementation and debugging process. Especially for startups and growing teams, it’s one of the best methodologies to improve development processes and ensure high-quality outcomes, especially for startups and growing teams.


This is a guest post contributed by:

Author’s Bio

Costanza Tagliaferri is a Writer and Content Marketer at DistantJob. She has covered a wide range of topics. Now, she is focussing on technology, traveling, and remote work.

Linkedin

Affiliated company: DistantJob, Remote IT Staffing Agency 


Posted on Leave a comment

Python enumerate() — A Simple Illustrated Guide with Video

If you’re like me, you want to come to the heart of an issue fast. Here’s the 1-paragraph summary of the enumerate() function—that’s all you need to know to get started using it:

Python’s built-in enumerate(iterable) function allows you to loop over all elements in an iterable and their associated counters. Formally, it takes an iterable as an input argument and returns an iterable of tuples (i, x)—one per iterable element x. The first integer tuple value is the counter of the element x in the iterable, starting to count from 0. The second tuple value is a reference to the element x itself. For example, enumerate(['a', 'b', 'c']) returns an iterable (0, 'a'), (1, 'b'), (2, 'c'). You can modify the default start index of the counter by setting the optional second integer argument enumerate(iterable, start).

I’ve created a short visual guide into enumerate in the following graphic:

Python enumerate()

Usage Example

Learn by example! Here are some examples of how to use the enumerate() built-in function:

fruits = ['apple', 'banana', 'cherry']
for counter, value in enumerate(fruits): print(counter, value) # OUTPUT:
# 0 apple
# 1 banana
# 2 cherry

The enumerate(iterable, start) function takes an optional second argument that is the start value of the counter.

fruits = ['apple', 'banana', 'cherry']
for counter, value in enumerate(fruits, 42): print(counter, value) # OUTPUT:
# 42 apple
# 43 banana
# 44 cherry

You can use the enumerate function to create a list of tuples from an iterable where the first tuple value is the index of the element:

fruits = ['apple', 'banana', 'cherry']
fruits_with_indices = list(enumerate(fruits))
print(fruits_with_indices)
# [(0, 'apple'), (1, 'banana'), (2, 'cherry')]

Video enumerate()

Syntax enumerate()

Syntax: 
enumerate(iterable) -> loop over all elements in an iterable and their counters, starting from 0. 
enumerate(iterable, start) -> loop over all elements in an iterable and their counters, starting from start. 
Arguments iterable The iterable you want to enumerate.
start The start counter of the first element iterable[0].
Return Value enumerate object An iterable that allows you to iterate over each element associated to its counter, starting to count from start.

Interactive Shell Exercise: Understanding enumerate()

Consider the following interactive code:

Exercise: Change the start value of the enumerate function to your personal age and run the code. What’s the associated counter to the last fruit in the list?

Next, you’re going to dive deeper into the enumerate() function.


But before we move on, I’m excited to present you my brand-new Python book Python One-Liners (Amazon Link).

If you like one-liners, you’ll LOVE the book. It’ll teach you everything there is to know about a single line of Python code. But it’s also an introduction to computer science, data science, machine learning, and algorithms. The universe in a single line of Python!

The book was released in 2020 with the world-class programming book publisher NoStarch Press (San Francisco).

Link: https://nostarch.com/pythononeliners


What is the Return Value of Python’s enumerate() function?

The return value of enumerate(iterable) is an object of type enumerate. The enumerate class definition implements the iterable interface—the __next__() function—which means that you can iterate over it.

fruits = ['apple', 'banana', 'cherry']
print(type(enumerate(fruits)))
# <class 'enumerate'>

How is Python’s enumerate() Function Implemented?

The default implementation of enumerate() is done in C++, assuming you use cPython as your Python engine. However, the documentation shows an equivalent implementation of enumerate() in Python code that helps you understand how it works under the hood:

def enumerate(sequence, start=0): counter = start for element in sequence: yield counter, element counter += 1

You can see that the return value of enumerate() is not a list but a generator that issues the (counter, element) tuples as they appear in the sequence. Thus, the implementation is memory efficient—it doesn’t generate all (counter, element) pairs in advance and holds them in memory, but generates them as they’re needed.

How to Use enumerate() on Strings?

The enumerate(iterable) function takes an iterable as an input argument. A string is an iterable, so you can pass the string as an input. The return value of the function enumerate(string) will be an enumerate object that associates a counter to each character in the string for a series of tuples (counter, character). Here’s an example:

>>> list(enumerate('finxter'))
[(0, 'f'), (1, 'i'), (2, 'n'), (3, 'x'), (4, 't'), (5, 'e'), (6, 'r')]

You can also set the optional second argument start:

>>> list(enumerate('finxter', 42))
[(42, 'f'), (43, 'i'), (44, 'n'), (45, 'x'), (46, 't'), (47, 'e'), (48, 'r')]

How to Make Your Loop More Pythonic With enumerate()?

Beginner Python coders and coders coming from other programming languages such as Java or C++, often think in indices when creating loops such as this one:

# NON_PYTHONIC
fruits = ['apple', 'banana', 'cherry']
for i in range(len(fruits)): print(i, fruits[i])

The output of this correct, but unpythonic code is:

0 apple
1 banana
2 cherry

While the code does what it needs to do, it shouts into the world that its creator is not an experienced Python coder, but a newbie in Python. Why? Because an experienced Python coder will always prefer the enumerate() function due its more idiomatic and crisp functionality:

# PYTHONIC
fruits = ['apple', 'banana', 'cherry']
for i, fruit in enumerate(fruits): print(i, fruit)

You don’t have to use a single indexing mechanism—which reduces the likelihood of a bug and improves readability of your code.

Python enumerate() step

How to set a step in the indices used by the enumerate() function? For example, you may want to use only every third counter:

0 element_0
3 element_1
6 element_2

The answer is to multiply the returned counter value from a default call of the enumerate() function with the step size like this:

lst = ['element_0', 'element_1', 'element_2']
step = 3
for i, x in enumerate(lst): print(i*step, x)
OUTPUT:
0 element_0
3 element_1
6 element_2

Summary

Python’s built-in enumerate(iterable) function allows you to loop over all elements in an iterable and their associated counters.

Formally, it takes an iterable as an input argument and returns an iterable of tuples(i, x)—one per iterable element x.

  • The first integer tuple value is the counter of the element x in the iterable, starting to count from 0.
  • The second tuple value is a reference to the element x itself.

For example, enumerate(['a', 'b', 'c']) returns an iterable (0, 'a'), (1, 'b'), (2, 'c').

print(*enumerate(['a', 'b', 'c']))
# (0, 'a'), (1, 'b'), (2, 'c')

You can modify the default start index of the counter by setting the optional second integer argument enumerate(iterable, start).

print(*enumerate(['a', 'b', 'c'], 10))
# (10, 'a') (11, 'b') (12, 'c')

I hope you enjoyed the article! To improve your Python education, you may want to join the popular free Finxter Email Academy:

Do you want to boost your Python skills in a fun and easy-to-consume way? Consider the following resources and become a master coder!

Where to Go From Here?

Enough theory, let’s get some practice!

To become successful in coding, you need to get out there and solve real problems for real people. That’s how you can become a six-figure earner easily. And that’s how you polish the skills you really need in practice. After all, what’s the use of learning theory that nobody ever needs?

Practice projects is how you sharpen your saw in coding!

Do you want to become a code master by focusing on practical code projects that actually earn you money and solve problems for people?

Then become a Python freelance developer! It’s the best way of approaching the task of improving your Python skills—even if you are a complete beginner.

Join my free webinar “How to Build Your High-Income Skill Python” and watch how I grew my coding business online and how you can, too—from the comfort of your own home.

Join the free webinar now!

References:

The post Python enumerate() — A Simple Illustrated Guide with Video first appeared on Finxter.

Posted on Leave a comment

Python divmod() — A Simple Guide with Video

Python’s built-in divmod(a, b) function takes two integer or float numbers a and b as input arguments and returns a tuple (a // b, a % b). The first tuple value is the result of the integer division a//b. The second tuple is the result of the remainder, also called modulo operation a % b. In case of float inputs, divmod() still returns the division without remainder by rounding down to the next round number.

Python divmod() visual explanation

Usage

Learn by example! Here are some examples of how to use the divmod() built-in function with integer arguments:

# divmod() with integers
>>> divmod(10, 2)
(5, 0)
>>> divmod(10, 3)
(3, 1)
>>> divmod(10, 4)
(2, 2)
>>> divmod(10, 5)
(2, 0)
>>> divmod(10, 10)
(1, 0)

You can also use float arguments as follows:

# divmod() with floats
>>> divmod(10.0, 2.0)
(5.0, 0.0)
>>> divmod(10.0, 3.0)
(3.0, 1.0)
>>> divmod(10.0, 4.0)
(2.0, 2.0)
>>> divmod(10.0, 5.0)
(2.0, 0.0)
>>> divmod(10.0, 10.0)
(1.0, 0.0)

Video divmod()

Syntax divmod()

Syntax: 
divmod(a, b) -> returns a tuple of two numbers. The first is the result of the division without remainder a/b. The second is the remainder (modulo) a%b. 
Arguments integer The dividend of the division operation.
integer The divisor of the division operation.
Return Value tuple Returns a tuple of two numbers. The first is the result of the division without remainder. The second is the remainder (modulo).

Interactive Shell Exercise: Understanding divmod()

Consider the following interactive code:

Exercise: Guess the output before running the code.


But before we move on, I’m excited to present you my brand-new Python book Python One-Liners (Amazon Link).

If you like one-liners, you’ll LOVE the book. It’ll teach you everything there is to know about a single line of Python code. But it’s also an introduction to computer science, data science, machine learning, and algorithms. The universe in a single line of Python!

The book is released in 2020 with the world-class programming book publisher NoStarch Press (San Francisco).

Link: https://nostarch.com/pythononeliners


Exact Mathematical Definition divmod()

You can generally use the divmod(a, b) function with two integers, one integer and one float, or two floats.

Two integers. Say you call divmod(a, b) with two integers a and b. In this case, the exact mathematical definition of the return value is (a // b, a % b).

a = 5
b = 2
print((a // b, a % b))
print(divmod(a, b))
# OUTPUT:
# (2, 1)
# (2, 1)

One integer and one float. Say you call divmod(a, b) with an integer a and a float b. In this case, the exact mathematical definition of the return value is the return value of converting the integer to a float and calling divmod(a, float(b)).

a = 5.0
b = 2
print((a // b, a % b))
print(divmod(a, b))
# OUTPUT:
# (2.0, 1.0)
# (2.0, 1.0)

Two floats. Say you call divmod(a, b) with two floats a and b. In this case, the exact mathematical definition of the return value is (float(math.floor(a / b)), a % b).

import math a = 5.0
b = 2.0
print((float(math.floor(a / b)), a % b))
print(divmod(a, b))
# OUTPUT:
# (2.0, 1.0)
# (2.0, 1.0)

Note that because of the imprecision of floating point arithmetic, the result may have a small floating point error in one of the lower decimal positions. You can read more about the floating point trap on the Finxter blog.

Related Tutorial: Floating Point Error Explained

Python divmod() Negative Numbers

Can you use the divmod() method on negative numbers for the dividend or the divisor?

You can use divmod(a, b) for negative input arguments a, b, or both. In any case, if both arguments are integers, Python performs integer division a // b to obtain the first element and modulo division a % b to obtain the second element of the returned tuple. Both operations allow negative inputs a or b. The returned tuple (x, y) is calculated so that x * b + y = a.

Here’s an example of all three cases:

>>> divmod(-10, -3)
(3, -1)
>>> divmod(-10, 3)
(-4, 2)
>>> divmod(10, -3)
(-4, -2)

Python divmod() Performance — Is It Faster Than Integer Division // and Modulo % Operators?

There are two semantically identical ways to create a tuple where the first element is the result of the integer division and the second is the result of the modulo operation:

  • Use the divmod(a, b) function.
  • Use the (a // b, a % b) explicit operation with Python built-in operators.

Next, we measure the performance of calculating the elapsed runtime in milliseconds when performing 10 million computations for relatively small integers. Let’s start with divmod():

import time
import random # Small Operands
operands = zip([random.randint(1, 100) for i in range(10**7)], [random.randint(1, 100) for i in range(10**7)]) start = time.time() for i, j in operands: divmod(i, j) stop = time.time()
print('divmod() elapsed time: ', (stop-start), 'milliseconds')
# divmod() elapsed time: 1.7654337882995605 milliseconds

Compare this to integer division and modulo:

import time
import random # Small Operands
operands = zip([random.randint(1, 100) for i in range(10**7)], [random.randint(1, 100) for i in range(10**7)]) start = time.time() for i, j in operands: (i // j, i % j) stop = time.time()
print('(i // j, i % j) elapsed time: ', (stop-start), 'milliseconds')
# (i // j, i % j) elapsed time: 1.9048900604248047 milliseconds

The result of this performance benchmark is that divmod() requires 1.76 milliseconds and the explicit way of using integer division and modulo requires 1.90 milliseconds for 10,000,000 operations. Thus, divmod() is 8% faster. The reason is that the explicit way performs many duplicate operations to calculate the result of the integer division and the modulo operation which internally uses integer division again. This effect becomes even more pronounced if you use larger integers.

Performance difference divmod() vs Integer Division and Modulo

Python divmod() Implementation

For integer input arguments, here’s a semantically equivalent divmod() implementation:

>>> def divmod_own(x, y): return (x // y, x % y) >>> divmod_own(10, 3)
(3, 1)
>>> divmod(10, 3)
(3, 1)

But note that this implementation still performs redundant computations (e.g., integer division) and, therefore, is less efficient than divmod().

Summary

Python’s built-in divmod(a, b) function takes two integer or float numbers a and b as input arguments and returns a tuple (a // b, a % b).

In case of float inputs, divmod() still returns the division without remainder by rounding down to the next round number.


I hope you enjoyed the article! To improve your Python education, you may want to join the popular free Finxter Email Academy:

Do you want to boost your Python skills in a fun and easy-to-consume way? Consider the following resources and become a master coder!

Where to Go From Here?

Enough theory, let’s get some practice!

To become successful in coding, you need to get out there and solve real problems for real people. That’s how you can become a six-figure earner easily. And that’s how you polish the skills you really need in practice. After all, what’s the use of learning theory that nobody ever needs?

Practice projects is how you sharpen your saw in coding!

Do you want to become a code master by focusing on practical code projects that actually earn you money and solve problems for people?

Then become a Python freelance developer! It’s the best way of approaching the task of improving your Python skills—even if you are a complete beginner.

Join my free webinar “How to Build Your High-Income Skill Python” and watch how I grew my coding business online and how you can, too—from the comfort of your own home.

Join the free webinar now!

The post Python divmod() — A Simple Guide with Video first appeared on Finxter.

Posted on Leave a comment

How to Get Started With Python Dash on PyCharm [Absolute Beginners]

This is a chapter draft for our upcoming book “Python Dash” with NoStarch—to appear in 2021. Stay tuned!

Why an IDE

Using an integrated development environment (IDE) has the potential to significantly accelerate your programming productivity. Many programmers do not unlock their full potential until they finally decide to switch from a simple code editor to an IDE—and mastering the advanced functionality provided by the IDE. Some advantages of IDEs over simple text editors are code highlighting, tooltips, syntax checker, code linters that check for style issues, version control to safeguard the history of programming edits, debugging with the help of breakpoints, visual aids such as flowcharts and block diagrams, performance optimization tools and profilers—just to name a few.

PyCharm for Dash Apps

In this book about dashboard applications, we recommend that you also take your time to switch to an IDE, if you haven’t already. In particular, we recommend that you use the PyCharm IDE to follow along with the provided code examples. Apart from the benefits of using IDEs, you’ll also develop web applications that can quickly grow by adding more and more features. As your Python dashboard applications grow, so will your need to aggregate all source code at a single spot and in a single development environment. Increasing complexity quickly demands the use of an IDE.

In the following, we’ll describe how to download and install PyCharm, and create your first simple dashboard application that you can view in your browser. After you’ve completed those steps, you’re well-prepared to duplicate the increasingly advanced applications in the upcoming chapters.

Download PyCharm

First, let’s start with downloading the latest PyCharm version. We assume you have a Windows PC, but the steps are very similar on a macOS and Linux computer. As soon as you’ve launched the PyCharm application, the similarity of usage increases even more across the different operating systems.

You can download the PyCharm app from the official website.

Click the download button of the free community version and wait for the download to complete.

Install PyCharm on Your Computer

Now, run the executable installer and follow the steps of the installation application. A sensible approach is to accept the default settings suggested by the PyCharm installer.

Congratulations, you’ve installed PyCharm on your system!

Open PyCharm

Now type “PyCharm” into the search bar of your operating system and run the IDE!

Create a New Dash Project in PyCharm

After choosing “New Project”, you should see a window similar to this one:

This user interface asks you to provide a project name, a virtual environment, and a Python interpreter. We call our project firstDashProject, use a virtual environment with the standard Python installation, and don’t create a main.py welcome script:

Create the project and you should see your first PyCharm dashboard project!

Create Your Dash File app.py in Your PyCharm Project

Let’s create a new file app.py in your project and copy&paste the code from the official documentation into your app.py file:

# -*- coding: utf-8 -*- # Run this app with `python app.py` and
# visit http://127.0.0.1:8050/ in your web browser. import dash
import dash_core_components as dcc
import dash_html_components as html
import plotly.express as px
import pandas as pd external_stylesheets = ['https://codepen.io/chriddyp/pen/bWLwgP.css'] app = dash.Dash(__name__, external_stylesheets=external_stylesheets) # assume you have a "long-form" data frame
# see https://plotly.com/python/px-arguments/ for more options
df = pd.DataFrame({ "Fruit": ["Apples", "Oranges", "Bananas", "Apples", "Oranges", "Bananas"], "Amount": [4, 1, 2, 2, 4, 5], "City": ["SF", "SF", "SF", "Montreal", "Montreal", "Montreal"]
}) fig = px.bar(df, x="Fruit", y="Amount", color="City", barmode="group") app.layout = html.Div(children=[ html.H1(children='Hello Dash'), html.Div(children=''' Dash: A web application framework for Python. '''), dcc.Graph( id='example-graph', figure=fig )
]) if __name__ == '__main__': app.run_server(debug=True)

You can get the code from the official Dash tutorial: https://dash.plotly.com/layout

Your PyCharm dashboard project should now look like this:

Debug Your Dash App Using PyCharm’s Tooltips

Now, let’s try to run our project by using the top menu and select Run > app.py. Unfortunately, it doesn’t already work—PyCharm doesn’t recognize dash!

You can easily fix this by hovering over the red underlined “dash” library import in your app and choosing the “install package dash” option.

This is one great advantage of an IDE is that installing dependencies in your Python projects is as simple as accepting the tooltips provided by your intelligent development environment.

Install Dash in Your Virtual Environment

Installing the dash library will take a few moments. Note that the library will be installed only in a virtual environment which means that it’ll install it not on your global operating system but only on a project level. For a different project, you may have to install dash again. While this may sound tedious, it’s actually the most Pythonic way because it keeps dependency management simple and decentralized. There won’t be any version issues because your first project needs version 1 and your second project needs version 2 of a given library. Instead, each project installs exactly the version it needs.

Install Pandas in Your Virtual Environment

PyCharm will tell you when it is done with installing the dash library in the virtual environment. Now repeat the same procedure for all red-underlined libraries in the project. If you used the code given above, you’ll have to install the pandas library (see Chapter 3) as well in your local environment. A few moments later, the pandas installation will also successfully complete. The red underlined error messages in your code will disappear and you’re ready to restart the project again by clicking “Run”.

Exploring Your First Dash App in Your Browser

On my machine, the output after running the app.py file in PyCharm is:

C:\Users\xcent\Desktop\Python\firstDashProject\venv\Scripts\python.exe C:/Users/xcent/Desktop/Python/firstDashProject/app.py
Dash is running on http://127.0.0.1:8050/ * Serving Flask app "app" (lazy loading) * Environment: production WARNING: This is a development server. Do not use it in a production deployment. Use a production WSGI server instead. * Debug mode: on

Note the highlighted line (in bold). You can now copy the URL http://127.0.0.1:8050/ and paste it into your browser—the dashboard app runs on a local server that is hosted on your machine with IP address 127.0.0.1 and port 8050.  

When you visit this URL in your browser, you should see your first Dash application!

Congratulations, you’re now well-prepared to run all dashboard apps in this book—and beyond it as well—using similar steps. For further reading on PyCharm, feel free to check out our multi-site blog tutorial on https://academy.finxter.com/course/introduction-to-pycharm/

The post How to Get Started With Python Dash on PyCharm [Absolute Beginners] first appeared on Finxter.

Posted on Leave a comment

Return Keyword in Python – A Simple Illustrated Guide

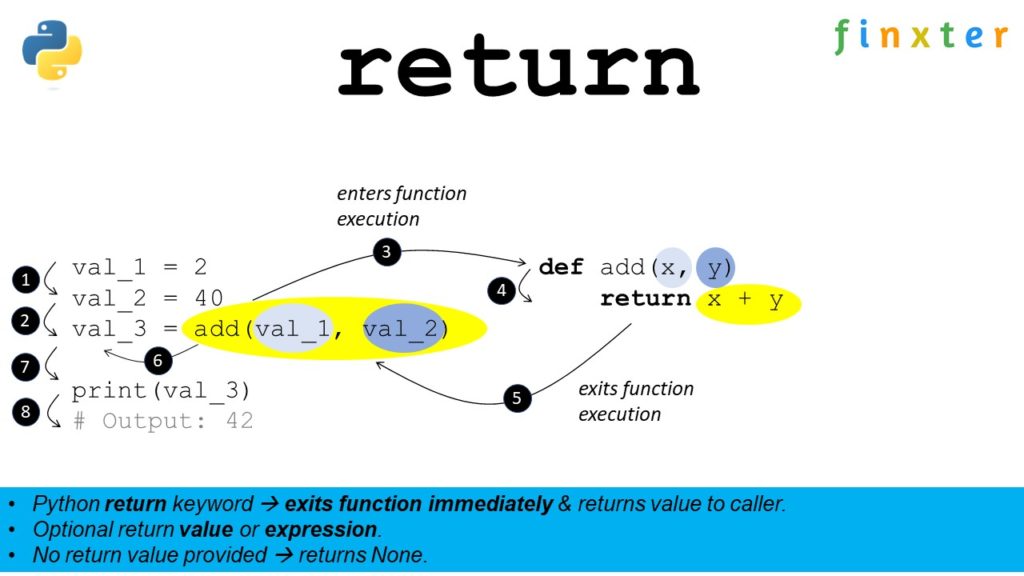
Python return keyword - visual example

Python’s return keyword commands the execution flow to exit a function immediately and return a value to the caller of the function. You can specify an optional return value—or even a return expression—after the return keyword. If you don’t provide a return value, Python will return the default value None to the caller.

Python Return Keyword Video

Return Keyword Followed by Return Value

Here’s an example of the return keyword in combination with a return value:

def f(): return 4 print(f())
# OUTPUT: 4

Within function f(), Python returns the result 4 to the caller. The print() function then prints the output to the shell.

Return Keyword Followed by Return Expression

Here’s an example of the return keyword in combination with a return expression:

def f(): return 2+2 print(f())
# OUTPUT: 4

Within function f(), Python evaluates the expression 2+2=4 and returns the result 4 to the caller. The print() function then prints the output to the shell.

Return Keyword Followed by No Value

Here’s an example of the return keyword without defining a return value:

def f(): return print(f())
# OUTPUT: None

Within function f(), Python returns the default value None to the caller. The print() function then prints the output to the shell.

Interactive Code Shell

Run the following code in your browser:

Exercise: Change the three return values to 42, 42, and ‘Alice’ in the interactive code shell!

The post Return Keyword in Python – A Simple Illustrated Guide first appeared on Finxter.

Posted on Leave a comment

Python dir() — A Simple Guide with Video

If used without argument, Python’s built-in dir() function returns the function and variable names defined in the local scope—the namespace of your current module. If used with an object argument, dir(object) returns a list of attribute and method names defined in the object’s scope. Thus, dir() returns all names in a given scope.

Python dir() Visual Explanation

Usage

Learn by example! Here are some examples of how to use the dir() built-in function.

Here’s the use without an argument:

alice = 22
bob = 42
print(dir())

It prints the implicitly and explicitly defined names in your module where you run this code:

['__annotations__', '__builtins__', '__doc__', '__file__', '__loader__', '__name__', '__package__', '__spec__', 'alice', 'bob']

The last two values in the list are the names 'alice' and 'bob'.

The following code exemplifies the use of dir() with an object argument of class Car.

class Car: speed = 100 color = 'black' porsche = Car()
print(dir(porsche))

The class Car has two attributes. If you print the names of the porsche instance of the Car class, you obtain the following output:

['__class__', '__delattr__', '__dict__', '__dir__', '__doc__', '__eq__', '__format__', '__ge__', '__getattribute__', '__gt__', '__hash__', '__init__', '__init_subclass__', '__le__', '__lt__', '__module__', '__ne__', '__new__', '__reduce__', '__reduce_ex__', '__repr__', '__setattr__', '__sizeof__', '__str__', '__subclasshook__', '__weakref__', 'color', 'speed']

The final two attributes are 'color' and 'speed', the ones you defined. There are many other names in the list with the double underscore (called dunder). These are the attribute and method names already defined implicitly by the Python environment for any object. For example, __str__ gives the default string representation of a given object.

Video dir()

Syntax dir()

Syntax: 
dir() -> names defined in the local scope/namespace. dir(object) -> names defined for the object. 
Arguments object The object for which the names should be returned.
Return Value list Returns all names defined in the namespace of the specified object. If no object argument is given, it returns the names defined in the local namespace of the module in which you run the code.

Interactive Shell Exercise: Understanding dir()

Consider the following interactive code:

Exercise: Guess the output before running the code. Do both cars, porsche and tesla, generate the same output?


But before we move on, I’m excited to present you my brand-new Python book Python One-Liners (Amazon Link).

If you like one-liners, you’ll LOVE the book. It’ll teach you everything there is to know about a single line of Python code. But it’s also an introduction to computer science, data science, machine learning, and algorithms. The universe in a single line of Python!

The book is released in 2020 with the world-class programming book publisher NoStarch Press (San Francisco).

Link: https://nostarch.com/pythononeliners


Using dir() on Modules

You can also use Python’s built-in dir() method on modules. For example, after importing the random module, you can pass it into the dir(random) function. This gives you all the names and functions defined in the module.

import random
print("The random module contains the following names: ")
print(dir(random))

The output is the following:

The random module contains the following names: ['BPF', 'LOG4', 'NV_MAGICCONST', 'RECIP_BPF', 'Random', 'SG_MAGICCONST', 'SystemRandom', 'TWOPI', '_BuiltinMethodType', '_MethodType', '_Sequence', '_Set', '__all__', '__builtins__', '__cached__', '__doc__', '__file__', '__loader__', '__name__', '__package__', '__spec__', '_acos', '_bisect', '_ceil', '_cos', '_e', '_exp', '_inst', '_itertools', '_log', '_os', '_pi', '_random', '_sha512', '_sin', '_sqrt', '_test', '_test_generator', '_urandom', '_warn', 'betavariate', 'choice', 'choices', 'expovariate', 'gammavariate', 'gauss', 'getrandbits', 'getstate', 'lognormvariate', 'normalvariate', 'paretovariate', 'randint', 'random', 'randrange', 'sample', 'seed', 'setstate', 'shuffle', 'triangular', 'uniform', 'vonmisesvariate', 'weibullvariate']

This way, you can quickly explore the contents of a module and which functions you may want to use in your own code!

Overwriting dir() with __dir__()

To customize the return value of the dir() function on a custom class, you can overwrite the __dir__() method and return the values to be returned. This way, you can hide names from the user or filter out only relevant names of your object.

class Car: speed = 100 color = 'gold' def __dir__(self): return ['porsche', 'tesla', 'bmw'] tesla = Car()
print(dir(tesla))

The output is the nonsensical list of “names”:

['bmw', 'porsche', 'tesla']

Summary

There are two different use cases for the dir() function.

  • If used without argument, Python’s built-in dir() function returns the function and variable names defined in the local scope—the namespace of your current module.
  • If used with an object argument, dir(object) returns a list of attribute and method names defined in the object’s scope.

Thus, dir() returns all names in a given scope.

Source: Documentation


I hope you enjoyed the article! To improve your Python education, you may want to join the popular free Finxter Email Academy:

Do you want to boost your Python skills in a fun and easy-to-consume way? Consider the following resources and become a master coder!

Where to Go From Here?

Enough theory, let’s get some practice!

To become successful in coding, you need to get out there and solve real problems for real people. That’s how you can become a six-figure earner easily. And that’s how you polish the skills you really need in practice. After all, what’s the use of learning theory that nobody ever needs?

Practice projects is how you sharpen your saw in coding!

Do you want to become a code master by focusing on practical code projects that actually earn you money and solve problems for people?

Then become a Python freelance developer! It’s the best way of approaching the task of improving your Python skills—even if you are a complete beginner.

Join my free webinar “How to Build Your High-Income Skill Python” and watch how I grew my coding business online and how you can, too—from the comfort of your own home.

Join the free webinar now!

The post Python dir() — A Simple Guide with Video first appeared on Finxter.

Posted on Leave a comment

Python dict() — A Simple Guide with Video

Python’s built-in dict() function creates and returns a new dictionary object from the comma-separated argument list of key = value mappings. For example, dict(name = 'Alice', age = 22, profession = 'programmer') creates a dictionary with three mappings: {'name': 'Alice', 'age': 22, 'profession': 'programmer'}. A dictionary is an unordered and mutable data structure, so it can be changed after creation.

Read more about dictionaries in our full tutorial about Python Dictionaries.

Python dict() Visual Explanation

Usage

Learn by example! Here are some examples of how to use the dict() built-in function:

>>> dict(name = 'Alice')
{'name': 'Alice'}
>>> dict(name = 'Alice', age = 22)
{'name': 'Alice', 'age': 22}
>>> dict(name = 'Alice', age = 22, profession = 'programmer')
{'name': 'Alice', 'age': 22, 'profession': 'programmer'}

You can pass an arbitrary number of those comma-separated key = value pairs into the dict() constructor.

Video dict()

Syntax dict()

You can use the dict() method with an arbitrary number of key=value arguments, comma-separated.

Syntax: There are four ways of using the constructor:
dict() -> new empty dictionary dict(mapping) -> new dictionary initialized from a mapping object's (key, value) pairs
dict(iterable) -> new dictionary initialized from an iterable of (key, value) tuples
dict(**kwargs) -> new dictionary initialized with the name=value pairs in the keyword argument list.

Interactive Shell Exercise: Understanding dict()

Consider the following interactive code:

Exercise: Guess the output before running the code.


But before we move on, I’m excited to present you my brand-new Python book Python One-Liners (Amazon Link).

If you like one-liners, you’ll LOVE the book. It’ll teach you everything there is to know about a single line of Python code. But it’s also an introduction to computer science, data science, machine learning, and algorithms. The universe in a single line of Python!

The book is released in 2020 with the world-class programming book publisher NoStarch Press (San Francisco).

Link: https://nostarch.com/pythononeliners


The dict() function has many different options to be called with different types of arguments. You’ll learn different ways to use the dict() function next.

How to Create an Empty Dictionary?

You can create an empty dictionary by using Python’s built-in dict() function without any argument. This returns an empty dictionary. As the dictionary is a mutable data structure, you can add more mappings later by using the d[key] = value syntax.

>>> d = dict()
>>> d['Alice'] = 22
>>> d
{'Alice': 22}

How to Create a Dictionary Using Only Keyword Arguments?

You can create a dictionary with initial key: value mappings by using a list of comma-separated arguments such as in dict(name = 'Alice', age = 22) to create the dictionary {'name': 'Alice', 'age': 22}. These are called keyword arguments because each argument value has its associated keyword.

>>> dict(name = 'Alice', age = 22)
{'name': 'Alice', 'age': 22}

How to Create a Dictionary Using an Iterable?

You can initialize your new dictionary by using an iterable as an input for the dict(iterable) function. Python expects that the iterable contains (key, value) pairs. An example iterable is a list of tuples or a list of lists. The first values of the inner collection types are the keys and the second values of the inner collection types are the values of the new dictionary.

>>> dict([(1, 'one'), (2, 'two')])
{1: 'one', 2: 'two'}
>>> dict([[1, 'one'], [2, 'two']])
{1: 'one', 2: 'two'}
>>> dict(((1, 'one'), (2, 'two')))
{1: 'one', 2: 'two'}

Note that you can use inner tuples, inner lists, outer tuples or outer lists—as long as each inner collection contains exactly two values. If it contains more, Python raises an ValueError: dictionary update sequence element.

>>> dict([(1, 'one', 1.0), (2, 'two', 2.0)])
Traceback (most recent call last): File "<pyshell#22>", line 1, in <module> dict([(1, 'one', 1.0), (2, 'two', 2.0)])
ValueError: dictionary update sequence element #0 has length 3; 2 is required

You can fix this ValueError by passing only two values in the inner collections. For example use a list of tuples with only two but not three tuple elements.

How to Create a Dictionary Using an Existing Mapping Object?

If you already have a mapping object such as a dictionary mapping keys to values, you can pass this object as an argument into the dict() function. Python will then create a new dictionary based on the existing key: value mappings in the argument. The resulting dictionary will be a new object so if you change it, the changes are not reflected in the original mapping object.

>>> d = {'Alice': 22, 'Bob': 23, 'Carl': 55}
>>> d2 = dict(d)
>>> d
{'Alice': 22, 'Bob': 23, 'Carl': 55}

If you now change the original dictionary, the change is not reflected in the new dictionary d2.

>>> d['David'] = 66
>>> d
{'Alice': 22, 'Bob': 23, 'Carl': 55, 'David': 66}
>>> d2
{'Alice': 22, 'Bob': 23, 'Carl': 55}

How to Create a Dictionary Using a Mapping Object and Keyword Arguments?

Interestingly, you can also pass a mapping object into the dict() function and add some more key: value mappings using keyword arguments after the first mapping argument. For example, dict({'Alice': 22}, Bob = 23) creates a new dictionary with both key:value mappings {'Alice': 22, 'Bob': 23}.

>>> dict({'Alice': 22}, Bob = 23)
{'Alice': 22, 'Bob': 23}
>>> dict({'Alice': 22}, Bob = 23, Carl = 55)
{'Alice': 22, 'Bob': 23, 'Carl': 55}

How to Create a Dictionary Using an Iterable and Keyword Arguments?

Similarly, you can also pass an iterable of (key, value) tuples into the dict() function and add some more key: value mappings using keyword arguments after the first mapping argument. For example, dict([('Alice', 22)], Bob = 23) creates a new dictionary with both key:value mappings {'Alice': 22, 'Bob': 23}.

>>> dict([('Alice', 22)], Bob = 23)
{'Alice': 22, 'Bob': 23}
>>> dict([('Alice', 22), ('Carl', 55)], Bob = 23)
{'Alice': 22, 'Carl': 55, 'Bob': 23}

Summary

Python’s built-in dict() function creates and returns a new dictionary object from the comma-separated argument list of key = value mappings.

For example, dict(name = 'Alice', age = 22, profession = 'programmer') creates a dictionary with three mappings: {'name': 'Alice', 'age': 22, 'profession': 'programmer'}.

>>> dict(name = 'Alice', age = 22, profession = 'programmer')
{'name': 'Alice', 'age': 22, 'profession': 'programmer'}

A dictionary is an unordered and mutable data structure, so it can be changed after creation.

I hope you enjoyed the article! To improve your Python education, you may want to join the popular free Finxter Email Academy:


Do you want to boost your Python skills in a fun and easy-to-consume way? Consider the following resources and become a master coder!

Where to Go From Here?

Enough theory, let’s get some practice!

To become successful in coding, you need to get out there and solve real problems for real people. That’s how you can become a six-figure earner easily. And that’s how you polish the skills you really need in practice. After all, what’s the use of learning theory that nobody ever needs?

Practice projects is how you sharpen your saw in coding!

Do you want to become a code master by focusing on practical code projects that actually earn you money and solve problems for people?

Then become a Python freelance developer! It’s the best way of approaching the task of improving your Python skills—even if you are a complete beginner.

Join my free webinar “How to Build Your High-Income Skill Python” and watch how I grew my coding business online and how you can, too—from the comfort of your own home.

Join the free webinar now!

The post Python dict() — A Simple Guide with Video first appeared on Finxter.

Posted on Leave a comment

Top 10 Python Freelancer Resources on Finxter

In this article, I’m going to compile the top ten Python freelancer resources on the Finxter website.

[Article] How to Go Full-Time ($3000/m) as a Python Freelancer

In this article, you are going to learn my exact strategy how to earn $3000 per month as a Python freelancer without actually working full-time and without sacrificing time with your family!

At the end of this article, you will know the exact steps you need to perform to become a well-paid Python freelancer. So stick around, if you like the idea of working part-time as a Python freelancer receiving a full-time income.

[Article] The Complete Guide to Freelance Developing

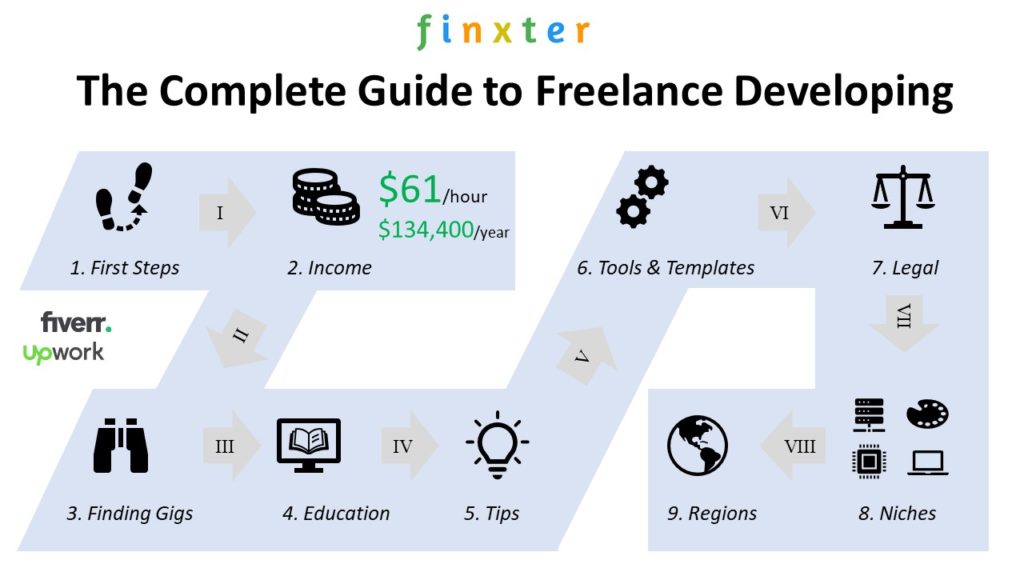
Do you want to work from home and earn a healthy living as a freelance developer? There never has been a better time! Freelance Developers make $51 per hour, on average, in the US.

Complete Guide to Freelance Developing & Programming (IT)

Table of Contents:

If there ever was a complete guide—this is it!

[Article] Freelancing as a Data Scientist

Two mega trends can be observed in the 21st century: (I) the proliferation of data—and (II) the reorganization of the biggest market in the world: the global labor market towards project-based freelancing work.

By positioning yourself as a freelance data scientist, you’ll not only work in an exciting area with massive growth opportunities but you’ll also put yourself into the “blue ocean” of freelancing where there’s still much more demand than supply.

This article shows you six fundamental building blocks (pillars) that will lead you towards success as a freelancer in the data science space.

The tabular data is drawn from 100 Upwork freelancer profiles as they appeared in the Upwork search. We randomly chose profiles and filtered them for data availability (e.g., total money earned). The result is that the average freelance data scientist earns $96 per hour. For 1700 working hours per year and a full schedule, this results in an average annual income of $163,200. To accomplish this, you need to join the ranks of relatively high-rated freelancers above 90% job satisfaction.

[Course] Six-Figure Python Freelancer

Learn How to Reach Six-Figure Earning Potential With The World’s #1 Python Freelancer Course Or Get Your Money Back

The world’s most popular freelance developer course takes you from beginner to freelancer level in Python

… so that you can earn between $21 and $95 per hour on Upwork working relaxed from the comfort of your own home. Guaranteed!

[Article] What Are the Best Freelancing Sites for Coders?

Freelancing is the new way to organize the world’s talents. The appearance of big freelancing platforms made it possible to exchange talent efficiently—across borders, currencies, and niches.

BEst Freelancing Sites

This article is for you if:

  • You’re a freelance developer and you’re looking for paid work—or simply to get started with your new home-based freelancing business.
  • You’re a business owner, project manager, or HR manager looking for programming talent to hire.

There are four major freelancing platforms for coders: Upwork, Fiverr, Toptal, and Freelancer.com. If you’re busy and you want to learn about the best freelancing sites right away, check out the following “Above-The-Fold” sites.

But there are dozens of big and small freelancing sites for coders. You’ll find a detailed ranking (by Alexa traffic rank 2020) below.

[Article] Top 5 Python Freelancer Jobs to Earn $51 per Hour on Upwork or Fiverr

Python freelancers earn $51 per hour on average. But how do they do it? In the following video I show you the top five trending gigs for Python freelancers:

[Article] Top 14 Places to Find Remote Freelance Developer Gigs and Work From Home

COVID-19 has changed the world in a sustainable way. Suddenly, even the most conservative bosses realized that it is perfectly efficient to allow developers to work from home. Remote work may easily be one of the most transformative trends in the 21st century: It will have an impact on almost every conventional job under the sun—and the year-over-year double-digit growth of freelancing platforms such as Upwork and Fiverr proves this point.

This article helps you to identify the best places to look for work-from-home, remote freelancing jobs—with a focus on jobs or gigs in the attractive programming sector. The average freelancer earns $51-$61 per hour and, thus, it may be an attractive way for you to build a second income stream besides your main job income.

[Webinar] My Journey How I Became a Python Freelancer and Created the Finxter Business Online

How did I get my online coding business started? I share my journey and success tips in this free 45-min evergreen webinar. Check it out!

[Book] Leaving the Rat Race with Python [PDF Free Download]

Leaving the Rat Race with Python Book (Free PDF Download)

Book: Leaving the Rat Race with Python

Subtitle: How to Nurture, Grow, and Harness Your Work-From-Home Coding Business Online, and Live the Good Life

Authors: Dr. Christian Mayer & Lukas Rieger

Direct download link: https://drive.google.com/file/d/11cgTvjU8uVYQH0JxEwY-NcnFlJ1Xzw1r/view?usp=sharing

File Format: PDF (100 pages)

Description:

This practical how-to book will help you nurture, grow, and harness your new online coding business plant—even if you’ve got little or no experience in both the coding and the business ecosystems.

If you follow the instructions in this book, you’ll make this book the most profitable investment in your life, and you’ll also create new joy, happiness, and a sense of independence and self-reliance.

[Website] Python-Freelancer.com Free Audiobook + Worksheet PDFs

If you’re interested in freelancing, the python-freelancer.com resource is for you—it’s packed with videos, worksheets, and valuable resource links about Python freelancing. Check it out:

The post Top 10 Python Freelancer Resources on Finxter first appeared on Finxter.

Posted on Leave a comment

Python — How to Import Modules From Another Folder?

The most Pythonic way to import a module from another folder is to place an empty file named __init__.py into that folder and use the relative path with the dot notation. For example, a module in the parent folder would be imported with from .. import module. The __init__.py file signals to Python that the folder should be treated as package.

Problem: How to import a file or a module from another folder or directory in Python?

Example: Say, you’ve given the following folder structure:

application ├── app │ └── folder │ └── file_1.py └── app2 └── some_folder └── file_2.py

Your goal is to import functions from file_1.py in file_2.py.

Method 1: sys.path.append()

The first method appends the path of the file_1.py to the system’s path variable.

# file_2.py
import sys
sys.path.append('/.../application/app/folder') import file_1

Note that you need to replace the first three dots in '/…/application/app/folder' with the concrete path to the applications folder.

Method 2: sys.path.insert()

A similar alternative is to insert the path of file_1.py to position 1 of the system’s path variable. This ensures that it’s loaded with higher priority and avoids some naming conflicts:

# file_2.py
import sys
sys.path.insert(1, '/.../application/app/folder') import file

Again, replace the first three dots in '/…/application/app/folder' with the concrete path to the applications folder.

Method 3: Dot Notation with __init__.py

You can also do the following trick—creating a new package.

# file_2.py
from application.app.folder.file_1 import func_name

However, you need to make sure to include an empty __init__.py file in the directory. This file tells Python to treat the directory as a package. It is considered to be the most Pythonic way of solving this problem.

Method 4: Importlib

A not-so Pythonic alternative is to use the importlib module:

import importlib.util
spec = importlib.util.spec_from_file_location("file_2", '/.../application/app/folder')
lib = importlib.util.module_from_spec(spec)
spec.loader.exec_module(foo)
lib.function()

References

Where to Go From Here?

Enough theory, let’s get some practice!

To become successful in coding, you need to get out there and solve real problems for real people. That’s how you can become a six-figure earner easily. And that’s how you polish the skills you really need in practice. After all, what’s the use of learning theory that nobody ever needs?

Practice projects is how you sharpen your saw in coding!

Do you want to become a code master by focusing on practical code projects that actually earn you money and solve problems for people?

Then become a Python freelance developer! It’s the best way of approaching the task of improving your Python skills—even if you are a complete beginner.

Join my free webinar “How to Build Your High-Income Skill Python” and watch how I grew my coding business online and how you can, too—from the comfort of your own home.

Join the free webinar now!

The post Python — How to Import Modules From Another Folder? first appeared on Finxter.