The absolute path (i.e., full path) is just what it sounds like — it’s the exact path to, and location of, the file entered as your function’s parameter, within the hierarchical structure on your machine.
The absolute path always starts at the root directory with no regard for your current working directory (CWD).
That’s it! So let’s get into some code.
Import Python Module to Get Absolute Path
With more than 200 core modules Python can do amazing things.
But, this can also make it seem daunting to the beginner. As we go through this one aspect, it should become much more clear to you how you can navigate your way around and find the specific tool for your project.
I have included some links and examples to help get you started.
We will be using the built-in os module, so we need to import that first.
import os
We could just write the code for the absolute path here and then dissect the output, but I want to give you a deeper look at what’s available to you in Python.
In order to get the absolute path in Python, we first check the output of the dir() statement on the os module:
print(dir(os))
This simple code will give us the directory for the os module.
You can see that it gives us a list of ALL the sub-modules and methods available to us. The 'path' sub-module in the output is the one we use to get the absolute path next.
Next, we combine the os module and the path sub-module to get a directory of the methods and functions we have available.
print(dir(os.path)) # os + .path
(If you are very new to Python, the hash in front of the highlighted section creates a comment)
As we can see, this returns the Absolute Path for the current directory in the Jupyter Notebook that I’m using to write and test my code. It is returned as a string data type.
And finally,the file name entered into the function.
Python Absolute Path vs Relative Path
Now that you understand a bit about absolute path in Python, we should take a look at the relative path, which does take the CWD (current working directory) into consideration.
First let’s get the CWD.
print(os.getcwd())
Output:
'C:\Users\tberr\FinxterProjects1'
We get everything except the file itself, which in this simple example is the relative path.
print(os.path.relpath('Demo_abspath'))
Output:
'Demo_abspath'
So, why not just use the absolute path? As I’ve said, this is a very simple example. When we get into deeply nested directories, the absolute path can get very complicated.
This is where the relative path becomes very useful (and can save you some typing!).
Summary
Use the os.path.abspath() function to get the absolute path without regard to the cwd.
Use os.path.relpath() function to get the relative path to the file with regard to the cwd.
I hope this article was helpful and gave you a beginners introduction to abspath() and the os module in Python. I was hooked on Python my first day. So maybe this will inspire you to dig deeper and explore all the amazing things Python can do – and you’ll be hooked too!
¿Cómo se puede filtrar una lista en Python utilizando una condición arbitraria? La forma más pitónica y más eficiente es utilizar la comprensión de lista[x for x in list if condition] para filtrar todos los elementos de una lista.
Filtrar con comprensión de lista
La forma más pitónica de filtrar una lista, en mi opinión, es la declaración de comprensión de lista [x for x in list if condition]. Puedes sustituir la condición por cualquier función de x que quieras utilizar como condición de filtrado.
Por ejemplo, si quieres filtrar todos los elementos menores de, digamos, 10, utilizarías la declaración de comprensión de lista [x for x in list if x<10] para crear una nueva lista con todos los elementos de la lista menores de 10.
Aquí hay tres ejemplos de filtrado de una lista:
Obtener elementos menores de ocho: [x for x in lst if x<8].
Obtener elementos pares: [x for x in lst if x%2==0].
Obtener elementos impares: [x for x in lst if x%2].
lst = [8, 2, 6, 4, 3, 1] # Filter all elements <8
small = [x for x in lst if x<8]
print(small) # Filter all even elements
even = [x for x in lst if x%2==0]
print(even) # Filter all odd elements
odd = [x for x in lst if x%2]
print(odd)
El resultado es:
# Elements <8
[2, 6, 4, 3, 1] # Even Elements
[8, 2, 6, 4] # Odd Elements
[3, 1]
Esta es la forma más eficiente de filtrar una lista y también la más pitónica. Pero si buscas alternativas, sigue leyendo porque te explicaré todos y cada uno de los matices del filtrado de listas en Python en esta completa guía.
Filtrar una lista en Python con filter()
La función filter(function, iterable) toma como entrada una función que recibe un argumento (un elemento de lista) y devuelve un valor booleano sobre si este elemento de lista debe pasar el filtro. Todos los elementos que pasan el filtro se devuelven como un nuevo objeto iterable (un objeto filter).
Puedes emplear una declaración de función lambda para crear la función justo donde la pasas como argumento. La sintaxis de la función lambda es lambda x: expression y significa que utilizas x como argumento de entrada y devuelves expression como resultado (que puede o no utilizar x para decidir sobre el valor de retorno). Para más información, consulta mi artículo detallado del blog sobre la función lambda.
lst = [8, 2, 6, 4, 3, 1] # Filter all elements <8
small = filter(lambda x: x<8, lst)
print(list(small)) # Filter all even elements
even = filter(lambda x: x%2==0, lst)
print(list(even)) # Filter all odd elements
odd = filter(lambda x: x%2, lst)
print(list(odd))
El resultado es:
# Elements <8
[2, 6, 4, 3, 1] # Even Elements
[8, 2, 6, 4] # Odd Elements
[3, 1]
La función filter() devuelve un objeto filter que es iterable. Para convertirlo en una lista, se utiliza el constructor list(...).
Sólo añado esta opción porque hay gente que aún intenta utilizar la función map() para filtrar elementos de una lista. Está claro que esta es la forma incorrecta de hacerlo. La razón es que la función map() sólo le permite transformar cada elemento de una lista en un nuevo elemento. Pero seguirás teniendo el mismo número de elementos en la lista. Por lo tanto, necesitas un paso adicional para filtrar todos los elementos (por ejemplo, utilizando comprensión de lista). Pero si estás dispuesto a dar este paso adicional, también podrías haber utilizado una comprensión de lista para filtrar desde un principio.
A esto me refiero:
lst = [8, 2, 6, 4, 3, 1] # Filter all elements <8
small = list(map(lambda x: x if x<8 else None, lst))
small = [x for x in small if x!=None]
print(small) # Filter all even elements
even = list(map(lambda x: x if x%2==0 else None, lst))
even = [x for x in even if x!=None]
print(even) # Filter all odd elements
odd = list(map(lambda x: x if x%2 else None, lst))
odd = [x for x in odd if x!=None]
print(odd)
El resultado vuelve a ser el mismo:
[2, 6, 4, 3, 1]
[8, 2, 6, 4]
[3, 1]
Pero el método para obtener este resultado es claramente ineficaz y no resulta legible.
Una expresión generadora crea un iterador sobre una secuencia de valores. Funciona igual que la comprensión de listas, pero sin crear un tipo de datos de lista. Esto es un poco más eficiente.
Puedes utilizar expresiones generadoras en cualquier llamada a una función que requiera un iterable como entrada. Por ejemplo, si quieres calcular la suma de todos los valores que cumplen una determinada condición en una lista.
Primero, determina el iterable de valores que cumplen una determinada condición.
En segundo lugar, suma todos esos valores con la función sum().
Aquí tienes un ejemplo de código que muestra cómo sumar todos los valores enteros de una lista (e ignorar el resto) utilizando una expresión generadora para filtrar los no enteros:
lst = [6, 8, 2, 8, 'Alice']
print(sum(x for x in lst if type(x) == int))
# 24
Comprueba el type(x) de cada elemento y compáralo con el tipo integer. Esta comparación devuelve True si el elemento es, de hecho, de tipo entero.
Filtrar una lista en Python con condición
Puedes definir cualquier condición compleja sobre un elemento de la lista para decidir si se filtra o no. Sólo tienes que crear tu propia función (por ejemplo, condition(x)) que tome un elemento de la lista como entrada y devuelva el valor booleano True si se cumple la condición o False en caso contrario.
Aquí tienes un ejemplo de código:
def condition(x): '''Define your arbitrarily complicated condition here''' return x<10 and x>0 lst = [11, 14, 3, 0, -1, -3] # Filter out all elements that do
# not meet condition
filtered = [x for x in lst if condition(x)]
print(filtered)
# [3]
Todos los elementos que son menores que 10 y mayores que 0 se incluyen en la lista filtrada. Por lo tanto, solo queda el elemento 3.
Filtrar una lista en Python con condiciones múltiples
Lo mismo se aplica si quieres combinar varias condiciones. Digamos que deseas filtrar todos los elementos x>9 y x<1. Estas son dos condiciones (simples). Puedes definir cualquier condición compleja sobre un elemento de la lista para decidir si se filtra o no. Sólo tienes que crear tu propia función (por ejemplo, condition(x)) que tome un elemento de la lista como entrada y devuelva el valor booleano True si se cumple la condición o False en caso contrario.
Aquí está el mismo ejemplo de código que antes:
def condition(x): '''Define your arbitrarily complicated condition here''' return x<10 and x>0 lst = [11, 14, 3, 0, -1, -3] # Filter out all elements that do
# not meet condition
filtered = [x for x in lst if condition(x)]
print(filtered)
# [3]
Todos los elementos que son menores que 10 y mayores que 0 se incluyen en la lista filtrada. Por lo tanto, solo queda el elemento 3.
Filtrar una lista en Python con Regex
Problema: Dada una lista de cadenas. ¿Cómo puedes filtrar aquellas que coincidan con una determinada expresión regular?
Ejemplo: Digamos que tienes una lista ['Alice', 'Anne', 'Ann', 'Tom'] y quieres descartar los elementos que no cumplen el patrón regex 'A.*e'. Esperas que la lista filtrada sea ['Alice', 'Anne'].
Solución: Utiliza el marco de filtrado de comprensión de lista [x for x in list if match] para filtrar todos los elementos que no concuerden con una cadena determinada.
import re # Define the list and the regex pattern to match
customers = ['Alice', 'Anne', 'Ann', 'Tom']
pattern = 'A.*e' # Filter out all elements that match the pattern
filtered = [x for x in customers if re.match(pattern, x)] print(filtered)
# ['Alice', 'Anne']
Utiliza el método re.match() que devuelve un objeto match si hay una coincidencia o None en caso contrario. En Python, cualquier objeto match se evalúa como True (si es necesario), salvo algunas excepciones (por ejemplo, None, 0, 0.0, etc.). Si necesitas refrescar tus conocimientos básicos sobre la función re.match(), echa un vistazo a mi detallado artículo del blog que te lleva paso a paso por esta potente herramienta de Python.
Respuesta corta: Para filtrar una lista de listas por una condición en las listas internas, utiliza la declaración de comprensión de lista [x for x in list if condition(x)] y sustituye condition(x) por tu condición de filtrado que devuelva True para incluir la lista interna x, y False en caso contrario.
Las listas pertenecen a las estructuras de datos más importantes de Python: ¡todo programador experto las conoce a fondo! Sorprendentemente, incluso los programadores intermedios no saben la mejor manera de filtrar una lista, y mucho menos una lista de listas en Python. ¡Este tutorial te muestra cómo hacer esto último!
Problema: Digamos que tienes una lista de listas. Quieres filtrar la lista de listas para que sólo queden las listas interiores que satisfagan una determinada condición. La condición es una función de la lista interna, como la media o la suma de los elementos de la lista interna.
Ejemplo: Dada la siguiente lista de listas con mediciones semanales de temperatura, y una lista interior semanal.
# Measurements of a temperature sensor (7 per week)
temperature = [[10, 8, 9, 12, 13, 7, 8], # week 1 [9, 9, 5, 6, 6, 9, 11], # week 2 [10, 8, 8, 5, 6, 3, 1]] # week 3
¿Cómo filtrar las semanas más frías con un valor medio de temperatura <8? Este es el resultado que deseas:
Problema: Dada una lista de cadenas y una cadena de búsqueda. ¿Cómo puedes filtrar las que contienen la cadena de búsqueda?
Ejemplo: Digamos que tienes una lista ['Alice', 'Anne', 'Ann', 'Tom'] y quieres obtener todos los elementos que contienen la subcadena 'An'. Esperas que la lista filtrada sea ['Anne', 'Ann'].
Solución: Utiliza el esquema de filtrado de comprensión de lista [x for x in list if condition] para descartar todos los elementos que no contengan otra cadena.
import re # Define the list
customers = ['Alice', 'Anne', 'Ann', 'Tom'] # Filter out all elements that contain 'An'
filtered = [x for x in customers if 'An' in x] print(filtered)
# ['Anne', 'Ann']
Utiliza la operación básica de pertenencia a la cadena “in” para comprobar si un elemento pasa el filtro o no.
Filtrar una lista en Python para eliminar cadenas vacías
Problema: Dada una lista de cadenas. ¿Cómo puedes eliminar todas las cadenas vacías?
Ejemplo: Digamos que tienes una lista ['Alice', 'Anne', '', 'Ann', '', 'Tom'] y quieres obtener una nueva lista ['Alice', 'Anne', 'Ann', 'Tom'] de cadenas no vacías.
Solución: Utiliza el esquema de filtrado de comprensión de lista [x for x in list if x] para filtrar todas las cadenas vacías.
import re # Define the list
customers = ['Alice', 'Anne', '', 'Ann', '', 'Tom'] # Filter out all elements that contain 'An'
filtered = [x for x in customers if x] print(filtered)
# ['Alice', 'Anne', 'Ann', 'Tom']
Aprovechas la característica de que Python asigna el valor booleano False a la cadena vacía ''.
Filtrar una lista en Python con endswith() y startswith()
Problema: Dada una lista de cadenas. ¿Cómo puedes filtrar aquellas que comienzan con otra cadena (o terminan con otra cadena)? En otras palabras, deseas obtener todas las cadenas que tienen otra cadena como prefijo o sufijo.
Ejemplo: Digamos que tienes una lista ['Alice', 'Anne', 'Ann', 'Tom'] y quieres obtener todos los elementos que empiezan por 'An'. Esperas que la lista filtrada sea ['Anne', 'Ann'].
Solución: Utiliza el esquema de filtrado de comprensión de lista [x for x in list if x.startswith('An')] para filtrar todos los elementos que empiezan por'An'. Si deseas comprobar cadenas que terminan con otra cadena, puedes usar la función str.endswith() en su lugar.
import re # Define the list
customers = ['Alice', 'Anne', 'Ann', 'Tom'] # Filter out all elements that start with 'An'
filtered = [x for x in customers if x.startswith('An')] print(filtered)
# ['Anne', 'Ann'] # Filter out all elements that end with 'e'
filtered = [x for x in customers if x.endswith('e')] print(filtered)
# ['Alice', 'Anne']
Utiliza las funciones startswith() y endswith() como condiciones de filtrado.
Filtrar una lista en Python con lambda
La función filter(function, iterable) toma como argumento una función de filtrado que toma un elemento de la lista como entrada y devuelve el valor booleano True si se cumple la condición o False en caso contrario. Esta función decide si un elemento se incluye en la lista filtrada o no.
Para definir esta función, puedes utilizar la palabra clave lambda. La función lambda es una función anónima: piensa en ella como una función desechable que sólo se necesita como argumento y para nada más en el código.
Este es el código que muestra cómo utilizar la función lambda para filtrar una lista y devolver sólo los valores impares de la lista:
# Create the list
lst = [1, 2, 3, 4] # Get all odd values
print(list(filter(lambda x: x%2, lst)))
# [1, 3]
La función lambda x: x%2 toma un argumento x -el elemento que hay que comprobar con el filtro- y devuelve el resultado de la expresión x%2. Esta expresión de módulo devuelve 1 si el entero es impar y 0 si es par. Por lo tanto, todos los elementos impares pasan la prueba.
Filtrar una lista en Python con otra lista
Problema: Dada una lista de valores lst y una lista de booleanos filter. ¿Cómo filtrar la primera lista usando la segunda lista? Más específicamente, quieres crear una nueva lista que incluya el i-ésimo elemento de lst si el i-ésimo elemento de filter es True.
Solución: Utiliza una simple declaración de comprensión de lista [lst[i] for i in range(len(lst)) if filter_lst[i]] que compruebe para cada índice i si el valor booleano del filtro correspondiente es True. En este caso, se añade el elemento en el índice i en lst a la nueva lista filtrada. Este es el código:
lst = [1, 2, 3, 4]
filter_lst = [True, False, False, True] res = [lst[i] for i in range(len(lst)) if filter_lst[i]]
print(res)
# [1, 4]
La lista booleana sirve de “máscara” que determina qué elemento pasa el filtro y cuál no.
Una alternativa es usar la función zip() para iterar sobre múltiples secuencias sin necesidad de tocar ningún índice:
lst = [1, 2, 3, 4]
filter_lst = [True, False, False, True] res = [x for (x, boo) in zip(lst, filter_lst) if boo]
print(res)
# [1, 4]
Problema: dada una lista de valores y una lista de índices. ¿Cómo filtrar todos los elementos con índices en la segunda lista?
Ejemplo: Tienes la lista ['Alice', 'Bob', 'Ann', 'Frank'] y los índices [1, 2]. Lo que estás buscando es la lista filtrada ['Bob', 'Ann'].
Solución: Recorre todos los índices de la segunda lista e incluye los elementos correspondientes de la lista mediante una simple sentencia de comprensión de lista [lst[i] for i in indices].
lst = ['Alice', 'Bob', 'Ann', 'Frank']
indices = [1, 2] res = [lst[i] for i in indices]
print(res)
# ['Bob', 'Ann']
Solo dos elementos con índices 1 y 2 pasan el filtro.
Filtrar en Python una lista de diccionarios
Problema: Dada una lista de diccionarios. Cada diccionario consta de uno o más pares (clave, valor). Quieres filtrarlos por el valor de una determinada clave del diccionario (atributo). ¿Cómo puedes lograrlo?
Ejemplo minimalista: Considera el siguiente ejemplo en el que tienes tres diccionarios de usuarios con las claves username, age y play_time. Quieres obtener una lista de todos los usuarios que cumplen una determinada condición, como play_time > 100. Esto es lo que intentas conseguir:
Solución: Utiliza la comprensión de lista[x for x in lst if condition(x)] para crear una nueva lista de diccionarios que cumplan la condición. Todos los diccionarios en lst que no cumplen con la condición se filtran. Puedes definir tu propia condición sobre el elemento x de la lista.
Aquí tienes el código que te muestra cómo filtrar todos los diccionarios de usuario que no cumplen la condición de haber jugado al menos 100 horas.
users = [{'username': 'alice', 'age': 23, 'play_time': 101}, {'username': 'bob', 'age': 31, 'play_time': 88}, {'username': 'ann', 'age': 25, 'play_time': 121},] superplayers = [user for user in users if user['play_time']>100] print(superplayers)
La salida es la lista filtrada de diccionarios que cumplen la condición:
El enfoque ingenuo es revisar cada elemento y verificar si este elemento ya existe en la lista. Si es así, retíralo. Sin embargo, esto requiere unas cuantas líneas de código.
Una forma más corta y concisa es crear un diccionario a partir de los elementos de la lista. Cada elemento de la lista se convierte en una nueva clave del diccionario. Todos los elementos que aparezcan varias veces se asignarán a la misma clave. El diccionario sólo contiene claves únicas, no puede haber varias claves iguales.
Como valores del diccionario, simplemente tomas valores ficticios (por defecto).
Luego, sólo tienes que volver a convertir el diccionario en una lista, desechando los valores ficticios. Como las claves del diccionario permanecen en el mismo orden, no se pierde la información de orden de los elementos de la lista original.
Filtrar todos los elementos de una lista que estén dentro del rango de valores entre los índices de start y stop dados.
lst = [3, 10, 3, 2, 5, 1, 11]
start, stop = 2, 9 filtered_lst = [x for x in lst if x>=start and x<=stop]
print(filtered_lst)
# [3, 3, 2, 5]
Empleas la condición x>=start y x<=stop para comprobar si la lista de elementos x está dentro del rango [start, stop] o no.
Filtrar en Python una lista con mayor que y menor que
Filtrar todos los elementos de una lista que sean mayores que un valor determinado y.
lst = [3, 10, 3, 2, 5, 1, 11]
y = 2 filtered_lst = [x for x in lst if x>y]
print(filtered_lst)
# [3, 10, 3, 5, 11]
Utiliza la condición x > y para comprobar si el elemento de lista x es mayor que y o no. En el primer caso, se incluye en la lista filtrada. En el último, no.
Puedes utilizar la misma idea con el operador menor que< mediante la declaración de comprensión de lista [x for x in lst if x<y].
Recuento de listas filtradas en Python
¿Cómo puedes contar elementos bajo una determinada condición en Python? Por ejemplo, ¿qué pasa si quieres contar todos los valores pares de una lista? ¿O todos los números primos? ¿O todas las cadenas que comienzan con un determinado carácter? Hay múltiples formas de conseguirlo, vamos a discutirlas una por una.
Digamos que tienes una condición para cada elemento x. Convirtámosla en una función con el nombre condition(x). Puedes definir cualquier condición que quieras, sólo tienes que ponerla en tu función. Por ejemplo, esta condición devuelve True para todos los elementos que son mayores que el entero 10:
Pero también puedes definir condiciones más complicadas, como comprobar si son números primos.
Recuento de listas en Python con if
¿Cómo puedes contar los elementos de la lista SI se cumple la condición?
La respuesta es utilizar una simple expresión generadorasum(condition(x) for x in lst):
>>> def condition(x): return x>10 >>> lst = [10, 11, 42, 1, 2, 3]
>>> sum(condition(x) for x in lst)
2
El resultado indica que hay dos elementos que son más grandes que 10. Has utilizado una expresión generadora que devuelve un iterador de booleanos. Ten en cuenta que el booleano True se representa con el valor entero 1 y el booleano False se representa con el valor entero 0. Por eso puedes calcular simplemente la suma de todos los booleanos para obtener el número de elementos para los que se cumple la condición.
Recuento de listas en Python con mayor / menor que
Si quieres determinar el número de elementos que son mayores o menores que un valor especificado, sólo tienes que modificar la condición de este ejemplo:
>>> def condition(x): return x>10 >>> lst = [10, 11, 42, 1, 2, 3]
>>> sum(condition(x) for x in lst)
2
Por ejemplo, para encontrar el número de elementos menores que 5, usa la condición x<5 en la expresión del generador:
>>> lst = [10, 11, 42, 1, 2, 3]
>>> sum(x<5 for x in lst)
3
Recuento de listas en Python de cero / no cero
Para contar el número de ceros en una lista dada, usa la llamada al método list.count(0).
Para contar el número de no-ceros en una lista dada, debes utilizar el recuento condicional, tal y como se comentó anteriormente:
def condition(x): return x!=0 lst = [10, 11, 42, 1, 2, 0, 0, 0]
print(sum(condition(x) for x in lst))
# 5
Recuento de listas en Python con lambda + map
Una alternativa es utilizar una combinación de las funciones map y lambda.
La función lambda devuelve un valor booleano para un elemento dado x.
La función map transforma cada elemento de lista en un valor booleano (1 o 0).
La función sum suma los “1”.
El resultado es el número de elementos para los que la condición se evalúa como True.
Filtrar una lista por longitud de cadena en Python
Dada una lista de cadenas. ¿Cómo obtener todos los elementos que tienen más de x caracteres? En otras palabras: ¿cómo filtrar una lista por longitud de cadena?
coders = ['Ann', 'Alice', 'Frank', 'Pit']
filtered = [x for x in coders if len(x)>3]
print(filtered)
# ['Alice', 'Frank']
La sentencia de comprensión de lista [x for x in coders if len(x)>3] filtra todas las cadenas que tienen más de tres caracteres.
Filtrar los elementos None de una lista en Python
¿Cómo eliminar todos los valores None de una lista? Por ejemplo, tienes la lista ['Alice', None, 'Ann', None, None, 'Bob'] y quieres la lista ['Alice', 'Ann', 'Bob']. ¿Cómo puedes lograrlo?
coders = ['Alice', None, 'Ann', None, None, 'Bob']
filtered = [x for x in coders if x]
print(filtered)
# ['Alice', 'Ann', 'Bob']
En Python, cada elemento tiene un valor booleano asociado, por lo que puede usar cualquier objeto Python como condición. El valor None está asociado al valor booleano False.
Filtrar en Python una lista JSON
Problema: Digamos que tienes un objeto de lista JSON. Quieres filtrar la lista en función de un atributo. ¿Cómo lograrlo?
Solución: Utiliza la comprensión de lista [x for x in json if x['type']=='paid'] para filtrar la lista y obtener una nueva lista json con los objetos que pasan el filtro.
Sólo Ann y Bob tienen una cuenta de pago y pasan el test x['type']=='paid'.
Filtrar en una línea una lista en Python
¿Quieres filtrar tu lista por una condición dada en una línea de código? Utiliza la declaración de comprensión de lista [x for x in list if condition], en la que la parte de la condición puede ser cualquier expresión booleana sobre x. Esta sentencia de una sola línea devuelve un nuevo objeto de lista con todos los elementos que pasan el “test” de filtrado.
Aquí hay un ejemplo:
lst = ['Alice', 3, 5, 'Bob', 10] # ONE-LINER:
f = [x for x in lst if type(x)==str] print(f)
# ['Alice', 'Bob']
La sentencia filtra todos los elementos de la lista y comprueba si son de tipo cadena. Si lo son, pasan la prueba y se incluyen en la nueva lista.
Si te gustan las sentencias de una sola línea, te encantará mi libro Python One-Liner (NoStarch Press 2020). Te muestra exactamente cómo escribir código pitónico y comprimir tu pensamiento y codificación a la forma más minimalista.
Cómo filtrar una lista en Python de forma eficiente: filter() frente a comprensión de lista
[Spoiler] ¿Qué es más rápido para filtrar una lista: filter() o comprensión de lista? Para listas grandes con un millón de elementos, filtrar listas con comprensión de lista es un 40% más rápido que el método incorporado filter().
Para responder a esta pregunta, he escrito un breve script que comprueba el rendimiento en tiempo de ejecución del filtrado de grandes listas de tamaños crecientes mediante los métodos filter() y de comprensión de lista.
Mi tesis es que el método de comprensión de lista debería ser ligeramente más rápido para los tamaños de lista más grandes, porque aprovecha la eficiente implementación de cPython de la comprensión de lista y no necesita llamar a una función adicional.
Utilicé mi portátil con un procesador Intel(R) Core(TM) i7-8565U a 1,8 GHz (con Turbo Boost hasta 4,6 GHz) y 8 GB de RAM.
A continuación, creé 100 listas con ambos métodos con tamaños que iban de 10.000 elementos a 1.000.000 de elementos. Como elementos, simplemente incrementé los números enteros en uno a partir de 0.
Este es el código que he utilizado para medir y representar los resultados: ¿qué método es más rápido: filter() o una comprensión de lista?
import time # Compare runtime of both methods
list_sizes = [i * 10000 for i in range(100)]
filter_runtimes = []
list_comp_runtimes = [] for size in list_sizes: lst = list(range(size)) # Get time stamps time_0 = time.time() list(filter(lambda x: x%2, lst)) time_1 = time.time() [x for x in lst if x%2] time_2 = time.time() # Calculate runtimes filter_runtimes.append((size, time_1 - time_0)) list_comp_runtimes.append((size, time_2 - time_1)) # Plot everything
import matplotlib.pyplot as plt
import numpy as np f_r = np.array(filter_runtimes)
l_r = np.array(list_comp_runtimes) print(filter_runtimes)
print(list_comp_runtimes) plt.plot(f_r[:,0], f_r[:,1], label='filter()')
plt.plot(l_r[:,0], l_r[:,1], label='list comprehension') plt.xlabel('list size')
plt.ylabel('runtime (seconds)') plt.legend()
plt.savefig('filter_list_comp.jpg')
plt.show()
El código compara los tiempos de ejecución de la función filter() y la variante de comprensión de lista para filtrar una lista. Ten en cuenta que la función filter() devuelve un objeto filter, por lo que debes convertirlo en lista mediante el constructor list().
Aquí está el gráfico resultante que compara el tiempo de ejecución de los dos métodos. En el eje x, puedes ver el tamaño de la lista de 0 a 1.000.000 de elementos. En el eje y, puedes ver el tiempo de ejecución que se necesita en segundos para ejecutar las respectivas funciones.
El gráfico resultante muestra que ambos métodos son extremadamente rápidos para unas decenas de miles de elementos. De hecho, son tan rápidos que la función time() del módulo time no puede capturar el tiempo transcurrido.
Pero a medida que aumentas el tamaño de las listas a cientos de miles de elementos, el método de comprensión de lista empieza a ganar:
Para listas grandes con un millón de elementos, filtrar listas con comprensión de lista es un 40% más rápido que el método incorporado filter().
El motivo es la eficiente implementación de la declaración de comprensión de lista. Sin embargo, es interesante la siguiente observación. Si no conviertes la función filter en una lista, obtendrás el siguiente resultado:
De repente, la función filter() tiene un tiempo de ejecución constante cercano a 0 segundos, independientemente del número de elementos que haya en la lista. ¿Por qué está pasando esto?
La explicación es simple: la función filter devuelve un iterador, no una lista. El iterador no necesita calcular un solo elemento hasta que se le pida que calcule el elemento next(). Por lo tanto, la función filter() calcula el siguiente elemento sólo si es necesario hacerlo. Sólo si lo conviertes en lista, tendrá que computar todos los valores. De lo contrario, no calcula de antemano ningún valor.
A dónde ir desde aquí
Este tutorial te ha mostrado los entresijos de la función filter() en Python y la ha comparado con el método de comprensión de lista para filtrar: [x for x in list if condition]. Has podido comprobar que esto último no sólo es más legible y más pitónico, sino también más rápido. ¡Así que adopta el enfoque de comprensión de lista para filtrar listas!
Si te encanta programar y quieres hacerlo a tiempo completo desde la comodidad de tu propia casa, estás de suerte:
He creado un seminario web gratuito que muestra cómo comencé como freelancer de Python después de mis estudios de informática trabajando desde casa (y viendo crecer a mis hijos) mientras ganaba un ingreso a tiempo completo trabajando solo horas a tiempo parcial.
Microsoft Excel is a cross-platform and battle-tested spreadsheet software widely used for data analysis and visualization. It is a powerful and user-friendly tool indeed! But how can we bring it to the next level?
Please continue reading and stay tuned for my Excel in Python series if it sounds great!
This tutorial is all about saving data to Excel.
Concretely, I will first introduce Excel’s data structure and lingos.
Then, you will learn the difference between four popular Python ways to save data to excel, including pandas and openpyxl.
Finally, I will focus on the pandas.DataFrame.to_excel() method. I will guide you through four actual use cases in pandas.DataFrame.to_excel(), ranging from one Excel worksheet, multiple Excel worksheets, multiple Excel workbooks, and dealing with index cases.
You can find all datasets and codes in this tutorial here. The data in our example datasets are not actual data and are only used for educational purposes.
Quick Introduction to Excel
Before jumping into reading data from Excel, let’s look at how data is stored in Excel and get ourselves familiar with some Excel lingos.
Simply put, data is stored in cells in Excel, and each cell can be identified with its unique row and column number pair.
Columns in Excel are labeled in alphabets, starting from ‘A’, and rows in Excel are labeled in roman numbers, starting from ‘1’. For example, in the following Excel picture, A1 is the cell in the intersection of the first column and first row, ‘ID’.
Yes, you got the idea! It is just like the DataFrame data structure in our friends, pandas.
And if you want to select an area to dump data into Excel, you can imagine drawing a rectangle data region based on the upper-left cell of the part.
On top of that, other commonly seen Excel lingos include worksheets and workbooks.
A worksheet means a single spreadsheet in an Excel file.
A workbook means a single Excel file with extensions like .xlsx and .xls.
Tip: More file extensions supported by Excel can be found in the Microsoft official doc here.
Now, you are ready to know how to read data from Excel!
Popular Python ways to Save Data to Excel
Here is the summary of popular Python ways to save data to excel:
One of pandas.DataFrame.to_excel()’s advantages is engine compatibility. It uses multiple external engines for different Excel extensions, including openpyxl, xlwt, and xlsxwriter.
“xlwt” supports old-style Microsoft Excel versions 95 to 2003 files (.xls).
“xlsxwriter” supports Excel 2007+ file format (.xlsx).
In summary, you can use openpyxl and other libraries for specific Excel file formats and basic data processing. And please remember that openpyxl and xlsxwriter support newer Excel file formats.
However, I recommend using pandas.DataFrame.to_excel() for data science and analytics applications because it supports most Excel file formats and accepts a DataFrame object with powerful methods.
Therefore, let’s see how to use pandas.DataFrame.to_excel() to save data to Excel!
Saving Data to Excel – pandas.DataFrame.to_excel()
Since pandas.DataFrame.to_excel() is the most powerful and inclusive way to save data from Excel files with different extensions, I will first introduce its syntax and walk you through three use cases with real Python codes below using pandas.DataFrame.to_excel().
Meet pandas.ExcelWriter
Before heading over to the pandas.DataFrame.to_excel method, we need to know a new friend, pandas.ExcelWriter. It is a class for writing pandas.DataFrame objects into excel sheets.
When you are trying to write to multiple sheets, you need to create an ExcelWriter object and pass it to pandas.DataFrame.to_excel() as the first parameter.
To create an ExcelWriter object, we pass something to it according to its syntax:
String specifying the engine to use for writing. Default is to use : xlwt for xls xlsxwriter for xlsx if xlsxwriter is installed otherwise openpyxl odf for ods
date_format
optional
Format string for dates written into Excel files (e.g. 'YYYY-MM-DD').
datetime_format
optional
Format string for datetime objects written into Excel files. (e.g. 'YYYY-MM-DD HH:MM:SS').
mode
optional
File mode to use ('w' for write; 'a' for append). The default is to use 'w'.
storage_options
optional
A dictionary that makes sense for a particular storage connection, e.g. host, port, username, password, etc.
if_sheet_exists
optional
What to do if a sheet exists under the append mode. Accepts {'error', 'new', 'replace', 'overlay'}. Default is 'error'. error: raise a ValueError. new: create a new sheet, with a name determined by the engine. replace: delete the contents of the sheet before writing to it. overlay: write contents to the existing sheet without removing the old contents.
engine_kwargs
optional
A dictionary containing keyword arguments passed into the engine.
Tip: Generally, you only need to use the four parameters in bold format. The default engine is automatically chosen depending on the file extension.
A small note: For compatibility with CSV writers, ExcelWriter serializes lists and dicts to strings before writing.
Last, if you use the with statement to create an ExcelWriter, you do not need to worry about saving the change in the end! An example code to create an ExcelWriter in the with statement is:
import pandas as pd df = pd.DataFrame()
excel_wb56_filepath = 'learn_excel_56.xlsx' # Syntax for create an ExcelWriter object in the with statement
# To create a new empty Excel file, learn_excel_56.xlsx with two new sheets!
with pd.ExcelWriter(excel_wb56_filepath) as writer: df.to_excel(writer, sheet_name='Class 5') df.to_excel(writer, sheet_name='Class 6')
After running the code, we create a new empty Excel file, learn_excel_56.xlsx with two new sheets, Class 5 and Class 6!
Meet pandas.DataFrame.to_excel
Hooray! Now, let’s look at the syntax and parameters of the pandas.DataFrame.to_excel method and get ourselves prepared for later examples!
To write a single object (pandas.DataFrame) to an Excel .xlsx file, it is only necessary to specify a target file name. To write to multiple sheets, it is necessary to create an ExcelWriter object with a target file name.
Parameter
Meta
Description
excel_writer
Required
Target file name or ExcelWriter object.
sheet_name
Optional
Name of sheet containing DataFrame. Default is "Sheet 1".
na_rep
Optional
Missing data representation. Default = ""
float_format
Optional
Format string for floating point numbers. For example float_format="%.2f" will format 0.1234 to 0.12.
column
Optional
Columns (in the DataFrame) to write.
header
Optional
Row to be considered as the header, excluding from the data part. Default = True, which means the first row. If None, no header.
index
Optional
Write row names (index). Default is True, which means show index. If set to be False, it means no index in the output Excel worksheet.
index_label
Optional
Column label for the index.
startrow
Optional
Upper left cell row to dump data frame. Default is 0.
startcol
Optional
Upper left cell column to dump data frame. Default is 0.
engine
Optional
String specifying the engine to use for writing. Default is xlwt for xls. xlsxwriter for xlsx if xlsxwriter is installed; otherwise openpyxl.
merge_cells
Optional
Write MultiIndex and Hierarchical Rows as merged cells.
encoding
Optional
Encoding of the resulting excel file. Only necessary for xlwt, other writers support Unicode natively.
inf_rep
Optional
Representation for infinity (there is no native representation for infinity in Excel).
verbose
Optional
Display more information in the error logs.
freeze_panes
Optional
Specifies the one-based bottom-most row and right-most column that is to be frozen.
storage_options
Optional
Extra options that make sense for a particular storage connection, e.g. host, port, username, password, etc.
Tip: Generally, you only need to use the four parameters in bold format.
Please try to have an intuition for these parameters right now and I will cover the details for sheet_name, index, and index_label parameters in our next exciting examples!
Getting started
To use the pandas.DataFrame.to_excel method, you need to first install the pandas package in your command line:
$ pip install pandas
Tip: you might need to use pip3 instead of pip, depending on your environment.
Given the engine compatibility mentioned above, you also need to install respective engine libraries. For example, to use openpyxl, you need to install this package on your command line:
$ pip install openpyxl
Tip: you might need to use pip3 instead of pip, depending on your environment.
By the way, if you have already installed Anaconda, you can skip this step
Dataset
In our examples, we will create Excel workbooks like the two Excel workbooks (.xlsx), learn_excel_12 and learn_excel_34, in our first Excel in Python series.
These workbooks have the same data structures and column names in each worksheet. For example, the following is the data in the Class_1 worksheet in the learn_excel_12 workbook.
One row in each sheet represents a student in each class and the columns represent the student’s ID, Major, and Score respectively.
Concretely, learn_excel_12 has two worksheets, Class 1 and Class 2. And learn_excel_34 has two worksheets, Class 3 and Class 4.
You can find all datasets and codes in this tutorial here. The data in our example datasets are not actual data and are only used for educational purposes.
Save Data to One Worksheet
So, how can we save data to a single excel sheet? We can pass a target file name or create an ExcelWriter object to do so!
For our example, we can create a new Excel file, learn_excel_56 and write some student data into the Class 5 sheet, specifying through the parameter sheet_name.
import pandas as pd # For our writing mode example,
# we can create a new Excel file, learn_excel_56
# and write some student data into it.
excel_fp = 'learn_excel_56.xlsx'
class5_df = pd.DataFrame( {'ID': [51, 52], 'Major': ['English', 'Math'], 'Score': [98, 89]}) with pd.ExcelWriter(excel_fp, mode='w') as writer: class5_df.to_excel(writer, sheet_name='Class 5', index=False)
After running the code, we can get the output Excel file:
Save Data to Multiple Worksheets
Likewise, we can save data to multiple worksheets by calling pandas.DataFrame.to_excel() method multiple times.
For our example, we can create a new Excel file, learn_excel_56 and write some student data into the Class 5 sheet and Class 6 sheet, specifying through the parameter sheet_name.
import pandas as pd # For our writing mode example,
# we can create a new Excel file, learn_excel_56
# and write some student data into it.
excel_fp = 'learn_excel_56.xlsx'
class5_df = pd.DataFrame( {'ID': [51, 52], 'Major': ['English', 'Math'], 'Score': [98, 89]})
class6_df = pd.DataFrame( {'ID': [61, 62], 'Major': ['History', 'Math'], 'Score': [78, 96]}) with pd.ExcelWriter(excel_fp, mode='w') as writer: class5_df.to_excel(writer, sheet_name='Class 5', index=False) class6_df.to_excel(writer, sheet_name='Class 6', index=False)
After running the code, we can get the output Excel file:
Save Data to Multiple Workbooks
To get multiple workbooks, we can just create multiple pandas.ExcelWriter objects.
To give a quick example, let’s create two workbooks, learn_excel_78 and learn_excel_910.
import pandas as pd # let’s create two workbooks, learn_excel_78 and learn_excel_910.
wb78_fp = 'learn_excel_78.xlsx'
wb910_fp = 'learn_excel_910.xlsx' df = pd.DataFrame() with pd.ExcelWriter(wb78_fp, mode='w') as writer_78, pd.ExcelWriter(wb910_fp, mode='w') as writer_910: df.to_excel(writer_78, sheet_name='Class 7', index=False) df.to_excel(writer_78, sheet_name='Class 8', index=False) df.to_excel(writer_910, sheet_name='Class 9', index=False) df.to_excel(writer_910, sheet_name='Class 10', index=False)
After running the code, we can get the output workbooks:
In the learn_excel_78 file, we can see that we have created two empty worksheets:
So far, we have understood the basic writing operations. Let’s move forward and deal with the most common issues—index and date
Deal with Index
You can set up the index and index’ column label when calling the pandas.DataFrame.to_excel() method.
Previously, our example codes set the index to be False, which means no index column in the output Excel file. Let’s see what will happen if we set the index to be True in the multiple worksheets scenario.
import pandas as pd # For our writing mode example,
# we can create a new Excel file, learn_excel_56
# and write some student data into it.
excel_fp = 'learn_excel_56.xlsx'
class5_df = pd.DataFrame( {'ID': [51, 52], 'Major': ['English', 'Math'], 'Score': [98, 89]})
class6_df = pd.DataFrame( {'ID': [61, 62], 'Major': ['History', 'Math'], 'Score': [78, 96]}) with pd.ExcelWriter(excel_fp, mode='w') as writer: class5_df.to_excel(writer, sheet_name='Class 5', index=True) class6_df.to_excel(writer, sheet_name='Class 6', index=True)
After running the code, we can see that we now have an index column, counting from zero.
On top of that, we can give a column name to the index column by specifying the parameter, index_label.
import pandas as pd # For our writing mode example,
# we can create a new Excel file, learn_excel_56
# and write some student data into it.
excel_fp = 'learn_excel_56.xlsx'
class5_df = pd.DataFrame( {'ID': [51, 52], 'Major': ['English', 'Math'], 'Score': [98, 89]})
class6_df = pd.DataFrame( {'ID': [61, 62], 'Major': ['History', 'Math'], 'Score': [78, 96]}) with pd.ExcelWriter(excel_fp, mode='w') as writer: class5_df.to_excel(writer, sheet_name='Class 5', index=True, index_label='No.') class6_df.to_excel(writer, sheet_name='Class 6', index=True, index_label='No.')
After running the code, we can see that we now have an index column with a name, “No.”!
Conclusion
That’s how to save data to Excel. This is the second article in our Excel in Python series.
We learned about Excel’s data structure and commonly used lingos and four popular ways to save data to Excel in Python, including pandas and openpyxl.
Finally, we looked at four actual use cases in pandas.DataFrame.to_excel, ranging from one Excel worksheet, multiple Excel worksheets, multiple Excel workbooks, and dealing with index cases.
I hope you enjoy all this, and stay tuned for our following Excel in Python article on saving data to Excel! Happy coding!
“Flex is a powerful, open source application framework that allows you to easily build mobile applications for iOS, Android, and BlackBerry® Tablet OS devices, as well as traditional applications for browser and desktop using the same programming model, tool, and codebase.
You can use the Flex SDK to create a wide range of highly interactive, expressive applications. For example, a data visualization application built in Flex can pull data from multiple back-end sources and display it visually. Business users can drill down into the data for deeper insight and even change the data and have it automatically updated on the back end. A product configuration application can help customers navigate the process of selecting or customizing products online. And a self-service application can guide customers through an address change or help employees complete an otherwise complicated multi-step benefits enrollment.”
Now that you know about what it is, let’s have a look at what it earns next!
Annual Income
How much does a Flex Developer make per year?
The average annual income of a Flex Developer in the United States is $99,000 per year according to PayScale. Top earners make $141,000 and more in the US!
If you decide to go the route as a freelance Flex Developer, you can expect to make between $30 and $40 per hour on Upwork (source). Assuming an annual workload of 2000 hours, you can expect to make between $60,000 and $80,000 per year.
Note: Do you want to create your own thriving coding business online? Feel free to check out our freelance developer course — the world’s #1 best-selling freelance developer course that specifically shows you how to succeed on Upwork and Fiverr!
But is there enough demand? Let’s have a look at Google trends to find out how interest evolves over time (source):
Work Description
So, you may wonder: Flex Developer – what’s the definition?
Flex Developer Definition: A Flex Developer creates, edits, analyzes, debugs, and supervises the development of software written in the Flex programming framework. (Source)
Learning Path, Skills, and Education Requirements
Do you want to become a Flex Developer? Here’s a step-by-step learning path I’d propose to get started with Flex:
But don’t wait too long to acquire practical experience!
Even if you have little skills, it’s best to get started as a freelance developer and learn as you work on real projects for clients — earning income as you learn and gaining motivation through real-world feedback.
Tip: An excellent start to turbo-charge your freelancing career (earning more in less time) is our Finxter Freelancer Course. The goal of the course is to pay for itself!
Related Video
You can find more job descriptions for coders, programmers, and computer scientists in our detailed overview guide:
The following statistic shows the self-reported income from 9,649 US-based professional developers (source).
The average annual income of professional developers in the US is between $70,000 and $177,500 for various programming languages.
Question: What is your current total compensation (salary, bonuses, and perks, before taxes and deductions)? Please enter a whole number in the box below, without any punctuation. If you are paid hourly, please estimate an equivalent weekly, monthly, or yearly salary. (source)
The following statistic compares the self-reported income from 46,693 professional programmers as conducted by StackOverflow.
The average annual income of professional developers worldwide (US and non-US) is between $33,000 and $95,000 for various programming languages.
Here’s a screenshot of a more detailed overview of each programming language considered in the report:
Here’s what different database professionals earn:
Here’s an overview of different cloud solutions experts:
Here’s what professionals in web frameworks earn:
There are many other interesting frameworks—that pay well!
Look at those tools:
Okay, but what do you need to do to get there? What are the skill requirements and qualifications to make you become a professional developer in the area you desire?
Let’s find out next!
General Qualifications of Professionals
StackOverflow performs an annual survey asking professionals, coders, developers, researchers, and engineers various questions about their background and job satisfaction on their website.
Interestingly, when aggregating the data of the developers’ educational background, a good three quarters have an academic background.
Here’s the question asked by StackOverflow (source):
Which of the following best describes the highest level of formal education that you’ve completed?
However, if you don’t have a formal degree, don’t fear! Many of the respondents with degrees don’t have a degree in their field—so it may not be of much value for their coding careers anyways.
Also, about one out of four don’t have a formal degree and still succeeds in their field! You certainly don’t need a degree if you’re committed to your own success!
Freelancing vs Employment Status
The percentage of freelance developers increases steadily. The fraction of freelance developers has already reached 11.21%!
This indicates that more and more work will be done in a more flexible work environment—and fewer and fewer companies and clients want to hire inflexible talent.
Here are the stats from the StackOverflow developer survey (source):
Do you want to become a professional freelance developer and earn some money on the side or as your primary source of income?
Resource: Check out our freelance developer course—it’s the best freelance developer course in the world with the highest student success rate in the industry!
Other Programming Languages Used by Professional Developers
The StackOverflow developer survey collected 58000 responses about the following question (source):
Which programming, scripting, and markup languages have you done extensive development work in over the past year, and which do you want to work in over the next year?
These are the languages you want to focus on when starting out as a coder:
And don’t worry—if you feel stuck or struggle with a nasty bug. We all go through it. Here’s what SO survey respondents and professional developers do when they’re stuck:
What do you do when you get stuck on a problem? Select all that apply. (source)
Related Tutorials
To get started with some of the fundamentals and industry concepts, feel free to check out these articles:
Coders get paid six figures and more because they can solve problems more effectively using machine intelligence and automation.
To become more successful in coding, solve more real problems for real people. That’s how you polish the skills you really need in practice. After all, what’s the use of learning theory that nobody ever needs?
You build high-value coding skills by working on practical coding projects!
Do you want to stop learning with toy projects and focus on practical code projects that earn you money and solve real problems for people?
If your answer is YES!, consider becoming a Python freelance developer! It’s the best way of approaching the task of improving your Python skills—even if you are a complete beginner.
If you just want to learn about the freelancing opportunity, feel free to watch my free webinar “How to Build Your High-Income Skill Python” and learn how I grew my coding business online and how you can, too—from the comfort of your own home.
In this article we explore how to install Ghostscript on numerous different platforms and operating systems.
What is Ghostcript? Why install it?
What is Ghostscript, and why would we want to install it? To understand this we should first learn about Postscript.
Postscript
Postscript is a page description language geared towards desktop publishing documents.
If you want really professional-looking typesetting, layout, and graphics in your documents, desktop publishing software is what you use.
It was first created at Adobe Systems starting in 1982. As a language, it is similar to Python in that documents contain human-readable and writable commands in the language that can be parsed by an interpreter to get something done.
In the case of Python, text files containing Python commands can be parsed by the Python interpreter to create any kind of program imaginable.
In the case of Postscript, files containing Postscript commands can be parsed by a Postscript interpreter to render professional-looking documents, either to the screen or to a printer.
In addition, the PDF format is an extension of the Postscript language which adds more functionality and is now one of the most commonly used document formats.
Ghostscript
Ghostscript is a free open-source interpreter to render Postscript and PDF documents.
One of the reasons you might want to install it is to use a program that requires it.
Even without a program that needs it, installing Ghostscript can be useful:
Ghostscript can be used to modify PDF documents, such as converting PDF to images, or extracting text, among other things.
Even better, since Ghostscript provides a language-binding API, Ghostscript functions can be implemented in other languages, allowing us to write our own programs for modifying PDF documents. Supported languages are C#, Java, and Python.
Checking if Ghostscript is Already Installed
You may already have Ghostscript installed – your system may have come with it, or it may have been installed in support of a program you have installed. So save yourself some effort and check first.
Checking for Ghostscript on Windows
Press Windows+R to open the “Run” box.
In the “Run” box type “cmd”.
A command line window opens.
In the command line window type “GSWIN64 -h” if your system is 64 bit (most machines these days), or “GSWIN32 -h” if your system is 32 bit (older machines). If Ghostscript is installed you will see Ghostscript help information. If you see an error then Ghostscript is not installed.
Type “exit” to close the command line window.
Checking for Ghostscript on Mac
In the Finder, open the /Applications/Utilities folder, then double-click Terminal.
In the terminal window type “gs -h”. If Ghostscript is installed you will see Ghostscript help information. If you see an error then Ghostscript is not installed.
In the Terminal app on your Mac, choose Terminal > Quit Terminal.
Checking for Ghostscript on Linux
Open a terminal window. How to do this varies depending on which distribution of Linux you are using.
In the terminal window type “gs -h”. If Ghostscript is installed you will see Ghostscript help information. If you see an error then Ghostscript is not installed.
There are two license versions available: Affero GPL (AGPL), and commercial. Review the license information at https://artifex.com/licensing/. For casual use most users will chose AGPL.
Choose 64 bit or 32 bit depending on your system.
Download your choice by clicking on the chosen link.
The installer program will download.
The downloaded program will be gsxxxxw64.exe or gsxxxxw32.exe. The ‘xxxx’ will be numbers indicating the release version. The most current version as of this writing is 9.55.0, so the installer program would be gs9550w64.exe for the 64 bit version.
Double-click the downloaded installer program.
Follow the prompts to do the installation.
Installing Ghostscript on Unix
Use this for any UNIX-based machine, so this should work for Mac or Linux.
Most UNIX systems have much easier ways of installing Ghostscript, so you will almost certainly not need to do this.
However, if you have trouble with those easier approaches you might try this as a backup.
This method usually works, but sometimes it does not, and then you need to do some troubleshooting to figure out why (the configure file might not be configured properly for your system, for example).
Also note that you will need to make sure that compiling software for Linux or Mac is installed on your system, which is beyond the scope of this article. So choose this approach as a last resort.
Go to the Ghostscript download page and download the source code version. As of this writing this file is ghostscript-9.55.0.tar.gz
Move this file to some folder where you want to work.
Unarchive the downloaded file. Usually your system will be configured to do so by double-clicking the file. If not, you can unarchive using this command in the terminal: tar -xzf ghostscript-9.55.0.tar.gz. The file will unpack into sub-directories and files.
In the terminal go to the top unpacked sub-directory.
Run the configure file by typing ./configure in your terminal. This will review your system and get ready to compile the code.
Compile the code by typing make in your terminal.
Install the compiled code by typing this: sudo make install
Here are the commands for ease of copy&paste:
tar -xzf ghostscript-9.55.0.tar.gz
./configure
make
sudo make install
Installing Ghostscript on Mac
The easiest way to install Ghostscript on Mac is to use the Homebrew or Macports systems. These are package management systems for Mac that make available to the Mac the wide world of Unix open-source software.
In these systems, much of the configuring is done for you by others so that downloading and installing software is as easy as a single command, just like downloading an app for the Mac is as simple as clicking an icon in the Mac App Store.
What programs are available depends on what has been prepared by others for the system.
Fortunately, Ghostscript is available for these systems.
Setting up these systems is beyond the scope of this article. This page has a nice summary of those systems (and of the Fink system, another package management system). Follow their respective links to learn more about each system.
Install Ghostscript using Homebrew using the following command:
brew install ghostscript
Install Ghostscript using Macports using the following command:
sudo port install ghostscript
Installing Ghostscript on Ubuntu
It is often most intuitive to install software on Ubuntu using the GUI-based software application.
This accesses the repositories of extensive software available for Ubuntu.
However, it is often the fastest to do a command line install. Do so for Ghostscript as follows:
sudo apt install ghostscript
Installing Ghostscript on Other Debian-based Distributions
There are many distributions that, like Ubuntu, are based on Debian.
Many also have GUI applications for installing software, and often these can be used to install Ghostscript. But like Ubuntu, it is often the fastest to use the command line install.
The command is still the same:
sudo apt install ghostscript
Installing Ghostscript on Centos 7, and Other Red Hat/ Fedora-based Distributions
Centos 7 is a free version of the Red Hat Linux distribution, without Red Hat branding or technical support from Red Hat.
Fedora is the “bleeding-edge” freely available distribution in the Red Hat family of distributions that serves as the development foundation for the more robust and stable Red Hat distribution.
Since these are all in the same distribution family, they are all most quickly updated by the same command. The many other distributions in this family are also most quickly updated by the same command.
The command is:
sudo yum install ghostscript
Installing Ghostscript for Anaconda
If you are a data scientist more comfortable with data analysis in Anaconda than you are comfortable with OS management, you can still make sure you have ghostscript through Anaconda.
Open the Anaconda command line interface and enter the following command to install Ghostscript:
conda install -c conda-forge ghostscript
Installing Ghostscript in Google Colab
Ghostscript can even be installed in Google Colab.
Cells in Colab are in-effect like the Python shell. Therefore users can use the exclamation mark to submit OS shell commands, then enter the command to install Ghostscript.
The OS behind Colab operates like Ubuntu, so the installation command mirrors that of Ubuntu. Therefore, to install Ghostscript enter the following command in a Colab cell:
!apt get install ghostscript
Conclusion
Ghostscript is a free open-source interpreter that renders Postscript and PDF documents either to the screen or to a printer.
Ghostscript can also be used to process or modify such documents.
Even better, because Ghostscript includes a language-binding API, programmers can use it to write programs in other languages to modify PDF documents.
As you can see, Ghostscript is available on many different platforms and operating systems. We have exhibited commands to install Ghostscript on many of these various platforms.
We hope you have found this helpful, and we wish you happy coding!
import math
import numpy as np
import pandas as pd x = float('nan')
print(math.isnan(x))
print(x != x)
print(np.isnan(x))
print(pd.isna(x))
print(not(float('-inf') < x < float('inf')))
So, what is a NaN value?
NaN is a constant value that indicates that the given value is Not a Number. It’s a floating-point value, hence cannot be converted to any other type other than float. We should know that NaN and Null are two different things in Python. The Null values indicate something which does not exist, i.e. is empty. But that is not the case with NaN.
We have to deal with NaN values frequently in Python especially when we deal with array objects or DataFrames. So, without further delay, let us dive into our mission critical question and have a look at the different methods to solve our problem.
Method 1: Using math.isnan()
The simplest solution to check for NaN values in Python is to use the mathematical function math.isnan().
math.isnan() is a function of the math module in Python that checks for NaN constants in float objects and returns True for every NaN value encountered and returns False otherwise.
Example:
# Importing the math module
import math # Function to check for NaN values
def isNaN(a): # Using math.isnan() if math.isnan(a): print("NaN value encountered!") else: print("Type of Given Value: ", type(a)) # NaN value
x = float('NaN')
isNaN(x)
# Floating value
y = float("5.78")
isNaN(y)
Output:
NaN value encountered!
Type of Given Value: <class 'float'>
In the above example, since x represents a NaN value, hence, the isNaN method returns True but in case of y , isNan returns False and prints the type of the variable y as an output.
Method 2: Hack NaN Using != Operator
The most unique thing about NaN values is that they are constantly shapeshifting. This means we cannot compare the NaN value even against itself. Hence, we can use the != (not equal to) operator to check for the NaN values. Thus, the idea is to check if the given variable is equal to itself. If we consider any object other than NaN, the expression (x == x) will always return True. If it’s not equal, then it is a NaN value.
# Function to check for NaN values
def not_a_number(x): # Using != operator if x != x: print("Not a Number!") else: print(f'Type of {x} is {type(x)}') # Floating value
x = float("7.8")
not_a_number(x)
# NaN value
y = float("NaN")
not_a_number(y)
We can also use the NumPy library to check whether the given value is NaN or not. We just need to ensure that we import the library at the start of the program and then use its np.isnan(x) method.
The np.isnan(number) function checks whether the element in a Numpy array is NaN or not. It then returns the result as a boolean array.
Example: In the following example we have a Numpy Array and then we will check the type of each value. We will also check if it is a NaN value or not.
import numpy as np arr = np.array([10, 20, np.nan, 40, np.nan])
for x in arr: if np.isnan(x): print("Not a Number!") else: print(x, ":", type(x))
Output:
10.0 : <class 'numpy.float64'>
20.0 : <class 'numpy.float64'>
Not a Number!
40.0 : <class 'numpy.float64'>
Not a Number!
TRIVIA
Let us try to perform some basic functions on an numpy array that involves NaN values and find out what happens to it.
Now this can be a problem in many cases. So, do we have a way to eliminate the NaN values from our array object and then perform the mathematical operations upon the array elements? Yes! Numpy facilitates us with methods like np.nansum() and np.nanmax() that help us to calculate the sum and maximum values in the array by ignoring the presence of NaN values in the array.
Another way to solve our problem is to use the isna() method of the Pandas module. pandas.isna() is a function that detects missing values in an array-like object. It returns True if any NaN value is encountered.
Example 1:
import pandas as pd x = float("nan")
y = 25.75
print(pd.isna(x))
print(pd.isna(y))
Output:
True
False
Example 2: In the following example we will have a look at a Pandas DataFrame and detect the presence of NaN values in the DataFrame.
We can check for the NaN values by using another NaN special property: limited range. The range of all the floating-point values falls within negative infinity to infinity. However, NaN values do not fall within this range.
Hence, the idea is to check whether a given value lies within the range of -inf and inf. If yes , then it is not a NaN value else it is a NaN value.
Example:
li = [25.87, float('nan')]
for i in li: if float('-inf') < float(i) < float('inf'): print(i) else: print("Not a Number!")
In this article, we learned how we can use the various methods and modules (pandas, NumPy, and math) in Python to check for the NaN values. I hope this article was able to answer your queries. Please stay tuned and subscribe for more such articles.
Authors: SHUBHAM SAYON and RASHI AGARWAL
Do you want to become a NumPy master? Check out our interactive puzzle book Coffee Break NumPy and boost your data science skills! (Amazon link opens in new tab.)
Summary: You can use consecutive single-line comments (using # character) to create a block of comments (multiline comments) in Python. Another way is to use """ quotes to enclose the comment block.
Problem Statement: How to create multiline comments in Python?
Other programming languages like C++, Java, and JavaScript, have an inbuilt mechanism (block comment symbols) for multiline comments, but there is no built-in mechanism for multiline comments in Python. Hence, the following code won’t work:
/* This is a multiline Comment in Python */
The above code will throw an error in Python. However, there are still some workarounds to using the multiline comments in Python. Let’s look at the different methods to do this in this article.
Quick Trivia on Comments:
Comments are a very important part of every programming language as it explains the logic used in the code. The developers provide these comments to make it more readable and for the users to get a better understanding of the code. The comments don’t run as they are ignored by the interpreters and compilers. Comments also help us while we are debugging, i.e., when there are two lines of code, we can comment one out to prevent it from running.
What is a multiline comment in Python?
A multiline comment in Python is a comment that generally expands to multiple lines, i.e., multiline comments are the comments that expand to two or more lines in the source code.
Method 1: Using Multiple Single Line Comments
We can use the multiple single-line comments to create multiline comments in Python. But first, you must know how to make a single-line comment is in Python. The Hash character (#) is used to make single-line comments in Python. The commented line does not get printed in the output.
Example:
# print("Hello Finxters")
print("Learning to create multiline comments in Python")
Output:
Learning to create multiline comments in Python
Now let’s create multiline comments using consecutive single line comments:
Example:
print("Learning to create multiline comments in Python")
# print("Hello Finxters")
# print("This is a")
# print("Multiline comment")
# print("in Python")
print("End of program")
Output:
Learning to create multiline comments in Python End of program
As we can see that the commented lines are ignored by the parser in Python, thereby creating a block of comments.
Discussion: Using single-line comments to comment out every line of a multiline comment individually becomes a very tedious process. Hence this method is not recommended to be used when you are not using any modern editor. However, most of the new code editors have a shortcut for block commenting in Python. You can just select a few lines of code using shift and the cursor keys and then press cmd + / (This shortcut may differ depending upon the editor you are using) to comment them out all at once. You can even uncomment them easily by simply selecting the block of comments and pressing the cmd + / keyboard shortcut.
Method 2: Using Docstrings Or Multiline Strings
We can create the multiline comments using multiline strings or docstrings in Python. This method has the same effect but is generally used for documentation strings, not block comments. However, if you want to comment things out temporarily, you can use this method. Python has two types of docstrings- 1) One-Line docstrings 2) Multiline docstrings.
To create a block comment, we use the multiline docstrings. Let’s create multiline comments using docstrings in the following example:
Example 1:
print("Learning to create multiline comments in Python") '''
print("Hello Finxters")
print("This is a")
print("Multiline comment")
print("in Python") '''
print("End of program")
Output:
Learning to create multiline comments in Python End of program
Example 2: Suppose you want to define a block comment inside a function using docstrings you have to do it the following way:
def multiply(x, y): res = x * y """ This is a multiline comment indented properly This function returns the result after multiplying the two numbers """ return res
print("The multiplication of the two numbers is", multiply(10, 5))
Output:
The multiplication of the two numbers is 50
Caution:
You must always ensure that you have used the indentation for the first """ correctly; otherwise, you may get a SyntaxError.
Also, if you are opening a multiline comment using three double quotes """ then you must ensure that you enclose the block with exactly three double quotes as well. If you do nt follow this convention, you will get an error again. For example – if you open a multiline comment with three double quotes and close it using three single quotes, then you will get an error.
Example I: If you don’t intend """ properly, you may get the following error:
def multiply(x, y): res = x * y """ This is a multiline comment indented properly This function returns the result after multiplying the two numbers """ return res
print("The multiplication of the two numbers is", multiply(10, 5))
Output:
File "main.py", line 10 return res ^ IndentationError: unexpected indent
Example II: Let’s visualize what happens when there is a mismatch between the type of triple quotes used.
def multiply(x, y): res = x * y """ This is a multiline comment indented properly This function returns the result after multiplying the two numbers ''' return res
print("The multiplication of the two numbers is", multiply(10, 5))
Output:
File "C:\Users\SHUBHAM SAYON\PycharmProjects\Finxter\General\rough.py", line 10 print("The multiplication of the two numbers is", multiply(10, 5)) ^ SyntaxError: EOF while scanning triple-quoted string literal
Note: You must always be careful where you place these multiline comments in the code. If it is commented right after a class definition, function, or at the start of a module, it turns into a docstring that has a different meaning in Python.
Example:
def multiply(x, y): """ This is a multiline comment made right after the function definition It now becomes a function docstring associated with the function object that is also accessible as runtime metadata """ res = x * y return res
print("The multiplication of the two numbers is", multiply(10, 3))
Output:
The multiplication of the two numbers is 30
The difference between the comment and the parser is that the comment is removed by the parser, whereas a docstring can be accessed programmatically at runtime and ends up in the byte code.
Conclusion
Therefore, in this tutorial, we learned two ways of creating multiline comments in Python – ➨Using consecutive single-line comments. ➨Multiline strings (docstrings).
That’s all for this article. I hope you found it helpful. Please stay tuned and subscribe for more interesting articles and tutorials in the future. Happy learning!
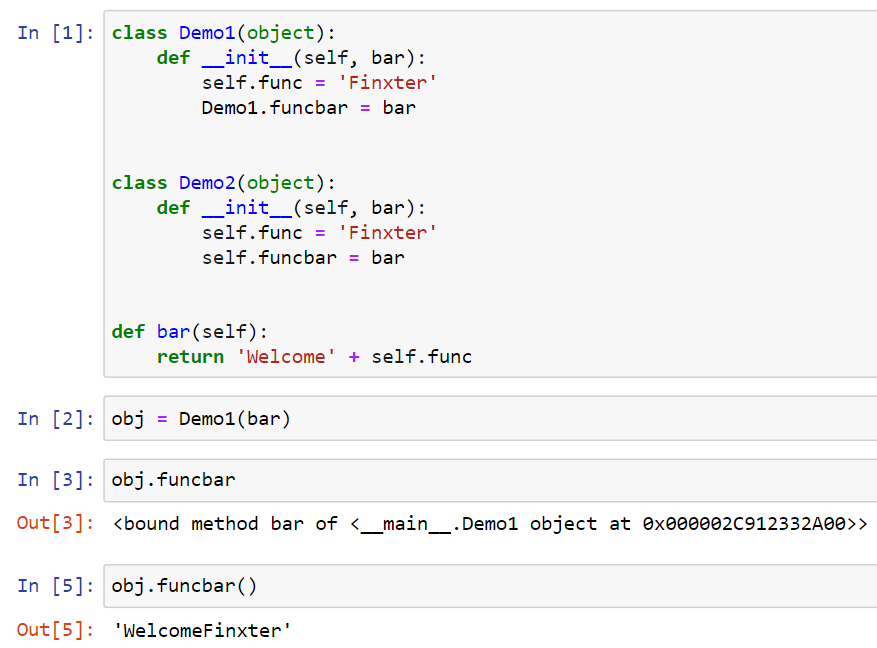
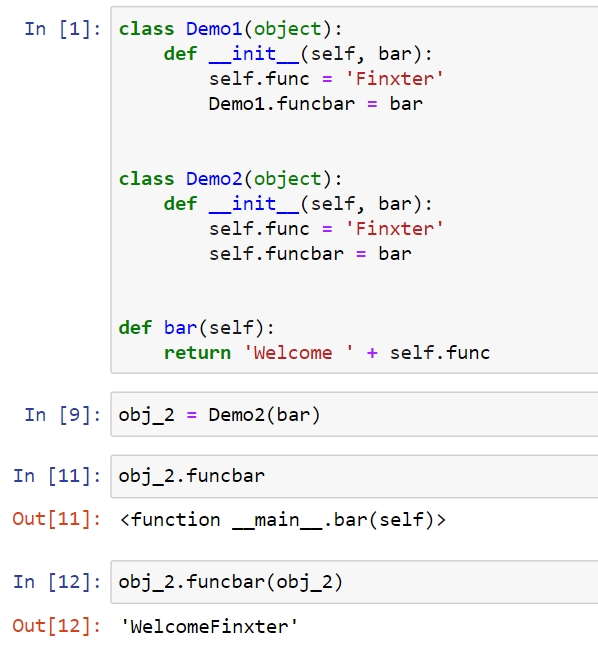
Problem Statement: How to define a method outside of class definition in Python?
Example:
# Given Class
class Demo:
# Given Method def foo(self): x = 10 return x
Can we create foo() outside of the class definition or maybe even in another module?
Introduction
We all know Python is an object-oriented programming language, and in Python, everything is an object including properties and methods. In Python, the class is like an object’s constructor for creating the objects. Thus, the variables can be defined inside the class, outside the class, and inside the methods in Python. The variables defined outside the class can be accessed by any method or class by just writing the variable name. So, in this article, we are going to learn how to define a method outside of the class definition.
What are Methods in Python?
As Python is an object-oriented programming language, it has objects that consist of properties. The attributes define the properties of these objects, and the behavior is defined using methods. Methods are reusable pieces of code called at any point in the program and are defined inside the class. Every method is associated with the class and can be invoked on the instances of that class.
For example, we can consider a class named ‘Students’ that contains properties like name, id , and rank. The class also holds behaviors like run, jump , and swim. Suppose an object Stud1 has the following properties:
Name- Finxter
Id – 1020
Rank- 1
Here’s how you can assign the values:
class Student: def __init__(self, name, id, rank): self.name = name self.id = id self.rank = rank def run(self): print(f'{self.name} is a cross country champion!') def jump(self): print(f'{self.name} with the following ID: {self.id} is a high jumper!') def swim(self): print(f'{self.name} secured rank {self.rank} in swimming.') stud1 = Student('Finxter', 1020, 1)
stud1.run()
stud1.jump()
stud1.swim()
Output:
Finxter is a cross country champion!
Finxter with the following ID: 1020 is a high jumper!
Finxter secured rank 1 in swimming.
The above example demonstrated the traditional way of adding functionality (methods) to a Python class. Here, the methods were defined inside the class body. Now, let’s say that you want to define a method outside the class body. How will you do so? Let’s dive into the different approaches to unearth the answers to this question.
Define The Method Outside and Use Inside Class Body
The idea here is to define the method outside the class and then use it inside the class body, as shown below.
Example 1:
# Defining the method outside the class
def foo(self): print("Method foo executed") x = 10 print("Value of x = ", x)
# Using the method inside the class body
class Demo: my_method = foo
You can also define a class first and then add a method or function to it from outside its body, as shown below.
Example 2:
# Define the class
class Demo: pass # Define the method outside the class def foo(self): print("Method foo executed ") # Pass the method to the class
Demo.method1 = foo
Caution: We can even define the functions, methods, and classes in different modules if we want to. However, it is advisable to use example 1 rather than example 2 (defining the class in one module, then importing it into another module and further adding methods to it dynamically) because the class objects may behave differently depending on whether the module has been imported or not.
There’s another way to define the function outside of a class and then further add it. But there is a difference in assigning the function to the instance object or the class. Look at the following example to understand the subtle difference:
class Demo1(object): def __init__(self, bar): self.func = 'Finxter' Demo1.funcbar = bar class Demo2(object): def __init__(self, bar): self.func = 'Finxter' self.funcbar = bar def bar(self): return 'Welcome' + self.func
In case of class Demo1 , funcbar is just like any other normal method that is bound to the instance of the class. Let’s have a look at what this looks like –
In case of class Demo 2, funcbar is simply a reference to the bar function, i.e., it is not abound function. Thus, we must pass the instance for this function for it to work properly.
You can even use the methods of a class in another class. In the following example we have a class Helper with certain methods defined within it. All the methods of the class Helper can be inherited by the class Demo as shown below.
class Helper(object): # Subtraction function def subs(self, a, b): return a - b # Addition function def add(self, a, b): return a + b # Multiplication function def mul(self, a, b): return a * b # Division function def div(self, a, b): return a / b
# Given class
class Demo(Helper): def __init__(self): Helper.__init__(self) print("The addition of numbers is", self.add(10, 5)) print("Subtraction of numbers is", self.subs(60, 15)) print("Multiplication of numbers is", self.mul(5, 9)) print("The division of numbers is", self.div(100, 50))
# Main method
if __name__ == '__main__': obj = Demo()
Output:
The addition of numbers is 15
Subtraction of numbers is 45
Multiplication of numbers is 45
The division of numbers is 2.0
To sum things up, it is absolutely possible to have functions outside classes in Python. If you want to gather a group of functions in one box then you can simply put them together in the same module. Further, you can nest modules within packages. It is recommended that you should use classes when you have to create a new datatype and don’t just use it to group functions together.
That’s it for this discussion and I hope it helped you. Please stay tuned and subscribe for more interesting articles and discussions in the future. Happy learning!
Before we learn about the money, let’s get this question out of the way:
What Is Puppet?
Let’s have a look at the definition from this Puppet website (highlights be me):
“Puppet is an open source software configuration management and deployment tool. It’s most commonly used on Linux and Windows to pull the strings on multiple application servers at once. But you can also use Puppet on several platforms, including IBM mainframes, Cisco switches, and Mac OS servers.”
Now that you know about what it is, let’s have a look at what it earns next!
Annual Income
How much does a Puppet Developer make per year?
The average annual income of a Puppet Developer in the United States is $92,000 per year according to PayScale (source). Top earners make $160,000 and more in the US!
Here are different job descriptions using the Puppet skillset:
If you decide to go the route as a freelance Puppet Developer, you can expect to make between $25 and $60 per hour on Upwork (source). Assuming an annual workload of 2000 hours, you can expect to make between $50,000 and $120,000 per year.
Note: Do you want to create your own thriving coding business online? Feel free to check out our freelance developer course — the world’s #1 best-selling freelance developer course that specifically shows you how to succeed on Upwork and Fiverr!
But is there enough demand? Let’s have a look at Google trends to find out how interest evolves over time (source):
Work Description
So, you may wonder: Puppet Developer – what’s the definition?
Puppet Developer Definition: A Puppet Developer is a DevOps engineer who automates repetitive administrative tasks in cloud and distributed environments (servers).
Learning Path, Skills, and Education Requirements
Do you want to become a Puppet Developer? Here’s a step-by-step learning path I’d propose to get started with Puppet:
But don’t wait too long to acquire practical experience!
Even if you have little skills, it’s best to get started as a freelance developer and learn as you work on real projects for clients — earning income as you learn and gaining motivation through real-world feedback.
Tip: An excellent start to turbo-charge your freelancing career (earning more in less time) is our Finxter Freelancer Course. The goal of the course is to pay for itself!
Related Video
You can find more job descriptions for coders, programmers, and computer scientists in our detailed overview guide:
The following statistic shows the self-reported income from 9,649 US-based professional developers (source).
The average annual income of professional developers in the US is between $70,000 and $177,500 for various programming languages.
Question: What is your current total compensation (salary, bonuses, and perks, before taxes and deductions)? Please enter a whole number in the box below, without any punctuation. If you are paid hourly, please estimate an equivalent weekly, monthly, or yearly salary. (source)
The following statistic compares the self-reported income from 46,693 professional programmers as conducted by StackOverflow.
The average annual income of professional developers worldwide (US and non-US) is between $33,000 and $95,000 for various programming languages.
Here’s a screenshot of a more detailed overview of each programming language considered in the report:
Here’s what different database professionals earn:
Here’s an overview of different cloud solutions experts:
Here’s what professionals in web frameworks earn:
There are many other interesting frameworks—that pay well!
Look at those tools:
Okay, but what do you need to do to get there? What are the skill requirements and qualifications to make you become a professional developer in the area you desire?
Let’s find out next!
General Qualifications of Professionals
StackOverflow performs an annual survey asking professionals, coders, developers, researchers, and engineers various questions about their background and job satisfaction on their website.
Interestingly, when aggregating the data of the developers’ educational background, a good three quarters have an academic background.
Here’s the question asked by StackOverflow (source):
Which of the following best describes the highest level of formal education that you’ve completed?
However, if you don’t have a formal degree, don’t fear! Many of the respondents with degrees don’t have a degree in their field—so it may not be of much value for their coding careers anyways.
Also, about one out of four don’t have a formal degree and still succeeds in their field! You certainly don’t need a degree if you’re committed to your own success!
Freelancing vs Employment Status
The percentage of freelance developers increases steadily. The fraction of freelance developers has already reached 11.21%!
This indicates that more and more work will be done in a more flexible work environment—and fewer and fewer companies and clients want to hire inflexible talent.
Here are the stats from the StackOverflow developer survey (source):
Do you want to become a professional freelance developer and earn some money on the side or as your primary source of income?
Resource: Check out our freelance developer course—it’s the best freelance developer course in the world with the highest student success rate in the industry!
Other Programming Languages Used by Professional Developers
The StackOverflow developer survey collected 58000 responses about the following question (source):
Which programming, scripting, and markup languages have you done extensive development work in over the past year, and which do you want to work in over the next year?
These are the languages you want to focus on when starting out as a coder:
And don’t worry—if you feel stuck or struggle with a nasty bug. We all go through it. Here’s what SO survey respondents and professional developers do when they’re stuck:
What do you do when you get stuck on a problem? Select all that apply. (source)
Related Tutorials
To get started with some of the fundamentals and industry concepts, feel free to check out these articles:
Coders get paid six figures and more because they can solve problems more effectively using machine intelligence and automation.
To become more successful in coding, solve more real problems for real people. That’s how you polish the skills you really need in practice. After all, what’s the use of learning theory that nobody ever needs?
You build high-value coding skills by working on practical coding projects!
Do you want to stop learning with toy projects and focus on practical code projects that earn you money and solve real problems for people?
If your answer is YES!, consider becoming a Python freelance developer! It’s the best way of approaching the task of improving your Python skills—even if you are a complete beginner.
If you just want to learn about the freelancing opportunity, feel free to watch my free webinar “How to Build Your High-Income Skill Python” and learn how I grew my coding business online and how you can, too—from the comfort of your own home.
“Terraform is an open-source infrastructure as code software tool that provides a consistent CLI workflow to manage hundreds of cloud services. Terraform codifies cloud APIs into declarative configuration files.”
Now that you know about what it is, let’s have a look at what it earns next!
Annual Income
How much does a Terraform Developer make per year?
The average annual income of a Terraform Developer in the United States is $116,000 per year according to PayScale (source). Top earners make $185,000 and more in the US!
Here’s a table with salary levels of jobs using the Terraform skillset to create more value for their companies and organizations:
If you decide to go the route as a freelance Terraform Developer, you can expect to make between $40 and $200 per hour on Upwork (source). Assuming an annual workload of 2000 hours, you can expect to make between $80,000 and $400,000 per year.
Note: Do you want to create your own thriving coding business online? Feel free to check out our freelance developer course — the world’s #1 best-selling freelance developer course that specifically shows you how to succeed on Upwork and Fiverr!
But is there enough demand? Let’s have a look at Google trends to find out how interest evolves over time (source):
Work Description
So, you may wonder: Terraform Developer – what’s the definition?
Terraform Developer Definition: A Terraform Developer is a DevOps engineer who manages a possibly large number of cloud platforms — such as AWS, Azure, or Google Cloud — via remote access and the Terraform utility toolsets.
Learning Path, Skills, and Education Requirements
Do you want to become a Terraform Developer? Here’s a step-by-step learning path I’d propose to get started with Terraform:
But don’t wait too long to acquire practical experience!
Even if you have little skills, it’s best to get started as a freelance developer and learn as you work on real projects for clients — earning income as you learn and gaining motivation through real-world feedback.
Tip: An excellent start to turbo-charge your freelancing career (earning more in less time) is our Finxter Freelancer Course. The goal of the course is to pay for itself!
Related Video
You can find more job descriptions for coders, programmers, and computer scientists in our detailed overview guide:
The following statistic shows the self-reported income from 9,649 US-based professional developers (source).
The average annual income of professional developers in the US is between $70,000 and $177,500 for various programming languages.
Question: What is your current total compensation (salary, bonuses, and perks, before taxes and deductions)? Please enter a whole number in the box below, without any punctuation. If you are paid hourly, please estimate an equivalent weekly, monthly, or yearly salary. (source)
The following statistic compares the self-reported income from 46,693 professional programmers as conducted by StackOverflow.
The average annual income of professional developers worldwide (US and non-US) is between $33,000 and $95,000 for various programming languages.
Here’s a screenshot of a more detailed overview of each programming language considered in the report:
Here’s what different database professionals earn:
Here’s an overview of different cloud solutions experts:
Here’s what professionals in web frameworks earn:
There are many other interesting frameworks—that pay well!
Look at those tools:
Okay, but what do you need to do to get there? What are the skill requirements and qualifications to make you become a professional developer in the area you desire?
Let’s find out next!
General Qualifications of Professionals
StackOverflow performs an annual survey asking professionals, coders, developers, researchers, and engineers various questions about their background and job satisfaction on their website.
Interestingly, when aggregating the data of the developers’ educational background, a good three quarters have an academic background.
Here’s the question asked by StackOverflow (source):
Which of the following best describes the highest level of formal education that you’ve completed?
However, if you don’t have a formal degree, don’t fear! Many of the respondents with degrees don’t have a degree in their field—so it may not be of much value for their coding careers anyways.
Also, about one out of four don’t have a formal degree and still succeeds in their field! You certainly don’t need a degree if you’re committed to your own success!
Freelancing vs Employment Status
The percentage of freelance developers increases steadily. The fraction of freelance developers has already reached 11.21%!
This indicates that more and more work will be done in a more flexible work environment—and fewer and fewer companies and clients want to hire inflexible talent.
Here are the stats from the StackOverflow developer survey (source):
Do you want to become a professional freelance developer and earn some money on the side or as your primary source of income?
Resource: Check out our freelance developer course—it’s the best freelance developer course in the world with the highest student success rate in the industry!
Other Programming Languages Used by Professional Developers
The StackOverflow developer survey collected 58000 responses about the following question (source):
Which programming, scripting, and markup languages have you done extensive development work in over the past year, and which do you want to work in over the next year?
These are the languages you want to focus on when starting out as a coder:
And don’t worry—if you feel stuck or struggle with a nasty bug. We all go through it. Here’s what SO survey respondents and professional developers do when they’re stuck:
What do you do when you get stuck on a problem? Select all that apply. (source)
Related Tutorials
To get started with some of the fundamentals and industry concepts, feel free to check out these articles:
Coders get paid six figures and more because they can solve problems more effectively using machine intelligence and automation.
To become more successful in coding, solve more real problems for real people. That’s how you polish the skills you really need in practice. After all, what’s the use of learning theory that nobody ever needs?
You build high-value coding skills by working on practical coding projects!
Do you want to stop learning with toy projects and focus on practical code projects that earn you money and solve real problems for people?
If your answer is YES!, consider becoming a Python freelance developer! It’s the best way of approaching the task of improving your Python skills—even if you are a complete beginner.
If you just want to learn about the freelancing opportunity, feel free to watch my free webinar “How to Build Your High-Income Skill Python” and learn how I grew my coding business online and how you can, too—from the comfort of your own home.

 Hint:
Hint: 
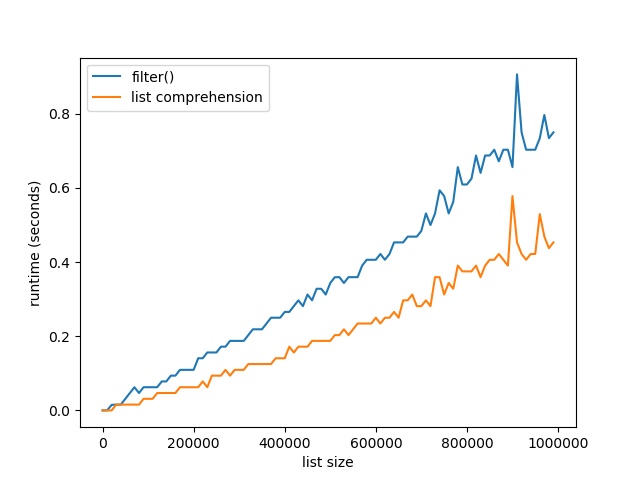


 , and BlackBerry® Tablet OS devices, as well as traditional applications for browser and desktop using the same programming model, tool, and codebase.
 Note: Do you want to create your own thriving coding business online? Feel free to check out our
 Tip: An excellent start to turbo-charge your freelancing career (earning more in less time) is our
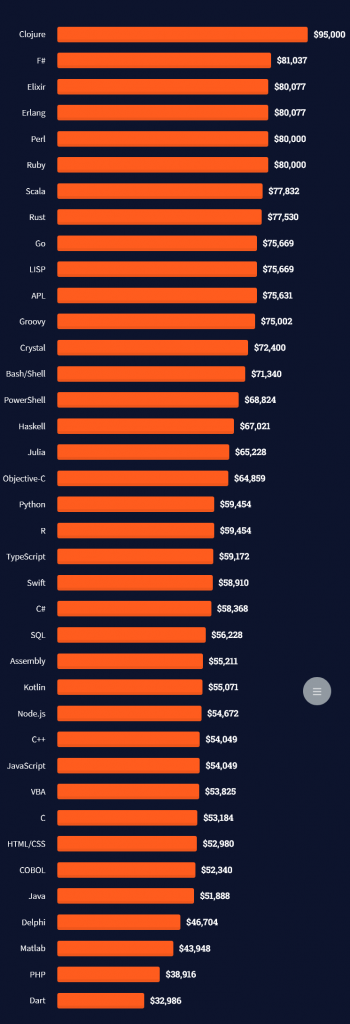

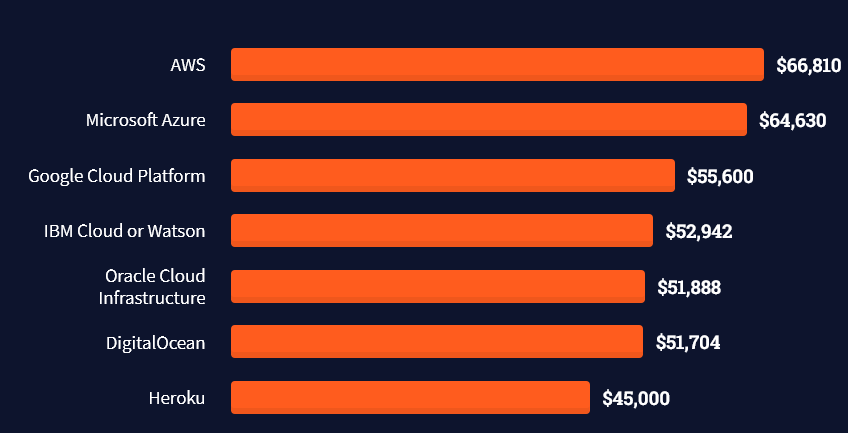
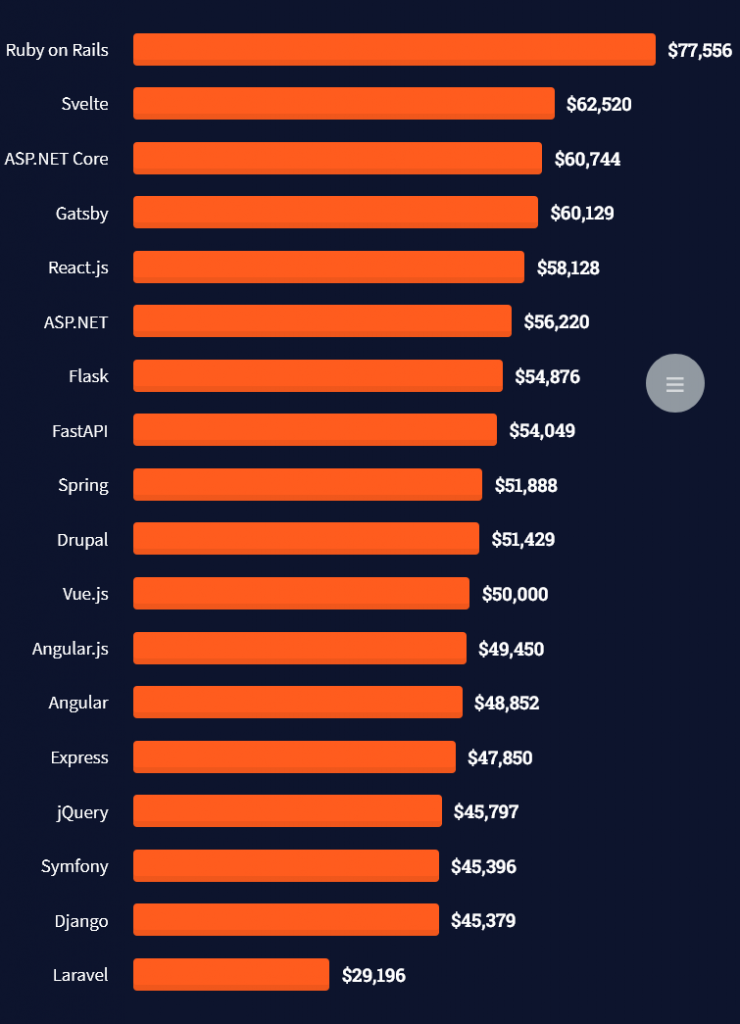

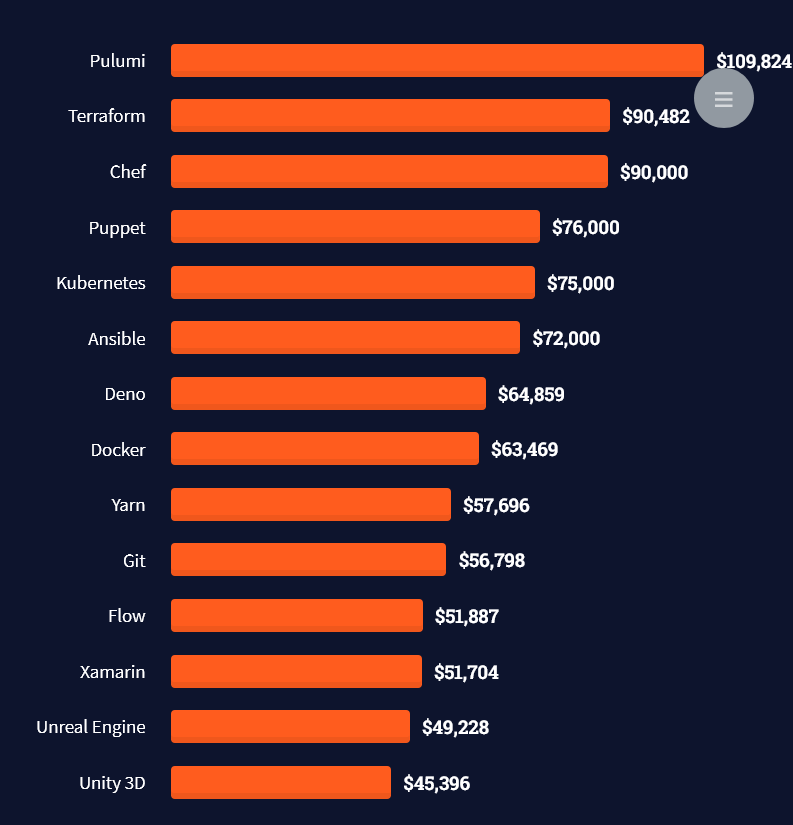
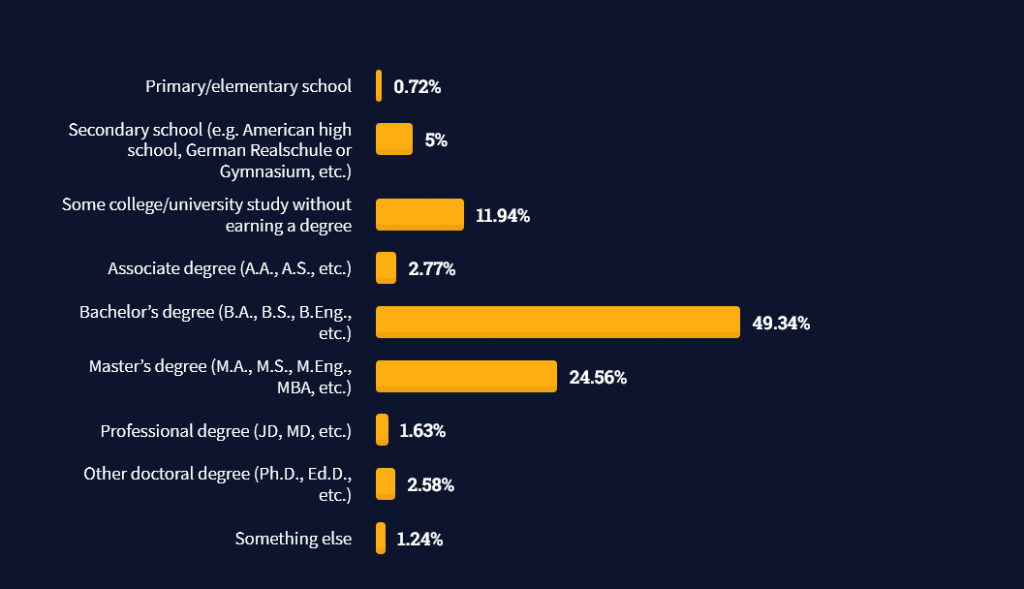
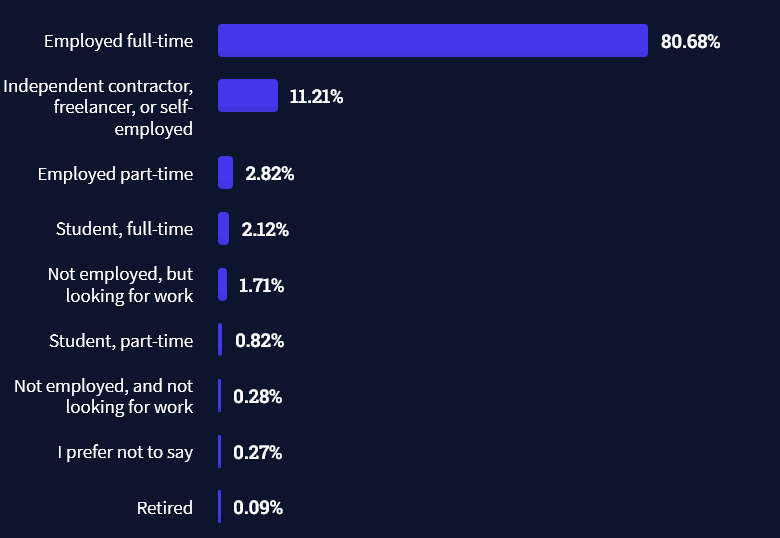


 Ghostscript can be used to modify PDF documents, such as converting PDF to images, or extracting text, among other things.
 The difference between the comment and the parser is that the comment is removed by the parser, whereas a docstring can be accessed programmatically at runtime and ends up in the byte code.