
The following table provides you with an overview of Pandas DataFrame methods — and where you can learn more about the specific method.
ALL LINKS OPEN IN A NEW TAB!
The following table provides you with an overview of Pandas DataFrame methods — and where you can learn more about the specific method.
ALL LINKS OPEN IN A NEW TAB!
Example:
"Success". "Failure". Specifically, how to implement the function has_connection() in the following sample code snippet?
if check_connection(): print('Success!')
else: print('Failure!')Let’s assume you are a Python Coder working for AllTech. Lately, they have been having issues with their internet connections. You are tasked with writing code to check the connection and return a status/error message.
 Question: How would we write Python code to check to see if an internet connection has been established?
To install this library, navigate to an IDE terminal. At the command prompt ($), execute the code below. For the terminal used in this example, the command prompt is a dollar sign ($). Your terminal prompt may be different.
$ pip install requests
Hit the <Enter> key on the keyboard to start the installation process.
If the installation was successful, a message displays in the terminal indicating the same.
Feel free to view the PyCharm installation guide for the required library.
Add the following code to the top of each code snippet. This snippet will allow the code in this article to run error-free.
from urllib.request import urlopen as url
import requests
import socket
This example uses urlopen() to establish a connection to the URL shown below. In addition, two (2) parameters are passed: a valid URL and a timeout.
try: url('https://finxter.com/', timeout=3) print('Success')
except ConnectionError as e: print(f'Failure - {e}')
This code is wrapped inside a try/except statement. When run, the code drops inside the try statement and checks to see if a connection can be established to the indicated URL. This attempt waits three (3) seconds before timing out.
Depending on the connection status, a message indicating the same is output to the terminal.
Output
SuccessThis example requires the use of the requests library and uses requests.get() to establish a connection to the URL shown below. A status code returns indicating Success or Failure.
res = requests.get('https://finxter.com/')
print(res) if (res.status_code): print('Success')
else: print('f'Failure')
This code accepts a URL and attempts to establish a connection to the same. The results of this connection save to res as an object.
<Response [200]>This object must be referenced as indicated above to retrieve the status code. Then, the appropriate message is output to the terminal depending on this code.
Output
SuccessIn the methods above, we used a few lines of code to establish a connection and display the appropriate result. This one-liner accomplishes the same task in one line!
# One-Liner to Check Internet Connection:
print((lambda a: 'Success' if 0 == a.system('ping finxter.com -w 4 > clear') else 'Failure')(__import__('os')))
This code pings the shown URL and, depending on the results, outputs the appropriate message to the terminal. The remarkable thing is how you can import a library on-the-fly!
Output
SuccessThis example requires the socket library and creates a function to establish a connection to the URL shown below. A Boolean value returns indicating True/False.
def check_connection(): try: host = socket.gethostbyname('www.google.com') s = socket.create_connection((host, 80), 2) return True except: return False res = check_connection()
print(res)
This code defines a new function, check_connection. Using a try/except statement attempts to connect to the indicated URL. Depending on the result, the function returns either True or False.
Finally, the function is called, the code runs, and the result outputs to the terminal.
Output
TrueThese four (4) methods to check the internet connection should give you enough information to select the best one for your coding requirements.
Good Luck & Happy Coding!
As a Python Coder, you will encounter times when you need to view a list of all imported modules possessing a global or local scope. This article answers the question below.
Question: How would we write Python code to display the imported modules?
This method displays a list of all imported global module names and versions sorted, by default, in alphabetical order.
pip freeze
Navigate to the terminal window from an IDE and enter the above command. Then, hit the <Enter> key to execute. The output is sent to the terminal.
 Note: Your prompt may be different from the example shown above.
Output (snippet)
Your imported global module names and versions may differ from that shown below.
absl-py==1.0.0 |
This example uses the sys library with List Comprenehsion to return all imported local module names, by default, in an unsorted list.
import sys
results = [m.__name__ for m in sys.modules.values() if m]
results = sorted(results)
print(results)
This code loops through sys.modules.values() using __name__ (aka a dunder) and determines if the item is a locally scoped module. If so, the module name saves to results.
This code sorts the results variable and saves it back to itself for readability. These results are output to the terminal in list format.
Output (snippet)
Your imported local module names may differ from that shown below.
['main', '_abc', '_codecs', '_collections', '_distutils_hack', '_functools', '_imp', '_operator', '_signal', '_sitebuiltins', '_stat', '_thread', '_warnings', '_weakref', 'abc',...'zope'] |
This example uses the dir() function to return all local module names in a sorted list format.
modules = dir()
print(modules)
The output below confirms this script displays only the names that apply to our local scope.
Output (snippet)
Your imported local module names may differ from that shown below.
['annotations', 'builtins', 'cached', 'doc', 'file', 'loader', 'name', 'package', 'spec'] |
inspect.getmember() and a LambdaThis example uses inspect.getmember() and a Lambda to return the imported local modules in a sorted format.
import inspect
import os
m = inspect.getmembers(os)
res = filter(lambda x: inspect.ismodule(x[1]), m) for r in res: print(r)
This code returns the names of the imported local modules and their location on the system as an iterable object. A for the loop is used to iterate through this and output one/line.
Output
('abc', <module 'abc' from 'C:\\mypythoninstall\\lib\\abc.py'>) |
If you want to determine the total number of imported modules, use the dir() and len() functions.
count = dir()
print(len(count))
This code references the imported local modules and uses len() to determine how many are imported. The output is sent to the terminal.
Output
Your count may differ from the output below.
| 11 |
Summary
These four (4) methods to list imported modules should give you enough information to select the best one for your coding requirements.
Good Luck & Happy Coding!
You should always apply your own critical thinking when it comes to the crypto space. One question asked by many critical thinkers who know the overall idea of the Bitcoin protocol but not yet its technicalities is:
Question: What if a miner is not trustworthy and tries to change my transaction?
The answer to all those questions is: No. Because if you want to issue a transaction, you need to broadcast the information
(sender_public_key, receiver_public_key, amount)
But here’s the trick: you sign the transaction using the private key of the sender:
sender_private_key --> sign(sender_public_key, receiver_public_key, amount)
Everybody knows the public key of the sender because it’s included in the transaction and therefore in the block.
Knowing the public key of the sender, anybody can verify that the whole transaction was signed by the owner of the private key.
If you changed one thing in the transaction (even by 1 SAT), the signature would not fit the transaction anymore and everybody would be able to know it!
Info: With public-key cryptography, robust authentication is possible. A sender can combine a message with a private key to create a short digital signature on the message. Anyone with the sender’s corresponding public key can combine that message with a claimed digital signature. If the signature matches the message, the origin of the message is verified because it must have been made by the owner of the corresponding private key. (Modified from Wikipedia)
Now, what would happen if the miner would change any of the following information?
sender_public_key, receiver_public_key, amount,Well, the signature would not match the changed transaction, so there are two possibilities for a malicious miner:
The following video does a great job explaining these details in Bitcoin:
There are some details to it that I abstracted away. For example, miners do not actually check if a transaction is valid—that’s what full nodes are here for:
ALL full nodes verify all transactions in all blocks that they receive (as well as transactions received outside of blocks). Just because a block has a valid proof of work does not mean that the block is valid. It must still build upon a valid block and must only contain valid transactions. Full nodes still verify that transactions contained within a block are valid.
Contrary to popular belief, miners do not say what transactions are valid. Their job is to determine the order of transactions, within certain constraints. It is the job of full nodes to verify transactions, and all miners (or the mining pools) should be running full nodes.
Summary: os.path.basename(path) enables us to get the file name from the path, no matter what the os/path format. Another workaround is to use the ntpath module, which is equivalent to os.path.
 Problem: How to extract the filename from a path, no matter what the operating system or path format is?
For example, let’s suppose that you want all the following paths to return demo.py:
➤ C:\Users\SHUBHAM SAYON\Desktop\codes\demo.py
➤ /home/username/Desktop/codes/demo.py
➤ /home/username/Desktop/../demo.py
Expected Output in each case:
demo.pyRecommended: How To Get The Filename Without The Extension From A Path In Python?
Let us dive into the solutions without further delay.
os.path.basename is a built-in method of the os module in Python that is used to derive the basename of a file from its path. It accepts the path as an input and then returns the basename of the file. Thus, to get the filename from its path, this is exactly the function that you would want to use.
Example 1: In Windows
import os
file_path = r'C:\Users\SHUBHAM SAYON\Desktop\codes\demo.py'
print(os.path.basename(file_path)) # OUTPUT: demo.py
Example 2: In Linux

Caution: If you use the os.path.basename() function on a POSIX system in order to get the basename from a Windows-styled path, for example: “C:\\my\\file.txt“, the entire path will be returned.
Tidbit: os.path.basename() method actually uses the os.path.split() method internally and splits the specified path into a head and tail pair and finally returns the tail part.
The ntpath module can be used to handle Windows paths efficiently on other platforms. os.path.basename function does not work in all the cases, like when we are running the script on a Linux host, and you attempt to process a Windows-style path, the process will fail.
This is where the ntpath module proves to be useful. Generally, the Windows path uses either the backslash or the forward-slash as a path separator. Therefore, the ntpath module, equivalent to the os.path while running on Windows, will work for all the paths on all platforms.
In case the file ends with a slash, then the basename will be empty, so you can make your own function and deal with it:
import ntpath def path_foo(path): head, tail = ntpath.split(path) return tail or ntpath.basename(head) paths = [r'C:\Users\SHUBHAM SAYON\Desktop\codes\demo.py', r'/home/username/Desktop/codes/demo.py', r'/home/username/Desktop/../demo.py']
print([path_foo(path) for path in paths]) # ['demo.py', 'demo.py', 'demo.py']
If you are using Python 3.4 or above, then the pathlib.Path() function of the pathlib module is another option that can be used to extract the file name from the path, no matter what the path format. The method takes the whole path as an input and extracts the file name from the path and returns the file name.
from pathlib import Path
file_path = r'C:\Users\SHUBHAM SAYON\Desktop\codes\demo.py'
file_name = Path(file_path).name
print(file_name) # demo.py
Note: The .name property followed by the pathname is used to return the full name of the final child element in the path, regardless of whatever the path format is and regardless of whether it is a file or a folder.
Bonus Tip: You can also use Path("File Path").stem to get the file name without the file extension.
Example:
from pathlib import Path
file_path = r'C:\Users\SHUBHAM SAYON\Desktop\codes\demo.py'
file_name = Path(file_path).stem
print(file_name) # demo
If you do not intend to use any built-in module to extract the filename irrespective of the OS/platform in use, then you can simply use the split() method.
Example:
import os
file_path = r'C:\Users\SHUBHAM SAYON\Desktop\codes\demo.py'
head, tail = os.path.split(file_path)
print(tail) # demo.py
Explanation: In the above example os.path.split() method is used to split the entire path string into head and tail pairs. Here, tail represents/stores the ending path name component, which is the base filename, and head represents everything that leads up to that. Therefore, the tail variable stores the name of the file that we need.
➤ A Quick Recap to split(): split() is a built-in method in Python that splits a string into a list based on the separator provided as an argument to it. If no argument is provided, then by default, the separator is any whitespace.
Learn more about the split() method here.
Alternatively, for more accurate results you can also use a combination of the strip() and split() methods as shown below.
file_path = r'C:\Users\SHUBHAM SAYON\Desktop\codes\demo.py'
f_name = file_path.strip('/').strip('\\').split('/')[-1].split('\\')[-1]
print(f_name)
# demo.py
Explanation: The strip method takes care of the forward and backward slashes, which makes the path string fullproof against any OS or path format, and then the split method ensures that the entire path string is split into numerous strings within a list. Lastly, we will just return the last element from this list to get the filename.
If you have a good grip on regular expressions then here’s a regex specific solution for you that will most probably work on any OS.
import re
file_path = r'C:\Users\SHUBHAM SAYON\Desktop\codes\\'
def base_name(path): basename = re.search(r'[^\\/]+(?=[\\/]?$)', path) if basename: return basename.group(0) paths = [r'C:\Users\SHUBHAM SAYON\Desktop\codes\demo.py', r'/home/username/Desktop/codes/demo.py', r'/home/username/Desktop/../demo.py']
print([base_name(path) for path in paths]) # ['demo.py', 'demo.py', 'demo.py']
Do you want to master the regex superpower? Check out my new book The Smartest Way to Learn Regular Expressions in Python with the innovative 3-step approach for active learning: (1) study a book chapter, (2) solve a code puzzle, and (3) watch an educational chapter video.
To sum thungs up, you can use one of the following methods to extract the filename from a given path irrespective of the OS/path format:
os.path.basename('path')ntpath.basename()pathlib.Path('path').nameos.path.split('path')using regexPlease stay tuned and subscribe for more interesting articles!
To become a PyCharm master, check out our full course on the Finxter Computer Science Academy available for free for all Finxter Premium Members:

Summary: You can evaluate the execution time of your code by saving the timestamps using time.time() at the beginning and the end of your code. Then, you can find the difference between the start and the end timestamps that results in the total execution time.
Table of Contents
Problem: Given a Python program; how will you measure the elapsed time ( the time taken by the code to complete execution)?
Consider the following snippet:
import time def perimeter(x): time.sleep(5) return 4 * x def area(x): time.sleep(2) return x * x p = perimeter(8)
print("Perimeter: ", p)
a = area(8)
print("Area: ", a)
Tidbit: sleep() is a built-in method of the time module in Python that is used to delay the execution of your code by the number of seconds specified by you.
Now, let us conquer the given problem and dive into the solutions.
time.time() is a function of the time module in Python that is used to get the time in seconds since the epoch. It returns the output, i.e., the time elapsed, as a floating-point value.
The code:
import time def perimeter(x): time.sleep(5) return 4 * x def area(x): time.sleep(2) return x * x begin = time.time() start = time.time()
p = perimeter(8)
end = time.time()
print("Perimeter: ", p)
print("Time Taken by perimeter(): ", end - start) start = time.time()
a = area(8)
end = time.time()
print("Area: ", a)
print("Time Taken by area(): ", end - start) end = time.time()
print("Total time elapsed: ", end - begin)
Output:
Perimeter: 32
Time Taken by Perimeter(): 5.0040647983551025
Area: 64
Time Taken by area(): 2.0023691654205322
Total time elapsed: 7.006433963775635
Approach:
➤ Keep track of the time taken by each function by saving the time stamp at the beginning of each function with the help of a start variable and using the time() method.
➤ Similarly, the end time, i.e., the timestamp at which a function completes its execution, is also tracked with the help of the time() function at the end of each function.
➤ Finally, the difference between the end and the start time gives the total time taken by a particular function to execute.
➤ To find the total time taken by the entire program to complete its execution, you can follow a similar approach by saving the time stamp at the beginning of the program and the time stamp at the end of the program and then find their difference.
Discussion: If you are working on Python 3.3 or above, then another option to measure the elapsed time is perf_counter or process_time, depending on the requirements. Prior to Python 3.3, you could have used time.clock, however, it has been currently deprecated and is not recommended.
In Python, the perf_counter() function from the time module is used to calculate the execution time of a function and gives the most accurate time measure of the system. The function returns the system-wide time and also takes the sleep time into account.
import time def perimeter(x): time.sleep(5) return 4 * x def area(x): time.sleep(2) return x * x begin = time.perf_counter() start = time.perf_counter()
p = perimeter(8)
end = time.perf_counter()
print("Perimeter: ", p)
print("Time Taken by perimeter(): ", end - start) start = time.perf_counter()
a = area(8)
end = time.perf_counter()
print("Area: ", a)
print("Time Taken by area(): ", end - start) end = time.perf_counter()
print("Total time elapsed: ", end - begin)
Output:
Perimeter: 32
Time Taken by perimeter(): 5.0133558
Area: 64
Time Taken by are(): 2.0052768
Total time elapsed: 7.0189293
Caution: The perf_counter() function not only counts the time elapsed along with the sleep time, but it is also affected by other programs running in the background on the system. Hence, you must keep this in mind while using perf_counter for performance measurement. It is recommended that if you utilize the perf_counter() function, ensure that you run it several times so that the average time would give an accurate estimate of the execution time.
Another method from the time module used to estimate the execution time of the program is process_time(). The function returns a float value containing the sum of the system and the user CPU time of the program. The major advantage of the process_time() function is that it does not get affected by the other programs running in the background on the machine, and it does not count the sleep time.
import time def perimeter(x): time.sleep(5) return 4 * x def area(x): time.sleep(2) return x * x begin = time.process_time() start = time.process_time()
p = perimeter(8)
end = time.process_time()
print("Perimeter: ", p)
print("Time Taken by perimeter(): ", end - start) start = time.process_time()
a = area(8)
end = time.process_time()
print("Area: ", a)
print("Time Taken by area(): ", end - start) end = time.process_time()
print("Total time elapsed: ", end - begin)
Output:
Perimeter: 32
Time Taken by perimeter(): 5.141000000000173e-05
Area: 64
Time Taken by area(): 4.1780000000005146e-05
Total time elapsed: 0.00029919000000000473
timeit is a very handy module that allows you to measure the elapsed time of your code. A major advantage of using the timeit module is its ability to measure and execute lambda functions by specifying the number of executions.
Note: The timeit module turns off the garbage collection process temporarily while calculating the execution time.
Let us dive into the different methods of this module to understand how you can use it to measure execution time within your code.
Example 1: In the following example, we will have a look at a lambda function being executed with the help of the timeit module such that we will be specifying the number of times this anonymous function will be executed and then calculate the time taken to execute it.
import timeit count = 1 def foo(x): global count print(f'Output for call{count} = {x * 3}') count += 1 a = timeit.timeit(lambda: foo(8), number=3)
print("Time Elapsed: ", a)
Output:
Output for call1 = 24
Output for call2 = 24
Output for call3 = 24
Time Elapsed: 6.140000000000312e-05
Explanation: After importing the timeit module, you can call the lambda function within the timeit.timeit() function as a parameter and also specify the number of times the function will be called with the help of the second parameter, i.e., number. In this case, we are calling the lambda function three times and printing the output generated by the function every time. Finally, we displayed the total time elapsed by the function.
Even though the above method allowed us to calculate the execution time of a lambda function, it is not safe to say that the value evaluated by the timeit() function was accurate. To get a more accurate result, you can record multiple values of execution time and then find their mean to get the best possible outcome. This is what timeit.repeat() function allows you to do.
Example:
import timeit count = 1 def foo(x): global count print(f'Output for call{count} = {x * 3}') count += 1 a = timeit.repeat(lambda: foo(8), number=1, repeat=3)
print(a)
s = 0
for i in a: s = s + i
print("Best Outcome: ", s)
Output:
Output for call1 = 24
Output for call2 = 24
Output for call3 = 24
[5.160000000001275e-05, 1.3399999999996748e-05, 1.0399999999993748e-05]
Best Outcome: 7.540000000000324e-05
Instead of using timeit.timeit() function, we can also use the timeit.default_timer(), which is a better option as it provides the best clock available based on the platform and Python version you are using, thereby generating more accurate results. Using timeit.default_timer() is quite similar to using time.time().
Example:
import timeit
import time def perimeter(x): time.sleep(5) return 4 * x def area(x): time.sleep(2) return x * x begin = timeit.default_timer() start = timeit.default_timer()
p = perimeter(8)
end = timeit.default_timer()
print("Perimeter: ", p)
print("Time Taken by Perimeter(): ", end - start) start = timeit.default_timer()
a = area(8)
end = timeit.default_timer()
print("Area: ", a)
print("Time Taken by Perimeter(): ", end - start) end = timeit.default_timer()
print("Total time elapsed: ", end - begin)
Output:
Perimeter: 32
Time Taken by Perimeter(): 5.0143883
Area: 64
Time Taken by Perimeter(): 2.0116591
Total time elapsed: 7.0264410999999996
The elapsed time can also be calculated using the DateTime.datetime.now() function from the datetime module in Python. The output of the method is represented as days, hours, and minutes. However, the disadvantage of this method is that it is slower than the timeit() module since calculating the difference in time is also included in the execution time.
Example:
import datetime
import time def perimeter(x): time.sleep(5) return 4 * x def area(x): time.sleep(2) return x * x begin = datetime.datetime.now() start = datetime.datetime.now()
p = perimeter(8)
end = datetime.datetime.now()
print("Perimeter: ", p)
print("Time Taken by Perimeter(): ", end - start) start = datetime.datetime.now()
a = area(8)
end = datetime.datetime.now()
print("Area: ", a)
print("Time Taken by Perimeter(): ", end - start) end = datetime.datetime.now()
print("Total time elapsed: ", end - begin)
Output:
Perimeter: 32
Time Taken by Perimeter(): 0:00:05.003221
Area: 64
Time Taken by Perimeter(): 0:00:02.011262
Total time elapsed: 0:00:07.014483
Thus to sum things up, you can use one of the following modules in Python to calculate the elapsed time of your code:
With that, we come to the end of this tutorial, and I hope you found it helpful. Please subscribe and stay tuned for more interesting articles.
Here’s a list of highly recommended tutorials if you want to dive deep into the execution time of your code and much more:
Given a list in Python. How to check if the list has an even number of elements?
Examples:
[] --> True[1] --> False[1, 2] --> True[1, 2, 3] --> FalseRelated Article:
The most Pythonic way to check if a list has an even number of elements is to use the modulo expression len(my_list)%2 that returns 1 if the list length is odd and 0 if the list length is even. So to check if a list has an even number of elements use the expression len(my_list)%2==0.
Here’s a simple code example:
def check_even(my_list): return len(my_list)%2==0 print(check_even([]))
# True print(check_even([1]))
# False print(check_even([1, 2]))
# True print(check_even([1, 2, 3]))
# False
As background, feel free to watch the following video on the modulo operator:
The length function is explained in this video and blog article:
A slight variant of this method is the following.
To check if a list has an even number of elements, you can use the modulo expression len(my_list)%2 that returns 1 if the list length is odd and 0 if the list length is even. So to convert the even value 0 to a boolean, use the built-in bool() function around the result and invert the result, i.e., not bool(len(my_list)%2).
Here’s a simple code example:
def check_even(my_list): return not bool(len(my_list)%2) print(check_even([]))
# True print(check_even([1]))
# False print(check_even([1, 2]))
# True print(check_even([1, 2, 3]))
# False
As background, you may want to look at this explainer video:
You can use the expression len(my_list)&1 that uses the Bitwise AND operator to return 1 if the list has an even number of elements and 0 otherwise. Now, you simply convert it to a Boolean if needed using the bool() function and invert it using the not operator: not bool(len(my_list)&1).
Python’s bitwise AND operator x & y performs logical AND on each bit position on the binary representations of integers x and y. Thus, each output bit is 1 if both input bits at the same position are 1, otherwise, it’s 0.
If you run x & 1, Python performs logical and with the bit sequence y=0000...001. For the result, all positions will be 0 and the last position will be 1 only if x‘s last position is already 1 which means it is odd.
After converting it using bool(), you still need to invert it using the not operator so that it returns True if the list has an even number of elements.
Here’s an example:
def check_even(my_list): return not bool(len(my_list)&1) print(check_even([]))
# True print(check_even([1]))
# False print(check_even([1, 2]))
# True print(check_even([1, 2, 3]))
# False
Bitwise AND is more efficient than the modulo operator so if performance is an issue for you, you may want to use this third approach.
You may want to watch this video on the Bitwise AND operator:
Enough theory. Let’s get some practice!
Coders get paid six figures and more because they can solve problems more effectively using machine intelligence and automation.
To become more successful in coding, solve more real problems for real people. That’s how you polish the skills you really need in practice. After all, what’s the use of learning theory that nobody ever needs?
You build high-value coding skills by working on practical coding projects!
Do you want to stop learning with toy projects and focus on practical code projects that earn you money and solve real problems for people?
 If your answer is YES!, consider becoming a Python freelance developer! It’s the best way of approaching the task of improving your Python skills—even if you are a complete beginner.
If you just want to learn about the freelancing opportunity, feel free to watch my free webinar “How to Build Your High-Income Skill Python” and learn how I grew my coding business online and how you can, too—from the comfort of your own home.
Before I show you the top 20 skills of a DevOps engineer, let’s quickly have a look at three concise definitions of DevOps first!
DevOps is short for software development (Dev) and IT operations (Ops).
Definition from Atlassian:
DevOps is a set of practices that automates the processes between software development and IT teams, in order that they can build, test, and release software faster and more reliably.
Definition from TechTarget:
A DevOps engineer/specialist works with engineers, software developers, system operators (SysOps) and administrators (SysAdmins), and other production IT professionals to release and deploy code in the real world.
Definition from AWS:
DevOps is the combination of cultural philosophies, practices, and tools that increases an organization’s ability to deliver applications and services at high velocity: evolving and improving products at a faster pace than organizations using traditional software development and infrastructure management processes.
You can play this video as you go over the full article—it’ll play well in the background and you can absorb more information this way:
If you’re interested in learning more about the income and opportunities of DevOps engineers, feel free to check out my in-depth tutorial on the Finxter blog.
Read More: DevOps Specialist — Income and Opportunity

Let’s dive into the top 20 skills of a DevOps engineer one by one:
DevOps engineers do not sit in an office and code all day. They must align goals and coordinate with both the developers and the operations teams. Great communication is crucial for DevOps engineers!
Many problems can be solved before they occur if you listen either to the developers who are close to the code or to the operators who are close to the customers. As a DevOps engineer, you need to listen to both in order to prevent problems before they happen.
A DevOps engineer is a great listener!
There are multiple popular tools specifically to increase efficiency of DevOps engineers. Understanding relevant DevOps tools well is crucial for any professional!
I’ve written an “Income and Opportuntiy” article on some of the most popular tools here:
Without understanding code, you cannot possibly become a great DevOps engineer. Yes, you are neither a developer nor an operator so you don’t need to lose yourself in the nitty-gritty details of programming.
However, you need to know your stuff. Because If you don’t know at least the basics of coding, developers and operators alike will run all over you!
DevOps engineers are coders too!
Likewise, SysAdmins are really great in scripting, Linux, SSH, Powershell, and many other scripting languages that help them keep a system running smoothly.
That’s why DevOps engineers need to understand the basics of scripting so they can talk the language of SysAdmins and SysOps engineers.
We already established that communication is important for DevOps—and scripting is communication.
Technologies fade away. Fundamentals stay. If you learned the basics of operating systems 20 years ago, you’d have built yourself a skillset for life!
DevOps engineers know the basics of operating systems because it helps them easily keep up with new technologies and tools that arise in both the developer and operator fields.
DevOps engineers understand operating systems.
Yeah, you don’t need to be a distributed system master. But again, you must know the stuff that’s in, say, a 10 page Wikipedia article on distributed systems:
DevOps engineers understand distributed systems because they need to keep up with the latest developments in cloud computing.
Speaking of which…
Deployment is where DevOps engineers shine.
 Make no mistake: Learning cloud computing is one of the most important, most sought-after, and most profitable things you can do as a developer! This is also true for DevOps engineers.
Cloud services such as storage, compute, scaling, and machine learning provide a comprehensive IT environment to a wide range of businesses.
This is where the applications get deployed, so as a DevOps engineer you must understand cloud computing very well!
You can find out more about the three biggest cloud providers — and related job roles in our Finxter blog tutorials here:
Before deploying software, you need to test it to find all bugs you can possibly find.
Testing is an integral part of any software engineering cycle because it helps you find bugs that both affect the future development of new features, as well as the deployment and operations of an existing software system.
You won’t be leading a stress-free life if you don’t spend lots of effort testing your application before launching it. This is one of the main responsibilities of a DevOps engineer as well!
Who said it’s going to be easy?
DevOps engineers only orchestrate but seldomly build themselves.
The building is done by developer teams that need to be managed. DevOps engineers help in managing those teams.
The operations is done by operators such as SysAdmins that need to be managed as well.
And management is only half of the job — every leader must know how to motivate their teams and reduce friction.
Much of this can be done by listening to the concerns of the implementers. A great DevOps engineers knows this and invests great effort in learning those soft skills.
Speaking of which…
Well, some of the skills mentioned in this article already are soft skills (e.g., listening and communication). However, there are more. DevOps engineers often have great presentation skills and they can figure out problems quickly.
They are sharp thinkers and they remain solution-oriented when bottlenecks in development and operations occur.
Don’t panic!
Really, don’t panic—you’ll learn many of the soft skills just by osmosis being in the field for a long time.
Here’s a great excerpt on the relationship of DevOps and agile from Wikipedia:
The motivations for what has become modern DevOps and several standard DevOps practices such as automated build and test, continuous integration, and continuous delivery originated in the Agile world, which dates (informally) to the 1990s, and formally to 2001.
Agile development teams using methods such as Extreme Programming couldn’t “satisfy the customer through early and continuous delivery of valuable software” unless they subsumed the operations / infrastructure responsibilities associated with their applications, many of which they automated.
Because Scrum emerged as the dominant Agile framework in the early 2000s and it omitted the engineering practices that were part of many Agile teams, the movement to automate operations/infrastructure functions splintered from Agile and expanded into what has become modern DevOps.
Today, DevOps focuses on the deployment of developed software, whether it is developed via Agile or other methodologies.
Why not read the article on Agile — and checking out one of the many free courses online?
Speed of deployment leads to risk in the operations phase: your application or system can get attacked by malicious hackers.
(Yes, some hackers are not malicious.)
Security is one of the pillars of a reliable system that is capable to survive and even thrive in the long term. Without it, your system will eventually fail.
There’s even a term for security for DevOps: DevSecOps. I know it’s not pretty but it delivers the message: security skills are needed and deeply desired by companies seeking DevOps engineers.
Here’s the definition from RedHat:
DevSecOps stands for development, security, and operations. It’s an approach to culture, automation, and platform design that integrates security as a shared responsibility throughout the entire IT lifecycle.
Automation is at the heart of any DevOps process.
It’s your bread and butter as a DevOps engineer, so give it the attention it deserves:
DevOps engineering is a lot about automation so don’t skip this skill set!
Make no mistake—being able to understand the needs and pain points of your customer is a skill.
As a DevOps engineer, you’re ultimately paid by the customers of your organization. They pay the stakeholders of your company who pay you.
So, DevOps engineers know on a high-level basis what their customer need. However, they are not marketing or sales people so a rough understanding is sufficient.
You cannot do everything as a DevOps engineer after all.
Software engineering is a systematic engineering approach to software development.
Definition: Software engineering examines the design, development, and maintenance of software. It concerns the reduction of problems and issues that arise with low-quality code such as exceeding timelines, budgets, or quality of service (QoS). (source)
This is one of the fields where a detailed study can yield extraordinary results for your practical work as a DevOps engineer.
So, take a mental note to take a course or two on “software engineering”. A great introductory book on the topic is “The Art of Clean Code”.
Site reliability engineering applies software engineering principles to infrastructure and operations to create scalable and highly reliable software systems.
It is closely related to DevOps in that it helps deliver value to customers by focusing more on operations rather than the creation of a software system.
Related Tutorial: Site Reliability Engineer — Income and Opportunity
A DevOps engineer needs to understand the relevant developer tools, at least rudimentary, such as Git, building tools such as Gradle, or IDEs such as PyCharm.
DevOps engineers know the coding tools!
A DevOps engineer needs to understand the basic tools used by SysOps and SysAdmins.
Here’s a list of the most relevant (Windows) tools recommended by SysOps expert Paolo:
If you haven’t figured it out already, DevOps engineering is one of the most demanding jobs in any organization in terms of the skills you’ll build over time.
Nobody expects you to have all the skills from the getgo. Be bold and get started — and commit yourself to lifetime learning!
We’ve explored the following skills of a DevOps engineer:
You don’t need to master all of them before starting out—this would be impossible. Just keep them in mind as you gain practical experience and never stop learning!
Enough theory. Let’s get some practice!
Coders get paid six figures and more because they can solve problems more effectively using machine intelligence and automation.
To become more successful in coding, solve more real problems for real people. That’s how you polish the skills you really need in practice. After all, what’s the use of learning theory that nobody ever needs?
You build high-value coding skills by working on practical coding projects!
Do you want to stop learning with toy projects and focus on practical code projects that earn you money and solve real problems for people?
If your answer is YES!, consider becoming a Python freelance developer! It’s the best way of approaching the task of improving your Python skills—even if you are a complete beginner.
If you just want to learn about the freelancing opportunity, feel free to watch my free webinar “How to Build Your High-Income Skill Python” and learn how I grew my coding business online and how you can, too—from the comfort of your own home.
Problem: How to convert one or more tuples to a csv file?
Example: Given is a tuple or list of tuples—for example, salary data of employees in a given company:
salary = [('Alice', 'Data Scientist', 122000), ('Bob', 'Engineer', 77000), ('Ann', 'Manager', 119000)]
Your goal is to write the content of the list of tuples into a comma-separated-values (CSV) file format. Your out file should look like this:
# file.csv
Alice,Data Scientist,122000
Bob,Engineer,77000
Ann,Manager,119000
Note that writing a single tuple to a CSV is a subproblem of writing multiple tuples to a CSV that can be easily solved by passing a list with a single tuple as an input to any function we’ll discuss in the article.
Solution: There are four simple ways to convert a list of tuples to a CSV file in Python.
csv module in Python, create a csv writer object, and write the list of tuples to the file in using the writerows() method on the writer object.DataFrame.to_csv('file.csv').numpy.savetxt('file.csv', array, delimiter=',') method.My preference is method 2 (Pandas) because it’s simplest to use and most robust for different input types (numerical or textual).
 Try It Yourself: Before we dive into these methods in more detail, feel free to play with them in our interactive code shell. Simply click the “Run” button and find the generated CSV files in the “Files” tab.

Do you want to develop the skills of a well-rounded Python professional—while getting paid in the process? Become a Python freelancer and order your book Leaving the Rat Race with Python on Amazon (Kindle/Print)!

You can convert a list of tuples to a CSV file in Python easily—by using the csv library. This is the most customizable of all four methods.
salary = [('Alice', 'Data Scientist', 122000), ('Bob', 'Engineer', 77000), ('Ann', 'Manager', 119000)] # Method 1
import csv
with open('file.csv', 'w', newline='') as f: writer = csv.writer(f) writer.writerows(salary)
Output:
# file.csv
Alice,Data Scientist,122000
Bob,Engineer,77000
Ann,Manager,119000
In the code, you first open the file using Python’s standard open() command. Now, you can write content to the file object f.
Next, you pass this file object to the constructor of the CSV writer that implements some additional helper method—and effectively wraps the file object providing you with new CSV-specific functionality such as the writerows() method.
You now pass a list of tuples to the writerows() method of the CSV writer that takes care of converting the list of tuples to a CSV format.
You can customize the CSV writer in its constructor (e.g., by modifying the delimiter from a comma ',' to a whitespace ' ' character). Have a look at the specification to learn about advanced modifications.

You can convert a tuple or list of tuples to a Pandas DataFrame that provides you with powerful capabilities such as the to_csv() method. This is the easiest method and it allows you to avoid importing yet another library (I use Pandas in many Python projects anyways).
salary = [('Alice', 'Data Scientist', 122000), ('Bob', 'Engineer', 77000), ('Ann', 'Manager', 119000)] # Method 2
import pandas as pd
df = pd.DataFrame(salary)
df.to_csv('file2.csv', index=False, header=False)
Output:
# file2.csv
Alice,Data Scientist,122000
Bob,Engineer,77000
Ann,Manager,119000
You create a Pandas DataFrame—which is Python’s default representation of tabular data. Think of it as an Excel spreadsheet within your code (with rows and columns).
The DataFrame is a very powerful data structure that allows you to perform various methods. One of those is the to_csv() method that allows you to write its contents into a CSV file.
You set the index and header arguments of the to_csv() method to False because Pandas, per default, adds integer row and column indices 0, 1, 2, ….
Again, think of them as the row and column indices in your Excel spreadsheet. You don’t want them to appear in the CSV file so you set the arguments to False.
If you want to customize the CSV output, you’ve got a lot of special arguments to play with. Check out this article for a comprehensive list of all arguments.

Related article: Pandas Cheat Sheets to Pin to Your Wall
NumPy is at the core of Python’s data science and machine learning functionality. Even Pandas uses NumPy arrays to implement critical functionality.
You can convert a list of tuples to a CSV file by using NumPy’s savetext() function and passing the NumPy array as an argument that arises from the conversion of the list of tuples.
This method is best if you have numerical data only—otherwise, it’ll lead to complicated data type conversions which are not recommended.
a = [(1, 2, 3), (4, 5, 6), (7, 8, 9)] # Method 3
import numpy as np
a = np.array(a)
np.savetxt('file3.csv', a, delimiter=',')
Output:
# file3.csv
1.000000000000000000e+00,2.000000000000000000e+00,3.000000000000000000e+00
4.000000000000000000e+00,5.000000000000000000e+00,6.000000000000000000e+00
7.000000000000000000e+00,8.000000000000000000e+00,9.000000000000000000e+00
The output doesn’t look pretty: it stores the values as floats. But no worries, you can reformat the output using the format argument fmt of the savetxt() method (more here). However, I’d recommend you stick to method 2 (Pandas) to avoid unnecessary complexity in your code.
If you don’t want to import any library and still convert a list of tuples into a CSV file, you can use standard Python implementation as well: it’s not complicated and efficient. However, if possible you should rely on libraries that do the job for you.
This method is best if you won’t or cannot use external dependencies.
salary = [('Alice', 'Data Scientist', 122000), ('Bob', 'Engineer', 77000), ('Ann', 'Manager', 119000)] # Method 4
with open('file4.csv','w') as f: for row in salary: for x in row: f.write(str(x) + ',') f.write('\n')
Output:
# file4.csv
Alice,Data Scientist,122000,
Bob,Engineer,77000,
Ann,Manager,119000,
In the code, you first open the file object f. Then you iterate over each row and each element in the row and write the element to the file—one by one. After each element, you place the comma to generate the CSV file format. After each row, you place the newline character '\n'.
Note: to get rid of the trailing comma, you can check if the element x is the last element in the row within the loop body and skip writing the comma if it is.
The following video shows how to convert a list of lists to a CSV in Python, converting a tuple or list of tuples will be similar:
Enough theory. Let’s get some practice!
Coders get paid six figures and more because they can solve problems more effectively using machine intelligence and automation.
To become more successful in coding, solve more real problems for real people. That’s how you polish the skills you really need in practice. After all, what’s the use of learning theory that nobody ever needs?
You build high-value coding skills by working on practical coding projects!
Do you want to stop learning with toy projects and focus on practical code projects that earn you money and solve real problems for people?
If your answer is YES!, consider becoming a Python freelance developer! It’s the best way of approaching the task of improving your Python skills—even if you are a complete beginner.
If you just want to learn about the freelancing opportunity, feel free to watch my free webinar “How to Build Your High-Income Skill Python” and learn how I grew my coding business online and how you can, too—from the comfort of your own home.
Before we learn about the money, let’s get this question out of the way:
A product manager (PM) identifies customer needs and communicates “success metrics” with the internal team building the product. By understanding the customer needs and what a successful product looks like, the product manager is an integral part of driving the project forward and turning a vision into reality.
In particular, PMs drive the physical or digital product strategy including requirements engineering and feature release management (see agile development).
PMs orchestrate the product development with software engineers, data scientists, and designers — and take over the responsibility for the ultimate product outcome.
For organizational and individual success, ownership, accountability, and responsibility are crucial. That’s why great PMs are in demand and highly paid (see later).
You can watch this video as you scan over the post:
This excellent graphic also shows the intersection of business, tech, and UX that is the world of a product manager:
Product managers traditionally resided in the marketing organizations of technology companies. But in recent years, the role has become much more in demand and PMs now work in a wide variety of companies and different departments in engineering, marketing, and software development. (source)
Here are some companies where you can work as a PM:
Basically, all major companies have lots of work for a PM one way or the other.
As a product manager, you need to fulfill the following responsibilities:
How much does a Product Manager make per year?

The average annual income of a Product Manager in the United States is between $100,827 and $133,593 with an average of $113,277 and a median of $113,277 per year.
This data is based on our meta-study of eight salary aggregators sources such as Glassdoor, ZipRecruiter, and PayScale.
| Source | Average Income |
|---|---|
| Glassdoor.com | $113,446 |
| Comparably.com | $111,000 |
| Builtin.com | $123,624 |
| Indeed.com | $100,827 |
| Salary.com | $133,593 |
| PayScale.com | $100,446 |
| Aha.io | $113,000 |
| Talent.com | $110,281 |
Let’s have a look at the hourly rate of Product Managers next!
Product Managers are well-paid on freelancing platforms such as Upwork or Fiverr.
If you decide to go the route as a freelance Product Manager, you can expect to make between $60 and $300 per hour on Upwork (source). Assuming an annual workload of 2000 hours, you can expect to make between $120,000 and $600,000 (!) per year.
Seriously!

 Note: Do you want to create your own thriving coding business online? Feel free to check out our freelance developer course — the world’s #1 best-selling freelance developer course that specifically shows you how to succeed on Upwork and Fiverr!
But is there enough demand? Let’s have a look at Google trends to find out how interest evolves over time (source):

Interestingly, the demand for “hire product manager” grows even faster in recent years (source):

So, becoming a PM may be one of the best career choices for ambitious product people that want to maximize their earnings and value creation potential.
Do you want to become a Product Manager? Here’s a step-by-step learning path I’d propose to get started:
… and never stop learning!
These are some interesting books on PM:

It doesn’t harm to get some computer science and coding skills — because this is how products get made in today’s world!
You can find many additional computer science courses on the Finxter Computer Science Academy (flatrate model).
But don’t wait too long to acquire practical experience!
Even if you have few skills, it’s best to get started as a freelance developer and learn as you work on real projects for clients — earning income as you learn and gaining motivation through real-world feedback.
Tip: An excellent start to turbo-charge your freelancing career (earning more in less time) is our Finxter Freelancer Course. The goal of the course is to pay for itself!
I compiled these tips from my own experience creating products in a role similar to that of a PM, and mixed my own tips with those published by various experts in the field. Feel free to study those excellent resources as well!
Further Reading and Resources:
You can find more job descriptions for coders, programmers, and computer scientists in our detailed overview guide:
The following statistic shows the self-reported income from 9,649 US-based professional developers (source).
The average annual income of professional developers in the US is between $70,000 and $177,500 for various programming languages.

Question: What is your current total compensation (salary, bonuses, and perks, before taxes and deductions)? Please enter a whole number in the box below, without any punctuation. If you are paid hourly, please estimate an equivalent weekly, monthly, or yearly salary. (source)
The following statistic compares the self-reported income from 46,693 professional programmers as conducted by StackOverflow.
The average annual income of professional developers worldwide (US and non-US) is between $33,000 and $95,000 for various programming languages.
Here’s a screenshot of a more detailed overview of each programming language considered in the report:

Here’s what different database professionals earn:

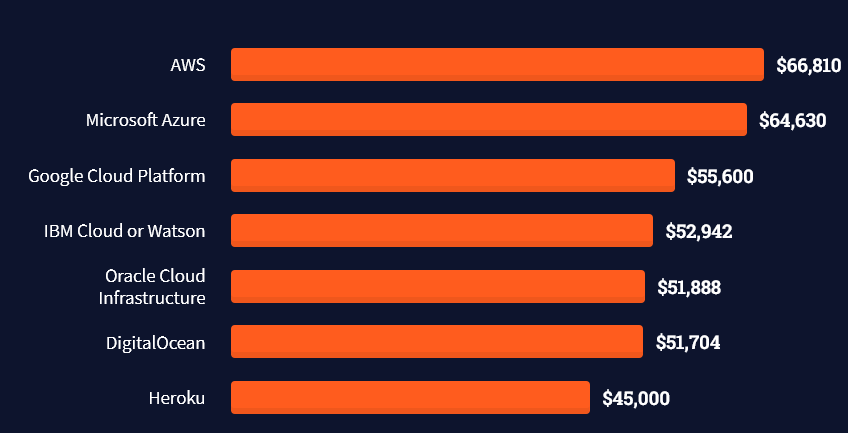
Here’s an overview of different cloud solutions experts:
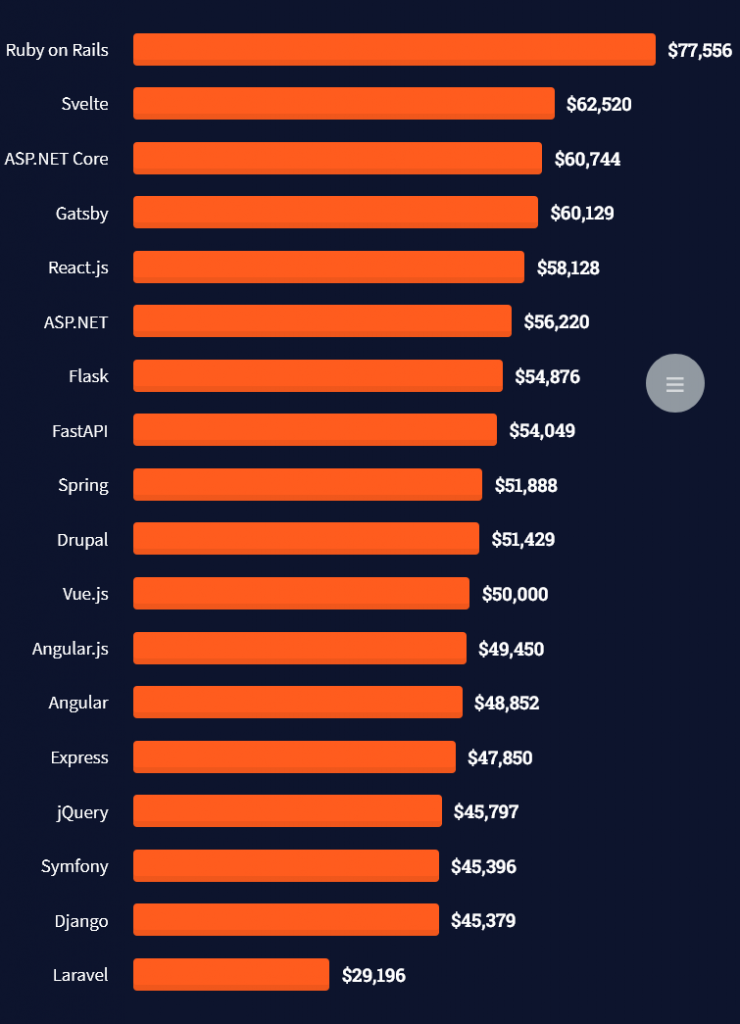
Here’s what professionals in web frameworks earn:
There are many other interesting frameworks—that pay well!
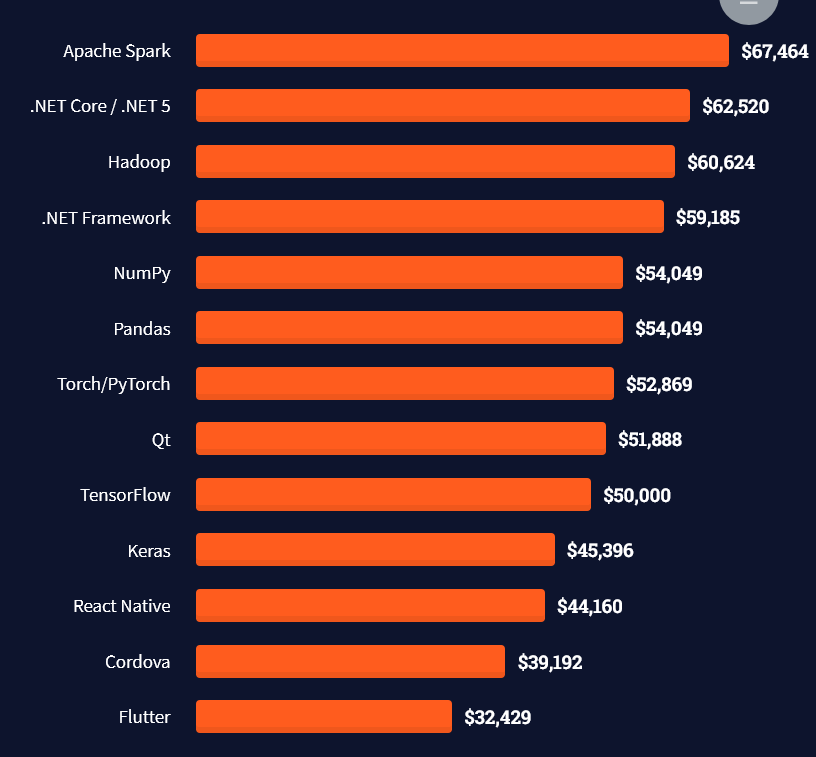
Look at those tools:

Okay, but what do you need to do to get there? What are the skill requirements and qualifications to make you become a professional developer in the area you desire?
Let’s find out next!
StackOverflow performs an annual survey asking professionals, coders, developers, researchers, and engineers various questions about their background and job satisfaction on their website.
Interestingly, when aggregating the data of the developers’ educational background, a good three quarters have an academic background.
Here’s the question asked by StackOverflow (source):
Which of the following best describes the highest level of formal education that you’ve completed?
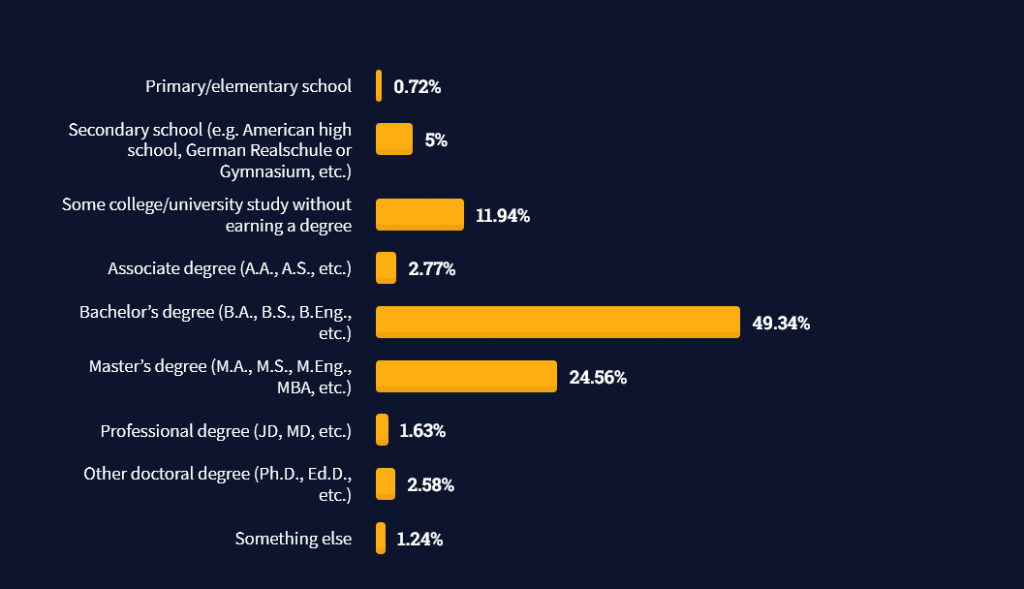
However, if you don’t have a formal degree, don’t fear! Many of the respondents with degrees don’t have a degree in their field—so it may not be of much value for their coding careers anyways.
Also, about one out of four don’t have a formal degree and still succeeds in their field! You certainly don’t need a degree if you’re committed to your own success!
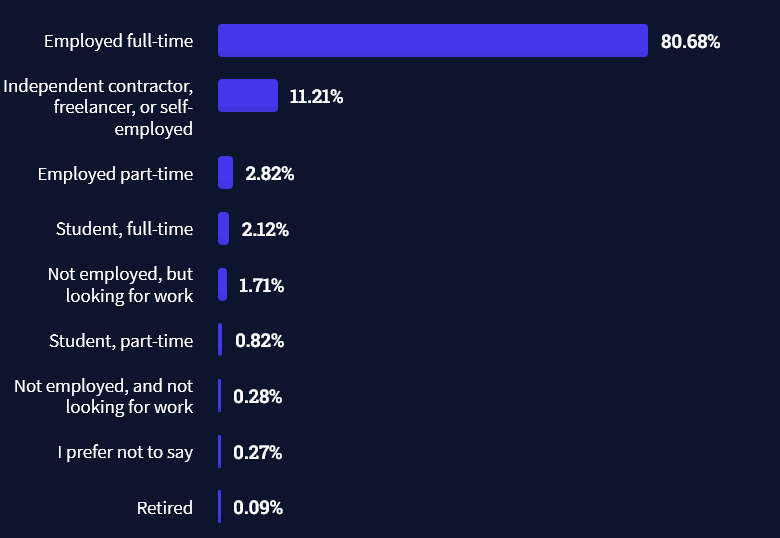
The percentage of freelance developers increases steadily. The fraction of freelance developers has already reached 11.21%!
This indicates that more and more work will be done in a more flexible work environment—and fewer and fewer companies and clients want to hire inflexible talent.
Here are the stats from the StackOverflow developer survey (source):
Do you want to become a professional freelance developer and earn some money on the side or as your primary source of income?
Resource: Check out our freelance developer course—it’s the best freelance developer course in the world with the highest student success rate in the industry!
The StackOverflow developer survey collected 58000 responses about the following question (source):
Which programming, scripting, and markup languages have you done extensive development work in over the past year, and which do you want to work in over the next year?
These are the languages you want to focus on when starting out as a coder:

And don’t worry—if you feel stuck or struggle with a nasty bug. We all go through it. Here’s what SO survey respondents and professional developers do when they’re stuck:
What do you do when you get stuck on a problem? Select all that apply. (source)

To get started with some of the fundamentals and industry concepts, feel free to check out these articles:
Enough theory. Let’s get some practice!
Coders get paid six figures and more because they can solve problems more effectively using machine intelligence and automation.
To become more successful in coding, solve more real problems for real people. That’s how you polish the skills you really need in practice. After all, what’s the use of learning theory that nobody ever needs?
You build high-value coding skills by working on practical coding projects!
Do you want to stop learning with toy projects and focus on practical code projects that earn you money and solve real problems for people?
If your answer is YES!, consider becoming a Python freelance developer! It’s the best way of approaching the task of improving your Python skills—even if you are a complete beginner.
If you just want to learn about the freelancing opportunity, feel free to watch my free webinar “How to Build Your High-Income Skill Python” and learn how I grew my coding business online and how you can, too—from the comfort of your own home.
[1] The following code was used to create the figure.
import matplotlib.pyplot as plt
import numpy as np
import math data = [113446, 111000, 123624, 100827, 133593, 100446, 113000, 110281] labels = ['Glassdoor.com', 'Comparably.com', 'Builtin.com', 'Indeed.com', 'Salary.com', 'PayScale.com', 'Aha.io', 'Talent.com'] median = np.median(data)
average = np.average(data)
print(median, average)
n = len(data) plt.plot(range(n), [median] * n, color='black', label='Median: $' + str(int(median)))
plt.plot(range(n), [average] * n, '--', color='red', label='Average: $' + str(int(average)))
plt.bar(range(len(data)), data)
plt.xticks(range(len(data)), labels, rotation='vertical', position = (0,0.45), color='white', weight='bold')
plt.ylabel('Average Income ($)')
plt.title('Product Manager Annual Income - by Finxter')
plt.legend()
plt.show()
