TLDR: GPT-4 with vision (GPT-4V) is now out for many ChatGPT Plus users in the US and some other regions! You can instruct GPT-4 to analyze image inputs. GPT-4V incorporates additional modalities such as image inputs into large language models (LLMs). Multimodal LLMs will expand the reach of AI from mainly language-based applications to a broad range of brand-new application categories that go beyond language user interfaces (UIs).
GPT-4V could explain why a picture was funny by talking about different parts of the image and their connections. The meme in the picture has words on it, which GPT-4V read to help make its answer. However, it made an error. It wrongly said the fried chicken in the image was called “NVIDIA BURGER” instead of “GPU”.
Still impressive! OpenAI’s GPT-4 with Vision (GPT-4V) represents a significant advancement in artificial intelligence, enabling the analysis of image inputs alongside text.
Let’s dive into some additional examples I and others encountered:
More Examples
Prompting GPT-4V with "How much money do I have?" and a photo of some foreign coins:
It can also identify locations from photos and give you information about plants you make photos of. In this way, it’s similar to Google Lens but much better and more interactive with a higher level of image understanding.
It can do optical character recognition (OCR) almost flawlessly:
Speaking of coding, here’s a fun example by another creative developer, Matt Shumer:
"The first GPT-4V-powered frontend engineer agent. Just upload a picture of a design, and the agent autonomously codes it up, looks at a render for mistakes, improves the code accordingly, repeat. Utterly insane." (source)
I’ve even seen GPT-4V analyzing financial data like Bitcoin indicators:
source
I could go on forever. Here are 20 more ideas of how to use GPT-4V that I found extremely interesting, fun, and even visionary:
Visual Assistance for the Blind: GPT-4V can describe the surroundings or read out text from images to assist visually impaired individuals.
Educational Tutor: It can analyze diagrams and provide detailed explanations, helping students understand complex concepts.
Medical Imaging: Assist doctors by providing preliminary observations from medical images (though not for making diagnoses).
Recipe Suggestions: Users can show ingredients they have, and GPT-4V can suggest possible recipes.
Fashion Advice: Offer fashion tips by analyzing pictures of outfits.
Plant or Animal Identification: Identify and provide information about plants or animals in photos.
Travel Assistance: Analyze photos of landmarks to provide historical and cultural information.
Language Translation: Read and translate text in images from one language to another.
Home Decor Planning: Provide suggestions for home decor based on pictures of users’ living spaces.
Art Creation: Offer guidance and suggestions for creating art by analyzing images of ongoing artwork.
Fitness Coaching: Analyze workout or yoga postures and offer corrections or enhancements.
Event Planning: Assist in planning events by visualizing and organizing space, decorations, and layouts.
Shopping Assistance: Help users in making purchasing decisions by analyzing product images and providing information.
Gardening Advice: Provide gardening tips based on pictures of plants and their surroundings.
DIY Project Guidance: Offer step-by-step guidance for DIY projects by analyzing images of the project at various stages.
Safety Training: Analyze images of workplace environments to offer safety recommendations.
Historical Analysis: Provide historical context and information for images of historical events or figures.
Real Estate Assistance: Analyze images of properties to provide insights and information for buyers or sellers.
Wildlife Research: Assist researchers by analyzing images of wildlife and their habitats.
Meme Creation: Help users create memes by suggesting text or edits based on the image provided.
These are truly mind-boggling times. Most of those ideas are million-dollar startup ideas. Some ideas (like the real estate assistance app #18) could become billion-dollar businesses that are mostly built on GPT-4V’s functionality and are easy to implement for coders like you and me.
If you’re interested, feel free to read my other article on the Finxter blog:
GPT-4V is a multimodal large language model that incorporates image inputs, expanding the impact of language-only systems by solving new tasks and providing novel experiences for users. It builds upon the work done for GPT-4, employing a similar training process and reinforcement learning from human feedback (RLHF) to produce outputs preferred by human trainers.
From an everyday user perspective that doesn’t try to harm people, the "Sorry I cannot do X" reply will remain one of the more annoying parts of LLM tech, unfortunately.
However, the race is on! People have still reported jailbroken queries like this:
I hope you had fun reading this compilation of GPT-4V ideas. Thanks for reading! If you’re not already subscribed, feel free to join our popular Finxter Academy with dozens of state-of-the-art LLM prompt engineering courses for next-level exponential coders. It’s an all-you-can-learn inexpensive way to remain on the right side of change.
For example, this is one of our recent courses:
Prompt Engineering with Llama 2
The Llama 2 Prompt Engineering course helps you stay on the right side of change. Our course is meticulously designed to provide you with hands-on experience through genuine projects.
You’ll delve into practical applications such as book PDF querying, payroll auditing, and hotel review analytics. These aren’t just theoretical exercises; they’re real-world challenges that businesses face daily.
By studying these projects, you’ll gain a deeper comprehension of how to harness the power of Llama 2 using Python, Langchain, Pinecone, and a whole stack of highly practical tools of exponential coders in a post-ChatGPT world.
To remove all Unicode characters from a JSON string in Python, load the JSON data into a dictionary using json.loads(). Traverse the dictionary and use the re.sub() method from the re module to substitute any Unicode character (matched by the regular expression pattern r'[^\x00-\x7F]+') with an empty string. Convert the updated dictionary back to a JSON string with json.dumps().
import json
import re # Original JSON string with emojis and other Unicode characters
json_str = '{"text": "I love  and  on a  day! \u200b \u1234"}' # Load JSON data
data = json.loads(json_str) # Remove all Unicode characters from the value
data['text'] = re.sub(r'[^\x00-\x7F]+', '', data['text']) # Convert back to JSON string
new_json_str = json.dumps(data) print(new_json_str)
# {"text": "I love and on a day! "}
The text "I love 🍕 and 🍦 on a ☀ day! \u200b \u1234" contains various Unicode characters including emojis and other non-ASCII characters. The code will output {"text": "I love and on a day! "}, removing all the Unicode characters and leaving only the ASCII characters.
This is only one method, keep reading to learn about alternative ones and detailed explanations!
Occasionally, you may encounter unwanted Unicode characters in your JSON files, leading to problems with parsing and displaying the data. Removing these characters ensures clean, well-formatted JSON data that can be easily processed and analyzed.
In this article, we will explore some of the best practices to achieve this, providing you with the tools and techniques needed to clean up your JSON data efficiently.
Understanding Unicode Characters
Unicode is a character encoding standard that includes characters from most of the world’s writing systems. It allows for consistent representation and handling of text across different languages and platforms. In this section, you’ll learn about Unicode characters and how they relate to JSON.
JSON is natively designed to support Unicode, which means it can store and transmit information in various languages without any issues. When you store a string in JSON, it can include any valid Unicode character, making it easy to work with multilingual data. However, certain Unicode characters might cause problems in specific scenarios, such as when using older software or transmitting data over a limited bandwidth connection.
In JSON, certain characters must be escaped, like quotation marks, reverse solidus, and control characters (U+0000 through U+001F). These characters must be represented using escape sequences in order for the JSON to be properly parsed.
You can find more information about escaping characters in JSON through this Stack Overflow discussion.
There might be times where you need to remove or replace Unicode characters from your JSON data. One way to achieve this is by using encoding and decoding techniques. For example, you can encode a string to ASCII while ignoring non-ASCII characters, and then decode it back to UTF-8.
JSON (JavaScript Object Notation) is a lightweight, text-based data interchange format that is easy to read and write. It has become one of the most popular data formats for exchanging information on the web. When dealing with JSON data, you may encounter situations where you need to remove or modify Unicode characters.
JSON is built on two basic structures: objects and arrays.
An object is an unordered collection of key-value pairs, while
an array represents an ordered list of values.
A JSON file typically consists of a single object or array, containing different types of data such as strings, numbers, and other objects.
When working with JSON data, it is important to ensure that the text is properly formatted. This includes using appropriate escape characters for special characters, such as double quotes and backslashes, as well as handling any Unicode characters in the text. Keep in mind that JSON is a human-readable format, so a well-formatted JSON file should be easy to understand.
Since JSON data is text-based, you can easily manipulate it using standard text-processing techniques. For example, to remove unwanted Unicode characters from a JSON file, you can use a combination of encoding and decoding methods, like this:
This process will remove all non-ASCII characters from the JSON data and return a new, cleaned-up version of the text.
How Unicode Characters Interact within JSON
In JSON, most Unicode characters can be freely placed within the string values. However, there are certain characters that must be escaped (i.e., replaced by a special sequence of characters) to be part of your JSON string. These characters include the quotation mark (U+0022), the reverse solidus (U+005C), and control characters ranging from U+0000 to U+001F.
When you encounter escaped Unicode characters in your JSON, they typically appear in a format like \uXXXX, where XXXX represents a 4-digit hexadecimal code. For example, the acute é character can be represented as \u00E9. JSON parsers can understand this format and interpret it as the intended Unicode character.
Sometimes, you might need or want to remove these Unicode characters from your JSON data. This can be done in various ways, depending on the programming language you are using. In Python, for instance, you could leverage the encode and decode functions to remove unwanted Unicode characters:
In this code snippet, the encode function tries to convert the original string to ASCII, replacing Unicode characters with basic ASCII equivalents. The ignore parameter specifies that any non-ASCII characters should be left out. Finally, the decode function transforms the bytes back into a string.
Method 1: Encoding and Decoding JSONs
JSON supports Unicode character sets, including UTF-8, UTF-16, and UTF-32. UTF-8 is the most commonly used encoding for JSON texts and it is well-supported across different programming languages and platforms.
If you come across unwanted Unicode characters in your JSON data while parsing, you can use the built-in encoding and decoding functions provided by most languages. For example, in Python, the json.dumps() and json.loads() functions allow you to encode and decode JSON data respectively. To remove unwanted Unicode characters, you can use the encode() and decode() functions available in string objects:
json_data = '{"quote_text": "This is an example of a JSON file with unicode characters like \\u201c and \\u201d."}'
decoded_data = json.loads(json_data)
cleaned_text = decoded_data['quote_text'].encode("ascii", "ignore").decode('utf-8')
In this example, the encode() function is used with the "ascii" argument, which ignores unicode characters outside the ASCII range. The decode() function then converts the encoded bytes object back to a string.
When dealing with JSON APIs and web services, be aware that different programming languages and libraries may have specific methods for encoding and decoding JSON data. Always consult the documentation for the language or library you are working with to ensure proper handling of Unicode characters.
Method 2: Python Regex to Remove Unicode from JSON
A second approach is to use a regex pattern before loading the JSON data. By applying a regex pattern, you can remove specific Unicode characters. For example, in Python, you can implement this with the re module as follows:
import json
import re def remove_unicode(input_string): return re.sub(r'\\u([0-9a-fA-F]{4})', '', input_string) json_string = '{"text": "Welcome to the world of \\u2022 and \\u2019"}'
json_string = remove_unicode(json_string)
parsed_data = json.loads(json_string)
This code uses the remove_unicode function to strip away any Unicode entities before loading the JSON string. Once you have a clean JSON data, you can continue with further processing.
Method 3: Replace Non-ASCII Characters
Another approach to removing Unicode characters is to replace non-ASCII characters after decoding the JSON data. This method is useful when dealing with specific character sets. Here’s an example using Python:
import json def remove_non_ascii(input_string): return ''.join(char for char in input_string if ord(char) < 128) json_string = '{"text": "Welcome to the world of \\u2022 and \\u2019"}'
parsed_data = json.loads(json_string)
cleaned_data = {} for key, value in parsed_data.items(): cleaned_data[key] = remove_non_ascii(value) print(cleaned_data)
# {'text': 'Welcome to the world of and '}
In this example, the remove_non_ascii function iterates over each character in the input string and retains only the ASCII characters. By applying this to each value in the JSON data, you can efficiently remove any unwanted Unicode characters.
When working with languages like JavaScript, you can utilize external libraries to remove Unicode characters from JSON data. For instance, in a Node.js environment, you can use the lodash library for cleaning Unicode characters:
const _ = require('lodash');
const json = {"text": "Welcome to the world of • and ’"}; const removeUnicode = (obj) => { return _.mapValues(obj, (value) => _.replace(value, /[\u2022\u2019]/g, ''));
}; const cleanedJson = removeUnicode(json);
In this example, the removeUnicode function leverages Lodash’s mapValues and replace functions to remove specific Unicode characters from the JSON object.
Handling Specific Unicode Characters in JSON
Dealing with Control Characters
Control characters are special non-printing characters in Unicode, such as carriage returns, linefeeds, and tabs. JSON requires that these characters be escaped in strings. When dealing with JSON data that contains control characters, it’s essential to escape them properly to avoid potential errors when parsing the data.
For instance, you can use the json.dumps() function in Python to output a JSON string with control characters escaped:
import json data = { "text": "This is a string with a newline character\nin it."
} json_string = json.dumps(data)
print(json_string)
This would output the following JSON string with the newline character escaped:
{"text": "This is a string with a newline character\\nin it."}
When you parse this JSON string, the control character will be correctly interpreted, and you’ll be able to access the data as expected.
Addressing Non-ASCII Characters
JSON strings can also contain non-ASCII Unicode characters, such as those from other languages. These characters may sometimes cause problems when processing JSON data in applications that don’t handle Unicode well.
One option is to escape non-ASCII characters when encoding the JSON data. You can do this by setting the ensure_ascii parameter of the json.dumps() function to True:
import json data = { "text": "こんにちは、世界!" # Japanese for "Hello, World!"
} json_string = json.dumps(data, ensure_ascii=True)
print(json_string)
This will output the JSON string with the non-ASCII characters escaped:
Keep in mind that when working with non-ASCII characters in JSON, it’s essential to use tools and libraries that support Unicode. This ensures that the data is correctly processed and displayed in your application.
Examples: Implementing the Unicode Removal
Before starting with the examples, make sure you have your JSON object ready for manipulation. In this section, you’ll explore different methods to remove unwanted Unicode characters from JSON objects, focusing on JavaScript implementation.
First, let’s look at a simple example using JavaScript’s replace() function and a regular expression. The following code showcases how to remove Unicode characters from a JSON string:
const jsonString = '{"message": "𝕴 𝖆𝖒 𝕴𝖗𝖔𝖓𝖒𝖆𝖓! I have some unicode characters."}';
const withoutUnicode = jsonString.replace(/[\u{0080}-\u{FFFF}]/gu, "");
console.log(withoutUnicode);
In the code above, the regular expression \u{0080}-\u{FFFF} covers most of the Unicode characters you might want to remove. By using the replace() function, you can replace those characters with an empty string ("").
Next, for more complex scenarios involving nested JSON objects, consider using a recursive function to traverse and clean up Unicode characters from the JSON data:
function cleanUnicode(jsonData) { if (Array.isArray(jsonData)) { return jsonData.map(item => cleanUnicode(item)); } else if (typeof jsonData === "object" && jsonData !== null) { const cleanedObject = {}; for (const key in jsonData) { cleanedObject[key] = cleanUnicode(jsonData[key]); } return cleanedObject; } else if (typeof jsonData === "string") { return jsonData.replace(/[\u{0080}-\u{FFFF}]/gu, ""); } else { return jsonData; }
} const jsonObject = { message: "𝕴 𝖆𝖒 𝕴𝖗𝖔𝖓𝖒𝖆𝖓! I have some unicode characters.", nested: { text: "𝕾𝖔𝖒𝖊 𝖚𝖓𝖎𝖈𝖔𝖉𝖊 𝖈𝖍𝖆𝖗𝖆𝖈𝖙𝖊𝖗𝖘 𝖍𝖊𝖗𝖊 𝖙𝖔𝖔!" }
}; const cleanedJson = cleanUnicode(jsonObject);
console.log(cleanedJson);
This cleanUnicode function processes arrays, objects, and strings, making it ideal for nested JSON data.
In conclusion, use the simple replace() method for single JSON strings, and consider a recursive approach for nested JSON data. Utilize these examples to confidently, cleanly, and effectively remove Unicode characters from your JSON data in JavaScript.
Common Errors and How to Resolve Them
When working with JSON data involving Unicode characters, you might encounter a few common errors that can easily be resolved. In this section, we will discuss these errors and provide solutions to overcome them.
One commonly observed issue is the presence of invalid Unicode characters in the JSON data. This can lead to decoding errors while parsing. To overcome this, you can employ a Python library called unidecode to remove accents and normalize the Unicode string into the closest possible representation in ASCII text. For example, using the unidecode library, you can transform a word like “François” into “Francois”:
from unidecode import unidecode
unidecode('François') # Output: 'Francois'
Another common error arises due to the presence of special characters in JSON data, which leads to parsing issues. Proper escaping of special characters is essential for building valid JSON strings. You can use the json.dumps() function in Python to automatically escape special characters in JSON strings. For instance:
import json
raw_data = {"text": "A string with special characters: \\, \", \'"}
json_string = json.dumps(raw_data)
Remember, it’s crucial to produce only 100% compliant JSON, as mentioned in RFC 4627. Ensuring that you follow these guidelines will help you avoid most of the common errors while handling Unicode characters in JSON.
Lastly, if you encounter non-compliant Unicode characters in text files, you can use a text editor like Notepad to remove them. For instance, you can save the file in Unicode format instead of the default ANSI format, which will help preserve the integrity of the Unicode characters.
By addressing these common errors, you’ll be able to effectively handle and process JSON data containing Unicode characters.
Conclusion
In summary, removing Unicode characters from JSON can be achieved using various methods. One approach is to encode the JSON string to ASCII and then decode it back to UTF-8. This method allows you to eliminate all Unicode characters in one go. For example, you can use the .encode("ascii", "ignore").decode('utf-8') technique to accomplish this, as explained on Stack Overflow.
Another option is applying regular expressions to target specific unwanted Unicode characters, as discussed in this Stack Overflow post. Employing regular expressions enables you to fine-tune your removal of specific Unicode characters from JSON strings.
Frequently Asked Questions
How to eliminate UTF-8 characters in Python?
To eliminate UTF-8 characters in Python, you can use the encode() and decode() methods. First, encode the string using ascii encoding with the ignore option, and then decode it back to utf-8. For example:
text = "Hello 你好"
sanitized_text = text.encode("ascii", "ignore").decode("utf-8")
What are the methods to remove non-ASCII characters in Python?
There are several methods to remove non-ASCII characters in Python:
Using the encode() and decode() methods as mentioned above.
Using a regular expression to filter out non-ASCII characters: re.sub(r'[^\x00-\x7F]+', '', text)
Using a list comprehension to create a new string with only ASCII characters: ''.join(c for c in text if ord(c) < 128)
How can Pandas be used to remove Unicode characters?
To remove Unicode characters in a Pandas dataframe, you can use the applymap() function combined with the encode() and decode() methods:
To replace Unicode characters in a JSON object, you can first convert the JSON object to a string using the json.dumps() method. Then, replace the Unicode characters using one of the methods mentioned earlier. Finally, parse the sanitized string back to a JSON object using the json.loads() method:
This will preserve the Unicode characters in the JSON output.
How can special characters be removed from a JSON file?
To remove special characters from a JSON file, first read the file and parse its content to a Python object using the json.loads() method. Then, iterate through the object and sanitize the strings, removing special characters using one of the mentioned methods. Finally, write the sanitized object back to a JSON file using the json.dump() method:
import json
import re with open("input.json", "r") as f: json_data = json.load(f) # sanitize your JSON object here with open("output.json", "w") as f: json.dump(sanitized_json_data, f)
This Llama 2 Prompt Engineering course helps you stay on the right side of change. Our course is meticulously designed to provide you with hands-on experience through genuine projects.
You’ll delve into practical applications such as book PDF querying, payroll auditing, and hotel review analytics.
These aren’t just theoretical exercises; they’re real-world challenges that businesses face daily.
By studying these projects, you’ll gain a deeper comprehension of how to harness the power of Llama 2 using Python, Langchain, Pinecone, and a whole stack of highly practical tools of exponential coders in a post-ChatGPT world.
Specifically, you’ll learn these topics (ToC):
This knowledge can be your foundation in creating solutions that have tangible value for real people. Equip yourself with the expertise to keep pace with technological change and be a proactive force in shaping it.
Summary: Use urllib.parse.urljoin() to scrape the base URL and the relative path and join them to extract the complete/absolute URL. You can also concatenate the base URL and the absolute path to derive the absolute path; but make sure to take care of erroneous situations like extra forward-slash in this case.
Quick Answer
When web scraping with BeautifulSoup in Python, you may encounter relative URLs (e.g., /page2.html) instead of absolute URLs (e.g., http://example.com/page2.html). To convert relative URLs to absolute URLs, you can use the urljoin() function from the urllib.parse module.
Below is an example of how to extract absolute URLs from the a tags on a webpage using BeautifulSoup and urljoin:
from bs4 import BeautifulSoup
import requests
from urllib.parse import urljoin # URL of the webpage you want to scrape
url = 'http://example.com' # Send an HTTP request to the URL
response = requests.get(url)
response.raise_for_status() # Raise an error for bad responses # Parse the webpage content
soup = BeautifulSoup(response.text, 'html.parser') # Find all the 'a' tags on the webpage
for a_tag in soup.find_all('a'): # Get the href attribute from the 'a' tag href = a_tag.get('href') # Use urljoin to convert the relative URL to an absolute URL absolute_url = urljoin(url, href) # Print the absolute URL print(absolute_url)
In this example:
url is the URL of the webpage you want to scrape.
response is the HTTP response obtained by sending an HTTP GET request to the URL.
soup is a BeautifulSoup object that contains the parsed HTML content of the webpage.
soup.find_all('a') finds all the a tags on the webpage.
a_tag.get('href') gets the href attribute from an a tag, which is the relative URL.
urljoin(url, href) converts the relative URL to an absolute URL by joining it with the base URL.
absolute_url is the absolute URL, which is printed to the console.
Now that you have a quick overview let’s dive into the specific problem more deeply and discuss various methods to solve this easily and effectively.
Problem Formulation
Problem: How do you extract all the absolute URLs from an HTML page?
Example: Consider the following webpage which has numerous links:
Now, when you try to scrape the links as highlighted above, you find that only the relative links/paths are extracted instead of the entire absolute path. Let us have a look at the code given below, which demonstrates what happens when you try to extract the 'href' elements normally.
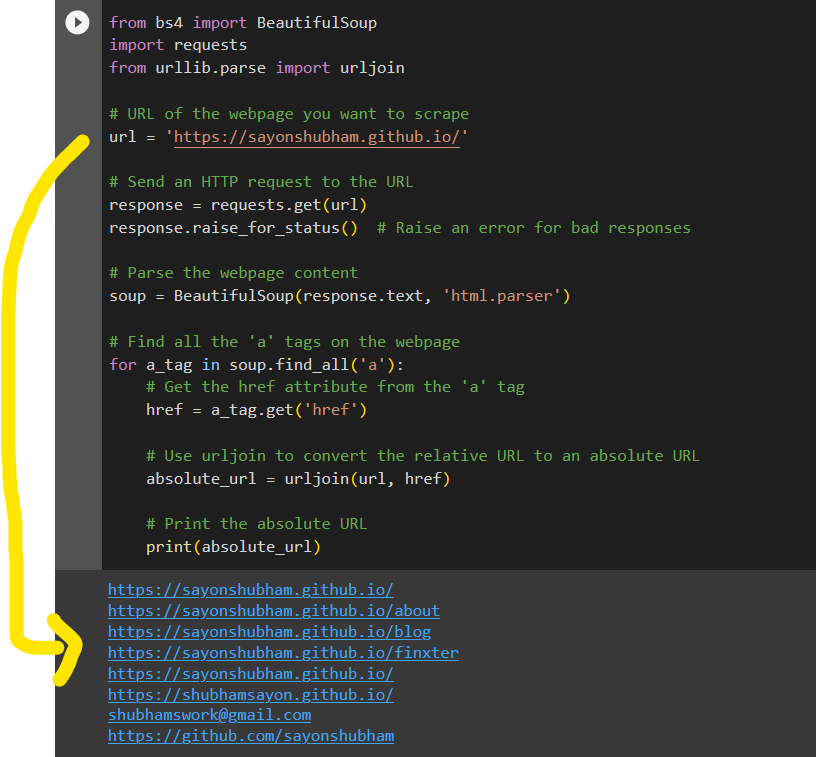
from bs4 import BeautifulSoup
import urllib.request
from urllib.parse import urljoin
import requests web_url = 'https://sayonshubham.github.io/'
headers = {"User-Agent": "Mozilla/5.0 (CrKey armv7l 1.5.16041) AppleWebKit/537.36 (KHTML, like Gecko) " "Chrome/31.0.1650.0 Safari/537.36"}
# get() Request
response = requests.get(web_url, headers=headers)
# Store the webpage contents
webpage = response.content
# Check Status Code (Optional)
# print(response.status_code)
# Create a BeautifulSoup object out of the webpage content
soup = BeautifulSoup(webpage, "html.parser")
for i in soup.find_all('nav'): for url in i.find_all('a'): print(url['href'])
Output:
/
/about
/blog
/finxter
/
The above output is not what you desired. You wanted to extract the absolute paths as shown below:
According to the Python documentation: urllib.parse.urljoin() is used to construct a full/absolute URL by combining the “base URL” with another URL. The advantage of using the urljoin() is that it properly resolves the relative path, whether BASE_URL is the domain of the URL, or the absolute URL of the webpage.
Now that we have an idea about urljoin, let us have a look at the following code which successfully resolves our problem and helps us to extract the complete/absolute paths from the HTML page.
Solution:
from bs4 import BeautifulSoup
import urllib.request
from urllib.parse import urljoin
import requests web_url = 'https://sayonshubham.github.io/'
headers = {"User-Agent": "Mozilla/5.0 (CrKey armv7l 1.5.16041) AppleWebKit/537.36 (KHTML, like Gecko) " "Chrome/31.0.1650.0 Safari/537.36"}
# get() Request
response = requests.get(web_url, headers=headers)
# Store the webpage contents
webpage = response.content
# Check Status Code (Optional)
# print(response.status_code)
# Create a BeautifulSoup object out of the webpage content
soup = BeautifulSoup(webpage, "html.parser")
for i in soup.find_all('nav'): for url in i.find_all('a'): print(urljoin(web_url, url.get('href')))
Method 2: Concatenate The Base URL And Relative URL Manually
Another workaround to our problem is to concatenate the base part of the URL and the relative URLs manually, just like two ordinary strings. The problem, in this case, is that manually adding the strings might lead to “one-off” errors — try to spot the extra front slash characters / below:
Therefore to ensure proper concatenation, you have to modify your code accordingly such that any extra character that might lead to errors is removed. Let us have a look at the following code that helps us to concatenate the base and the relative paths without the presence of any extra forward slash.
Solution:
from bs4 import BeautifulSoup
import urllib.request
from urllib.parse import urljoin
import requests web_url = 'https://sayonshubham.github.io/'
headers = {"User-Agent": "Mozilla/5.0 (CrKey armv7l 1.5.16041) AppleWebKit/537.36 (KHTML, like Gecko) " "Chrome/31.0.1650.0 Safari/537.36"}
# get() Request
response = requests.get(web_url, headers=headers)
# Store the webpage contents
webpage = response.content
# Check Status Code (Optional)
# print(response.status_code)
# Create a BeautifulSoup object out of the webpage content
soup = BeautifulSoup(webpage, "html.parser")
for i in soup.find_all('nav'): for url in i.find_all('a'): # extract the href string x = url['href'] # remove the extra forward-slash if present if x[0] == '/': print(web_url + x[1:]) else: print(web_url+x)
Caution: This is not the recommended way of extracting the absolute path from a given HTML page. In situations when you have an automated script that needs to resolve a URL but at the time of writing the script you don’t know what website your script is visiting, in that case, this method won’t serve your purpose, and your go-to method would be to use urlljoin. Nevertheless, this method deserves to be mentioned because, in our case, it successfully serves the purpose and helps us to extract the absolute URLs.
Conclusion
In this article, we learned how to extract the absolute links from a given HTML page using BeautifulSoup. If you want to master the concepts of Pythons BeautifulSoup library and dive deep into the concepts along with examples and video lessons, please have a look at the following link and follow the articles one by one wherein you will find every aspect of BeautifulSoup explained in great details.
To add trailing zeros to a string up to a certain length in Python, convert the number to a string and use the ljust(width, '0') method. Call this method on the string, specifying the total desired width and the padding character '0'. This will append zeros to the right of the string until the specified width is achieved.
Challenge: Given an integer number. How to convert it to a string by adding trailing zeros so that the string has a fixed number of positions.
Example: For integer 42, you want to fill it up with trailing zeros to the following string with 5 characters: '42000'.
In all methods, we assume that the integer has less than 5 characters.
Method 1: string.ljust()
In Python, you can use the str.ljust() method to pad zeros (or any other character) to the right of a string. The ljust() method returns the string left-justified in a field of a given width, padded with a specified character (default is space).
Below is an example of how to use ljust() to add trailing zeros to a number:
# Integer value to be converted
i = 42 # Convert the integer to a string
s = str(i) # Use ljust to add trailing zeros, specifying the total width and the padding character ('0')
s_padded = s.ljust(5, '0') print(s_padded)
# Output: '42000'
In this example:
str(i) converts the integer i to a string.
s.ljust(5, '0') pads the string s with zeros to the right to make the total width 5 characters.
This is the most Pythonic way to accomplish this challenge.
Method 2: Format String
The second method uses the format string feature in Python 3+ called f-strings or replacement fields.
Info: In Python, f-strings allow for the embedding of expressions within strings by prefixing a string with the letter "f" or "F" and enclosing expressions within curly braces {}. The expressions within the curly braces in the f-string are evaluated, and their values are inserted into the resulting string. This allows for a concise and readable way to include variable values or complex expressions within string literals.
The following f-string converts an integer i to a string while adding trailing zeros to a given integer:
# Integer value to be converted
i = 42 # Convert the integer to a string and then use format to add trailing zeros
s1 = f'{str(i):<5}'
s1 = s1.replace(" ", "0") # replace spaces with zeros print(s1)
# 42000
The code f'{str(i):<5}' first converts the integer i to a string. The :<5 format specifier aligns the string to the left and pads with spaces to make the total width 5. Then we replace the padded spaces with zeros using the string.replace() function.
Method 3: List Comprehension
Many Python coders don’t quite get the f-strings and the ljust() method shown in Methods 1 and 2. If you don’t have time to learn them, you can also use a more standard way based on string concatenation and list comprehension.
You first convert the integer to a basic string. Then, you concatenate the integer’s string representation to the string of 0s, filled up to n=5 characters. The asterisk operator creates a string of 5-len(s3) zeros here.
Programmer Humor
“Real programmers set the universal constants at the start such that the universe evolves to contain the disk with the data they want.” — xkcd
The Python xlrd library reads data and formatting information from Excel files in the historical .xls format. Note that it won’t read anything other than .xls files.
pip install xlrd
The Python xlrdlibrary is among the top 100 Python libraries, with more than 17,375,582 downloads. This article will show you everything you need to install this in your Python environment.
Alternatively, you may use any of the following commands to install xlrd, depending on your concrete environment. One is likely to work!
If you have only one version of Python installed:pip install xlrdIf you have Python 3 (and, possibly, other versions) installed:pip3 install xlrdIf you don't have PIP or it doesn't workpython -m pip install xlrd
python3 -m pip install xlrdIf you have Linux and you need to fix permissions (any one):sudo pip3 install xlrd
pip3 install xlrd --userIf you have Linux with aptsudo apt install xlrdIf you have Windows and you have set up the py aliaspy -m pip install xlrdIf you have Anacondaconda install -c anaconda xlrdIf you have Jupyter Notebook!pip install xlrd!pip3 install xlrd
Let’s dive into the installation guides for the different operating systems and environments!
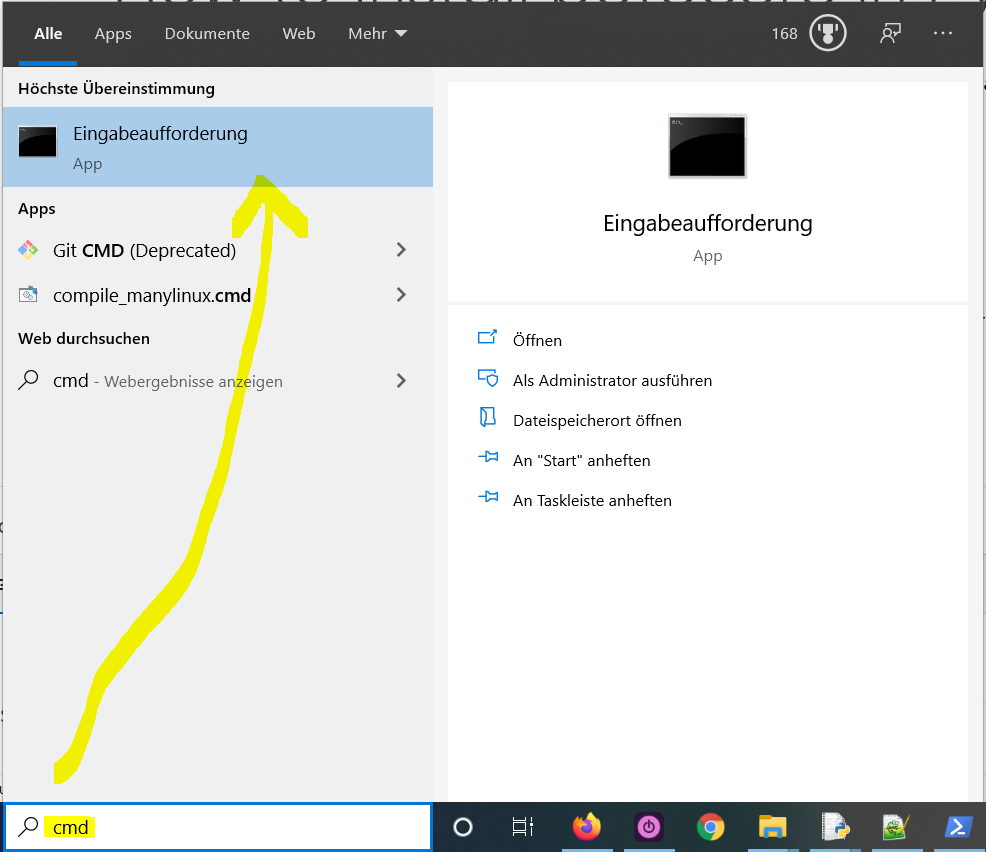
How to Install xlrd on Windows?
Type "cmd" in the search bar and hit Enter to open the command line.
Type “pip install xlrd” (without quotes) in the command line and hit Enter again. This installs xlrd for your default Python installation.
The previous command may not work if you have both Python versions 2 and 3 on your computer. In this case, try "pip3 install xlrd" or “python -m pip install xlrd“.
Wait for the installation to terminate successfully. It is now installed on your Windows machine.
Here’s how to open the command line on a (German) Windows machine:
First, try the following command to install xlrd on your system:
pip install xlrd
Second, if this leads to an error message, try this command to install xlrd on your system:
pip3 install xlrd
Third, if both do not work, use the following long-form command:
python -m pip install xlrd
The difference between pip and pip3 is that pip3 is an updated version of pip for Python version 3. Depending on what’s first in the PATH variable, pip will refer to your Python 2 or Python 3 installation—and you cannot know which without checking the environment variables. To resolve this uncertainty, you can use pip3, which will always refer to your default Python 3 installation.
How to Install xlrd on Linux?
You can install xlrd on Linux in four steps:
Open your Linux terminal or shell
Type “pip install xlrd” (without quotes), hit Enter.
If it doesn’t work, try "pip3 install xlrd" or “python -m pip install xlrd“.
Wait for the installation to terminate successfully.
The package is now installed on your Linux operating system.
How to Install xlrd on macOS?
Similarly, you can install xlrd on macOS in four steps:
Open your macOS terminal.
Type “pip install xlrd” without quotes and hit Enter.
If it doesn’t work, try "pip3 install xlrd" or “python -m pip install xlrd“.
Wait for the installation to terminate successfully.
The package is now installed on your macOS.
How to Install xlrd in PyCharm?
Given a PyCharm project. How to install the xlrd library in your project within a virtual environment or globally? Here’s a solution that always works:
Open File > Settings > Project from the PyCharm menu.
Select your current project.
Click the Python Interpreter tab within your project tab.
Click the small + symbol to add a new library to the project.
Now type in the library to be installed, in your example "xlrd" without quotes, and click Install Package.
Wait for the installation to terminate and close all pop-ups.
Here’s the general package installation process as a short animated video—it works analogously for xlrd if you type in “xlrd” in the search field instead:
Make sure to select only “xlrd” because there may be other packages that are not required but also contain the same term (false positives):
How to Install xlrd in a Jupyter Notebook?
To install any package in a Jupyter notebook, you can prefix the !pip install my_package statement with the exclamation mark "!". This works for the xlrd library too:
!pip install my_package
This automatically installs the xlrd library when the cell is first executed.
How to Resolve ModuleNotFoundError: No module named ‘xlrd’?
Say you try to import the xlrd package into your Python script without installing it first:
import xlrd
# ... ModuleNotFoundError: No module named 'xlrd'
Because you haven’t installed the package, Python raises a ModuleNotFoundError: No module named 'xlrd'.
To fix the error, install the xlrd library using “pip install xlrd” or “pip3 install xlrd” in your operating system’s shell or terminal first.
See above for the different ways to install xlrd in your environment. Also check out my detailed article:
If you want to keep improving your Python skills and learn about new and exciting technologies such as Blockchain development, machine learning, and data science, check out the Finxter free email academy with cheat sheets, regular tutorials, and programming puzzles.
Although open-source LLMs are now widely used and studied, they faced initial challenges and criticism. Early attempts at creating open-source LLMs like OPT and BLOOM had poor performance compared to closed-source models.
This led researchers to realize the need for higher-quality base models pre-trained on larger datasets with trillions (!) of tokens!
OPT: 180 billion tokens
BLOOM: 341 billion tokens
LLaMa: 1.4 trillion tokens
MPT: 1 trillion tokens
Falcon: 1.5 trillion tokens
LLaMA 2: 2 trillion tokens
However, pre-training these models is expensive and requires organizations with sufficient funding to make them freely available to the community.
This article focuses on high-performing open-source base models significantly improving the field. A great graphic of the historic context of open-source LLMs is presented on the Langchain page:
How can we determine the best of those? Easy, with Chatbot leaderboards like this on Hugginface:
At the time of writing, the best non-commercial LLM is Vicuna-33B. Of course, closed-source GPT-4 by OpenAI and Claude by Anthropic models are the best.
By the way, feel free to check out my article on Claude-2 proven to be one of the most powerful free but closed-source LLMs:
The introduction of LLaMA 1 and 2 was a significant step in improving the quality of open-source LLMs. LLaMA is a suite of different LLMs with sizes ranging from 7 billion to 65 billion parameters. These models strike a balance between performance and inference efficiency.
LLaMA models are pre-trained on a corpus containing over 1.4 trillion tokens of text, making it one of the largest open-source datasets available. The release of LLaMA models sparked an explosion of open-source research and development in the LLM community.
Here’s a couple of open-source LLMs that were kicked off after the release of Llama: Alpaca, Vicuna, Koala, GPT4All:
LLaMA-2, the latest release, sets a new state-of-the-art among open-source LLMs. These models are pre-trained on 2 trillion tokens of publicly available data and utilize a novel approach called Grouped Query Attention (GQA) to improve inference efficiency.
MPT, another commercially-usable open-source LLM suite, was released by MosaicML. MPT-7B and MPT-30B models gained popularity due to their performance and ability to be used in commercial applications. While these models perform slightly worse than proprietary models like GPT-based variants, they outperform other open-source models.
Falcon, an open-source alternative to proprietary models, was the first to match the quality of closed-source LLMs. Falcon-7B and Falcon-40B models are commercially licensed and perform exceptionally well. They are pre-trained on a custom-curated corpus called RefinedWeb, which contains over 5 trillion tokens of text.
TLDR: Open-source LLMs include OPT, BLOOM, LLaMa, MPT, and Falcon, each pre-trained on extensive tokens. LLaMa-2 and Falcon stand out for their innovative approaches and extensive training data.
For the best open-source LLM, consider using Vicuna-33B for its superior performance among non-commercial options.
Also, make sure to check out my other article on the Finxter blog:
A couple of years ago, I watched a TED talk that changed my life.
I had just finished my computer science master’s degree and was starting out as a fresh Ph.D. student in the department of distributed systems…
… and I was overwhelmed.
There are many computer science students reading the Finxter blog so I hope to find a few encouraging words in this article.
Not only was I overwhelmed, but I seriously doubted my ability to finish the doctoral research program successfully.
I was so impressed by my colleagues, who were much smarter, wittier, and better coders.
So what were (some of) the things that were bothering me?
Reading and understanding code.
Reading and understanding research papers.
Designing algorithms.
Maths.
Presenting stuff.
English.
Writing scientifically.
“Selling” my approaches to my supervisors.
The list goes on and on — and I really felt like an imposter not worthy to contribute to the scientific community.
~~~
Then I watched the TED talk from a former investment banker who claimed to possess the formula to achieve anything.
The formula: break the big task into a series of small tasks. Then just keep doing the small tasks (and don’t stop).
I know it sounds lame, but it really resonated with me. So I approached my problem from first principles: What must I do to finish my dissertation within four years?
I need to publish at least four research papers.
I need to submit at least ten times to top conferences — maybe even more often.
I need to create a 10,000-word research paper every three months or so.
I need to write (or edit) 300 words every day.
So my output was clear: if I just do this one thing (it’s really easy to write 300 words) — I will have enough written content for my dissertation.
Quality comes as a byproduct of massive quantity.
But to produce output, any system needs input. To brew tasty coffee, put in the right ingredients: high-quality beans and pure water. To produce better outputs, just feed the system with better inputs.
Question: What’s the input that helps me produce excellent 300-word written output?
Answer: Read papers from top conferences.
So the formula boils down to:
INPUT: read (at least skim over) one paper a day from a top conference in my research area.
OUTPUT: generate 300 words for the current paper project.
That’s it. After I developed this formula, the remaining three and a half years were simple: follow this straightforward recipe to the best of my abilities, even with serious distractions, doubts, highs, and lows.
The day before I published this article originally (in 2019), I delivered my defense. Based on my sample size of one, the system works!
So what is your BIG TASK that is overwhelming you? How can you break into a series of small outputs that guarantees your success? What is the input that helps you generate this kind of output?
As a Python developer, you might have come across the concept of asynchronous programming. Asynchronous programming, or async I/O, is a concurrent programming design that has received dedicated support in Python, evolving rapidly from Python 3.4 through 3.7 and beyond. With async I/O, you can manage multiple tasks concurrently without the complexities of parallel programming, making it a perfect fit for I/O bound and high-level structured network code.
In the Python world, the asyncio library is your go-to tool for implementing asynchronous I/O. This library provides various high-level APIs to run Python coroutines concurrently, giving you full control over their execution. It also enables you to perform network I/O, Inter-process Communication (IPC), control subprocesses, and synchronize concurrent code using tasks and queues.
Understanding Asyncio
In the world of Python programming, asyncio plays a crucial role in designing efficient and concurrent code without using threads. It is a library that helps you manage tasks, event loops, and coroutines. To fully benefit from asyncio, you must understand some key components.
First, let’s start with coroutines. They are special functions that can pause their execution at specified points without completely terminating it. In Python, you declare a coroutine using the async def syntax.
For instance:
async def my_coroutine(): # Your code here
Next, the event loop is a core feature of asyncio and is responsible for executing tasks concurrently and managing I/O operations. An event loop runs tasks one after the other and can pause a task when it is waiting for external input, such as reading data from a file or from the network. It also listens for other tasks that are ready to run, switches to them, and resumes the initial task when it receives the input.
Tasks are the coroutines wrapped in an object, managed by the event loop. They are used to run multiple concurrent coroutines simultaneously. You can create a task using the asyncio.create_task() function, like this:
async def my_coroutine(): # Your code here task = asyncio.create_task(my_coroutine())
Finally, the sleep function in asyncio is used to simulate I/O bound tasks or a delay in the code execution. It works differently than the standard time.sleep() function as it is non-blocking and allows other coroutines to run while one is paused. You can use await asyncio.sleep(delay) to add a brief pause in your coroutine execution.
Putting it all together, you can use asyncio to efficiently manage multiple coroutines concurrently:
In this example, the event loop will start running both tasks concurrently, allowing task two to complete while task one is paused during the sleep period. This allows you to handle multiple tasks in a single-threaded environment.
You can see it play out in this Gif:
Async/Await Syntax
In Python, the async/await syntax is a powerful tool to create and manage asynchronous tasks without getting lost in callback hell or making your code overly complex.
The async/await keywords are at the core of asynchronous code in Python. You can use the async def keyword to define an asynchronous function. Inside this function, you can use the await keyword to pause the execution of the function until some asynchronous operation is finished.
yield and yield from are related to asynchronous code in the context of generators, which provide a way to iterate through a collection of items without loading all of them into memory at once. In Python 3.3 and earlier, yield from was used to delegate a part of a generator’s operation to another generator. However, in later versions of Python, the focus shifted to async/await for managing asynchronous tasks, and yield from became less commonly used.
For example, before Python 3.4, you might have used a generator with yield and yield from like this:
def generator_a(): for i in range(3): yield i def generator_b(): yield from generator_a() for item in generator_b(): print(item)
With the introduction of async/await, asynchronous tasks can be written more consistently and readably. You can convert the previous example to use async/await as follows:
import asyncio async def async_generator_a(): for i in range(3): yield i await asyncio.sleep(1) async def async_generator_b(): async for item in async_generator_a(): print(item) await async_generator_b()
Working with Tasks and Events
In asynchronous programming with Python, you’ll often work with tasks and events to manage the execution of simultaneous IO-bound operations. To get started with this model, you’ll need to understand the event loop and the concept of tasks.
The event loop is a core component of Python’s asyncio module. It’s responsible for managing and scheduling the execution of tasks. A task, created using asyncio.create_task(), represents a coroutine that runs independently of other tasks in the same event loop.
To create tasks, first, define an asynchronous function using the async def syntax. Then, you can use the await keyword to make non-blocking calls within this function. The await keyword allows the event loop to perform other tasks while waiting for an asynchronous operation to complete.
In this example, my_async_function is an asynchronous function, and await asyncio.sleep(2) represents an asynchronous operation. The event_loop.create_task() method wraps the coroutine into a task, allowing it to run concurrently within the event loop.
To execute tasks and manage their output, you can use asyncio.gather(). This function receives a list of tasks and returns their outputs as a list in the same order they were provided. Here’s an example of how you can use asyncio.gather():
In this example, asyncio.gather() awaits the completion of both tasks and then collects their output in a list, which is printed at the end.
Working with tasks and events in Python’s asynchronous IO model helps improve the efficiency of your code when dealing with multiple IO operations, ensuring smoother and faster execution. Remember to use asyncio.create_task(), await, and asyncio.gather() when handling tasks within your event loop.
Coroutines and Futures
In Python, async IO is powered by coroutines and futures. Coroutines are functions that can be paused and resumed at specific points, allowing other tasks to run concurrently. They are declared with the async keyword and used with await. Asyncio coroutines are the preferred way to write asynchronous code in Python.
On the other hand, futures represent the result of an asynchronous operation that hasn’t completed yet. They are primarily used for interoperability between callback-based code and the async/await syntax. With asyncio, Future objects should be created using loop.create_future().
To execute multiple coroutines concurrently, you can use the gather function. asyncio.gather() is a high-level function that takes one or more awaitable objects (coroutines or futures) and schedules them to run concurrently. Here’s an example:
In this example, both foo() and bar() coroutines run concurrently, and the gather() function returns a list of their results.
Error handling in asyncio is done through the set_exception() method. If a coroutine raises an exception, you can catch the exception and attach it to the associated future using future.set_exception(). This allows other coroutines waiting for the same future to handle the exception gracefully.
In summary, working with coroutines and futures helps you write efficient, asynchronous code in Python. Use coroutines along with the async/await syntax for defining asynchronous tasks, and futures for interacting with low-level callback-based code. Utilize functions like gather() for running multiple coroutines concurrently, and handle errors effectively with future.set_exception().
Threading and Multiprocessing
In the world of Python, you have multiple options for concurrent execution and managing concurrency. Two popular approaches to achieve this are threading and multiprocessing.
Threading can be useful when you want to improve the performance of your program by efficiently utilizing your CPU’s time. It allows you to execute multiple threads in parallel within a single process. Threads share memory and resources, which makes them lightweight and more suitable for I/O-bound tasks. However, because of the Global Interpreter Lock (GIL) in Python, only one thread can execute at a time, limiting the benefits of threading for CPU-bound tasks. You can explore the threading module for building multithreaded applications.
Multiprocessing overcomes the limitations of threading by using multiple processes working independently. Each process has its own Python interpreter, memory space, and resources, effectively bypassing the GIL. This approach is better for CPU-bound tasks, as it allows you to utilize multiple cores to achieve true parallelism. To work with multiprocessing, you can use Python’s multiprocessing module.
While both threading and multiprocessing help manage concurrency, it is essential to choose the right approach based on your application’s requirements. Threading is more suitable when your tasks are I/O-bound, and multiprocessing is advisable for CPU-bound tasks. When dealing with a mix of I/O-bound and CPU-bound tasks, using a combination of the two might be beneficial.
Async I/O offers another approach for handling concurrency and might be a better fit in some situations. However, understanding threading and multiprocessing remains crucial to make informed decisions and efficiently handle concurrent execution in Python.
Understanding Loops and Signals
In the world of Python async IO, working with loops and signals is an essential skill to grasp. As a developer, you must be familiar with these concepts to harness the power of asynchronous programming.
Event loops are at the core of asynchronous programming in Python. They provide a foundation for scheduling and executing tasks concurrently. The asyncio library helps you create and manage these event loops. You can experiment with event loops using Python’s asyncio REPL, which can be started by running python -m asyncio in your command line.
Signals, on the other hand, are a way for your program to receive notifications about certain events, like a user interrupting the execution of the program. A common use case for handling signals in asynchronous programming involves stopping the event loop gracefully when it receives a termination signal like SIGINT or SIGTERM.
A useful method for running synchronous or blocking functions in an asynchronous context is the loop.run_in_executor() method. This allows you to offload the execution of such functions to a separate thread or process, preventing them from blocking the event loop. For example, if you have a CPU-bound operation that cannot be implemented using asyncio‘s native coroutines, you can utilize loop.run_in_executor() to keep the event loop responsive.
Here’s a simple outline of using loops and signals together in your asynchronous Python code:
Create an event loop using asyncio.get_event_loop().
Register your signal handlers with the event loop, typically by using the loop.add_signal_handler() method.
Schedule your asynchronous tasks and coroutines in the event loop.
Run the event loop using loop.run_forever(), which will keep running until you interrupt it with a signal or a coroutine stops it explicitly.
Managing I/O Operations
When working with I/O-bound tasks in Python, it’s essential to manage I/O operations efficiently. Using asyncio can help you handle these tasks concurrently, resulting in more performant and scalable code.
I/O-bound tasks are operations where the primary bottleneck is fetching data from input/output sources like files, network requests, or databases. To improve the performance of your I/O-bound tasks, you can use asynchronous programming techniques. In Python, this often involves using the asyncio library and writing non-blocking code.
Typically, you’d use blocking code for I/O operations, which means waiting for the completion of an I/O task before continuing with the rest of the code execution. This blocking behavior can lead to inefficient use of resources and poor performance, especially in larger programs with multiple I/O-bound tasks.
Non-blocking code, on the other hand, allows your program to continue executing other tasks while waiting for the I/O operation to complete. This can significantly improve the efficiency and performance of your program. When using Python’s asyncio library, you write non-blocking code with coroutines.
For I/O-bound tasks involving file operations, you can use libraries like aiofiles to perform asynchronous file I/O. Just like with asyncio, aiofiles provides an API to work with files using non-blocking code, improving the performance of your file-based tasks.
When dealing with network I/O, the asyncio library provides APIs to perform tasks such as asynchronous reading and writing operations for sockets and other resources. This enables you to manage multiple network connections concurrently, efficiently utilizing your system resources.
In summary, when managing I/O operations in Python:
Identify I/O-bound tasks in your program
Utilize the asyncio library to write non-blocking code using coroutines
Consider using aiofiles for asynchronous file I/O
Utilize asyncio APIs to manage network I/O efficiently
Handling Transports and Timeouts
When working with Python’s Async IO, you might need to handle transports and timeouts effectively. Transports and protocols are low-level event loop APIs for implementing network or IPC protocols such as HTTP. They help improve the performance of your application by using callback-based programming style. You can find more details in the Python 3.11.4 documentation.
Timeouts are often useful when you want to prevent your application from waiting indefinitely for a task to complete. To handle timeouts in asyncio, you can use the asyncio.wait_for function. This allows you to set a maximum time that your function can run. If the function doesn’t complete within the specified time, an asyncio.TimeoutError is raised.
In this example, some_function takes 5 seconds to complete, but we set a timeout of 3 seconds. As a result, an asyncio.TimeoutError is raised, and the program prints “Task took too long.”
Another concept to be familiar with is the executor, which allows you to run synchronous functions in an asynchronous context. You can use the loop.run_in_executor() method, where loop is an instance of the event loop. This method takes three arguments: the executor, the function you want to run, and any arguments for that function. The executor can be a custom one or None for the default ThreadPoolExecutor.
Here’s an example:
import asyncio
import time def sync_function(seconds): time.sleep(seconds) return "Slept for {} seconds".format(seconds) async def main(): loop = asyncio.get_event_loop() result = await loop.run_in_executor(None, sync_function, 3) print(result) asyncio.run(main())
In this example, we run the synchronous sync_function inside the async main() function using the loop.run_in_executor() method.
Dealing with Logging and Debugging
When working with Python’s asyncio library, properly handling logging and debugging is essential for ensuring efficient and smooth development. As a developer, it’s crucial to stay confident and knowledgeable when dealing with these tasks.
To begin logging in your asynchronous Python code, you need to initialize a logger object. Import the logging module and create an instance of the Logger class, like this:
This configuration sets up a logger object that will capture debug-level log messages. To log a message, simply call the appropriate method like logger.debug, logger.info, or logger.error:
Keep in mind that Python’s logging module is not inherently asynchronous. However, there are ways to work around this issue. One approach is to use a ThreadPoolExecutor, which executes logging methods in a separate thread:
For debugging your asynchronous code, it’s possible to enable the debug mode in asyncio by calling the loop.set_debug() method. Additionally, consider setting the log level of the asyncio logger to logging.DEBUG and configuring the warnings module to display ResourceWarning warnings. Check the official Python documentation for more information and best practices.
Understanding Virtual Environments and Resources
When working with Python, you’ll often encounter the need for a virtual environment. A virtual environment is an isolated environment for your Python applications, which allows you to manage resources and dependencies efficiently. It helps ensure that different projects on your computer do not interfere with each other in terms of dependencies and versions, maintaining the availability of the required resources for each project.
To create a virtual environment, you can use built-in Python libraries such as venv or third-party tools like conda. Once created, you’ll activate the virtual environment and install the necessary packages needed for your project. This ensures that the resources are available for your application without causing conflicts with other Python packages or applications on your computer.
When working with async IO in Python, it’s crucial to manage resources effectively, especially when dealing with asynchronous operations like networking requests or file I/O. By using a virtual environment, you can make sure that your project has the correct version of asyncio and other async libraries, ensuring that your code runs smoothly and efficiently.
In a virtual environment, resources are allocated based, on the packages and libraries you install. This way, only the necessary resources for your project are used, improving performance and consistency across development. The virtual environment lets you keep track of your project’s dependencies, making it easier to maintain and share your project with others, ensuring that they can access the required resources without compatibility issues.
Optimizing Asynchronous Program
When working with Python, you may often encounter situations where an asynchronous program can significantly improve the performance and responsiveness of your application. This is especially true when dealing with I/O-bound tasks or high-level structured network code, where asyncio can be your go-to library for writing concurrent code.
Before diving into optimization techniques, it’s crucial to understand the difference between synchronous and asynchronous programs. In a synchronous program, tasks are executed sequentially, blocking other tasks from running. Conversely, an asynchronous program allows you to perform multiple tasks concurrently without waiting for one to complete before starting another. This cooperative multitasking approach enables your asynchronous program to run much faster and more efficiently.
To make the most of your asynchronous program, consider applying the following techniques:
Use async/await syntax: Employing the async and await keywords when defining asynchronous functions and awaiting their results ensures proper execution and responsiveness.
Implement an event loop: The event loop is the core of an asyncio-based application. It schedules, executes, and manages tasks within the program, so it’s crucial to utilize one effectively.
Leverage libraries: Many asynchronous frameworks, such as web servers and database connection libraries, have been built on top of asyncio. Take advantage of these libraries to simplify and optimize your asynchronous program.
Avoid blocking code: Blocking code can slow down the execution of your asynchronous program. Ensure your program is entirely non-blocking by avoiding time-consuming operations or synchronous APIs.
It’s essential to remember that while asynchronous programming has its advantages, it might not always be the best solution. In situations where your tasks are CPU-bound or require a more straightforward processing flow, a synchronous program might be more suitable.
Exploring Asyncio Libraries and APIs
When working with asynchronous programming in Python, it’s essential to explore the available libraries you can use. One such library is aiohttp. It allows you to make asynchronous HTTP requests efficiently using asyncio. You can find more details about this library from the aiohttp documentation.
To get started with aiohttp, you’ll first need to install the library:
pip install aiohttp
In your Python code, you can now import aiohttp and use it with the asyncio library. For example, if you want to make an asynchronous GET request, you can use the following code:
import aiohttp
import asyncio async def fetch_data(url): async with aiohttp.ClientSession() as session: async with session.get(url) as response: return await response.text() async def main(): url = 'https://api.example.com/data' data = await fetch_data(url) print(data) await main()
In the example above, the fetch_data function is defined as an async function using the async def syntax. This indicates that this function can be called with the await statement within other asynchronous functions.
The pathlib library provides classes for working with filesystem paths. While it is not directly related to async IO, it can be useful when working with file paths in your async projects. The pathlib.Path class offers a more Pythonic way to handle file system paths, making it easier to manipulate file and directory paths across different operating systems. You can read more about this library in the official Python documentation on pathlib.
When you create async function calls in your code, remember to use the await keyword when calling them. This ensures that the function is executed asynchronously. By combining the power of aiohttp, asyncio, and other async-compatible libraries, you can efficiently perform multiple tasks concurrently in your Python projects.
Understanding Queues and Terminals
With Python’s asyncio module, you can write concurrent, asynchronous code that works efficiently on I/O-bound tasks and network connections. In this context, queues become helpful tools for coordinating the execution of multiple tasks and managing shared resources.
Queues in asyncio are similar to standard Python queues, but they have special asynchronous properties. With coroutine functions such as get() and put(), you can efficiently retrieve an item from the queue or insert an item, respectively. When the queue is empty, the get() function will wait until an item becomes available. This enables smooth flow control and ensures that your async tasks are executed in the most optimal order.
Terminals, on the other hand, are interfaces for interacting with your system – either through command-line or graphical user interfaces. When working with async tasks in Python, terminals play a crucial role in tracking the progress and execution of your tasks. You can use terminals to initiate and monitor the state of your async tasks by entering commands and viewing the output.
When it comes to incorporating multithreaded or asynchronous programming in a parent-child relationship, queues and terminals can come in handy. Consider a scenario where a parent task is responsible for launching multiple child tasks that operate concurrently. In this case, a queue can facilitate the communication and synchronization between parent and child tasks by efficiently passing data to and fro.
Here are a few tips to keep in mind while working with queues and terminals in asynchronous Python programming:
Use asyncio.Queue() to create an instance suitable for async tasks, while still maintaining similar functionality as a standard Python queue.
For managing timeouts, remember to use the asyncio.wait_for() function in conjunction with queue operations, since the methods of asyncio queues don’t have a built-in timeout parameter.
When working with terminals, be mindful of potential concurrency issues. Make sure you avoid race conditions by properly synchronizing your async tasks’ execution using queues, locks, and other synchronization primitives provided by the asyncio module.
Frequently Asked Questions
How does asyncio compare to threading in Python?
Asyncio is a concurrency model that uses a single thread and an event loop to execute tasks concurrently. While threading allows for concurrent execution of tasks using multiple threads, asyncio provides better performance by managing tasks in a non-blocking manner within a single thread. Thus, asyncio is often preferred when dealing with I/O-bound tasks, as it can handle many tasks without creating additional threads.
What are the main components of the asyncio event loop?
The asyncio event loop is responsible for managing asynchronous tasks in Python. Its main components include:
Scheduling tasks: The event loop receives and schedules coroutine functions for execution.
Managing I/O operations: The event loop monitors I/O operations and receives notifications when the operations are complete.
Executing asynchronous tasks: The event loop executes scheduled tasks in a non-blocking manner, allowing other tasks to run concurrently.
How do I use asyncio with pip?
To use asyncio in your Python projects, no additional installation is needed, as it is included in the Python Standard Library from Python version 3.4 onwards. Simply import asyncio in your Python code and make use of its features.
What is the difference between asyncio.run() and run_until_complete()?
asyncio.run() is a newer and more convenient function for running an asynchronous coroutine until it completes. It creates an event loop, runs the passed coroutine, and closes the event loop when the task is finished. run_until_complete() is an older method that requires an existing event loop object on which to run a coroutine.
How can I resolve the ‘asyncio.run() cannot be called from a running event loop’ error?
This error occurs when you try to call asyncio.run() inside an already running event loop. Instead of using asyncio.run() in this case, you should use create_task() or gather() functions to schedule your coroutines to run concurrently within the existing loop.
This example demonstrates two async functions running concurrently. The main() function uses asyncio.gather() to run both async_function() tasks at the same time, and asyncio.run(main()) starts the event loop to execute them.
In Python, “dunder” methods, short for “double underscore” methods, are special methods that allow developers to define the behavior of built-in operations for custom objects. For instance, when you use the + operator to add two objects, Python internally calls the __add__ method. Similarly, other operators have their corresponding dunder methods.
However, the term “not and” operator might be a bit misleading, as there isn’t a direct “not and” operator in Python.
Instead, Python provides individual operators for not, and and. But if we delve into the realm of bitwise operations, we find operators that might resemble this behavior: the bitwise NOT (~) and the bitwise AND (&).
Let’s explore the dunder methods associated with these operators.
Bitwise NOT (~) and its Dunder Method __invert__
The bitwise NOT operator flips the bits of a number. For a custom class, if you want to define or override the behavior of the ~ operator, you’d use the __invert__ method.
class BitwiseNumber: def __init__(self, value): self.value = value def __invert__(self): return BitwiseNumber(~self.value) def __repr__(self): return str(self.value) number = BitwiseNumber(5)
print(~number) # Outputs: -6
In the above example, the __invert__ method returns a new BitwiseNumber object with its value inverted.
Bitwise AND (&) and its Dunder Method __and__
The bitwise AND operator performs a bitwise AND operation between two numbers. For custom classes, the behavior of the & operator can be defined or overridden using the __and__ method.
In this example, the __and__ method checks if the other object is an instance of BitwiseNumber and then performs a bitwise AND operation.
TLDR
While there isn’t a direct “not and” operator in Python, leveraging the __invert__ and __and__ methods, you can define how the bitwise NOT and AND operations work for custom objects, respectively.

 TLDR: GPT-4 with vision (GPT-4V) is now out for many ChatGPT Plus users in the US and some other regions! You can instruct GPT-4 to analyze image inputs. GPT-4V incorporates additional modalities such as image inputs into large language models (LLMs). Multimodal LLMs will expand the reach of AI from mainly language-based applications to a broad range of brand-new application categories that go beyond language user interfaces (UIs).
 GPT-4V could explain why a picture was funny by talking about different parts of the image and their connections. The meme in the picture has words on it, which GPT-4V read to help make its answer. However, it made an error. It wrongly said the fried chicken in the image was called “NVIDIA BURGER” instead of “GPU”.
 OpenAI’s GPT-4 with Vision (GPT-4V) represents a significant advancement in artificial intelligence, enabling the analysis of image inputs alongside text.


 Recommended: Startup.ai – Eight Steps to Start an AI Subscription Biz
 like so:


 Python,
 Langchain,
  Pinecone, and a whole stack of highly
 practical tools of exponential coders in a post-ChatGPT world.
 and
and  on a
on a  day! \u200b \u1234"}' # Load JSON data
data = json.loads(json_str) # Remove all Unicode characters from the value
data['text'] = re.sub(r'[^\x00-\x7F]+', '', data['text']) # Convert back to JSON string
new_json_str = json.dumps(data) print(new_json_str)
# {"text": "I love and on a day! "}
day! \u200b \u1234"}' # Load JSON data
data = json.loads(json_str) # Remove all Unicode characters from the value
data['text'] = re.sub(r'[^\x00-\x7F]+', '', data['text']) # Convert back to JSON string
new_json_str = json.dumps(data) print(new_json_str)
# {"text": "I love and on a day! "}


 Recommended:


 For the best open-source LLM, consider using


 Recommended: