Posted on Leave a comment

Customize Fedora Linux Workstation with Extension Manager

What are GNOME Shell extensions?

Imagine that Fedora Workstation is your desk, and GNOME Shell extensions are small accessories you add to make it feel more personal. It’s like placing a pencil case on the right side, a lamp that helps you focus, or a small cabinet to keep your things from getting scattered. It’s the same desk—GNOME stays clean and minimal—but a few additions can make your routine more comfortable.

Extensions work on the GNOME interface: the top panel, the way you open applications, how notifications appear, and small details that usually stay hidden. These simple changes can be enough to make your Fedora Workstation feel different. With just one extension, you can make Fedora feel more “you.”

But like any accessories, choose only what truly helps—don’t install everything. Too many extensions can clutter your desktop or make things feel unstable. The goal isn’t to chase excitement, but to find a few small add-ons that better fit the way you work in Fedora Workstation.

Why use Extension Manager?

Once you see extensions as small “accessories” for GNOME, a question comes up fast: how do you install them without the hassle? This is where Extension Manager helps.

Instead of opening many browser tabs, you can do everything in one place. You can browse extensions. You can search for what you need. You can also read a short description before installing. As a result, the whole process feels calmer and more familiar.

More importantly, Extension Manager makes it easier to experiment safely. For example, you can try one extension to make the top panel more useful. If it doesn’t feel right, you can simply turn it off. Or you can uninstall it in seconds. That way, you stay in control.

Also, you’re not “modding” your whole system. You’re only adding small features. And if you change your mind, you can always go back to GNOME’s clean default look.

In short, Extension Manager is like a small drawer on your desk. It keeps your extensions in one spot. So they’re easy to find, easy to try, and easy to tidy up again.

Install Extension Manager

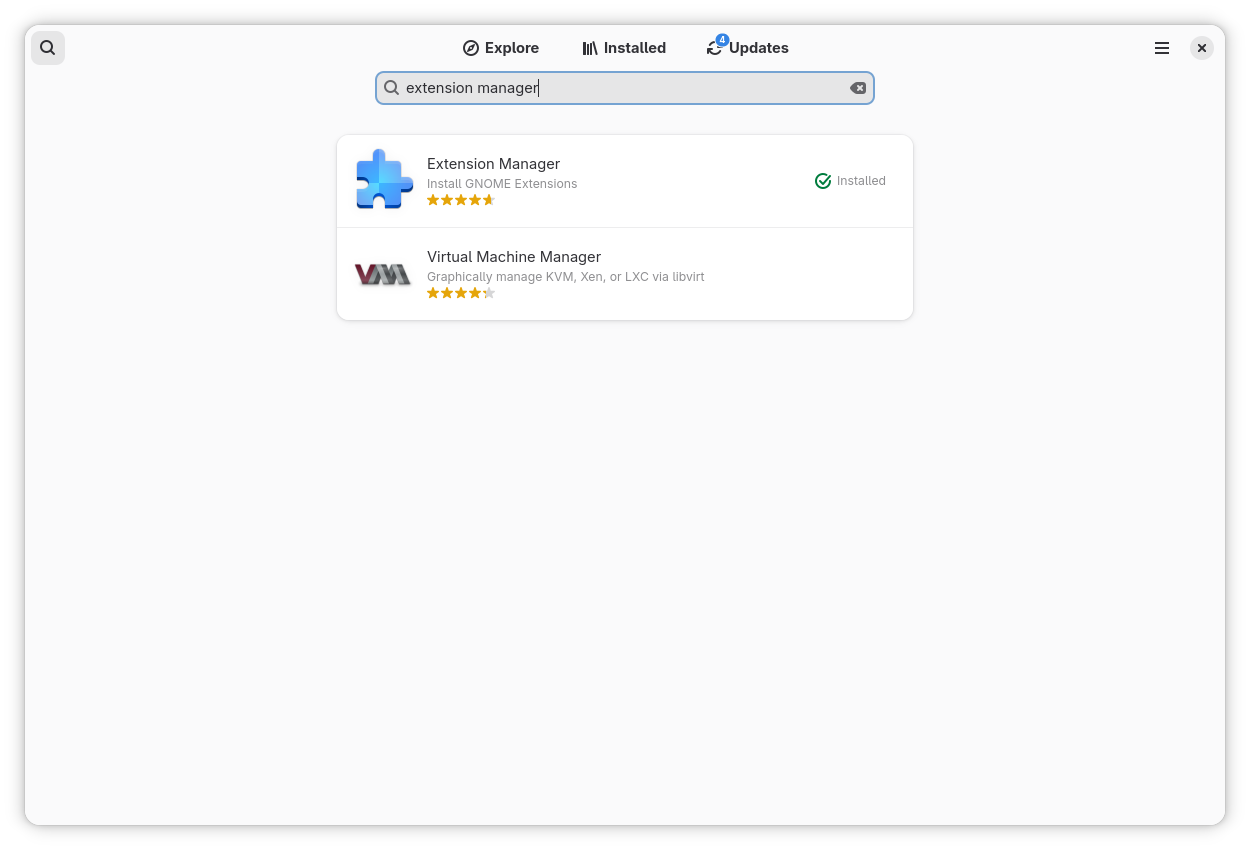
Let’s move to the easiest part: installing Extension Manager with just a few clicks. Open the Software app on Fedora Workstation, then search for Extension Manager using the search bar. Select the app and click Install. That’s it.

Once the installation is complete, open it from the app menu—look for Extension Manager. Now you’re ready to customize. Start slowly: try one extension first, then see if it fits your daily routine.

Find and Install an Extension

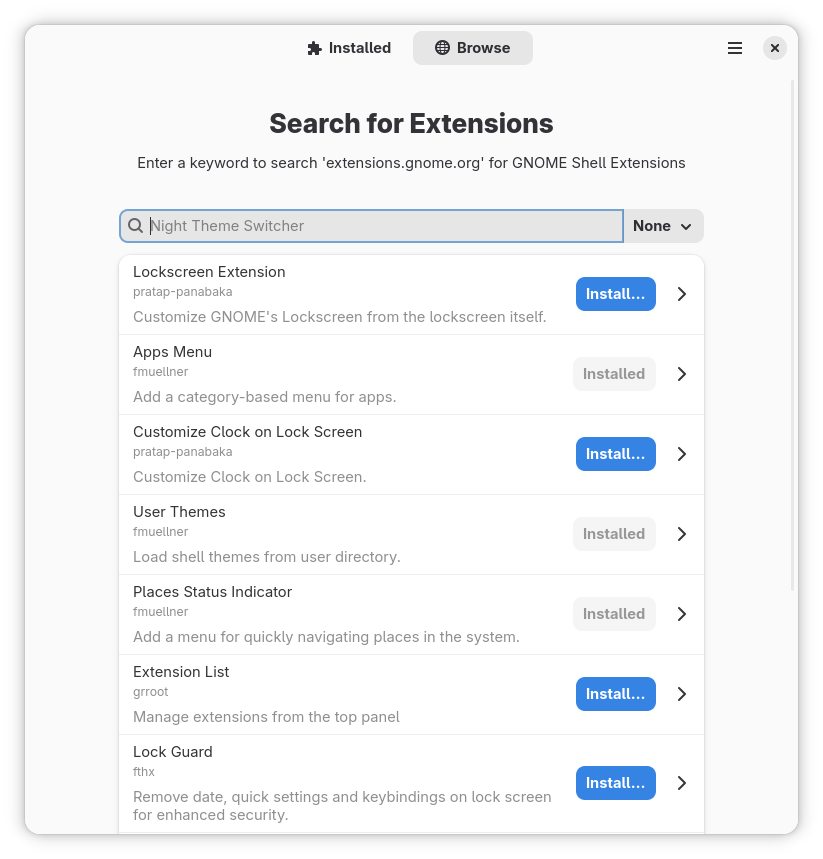
After you open Extension Manager, it can feel like opening an “accessories shop” for your Fedora Workstation. There are many options, from small tweaks to extensions that can change how you work.

Start with the search bar. Think about what you most often need in your day-to-day routine. For example, you might want quicker access to apps, tray icons for indicators, or a more informative top panel. When you find an extension that looks interesting, open its page for a moment. Read the short description, look at the screenshots, and then ask yourself whether it will really help your work flow.

If you’re sure, just click Install. In a few seconds, it will be installed, and you’ll notice the change right away. However, if it doesn’t feel right, don’t hesitate to uninstall it. At this stage, you’re simply trying things out—like picking the accessories that best fit your desk.

Enable/disable and adjust settings

After you install a few extensions, you don’t have to stick with all of them. Sometimes an extension is useful, but you don’t need it all the time. That’s the nice thing about Extension Manager: you can enable or disable extensions at any time, without any drama.

Think of it like accessories on your desk. Some days you need a desk lamp to help you focus. On other days, you want your desk to stay clean and simple. Extensions work the same way. You can turn one on when you need it, and turn it off when you’re done.

If an extension has options, you’ll usually see a Settings or Preferences button. From there, you can tweak small details to match your style—icon placement, button behaviour, panel appearance, and more. This is what makes extensions feel personal. You’re not just installing something and forgetting it; you’re shaping it around your workflow.

And if one day your Fedora starts to feel too crowded, don’t panic. Just open the list of installed extensions and disable the ones you don’t need. Take it slow. The best customization isn’t about how many extensions you have, but how well they fit your daily activities.

Keep it safe: a few practical tips

At this point, you might start thinking, “Wow, there are so many things I can change.” And that’s true. However, if you want Fedora Workstation to stay light and comfortable, there are a few simple habits worth keeping in mind.

First, install extensions the same way you choose tools: only when you truly need them. If you stop using an extension after a few days, it’s better to disable it or remove it. A comfortable desktop isn’t the most crowded one—it’s the one with fewer distractions.

Second, try extensions one by one. If you install many at once, it’s hard to tell which one causes a problem. On the other hand, if you take it slowly, you can quickly feel what fits and what doesn’t.

Finally, remember that GNOME keeps evolving. Sometimes after a major update, an extension may not be ready yet. If something feels odd after an update, the safest move is simple: open Extension Manager and disable the extension you suspect. Once things are back to normal, you can wait for an update or choose an alternative.

In the end, Extension Manager isn’t a ticket to customize without limits. It’s more like a clean toolbox. If you use it with care and focus on what you really need, customization can stay enjoyable—without losing the clean, stable feel of Fedora Workstation.

Wrapping up: share your favorite extensions

Now you know how to customize your Fedora Workstation with Extension Manager. You’ve learned how to install the app, try a few extensions, and adjust their settings. And here’s the fun part: everyone ends up with a different mix of extensions, because we all have different needs and work styles.

If you have a favorite extension, share it. Which one do you rely on most, and what do you use it for? Maybe it helps you stay focused during presentations. Or maybe it makes the top panel more informative, brings back tray icons, or simply speeds up your work flow. Tell us why you like it, so others can picture the benefit.

Who knows—your list might inspire someone else. And you might also discover a new extension that fits your daily routine even better.

Posted on Leave a comment

Announcing Fedora Linux 44 Beta

On Tuesday, 10 March 2026, it is our pleasure to announce the availability of Fedora Linux 44 Beta! As with every beta release, this is your opportunity to contribute by testing out the upcoming Fedora Linux 44 Beta release. Testing the beta release is a vital way you can contribute to the Fedora Project. Your testing is invaluable feedback that helps us refine what the final F44 experience will be for all users.

We hope you enjoy this latest beta version of Fedora!

How to get the Fedora Linux 44 Beta release

You can download Fedora Linux 44 Beta, or our pre-release edition versions, from any of the following places:

The Fedora CoreOS “next” stream moves to the beta release one week later. Content for F44, however, is still available from their current branched stream to enjoy now.

You can also update an existing system to the beta using DNF system-upgrade.

The Fedora Linux 44 Beta release content may also be available for Fedora Spins and Labs.

Fedora Linux 44 Beta highlights

Like every Beta release, the Fedora Linux 44 Beta release is packed with changes. The following are highlights from the full set of changes for F44. They are ready for you to test drive in the Fedora Linux 44 Beta.

Installer and desktop Improvements

Goodbye Anaconda Created Default Network Profiles: This change impacts how Anaconda populates network device profiles. Only those devices configured during installation (by boot options, kickstart or interactively in UI) become part of the final system install. This behavior change addresses some long standing issues caused by populating network profiles for all network devices. These made it difficult to correctly reconfigure devices post-install.

Unified KDE Out of the Box Experience: This change introduces the post-install Plasma Setup application for all Fedora KDE variants. In the variants making use of this new setup application, the Anaconda configuration will be adjusted to disable redundant configuration stages that duplicate the functionality exposed in the setup application.

KDE Plasma Login Manager: This change introduced the Plasma Login Manager (PLM) for Fedora KDE variants instead of SDDM for the default login manager.

Reworked Games Lab: This change modernizes the Games Lab deliverable by leveraging the latest technologies. This offers a high quality gaming and game development experience. It includes a change from Xfce to KDE Plasma to take advantage of the latest and greatest Wayland stack for gaming.

Budgie 10.10: Budgie 10.10 is the latest release of Budgie Desktop. Budgie 10.10 migrates from X11 to Wayland. This ensures a viable long-term user experience for Fedora Budgie users and lays groundwork for the next major Budgie release.

LiveCD Improvements

Automatic DTB selection for aarch64 EFI systems: This change intends to make the aarch64 Fedora Live ISO images work out of the box on Windows on ARM (WoA) laptops. This will automatically select the right DTB at boot.

Modernize Live Media: This change modernizes the live media experience by switching to the “new” live environment setup scripts provided by livesys-scripts and leverage new functionality in dracut to enable support for automatically enabling persistent overlays when flashed to USB sticks.

System Enhancements

GNU Toolchain Update: The updates to the GNU Toolchain ensure Fedora stays current with the latest features, improvements, and bug and security fixes from the upstream gcc, glibc, binutils, and gdb projects. They guarantee a working system compiler, assembler, static and dynamic linker, core language runtimes, and debugger.

Reproducible Package Builds: Over the last few releases, we changed our build infrastructure to make package builds reproducible. This is enough to reach 90%. The remaining issues need to be fixed in individual packages. With this change, all package builds are expected to be reproducible in the F44 final release. Bugs will be filed against packages when an irreproducibility is detected. The goal is to have no fewer than 99% of package builds reproducible.

Packit as a dist-git CI: This change continues down the path of modernizing the Fedora CI experience by moving forward with the final phase of the plan to integrate Packit as the default CI for Fedora dist-git.

Remove Python Mock Usage: python-mock was deprecated with Fedora 34. However, it is still in use in many packages. We plan to go through the remaining usages and clean them up, with the goal of retiring python-mock from Fedora.

Adoption of new R Packaging Guidelines: This change introduces new rpm macros to help standardize and automate common R language packaging tasks resulting in a simplification of the rpm spec files.

Introduction of Nix Developer Tool: This change adds the nix package manager developer tool to Fedora.

Hardlink identical files in packages by default: With this change, all fedora packages will automatically hardlink files under /usr by default as a post install action. The mechanism introduced in this change is designed specifically to address reproducibility validation race conditions found in use by traditional hardlinking approaches.

Fedora Linux 44 Beta upgrades and removals

Golang 1.26: Fedora users will receive the most current and recent Go release. Being close to upstream allows us to avoid security issues and provide more updated features. Consequently, Fedora will provide a reliable development platform for the Go language and projects written in it.

MariaDB 11.8 as Distribution Default Version: The distribution default for MariaDB packaging will switch to 11.8. Multiple versions of the MariaDB packages will continue to be available. This change only impact which of the versioned packages presents itself as the unversioned “default”

IBus 1.5.34: Fedora users will benefit from better support of Wayland and Emoji features.

Django 6.x: Fedora Users can make use of the latest Django version; users who use Django add-ons that are not ready for 6.0 yet should be able to switch it out for python3-django5

TagLib 2: This change puts Fedora on the latest supported version, and it will benefit from improvements in future minor releases with a simple update.

Helm 4: Helm 4 has been released upstream with intentional backwards-incompatible changes relative to Helm 3. To ensure a smooth transition for Fedora, this Change introduces Helm 4 as the default helm package, while providing a parallel-installable helm3 package for users and tooling that still rely on Helm 3.

Ansible 13: Update from Ansible 11 and Ansible Core 2.18 to Ansible 13 and Ansible Core 2.20. This includes major robustness and security fixes to the templating engine which might break existing playbooks that had incorrect behavior. This was silently ignored in previous releases.

TeXLive 2025: With this change, we update to the latest version of TeXLive (2025). We also move to a modularized packaging system, which splits the “texlive” SPEC into a set of collection and scheme packages. This reflects the categorization that TeXLive upstream defines. Each collection package will package the immediate component dependencies as subpackages.

Drop QEMU 32-bit Host Builds: Fedora will stop building QEMU on i686 architecture. This change brings Fedora inline with the QEMU upstream project decision to deprecate support for 32-bit host builds. Upstream intends to start removing 32-bit host build support code in a future release and will assume 64-bit atomic ops in all builds.

Drop FUSE 2 libraries in Atomic Desktops: Remove FUSE 2 binaries and libraries from all Atomic Desktops

Drop compatibility for pkla polkit rules in Atomic Desktops: Remove support for deprecated pkla polkit rules from all Fedora Atomic Desktops

More information about Fedora Linux 44 Beta

Details and more information on the many great changes landing in Fedora Linux 44 are available on the Change Set page.

Posted on Leave a comment

Contribute to Fedora 44 KDE and GNOME Test Days

test days

Fedora test days are events where anyone can help make certain that changes in Fedora Linux work well in an upcoming release. Fedora community members often participate, and the public is welcome at these events. If you’ve never contributed to Fedora before, this is a perfect way to get started.

There are two test periods occurring in the coming days:

  • Monday February 2 through February 9 is to test the KDE Plasma 6.6.
  • Wednesday February 11 through February 13 is to test GNOME 50 Desktop.

Come and test with us to make Fedora 44 even better. Read more below on how to do it.

KDE Plasma 6.6

Our Test Day focus on making KDE work better on all your devices. We are improving core features for both Desktop and Mobile, starting with Plasma Setup, a new and easy way to install the system. This update also introduces the Plasma Login Manager to startup experience feel smoother, along with Plasma Keyboard—a smart on-screen keyboard made for tablets and 2-in-1s so you can type easily without a physical keyboard.

GNOME 50 Desktop

Our next Test Day focuses on GNOME 50 in Fedora 44 Workstation. We will check the main desktop and the most important apps to make sure everything works well. We also want you to try out the new apps added in this version. Please explore the system and use it as you normally would for your daily work to see how it acts during real use.

What do I need to do?

  • Make sure you have a Fedora Account (FAS).
  • Download test materials in advance where applicable, which may include some large files.
  • Follow the steps on the wiki test page one by one.
  • Send us your results through the app.

KDE Plasma 6.6 Test Day begins February 2nd: https://fedoraproject.org/wiki/Test_Day:2026-02-02_KDE_Plasma_6.6

GNOME 50 Test Day begins February 11th: https://fedoraproject.org/wiki/Test_Day:2026-02-11_GNOME_50_Desktop

Thank you for taking part in the testing of Fedora Linux 44!

Posted on Leave a comment

Contribute at the Test Week for the Anaconda WebUI Installer for Fedora Workstation

The Workstation team is working on the final integration of Anaconda WebUI Installer for Fedora Linux Workstation. As a result, the Fedora Workstation Working Group and QA teams have organized a test week from Monday, Aug 28, 2023 to Monday, Sept 04, 2023. The wiki page in this article contains links to the test images you’ll need to participate. Please continue reading for details.

How does a test week work?

A test week is an event where anyone can help ensure changes in Fedora Linux work well in an upcoming release. Fedora community members often participate, and the public is welcome at these events. If you’ve never contributed before, this is a perfect way to get started.

To contribute, you only need to be able to do the following things:

  • Download test materials, which include some large files
  • Read and follow directions step by step

The wiki page for the Anaconda WebUI test week has a lot of good information on what and how to test. After you’ve done some testing, you can log your results in the test day web application. If you’re available on or around the days of the event, please do some testing and report your results. We have a document which provides all the necessary steps.

Posted on Leave a comment

What’s new in Fedora Workstation 38

Fedora Workstation 38 is the latest version of the leading-edge Linux desktop OS, made by a worldwide community, including you! This article describes some of the user-facing changes in this new version of Fedora Workstation. Upgrade today from GNOME Software, or use dnf system-upgrade in a terminal emulator!

GNOME 44

Fedora Workstation 38 features the newest version of the GNOME desktop environment. GNOME 44 features subtle tweaks and revamps all throughout, most notably in the Quick Settings menu and the Settings app. More details about can be found in the GNOME 44 release notes.

File chooser

Most of the GNOME applications are built on GTK 4.10. This introduces a revamped file chooser with an icon view and image previews.

GTK 4.10's new file chooser, showing the icon view with image previews.
Icon view with image previews, new in GTK 4.10

Quick Settings tweaks

For GNOME 44 There have been a number of improvements to the Quick Settings menu. The new version includes a new Bluetooth menu, which introduces the ability to quickly connect and disconnect known Bluetooth devices. Additional information is available in each quick settings button, thanks to new subtitles.

The Bluetooth menu can now be used to connect to known devices

Also in the quick settings menu, a new background apps feature lists Flatpak apps which are running without a visible window.

Background Apps lets you see sandboxed apps running without a visible window and close them

Core applications

GNOME’s core applications have received significant improvements in the new version.

Settings has seen a round of updates, focused on improving the experience in each of the settings panels. Here are some notable changes:

  • Major redesigns of Mouse & Touchpad and Accessibility significantly improves usability.
  • Updated Device Security now uses clearer language.
  • Redesigned sound now includes new windows for the volume mixer and alert sound.
  • You can now share your Wi-Fi credentials to another device through a QR code.
The Mouse & Touchpad panel in the GNOME Settings app, showing the Touchpad settings.
The revamped Mouse & Touchpad panel in Settings

In Files, there is now an option to expand folders in the list view.

The tree view can be turned on in Files’ settings

GNOME Software now automatically checks for unused Flatpak runtimes and removes them, saving disk space. You can also choose to only allow open source apps in search results.

In Contacts, you can now share a contact through a QR code, making it super easy to share a contact from your desktop to your phone!

Third-party repositories

Fedora’s third-party repositories feature makes it easy to enable a selection of additional software repos. Previous versions included a filtered version of Flathub, which included a small number of apps. For Fedora 38, filtering of Flathub content no longer occurs. This means that the third party repos now provide full access to all of Flathub.

The third party repos must still be manually enabled, and individual repositories may be disabled from the GNOME Software settings. If you want to keep proprietary apps from showing up in your search results, you can also do that in GNOME Software’s preferences menu.

You are in control.

Under-the-hood changes throughout Fedora Linux 38

Fedora Linux 38 features many under the hood changes. Here are some notable ones:

  • The latest Linux kernel, version 6.2, brings extended hardware support, bug fixes and performance improvements.
  • The length of time that system services may block shutdown has been reduced. This means that, if a service delays your machine from powering off, it will be much less disruptive than in the past.
  • RPM now uses the Rust-written Sequoia OpenGPG parser for better security.
  • The Noto fonts are now the default for Khmer and Thai. The variable versions of the Noto CJK fonts are now used for Chinese, Japanese, and Korean. This reduces disk usage.
  • Profiling will be easier from Fedora 38, thanks to changes in its default build configuration. The expectation is that this will result in performance improvements in future versions.

Also check out…

Official spins for the Budgie desktop environment and Sway tiling Wayland compositor are now available!

Posted on Leave a comment

What’s new in Fedora Workstation 37

Fedora Workstation 37 is the latest version of the Fedora Project’s desktop operating system, made by a worldwide community dedicated to pushing forward innovation in open source. This article describes some of the new user-facing features in Fedora Workstation 37. Upgrade today from GNOME Software, or by using dnf system-upgrade in your favourite terminal emulator!

GNOME 43

Fedora Workstation 37 features the latest version of the GNOME desktop environment which sees more core applications ported to GTK 4, user interface tweaks, and performance tune-ups. Check out the GNOME 43 release notes for more information!

Redesigned Quick Settings menu

No need to open Settings just to change to and from Dark Mode

The new Quick Settings menu offers more control and convenience. You can now easily switch your Wi-Fi network in the menu instead of being taken to a full-screen dialogue box, change between default and dark modes, and enable Night Light without opening the Settings app. A convenient button for taking screenshots and screencasts is also now present.

Core applications

The GNOME core applications included in Fedora Workstation 37 have seen a round of tweaks and improvements.

  • Files has been ported to GTK 4, and the user interface has seen many improvements. Here are just some of them:
    • It is now adaptive – meaning it automatically adjusts to a narrower size, making better use of the available space.
    • The list view has been re-architected to make rubber-band selections easier.
    • The “Properties” and “Open With…” dialogues have been redesigned.
Rubber-band selection in Files 43
  • Calendar features a new sidebar that shows your upcoming events at a glance. It, along with Contacts, now feature adaptive user interfaces.
  • Characters now shows you different skin tone, hair colour, and gender options for emoji.
  • The package source selector in Software has been redesigned and moved to a more visible location.
  • Maps has been ported to GTK 4.
  • Settings includes a new Device Security panel, allowing you to easily see the hardware security features your devices offers – or lacks!
Uh oh!

New supplemental default wallpapers

Fedora Workstation 37 ships with a new set of supplemental wallpapers. See how they were made here!

The six new wallpapers come in both light and dark variants

Under-the-hood changes throughout Fedora Linux 37

Fedora Linux 37 features many under-the-hood changes. Here are some notable ones:

  • The Raspberry Pi 4 single-board computer is now officially supported, including 3D acceleration!
  • New installs on BIOS systems will use the GPT disk layout instead of the legacy MBR layout. The installer images will also now use GRUB instead of syslinux to boot on BIOS systems.
  • If you disable and then re-enable SELinux, or run the fixfiles onboot command, the file system relabelling processes will now be done in parallel, allowing for a significant speed boost.
  • The default fonts for Persian has been changed from DejaVu and Noto Sans Arabic to Vazirmatn, providing a more consistent experience for those who use Fedora Linux in Persian.

Also check out…

Cool happenings throughout the Fedora Project!

  • Fedora CoreOS and Fedora Cloud Base have been promoted to Edition status!
  • Preview installer images with a new GUI for Anaconda, the Fedora Linux system installer, will become available in about a week. An article will be published with more details, so watch this space!
Posted on Leave a comment

Contribute at the i18n, Release Validation, CrytoPolicy and GNOME 43 Final test weeks for Fedora Linux 37

There are 4 upcoming test days/weeks in the coming weeks. The first is Wed 31 August through Wed 07 Sept. It is to test Pre-Beta Release Validation. The second is Tuesday 6 Sept through Monday 12 Sept. It focuses on testing i18n. The third is Monday 5 Sept the Crypto Policy test day. The fourth is Wed 7 Sept through Wed 14 Sept to test GNOME 43 Final. Please come and test with us to make the upcoming Fedora 37 even better. Read more below on how to participate.

Pre-Beta Release Validation

Fedora Linux is foremost a community-powered distribution. Fedora Linux runs on all sorts of off-the-shelf hardware. The QA team relies on looking at bugs and edge cases coming out of community-owned hardware, so testing pre-release composes is a crucial part of the release process. We try to fix as many of them as we can! Please participate in the pre-beta release validation test week now through 7 September. You can help us catch those bugs at an early stage. A detailed post can be found here

GNOME 43 Final test week

GNOME is the default desktop environment for Fedora Workstation and thus for many Fedora users. As a part of the planned change, the GNOME 43 Final will land on Fedora which then will be shipped with Fedora Linux 37. To ensure that everything works fine The Workstation Working Group and QA team will have this test week Wed 7 Sept through Wed 14 Sept. Refer to the GNOME 43 test week wiki page for links and resources needed to participate.

i18n test week

i18n test week focuses on testing internationalization features in Fedora Linux. The test week is Tuesday 6 Sept through Monday 12 Sept.

StrongCryptoSettings3 test day

This is a new and unconventional test day. The change, however small, will have impacts across many areas and we want our users to spot as many bugs as we possibly can. The advice is to use exotic VPNs, proprietary chat apps, different email providers and even git workflows. These can be tested with some advice which can be found here. This test day is Monday 5 Sept.

How do test days work?

A test day is an event where anyone can help make sure changes in Fedora Linux work well in an upcoming release. Fedora community members often participate, and the public is welcome at these events. If you’ve never contributed before, this is a perfect way to get started.

To contribute, you only need to be able to download test materials (which include some large files) and then read and follow directions step by step.

Detailed information about both test days is available on the wiki pages mentioned above. If you’re available on or around the days of the events, please do some testing and report your results.

Come and test with us to make the upcoming Fedora 37 even better.

Posted on Leave a comment

What’s new in Fedora Workstation 36

The latest release of Fedora Workstation 36 continues the Fedora Project’s ongoing commitment to delivering the latest innovations in the open source world. This article describes some of the notable user-facing changes that appear in this version.

GNOME 42

Fedora Workstation 36 includes the latest version of the GNOME desktop environment. GNOME 42 includes many improvements and new features. Just some of the improvements include:

  • Significantly improved input handling, resulting in lower input latency and improved responsiveness when the system is under load. This is particularly beneficial for games and graphics applications.
  • The Wayland session is now the default for those who use Nvidia’s proprietary graphics driver.
  • A universal dark mode is now available.
  • A new interface has been added for taking screenshots and screen video recordings.

In addition, many of the core apps have been ported to GTK 4, and the shell features a number of subtle refinements.

Refreshed look and feel

GNOME 42 as featured in Fedora Workstation 36

GNOME Shell features a refreshed look and feel, with rounder and more clearly separated elements throughout. All the symbolic icons have been updated and the top bar is no longer rounded.

Universal dark mode option

In Settings > Appearance, you can now choose a dark mode option which applies a dark theme to all supported applications. In addition, the pre-installed wallpapers now include dark mode variants. Dark themes can help reduce eye-strain when there is low ambient light, can help conserve battery life on devices with OLED displays, and can reduce the risk of burn-in on OLED displays. Plus, it looks cool!

New screenshot interface

Taking screenshots and screen video recordings is now easier than ever

Previously, pressing the Print Screen key simply took a screenshot of the entire screen and saved it to the Pictures folder. If you wanted to customize your screenshots, you had to remember a keyboard shortcut, or manually open the Screenshots app and use that to take the screenshot you wanted. This was inconvenient.

Now, pressing Print Screen presents you with an all-new user interface that allows you to take a screenshot of either your entire screen, just one window, or a rectangular selection. You can also choose whether to hide or show the mouse pointer, and you can also now take a screen video recording from within the new interface.

Core applications

Apps made in GTK 4 + libadwaita feature a distinct visual style

GNOME’s core applications have seen a number of improvements. A number of them have been ported to GTK 4 and use libadwaita, a new widget library that implements GNOME’s Human Interface Guidelines.

  • Files now includes the ability to sort files by creation date, and includes some visual refinements, such as a tweaked headerbar design and file renaming interface.
  • The Software app now includes a more informative update interface, and more prominently features GNOME Circle apps.
  • The Settings app now has a more visually appealing interface matching the visual tweaks present throughout GNOME Shell.
  • Text Editor replaces Gedit by default. Text Editor is an all-new app built in GTK 4 and libadwaita. You can always reinstall Gedit by searching for it in the Software app.

Wayland support on Nvidia’s proprietary graphics driver

In previous versions, Fedora Workstation defaulted to the X display server when using Nvidia’s proprietary graphics driver – now, Fedora Workstation 36 uses the Wayland session by default when using Nvidia’s proprietary graphics driver.

If you experience issues with the Wayland session, you can always switch back to the Xorg session by clicking the gear icon at the bottom-right corner of the login screen and choosing “GNOME on Xorg”.

Under-the-hood changes throughout Fedora Linux 36

  • When installing or upgrading packages with DNF or PackageKit, weak dependencies that have been manually removed will no longer be reinstalled. That is to say: if foo is installed and it has bar as a weak dependency, and bar is then removed, bar will not be reinstalled when foo is updated.
  • The Noto fonts are now used by default for many languages. This provides greater coverage for different character sets. For users who write in the Malayalam script, the new Meera and RIT Rachana fonts are now the default.
  • systemd messages now include unit names by default rather than just the description, making troubleshooting easier.
systemd messages shows unit names by default

Upgrade now!

You can upgrade your system through GNOME Software, via dnf system-upgrade in the terminal, or download the live ISO image from the official website.

Also check out…

There are always cool things happening in the Fedora Project!

Posted on Leave a comment

Sharing the computer screen in Gnome

You do not want someone else to be able to monitor or even control your computer and you usually work hard to cut off any such attempts using various security mechanisms. However, sometimes a situation occurs when you desperately need a friend, or an expert, to help you with a computer problem, but they are not at the same location at the same time. How do you show them? Should you take your mobile phone, take pictures of your screen, and send it to them? Should you record a video? Certainly not. You can share your screen with them and possibly let them control your computer remotely for a while. In this article, I will describe how to allow sharing the computer screen in Gnome.

Setting up the server to share its screen

A server is a computer that provides (serves) some content that other computers (clients) will consume. In this article the server runs Fedora Workstation with the standard Gnome desktop.

Switching on Gnome Screen Sharing

By default, the ability to share the computer screen in Gnome is off. In order to use it, you need to switch it on:

  1. Start Gnome Control Center.
  2. Click on the Sharing tab.

    Sharing switched off

  3. Switch on sharing with the slider in the upper right corner.
  4. Click on Screen sharing.

    Sharing switched on

  5. Switch on screen sharing using the slider in the upper left corner of the window.
  6. Check the Allow connections to control the screen if you want to be able to control the screen from the client. Leaving this button unchecked will only allow view-only access to the shared screen.
  7. If you want to manually confirm all incoming connections, select New connections must ask for access.
  8. If you want to allow connections to people who know a password (you will not be notified), select Require a password and fill in the password. The password can only be 8 characters long.
  9. Check Show password to see what the current password is. For a little more protection, do not use your login password here, but choose a different one.
  10. If you have more networks available, you can choose on which one the screen will be accessible.

Setting up the client to display a remote screen

A client is a computer that connects to a service (or content) provided by a server. This demo will also run Fedora Workstation on the client, but the operating system actually should not matter too much, if it runs a decent VNC client.

Check for visibility

Sharing the computer screen in Gnome between the server and the client requires a working network connection and a visible “route” between them. If you cannot make such a connection, you will not be able to view or control the shared screen of the server anyway and the whole process described here will not work.

To make sure a connection exists

Find out the IP address of the server.

Start Gnome Control Center, a.k.a Settings. Use the Menu in the upper right corner, or the Activities mode. When in Activities, type

settings

and click on the corresponding icon.

Select the Network tab.

Click on the Settings button (cogwheel) to display your network profile’s parameters.

Open the Details tab to see the IP address of your computer.

Go to your client’s terminal (the computer from which you want to connect) and find out if there is a connection between the client and the server using the ping command.

$ ping -c 5 192.168.122.225

Examine the command’s output. If it is similar to the example below, the connection between the computers exists.

PING 192.168.122.225 (192.168.122.225) 56(84) bytes of data. 64 bytes from 192.168.122.225: icmp_seq=1 ttl=64 time=0.383 ms 64 bytes from 192.168.122.225: icmp_seq=2 ttl=64 time=0.357 ms 64 bytes from 192.168.122.225: icmp_seq=3 ttl=64 time=0.322 ms 64 bytes from 192.168.122.225: icmp_seq=4 ttl=64 time=0.371 ms 64 bytes from 192.168.122.225: icmp_seq=5 ttl=64 time=0.319 ms --- 192.168.122.225 ping statistics --- 5 packets transmitted, 5 received, 0% packet loss, time 4083ms rtt min/avg/max/mdev = 0.319/0.350/0.383/0.025 ms

You will probably experience no problems if both computers live on the same subnet, such as in your home or at the office, but problems might occur, when your server does not have a public IP address and cannot be seen from the external Internet. Unless you are the only administrator of your Internet access point, you will probably need to consult about your situation with your administrator or with your ISP. Note, that exposing your computer to the external Internet is always a risky strategy and you must pay enough attention to protecting your computer from unwanted access.

Install the VNC client (Remmina)

Remmina is a graphical remote desktop client that can you can use to connect to a remote server using several protocols, such as VNC, Spice, or RDP. Remmina is available from the Fedora repositories, so you can installed it with both the dnf command or the Software, whichever you prefer. With dnf, the following command will install the package and several dependencies.

$ sudo dnf install remmina

Connect to the server

If there is a connection between the server and the client, make sure the following is true:

  1. The computer is running.
  2. The Gnome session is running.
  3. The user with screen sharing enabled is logged in.
  4. The session is not locked, i.e. the user can work with the session.

Then you can attempt to connect to the session from the client:

  1. Start Remmina.
  2. Select the VNC protocol in the dropdown menu on the left side of the address bar.
  3. Type the IP address of the server into the address bar and hit Enter.

    Remmina Window

  4. When the connection starts, another connection window opens. Depending on the server settings, you may need to wait until the server user allows the connection, or you may have to provide the password.
  5. Type in the password and press OK.

    Remmina Connected to Server

  6. Press Align with resolution button to resize the connection window to match the server resolution, or press Full Screen Button to resize the connection window over your entire desktop. When in fullscreen mode, notice the narrow white bar at the upper edge of the screen. That is the Remmina menu and you can access it by moving the mouse to it when you need to leave the fullscreen mode or change some of the settings.

When you return back to the server, you will notice that there is now a yellow icon in the upper bar which indicates that you are sharing the computer screen in Gnome. If you no longer wish to share the screen, you can enter the menu and click on Screen is being shared and then on select Turn off to stop sharing the screen immediately.

Turn off menu item

Terminating the screen sharing when session locks.

By default, the connection will always terminate when the session locks. A new connection cannot be established until the session is unlocked.

On one hand, this sounds logical. If you want to share your screen with someone, you might not want them to use your computer when you are not around. On the other hand, the same approach is not very useful, if you want to control your own computer from a remote location, be it your bed in another room or your mother-in-law’s place. There are two options available to deal with this problem. You can either disable locking the screen entirely or you can use a Gnome extension that supports unlocking the session via the VNC connection.

Disable screen lock

In order to disable the screen lock:

  1. Open the Gnome Control Center.
  2. Click on the Privacy tab.
  3. Select the Screen Lock settings.
  4. Switch off Automatic Screen Lock.

Now, the session will never lock (unless you lock it manually), so it will be possible to start a VNC connection to it.

Use a Gnome extension to allow unlocking the session remotely.

If you do not want to switch off locking the screen or you want to have an option to unlock the session remotely even when it is locked, you will need to install an extension that provides this functionality as such behavior is not allowed by default.

To install the extension:

  1. Open the Firefox browser and point it to the Gnome extension page.

    Gnome Extensions Page

  2. In the upper part of the page, find an info block that tells you to install GNOME Shell integration for Firefox.
  3. Install the Firefox extension by clicking on Click here to install browser extension.
  4. After the installation, notice the Gnome logo in the menu part of Firefox.
  5. Click on the Gnome logo to navigate back to the extension page.
  6. Search for allow locked remote desktop.
  7. Click on the displayed item to go to the extension’s page.
  8. Switch the extension ON by using the on/off button on the right.

    Extension selected

Now, it will be possible to start a VNC connection any time. Note, that you will need to know the session password to unlock the session. If your VNC password differs from the session password, your session is still protected a little.

Conclusion

This article, described the way to enable sharing the computer screen in Gnome. It mentioned the difference between the limited (view-only) access or not limited (full) access. This solution, however, should in no case be considered a correct approach to enable a remote access for serious tasks, such as administering a production server. Why?

  1. The server will always keep its control mode. Anyone working with the server session will be able to control the mouse and keyboard.
  2. If the session is locked, unlocking it from the client will also unlock it on the server. It will also wake up the display from the stand-by mode. Anybody who can see your server screen will be able to watch what you are doing at the moment.
  3. The VNC protocol per se is not encrypted or protected so anything you send over this can be compromised.

There are several ways, you can set up a protected VNC connection. You could tunnel it via the SSH protocol for better security, for example. However, these are beyond the scope of this article.

Disclaimer: The above workflow worked without problems on Fedora 35 using several virtual machines. If it does not work for you, then you might have hit a bug. Please, report it.

Posted on Leave a comment

Connect Fedora to your Android phone with GSConnect

Both Apple and Microsoft offer varying levels of integration of their desktop offerings with your mobile devices. Fedora offers a similar if not greater degree of integration with GSConnect. It lets you pair your Android phone with your Fedora desktop and opens up a lot of possibilities. Keep reading to discover more about what it is and how it works.

What is GSConnect?

GSConnect is an implementation of the KDE Connect project tailored for the GNOME desktop. KDE Connect makes it possible for your devices to communicate with each other. However, installing it on Fedora’s default GNOME desktop requires pulling in a large number of KDE dependencies.

GSConnect is a complete implementation of KDE Connect, but in the form of a GNOME shell extension. Once installed, GSConnect lets you do the following and a lot more:

  • Receive phone notifications on your desktop and reply to messages
  • Use your phone as a remote control for your desktop
  • Share files and links between devices
  • Check your phone’s battery level from the desktop
  • Ring your phone to help find it

Setting up the GSConnect extension

Setting up GSConnect requires installing two components: the GSConnect extension on your desktop and the KDE Connect app on your Android device.

First, install the GSConnect extension from the GNOME Shell extensions website: GSConnect. (Fedora Magazine has a handy article on How to install a GNOME Shell extension to help you with this step.)

The KDE Connect app is available on Google’s Play Store. It’s also available on the FOSS Android apps repository, F-Droid.

Once you have installed both these components, you can pair your two devices. Installing the extension makes it show up in your system menu as Mobile Devices. Clicking on it displays a drop down menu, from which you can access Mobile Settings.

GSConnect menu within system menu

Here’s where you can view your paired devices and manage the features offered by GSConnect. Once you are on this screen, launch the app on your Android device.

You can initiate pairing from either device, but here you’ll be connecting to your desktop from the Android device. Simply hit refresh on the app, and as long as both devices are on the same wireless network, your desktop shows up in your Android device. You can now send a pair request to the desktop. Accept the pair request on your desktop to complete the pairing.

Pair request from Android app to desktop

Using GSConnect

Once paired, you’ll need to grant permissions on your Android device to make use of the many features available on GSConnect. Click on the paired device in the list of devices to see all available functions and enable or disable them according to your preferences.

GSConnect device preferences

Remember that you’ll also need to grant corresponding permissions in the Android app to be able to use these functions. Depending upon the features you’ve enabled and the permissions you’ve granted, you can now access your mobile contacts on your desktop, get notified of messages and reply to them, and even sync the desktop and Android device clipboards.

Integration with Files and your web browsers

GSConnect allows you to directly send files to your Android device from your desktop file explorer’s context menu.

On Fedora’s default GNOME desktop, you will need to install the nautilus-python package in order to make your paired devices show up in the context menu. Installing this is as straightforward as running the following command from your preferred terminal:

$ sudo dnf install nautilus-python

Once done, the Send to Mobile Device entry appears in the context menu of the Files app.

Context menu entry to send file to mobile device

Similarly, install the corresponding WebExtension for your browser, be it Firefox or Chrome, to send links to your Android device. You have the option to send the link to launch directly in your browser or to deliver it as SMS.

Running Commands

GSConnect lets you define commands which you can then run on your desktop, from your remote device. This allows you to do things such as take a screenshot of your desktop, or lock and unlock your desktop from your Android device, remotely.

Define commands to be run from the mobile device, on the desktop

To make use of this feature, you can use standard shell commands and the CLI exposed by GSConnect. Documentation on this is provided in the project’s GitHub repository: CLI Scripting.

The KDE UserBase Wiki has a list of example commands. These examples cover controlling the brightness and volume on your desktop, locking the mouse and keyboard, and even changing the desktop theme. Some of the commands are specific for KDE Plasma, and modifications are necessary to make it run on the GNOME desktop.

Explore and have fun

GSConnect makes it possible to enjoy a great degree of convenience and comfort. Dive into the preferences to see all that you can do and get creative with the commands function. Feel free to share all the possibilities this utility unlocked in your workflow in the comments below.


Photo by Pathum Danthanarayana on Unsplash.