This article introduces projects available in Flathub with installation instructions.
Flathub is the place to get and distribute apps for all of Linux. It is powered by Flatpak, allowing Flathub apps to run on almost any Linux distribution.
Flatseal is a graphical utility to review and modify permissions from your Flatpak applications. This is one of the most used apps in the flatpak world, it allows you to improve security on flatpak applications. However, it needs to be used with caution because you can make your permissions be too open.
It’s very simple to use: Simply launch Flatseal, select an application, and modify its permissions. Restart the application after making the changes. If anything goes wrong just press the reset button.
You can install “Flatseal” by clicking the install button on the web site or manually using this command:
Reco is an audio recording app that helps you recall and listen to things you listened to earlier.
Some of the features include:
Recording sounds from both your microphone and system at the same time.
Support formats like ALAC, FLAC, MP3, Ogg Vorbis, Opus, and WAV
Timed recording.
Autosaving or always-ask-where-to-save workflow.
Saving recording when the app quits.
I used it a lot to help me record interviews for the Fedora Podcast
You can install “Reco” by clicking the install button on the web site or manually using this command:
flatpak install flathub com.github.ryonakano.reco
Mini Text
Mini Text is a very small and minimalistic text viewer with minimal editing capabilities. It’s meant as a place to edit text to be pasted, it doesn’t have saving capabilities. It uses GTK4 and it’s interface integrates nicely with GNOME.
I found this to be very useful just to keep data that I want to paste anywhere, it doesn’t have unwanted and/or unneeded rich text capabilities, just plain text with minimal editing features.
You can install “Mini Text” by clicking the install button on the web site or manually using this command:
The Workstation team is working on the final integration of Anaconda WebUI Installer for Fedora Linux Workstation. As a result, the Fedora Workstation Working Group and QA teams have organized a test week from Monday, Aug 28, 2023 to Monday, Sept 04, 2023. The wiki page in this article contains links to the test images you’ll need to participate. Please continue reading for details.
How does a test week work?
A test week is an event where anyone can help ensure changes in Fedora Linux work well in an upcoming release. Fedora community members often participate, and the public is welcome at these events. If you’ve never contributed before, this is a perfect way to get started.
To contribute, you only need to be able to do the following things:
Download test materials, which include some large files
Read and follow directions step by step
The wiki page for the Anaconda WebUI test week has a lot of good information on what and how to test. After you’ve done some testing, you can log your results in the test day web application. If you’re available on or around the days of the event, please do some testing and report your results. We have a document which provides all the necessary steps.
At the Fedora Linux 38 release party, the Docs team suggested that we take advantage of a virtual meetup to bring teamwork into documentation writing. Documentation writing shouldn’t be a solitary pursuit.
An interactive session at Flock 2023 helped exchange ideas on a collaborative way to run meetings and invite more contributions for documentation.
After months of waiting for ideas to be finalized, the Docs team is pleased to announce the workshop will begin September 2023.
If you fancy coming along, just let us know your preferred timeslot in the When-is-good scheduler by September 15 2023.
But why and how?
The idea behind a virtual writing session is to combine the power of the Fedora Podcast with advocacy of writing and maintaining excellent user documentation. Here is why.
Documentation in any free and open source software project provides reasons for users and contributors to stay loyal to the project and software.
The Docs workshop aims to facilitate individual and collaborative work through a supportive community of documentarians.
Documentation is more than a fix of visual presentation. We’re writing, reviewing, and deploying docs.
In accordance with the Fedora project motto “First”, we like to try new things in toolset, automation, and UI improvement.
Building on feedback from each session, the Docs team wants to empower people to learn about templates, issue tickets, review processes, and tool chains to improve documentation for Fedora Linux users and contributors.
Program agenda
A monthly agenda will be posted in Fedocal and Fosstodon (@fedora@fosstodon.org).
Track 1: Introduction and onboarding (odd months) – What the Docs team is all about. What role will interest you? – The types of user documentation Fedora Linux publishes – How you can help improve Fedora Documentation.
Track 2: Skill-based workshop (even months) – Technical review, Git workshop, AsciiDoc template and attributes – Use of local build and preview script – Test documentation quality
Format of Track 2 – Demo – Try it yourself – Q&A
If you come along to the Track 2 workshop, all you need is a Fedora account and Pagure account with your computer, preferably with Git and Podman (or Docker) installed.
In the meantime, if you have questions, feel free to drop by our Discussion forum. I’m looking forward to saying hello at our first virtual docs workshop someday in late September (the exact date depends on the when-is-good responses)! Let’s do it!
FLAC, or Free Lossless Audio Codec, is a lossless audio compression format that preserves all the original audio data. This means that FLAC files can be decoded to an identical copy of the original audio file, without any loss in quality. However, lossless compression typically results in larger file sizes than lossy compression, which is why a method to convert FLAC to lossy formats is desirable. This is where TransFLAC can help.
FLAC is a popular format for archiving digital audio files, as well as for storing music collections on home computers. It is also becoming increasingly common for music streaming services to offer FLAC as an option for high-quality audio.
For portable devices, where storage space is limited, lossy audio formats such as MP3, AAC, and OGG Vorbis are often used. These formats can achieve much smaller file sizes than lossless formats, while still providing good sound quality.
In general, FLAC is a good choice for applications where lossless audio quality is important, such as archiving, mastering, and critical listening. Lossy formats are a good choice for applications where file size is more important, such as storing music on portable devices or streaming music over the internet.
TransFLAC: Convert FLAC to lossy formats
TransFLAC is a command-line application that converts FLAC audio files to a lossy format at a specified quality level. It can keep both the FLAC and lossy libraries synchronized, either partially or fully. TransFLAC also synchronizes album art stored in the directory structure, such as cover, albumart, and folder files. You can run TransFLAC interactively in a terminal window, or you can schedule it to run automatically using applications such as cron or systemd.
The following four parameters must be specified:
Input FLAC Directory: The directory to recursively search for FLAC audio files. The case of the directory name matters. TransFLAC will convert all FLAC audio files in the directory tree to the specified lossy codec format. The program will resolve any symlinks encountered and display the physical path.
Output Lossy Directory: The directory to store the lossy audio files. The case of the directory name matters. The program will resolve any symlinks encountered and display the physical path.
Lossy Codec: The codec used to convert the FLAC audio files. The case of the codec name does not matter. OPUS generally provides the best sound quality for a given file size or bitrate, and is the recommended codec. Valid values are: OPUS | OGG | AAC | MP3
Codec Quality: The quality preset used to encode the lossy audio files. The case of the quality name does not matter. OPUS STANDARD quality provides full bandwidth, stereo music, good audio quality approaching transparency, and is the recommended setting. Valid values are: LOW | MEDIUM | STANDARD | HIGH | PREMIUM
TransFLAC allows for customization of certain items in the configuration. The project wiki provides additional information.
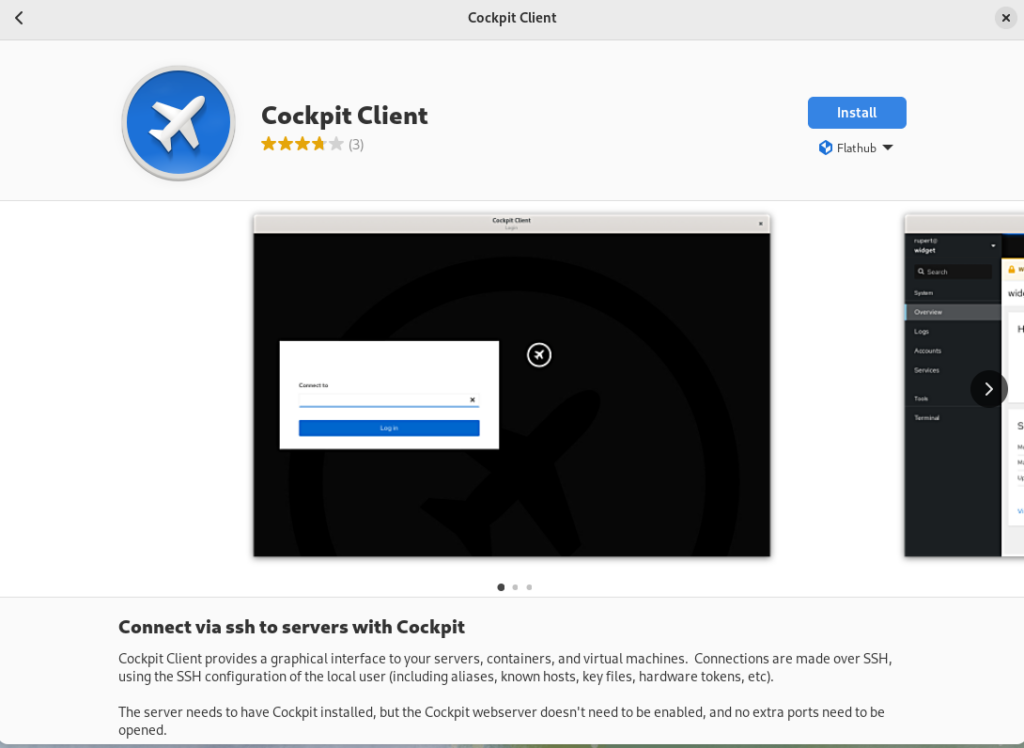
It probably sounds too good to be true: the ability to manage remote systems using an easy to use, intuitive graphical interface – without the need to install extra software on the remote systems, enable additional services, or make any other changes on the remote systems. This functionality, however, is now available with a combination of the recently introduced Python bridge for Cockpit and the Cockpit Client Flatpak! This allows Cockpit to manage remote systems, assuming only SSH access and that Python is installed on the remote host. Read on for more information on how this works and how to get started.
If you are not familiar with Cockpit, it is described on the project’s web site as a web-based graphical interface for servers. Cockpit is intended for everyone, especially those who are:
new to Linux (including Windows admins)
familiar with Linux and want an easy, graphical way to administer servers
expert admins who mainly use other tools but want an overview on individual systems
You can easily and intuitively complete a variety of tasks from Cockpit. These including tasks such as:
expanding the size of a filesystem
creating a network bond
modifying the firewall
viewing log entries
viewing real time and historical performance information
managing Podman containers
managing KVM virtual machines
and many additional tasks.
Objections to using Cockpit on systems
In the past, I’ve heard two main objections to using Cockpit on systems:
I don’t want to run the Cockpit web server on my systems. Additional network services like this increase the attack surface. I don’t want to open another port in the firewall. I don’t want more HTTPS certificates in my environment to manage and maintain.
I don’t want to install additional packages on my systems. I don’t even have access to install additional packages). The more packages installed, the larger my footprint is, and the more attack surface there is. For me to install additional packages in a production environment, I have to go through a change management process, etc. What a hassle!
Let’s address these one at a time. For the first concern, you have actually had several options for connecting to Cockpit over SSH, without running the Cockpit web server, for quite some time. These options include:
The ability to set up a bastion host, which is a host that has the Cockpit web server running on it. You can then connect to Cockpit on the bastion host using a web browser. From the Cockpit login screen on the bastion host you can use the Connect tooption to specify an alternate host to login to (refer to the LoginTo cockpit.conf configuration option). Another option is to authenticate to Cockpit on the bastion host, and use the Add new host option. In either case, the bastion Cockpit host will connect to these additional remote hosts over SSH (so only the bastion host in your environment needs to be running the Cockpit web server).
You can use the Cockpit integration available with the upstream Foreman, or downstream Red Hat Satellite, to connect to Cockpit on systems in your environment over SSH.
You can use the cockpit/ws container image. This is a containerized version of the Cockpit web server that acts as a containerized bastion host
For more information on these options, refer to the Connecting to the RHEL web console, part 1: SSH access methods blog post. This blog post focuses on the downstream RHEL web console, however, the information also applies to the upstream Cockpit available in Fedora.
This brings me to the second concern, and the main focus of this article. This is the concern that I don’t want to install additional packages on the remote systems I am managing. While there are several options for using the web console without the Cockpit web server, all of these options previously had a prerequisite that the remote systems needed to have at least the cockpit-system package installed. For example, previously if you tried to use the Cockpit Client Flatpak to connect to a remote system that didn’t have Cockpit installed, you’d see an error message stating that the remote system doesn’t have cockpit-bridge installed.
The Cockpit team has replaced the previous Cockpit bridge (implemented using C) with a new bridge written in Python. For a technical overview of the function of the Cockpit bridge, and how the new Python bridge was implemented, refer to the recent Monty Python’s Flying Cockpit DevConf presentation by Allison Karlitskaya and Martin Pitt.
This new Python bridge overcomes the previous limitation requiring Cockpit to be installed on the remote hosts.
Using the Cockpit Client Flatpak
With the Cockpit Client Flatpak application installed on a workstation, we can connect to remote systems over SSH and manage them using Cockpit.
Installation
In the following example, I’m using a Fedora 38 workstation. Install the Cockpit Client Flatpak by simply opening the GNOME Software application and searching for Cockpit. Note that you’ll need to have Flathub enabled in GNOME Software.
Using the Cockpit Client
Once installed, you’ll see the following when opening the Cockpit Client:
You can type in a hostname or IP address that you would like to connect to. To authenticate as a user other than the user you are currently using, you can use the user@hostname syntax. A list of recent hosts that you’ve connected to will appear, if this is not the first time using the Cockpit Client. In that case, you can simply click on a host name to reconnect
If you have SSH key based authentication setup, you’ll be logged in to the remote host using the key based authentication. With out SSH keys setup, you’ll be prompted to authenticate with a password. In either case, if it is your first time connecting to the host over SSH, you’ll be prompted to accept the host key fingerprint.
As a special case, you can log into your currently running local session by connecting to localhost, without authentication.
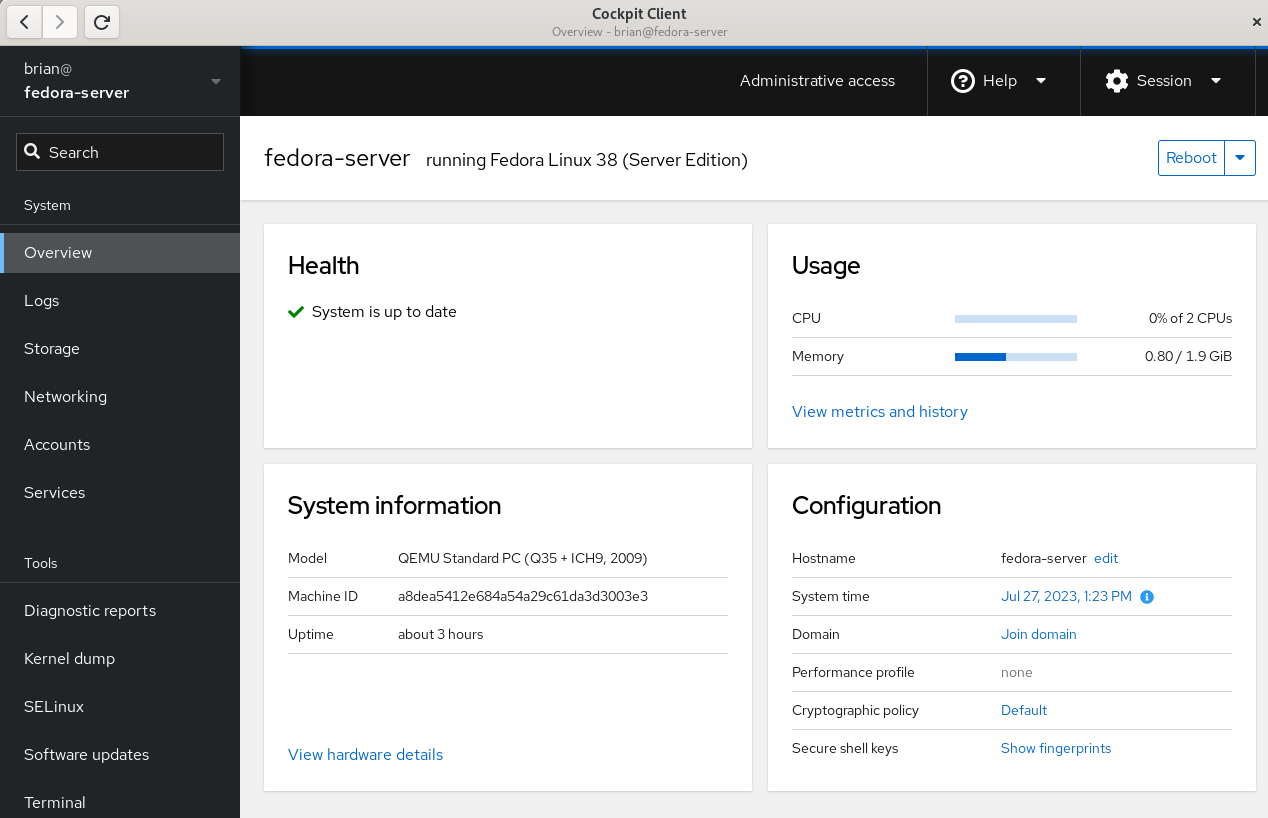
Once connected, you’ll see the Cockpit Overview page:
Cockpit overivew menu
Select the Terminal menu item in Cockpit to show that the remote system that I’m logged in to does not have any Cockpit packages installed:
Cockpit Terminal view
Prerequisites for connecting to systems with Cockpit Client
There are several prerequisites for utilizing Cockpit Client to connect to a remote system. If you are familiar with managing remote hosts with Ansible, you’ll likely already be familiar with the prerequisites. They are the same:
You must have connectivity to the remote system over SSH.
You must have a valid user account on the remote system that you can authenticate with.
If you need the ability to complete privileged operations in Cockpit, the user account on the remote system will need sudo privileges.
If you are connecting to a remote system that doesn’t have Cockpit installed, there are a couple of additional prerequisites:
Python 3.6 or later must be installed on the remote host. This is not usually an issue, with some exceptions, such as Fedora CoreOS which does not include Python by default.
An older version of Cockpit Client can not be used to connect to a newer operating system version. For example, if I installed Cockpit Client on my Fedora 38 workstation today and never updated it, it may not work properly to manage a Fedora 39 or Fedora 40 server in the future.
Frequently asked questions
Here are some frequently asked questions about this functionality:
Question: Cockpit is extendable via additional Applications. Which Cockpit applications are available if I use the Cockpit Client to connect to a remote system that doesn’t have Cockpit installed?
Answer: Currently, Cockpit Client includes
cockpit-machines (virtual machine management)
cockpit-podman (Podman container management)
cockpit-ostree (used to manage rpm-ostree based systems)
The Cockpit team is looking for feedback on what Cockpit applications you’d like to see included in the Cockpit Client. Post a comment below with your feedback.
Question: I connected to a remote system that doesn’t have Cockpit installed, but I don’t see Virtual Machines or one of the other applications listed in the menu. I thought you just said these were included in the Cockpit Client Flatpak?
Answer: When you login to a remote system that doesn’t have Cockpit packages installed, you’ll only see the menu options for underlying functionality available on the remote system. For example, you’ll only see Virtual Machines in the Cockpit menu if the remote host has the libvirt-dbus package installed.
Question: Can Cockpit applications available in the Cockpit Client be used with locally installed Cockpit applications on the remote host? In other words, if I need a Cockpit application not included in the Cockpit Client, can I install just that single package on the remote host?
Answer: No, you cannot mix and match applications included in the Cockpit Client flatpak and those installed locally on the remote host. For a remote host that has thecockpit-bridge package installed, Cockpit Client will exclusively use the applications that are installed locally on the remote host. If the remote host does not have the cockpit-bridge package installed, Cockpit Client will exclusively use the applications bundled in the Cockpit Client Flatpak.
Question: Can I use Cockpit Client to connect to the local host?
Answer: Yes! Simply open Cockpit Client and type in localhost and you’ll be able to manage the local host. You don’t need to have any Cockpit packages installed on the local host if you use this method. You only need the Cockpit Client Flatpak.
Question: What Linux distributions can I connect to using the Cockpit Client?
Answer: Cockpit is compatible with a number of different Linux distributions. For more information, see the Running Cockpit page. If connecting to a remote system that doesn’t have Cockpit installed, keep in mind the previously mentioned requirements regarding not connecting to newer OS’s from an older Cockpit Client.
Question: Does the Cockpit team have any future plans regarding this functionality?
Answer: The Cockpit team is planning on adding the ability to connect to remote hosts without Cockpit packages installed to the cockpit-ws container image. See COCKPIT-954 ticket for more info.
Have more questions not covered here? Ask them in the comments section below!
Conclusion
The new Python bridge, and the corresponding ability to use the Cockpit Client to connect to remote systems without installing Cockpit, makes it incredibly easy to use Cockpit in almost any circumstance.
Try this out! It’s easy to do. Simply install the Cockpit Client Flatpak, and use it to connect to either your localhost or a remote system. Once you’ve tried it, let us know what you think in the comments below.
Fedora test days are events where anyone can help make sure changes in Fedora Linux work well in an upcoming release. Fedora community members often participate, and the public is welcome at these events. If you’ve never contributed to Fedora Linux before, this is a perfect way to get started.
There are four test periods in the upcoming weeks:
Friday 11 August through Thursday 17 August , is to test DNF5.
Monday 14 August through Sunday 20 August, two test day periods focusing on testing GNOME Desktop and Core Apps.
Tuesday 5 September through Monday 11 September, is to test i18n.
Come and test with us to make the upcoming Fedora Linux 39 release even better. Read more below about how to do it.
DNF5
Since the brand new dnf5 package has landed in rawhide, we would like to organize a test week to get some initial feedback on it before it becomes the default. We will be testing DNF5 to iron out any rough edges.
The test week will be Friday 11 August through Thursday 17 August. The test week page is available here .
GNOME 45 test week
GNOME 45 has landed and will be part of the change for Fedora Linux 39. Since GNOME is the default desktop environment for Fedora Workstation, and thus for many Fedora users, this interface and environment merits a lot of testing. The Workstation Working Group and Fedora Quality team have decided to split the test week into two parts:
Monday 14 August through Thursday 17 August, we will be testing GNOME Desktop and Core Apps. You can find the test day page here.
Friday 18 August through Sunday 20 August, the focus will be to test GNOME Apps in general. This will be shipped by default. The test day page is here.
i18n test week
The i18n test week focuses on testing internationalization features in Fedora Linux.
The test week is Tuesday 5 September through Monday 11 September. The test week page is available here.
How do test days work?
A test day is an event where anyone can help make sure changes in Fedora Linux work well in an upcoming release. Fedora community members often participate, and the public is welcome at these events. If you’ve never contributed before, this is a perfect way to get started.
To contribute, you only need to be able to download test materials (which include some large files) and then read and follow directions step by step.
Detailed information about all the test days is available on the wiki pages mentioned above. If you’re available on or around the days of the events, please do some testing and report your results. All the test day pages receive some final touches which complete about 24 hrs before the test day begins. We urge you to be patient about resources that are, in most cases, uploaded hours before the test day starts.
Come and test with us to make the upcoming Fedora Linux 39 even better.
This article introduces projects available in Flathub with installation instructions.
Flathub is the place to get and distribute apps for all of Linux. It is powered by Flatpak, allowing Flathub apps to run on almost any Linux distribution.
Authenticator is a simple app that allows you to generate Two-Factor authentication codes. It has a very simple and elegant interface with support for a a lot of algorithms and methods. Some of its features are:
Time-based/Counter-based/Steam methods support
SHA-1/SHA-256/SHA-512 algorithms support
QR code scanner using a camera or from a screenshot
Lock the application with a password
Backup/Restore from/into known applications like FreeOTP+, Aegis (encrypted / plain-text), andOTP, Google Authenticator
You can install “Authenticator” by clicking the install button on the site or manually using this command:
Secrets is a password manager that integrates with GNOME. It’s easy to use and uses the KeyPass file format. Some of its features are:
Supported Encryption Algorithms:
AES 256-bit
Twofish 256-bit
ChaCha20 256-bit
Supported Derivation algorithms:
Argon2 KDBX4
Argon2id KDBX4
AES-KDF KDBX 3.1
Create or import KeePass safes
Add attachments to your encrypted database
Generate cryptographically strong passwords
Quickly search your favorite entries
Automatic database lock during inactivity
Support for two-factor authentication
You can install “Secrets” by clicking the install button on the site or manually using this command:
flatpak install flathub org.gnome.World.Secrets
Flatsweep
Flatsweep is a simple app to remove residual files after a flatpak is unistalled. It uses GTK4 and Libadwaita to provide a coherent user interface that integrates nicely with GNOME, but you can use it on any desktop environment.
You can install “Flatsweep” by clicking the install button on the site or manually using this command:
Fedora Linux packages a suite of graphical software for content creators. This article introduces a use case and suggestions for creating tutorial videos with Kdenlive.
Plan tutorial
A question that you need to address is whether text and images are appropriate to share your knowledge. If you create resources for learners of graphical software, a tutorial video is something to consider.
Review abstract and draft script
An abstract in content writing helps reviewers look for key points of your tutorial. Depending on your workflow, you can submit this abstract to reviewers for comments, questions, or updates.
Once an abstract of the tutorial video is agreed upon by the reviewers, a video script is created and works like a manuscript for your tutorial. Break down process steps into each sequence. Check this link for an example.
Screen recording
Use your preferred recording tool that comes with the desktop environment or enable the ‘Screen Grab’ option in Kdenlive in the ‘View’ menu. Alternatively, you can install OBS Studio.
Kdenlive can process various container formats. You should transcode to a high-quality lossless matroska file (.mkv) that ensures high quality and compression ratio.
Installation
Kdenlive supports Linux, Mac, Windows and FreeBSD, which encourages collaboration among content creators. If you are Linux users, go to the packager manager of your distro to install Kdenlive. If you use Fedora Linux, we recommend the Fedora Linux RPM version or Flatpak.
Set up Kdenlive
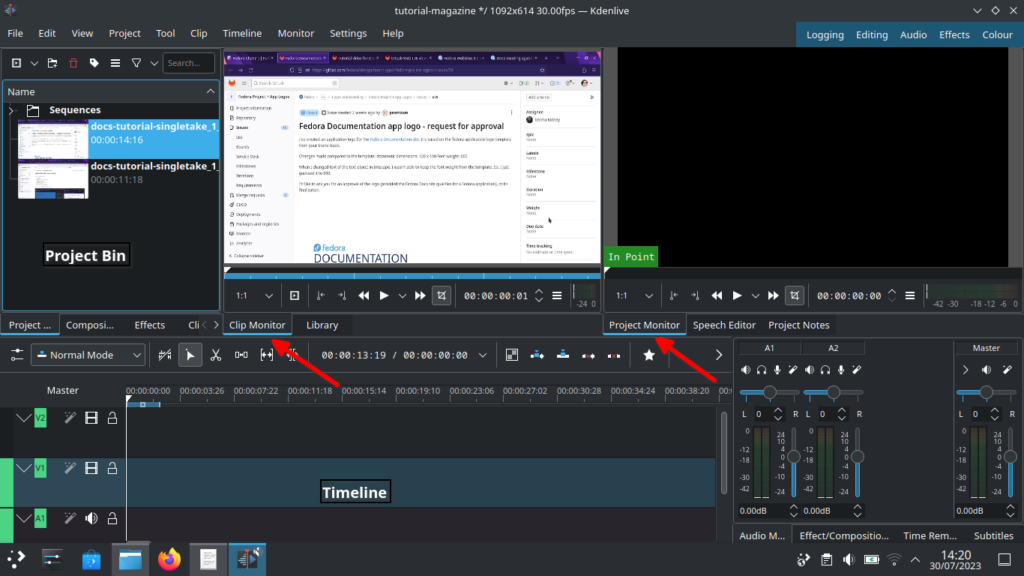
Let’s start with Kdenlive’s user interface and focus on three sections – Project bin, Monitors and Timeline.
Kdenlive user interface
Project bin
Load video clips into Project Bin on the upper left. The Project Bin lists all the clips that are associated with your project. You can drag and drop the clips onto Project Bin.
Monitors
Clip Monitor on the left window displays the unedited clip that is currently selected in The Project Bin. If you have loaded multiple takes of the same scene (process steps), you need to know which one you’re going to choose and edit. If you changed your mind during editing processes, that’s no problem. You can move around a sequence with timeline and tracks after the initial cut.
The Project Monitor is a place to watch your edited footage.
Timeline
Timeline is a place for all selected clips you edit. Drag and drop the clips directly on to the Timeline from the Project Bin.
Editing processes
Cut and stitch
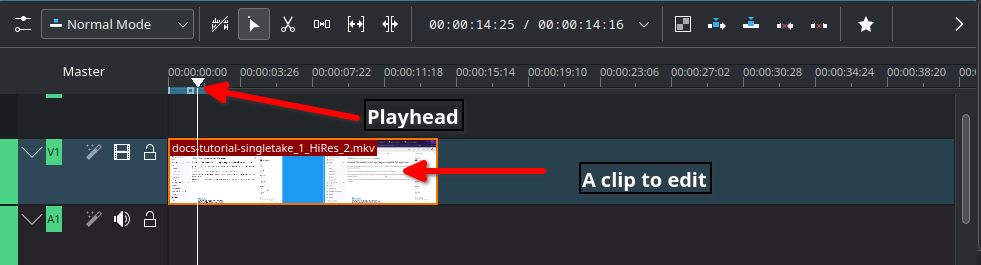
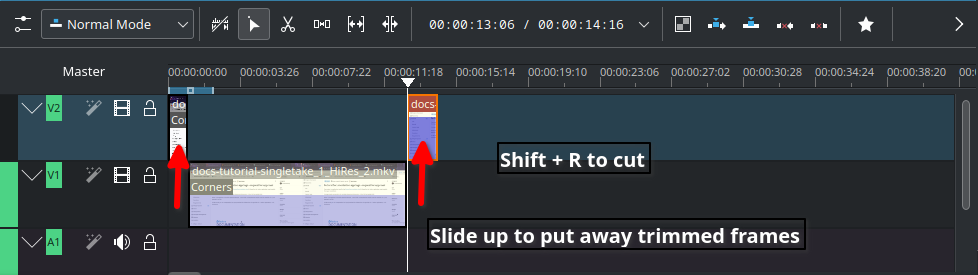
Timeline cursor, also known as playhead, indicates the position of clips you are working on and previewing in the Project Monitor.
Timeline
The initial cut means editing on a scene by scene basis until you’re ready to stitch tracks together into a complete piece.
Cut when; – Delayed, boring or repetitive part was recorded. This happens often when recording a scene for loading apps or waiting for rendering on web browser – Transition pieces when a scene starts and ends – Trim off a few frames before you tidy up – Ensure basic continuity – let it flow!
In Timeline, video tracks (V2, V1) are cascaded up whereas audio tracks (A1, A2) are cascaded down as default.
Slide up trimmed video track and stitch frames you want to keep. Delete trimmed frames when you’re sure you don’t need them.
Cut
Timeline works like chef’s chopping board and takes time for new users to get familiar with it. Check the upstream documentation on this link.
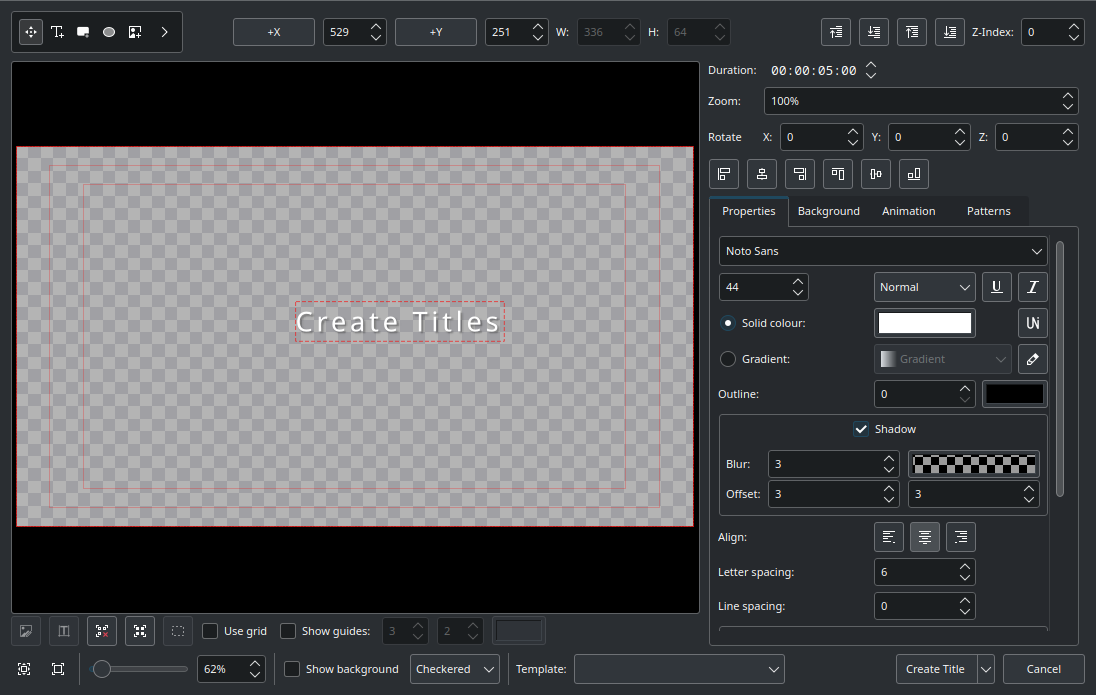
Text effects with Titles
Titles are text elements that you can overlay to the timeline. To create Titles, right-click in the The Project Bin and open the Titles window as shown below. Select ‘Create Title’ to save it. Drag and drop the Title to the video track 2 in timeline. Check this link for more information.
Titler
Sound effects
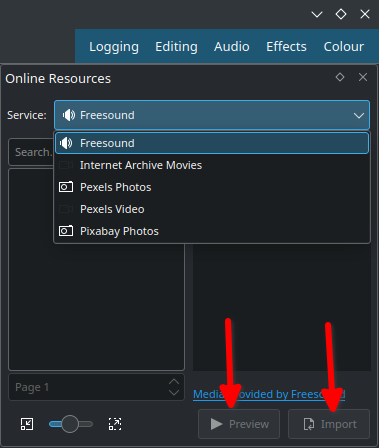
Ambient music could jazz up your video tutorial for the audience.
Go to top left corner of the Project Bin and select the arrow to list options. Select ‘Online Resources’. At the top right, ‘Service’ drop-down menu, choose ‘Freesound’. Select ‘Preview’ to play back and import to download and overlay to A1 audio track.
Sound
Transition and finishing touch
Text and sounds effects will blend well if tracks have transitions. Check this link for fine-tuning your final cut video.
Rendering
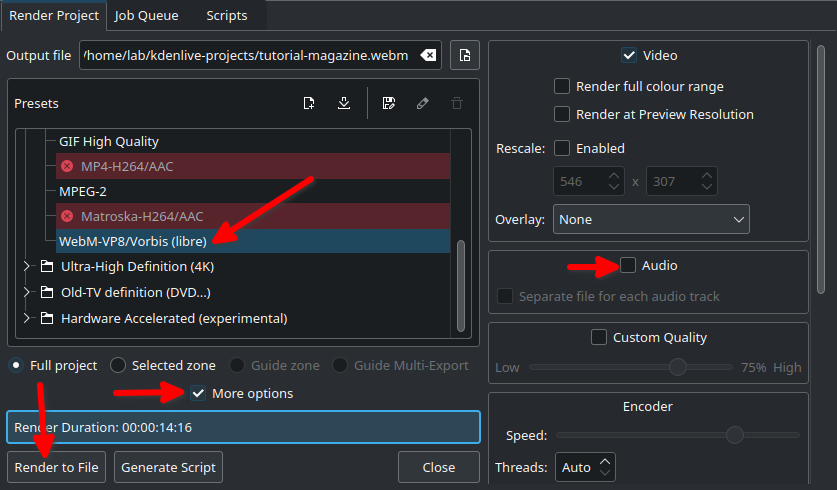
In the Render dialogue box (Ctrl + Return) on Project Bin, choose WebM as output file, select ‘More options’ to de-select the Export Audio option, and select ‘Render to File’ to save the clip.
Rendering
WebM offers good compression and output.
Rendering speed is dependent on the number of CPU cores in your computer. If you work with high quality footage and visual effects in a computer with low-end CPU and RAM, adapt your workflow with proxy clips and use script for rendering.
Share your tutorial video
PeerTube is a video sharing platform that runs on GNU/Linux infra, and Open Source/Free Software. Just like Vimeo or YouTube, you can embed your content to your documentation site from PeerTube.
Credits and acknowledgements
Big thanks to Seth Kenlon who provided me with a great deal of inspiration from his publication in Opensource.com and Kdenlive workshop.
Kdenlive Version 23.04.2 was used for this article.
Today at Flock, we announced that Fedora Linux will soon be available on Apple Silicon Macs. Developed in close collaboration with the Fedora Asahi SIG and the Asahi Linux project, the Fedora Asahi Remix will provide a polished experience for Workstation and Server usecases on Apple Silicon systems. The Asahi Linux project has also announced that the new Asahi Linux flagship distribution will be Fedora Asahi Remix.
We are using a Remix as opposed to delivering this support in Fedora Linux proper because this ecosystem is still very fast moving and we believe a Remix will offer the best user experience for the time being. Also, the Remix will allow us to integrate hardware support as it becomes available. Nonetheless, as much of this work as possible is being conducted upstream, with several key components being developed, maintained and packaged in Fedora Linux upstream. Ultimately, we expect Apple Silicon support to be integrated in Fedora Workstation and Fedora Server in a future release, and are working towards this goal. This approach is in line with the overarching goal of the Asahi project itself to integrate support for these systems in the relevant upstream projects.
The first official release of Fedora Asahi Remix is slated to be available by the end of August 2023. Development builds are already available for testing at https://fedora-asahi-remix.org/, though they should be considered unsupported and likely to break until the official release.
A letter from Fedora Project Leader Matthew Miller
Hello Fedora friends! In just about a week, we will kick off Flock to Fedora — our annual contributor conference. I hope you’re as excited as I am! For the last three years, we’ve run this as a virtual event — we stayed cozy at home with Nest. Now, we’re back to in-person, and I can’t wait to see so many of you again as we flock together to meet in Cork, Ireland.
Flock is different from other conferences — it’s not a showcase or sales pitch, and it’s not a corporate event where we stand up for or root for the companies we work for or are fans of. Of course, we are grateful for our sponsors and our employers, but in Fedora in general — and especially at Flock! — that’s not what things are about. We come together in a positive spirit to collaborate and build. We’re a community of people, and friendship is a cornerstone value. Fedora is our community, and Flock is where we come together.
This year, we’re combining forces with our friends at the CentOS Project: CentOS Connect will be co-located with Flock. CentOS is a different kind of project, but the same approach applies: this is about community. I know there are a lot of strong feelings around Red Hat and CentOS and rebuilds and downstreams lately. Fedora doesn’t control any of that, but it affects us — so, I’m sure we’ll talk about it. (We even have a session related to the topic.) As we talk, though, let’s all keep in mind the spirit of our projects: working together collaboratively to build a better world with free and open source software for everyone.
The Nest events were wonderful: the best virtual events during the whole pandemic, I think. While I obviously am biased about this, I think it’s fair, since I didn’t really do any of the organizing work. (Thanks to everyone who did, and especially to Marie Nordin!) This year, while we wish everyone could be there in person, we want to make the event as accessible as possible to those who can’t be there, so we will live-stream and record the sessions. I hope you’ll join as many sessions as your local time zone permits.
I look forward to talking about our in-progress strategy, and our goal of doubling the number of active Fedora contributors. I want to hear what all of you are working on, all the ideas you have, all the proposals and plans for the future. Most of all, though, I’m looking forward to seeing so many of my friends again, and making new connections. I hope you are too!
Be sure to check out the schedule. If you haven’t registered yet, don’t forget to do that!