Challenge: Given a Python list of strings and a query string. Find the strings that partially match the query string.
Example 1:
Input: ['hello', 'world', 'python'] and 'pyth'
Output: ['python']
Example 2:
Input: ['aaa', 'aa', 'a'] and 'a'
Output: ['aaa', 'aa', 'a']
Example 3:
Input: ['aaa', 'aa', 'a'] and 'b'
Output: []
Let’s dive into several methods that solve this and similar type of problems. We start with the most straightforward solution.
Method 1: Membership + List Comprehension
The most Pythonic way to find a list of partial matches of a given string query in a string list lst is to use the membership operator in and the list comprehension statement like so: [s for s in lst if query in s].
Here’s a simple example:
def partial(lst, query): return [s for s in lst if query in s] # Example 1:
print(partial(['hello', 'world', 'python'], 'pyth'))
# ['python'] # Example 2:
print(partial(['aaa', 'aa', 'a'], 'a'))
# ['aaa', 'aa', 'a'] # Example 3:
print(partial(['aaa', 'aa', 'a'], 'b'))
# []
In case you need some background information, feel free to check out our two tutorials and the referenced videos.
To find a list of partial query matches given a string list lst, combine the membership operator with the filter() function in which you pass a lambda function that evaluates the membership operation for each element in the list like so: list(filter(lambda x: query in x, lst)).
Here’s an example:
def partial(lst, query): return list(filter(lambda x: query in x, lst)) # Example 1:
print(partial(['hello', 'world', 'python'], 'pyth'))
# ['python'] # Example 2:
print(partial(['aaa', 'aa', 'a'], 'a'))
# ['aaa', 'aa', 'a'] # Example 3:
print(partial(['aaa', 'aa', 'a'], 'b'))
# []
Generally, I like list comprehension more than the filter() function because the former is more concise (e.g., no need to convert the result to a list) and slightly faster. But both work perfectly fine!
Method 3: Regex Match + List Comprehension
The most flexible way to find a list of partial query matches given a string list lst is provided by Python’s powerful regular expressions functionality. For example, the expression [x for x in lst if re.match(pattern, x)] finds all strings that match a certain query pattern as defined by you.
The following examples showcase this solution:
import re def partial(lst, query): pattern = '.*' + query + '.*' return [x for x in lst if re.match(pattern, x)] # Example 1:
print(partial(['hello', 'world', 'python'], 'pyth'))
# ['python'] # Example 2:
print(partial(['aaa', 'aa', 'a'], 'a'))
# ['aaa', 'aa', 'a'] # Example 3:
print(partial(['aaa', 'aa', 'a'], 'b'))
# []
In this example, we use the dummy pattern .*query.* that simply matches words that contain the query string. However, you could also do more advanced pattern matching—regex to the rescue!
Again, I’d recommend you check out the background info on regular expressions:
Given the following minimal example where you create a set and attempt to access an element of this set using indexing or slicing:
my_set = {1, 2, 3}
my_set[0]
If you run this code snippet, Python raises the TypeError: 'set' object is not subscriptable:
Traceback (most recent call last): File "C:\Users\xcent\Desktop\code.py", line 2, in <module> my_set[0]
TypeError: 'set' object is not subscriptable
Why Does the Error Occur?
The Python TypeError: 'set' object is not subscriptable occurs if you try to access an element of a set using indexing or slicing that imply an ordering of the set.
However, sets are unordered collections of unique elements: they have no ordering of elements. Thus, you cannot use slicing or indexing, operations that are only possible on an ordered type.
How to fix the TypeError: 'set' object is not subscriptable?
To fix the TypeError: 'set' object is not subscriptable, either convert the unordered set to an ordered list or tuple before accessing it or get rid of the indexing or slicing call altogether.
Here’s an example where you convert the unordered set to an ordered list first. Only then you use indexing or slicing so the error doesn’t occur anymore:
Here’s the code that applies these four steps, assuming the image is stored in a file named 'c++.jpg':
from PIL import Image
import numpy as np # 1. Read image
img = Image.open('c++.jpg') # 2. Convert image to NumPy array
arr = np.asarray(img)
print(arr.shape)
# (771, 771, 3) # 3. Convert 3D array to 2D list of lists
lst = []
for row in arr: tmp = [] for col in row: tmp.append(str(col)) lst.append(tmp) # 4. Save list of lists to CSV
with open('my_file.csv', 'w') as f: for row in lst: f.write(','.join(row) + '\n')
Note that the resulting CSV file looks like this with super long rows.
Each CSV cell (column) value is a representation of the RGB value at that specific pixel. For example, [255 255 255] represents the color white at that pixel.
For more information and some background on file I/O, check out our detailed tutorial on converting a list of lists to a CSV:
This article will show you how to find the most common element in a Python Dictionary. However, since all Dictionary Keys are unique, this article focuses on searching for the most common Dictionary Value.
To make it more fun, we have the following running scenario:
Marty Smart, a Math Teacher at Harwood High, has amassed his student’s grades for the semester and has come to you to write a script to determine the most common grade. Below is sample data.
Next, the counter() function is called and is passed all values from the key:value pair of students as an argument. Then, most_common() is appended. The results save to common_val.
If this was output to the terminal, the following would display.
[99, 76, 98, 99, 77, 98, 67, 61, 54, 76, 67, 99, 98, 49, 76, 99, 67, 54, 98, 100]
<built-in method count of list object at 0x00000239566D3540>
To retrieve the most common element, run the following code.
print(common_val)
99
Summary
This article has provided four (4) ways to find the most common element in a Python Dictionary. These examples should give you enough information to select the best fitting for your coding requirements.
Good Luck & Happy Coding!
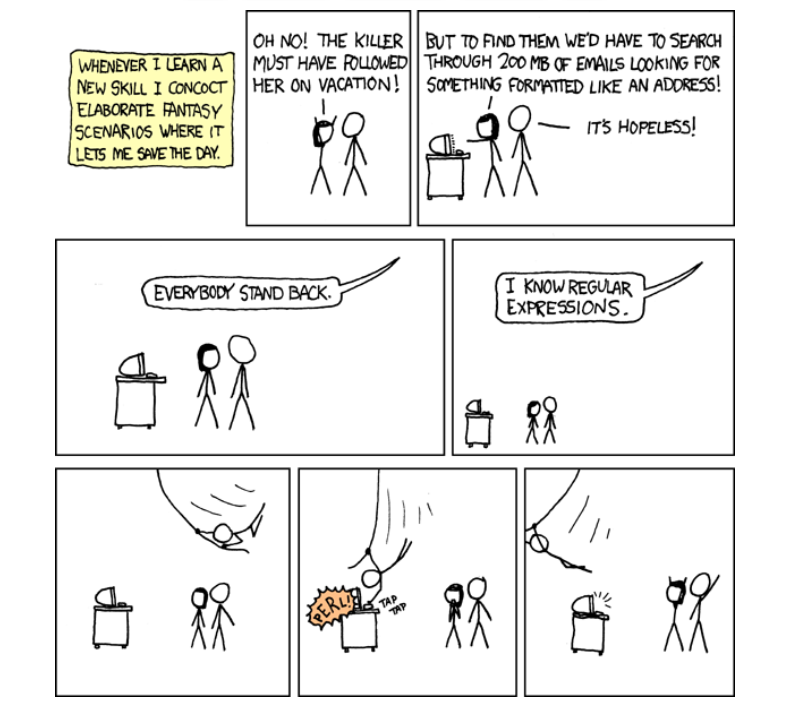
Programmer Humor – Blockchain
“Blockchains are like grappling hooks, in that it’s extremely cool when you encounter a problem for which they’re the right solution, but it happens way too rarely in real life.”source – xkcd
We’ll first lay out the entire smart contract example without the comments for readability and development purposes.
Then we’ll dissect it part by part, analyze it and explain it.
Following this path, we’ll get a hands-on experience with smart contracts, as well as good practices in coding, understanding, and debugging smart contracts.
Parameters of the auction are variables beneficiary and auctionEndTime which we’ll initialize with contract creation arguments while the contract gets created, i.e. in the contract constructor.
Data type for time variables is unsigned integer uint, so that we can represent either absolute Unix timestamps (seconds since 1970-01-01) or time periods in seconds (seconds lapsed from the reference moment we chose).
address payable public beneficiary; uint public auctionEndTime;
The current state of the auction is reflected in two variables, highestBidder and highestBid.
address public highestBidder; uint public highestBid;
Previous bids can be withdrawn, that’s why we have mapping data structure to record pendingReturns.
mapping(address => uint) pendingReturns;
Indicator flag variable for the auction end. By default, the flag is initialized to false; we’ll prevent changing it once it switches to true.
bool ended;
When changes occur, we want our smart contract to emit the corresponding change events.
We’re defining four errors to describe relevant failures. Along with these errors, we’ll also introduce “triple-slash” comments, commonly known as natspec comments. They enable users to see comments when an error is displayed or when users are asked to confirm the transaction.
/// The auction has already ended. error AuctionAlreadyEnded(); /// There is already a higher or equal bid. error BidNotHighEnough(uint highestBid); /// The auction has not ended yet, the remaining seconds are displayed. error AuctionNotYetEnded(uint timeToAuctionEnd); /// The function auctionEnd has already been called. error AuctionEndAlreadyCalled();
Initialization of the contract with the contract creation arguments biddingTime and beneficiaryAddress.
/// Create a simple auction with `biddingTime` /// seconds bidding time on behalf of the /// beneficiary address `beneficiaryAddress`. constructor( uint biddingTime, address payable beneficiaryAddress ) { beneficiary = beneficiaryAddress; auctionEndTime = block.timestamp + biddingTime; }
A bidder bids by sending the currency (paying) to the smart contract representing the beneficiary, hence the bid() function is defined as payable.
/// Bid on the auction with the value sent /// together with this transaction. /// The value will only be refunded if the /// auction is not won. function bid() external payable {
The function call reverts if the bidding period ended.
if (block.timestamp > auctionEndTime) revert AuctionAlreadyEnded();
The function rolls back the transaction to the bidder if the bid does not exceed the highest one.
if (msg.value <= highestBid) revert BidNotHighEnough(highestBid);
The previous highest bidder was outbid and his bid is added to his previous bids reserved for a refund.
A direct refund is considered a security risk due to the possibility of executing an untrusted contract.
Instead, the bidders (recipients) will withdraw their bids themselves by using withdraw() function below.
if (highestBid != 0) { pendingReturns[highestBidder] += highestBid; }
The new highest bidder and his bid are recorded; the event HighestBidIncreased is emitted carrying this information pair.
Bidders call the withdraw() function to retrieve the amount they bid.
/// Withdraw a bid that was overbid. function withdraw() external returns (bool) { uint amount = pendingReturns[msg.sender]; if (amount > 0) {
It is possible to call the withdraw() function again before the send() function returns. That’s the reason why we need to disable multiple sequential withdrawals from the same sender by setting the pending returns for a sender to 0.
pendingReturns[msg.sender] = 0;
Variable type of msg.sender is not address payable, therefore we need to convert it explicitly by using function payable() as a wrapping function.
If the send() function ends with an error, we’ll just reset the pending amount and return false.
if (!payable(msg.sender).send(amount)) { // No need to call throw here, just reset the amount owing pendingReturns[msg.sender] = amount; return false; } } return true; }
The auctionEnd() function ends the auction and sends the highest bid to the beneficiary.
The official Solidity documentation recommends dividing the interacting functions into three functional parts:
checking the conditions,
performing the actions, and
interacting with other contracts.
Otherwise, by combining these parts rather than keeping them separated, more than one calling contract could try and modify the state of the called contract and change the called contract’s state.
/// End the auction and send the highest bid /// to the beneficiary. function auctionEnd() external {
Checking the conditions…
if (block.timestamp < auctionEndTime) revert AuctionNotYetEnded(auctionEndTime - block.timestamp); if (ended) revert AuctionEndAlreadyCalled();
Our smart contract example is a simple, but a powerful one, enabling us to bid an amount of currency to the beneficiary.
When the contract instantiates via its constructor, it sets the auction end time and its beneficiary, i.e. beneficiary address.
The contract has three simple features, implemented via dedicated functions: bidding, withdrawing the bids and ending the auction.
A new bid is accepted only if its amount is strictly larger than the current highest bid. A new bid acceptance means that the current highest bid is added to the bidder’s balance for later withdrawal. The new highest bidder becomes the current highest bidder and the new highest bid becomes the current highest bid.
Bid withdrawing returns all summed previous bids to each bidder (mapping pendingReturns).
Account 0x617F2E2fD72FD9D5503197092aC168c91465E7f2 withdraws his bids;
Appendix – The Contract Arguments
In this section is additional information for running the contract. We should expect that our example accounts may change with each refresh/reload of Remix.
Our contract creation arguments are the open auction duration (in seconds) and the beneficiary address (copy this line when deploying the example):
300, 0x5B38Da6a701c568545dCfcB03FcB875f56beddC4
Info: we could’ve used any amount of time, but I went with 300 seconds to timely simulate both a rejected attempt of ending the auction and the successful ending of the auction.
Conclusion
We continued our smart contract example series with this article that implements a simple open auction.
First, we laid out clean source code (without any comments) for readability purposes. Omitting the comments is not recommended, but we love living on the edge – and trying to be funny!
Second, we dissected the code, analyzed it, and explained each possibly non-trivial segment. Just because we’re terrific, safe players who never risk it and do everything by the book
Programmer Humor – Blockchain
“Blockchains are like grappling hooks, in that it’s extremely cool when you encounter a problem for which they’re the right solution, but it happens way too rarely in real life.”source – xkcd
The above code reads in the crimedescr column from the crimes.csv file downloaded earlier. This saves to the DataFrame df.
Next, the crimedescr column is then accessed, and the mode() method is appended. This method returns a value or set of values that appear most often along a selected axis. The results save to max_crime.
These results are output to the terminal.
0 10851(A)VC TAKE VEH W/O OWNER
Name: crimedescr, dtype: object
So, out of 7,854 rows of crimes committed on a given day for San Diego, the above offense was committed the highest number of times.
The above code only provides us with the name of the most common crime; what if we need the crime name and the respective count?
Now, you are equipped to return to your boss and tell them that 7,000 offenses of 10851 (A) VC TAKE VEH W/O OWNER occurred on a given day in San Diego.
Method 2: Use value_counts()
This example uses the value_counts() function to determine the top 5 most common crimes committed in San Diego on a given day.
The above code reads in the crimedescr and ucr_ncic_code columns from the crimes.csv file downloaded earlier. This saves to the DataFrame df.
Then, the crimedescr column is accessed, and the value_counts() function is appended. This function returns a series containing the counts of unique values.
However, since slicing is also appended ([:5]), only the top five (5) common crimes are retrieved and then converted to a List. The results save to top5_names.
['10851(A)VC TAKE VEH W/O OWNER', 'TOWED/STORED VEH-14602.6', '459 PC BURGLARY VEHICLE', 'TOWED/STORED VEHICLE', '459 PC BURGLARY RESIDENCE']
The above code only provides us with the names of the top 5 most common crimes; what if we need the names and their respective counts?
The above code reads in the crimedescr and ucr_ncic_code columns from the crimes.csv file downloaded earlier. This saves to the DataFrame df.
Then, the crimedescr column is accessed, and the value_counts() function is appended. This function returns a series containing the count of unique values.
Next, idxmax() is appended. This method returns the index of the first occurrence of the maximum index(es) over a selected axis.
The results save to max_crime and are output to the terminal.
10851(A)VC TAKE VEH W/O OWNER
Method 4: Use value_counts() and keys()
This example uses value_counts() and keys() to determine the top 5 most common crimes committed in unique grid areas of San Diego on a given day.
The above code reads in the crimedescr, grid, and the ucr_ncic_code columns from the crimes.csv file downloaded earlier. This saves to the DataFrame df.
Let’s break the highlighted line down.
If df['grid'].value_counts() was output to the terminal, the following would display (snippet). However, we have added a heading row to make it more understandable, and only five (5) rows are displayed.
Grid #
Grid Total
742
115
969
105
958
100
564
80
1084
71
Next, the code keys()[:5] is appended. The final output displays as follows.
The above code reads in the crimedescr and the ucr_ncic_code columns from the crimes.csv file downloaded earlier. This saves to the DataFrame df.
Next, the groupby() function is called and passed the first argument: df.groupby(['ucr_ncic_code','crimedescr']).size(). If this was output to the terminal at this point, the following would display (snippet).
As you can see, the other arguments need to be added to turn this into something usable. Sorting the data in descending order and adding a count column will provide the results we are looking for.
If the original Method 5 code example was output to the terminal, the following would display.
ucr_ncic_code
crimedescr
count
0
2404
10851(A)VC TAKE VEH W/O OWNER
653
1
7000
TOWED/STORED VEH-14602.6
463
2
2299
459 PC BURGLARY VEHICLE
462
3
7000
TOWED/STORED VEHICLE
434
4
2204
459 PC BURGLARY RESIDENCE
356
Summary
This article has provided five (5) ways to find the most common element in a Panda Column. These examples should provide you with enough information to select the one that best meets your coding requirements.
Good Luck & Happy Coding!
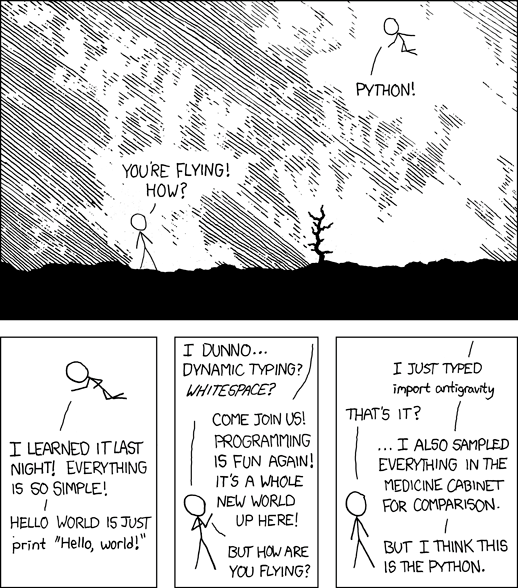
Programming Humor – Python
“I wrote 20 short programs in Python yesterday. It was wonderful. Perl, I’m leaving you.” — xkcd
You’re not alone! This short tutorial will show you why this error occurs, how to fix it, and how to never make the same mistake again.
So, let’s get started!
Summary
Python raises the TypeError: NoneType is not subscriptable if you try to index x[i] or slice x[i:j] a None value. The None type is not indexable, i.e., it doesn’t define the __getitem__() method. You can fix it by removing the indexing or slicing call, or defining the __getitem__ method.
Example
The following minimal example that leads to the error:
x = None
print(x[0])
# TypeError: 'NoneType' object is not subscriptable
You set the variable to the value None. The value None is not a container object, it doesn’t contain other objects. So, the code really doesn’t make any sense—which result do you expect from the indexing operation?
Exercise: Before I show you how to fix it, try to resolve the error yourself in the following interactive shell:
If you struggle with indexing in Python, have a look at the following articles on the Finxter blog—especially the third!
You overwrite the __getitem__ method that takes one (index) argument i (in addition to the obligatory self argument) and returns the i-th value of the “container”.
In our case, we just return a string "Value 0" for the element variable[0] and "Value 10" for the element variable[10].
I hope you’d be able to fix the bug in your code! Before you go, check out our free Python cheat sheets that’ll teach you the basics in Python in minimal time:
If you run this code, instead of the desired plot, you get the following TypeError: 'AxesSubplot' object is not subscriptable:
Traceback (most recent call last): File "C:\Users\xcent\Desktop\code.py", line 4, in <module> axes[0, 0].plot([1, 2, 3], [5, 5, 5])
TypeError: 'AxesSubplot' object is not subscriptable
Question: How to resolve the TypeError: 'AxesSubplot' object is not subscriptable in your Python script?
Don’t panic! The solution is easier than you think…
Fix Not Subscriptable TypeError on ‘AxesSubplot’ Object
Generally, Python raises the TypeError XXX object is not subscriptable if you use indexing with the square bracket notation on an object that is not indexable. In this case, you tried to index an Axes object because you thought it was an array of Axes objects.
Let’s go over the code to understand why the error happened!
First, you assign the result of the plt.subplots() function to the two variables fig and axes.
fig, axes = plt.subplots()
If you don’t pass an argument in the plt.subplots() function, it creates a Figure with one Axes object.
So if you try to subscript using axes[0,0], axes[0], or any other indexing scheme, Python will raise an error. It’s simple: axes doesn’t hold a container type so it cannot be indexed using the square bracket notation!
So to fix the TypeError: 'AxesSubplot' object is not subscriptable, simply remove the indexing notation on the axes object obtained by plt.subplots() called without arguments.
However, this error is tough to spot because if you pass any other argument into the plt.subplot() function, it creates a Figure and a Numpy array of Subplot/Axes objects which you store in fig and axes respectively.
For example, this creates a non-subscriptable axes because you don’t pass any argument:
fig, axes = plt.subplots()
For example, this creates a subscriptable array of axes that is a one-dimensional array of subplots because you pass an argument:
fig, axes = plt.subplots(3)
For example, this creates a subscriptable array of axes that is a two-dimensional array of subplots because you passed two arguments
fig, axes = plt.subplots(3, 2)
No wonder did you think that you can call axes[0,0] or axes[0] on the return value of the plt.subplot() function! However, doing so is only possible if you didn’t pass an argument into it.
Make sure you never run into similar errors by spending a couple of minutes understanding the plt.subplot() function once and for all!
Learn More about plt.subplot()
To further understand the subplots() function, check out our detailed guide on the Finxter blog and the following video:
To print all values of a Python list without the trailing newline character or line break, pass the end='' argument in your print() function call. Python will then avoid adding a newline character after the printed output. For example, the expression print(*[1, 2, 3], end='') will print without newline.
lst = [1, 2, 3]
print(*lst, end='')
# 1 2 3
If you print anything afterward, it’ll be added right to the list.
To print all values of a Python list without newline character pass the end='' argument in your print() function call. To overwrite the default empty space as a separator string, pass the sep=’…’ argument with your separator. For example, the expression print(*[1, 2, 3], sep='|', end='') will print without newline.
Also, check out the following video tutorial on printing something and using a separator and end argument:
Python Print Raw List Without Newline
If you don’t want to print the individual elements of the list but the overall list with square brackets and comma-separated, but you don’t want to print the newline character afterwards, the best way is to pass the list into the print() function along with the end='' argument such as in print([1, 2, 3], end='').
The idea of BitcoinVows.com is to create an immortal message, i.e., a “vow”, promise, love message, dedication, or just a simple note to your (future) kids that shall outlast civilizations.
Bitcoiners believe that the Bitcoin Blockchain will exist for hundreds of years.
The last Bitcoin will be mined in the year 2140. So, the “launch” process of the Bitcoin token distribution was set to roughly 132 years by Satoshi. After that, all 21 million tokens will have been distributed, and the Bitcoin network will start to converge to its steady state in which it may operate forever.
One day not too far in the future, we’ll all be dead. But the Bitcoin network will still produce block, after block, after block.
Tick, tock, next block. Forever.
Becoming Immortal
Nations collapse. Religions come and go. Stories and legends will eventually be forgotten.
If you craved immortality and glory in the years 10, 100, or 1000 BB (Before Bitcoin), you had to win epic battles such as Julius Caesar, create groundbreaking technologies and artworks such as Leonardo DaVinci, or launch whole new religions such as Jesus Christ.
Too much work, you say? I agree. Fortunately, there’s an easier solution to becoming immortal today and it doesn’t involve effort. Just some imagination…
How to Become Immortal as a Lazy Early Adopter?
If you crave immortality and glory today, your best shot is to become an early adopter of the Bitcoin network and engrave your message into the Blockchain — rest assured: your message will be read by generations of humans far in the future!
Why not send your partner a love message, renew your vows, or write a note to your future children into the Blockchain?
Today, it’s still possible. In only a few years, Blockspace will be too expensive for us mere mortals. Blockspace will be so expensive that only higher-layer protocols can afford to pay for it in order to batch thousands or even millions of second-layer transactions into a single first-layer Bitcoin transaction.
Only the richest of the rich will compete for the right to become immortal by writing to the Bitcoin network in the year 2140!
So, if you agree with this futuristic outlook and you also believe that Bitcoin will endure, write your partner a love message like I did:
Figure: See the message I sent to my partner using BitcoinVows.com!
You can order the full service on our new offering: BitcoinVows.com. We’ll handle all the technical difficulties of creating OP_RETURN scripts and all that. You just send us the 30-character message to be included in the Blockchain!

 Challenge: Given a Python list of strings and a query string. Find the strings that partially match the query string.
  Recommended Tutorial: List Comprehension in Python


 Recommended Tutorial:


 A direct refund is considered a


 five minutes ago, and you want to create a
  The solution is easier than you think…


 Forever.
 If you craved immortality and glory in the years 10, 100, or 1000 BB (Before Bitcoin), you had to win epic battles such as Julius Caesar, create groundbreaking technologies and artworks such as Leonardo DaVinci, or launch whole new religions such as Jesus Christ.
