Posted on Leave a comment

How to Read a CSV to Array in PHP

by Vincy. Last modified on November 2nd, 2022.

There are many ways to read a CSV file to an array. Online hosted tools provide interfaces to do this. Also, it is very easy to create a custom user interface for the purpose of reading CSV to the array.

In PHP, it has more than one native function to read CSV data.

  • fgetcsv() – It reads the CSV file pointer and reads the line in particular to the file handle.
  • str_getcsv() -It reads the input CSV string into an array.

This article provides alternate ways of reading a CSV file to a PHP array. Also, it shows how to prepare HTML from the array data of the input CSV.

Quick example

This example reads an input CSV file using the PHP fgetcsv() function. This function needs the file point to refer to the line to read the CSV row columns.

<?php // PHP function to read CSV to array
function csvToArray($csv)
{ // create file handle to read CSV file $csvToRead = fopen($csv, 'r'); // read CSV file using comma as delimiter while (! feof($csvToRead)) { $csvArray[] = fgetcsv($csvToRead, 1000, ','); } fclose($csvToRead); return $csvArray;
} // CSV file to read into an Array
$csvFile = 'csv-to-read.csv';
$csvArray = csvToArray($csvFile); echo '<pre>';
print_r($csvArray);
echo '</pre>';
?>

This program sets the CSV file stream reference and other parameters to read the records in a loop.

The loop iteration pushes the line data into an array. The PHP array push happens using one of the methods we have seen in the linked article.

Save the below comma-separated values to a csv-to-array.csv file. It has to be created as an input of the above program.

csv-to-array.csv

Lion,7,Wild
Tiger,9,Wild
Dog,4,Domestic

Output:

The above program returns the following array after reading the input CSV file data.

Array
( [0] => Array ( [0] => Lion [1] => 7 [2] => Wild ) [1] => Array ( [0] => Tiger [1] => 9 [2] => Wild ) [2] => Array ( [0] => Dog [1] => 4 [2] => Domestic ) )

csv to PHP array

Map str_getcsv() to read CSV and convert it into a PHP array

This program will be suitable if you want to skip the step of writing a loop. It saves the developer’s effort. But the background processing will be the same as the above program.

The PHP file() converts the entire CSV into an array. Then, the array_map sets the str_getcsv() function as a callback to iterate the array of CSV file rows.

The str_getcsv() imports the CSV row data into an array. In a previous article, we have seen about handling CSV file read and other operations like import, and export.

The resultant $csvArray variable will contain the complete CSV data in a multi-dimensional array.

The output of this program will be similar to that of the quick example.

<?php
// a one-line simple option to reade CSV to array
// it uses PHP str_getcsv
$csvArray = array_map('str_getcsv', file('csv-to-read.csv'));
echo '<pre>';
print_r($csvArray);
echo '</pre>';
?>

Convert CSV to Array and then convert array to HTML

This example will be useful if you want to display the CSV content in the UI in a tabular form.

Mostly, this code must be more useful since it has the possibility of using it in real-time projects. But, the other examples are basics which are also important to learn about reading CSV using PHP.

This code iterates the CSV row and reads the column data using fgetcsv() as did in the quick example.

Then, it forms the HTML table structure using the CSV array data. In a previous tutorial, we saw code to convert an HTML table into an excel.

<?php // PHP script to read CSV and convert to HTML table // create file handle to read CSV file
$csvFile = fopen('csv-to-read.csv', 'r'); if ($csvFile !== FALSE) { echo "<table border=1 cellpadding=10>"; while (($csvArray = fgetcsv($csvFile, 100, ',')) !== FALSE) { echo "<tr>"; for ($i = 0; $i < count($csvArray); $i ++) { echo "<td>" . $csvArray[$i] . "</td>"; } echo "</tr>"; } echo "</table>"; fclose($csvFile);
}
?>

Output:

This program will display the HTML table on the screen. The row data is from the input CSV file.

csv to html
Download

↑ Back to Top

Posted on Leave a comment

PHP array_push – Add Elements to an Array

by Vincy. Last modified on October 30th, 2022.

Adding elements to an array in PHP is very easy with its native function array_push().

This quick example shows the simplicity of this function to add more elements to the end of an array.

Quick example

<?php
$animalsArray = array( "Lion", "Tiger"
);
array_push($animalsArray, "Elephant", "Horse");
print_r($animalsArray);
?>

Output:

Array ( [0] => Lion [1] => Tiger [2] => Elephant [3] => Horse )

About PHP array_push()

PHP array_push() function add elements to an array. It can add one or more trailing elements to an existing array.

Syntax

array_push(array &$array, mixed ...$values): int
  • $array – The reference of a target array to push elements.
  • $values – one or more elements to be pushed to the target array.

When we see the PHP array functions, we have seen a short description of this function.

php array push

All possible ways of doing array push in PHP

In this tutorial, we will see all the possibilities for adding elements to an array in PHP. Those are,

  • Array push by assigning values to an array variable by key.
  • Pushing array elements in a loop.

When seeing the examples, it will be very simple and may be too familiar also. But recollecting all the methods at one glance will help to rejuvenate the skillset on basics.

How to add an array of elements to a target array using array_push()

This example uses the PHP array_push() function to push an array of elements into a target array.

<?php
$animalsArray = array( "Lion", "Tiger"
);
$anotherArray = array( "Elephant", "Crocodile"
); array_push($animalsArray, ...$anotherArray);
print_r($animalsArray);
// this method adds elements from two arrays sequentially into the target array
// this is similar to merge
?>

Output:

Array ( [0] => Lion [1] => Tiger [2] => Elephant [3] => Crocodile )

The alternate method to array_push

The array_push function is useful if there is a requirement to push elements later after the alignment.

If you want to push the elements at an assignment level the following code shows the way to do it.

If you want to merge JSON array or object using PHP the linked article will be helpful.

<?php
// alternate to use array_push when you have a key value
// add elements as key value via index
$animalsArray['a1'] = 'Lion';
$animalsArray['a2'] = 'Tiger';
$animalsArray['a3'] = 'Elephant';
$animalsArray['a4'] = 'Horse';
print_r($animalsArray);
?>

Output:

Array ( [a1] => Lion [a2] => Tiger [a3] => Elephant [a4] => Horse )

Pushing elements into an array in a loop without using array_push

This code is the same as above but with a PHP for a loop. It pushes only the value to the array variable with a square bracket.

The output will have the array with a numerical key.

<?php
// another alternate to array_push
// add elements to an array with just []
$array = array();
for ($i = 1; $i <= 10; $i ++) { $array[] = $i;
}
print_r($array);
?>

If you want to push the key-value pair to form an associative array with a loop, the following code will be helpful.

Output:

Array ( [0] => 1 [1] => 2 [2] => 3 [3] => 4 [4] => 5 [5] => 6 [6] => 7 [7] => 8 [8] => 9 [9] => 10 )

Adding elements into an array using PHP array_merge()

The array_merge() and the array_push($array, …$array_sequence) gives same output.

It merges two array variables and results in a consolidated element array. If you want to merge JSON array or object in PHP the linked article has the code.

<?php
$animalsArray = array( "Lion", "Tiger"
);
$moreAnimalsArray = array( "Elephant", "Horse"
);
// to add elements in an array from existing arrays
$array = array_merge($animalsArray, $moreAnimalsArray);
print_r($array);
?>

Output:

Array ( [0] => Lion [1] => Tiger [2] => Elephant [3] => Horse )

PHP function to add elements to the beginning of an array

PHP also contains functions to add elements to an array at the beginning of an array. The array_unshift() function is used for this. See the following code that adds elements to an array using array_shift().

<?php
$animalsArray = array( "Lion", "Tiger"
);
array_unshift($animalsArray, "Elephant", "Horse");
print_r($animalsArray);
?>

Output:

Array ( [0] => Elephant [1] => Horse [2] => Lion [3] => Tiger )

Download

↑ Back to Top

Posted on Leave a comment

Convert JSON to Array in PHP with Online Demo

by Vincy. Last modified on October 27th, 2022.

This tutorial covers the basic details of the PHP json_encode function. It gives examples of decoding JSON string input to a PHP array.

It also describes this PHP JSON function‘s conventions, rules and limitations. First, let’s see a quick example of converting JSON to an array.

Convert JSON to PHP Array

This example has a JSON string that maps the animal with its count. The output of converting this JSON will return an associative array.

It uses PHP json_decode() with boolean true as its second parameter. With these decoding params, the JSON will be converted into a PHP array.

Quick example

<?php
// JSON string in PHP Array
$jsonString = '{"Lion":101,"Tiger":102,"Crocodile":103,"Elephant":104}';
$phpArray = json_decode($jsonString, true); // display the converted PHP array
var_dump($phpArray);
?>

Output

array(4) { ["Lion"]=> int(101) ["Tiger"]=> int(102) ["Crocodile"]=> int(103) ["Elephant"]=> int(104)
}

See this online demo to get the converted array result from a JSON input.
View demo

See the diagram that shows the input JSON string and the output stdClass object of the JSON decoding. In the previous article, we have seen examples of the reverse operation that is converting a PHP array to a JSON string.
php json to array

PHP json_decode()

This native PHP function decodes the JSON string into a parsable object tree or an array. This is the syntax of this function.

json_decode( string $json, ?bool $associative = null, int $depth = 512, int $flags = 0
): mixed
  1. $json – Input JSON string.
  2. $associative – a boolean based on which the output format varies between an associative array and a stdClass object.
  3. $depth – the allowed nesting limit.
  4. $flag – Predefine constants to enable features like exception handling during the JSON to array convert.

You can find more about this function in the official documentation online.

Convert JSON to PHP Object

This program has a minute change of not setting the boolean flag to the PHP json_decode function. This will return a PHP stdClass object tree instead of an array.

<?php
// JSON string in PHP Array
$jsonString = '{"name":"Lion"}'; $phpObject = json_decode($jsonString);
print $phpObject->name;
?>

Output

Lion

Common mistakes during conversion from JSON to Array

The following JSON string is a valid JSON object in JavaScript, but not here in PHP. The issue is the single quote. It should be changed to a double quote.

If you want to see the JavaScript example to read and display JSON data the linked article has the code.

<?php
// 1. key and value should be within double quotes
$notValidJson = "{ 'lion': 'animal' }";
json_decode($notValidJson); // will return null // 2. without a quote is also not allowed
$notValidJson = '{ lion: "animal" }';
json_decode($notValidJson); // will return null // 3. should not have a comma at the end
$notValidJson = '{ "lion": "animal", }';
json_decode($notValidJson); // will return null
?>

How to convert JSON with large integers

This can be achieved by setting the bitmask parameter of the predefined JSON constants.

The JSON_BIGINT_AS_STRING constant is used to convert JSON with data having large integers.

<?php
$jsonString = '{"largeNumber": 12345678901234567890123}'; var_dump(json_decode($jsonString, false, 512, JSON_BIGINT_AS_STRING));
?>

Output

object(stdClass)#1 (1) { ["number"]=> string(20) "12345678901234567890123"
}

How to get errors when using json_decode

The function json_last_error() is used to return details about the last error occurrence. The following example handles the possible error cases of this PHP JSON function.

<?php
$jsonString = '{"Lion":101,"Tiger":102,"Crocodile":103,"Elephant":104}';
json_decode($jsonString); switch (json_last_error()) { case JSON_ERROR_DEPTH: echo 'Error: Nesting limit exceeded.'; break; case JSON_ERROR_STATE_MISMATCH: echo 'Error: Modes mismatch.'; break; case JSON_ERROR_CTRL_CHAR: echo 'Error: Unexpected character found.'; break; case JSON_ERROR_SYNTAX: echo 'Error: Syntax error, invalid JSON.'; break; case JSON_ERROR_UTF8: echo 'Error: UTF-8 characters incorrect encoding.'; break; default: echo 'Unexpected error.'; break;
}
?>

SURPRISE! JSON to Array and Array to JSON conversion is not symmetrical

<?php $jsonString = '{"0": "No", "1": "Yes"}'; // convert json to an associative array $array = json_decode($jsonString, true); print json_encode($array) . PHP_EOL;
?>

Output

["No","Yes"]

The PHP object is now changed to a PHP array. You may not expect it.

Encode -> Decode -> Encode

The above will not return the data to its original form.

The output of decoding to PHP arrays and encoding from PHP arrays are not always symmetrical. But, the output of decoding from stdClass objects and encoding to stdClass objects are always symmetrical.

So if you have plans to do cyclical conversion between the PHP array and a JSON string, then first convert the PHP array to an object. The convert the JSON.

View demo

↑ Back to Top

Posted on Leave a comment

Convert JavaScript Object to JSON String

by Vincy. Last modified on October 26th, 2022.

JSON string conversion on the client and server side is an important requirement in data handling. Most programming languages contain native functions for handling JSON objects and string data.

The JSON format is a convenient way of structuring, transmitting, or logging hierarchical data. The JSON string is a bundled unit to transmit object properties over the API terminals.

In this tutorial, we will see how to convert a JavaScript object to a JSON string. The JSON.stringify() of the JS script is used to do this. This is a quick solution for converting the given JS object to a JSON.

Quick example

var jsObject = { "name": "Lion", "type": "wild"
};
var jsonString = JSON.stringify(jsObject)
console.log(jsonString);

Output

{"name":"Lion","type":"wild"}

javascript object to string

About JavaScript JSON.stringify()

The JSON.stringify() method accepts 3 parameters to convert JavaScript objects into JSON string. See the syntax and the possible parameters of this JavaScript method.

Syntax

JSON.stringify(value)
JSON.stringify(value, replacer)
JSON.stringify(value, replacer, space)

The replacer and space parameters are optional.

  • value – The JS object to be converted to a JSON string.
  • replacer – a  function or an array of specifications to convert JavaScript objects.
  • space – It is a specification used to format or prettify the output JSON.

The JSON.stringify() method can also accept JavaScript arrays to convert into JSON strings.

How to get a formatted JSON string from a JavaScript object

This example supplies the “space” parameter to the JSON.stringify method. This parameter helped to format the JSON string as shown in the output below the program.

When we see the PHP array to JSON conversion example, it used the PHP bitmask parameter to achieve prettyprinting of JSON output.

var jsObject = { "name": "Lion", "type": "wild"
}; // this is to convert a JS object to a formatted JSON string
var formattedJSON = JSON.stringify(jsObject, null, 2);
console.log(formattedJSON);

Output

{ "name": "Lion", "type": "wild"
}

How to store JSON string to a JavaScript localStorage

The localStorage is a mechanism to have persistent data or state on the client side. It accepts string data to be stored with a reference of a user-defined key.

In this example, we used this storage tool to keep the JSON string of cart session data.

This code pushes two records to the cart array. Then, it converts the array into the JSON string to put it into the localStorage.

Note: JSON.stringify() can also accepts array to convert into a JSON string.

We have already used this storage mechanism to create a JavaScript persistent shopping cart.

const cart = { cartItem: []
};
cart.cartItem.push({ product: "Watch", quantity: 3, unitPrice: 100 });
cart.cartItem.push({ product: "Smart Phone", quantity: 5, unitPrice: 600 }); // use case for converting JS object to a JSON string
// convert object to JSON string before storing in local storage
const cartJSONString = JSON.stringify(cart); localStorage.setItem("cartSession", JSON.stringify(cartJSONString)); // retrieving from local storage
let cartFromStorage = localStorage.getItem("cartSession");
const getCartItemFromSession = JSON.parse(cartFromStorage); console.log(getCartItemFromSession);

Output

{ "cartItem": [ {"product":"Watch","quantity":3,"unitPrice":100}, {"product":"Smart Phone","quantity":5,"unitPrice":600} ]
}

How dates in the JavaScript object behave during JSON stringify

The JSON.stringify() function converts the JavaScript Date object into an equivalent date string as shown in the output.

The code instantiates the JavaScript Date() class to set the current date to a JS object property.

// when you convert a JS object to JSON string, date gets automatically converted
// to equivalent string form
var jsObject = { "name": "Lion", "type": "wild", today: new Date()
};
const jsonString = JSON.stringify(jsObject);
console.log(jsonString);

Output

{"name":"Lion","type":"wild","today":"2022-10-23T10:58:55.791Z"}

How JSON stringify converts the JavaScript objects with functions

If the JS object contains functions as a value of a property, the JSON.stringify will omit the function. Then, it will return nothing for that particular property.

The resultant JSON string will have the rest of the properties that have valid mapping.

// when you convert a JS object to JSON string, // functions in JS object is removed by JSON.stringify var jsObject = { "name": "Lion", "type": "wild", age: function() { return 10; }
};
const jsonString = JSON.stringify(jsObject);
console.log(jsonString);

Output

{"name":"Lion","type":"wild"}

JavaScript toString() limitations over JSON.stringify: 

If the input JavaScript object contains a single or with a predictable structure, toString() can achieve this conversion.

It is done by iterating the JS object array and applying stringification on each iteration. Example,

let jsonString = { 'name': 'Lion', type: 'wild', toString() { return '{name: "${this.name}", age: ${this.type}}'; }
};
console.log(jsonString);

But, it is not an efficient way that has the probability of missing some properties during the iteration.

Why and how to convert the JSON string into a JSON object

The JSON string is a comfortable format during data transmission and data logging. Other than that it must be in a format of an object tree to parse, read from, and write to the JSON.

The JSON.parse() method is used to convert JSON String to a JSON Object. A JSON object will look like a JS object only. See the following comparison between a JS object and a JSON object.

//JavaScript object
const jsObject = { 'animal-name': 'Lion', animalType: 'wild', endangered: false
} //JSON object
{ "animal-name": "Lion", "animalType": "wild", "endangered": false
}

Download

↑ Back to Top

Posted on Leave a comment

PHP Array to JSON String Convert with Online Demo

by Vincy. Last modified on October 22nd, 2022.

JSON is the best format to transfer data over network. It is an easily parsable format comparatively. That’s why most of the API accepts parameters and returns responses in JSON.

There are online tools to convert an array to a JSON object. This tutorial teaches how to create a program to convert various types of PHP array input into a JSON format.

It has 4 different examples for converting a PHP array to JSON. Those are too tiny in purpose to let beginners understand this concept easily.

Quick example

This quick example is simply coded with a three-line straightforward solution. It takes a single-dimensional PHP array and converts it to JSON.

<?php
$array = array(100, 250, 375, 400);
$jsonString = json_encode($array);
echo $jsonString;
?>

View Demo

The other different array-to-JSON examples handle simple to complex array conversion. It also applies pre-modification (like array mapping) before conversion. The four examples are,

  1. Simple to complex PHP array to JSON.
  2. Remove array keys before converting to JSON.
  3. Convert PHP array with accented characters to JSON
  4. PHP Array to JSON with pretty-printing

If you want the code for the reverse to decode JSON objects to an array, then the linked article has examples.

See this online demo to convert an array of comma-separated values into a JSON object.

php array to json

1) Simple to complex PHP array to JSON

This code handles 3 types of array data into a JSON object. In PHP, it is very easy to convert an array to JSON.

It is a one-line code by using the PHP json_encode() function.

<?php
// PHP Array to JSON string conversion for
// simple, associative and multidimensional arrays
// all works the same way using json_encode
// just present different arrays for example purposes only // simple PHP Array to JSON string
echo '<h1>PHP Array to JSON</h1>';
$array = array( 100, 250, 375, 400
);
$jsonString = json_encode($array);
echo $jsonString; // Associative Array to JSON
echo '<h2>Associative PHP Array to JSON</h2>';
$array = array( 'e1' => 1000, 'e2' => 1500, 'e3' => 2000, 'e4' => 2350, 'e5' => 3000
);
$jsonString = json_encode($array);
echo $jsonString; // multidimensional PHP Array to JSON string
echo '<h2>Multidimensional PHP Array to JSON</h2>';
$multiArray = array( 'a1' => array( 'item_id' => 1, 'name' => 'Lion', 'type' => 'Wild', 'location' => 'Zoo' ), 'a2' => array( 'item_id' => 2, 'name' => 'Cat', 'type' => 'Domestic', 'location' => 'Home' )
);
echo json_encode($multiArray);
?>

Output:

//PHP Array to JSON
[100,250,375,400] //Associative PHP Array to JSON
{"e1":1000,"e2":1500,"e3":2000,"e4":2350,"e5":3000} //Multidimensional PHP Array to JSON
{"a1":{"item_id":1,"name":"Lion","type":"Wild","location":"Zoo"},"a2":{"item_id":2,"name":"Cat","type":"Domestic","location":"Home"}}

2) Remove array keys before converting to JSON

This code handles a different scenario of JSON conversion which must be helpful if needed. For example, if the array associates subject=>marks and the user needs only the marks to plot it in a graph.

It removes the user-defined keys from an associative array and applies json_encode to convert it. It is a two-step process.

  1. It applies PHP array_values() to read the value array.
  2. Then, it applies json_encode on the values array.
<?php
// array_values() to remove assigned keys and convert to the original PHP Array key
echo '<h1>To remove assigned associative keys and PHP Array to JSON</h1>';
$array = array( 'e1' => 1000, 'e2' => 1500, 'e3' => 2000, 'e4' => 2350, 'e5' => 3000
); $jsonString = json_encode(array_values($array));
echo $jsonString;
?>

Output:

[1000,1500,2000,2350,3000]

3) Convert the PHP array with accented characters to JSON

It is also a two-step process to convert the array of data containing accented characters.

It applies UTF8 encoding on the array values before converting them into a JSON object.

For encoding all the elements of the given array, it maps the utf8_encode() as a callback using the PHP array_map() function.

We have seen PHP array functions that are frequently used while working with arrays.

<?php
// Accented characters
// to preserve accented characters during PHP Array to JSON conversion
// you need to utf8 encode the values and then do json_encode
echo '<h1>For accented characters PHP Array to JSON</h1>';
$array = array( 'w1' => 'résumé', 'w2' => 'château', 'w3' => 'façade', 'w4' => 'déjà vu', 'w5' => 'São Paulo'
);
$utfEncodedArray = array_map("utf8_encode", $array);
echo json_encode($utfEncodedArray);
?>

Output:

{"w1":"r\u00c3\u00a9sum\u00c3\u00a9","w2":"ch\u00c3\u00a2teau","w3":"fa\u00c3\u00a7ade","w4":"d\u00c3\u00a9j\u00c3\u00a0 vu","w5":"S\u00c3\u00a3o Paulo"}

4) PHP Array to JSON with pretty-printing

It applies to prettyprint on the converted output JSON properties in a neet spacious format.

The PHP json_encode() function accepts the second parameter to set the bitmask flag. This flag is used to set the JSON_PRETTY_PRINT to align the output JSON properties.

<?php
// to neatly align the output with spaces
// it may be useful when you plan to print the
// JSON output in a raw format
// helpful when debugging complex multidimensional PHP Arrays and JSON objects
// lot more constants are available like this, which might be handy in situations
echo '<h1>Convert PHP Array to JSON and Pretty Print</h1>';
$array = array( 'e1' => 1000, 'e2' => 1500, 'e3' => 2000, 'e4' => 2350, 'e5' => 3000
);
echo json_encode($array, JSON_PRETTY_PRINT);
?>

Output:

{ "e1": 1000, "e2": 1500, "e3": 2000, "e4": 2350, "e5": 3000 }

Download

↑ Back to Top

Posted on Leave a comment

Create Web Text Editor using JavaScript with Editor.js

by Vincy. Last modified on October 20th, 2022.

Editor.js is a JavaScript solution to create a web text editor. It is a WYSIWYG editor that allows inline editing of web text content.

Online-hosted editors provide more features to create and format content in an enriched manner. The Editor.js JavaScript library helps to create our own editor in an application.

There are numerous online editors with advanced tools. But, having a custom editor can be sleeker to use and maintain.

The Editor.js has many features to embed rich text content by creating placeholders in the editor with the help of its tools. Tools are enabled by using the external libraries developed for Editor.js.

Those library tools enrich the capability of this web text editor plugin. The following table shows the tools enabled with this Editor.js JavaScript initiation. These tools are used to create different types of rich text content in different formats.

This demo allows you to experience the features of an online editor by integrating this library.

View Demo

Tool Description
Header Creates the H1, H2, H3, H4, H5 and H6 heading blocks for the web editor.
Link embeds It lets pasting URL and extracts content from the link pasted into this input.
Raw HTML blocks It allows embedding raw HTML codes to the web text editor.
Simple image It accepts the image full path or allows to paste of copied image content to render images without server-side processing.
Image It supports choosing files, pasting URLs, pasting images or dragging and dropping images to the rich text content area.
Checklist It is used to create checklist items.
List It adds ordered and unordered list items.
Embeds It embeds content by loading iFrame to the content.
Quote It creates quote blocks that have a toolbar to format rich text content and add links.

The official getting started tutorial has detailed usage documentation about this JavaScript editor. The list of the above tools is described with appropriate linking to their 3-party library manual.

create web text editor javascript

How to install and initiate Editor.js

The Editor.js and its libraries can be integrated by using one of the several ways listed below.

  1. Node package modules.
  2. By using the available CDN URLs of this JavaScript library.
  3. By including the local minified library files downloaded to the application folder.

After including the required library files, the Editor.js has to be instantiated.

const editor = new EditorJS('editorjs');

[OR]

const editor = new EditorJS({ holder: 'editorjs'
});

Here, the “editorjs” is used as the holder which is referring the HTML target to render the web text editor.

Fill the editor with the initial data

If the editor has to display some default template, it requires creating a landing template to render into this. This web editor plugin class accepts rich text content template via a data property. The format will be as shown below.

{ time: 1452714582955, blocks: [ { "type": "header", "data": { "text": "Title of the Editor", "level": 2 } } ], version: "2.10.10"
}

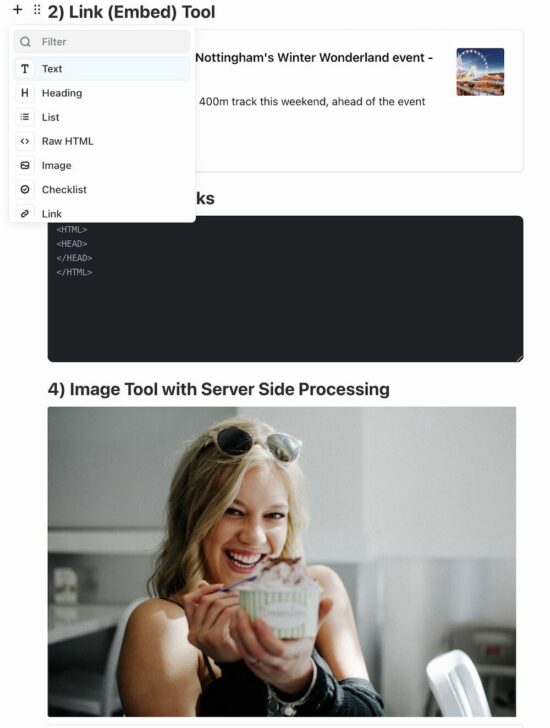
Example: Integrate Editor.js with Raw HTML block, Image, Link embeds and more

This example has the code that teaches how to configure the most used tools of the Editor.js library. It renders HTML code blocks and embeds images, and link extracts.

The image upload and link extract tools are configured with the server-side endpoint. It handles backend action on the upload or the extract events.

On saving the composing rich text content, the Editor.js data will be saved to the database. The data shown in the web editor is dynamic from the database.

<?php
require_once __DIR__ . '/dbConfig.php';
$content = "''";
$sql = "SELECT * FROM editor";
$stmt = $conn->prepare($sql);
$stmt->execute();
$result = $stmt->get_result();
$row = $result->fetch_assoc();
if(!empty($row["content"])) { $content = $row["content"];
}
?>
<html>
<head>
<title>Create Web Text Editor using JavaScript with Editor.js</title>
<link href="style.css" rel="stylesheet" type="text/css" />
<link href="form.css" rel="stylesheet" type="text/css" />
<style>
#loader-icon { display: none; vertical-align: middle; width: 100px;
}
</style>
</head>
<body> <div class="phppot-container"> <h1>Create Web Text Editor using JavaScript with Editor.js</h1> <div id="editorjs" name="editor"></div> <input type="submit" onClick=save() value="save"> <div id="loader-icon"> <img src="loader.gif" id="image-size" /> </div> </div> <script src="https://cdn.jsdelivr.net/npm/@editorjs/editorjs@latest"></script> <script src="https://cdn.jsdelivr.net/npm/@editorjs/header@latest"></script> <script src="https://cdn.jsdelivr.net/npm/@editorjs/list@latest"></script> <script src="https://cdn.jsdelivr.net/npm/@editorjs/image@latest"></script> <script src="https://cdn.jsdelivr.net/npm/@editorjs/raw"></script> <script src="https://cdn.jsdelivr.net/npm/@editorjs/checklist@latest"></script> <script src="https://cdn.jsdelivr.net/npm/@editorjs/link@latest"></script> <script src="editor-tool.js"></script> <script> const editor = new EditorJS({ /** * Id of Element that should contain Editor instance */ holder: 'editorjs', tools: { header: Header, list: List, raw: RawTool, image: { class: ImageTool, config: { endpoints: { byFile: 'http://localhost/phppot/javascript/create-web-text-editor-javascript/ajax-endpoint/upload.php', // Your backend file uploader endpoint byUrl: 'http://localhost/phppot/javascript/create-web-text-editor-javascript/ajax-endpoint/upload.php', // Your endpoint that provides uploading by Url } } }, checklist: { class: Checklist }, linkTool: { class: LinkTool, config: { endpoint: 'http://localhost/phppot/jquery/editorjs/extract-link-data.php', // Your backend endpoint for url data fetching, } } }, data: <?php echo $row["content"]; ?>, });
</script>
</body>
</html>

It has the ladder of six tools of Editor.js with JavaScript code. In this example, it creates images, link embeds and more types of rich text content. Some of them are basic like header, list, the default text tool and more.

The Image and Link embed tools depend on the PHP endpoint URL to take action on the back end.

Image tool configuration keys and endpoint script

The image tool requires the PHP endpoint URL to save the uploaded files to the target folder. The JavaScript editor keys to configure the endpoint are listed below.

  1. byFile – This endpoint is used while pasting the file.
  2. byUrl – This endpoint is used while choosing the file, dragging and dropping files and all.
tools: { image: { class: ImageTool, config: { endpoints: { byFile: 'http://localhost/phppot/javascript/create-web-text-editor-javascript/ajax-endpoint/upload.php', byUrl: 'http://localhost/phppot/javascript/create-web-text-editor-javascript/ajax-endpoint/upload.php' } } }
}

PHP endpoint to upload file

This is simple and straightforward that performs the image upload operation in PHP. The image file is posted via JavaScript links to this server-side script.

<?php
$targetDir = "../uploads/";
$output = array();
if (is_array($_FILES)) { $fileName = $_FILES['image']['name']; if (is_uploaded_file($_FILES['image']['tmp_name'])) { if (move_uploaded_file($_FILES['image']['tmp_name'], $targetDir . $fileName)) { $output["success"] = 1; $output["file"]["url"] = "http://localhost/phppot/javascript/create-web-text-editor-javascript/ajax-endpoint/" . $targetDir . $fileName; } }
}
print json_encode($output);
?>

Extract content from link embeds

This tool is configured like below to set the PHP endpoint to extract the content.

In this example, it extracts contents like title, image, and text description from the embedded link.

tools: { linkTool: { class: LinkTool, config: { endpoint: 'http://localhost/phppot/jquery/editorjs/extract-link-data.php', // Your backend endpoint for url data fetching, } }
}

PHP endpoint to extract content from the remote file

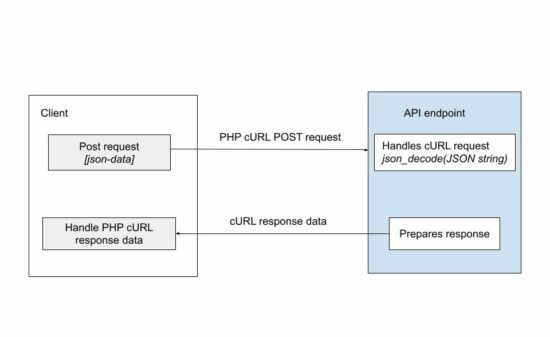
It creates a cURL post request in the endpoint PHP file to extract the data from the link. After getting the cURL response, the below code parses the response and creates a DOM component to render the rich text content into the WYSIWYG web editor.

It uses the GET method during the cURL request to extract rich text content and image from the link. In a previous tutorial, we used the GET and POST methods on PHP cURL requests.

<?php
$output = array();
$ch = curl_init(); curl_setopt($ch, CURLOPT_HEADER, 0);
curl_setopt($ch, CURLOPT_RETURNTRANSFER, 1);
curl_setopt($ch, CURLOPT_URL, $_GET["url"]);
curl_setopt($ch, CURLOPT_FOLLOWLOCATION, 1); $data = curl_exec($ch);
curl_close($ch); $dom = new DOMDocument();
@$dom->loadHTML($data); $nodes = $dom->getElementsByTagName('title');
$title = $nodes->item(0)->nodeValue; $metas = $dom->getElementsByTagName('meta');
$body = "";
for ($i = 0; $i < $metas->length; $i ++) { $meta = $metas->item($i); if ($meta->getAttribute('name') == 'description') { $body = $meta->getAttribute('content'); }
} $image_urls = array();
$images = $dom->getElementsByTagName('img'); for ($i = 0; $i < $images->length; $i ++) { $image = $images->item($i); $src = $image->getAttribute('src'); if (filter_var($src, FILTER_VALIDATE_URL)) { $image_src[] = $src; }
} $output["success"] = 1;
$output["meta"]["title"] = $title;
$output["meta"]["description"] = $body;
$output["meta"]["image"]["url"] = $image_src[0];
echo json_encode($output);
?>

Save Editor content to the database

On clicking the “Save” button below the web text editor, it gets the editor output data and saves it to the database.

It calls the editor.save() callback to get the WYSIWYG web editor output. An AJAX call sends this data to the PHP to store it in the database.

function save() { editor.save().then((outputData) => { document.getElementById("loader-icon").style.display = 'inline-block'; var xmlHttpRequest = new XMLHttpRequest(); xmlHttpRequest.onreadystatechange = function() { if (xmlHttpRequest.readyState == XMLHttpRequest.DONE) { document.getElementById("loader-icon").style.display = 'none'; if (xmlHttpRequest.status == 200) { // on success get the response text and // insert it into the ajax-example DIV id. document.getElementById("ajax-example").innerHTML = xmlHttpRequest.responseText; } else if (xmlHttpRequest.status == 400) { // unable to load the document alert('Status 400 error - unable to load the document.'); } else { alert('Unexpected error!'); } } }; xmlHttpRequest.open("POST", "ajax-endpoint/save-editor.php", true); xmlHttpRequest.setRequestHeader('Content-type', 'application/x-www-form-urlencoded'); xmlHttpRequest.send("btnValue=" + JSON.stringify(outputData)); }).catch((error) => { console.log('Saving failed: ', error) });
}

PHP code to save Editor.js data

This is the endpoint PHP file to process the editor’s rich text output in the backend. It creates the query to prepare and execute the insert operation to save the rich text content to the database.

<?php
require_once __DIR__ . '/../dbConfig.php'; $sql = "SELECT * FROM editor";
$stmt = $conn->prepare($sql);
$stmt->execute();
$result = $stmt->get_result();
$row = $result->fetch_assoc();
if (isset($_POST['btnValue'])) { $editorContent = $_POST['btnValue']; if (empty($row["content"])) { $query = "INSERT INTO editor(content,created)VALUES(?, NOW())"; $statement = $conn->prepare($query); $statement->bind_param("s", $editorContent); $statement->execute(); } else { $query = "UPDATE editor SET content = ? WHERE id = ?"; $statement = $conn->prepare($query); $statement->bind_param("si", $editorContent, $row["id"]); $statement->execute(); }
}
?>

View DemoDownload

↑ Back to Top

Posted on Leave a comment

How to Wait 1 Second in JavaScript?

by Vincy. Last modified on October 18th, 2022.

Wait is there every aspect of human life. Let’s get philosophical for a moment! For every good thing in life, you need to wait.

“There’s no such thing as failure – just waiting for success.” – John Osborne

Like in life, wait in programming is also unavoidable. It is a tool, that you will need some day on desperate situations. For example, a slider, a fading animation, a bouncing ball, you never know.

In this tutorial, we will learn about how to wait one second in JavaScript? One second is an example. It could be a “5 seconds” or any duration your code needs to sleep before continuing with operation.

Refer this linked article to learn about PHP sleep.

Wait

JavaScript wait 1 second

I have used the good old setTimeout JavaScript function to wait. It sleeps the processing for the milliseconds duration set. Then calls the callback function passed.

You should put the code to execute after wait inside this callback function. As for the wait duration 1000 millisecond is one second. If you want to wait 5 seconds, then pass 5000.

This code will be handy if you are creating a news ticker like scroll animation.

	var testWait = function(milliseconds) { console.log('Before wait'); setTimeout(function() { console.log('After wait'); }, milliseconds); } testWait(1000);

JavaScript wait 1 second for promise

If you are using a modern browser, then you can use the below code. Modern means, your browser should support ES6 JavaScript standard.

In summary, you need support for JavaScript Promise. Here we use the setTimeout function. It resolves the promise after the defined milliseconds wait.

// Promise is available with JavaScript ES6 standard
// Need latest browsers to run it
const wait = async (milliseconds) => { await new Promise(resolve => { return setTimeout(resolve, milliseconds) });
}; const testWait = async () => { console.log('Before wait.'); await wait(1000); console.log('After wait.');
} testWait();

JavaScript wait 1 second in loop

If you want to wait the processing inside a loop in JavaScript, then use the below code. It uses the above Promise function and setTimeout to achieve the wait.

If yours is an old browser then use the first code given above for the wait part. If you need to use this, then remember to read the last section of this tutorial. In particular, if you want to “wait” in a mission critical JavaScript application.

const wait = async (milliseconds) => { await new Promise(resolve => { return setTimeout(resolve, milliseconds) });
}; const waitInLoop = async () => { for (let i = 0; i < 10; i++) { console.log('Waiting ...'); await wait(1000); console.log(i); } console.log("The wait is over.");
} waitInLoop();

JavaScript wait 1 second in jQuery

This is for people out there who wishes to write everything in jQuery. It was one of the greatest frontend JavaScript libraries but nowadays losing popularity. React is the new kid in the block. Here in this wait scenario, there is no need to look for jQuery specific code even if you are in jQuery environment.

Because you will have support for JavaScript. You can use setTimeout without any jQuery specific constructs. I have wrapped setTimeout in a jQuery style code. Its old wine in a new bottle.

// if for some strange reason you want to write // it in jQuery style // just wrapping the setTimout function in jQuery style $.wait = function(callback, milliseconds) { return window.setTimeout(callback, milliseconds); } $.wait(function() { $("#onDiv").slideUp() }, 1000);

Cancel before wait for function to finish

You may have to cancel the wait and re-initiate the setTimeout in special scenarios. In such a situation use the clearTimeout() function as below. Go through the next section to know about such a special wait scenario.

let timeoutId = setTimeout(() => { // do process }) // store the timeout id and call clearTimeout() function // to clear the already set timeout clearTimeout(timeoutId);

Is the wait real?

You need to understand what the JavaScript wait means. When the JavaScript engine calls setTimeout, it processes a function. When the function exits, then a timeout with defined milliseconds is set. After that wait, then JavaScript engine makes the callback.

When you want to know the total wait period for next consecutive call. You need to add the time taken by your function to process to the wait duration.

So that is a variable unit. Assume that the function runs for five seconds. And the setTimeout wait duration is one second. Then the actual wait will become six seconds for the next call.

If you want to precise call every five seconds, then you need to define a self adjusting setTimeout timer.

You should account the time taken to process, then reduce the time from the wait milliseconds. Then cancel the current setTimeout. And start new setTimeout with the new calculated time.

That’s going to be tricky. If you are running a mission critical wait call, then that is the way to go.

For example, general UI animations, the above basic implementations will hold good. But you need the self adjusting setTimeout timer for critical time based events.

setInterval will come closer for the above scenario. Any other UI process running in main thread will affect setInterval’s wait period. Then your one second wait may get converted to 5 seconds wait. So, you should define a self adjusting setTimeout wait for mission critical events.

↑ Back to Top

Posted on Leave a comment

PHP Curl POST JSON Send Request Data

by Vincy. Last modified on October 13th, 2022.

Most of the APIs are used to accept requests and send responses in JSON format. JSON is the de-facto data exchange format. It is important to learn how to send JSON request data with an API call.

The cURL is a way of remote accessing the API endpoint over the network. The below code will save you time to achieve posting JSON data via PHP cURL.

Example: PHP cURL POST by Sending JSON Data

It prepares the JSON from an input array and bundles it to the PHP cURL post.

It uses PHP json_encode function to get the encoded request parameters. Then, it uses the CURLOPT_POSTFIELDS option to bundle the JSON data to be posted.

curl-post-json.php

<?php
// URL of the API that is to be invoked and data POSTed
$url = 'https://example.com/api-to-post'; // request data that is going to be sent as POST to API
$data = array( "animal" => "Lion", "type" => "Wild", "name" => "Simba", "zoo" => array( "address1" => "5333 Zoo", "city" => "Los Angeles", "state" => "CA", "country" => "USA", "zipcode" => "90027" )
); // encoding the request data as JSON which will be sent in POST
$encodedData = json_encode($data); // initiate curl with the url to send request
$curl = curl_init($url); // return CURL response
curl_setopt($curl, CURLOPT_RETURNTRANSFER, true); // Send request data using POST method
curl_setopt($curl, CURLOPT_CUSTOMREQUEST, "POST"); // Data conent-type is sent as JSON
curl_setopt($curl, CURLOPT_HTTPHEADER, array( 'Content-Type:application/json'
));
curl_setopt($curl, CURLOPT_POST, true); // Curl POST the JSON data to send the request
curl_setopt($curl, CURLOPT_POSTFIELDS, $encodedData); // execute the curl POST request and send data
$result = curl_exec($curl);
curl_close($curl); // if required print the curl response
print $result;
?>

php curl post json

The above code is one part of the API request-response cycle. If the endpoint belongs to some third-party API, this code is enough to complete this example.

But, if the API is in the intra-system (custom API created for the application itself), then, the posted data has to be handled.

How to get the JSON data in the endpoint

This is to handle the JSON data posted via PHP cURL in the API endpoint.

It used json_decode to convert the JSON string posted into a JSON object. In this program, it sets “true” to convert the request data into an array.

curl-request-data.php

<?php
// use the following code snippet to receive
// JSON POST data
// json_decode converts the JSON string to JSON object
$data = json_decode(file_get_contents('php://input'), true);
print_r($data);
echo $data;
?>

The json_encode function also allows setting the allowed nesting limit of the input JSON. The default limit is 512.

If the posted JSON data is exceeding the nesting limit, then the API endpoint will be failed to get the post data.

Other modes of posting data to a cURL request

In a previous tutorial, we have seen many examples of sending requests with PHP cURL POST.

This program sets the content type “application/json” in the CURLOPT_HTTPHEADER. There are other modes of posting data via PHP cURL.

  1. multipart/form-data – to send an array of post data to the endpoint/
  2. application/x-www-form-urlencoded – to send a URL-encoded string of form data.

Note: PHP http_build_query() can output the URL encoded string of an array.
Download

↑ Back to Top

Posted on Leave a comment

Google Sheets JavaScript API Spreadsheet Tutorial

by Vincy. Last modified on October 11th, 2022.

Google Sheets API provides services of to read and write a Google spreadsheet document.

This tutorial is for reading data from Google sheets and displaying them in the UI with JavaScript. Only JavaScript is used without any plugins or dependencies.

Steps to access Google Sheets

It requires the following steps to achieve this.

  1. Get OAuth Credentials and API keys and configure them into an application.
  2. Authenticate and Authorise the app to allow accessing Google sheets.
  3. Read spreadsheet data and store it in an array.
  4. Parse response data and display them on the UI.

Steps 1 and 2 are common for all Google JavaScript API services. When uploading files to Google Drive via JavaScript API, we have seen it.

We have also seen how to upload to Google Drive using PHP. It doesn’t need API Key. Instead, it does token-based authentication to get API access.

Step 1: Get OAuth Credentials and API keys and configure them into an application

In this step, it needs to create a developer’s web client app to get the client id and the API keys. For that, it requires the following setting should be enabled with the developer’s dashboard.

  1. Login to the Google Developers console and create a web client.
  2. Enable Google Sheets API from the gallery of Google APIs.
  3. Configure OAuth content screen to set the app details
  4. Click OAuth credentials and get the app client id and secret key.
  5. Set the scope on which the program going to access the spreadsheet.
  6. Get the API key to authenticate and authorize the app to access the Google Spreadsheet API service.

enable google sheets api

Note: The secret key will be used for server-side implementation, but not in this JavaScript example.

Required scope to access the spreadsheet data

The following scopes should be selected to read the Google Spreadsheets via a program.

  • …auth/spreadsheets – to read, edit, create and delete Spreadsheets.
  • …auth/spreadsheets.readonly – to read Spreadsheets.
  • …auth/drive – to read, edit, create and delete Drive files.
  • …auth/drive.readonly – to read Drive files
  • …auth/drive.file – to read, edit, create and delete a specific Drive files belongs to the app gets authorized.

Step 2: Authenticate and Authorise the app to allow accessing Google sheets

Authorization is the process of the client signing into the Google API to access its services.

On clicking an “Authorize” button, it calls authorizeGoogleAccess() function created for this example.

This function shows a content screen for the end user to allow access. Then, it receives the access token in a callback handler defined in this function.

Step 3: Read spreadsheet data and store it in an array

Once access is permitted, the callback will invoke the script to access an existing Google spreadsheet.

The listMajors() function specifies a particular spreadsheet id to be accessed. This function uses JavaScript gapi instance to get the spreadsheet data.

Step 4: Parse response data and display them on the UI

After getting the response data from the API endpoint, this script parses the resultant object array.

It prepares the output HTML with the spreadsheet data and displays them to the target element.

If anything strange with the response, it shows the “No records found” message in the browser.

A complete code: Accessing Google Spreadsheets via JavaScript

The following script contains the HTML to show either “Authorize” or the two “Refresh” and “Signout” buttons. Those buttons’ display mode is based on the state of authorization to access the Google Spreadsheet API.

The example code includes the JavaScript library to make use of the required Google API services.

The JavaScript has the configuration to pin the API key and OAuth client id in a right place. This configuration is used to proceed with the steps 2, 3 and 4 we have seen above.

<!DOCTYPE html>
<html>
<head>
<title>Google Sheets JavaScript API Spreadsheet Tutorial</title>
<link rel='stylesheet' href='style.css' type='text/css' />
<link rel='stylesheet' href='form.css' type='text/css' />
</head>
<body> <div class="phppot-container"> <h1>Google Sheets JavaScript API Spreadsheet Tutorial</h1> <p>This tutorial is to help you learn on how to read Google Sheets (spreadsheet) using JavaScript Google API.</p> <button id="authorize_btn" onclick="authorizeGoogleAccess()">Authorize Google Sheets Access</button> <button id="signout_btn" onclick="signoutGoogle()">Sign Out</button> <pre id="content"></pre> </div> <script async defer src="https://apis.google.com/js/api.js" onload="gapiLoaded()"></script> <script async defer src="https://accounts.google.com/gsi/client" onload="gisLoaded()"></script>
</body>
</html>
// You should set your Google client ID and Google API key
const GOOGLE_CLIENT_ID = '';
const GOOGLE_API_KEY = '';
// const DISCOVERY_DOC = 'https://sheets.googleapis.com/$discovery/rest?version=v4'; // Authorization scope should be declared for spreadsheet handing
// multiple scope can he included separated by space
const SCOPES = 'https://www.googleapis.com/auth/spreadsheets.readonly'; let tokenClient;
let gapiInited = false;
let gisInited = false;
document.getElementById('authorize_btn').style.visibility = 'hidden';
document.getElementById('signout_btn').style.visibility = 'hidden'; /** * Callback after api.js is loaded. */
function gapiLoaded() { gapi.load('client', intializeGapiClient);
} /** * Callback after the Google API client is loaded. Loads the * discovery doc to initialize the API. */
async function intializeGapiClient() { await gapi.client.init({ apiKey: GOOGLE_API_KEY, discoveryDocs: [DISCOVERY_DOC], }); gapiInited = true; maybeEnableButtons();
} /** * Callback after Google Identity Services are loaded. */
function gisLoaded() { tokenClient = google.accounts.oauth2.initTokenClient({ client_id: GOOGLE_CLIENT_ID, scope: SCOPES, callback: '', // defined later }); gisInited = true; maybeEnableButtons();
} /** * Enables user interaction after all libraries are loaded. */
function maybeEnableButtons() { if (gapiInited && gisInited) { document.getElementById('authorize_btn').style.visibility = 'visible'; }
} /** * Sign in the user upon button click. */
function authorizeGoogleAccess() { tokenClient.callback = async (resp) => { if (resp.error !== undefined) { throw (resp); } document.getElementById('signout_btn').style.visibility = 'visible'; document.getElementById('authorize_btn').innerText = 'Refresh'; await listMajors(); }; if (gapi.client.getToken() === null) { // Prompt the user to select a Google Account and ask for consent to share their data // when establishing a new session. tokenClient.requestAccessToken({ prompt: 'consent' }); } else { // Skip display of account chooser and consent dialog for an existing session. tokenClient.requestAccessToken({ prompt: '' }); }
} /** * Sign out the user upon button click. */
function signoutGoogle() { const token = gapi.client.getToken(); if (token !== null) { google.accounts.oauth2.revoke(token.access_token); gapi.client.setToken(''); document.getElementById('content').innerText = ''; document.getElementById('authorize_btn').innerText = 'Authorize'; document.getElementById('signout_btn').style.visibility = 'hidden'; }
} /** * Print the names and majors of students in a sample spreadsheet: * https://docs.google.com/spreadsheets/d/1aSSi9jk2gBEHXOZNg7AV7bJj0muFNyPLYwh2GXThvas/edit */
async function listMajors() { let response; try { // Fetch first 10 files response = await gapi.client.sheets.spreadsheets.values.get({ spreadsheetId: '', range: 'Sheet1!A2:D', }); } catch (err) { document.getElementById('content').innerText = err.message; return; } const range = response.result; if (!range || !range.values || range.values.length == 0) { document.getElementById('content').innerText = 'No values found.'; return; } const output = range.values.reduce( (str, row) => `${str}${row[0]}, ${row[2]}\n`, 'Birds, Insects:\n'); document.getElementById('content').innerText = output;
}

Source and output of this example

The spreadsheet shown in this screenshot is the source of this program to access its data.

google sheets spreadsheet source

The JavaScript example reads the spreadsheet and displays the Birds and the Insects column data in the UI.

google sheets javascript api read output
Download

↑ Back to Top

Posted on Leave a comment

Web Push Notifications in PHP

by Vincy. Last modified on October 6th, 2022.

Web push notifications are a promising tool to increase traffic and conversions. We have already seen how to send web push notifications using JavaScript.

This tutorial is for those who are looking for sending web push notifications with dynamic data using PHP. This is an alternate method of that JavaScript example but with server-side processing in PHP.

It gets the notification content from PHP. The hardcoded notification content can be replaced with any source of data from a database or a file.

If you want a fully PHP solution to send custom notifications, the linked article will be useful.

web push notification php

About this example

This example shows a web push notification on the browser. The notifications are sent every 10 minutes as configured. Then, the sent notifications are closed automatically. The notifications display time on a browser is configured as 5 minutes.

The notification instances are created and handled on the client side. The JavaScript setTimeout function is used to manage the timer of popping up or down the notifications.

AJAX call to PHP to send the web push notification

This HTML has the script to run the loop to send the notifications in a periodic interval.

It has the function pushNotify() that requests PHP via AJAX to send notifications. PHP returns the notification content in the form of a JSON object.

The AJAX callback handler reads the JSON and builds the notification. In this script, the createNotification() function sends the notification to the event target.

It maps the JavaScript Notification click property to open a URL from the PHP JSON response.

index.php

<!DOCTYPE html>
<html>
<head>
<title>Web Push Notifications in PHP</title>
<meta name="viewport" content="width=device-width, initial-scale=1">
<link href="style.css" type="text/css" rel="stylesheet" />
<script src="https://code.jquery.com/jquery-3.6.1.min.js" integrity="sha256-o88AwQnZB+VDvE9tvIXrMQaPlFFSUTR+nldQm1LuPXQ=" crossorigin="anonymous"></script>
</head>
<body> <div class="phppot-container"> <h1>Web Push Notification using PHP in a Browser</h1> <p>This example shows a web push notification from PHP on browser automatically every 10 seconds. The notification also closes automatically just after 5 seconds.</p> </div> <script> // enable this if you want to make only one call and not repeated calls automatically // pushNotify(); // following makes an AJAX call to PHP to get notification every 10 secs setInterval(function() { pushNotify(); }, 10000); function pushNotify() { if (!("Notification" in window)) { // checking if the user's browser supports web push Notification alert("Web browser does not support desktop notification"); } if (Notification.permission !== "granted") Notification.requestPermission(); else { $.ajax({ url: "push-notify.php", type: "POST", success: function(data, textStatus, jqXHR) { // if PHP call returns data process it and show notification // if nothing returns then it means no notification available for now if ($.trim(data)) { var data = jQuery.parseJSON(data); console.log(data); notification = createNotification(data.title, data.icon, data.body, data.url); // closes the web browser notification automatically after 5 secs setTimeout(function() { notification.close(); }, 5000); } }, error: function(jqXHR, textStatus, errorThrown) { } }); } }; function createNotification(title, icon, body, url) { var notification = new Notification(title, { icon: icon, body: body, }); // url that needs to be opened on clicking the notification // finally everything boils down to click and visits right notification.onclick = function() { window.open(url); }; return notification; } </script>
</body>
</html>

PHP code to prepare the JSON bundle with dynamic content of the notification

This code supplies the notification data from the server side. Hook your application DAO in this PHP to change the content if you want it from a database.

push-notify.php

<?php
// if there is anything to notify, then return the response with data for
// push notification else just exit the code
$webNotificationPayload['title'] = 'Push Notification from PHP';
$webNotificationPayload['body'] = 'PHP to browser web push notification.';
$webNotificationPayload['icon'] = 'https://phppot.com/badge.png';
$webNotificationPayload['url'] = 'https://phppot.com';
echo json_encode($webNotificationPayload);
exit();
?>

Thus we have created the web push notification with dynamic content from PHP. There are various uses of it by having it in an application.

Uses of push notifications

  • Push notification helps to increase website traffic by sending relevant content to subscribed users.
  • It’s a way to send pro ads to create entries to bring money into the business.
  • It helps to spread the brand and keep it on the customer’s minds that retain them with you.

Download

↑ Back to Top