Last modified on February 4th, 2020 by Vincy.
How do you know your readers’ or customers’ thoughts on your website content? How does the star rating feature help to collect customers’ opinions?
Star rating is a feature that is used across different domains in a variety of ways. For example, it is one of the key building blocks in an eCommerce website.
Star rating helps you to know how people rank your content. It not only gives rank on your content. Also, it brings more readers to your page by the gained rating.
When you build a website, if you have got scope for implementing a star rating system and you should definitely experiment with it.
Websites use a variety of ways to allow users to rate content. For example, star rating, up-down rating, emoji rating and more.
We have seen so many examples for star rating, emoji rating and more. I grouped all those in this one single example.
I supported three UI alternatives for the rating section. Those are,
- Five-star rating
- Favorite rating
- Emoji rating
I created a directive in PHP to configure the template for the rating appearance.
What is inside?
- Existing plugin to implement a dynamic star rating
- Advantages of creating a custom star rating script
- Various types of rating options
- jQuery star rating example script
- The rating example database
- UI design to render star rating option
- jQuery functions to handle user rating action
- Storing user rating to MySQL database from PHP
- Output screenshot of different rating options with star, favorite, emoji
Existing plugins to implement a dynamic star rating
There are various plugins available in the market to enable star rating. The ready-made plugins are with enormous features.
For example, Rateit is a jQuery based star rating plugin. It allows embedding a star rating with a list, select and more HTML markup. It supports Font Awesome, Material icons to display rating icons.
The UpvoteJS is a JavaScript package to render a StackExchange-like rating widget.
If you are having a WordPress website, there are built-in rating plugins available. Wp-PostRatings is a popular plugin to implement rating.
Advantages of creating a custom star rating script
With a custom star rating, we can simplify the code logic instead of stuffing a lot.
And thereby, it will make it easy at the time of enhancement or maintenance phase.
It rectifies your overload with a feature-packed built-in. Also, it reduces your effort on managing a thousand lines of code for this simple UI feature.
Various types of rating options
Websites use a different type of rating options to get user’s reviews. The following list shows some of the types.
- Single or multiple star rating
- Facebook-like emoji rating
- Simple up-down voting.
- Like-unlike rating
- Bar rating
The types are veries in user’s mindset while rating. For example, the like-unlike and up-down rating expects binary options 0 or 1 from the user. But with the bar rating, it can have a range of points out of some limit.
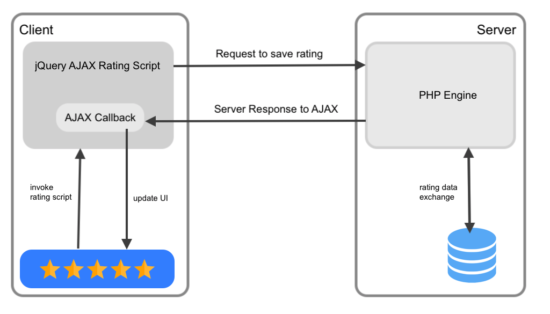
Star rating example with AJAX
I have created an AJAX-based star rating example code with PHP and jQuery.
This code will show a list of courses with an option to rate each course. The courses are from the database.
The rating element in the UI is configurable. I provided three UI alternatives for the rating section. Star, favorite and emoji ratings are there to collect users’ reviews.
While adding the rating, the code sends it to the PHP via AJAX. Then, it saves the ratings in the MySQL database.
Once rated, the user cannot rerate a course again to avoid duplicate ratings.
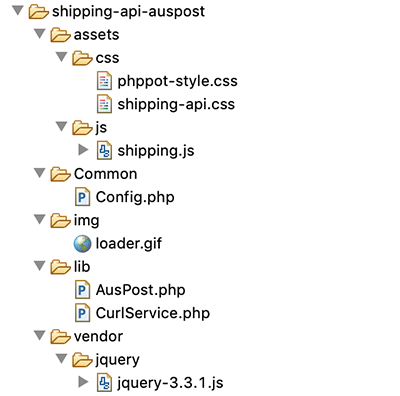
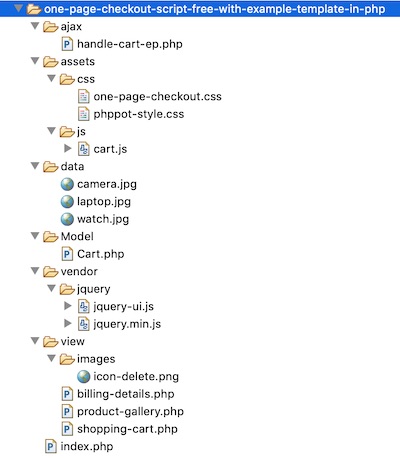
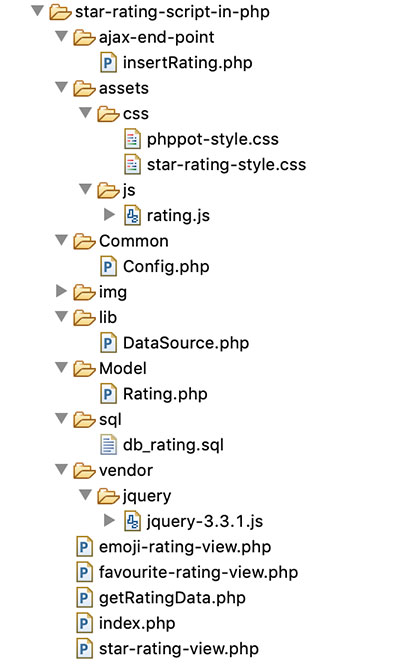
The following figure shows the file strucuture of the example code.
The rating example database
This section shows the structure and the SQL of the database used in this example.
I have created two tables tbl_courses and tbl_course_rating. The tbl_cources database table contains courses on which the user will add ratings.
The tbl_cource_rating table has the mapping with the tbl_cource database. It has a unique rating without duplicates.
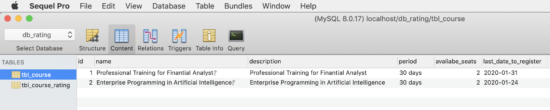
The below script shows the CREATE statement and the data dump for these two tables. By importing this script, you can setup this example in the local environment.
sql/db_rating.sql
--
-- Database: `db_rating`
-- -- -------------------------------------------------------- --
-- Table structure for table `tbl_course`
-- CREATE TABLE `tbl_course` ( `id` int(11) NOT NULL, `name` varchar(255) NOT NULL, `description` varchar(255) NOT NULL, `period` varchar(255) NOT NULL, `availabe_seats` int(11) NOT NULL, `last_date_to_register` date NOT NULL
) ENGINE=InnoDB DEFAULT CHARSET=latin1; --
-- Dumping data for table `tbl_course`
-- INSERT INTO `tbl_course` (`id`, `name`, `description`, `period`, `availabe_seats`, `last_date_to_register`) VALUES
(1, 'Professional Training for Finantial Analyst\r\n', 'Professional Training for Finantial Analyst', '30 days', 2, '2020-01-31'),
(2, 'Enterprise Programming in Artificial Intelligence\r\n', 'Enterprise Programming in Artificial Intelligence', '30 days', 2, '2020-01-24'); -- -------------------------------------------------------- --
-- Table structure for table `tbl_course_rating`
-- CREATE TABLE `tbl_course_rating` ( `id` int(11) NOT NULL, `course_id` int(11) NOT NULL, `member_id` int(11) NOT NULL, `rating` int(11) NOT NULL
) ENGINE=InnoDB DEFAULT CHARSET=latin1; --
-- Indexes for dumped tables
-- --
-- Indexes for table `tbl_course`
--
ALTER TABLE `tbl_course` ADD PRIMARY KEY (`id`); --
-- Indexes for table `tbl_course_rating`
--
ALTER TABLE `tbl_course_rating` ADD PRIMARY KEY (`id`); --
-- AUTO_INCREMENT for dumped tables
-- --
-- AUTO_INCREMENT for table `tbl_course`
--
ALTER TABLE `tbl_course` MODIFY `id` int(11) NOT NULL AUTO_INCREMENT, AUTO_INCREMENT=3; --
-- AUTO_INCREMENT for table `tbl_course_rating`
--
ALTER TABLE `tbl_course_rating` MODIFY `id` int(11) NOT NULL AUTO_INCREMENT, AUTO_INCREMENT=95;
COMMIT;
UI design to render star rating option
In a landing page, it shows the list of courses from the database. The HTML code for this page is below.
It loads the rating element based on the PHP constant defined in a common configuration file.
The rating element will show clickable 5-stars or favorite-icons or emoji icons.
On clicking the rating element, it invokes a jQuery script to send AJAX requests to save ratings.
index.php
<!DOCTYPE html>
<html>
<head>
<meta name="viewport" content="width=device-width, initial-scale=1">
<title>Star Rating Script in PHP</title>
<link href="./assets/css/phppot-style.css" type="text/css" rel="stylesheet" />
<link href="./assets/css/star-rating-style.css" type="text/css" rel="stylesheet" />
<script src="./vendor/jquery/jquery-3.3.1.js" type="text/javascript"></script>
</head> <body> <div class="phppot-container"> <div class="container"> <h2>Star Rating Script in PHP</h2> <div id="course_list"> <?php require_once "getRatingData.php"; ?> </div> </div> </div> <script src="./assets/js/rating.js"></script>
</body>
</html>
I created separate template files to have different types of rating UI. Those are star-rating-view.php, favorite-rating-view.php and emoji_rating_view.php.
The template files show the onClick event handling specification in the markup.
star-rating-view.php
<?php
for ($count = 1; $count <= 5; $count ++) { $starRatingId = $row['id'] . '_' . $count; if ($count <= $userRating) { ?>
<li value="<?php echo $count; ?>" id="<?php echo $starRatingId; ?>" class="star"><img src="./img/<?php echo $apperance; ?>-filled.png"></li>
<?php } else { ?>
<li value="' . $count; ?>" id="<?php echo $starRatingId; ?>" class="star" onclick="addRating(this,<?php echo $row['id']; ?>,<?php echo $count; ?>, 'star');" onMouseOver="mouseOverRating(<?php echo $row['id']; ?>,<?php echo $count; ?>,'<?php echo $apperance; ?>');" onMouseLeave="mouseOutRating(<?php echo $row['id']; ?>,<?php echo $userRating; ?>,'<?php echo $apperance; ?>');"><img src="./img/<?php echo $apperance; ?>-open.png"></li>
<?php }
}
?>
favourite-rating-view.php
<?php
for ($count = 1; $count <= 5; $count ++) { $starRatingId = $row['id'] . '_' . $count; if ($count == $userRating) { ?>
<li value="<?php echo $count; ?>" id="<?php echo $starRatingId; ?>" class="star"><img src="./img/<?php echo $apperance; ?>-filled.png"></li>
<?php } else { ?>
<li value="<?php $count; ?>" id="<?php echo $starRatingId; ?>" class="star" onclick="addRating(this,<?php echo $row['id']; ?>,<?php echo $count; ?>);" onMouseOver="mouseOverRating(<?php echo $row['id']; ?>,<?php echo $count; ?>,'<?php echo $apperance; ?>');" onMouseLeave="mouseOutRating(<?php echo $row['id']; ?>,<?php echo $userRating; ?>,'<?php echo $apperance; ?>');"><img src="./img/<?php echo $apperance; ?>-open.png"></li>
<?php }
}
?>
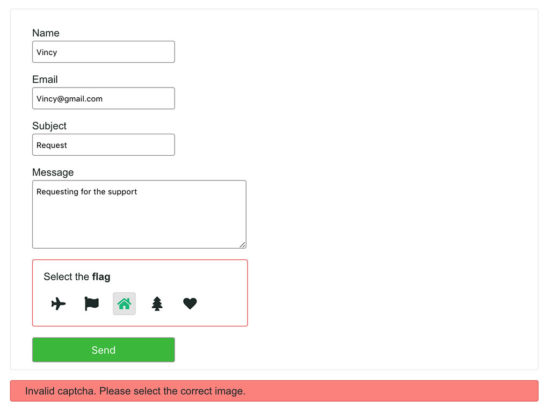
In the emoji rating template, it shows a range of five emotion icons from very-sad to very-happy.
If you are providing support on the user’s queries, you can use the emoji rating. Embedding the emoji rating will give the customer’s emotional feel on your support.
emoji-rating-view.php
<?php
for ($count = 1; $count <= 5; $count ++) { $starRatingId = $row['id'] . '_' . $count; if ($count == $userRating) { ?> <li value="<?php echo $count; ?>" id="<?php echo $starRatingId; ?>" class="star"><img src="./img/<?php echo $apperance . $count; ?>-filled.png"></li>
<?php } else {
?> <li value="<?php $count; ?>" id="<?php echo $starRatingId; ?>" class="star" onclick="addRating(this,<?php echo $row['id']; ?>,<?php echo $count; ?>);" onMouseOver="mouseOverRating(<?php echo $row['id']; ?>,<?php echo $count; ?>,'<?php echo $apperance; ?>');" onMouseLeave="mouseOutRating(<?php echo $row['id']; ?>,<?php echo $userRating; ?>,'<?php echo $apperance; ?>');"><img src="./img/<?php echo $apperance . $count; ?>-open.png"></li>
<?php } }
?>
CSS Styles created for the star rating UI
assets/css/star-rating-style.php
ul { margin: 0px; padding: 10px 0px 0px 0px; display: inline-flex;
} li.star { list-style: none; display: inline-block; margin-right: 5px; cursor: pointer; color: #9E9E9E;
} .row-title { font-size: 20px; color: #232323;
} .review-note { font-size: 12px; color: #999; font-style: italic;
} .row-item { margin-bottom: 20px; border-bottom: #F0F0F0 1px solid;
} p.text-address { font-size: 12px;
} img { height: 20px; width: 20px;
} .course-detail { font-size: 1em; margin-right: 20px;
} .loader-icon { display: none;
}
.response { display: inline-block; vertical-align: super; margin-left: 10px; color: #FF0000;
}
jQuery functions to handle user rating action
This file contains jQuery functions to prepare AJAX requests to save user ratings.
It also handles the mouse hover events to highlight the rating element. The mouseOverRating() function highlights the star or other rating elements on hovering.
Similarly, mouseOutRating() resets the rating UI back to its original form on mouse out.
The AJAX code in the addRating() prepares the request with PHP endpoint URL and data params.
It receives the server response in the AJAX success callback at which it updates the UI accordingly.
assets/js/rating.js
function mouseOverRating(courseId, rating, appearance) { if (appearance == "star") { for (var i = 1; i <= rating; i++) { $('#' + courseId + "_" + i + ' img').attr('src', "./img/" + appearance + "-filled.png"); } } else { ratingIconPrefix = "./img/" + appearance; for (var i = 1; i <= rating; i++) { if (appearance == "emoji") { ratingIconPrefix = "./img/" + appearance + "1"; } if (i == rating) { $('#' + courseId + "_" + i + ' img').attr('src', ratingIconPrefix + "-filled.png"); } } } } function mouseOutRating(courseId, userRating, appearance) { var ratingId; if (appearance == "star") { if (userRating != 0) { for (var i = 1; i <= userRating; i++) { $('#' + courseId + "_" + i + ' img').attr('src', "./img/" + appearance + "-filled.png"); } } if (userRating <= 5) { for (var i = (userRating + 1); i <= 5; i++) { $('#' + courseId + "_" + i + ' img').attr('src', "./img/" + appearance + "-open.png"); } } $(".selected img").attr('src', "./img/" + appearance + "-filled.png"); } else { ratingIconPrefix = "./img/" + appearance; if (userRating <= 5) { for (var i = 1; i <= 5; i++) { if (appearance == "emoji") { ratingIconPrefix = "./img/" + appearance + i; } if (userRating == i) { $('#' + courseId + "_" + i + ' img').attr('src', ratingIconPrefix + "-filled.png"); } else { $('#' + courseId + "_" + i + ' img').attr('src', ratingIconPrefix + "-open.png"); } } } var selectedImageSource = $(".selected img").attr('src'); if (selectedImageSource) { selectedImageSource = selectedImageSource.replace('open', "filled"); $(".selected img").attr('src', selectedImageSource); } } } function addRating(currentElement, courseId, ratingValue, appearance) { var loaderIcon = $(currentElement).closest(".row-item"); $.ajax({ url : "ajax-end-point/insertRating.php", data : "index=" + ratingValue + "&course_id=" + courseId, type : "POST", beforeSend : function() { $(loaderIcon).find("#loader-icon").show(); }, success : function(data) { loaderIcon = $(currentElement).closest(".row-item"); $(loaderIcon).find("#loader-icon").hide(); if (data != "") { $('#response-' + courseId).text(data); return false; } if (appearance == 'star') { $('#list-' + courseId + ' li').each( function(index) { $(this).addClass('selected'); if (index == $('#list-' + courseId + ' li').index( currentElement)) { return false; } }); } else { $(currentElement).addClass('selected'); } } }); }
Storing user rating to MySQL database from PHP
When the AJAX script called, it prepares a request to the PHP. In PHP, it receives the chosen rating post data and stores it in the rating database.
Though the UI displays different elements, the rating value ranges from 1 to 5. In the database, it has the mapping between the rating value, course id and member id.
The below configuration is for setting the rating element appearance. The possible values are there with a comment statement.
Common/Config.php
<?php
namespace Phppot; class Config
{ // Possible values: star | favourite | emoji const RATING_APPEARANCE = "favourite";
}
This is a PHP endpoint called via AJAX. It inserts the user rating to the database.
Before insert, it checks if the user added a rating already for that particular course. If so, then the code will not allow the user to rate again.
ajax-end-point/insertRating.php
<?php
namespace Phppot; use Phppot\Rating;
require_once __DIR__ . "./../Model/Rating.php";
$rating = new Rating();
// Here the user id is harcoded.
// You can integrate your authentication code here to get the logged in user id
$userId = 5; if (isset($_POST["index"], $_POST["course_id"])) { $courseId = $_POST["course_id"]; $ratingIndex = $_POST["index"]; $rowCount = $rating->isUserRatingExist($userId, $courseId); if ($rowCount == 0) { $insertId = $rating->addRating($userId, $courseId, $ratingIndex); if (empty($insertId)) { echo "Problem in adding ratings."; } } else { echo "You have added rating already."; }
}
This code reads courses and corresponding rating from the database. It prepares HTML markup embedded with dynamic data.
This file displays the courses list with the rating option in a landing page.
getRatingData.php
<?php
namespace Phppot; use Phppot\Rating;
require_once "./Common/Config.php";
$config = new Config();
require_once "./Model/Rating.php";
$rating = new Rating();
// Here the user id is harcoded.
// You can integrate your authentication code here to get the logged in user id
$userId = 5; $apperance = $config::RATING_APPEARANCE; $courseResult = $rating->getCourse();
if (! empty($courseResult)) { foreach ($courseResult as $row) { $userRating = $rating->getUserRating($userId, $row['id']); $totalRating = $rating->getTotalRating($row['id']); $date = date_create($row["last_date_to_register"]); ?>
<div class="row-item"> <div class="row-title"><?php echo $row['name']; ?></div> <ul class="list-inline" id="list-<?php echo $row['id']; ?>"> <?php require $apperance . "-rating-view.php"; ?> <img src="img/loader.gif" class="loader-icon" id="loader-icon"> </ul> <div class="response" id="response-<?php echo $row['id']; ?>"></div> <p class="review-note">Total Reviews: <?php echo $totalRating; ?></p> <p class="text-address"> <label class="course-detail">Period: <?php echo $row["period"]; ?></label><label class="course-detail">Available seats: <?php echo $row["availabe_seats"]; ?></label><label class="course-detail">Last Date to Register: <?php echo date_format($date, "d M Y"); ?></label> </p>
</div>
<?php }
}
?>
In the above two PHP files, I have harcoded the user id with a PHP variable $userId. You can plugin user authentication code and get the logged-in user id.
The Rating.php is a PHP model class created for performing the rating actions.
It has functions to read courses and user ratings on them. The getUserRating() and getTotalRating() functions returns data to display the rating statistics.
The isUserRatingExist() checks the uniqueness of the user rating on a particular course.
I used prepared statements with MySQLi for executing the database queries. The source contains a generic DAO class DataSource.php for executing database operations.
Model/Rating.php
<?php
namespace Phppot; use Phppot\DataSource; class Rating
{ private $ds; function __construct() { require_once __DIR__ . './../lib/DataSource.php'; $this->ds = new DataSource(); } function getCourse() { $query = "SELECT * FROM tbl_course ORDER BY id DESC"; $result = $this->ds->select($query); return $result; } function getUserRating($userId, $courseId) { $average = 0; $avgQuery = "SELECT rating FROM tbl_course_rating WHERE member_id = ? and course_id = ?"; $paramType = 'ii'; $paramValue = array( $userId, $courseId ); $result = $this->ds->select($avgQuery, $paramType, $paramValue); if ($result > 0) { foreach ($result as $row) { $average = round($row["rating"]); } // endForeach } // endIf return $average; } function getTotalRating($courseId) { $totalVotesQuery = "SELECT * FROM tbl_course_rating WHERE course_id = ?"; $paramType = 'i'; $paramValue = array( $courseId ); $result = $this->ds->getRecordCount($totalVotesQuery, $paramType, $paramValue); return $result; } function isUserRatingExist($userId, $courseId) { $checkIfExistQuery = "select * from tbl_course_rating where member_id = ? and course_id = ?"; $userId; $courseId; $paramType = 'ii'; $paramValue = array( $userId, $courseId ); $rowCount = $this->ds->getRecordCount($checkIfExistQuery, $paramType, $paramValue); return $rowCount; } function addRating($userId, $courseId, $rating) { $insertQuery = "INSERT INTO tbl_course_rating(member_id,course_id, rating) VALUES (?,?,?) "; $paramType = 'iii'; $paramValue = array( $userId, $courseId, $rating ); $insertId = $this->ds->insert($insertQuery, $paramType, $paramValue); return $insertId; }
}
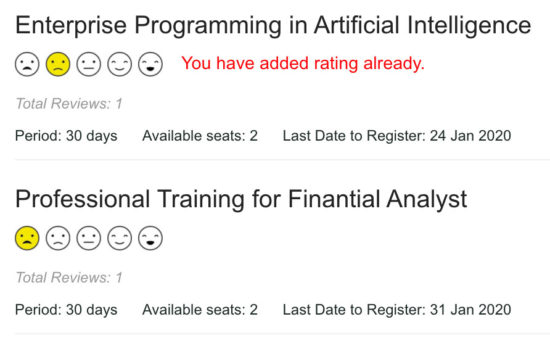
Output screenshot of different rating options with star, favorite, emoji


In the following screenshot, it displays a text in red. It is an error message to notify the user if he tries to add rating again.
Conclusion
We have seen the importance of implementing a rating script in an application. Also, we have seen the types of ratings generally used by the applications.
By supporting 3 types of rating UI components in an example script, I sure it helps you to have options. You can choose and fix one among them on a need basis.
For example, if you manage more applications, then integrate this one in all. The rating configuration allows setting based on the nature of the application.
There is no limit. We can enhance this component by adding more rating options like-unlike, up-down voting, rating with a ranger and more.
Download
Popular Articles
↑ Back to Top