
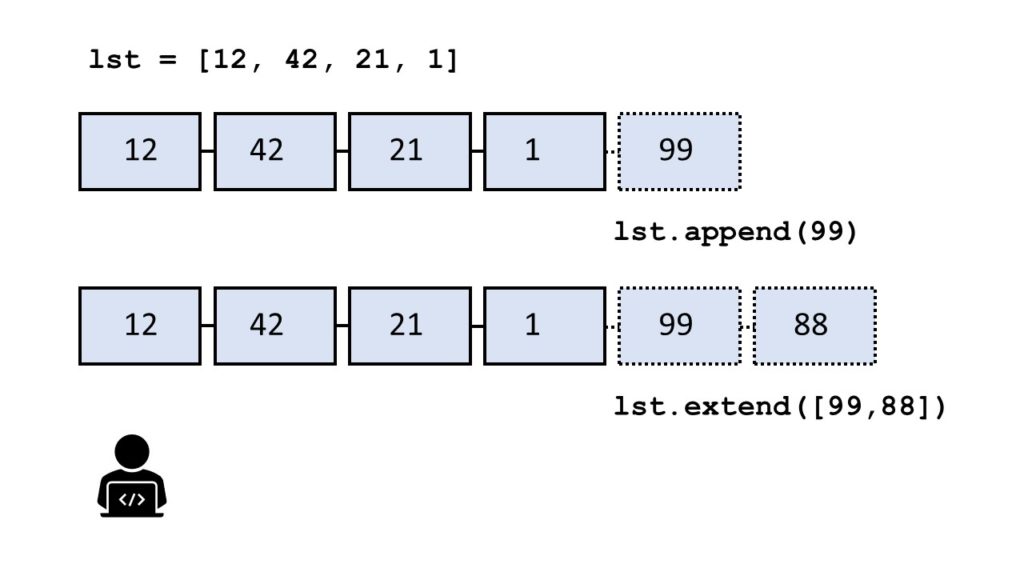
How can you not one but multiple elements to a given list? Use the extend() method in Python. This tutorial shows you everything you need to know to help you master an essential method of the most fundamental container data type in the Python programming language.
Definition and Usage
The list.extend(iter) method adds all elements in the argument iterable iter to an existing list.
Here’s a short example:
>>> lst = [1, 2, 3]
>>> lst.extend([4, 5, 6])
>>> lst
[1, 2, 3, 4, 5, 6]
In the first line of the example, you create the list lst. You then append the integers 4, 5, 6 to the end of the list using the extend() method. The result is the list with six elements [1, 2, 3, 4, 5, 6].
Try it yourself:
Syntax
You can call this method on each list object in Python. Here’s the syntax:
list.extend(iterable)
Arguments
| Argument | Description |
|---|---|
iterable |
All the elements of the iterable will be added to the end of the list—in the order of their occurrence. |
Video
Code Puzzle
Now you know the basics. Let’s deepen your understanding with a short code puzzle—can you solve it?
# Puzzle
# Author: Finxter Lee
lst1 = [1, 2, 3]
lst2 = [4, 5, 6]
lst1.append(lst2) lst3 = [1, 2, 3]
lst4 = [4, 5, 6]
lst3.extend(lst4) print(lst1 == lst3)
# What's the output of this code snippet?
You can check out the solution on the Finxter app. (I know it’s tricky!)
Examples
Let’s dive into a few more examples:
>>> lst = [1, 2, 3]
>>> lst.extend({32, 42})
>>> lst
[1, 2, 3, 32, 42]
>>> lst.extend((1, 2))
>>> lst
[1, 2, 3, 32, 42, 1, 2]
>>> lst.extend(range(10,13))
>>> lst
[1, 2, 3, 32, 42, 1, 2, 10, 11, 12]
>>> lst.extend(1)
Traceback (most recent call last): File "<pyshell#10>", line 1, in <module> lst.extend(1)
TypeError: 'int' object is not iterable
>>>
You can see that the extend() method allows for all sorts of iterables: lists, sets, tuples, and even range objects. But what it doesn’t allow is an integer argument. Why? Because the integer argument isn’t an iterable—it doesn’t make sense to “iterate over all values in an integer”.
Python List extend() At The Beginning
What if you want to use the extend() method at the beginning: you want to “add” a number of elements just before the first element of the list.
Well, you should work on your terminology for starters. But if you insist, you can use the insert() method instead.
Here’s an example:
>>> lst = [1, 2, 3]
>>> lst.insert(0, 99)
>>> lst
[99, 1, 2, 3]
The insert(i, x) method inserts an element x at position i in the list. This way, you can insert an element to each position in the list—even at the first position. Note that if you insert an element at the first position, each subsequent element will be moved by one position. In other words, element i will move to position i+1.
Python List extend() vs +
List concatenation operator +: If you use the + operator on two integers, you’ll get the sum of those integers. But if you use the + operator on two lists, you’ll get a new list that is the concatenation of those lists.
l1 = [1, 2, 3]
l2 = [4, 5, 6]
l3 = l1 + l2
print(l3)
Output:
[1, 2, 3, 4, 5, 6]
The problem with the + operator for list concatenation is that it creates a new list for each list concatenation operation. This can be very inefficient if you use the + operator multiple times in a loop.
How fast is the + operator really? Here’s a common scenario how people use it to add new elements to a list in a loop. This is very inefficient:
import time start = time.time() l = []
for i in range(100000): l = l + [i] stop = time.time() print("Elapsed time: " + str(stop - start))
Output:
Elapsed time: 14.438847541809082
The experiments were performed on my notebook with an Intel(R) Core(TM) i7-8565U 1.8GHz processor (with Turbo Boost up to 4.6 GHz) and 8 GB of RAM.
I measured the start and stop timestamps to calculate the total elapsed time for adding 100,000 elements to a list.
The result shows that it takes 14 seconds to perform this operation.
This seems slow (it is!). So let’s investigate some other methods to concatenate and their performance:
Python List extend() Performance
Here’s a similar example that shows how you can use the extend() method to concatenate two lists l1 and l2.
l1 = [1, 2, 3]
l2 = [4, 5, 6]
l1.extend(l2)
print(l1)
Output:
[1, 2, 3, 4, 5, 6]
But is it also fast? Let’s check the performance!
Performance:
I performed a similar experiment as before for the list concatenation operator +.
import time start = time.time() l = []
l.extend(range(100000)) stop = time.time() print("Elapsed time: " + str(stop - start))
Output:
Elapsed time: 0.0
I measured the start and stop timestamps to calculate the total elapsed time for adding 100,000 elements to a list.
The result shows that it takes negligible time to run the code (0.0 seconds compared to 0.006 seconds for the append() operation above).
The extend() method is the most concise and fastest way to concatenate lists.
Python List append() vs extend()
I shot a small video explaining the difference and which method is faster, too:
The method list.append(x) adds element x to the end of the list.
The method list.extend(iter) adds all elements in iter to the end of the list.
The difference between append() and extend() is that the former adds only one element and the latter adds a collection of elements to the list.
You can see this in the following example:
>>> l = []
>>> l.append(1)
>>> l.append(2)
>>> l
[1, 2]
>>> l.extend([3, 4, 5])
>>> l
[1, 2, 3, 4, 5]
In the code, you first add integer elements 1 and 2 to the list using two calls to the append() method. Then, you use the extend method to add the three elements 3, 4, and 5 in a single call of the extend() method.
Which method is faster — extend() vs append()?
To answer this question, I’ve written a short script that tests the runtime performance of creating large lists of increasing sizes using the extend() and the append() methods.
Our thesis is that the extend() method should be faster for larger list sizes because Python can append elements to a list in a batch rather than by calling the same method again and again.
I used my notebook with an Intel(R) Core(TM) i7-8565U 1.8GHz processor (with Turbo Boost up to 4.6 GHz) and 8 GB of RAM.
Then, I created 100 lists with both methods, extend() and append(), with sizes ranging from 10,000 elements to 1,000,000 elements. As elements, I simply incremented integer numbers by one starting from 0.
Here’s the code I used to measure and plot the results: which method is faster—append() or extend()?
import time def list_by_append(n): '''Creates a list & appends n elements''' lst = [] for i in range(n): lst.append(n) return lst def list_by_extend(n): '''Creates a list & extends it with n elements''' lst = [] lst.extend(range(n)) return lst # Compare runtime of both methods
list_sizes = [i * 10000 for i in range(100)]
append_runtimes = []
extend_runtimes = [] for size in list_sizes: # Get time stamps time_0 = time.time() list_by_append(size) time_1 = time.time() list_by_extend(size) time_2 = time.time() # Calculate runtimes append_runtimes.append((size, time_1 - time_0)) extend_runtimes.append((size, time_2 - time_1)) # Plot everything
import matplotlib.pyplot as plt
import numpy as np append_runtimes = np.array(append_runtimes)
extend_runtimes = np.array(extend_runtimes) print(append_runtimes)
print(extend_runtimes) plt.plot(append_runtimes[:,0], append_runtimes[:,1], label='append()')
plt.plot(extend_runtimes[:,0], extend_runtimes[:,1], label='extend()') plt.xlabel('list size')
plt.ylabel('runtime (seconds)') plt.legend()
plt.savefig('append_vs_extend.jpg')
plt.show()
The code consists of three high-level parts:
- In the first part of the code, you define two functions
list_by_append(n)andlist_by_extend(n)that take as input argument an integer list sizenand create lists of successively increasing integer elements using theappend()andextend()methods, respectively. - In the second part of the code, you compare the runtime of both functions using 100 different values for the list size
n. - In the third part of the code, you plot everything using the Python matplotlib library.
Here’s the resulting plot that compares the runtime of the two methods append() vs extend(). On the x axis, you can see the list size from 0 to 1,000,000 elements. On the y axis, you can see the runtime in seconds needed to execute the respective functions.

The resulting plot shows that both methods are extremely fast for a few tens of thousands of elements. In fact, they are so fast that the time() function of the time module cannot capture the elapsed time.
But as you increase the size of the lists to hundreds of thousands of elements, the extend() method starts to win:
For large lists with one million elements, the runtime of the extend() method is 60% faster than the runtime of the append() method.
The reason is the already mentioned batching of individual append operations.
However, the effect only plays out for very large lists. For small lists, you can choose either method. Well, for clarity of your code, it would still make sense to prefer extend() over append() if you need to add a bunch of elements rather than only a single element.
Python Append List to Another List
To append list lst_1 to another list lst_2, use the lst_2.extend(lst_1) method. Here’s an example:
>>> lst_1 = [1, 2, 3]
>>> lst_2 = [4, 5, 6]
>>> lst_2.extend(lst_1)
>>> lst_2
[4, 5, 6, 1, 2, 3]
Python List extend() Returns None
The return value of the extend() method is None. The return value of the extend() method is not a list with the added elements. Assuming this is a common source of mistakes.
Here’s such an error where the coder wrongly assumed this:
>>> lst = [1, 2].extend([3, 4])
>>> lst[0]
Traceback (most recent call last): File "<pyshell#16>", line 1, in <module> lst[0]
TypeError: 'NoneType' object is not subscriptable
It doesn’t make sense to assign the result of the extend() method to another variable—because it’s always None. Instead, the extend() method changes a list object without creating (and returning) a new list.
Here’s the correct version of the same code:
>>> lst = [1, 2]
>>> lst.extend([3, 4])
>>> lst[0]
1
Now, you change the list object itself by calling the extend() method on it. You through away the None return value because it’s not needed.
Python List Concatenation
So you have two or more lists and you want to glue them together. This is called list concatenation. How can you do that?
These are six ways of concatenating lists (detailed tutorial here):
- List concatenation operator
+ - List
append()method - List
extend()method - Asterisk operator
* Itertools.chain()- List comprehension
a = [1, 2, 3]
b = [4, 5, 6] # 1. List concatenation operator +
l_1 = a + b # 2. List append() method
l_2 = [] for el in a: l_2.append(el) for el in b: l_2.append(el) # 3. List extend() method
l_3 = []
l_3.extend(a)
l_3.extend(b) # 4. Asterisk operator *
l_4 = [*a, *b] # 5. Itertools.chain()
import itertools
l_5 = list(itertools.chain(a, b)) # 6. List comprehension
l_6 = [el for lst in (a, b) for el in lst]
Output:
'''
l_1 --> [1, 2, 3, 4, 5, 6]
l_2 --> [1, 2, 3, 4, 5, 6]
l_3 --> [1, 2, 3, 4, 5, 6]
l_4 --> [1, 2, 3, 4, 5, 6]
l_5 --> [1, 2, 3, 4, 5, 6]
l_6 --> [1, 2, 3, 4, 5, 6] '''
What’s the best way to concatenate two lists?
If you’re busy, you may want to know the best answer immediately. Here it is:
To concatenate two lists l1, l2, use the l1.extend(l2) method which is the fastest and the most readable.
To concatenate more than two lists, use the unpacking (asterisk) operator [*l1, *l2, ..., *ln].
However, you should avoid using the append() method for list concatenation because it’s neither very efficient nor concise and readable.
Python List extend() Unique – Add If Not Exists
A common question is the following:
How can you add or append elements to a list, but only if they don’t already exist in the list?
When ignoring any performance issues, the answer is simple: use an if condition in combination with the membership operation element in list and only append() the element if the result is False (don’t use extend() for this fine-grained method). As an alternative, you can also use the negative membership operation element not in list and add the element if the result is True.
Example: Say, you want to add all elements between 0 and 9 to a list of three elements. But you don’t want any duplicates. Here’s how you can do this:
lst = [1, 2, 3]
for element in range(10): if element not in lst: lst.append(element)
Resulting list:
[1, 2, 3, 0, 4, 5, 6, 7, 8, 9]
You add all elements between 0 and 9 to the list but only if they aren’t already present. Thus, the resulting list doesn’t contain duplicates.
But there’s a problem: this method is highly inefficient!
In each loop iteration, the snippet element not in lst searches the whole list for the current element. For a list with n elements, this results in n comparisons, per iteration. As you have n iterations, the runtime complexity of this code snippet is quadratic in the number of elements.
Can you do better?
Sure, but you need to look beyond the list data type: Python sets are the right abstraction here. If you need to refresh your basic understanding of the set data type, check out my detailed set tutorial (with Harry Potter examples) on the Finxter blog.
Why are Python sets great for this? Because they don’t allow any duplicates per design: a set is a unique collection of unordered elements. And the runtime complexity of the membership operation is not linear in the number of elements (as it’s the case for lists) but constant!
Example: Say, you want to add all elements between 0 and 9 to a set of three elements. But you don’t want any duplicates. Here’s how you can do this with sets:
s = {1, 2, 3}
for element in range(10): s.add(element) print(s)
Resulting set:
{0, 1, 2, 3, 4, 5, 6, 7, 8, 9}
The set doesn’t allow for duplicate entries so the elements 1, 2, and 3 are not added twice to the set.
You can even make this code more concise:
s = {1, 2, 3}
s = s.union(range(10)) print(s)
Output:
{0, 1, 2, 3, 4, 5, 6, 7, 8, 9}
The union method creates a new set that consists of all elements in both operands.
Now, you may want to have a list as a result and not a set. The solution is simple: convert the resulting set to a list by using the list(set) conversion method. This has linear runtime complexity and if you call it only once, it doesn’t change the overall runtime complexity of the code snippet (it remains linear in the number of set elements).
Problem: what if you want to maintain the order information and still add all elements that are not already in the list?
The problem with the previous approach is that by converting the list to a set, the order of the list is lost. In this case, I’d advise you to do the following: use two data structures, a list and a set. You use the list to add new elements and keep the order information. You use the set to check membership (constant rather than linear runtime complexity). Here’s the code:
lst = [1, 2, 3]
s = set(lst) for element in range(10): if element not in s: s.add(element) lst.append(element) print(lst)
Resulting list:
[1, 2, 3, 0, 4, 5, 6, 7, 8, 9]
You can see that the resulting list doesn’t contain any duplicates but the order information is maintained. At the same time, the runtime complexity of the code is linear because each loop iteration can be completed in constant time.
The trade-off is that you have to maintain two data structures which results in double the memory overhead. This nicely demonstrates the common inverse relationship between memory and runtime overhead.
Python List extend() Return New List
If you use the lst.extend(iter) operation, you add the elements in iter to the existing list lst. But what if you want to create a new list where all elements were added?
The answer is simply to use the list concatenation operation lst + list(iter) which creates a new list each time it is used. The original list lst will not be affected by the list concatenation operation.
Here’s an example that shows that the extend() method only modifies an existing list:
>>> lst_1 = [1, 2, 3]
>>> lst_2 = lst_1.extend([42, 99])
>>> lst_1
[1, 2, 3, 42, 99]
And here’s the example that shows how to create a new list as you add elements 42 and 99 to a list:
>>> lst_3 = [1, 2, 3]
>>> lst_4 = lst_3 + [42, 99]
>>> lst_3
[1, 2, 3]
By using the list concatenation operation, you can create a new list rather than appending the element to an existing list.
Python List extend() Time Complexity, Memory, and Efficiency
Time Complexity: The extend() method has linear time complexity O(n) in the number of elements n to be added to the list. Adding one element to the list requires only a constant number of operations—no matter the size of the list.
Space Complexity: The extend() method has linear space complexity O(n) in the number of elements n to be added to the list. The operation itself needs only a constant number of bytes for the involved temporary variables. The memory overhead does not depend on the size of the list.
Python List extend() at Index
If you want to insert a whole list at a certain position and create a new list by doing so, I’d recommend to use Python slicing. Check out this in-depth blog tutorial that’ll show you everything you need to know about slicing.
Here’s the code that shows how to create a new list after inserting a list at a certain position:
>>> lst = [33, 44, 55]
>>> lst[:2] + [99, 42] + lst[2:]
[33, 44, 99, 42, 55]
Again, you’re using list concatenation to create a new list with element 99 inserted at position 2. Note that the slicing operations lst[:2] and lst[2:] create their own shallow copy of the list.
Python List extend() Thread Safe
Do you have a multiple threads that access your list at the same time? Then you need to be sure that the list operations (such as extend()) are actually thread safe.
In other words: can you call the extend() operation in two threads on the same list at the same time? (And can you be sure that the result is meaningful?)
The answer is yes (if you use the cPython implementation). The reason is Python’s global interpreter lock that ensures that a thread that’s currently working on it’s code will first finish its current basic Python operation as defined by the cPython implementation. Only if it terminates with this operation will the next thread be able to access the computational resource. This is ensured with a sophisticated locking scheme by the cPython implementation.
The only thing you need to know is that each basic operation in the cPython implementation is atomic. It’s executed wholly and at once before any other thread has the chance to run on the same virtual engine. Therefore, there are no race conditions. An example for such a race condition would be the following: the first thread reads a value from the list, the second threads overwrites the value, and the first thread overwrites the value again invalidating the second thread’s operation.
All cPython operations are thread-safe. But if you combine those operations into higher-level functions, those are not generally thread safe as they consist of many (possibly interleaving) operations.
Where to Go From Here?
The list.extend(iter) method adds all elements in iter to the end of the list (in the order of their appearance).
You’ve learned the ins and outs of this important Python list method.
If you keep struggling with those basic Python commands and you feel stuck in your learning progress, I’ve got something for you: Python One-Liners (Amazon Link).
In the book, I’ll give you a thorough overview of critical computer science topics such as machine learning, regular expression, data science, NumPy, and Python basics—all in a single line of Python code!
OFFICIAL BOOK DESCRIPTION: Python One-Liners will show readers how to perform useful tasks with one line of Python code. Following a brief Python refresher, the book covers essential advanced topics like slicing, list comprehension, broadcasting, lambda functions, algorithms, regular expressions, neural networks, logistic regression and more. Each of the 50 book sections introduces a problem to solve, walks the reader through the skills necessary to solve that problem, then provides a concise one-liner Python solution with a detailed explanation.


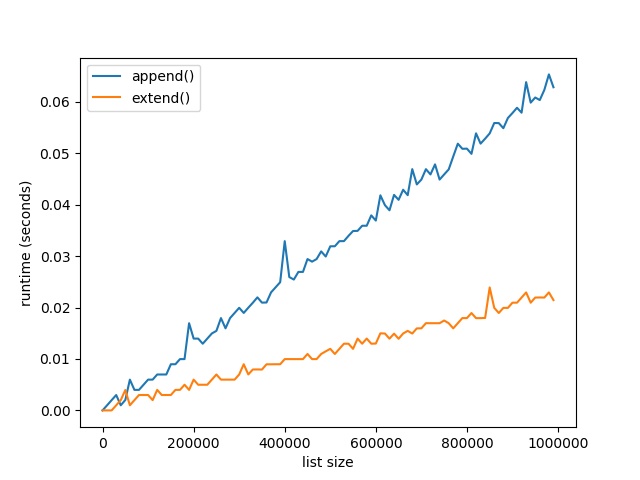

 Figure: A simple example of lookahead. The regular expression engine matches (“consumes”) the string partially. Then it checks whether the remaining pattern could be matched without actually matching it.