Welcome, Guest
You have to register before you can post on our site.

Username
  

Password


Search Forums

(Advanced Search)

Forum Statistics
» Members: 20,946
» Latest member: blackopsdlc
» Forum threads: 22,010
» Forum posts: 22,977

Full Statistics

Online Users
There are currently 1931 online users.
» 0 Member(s) | 1926 Guest(s)
Applebot, Baidu, Bing, Facebook, Google

Latest Threads
[DevBlog MS] Microsoft is...
Forum: C#, Visual Basic, & .Net Frameworks
Last Post: xSicKxBot

» Replies: 0
» Views: 13
[WoW Retail News] BlizzCo...
Forum: World of Warcraft
Last Post: xSicKxBot

» Replies: 0
» Views: 13
What is Celestial Codex i...
Forum: PC Discussion
Last Post: xSicKxBot

» Replies: 0
» Views: 13
[Ubuntu News] Fine tune y...
Forum: Linux, FreeBSD, and Unix types
Last Post: xSicKxBot

» Replies: 0
» Views: 12
[WoW Retail News] Xal'ata...
Forum: World of Warcraft
Last Post: xSicKxBot

» Replies: 0
» Views: 31
[Ubuntu News] Scaling And...
Forum: Linux, FreeBSD, and Unix types
Last Post: xSicKxBot

» Replies: 0
» Views: 22
[WoW Retail News] Comment...
Forum: World of Warcraft
Last Post: xSicKxBot

» Replies: 0
» Views: 21
How to unlock Maya Aguina...
Forum: PC Discussion
Last Post: xSicKxBot

» Replies: 0
» Views: 25
[Steam Release] The Unive...
Forum: New Game Releases
Last Post: xSicKxBot

» Replies: 0
» Views: 31
[DevBlog MS] Creating a m...
Forum: C#, Visual Basic, & .Net Frameworks
Last Post: xSicKxBot

» Replies: 0
» Views: 38

 
  News - Asus Is Reducing Its Graphics Card Prices Across The Board
Posted by: xSicKxBot - 03-29-2022, 11:37 AM - Forum: Lounge - No Replies

Asus Is Reducing Its Graphics Card Prices Across The Board

While new, high-end graphics cards have been hard to get for some time, that's been changing recently. Supply has slowly been increasing, and as high school economics teaches us, the more of a product there is, the less it costs for consumers. PC hardware manufacturer Asus is already shifting its pricing according to that rule reports PC Gamer, meaning RTX 30 Series cards may finally be affordable.

In a series of statements to PC Gamer, Asus confirmed that it "is reducing MSRP aggressively." Specifically, the company has "been dropping pricing across all SKUs" of graphics cards, meaning prices won't just be dropping for Nvidia cards. Anyone who wants to get an Asus AMD card should also find lower prices, although it's not clear when Asus' reduced MSRPs will actually have an effect on what consumers see on store shelves. Currently, an Asus KO Nvidia' GeForce RTX 3070 V2 OC is $900 on Amazon, which is inflated far past the price of an AIB model for the card. Nvidia lists Founders Edition RTX 3070 graphics cards at a $500 MSRP.

While there isn't a clear change in pricing just yet, Asus' confirmation that it is lowering the MSRPs for its graphics cards is a great sign. We could soon see other AIB graphics cards manufacturers–Zotac, EVGA, MSI, Gigabyte, etc.--reduce their prices too.

Continue Reading at GameSpot

https://www.gamespot.com/articles/asus-i...01-10abi2f

Print this item

  PC - Babylon's Fall
Posted by: xSicKxBot - 03-29-2022, 11:37 AM - Forum: New Game Releases - No Replies

Babylon's Fall


Experience acclaimed developer PlatinumGames' signature combat in BABYLON’S FALL with up to 3 other players or take on the Tower of Babel alone, in this new cooperative action RPG. After the Babylonians perished, only their great tower “The Ziggurat” remained. Now a new Empire has come to pillage its ruins and uncover its fabled treasures. Join forces with other Sentinels, unwilling subjects forcibly implanted with Gideon Coffin, relics that grant the few survivors unrivalled powers. Ascend to greatness as you climb the looming Tower of Babel and uncover its fabled treasures. Only by mastering the powers of your Gideon Coffin, will you unlock your true potential and become strong enough to survive the summit and uncover the secrets that await. Pre-order BABYLON'S FALL to obtain a unique customization for your character, The Empress' Insignia. Show off to other Sentinels that you were one of the first to obtain a Gideon Coffin and become a Sentinel.

Publisher: Square Enix

Release Date: Mar 03, 2022


https://www.metacritic.com/game/pc/babylons-fall

Print this item

  [Tut] Is There A List Of Line Styles In Matplotlib?
Posted by: xSicKxBot - 03-28-2022, 07:29 AM - Forum: Python - No Replies

Is There A List Of Line Styles In Matplotlib?

You want to plot a series of data with unique styles. You need to pick various line styles from a list but not sure how to get started. This tutorial will help you out.

Yes, there is a list of line styles in matplotlib. To get the list, import the lines from the matplotlib library.

from matplotlib import lines

Next, get the keys from the lineStyle attribute.

lines.lineStyles.keys()

You can then print the styles and choose your preferred style per plot.

print(lines.lineStyles.keys())

The result is

dict_keys(['-', '--', '-.', ':', 'None', ' ', ''])

As you will see in this tutorial, you can also generate line styles using colors and markers. What is more? Find out below.

Lab Setup To explore Line Styles In Matplotlib


Assume we want to plot the annual earnings of company X’s employees (designers, developers, and accountants) aged between 20 and 29. We store the ages in a list as follows.

ages = [20, 21, 22, 23, 24, 25, 26, 27, 28, 29]

Next, we create lists for each group of employees’ salaries.

designers = [45893, 50375, 52000, 52009, 54000, 55555, 56979, 57040, 55991, 54000]
developers = [55893, 53375, 52000, 51008, 58000, 58555, 59979, 60050, 65991, 67000]
accountants = [40000, 41500, 42000, 42508, 43001, 44555, 46979, 48050, 49991, 51000]

Now that we have some data to practice various line styles in matplotlib, let’s go ahead and manipulate the data.

Practical Ways To Use Line Styles In Matplotlib


➥Get the required functions


Install the matplotlib library using pip.

pip install matplotlib
# OR
pip3 install matplotlib

After installing Matplotlib, create a file and import the library’s functions into it. I have created one called employees.py and imported lines and pyplot as follows.

from matplotlib import lines, pyplot as plt

We will get the line styles from lines and plot the lines with pyplot. It is a convention to shorten pyplot as plt. In simple words it is an alias.

➥Plot the data


Plotting a bunch of data on a curve requires specifying the values for the x-axis and y-axis.

plt.plot(<x-axis data list>, <y-axis data list>)

We can plot our employee values as follows.

ages = [20, 21, 22, 23, 24, 25, 26, 27, 28, 29] designers = [45893, 50375, 52000, 52009, 54000, 55555, 56979, 57040, 55991, 54000]
developers = [55893, 53375, 52000, 51008, 58000, 58555, 59979, 60050, 65991, 67000]
accountants = [40000, 41500, 42000, 42508, 43001, 44555, 46979, 48050, 49991, 51000] plt.plot(ages, designers)
plt.plot(ages, developers)
plt.plot(ages, accountants) plt.show()

The plt.show() function instructs Python to reveal the graphical information cached in the memory. As soon as you run the file on the terminal, you get three solid lines of different colors.

python employees.py
List of Line Styles in Python - Figure 1

Now let us label the lines and add a title to the plots for easier identification. Insert the code before the plt.show() line.

plt.xlabel("Ages")
plt.ylabel("Annual salary in USD")
plt.title("Salaries of X employees for 20-29 ages")

Output:

List of Line Styles in Python - Figure 2

However, we cannot tell what the green, blue, and coral lines represent. So, let’s mark the lines using labels and a legend.

labels

plt.plot(ages, designers, label='designers')
plt.plot(ages, developers, label='developers')
plt.plot(ages, accountants, label='accountants')

legend represents the area that describes specific elements of the graph. In this case, we will use the legend() method to describe the labels assigned previously.

plt.legend()
plt.show()

Output:

Displaying Legends in Graph

Full code: Here’s the full code that helps to represent our data in the form of different lines.

from matplotlib import lines, pyplot as plt ages = [20, 21, 22, 23, 24, 25, 26, 27, 28, 29] designers = [45893, 50375, 52000, 52009, 54000, 55555, 56979, 57040, 55991, 54000]
developers = [55893, 53375, 52000, 51008, 58000, 58555, 59979, 60050, 65991, 67000]
accountants = [40000, 41500, 42000, 42508, 43001, 44555, 46979, 48050, 49991, 51000] plt.plot(ages, designers, label='designers')
plt.plot(ages, developers, label='developers')
plt.plot(ages, accountants, label='accountants') plt.xlabel("Ages")
plt.ylabel("Annual salary in USD")
plt.title("Salaries of X employees for 20-29 ages") plt.legend() plt.show()

Looks better, right? Yes, but we can improve the visuals by changing the line styles.

?Change The Line Styles


We assigned different labels to distinguish different data but is there a way to change the style of the line? Yes! The first step is to grab the lines with the help of the lines module. You can import lines from matplotlib as we have done above or get them from Matplotlib line style docs.

Let’s print the styles from the imported lines. After commenting out the plt.show() method, run the print line below the import statement.

print(lines.lineStyles)

We get a dictionary which represents the type of styles in which the lines can be represented as follows:

{'-': '_draw_solid', '--': '_draw_dashed', '-.': '_draw_dash_dot', ':': '_draw_dotted', 'None': '_draw_nothing', ' ': '_draw_nothing', '': '_draw_nothing'}

Let’s find the keys and store them as list_styles.

line_styles = lines.lineStyles.keys()

We get a list on running printing line_styles.

print(line_styles)
dict_keys(['-', '--', '-.', ':', 'None', ' ', ''])

Let’s use the result to change line styles for the plots.

Combining the lines.lineStyles.keys() and pyplot.linestyle helps us change the designers and developers plots as follows.

from matplotlib import pyplot as plt ages = [20, 21, 22, 23, 24, 25, 26, 27, 28, 29] designers = [45893, 50375, 52000, 52009, 54000, 55555, 56979, 57040, 55991, 54000]
developers = [55893, 53375, 52000, 51008, 58000, 58555, 59979, 60050, 65991, 67000]
accountants = [40000, 41500, 42000, 42508, 43001, 44555, 46979, 48050, 49991, 51000] plt.plot(ages, designers, label='designers', linestyle='--')
plt.plot(ages, developers, label='developers', linestyle=':')
plt.show()

Output:


Here, lines.lineStyles show the styles, while pyplot‘s linestyle attribute changes the lines graphically.

? Tidbits

  • You can also style the lines using markers, width, and colors. For example, you can mark the accountants‘ plot using o as follows.
from matplotlib import pyplot as plt ages = [20, 21, 22, 23, 24, 25, 26, 27, 28, 29]
accountants = [40000, 41500, 42000, 42508, 43001, 44555, 46979, 48050, 49991, 51000]
plt.plot(ages, accountants, label='accountants', marker='o')
plt.show()

Output:


  • You can increase the width of the designers plot from 1 to 3 as follows
from matplotlib import pyplot as plt ages = [20, 21, 22, 23, 24, 25, 26, 27, 28, 29]
designers = [45893, 50375, 52000, 52009, 54000, 55555, 56979, 57040, 55991, 54000]
plt.plot(ages, designers, label='designers', linestyle='-.', linewidth=3)
plt.show()

Output:


  • Lastly you can customize the plot colors using the color aliases, hex colors or names.
from matplotlib import pyplot as plt ages = [20, 21, 22, 23, 24, 25, 26, 27, 28, 29]
designers = [45893, 50375, 52000, 52009, 54000, 55555, 56979, 57040, 55991, 54000]
developers = [55893, 53375, 52000, 51008, 58000, 58555, 59979, 60050, 65991, 67000]
accountants = [40000, 41500, 42000, 42508, 43001, 44555, 46979, 48050, 49991, 51000]
plt.plot(ages, designers, label='designers', linestyle='-.', color='b')
plt.plot(ages, developers, label='developers', linestyle=':', linewidth=3, color='#6dee6d')
plt.plot(ages, accountants, label='accountants', marker='o', color='gold')
plt.show()

Output:


Conclusion


You can get a list of styles in matplotlib using the lines attribute. After storing the target styles, you can change the lines’ appearance using pyplot‘s built-in linestyle attribute. Additionally, as illustrated in this tutorial, you can differentiate lines using markers, width, and colors.

Recommended: Matplotlib — A Simple Guide with Videos

Please stay tuned and subscribe for more interesting discussions in the future. Happy learning!


https://www.sickgaming.net/blog/2022/03/...atplotlib/

Print this item

  [Oracle Blog] Oracle JDK Releases for Java 11 and Later
Posted by: xSicKxBot - 03-28-2022, 07:29 AM - Forum: Java Language, JVM, and the JRE - No Replies

Oracle JDK Releases for Java 11 and Later

Exec Summary Starting with Java 11, Oracle will provide JDK releases under the open source GNU General Public License v2, with the Classpath Exception (GPLv2+CPE), and under a commercial license for those using the Oracle JDK as part of an Oracle product or service, or who do not wish to use open so...

https://blogs.oracle.com/java/post/oracl...-and-later

Print this item

  [Tut] PHP session time set unset and check existence
Posted by: xSicKxBot - 03-28-2022, 07:29 AM - Forum: PHP Development - No Replies

PHP session time set unset and check existence

by Vincy. Last modified on November 21st, 2021.

PHP session is one of the methods for keeping data persistency on the server side.

PHP sessions have a deadline time limit for keeping data persistent. PHP configuration file includes directives to have this specification.

We can also create custom code to change the default PHP session deadline.

This article contains sections that describe the PHP sessions, their time-limit configurations. It provides examples for setting session limits and tracking existence.

The below example gives a quick solution to set PHP session time. It contains only two steps to set and track the session expiration status.

Quick example


1. Create a file set-session.php and set value and lifetime.


<?php
session_start();
//Set PHP session with value, time
$currentTime = time();
$_SESSION['color'] = array( "value" => "blue", "time" => $currentTime, "life_time" => 5
);
?>

2. Create a file check-session.php to compute if the session existence.


<?php
session_start();
if (isset($_SESSION['color'])) { $sessionSetTime = $_SESSION['color']['time']; $sessionLifeTime = $_SESSION['color']['life_time']; if ((time() - $sessionSetTime) > $sessionLifeTime) { unset($_SESSION['color']); print 'Session expired'; }
}
?>

About PHP session


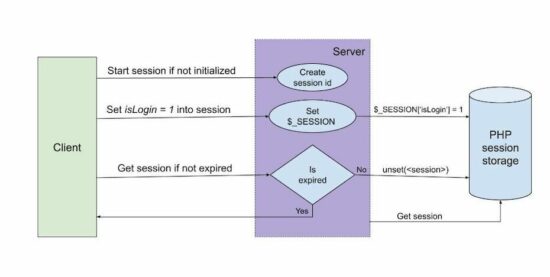
We have already seen PHP sessions and cookies in a previous article. PHP sessions are for managing application data, state persistent during the working flow.

There are a lot of uses of sessions in an application. The below list shows some of the states or data managed by the use of sessions.

We have seen how to create a login script using the PHP session. In that, the session lifetime tracking can be used to log out after few minutes of inactivity.

php session

PHP session lifetime settings


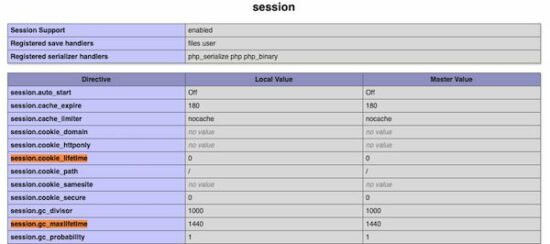
This section describes the configuration directives used to set PHP session time. The below table shows two PHP.ini settings related to the session.

PHP directive Description
session.gc_maxlifetime It sets the max lifetime after which the session will be elapsed and collected as garbage.
session.cookie_lifetime It sets the time limit for the session cookie in seconds. Default is 0 which means to be persistent until the client quits. Note: PHP session_set_cookie_params() sets all the session cookie parameters in runtime.

The below PHP info highlights the session configuration settings. Refer to more runtime session configuration directives in the linked official site.

php session settings

Example: Working with PHP session time – Set expiration and limit lifetime


This PHP session time handling example is the enhanced version of the above quick example.

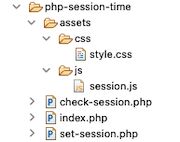
It creates three session variables to set color, shape and size. It sets the lifetime for each PHP session variable while setting values.

The PHP code checks if the session exists. Once the time is reached, it unset that particular session variable and destroys it.

php session time files

Landing page to set session


The landing page of this example shows a control to set the PHP session time. Once started, the session expiration status is checked at a periodic interval. This page includes the AJAX script to raise the call to PHP to check the session.

If the PHP session time is over, then this page will display a notice to the user. After all the sessions are expired, then the page will clear the notification and ask to reset the session.

index.php


<html>
<head>
<link href="./assets/css/style.css" rel="stylesheet" type="text/css" />
</head>
<body> <div class="session" data-status='<?php if(!empty($_GET["status"])) { echo $_GET["status"]; } ?>'> <div id="box"> <h1 align="center">Set PHP session time</h1> <div class="text"> <a href="set-session.php" class="btn">Reset Session</a> </div> <div id="status"></div> </div> <div id="message"></div> </div> <script src="https://code.jquery.com/jquery-3.6.0.min.js"></script> <script src="./assets/js/session.js"></script>
</body>
</html>

Check PHP session time via JavaScript AJAX


This script sets an interval to call the AJAX script to check the PHP session time. After getting the response, this AJAX success block shows the expired PHP sessions.

It checks the PHP session time every 5 seconds via AJAX. This script uses JavaScript setInterval() to invoke the checkSession() method.

session.js


if($('.session').data('status') != "") { var interval; interval=setInterval(checkSession, 5000); $("#status").text("Checking session expiration status...");
}
function checkSession(){ $.ajax({ url:"check-session.php", method:"POST", success:function(response){ if(response!=""){ if(response == -1){ $("#status").hide(); clearInterval(interval); window.location.href='index.php'; } else{ $("#message").append(response); } } } });
};

Set unset PHP session time


In this section, it shows two PHP files to set and unset the PHP session time.

The set-session.php is called on clicking the UI control on the landing page. It sets the color, shape and size in the PHP session.

Each session array is a multi-dimensional associative array. It has the details of PHP session set time, lifetime and value.

The session set-time and lifetime are used to calculate the session expiry.

set-session.php


<?php
if (! isset($_SESSION)) { session_start();
}
$currentTime = time();
$_SESSION['color'] = array( "value" => "blue", "time" => $currentTime, "lifetime" => 3
);
$_SESSION['shape'] = array( "value" => "circle", "time" => $currentTime, "lifetime" => 5
);
$_SESSION['size'] = array( "value" => "big", "time" => $currentTime, "lifetime" => 10
);
header("Location: index.php?status=starts");
exit();
?>

This code returns the response text once the session is expired.

It validates the session expiry by comparing the remaining time and the PHP session lifetime.

Once all three sessions are expired, then this code returns -1. On receiving -1, the AJAX callback stops tracking by clearing the interval.

check-session.php


<?php
if (! isset($_SESSION)) { session_start();
} if (! isset($_SESSION['color']) && (! isset($_SESSION['shape'])) && (! isset($_SESSION['size']))) { print - 1;
}
if (isset($_SESSION['color'])) { $sessionTimeColor = $_SESSION['color']['time']; $sessionLifeTimeColor = $_SESSION['color']['lifetime']; if ((time() - $sessionTimeColor) > $sessionLifeTimeColor) { unset($_SESSION['color']); print '<div class="response-text"><span>Color Session Expired</span></div>'; } } if (isset($_SESSION['shape'])) { $sessionTimeShape = $_SESSION['shape']['time']; $sessionLifeTimeShape = $_SESSION['shape']['lifetime']; if ((time() - $sessionTimeShape) > $sessionLifeTimeShape) { unset($_SESSION['shape']); print '<div class="response-text"><span>Shape Session Expired</span></div>'; } } if (isset($_SESSION['size'])) { $sessionTimeSize = $_SESSION['size']['time']; $sessionLifeTimeSize = $_SESSION['size']['lifetime']; if ((time() - $sessionTimeSize) > $sessionLifeTimeSize) { unset($_SESSION['size']); print '<div class="response-text"><span>Size Session Expired</span></div>'; }
}
exit();
?>

Conclusion


Thus we have learned how to set PHP session time via programming. This article described the PHP configurations to set max session lifetime.

I hope this example helped to create your own code to manage PHP sessions and time.
Download

↑ Back to Top


https://www.sickgaming.net/blog/2021/10/...existence/

Print this item

  (Indie Deal) Force Energy Bundle, Metal Gear, HITMAN, Handy Sales
Posted by: xSicKxBot - 03-28-2022, 07:29 AM - Forum: Deals or Specials - No Replies

Force Energy Bundle, Metal Gear, HITMAN, Handy Sales

Force Energy Bundle | 6 Steam Games | 94% OFF
[www.indiegala.com]
Get energized, accelerate and move forward through the day with force, enthusiasm and a powerful indie selection of 6 video games on Steam.

Konami, Handy, PQube, IO Interactive Games Sales
[www.indiegala.com]
[www.indiegala.com]
[www.indiegala.com]
[www.indiegala.com]

Stay Inside, Stay Safe and Enjoy Good Games.
Check out IndieGala on Twitter, YouTube & Facebook[www.facebook.com]


https://steamcommunity.com/groups/indieg...0012079770

Print this item

  (Free Game Key) In Sound Mind - Free Epic Game
Posted by: xSicKxBot - 03-28-2022, 07:29 AM - Forum: Deals or Specials - No Replies

In Sound Mind - Free Epic Game

Visit the store page and add the game to your account:

In Sound Mind[store.epicgames.com]

The game is free to keep until Mar 24th 2022 - 15:00 UTC.

Next week's freebie:
DEMON'S TILT

We are welcoming everyone to join our discord[discord.gg]. We are more active there on finding giveaways, small or large, and there are daily raffles you can participate.

?GrabFreeGames.com ?Twitter ?Steam Curator ?Facebook[fb.me]?Discord[discord.gg]
❤️Support us: ✔️HumbleBundle Partner[www.humblebundle.com] Epic Tag: GrabFreeGames


https://steamcommunity.com/groups/GrabFr...9634087998

Print this item

  PC - Ghostrunner: Project_Hel
Posted by: xSicKxBot - 03-28-2022, 07:29 AM - Forum: New Game Releases - No Replies

Ghostrunner: Project_Hel


Take control of Hel, one of the original games’ bosses, as she descends Dharma Tower on a bloody quest of her own. Designed to appeal to new players and veterans, she’s more combat-oriented and can survive an additional attack compared to the Ghostrunner. Run on walls, soar through neon cityscapes, and slice through six levels while mastering Hel’s powers through her own ability progression system. Battle new enemies and bosses to the beat of six fresh tracks courtesy of electronic musician Daniel Deluxe.

Publisher: All in! Games

Release Date: Mar 03, 2022


https://www.metacritic.com/game/pc/ghost...roject_hel

Print this item

  Using Kubernetes ConfigMaps to define your Quarkus application’s properties
Posted by: xSicKxBot - 03-27-2022, 04:07 AM - Forum: Java Language, JVM, and the JRE - No Replies

Using Kubernetes ConfigMaps to define your Quarkus application’s properties

So, you wrote your Quarkus application, and now you want to deploy it to a Kubernetes cluster. Good news: Deploying a Quarkus application to a Kubernetes cluster is easy. Before you do this, though, you need to straighten out your application’s properties. After all, your app probably has to connect with a database, call other services, and so on. These settings are already defined in your application.properties file, but the values match the ones for your local environment and won’t work once deployed onto your cluster.

So, how do you easily solve this problem? Let’s walk through an example.

Create the example Quarkus application


Instead of using a complex example, let’s take a simple use case that explains the concept well. Start by creating a new Quarkus app:

$ mvn io.quarkus:quarkus-maven-plugin:1.1.1.Final:create

You can keep all of the default values while creating the new application. In this example, the application is named hello-app. Now, open the HelloResource.java file and refactor it to look like this:

@Path("/hello") public class HelloResource { @ConfigProperty(name = "greeting.message") String message; @GET @Produces(MediaType.TEXT_PLAIN) public String hello() { return "hello " + message; } } 

In your application.properties file, now add greeting.message=localhost. The @ConfigProperty annotation is not in the scope of this article, but here we can see how easy it is to inject properties inside our code using this annotation.

Now, let’s start our application to see if it works as expected:

$ mvn compile quarkus:dev

Browse to http://localhost:8080/hello, which should output hello localhost. That’s it for the Quarkus app. It’s ready to go.

Deploy the application to the Kubernetes cluster


The idea here is to deploy this application to our Kubernetes cluster and replace the value of our greeting property with one that will work on the cluster. It is important to know here that all of the properties from application.properties are exposed, and thus can be overridden with environment variables. The convention is to convert the name of the property to uppercase and replace every dot (.) with an underscore (_). So, for instance, our greeting.message will become GREETING_MESSAGE.

At this point, we are almost ready to deploy our app to Kubernetes, but we need to do three more things:

  1. Create a Docker image of your application and push it to a repository that your cluster can access.
  2. Define a ConfgMap resource.
  3. Generate the Kubernetes resources for our application.

To create the Docker image, simply execute this command:

$ docker build -f src/main/docker/Dockerfile.jvm -t quarkus/hello-app .

Be sure to set the right Docker username and to also push to an image registry, like docker-hub or quay. If you are not able to push an image, you can use sebi2706/hello-app:latest.

Next, create the file config-hello.yml:

apiVersion: v1 data: greeting: "Kubernetes" kind: ConfigMap metadata: name: hello-config 

Make sure that you are connected to a cluster and apply this file:

$ kubectl apply -f config-hello.yml

Quarkus comes with a useful extension, quarkus-kubernetes, that generates the Kubernetes resources for you. You can even tweak the generated resources by providing extra properties—for more details, check out this guide.

After installing the extension, add these properties to our application.properties file so it generates extra configuration arguments for our containers specification:

kubernetes.group=yourDockerUsername kubernetes.env-vars[0].name=GREETING_MESSAGE kubernetes.env-vars[0].value=greeting kubernetes.env-vars[0].configmap=hello-config

Run mvn package and view the generated resources in target/kubernetes. The interesting part is in spec.containers.env:

- name: "GREETING_MESSAGE"   valueFrom:   configMapKeyRef:     key: "greeting"    name: "hello-config"

Here, we see how to pass an environment variable to our container with a value coming from a ConfigMap. Now, simply apply the resources:

$ kubectl apply -f target/kubernetes/kubernetes.yml

Expose your service:

kubectl expose deployment hello --type=NodePort

Then, browse to the public URL or do a curl. For instance, with Minikube:

$ curl $(minikube service hello-app --url)/hello

This command should output: hello Kubernetes.

Conclusion


Now you know how to use a ConfigMap in combination with environment variables and your Quarkus’s application.properties. As we said in the introduction, this technique is particularly useful when defining a DB connection’s URL (like QUARKUS_DATASOURCE_URL) or when using the quarkus-rest-client (ORG_SEBI_OTHERSERVICE_MP_REST_URL).

Share

The post Using Kubernetes ConfigMaps to define your Quarkus application’s properties appeared first on Red Hat Developer.


https://www.sickgaming.net/blog/2020/01/...roperties/

Print this item

  [Oracle Blog] Fast Forward To 11
Posted by: xSicKxBot - 03-27-2022, 04:07 AM - Forum: Java Language, JVM, and the JRE - No Replies

Fast Forward To 11

With Java 11 around the corner, and release candidate builds available at http://jdk.java.net/11 , it’s time to look back at the effect the new release cadence has had on adoption of new releases. Changing the Pace of Change New Java releases used to take quite a while to get adopted by developers. ...

https://blogs.oracle.com/java/post/fast-forward-to-11

Print this item