Set out on ESO's year-long adventure, the Legacy of the Bretons, and uncover an epic storytelling experience told across three DLCs and the High Isle Chapter. A tale of chivalric honor and political upheaval set within the stunning Systres Archipelago awaits.
Create your ultimate RPG character, play solo or adventure with friends, and determine your fate in an ever-expanding world. With no level restrictions, go anywhere at any time in a truly open world. In The Elder Scrolls Online, the choice is yours.
Begin your adventure where you like: emerge from Coldharbour in the Base Game, battle Dragons in the Elsweyr Chapter, or face the Prince of Destruction, Mehrunes Dagon, in Blackwood. All content is accessible for new players, and you can switch adventures whenever you like.
Java is #1 choice for cloud according to VDC Research
VDC Research report on the state of Java globally produces interesting findings every year. This post highlights a few of the noteworthy discoveries based on research conducted by VDC.
Posted by: xSicKxBot - 06-17-2022, 01:53 AM - Forum: Python
- No Replies
Scrape a Bookstore in 5 Steps Python [Learn Project]
5/5 – (1 vote)
Story: This series of articles assume you work in the IT Department of Mason Books. The Owner asks you to scrape the website of a competitor. He would like this information to gain insight into his pricing structure.
Note: Before continuing, we recommend you possess, at minimum, a basic knowledge of HTML and CSS and have reviewed our articles on How to Scrape HTML tables.
There are, in total, 1,000 books listed on the website.
Each web page shows 20 Books.
Each price is in £ (in this instance, the UK pound).
Each Book displays minimum details.
To view complete details for a book, click on the image or the Book Title hyperlink. This hyperlink forwards to a page containing additional book details for the selected item (see below).
The total number of website pages displays in the footer (Page 1 of 50).
Step 1: Install and Import Libraries for Project
Before any data manipulation can occur, three (3) new libraries will require installation.
The Pandas library enables access to/from a DataFrame.
The Requestslibrary provides access to the HTTP requests in Python.
The Beautiful Soup library enables data extraction from HTML and XML files.
To install these libraries, navigate to an IDE terminal. At the command prompt ($), execute the code below. For the terminal used in this example, the command prompt is a dollar sign ($). Your terminal prompt may be different.
$ pip install pandas
Hit the <Enter> key on the keyboard to start the installation process.
$ pip install requests
Hit the <Enter> key on the keyboard to start the installation process.
$ pip install beautifulsoup4
Hit the <Enter> key on the keyboard to start the installation process.
If the installations were successful, a message displays in the terminal indicating the same.
Feel free to view the PyCharm installation guides for the required libraries.
Add the following code to the top of each code snippet. This snippet will allow the code in this article to run error-free.
import pandas as pd

import requests

from bs4 import BeautifulSoup

import time

import urllib.request

from csv import reader, writer
The time library is built-in with Python and does not require installation. This library contains time.sleep() and is used to set a delay between page scrapes.
The urllib library is built-in with Python and does not require installation. This library contains urllib.request and is used to save images.
The csv library is built-in Pandas and does not require additional installation. This library contains reader and writer methods to save data to a CSV file.
Step 2: Understand Basics and Scrape Your First Results
Posted by: xSicKxBot - 06-17-2022, 01:53 AM - Forum: Python
- No Replies
Ten Easy Steps to Your First Python Flask App
Rate this post
Project Description
Story: Assume you work in the IT Department of Right-On Realtors.
Your boss asks you to create a simple website the Realtors can query to view current Home Sales.
He would like this website created using the Flask framework in Python.
In this article, we’ll create a simple website app to query real estate stats from a CSV on the server that looks like this:
What is Flask?
Flask is a web app framework created with ease of use in mind. Without much training, you can easily create a simple web application. Flask works with Bootstrap, HTML, CSS, and Jinja (to name a few) to create a website.
Step 1: Set Up a Virtual Environment
All your projects share the same globally installed libraries. But some of them may require different versions or incompatible libraries.
This is where virtual environments come into play.
A virtual environment serves as a “sandbox” for your Python program. You can install any external library or version there without having any global impact.
The virtual environments are isolated, independent, and separate.
Click here for instructions on setting up and activating a virtual environment.
Step 2: Install Libraries
Before our code executes successfully, two (2) new libraries will require installation.
The Pandas library enables access to/from a DataFrame.
The Flasklibrary allows us to create and render our website.
To install these libraries, navigate to an IDE terminal. At the command prompt ($), execute the code below. For the terminal used in this example, the command prompt is a dollar sign ($). Your terminal prompt may be different.
$ pip install pandas
Hit the <Enter> key on the keyboard to start the installation process.
$ pip install flask
Hit the <Enter> key on the keyboard to start the installation process.
Step 3: Set up the Folder Structure
We want to have the following folder structure.
Then set up the app.py file that is responsible for most of the Flask action and create a basic template file from which all of the HTML files served by your app will inherit.
Follow our in-depth guide on how to set this up here:
Tutorial: Learn more about how to accomplish this step.
Step 4: Routes and Dynamic Content
First, add routes to your web project, so people can navigate to different parts of your website. You can do this by replacing the app.py file with the following code:
Second, you create blank HTML files that inherit from the base template and that should be returned after calling each of those URLs 'https://yourwebsite.com/', 'https://yourwebsite.com/reports', and 'https://yourwebsite.com/contact'.
Third, add Jinja to the base template file so that you can add some dynamically created content to your website—it shouldn’t return the same content for all users after all!
Tutorial: Learn more about how to accomplish this step.
Step 5: Styling, Navigation, and Running the App Locally
Bootstrap is a popular framework that contains numerous HTML, API, and JS code snippets. These snippets assist web designers/developers everywhere create a responsive website.
Add Bootstrap to your project and create a navigation bar using the provided styling options.
Next, you can run your app with a simple command in your shell and view it in your browser:
Tutorial: Learn more about how to accomplish this step.
Step 6: Forms for User Input and Output
Add a Form with elements to an HTML page. Then add Jinja to the Reports page and update the code in app.py to get the HTML Form working.
Your project will look like this at this point:
Congratulations, users can now input numbers into the front-end and your Python code will process them on the back-end!
To view any changes, Flask needs to be re-started. To perform this task, navigate to the command prompt and enter CTRL+C (stop), then flask run (re-start).
Tutorial: Learn more about how to accomplish this step.
Step 7: Data Processing at the Back-End
Next, read in the Real Estate CSV file to a DataFrame and allow users to query the results based on the entered Zip code and display the results on the Reports page.
It’ll look like so:
Tutorial: Learn more about how to accomplish this step.
Step 8: Data Cleaning
In this step, you write some Python code to validate the Zip Code to make sure the user input is correct. You’ll clean up the data and reformat the sales price of the real estate objects for clarity of presentation.
Tutorial: Learn more about how to accomplish this step.
Step 9: Stylesheets
Next, we’ll add a stylesheet, and add some specific styles to the navigation bar and the remaining HTML pages. Styling should come after the core functionality is implemented—which at this point is done!
After this step, the website will look much cleaner and prettier:
Tutorial: Learn more about how to accomplish this step.
Step 10: Contact Us and Email Automation
The last step makes sure that users can contact you via the contact page. We’ll style it too using CSS and stylesheets and email the form values to you using the Flask functionality.
Tutorial: Learn more about how to accomplish this step.
Summary
This post has summarized the steps necessary to create a simple real estate related website with Flask. If you have followed the outlined steps and read the tutorials linked after each step, you should now have a running prototype website on your local computer.
You should also know the basics of how to create a dynamic and interactive website in Python, a skill that is sought-after by many companies today as a freelance or employed full-stack web developer!
The games are free to keep until June 23 2022 - 15:00 UTC.
Next week's freebie: A Game Of Thrones: The Board Game Digital Edition Car Mechanic Simulator 2018
We are welcoming everyone to join our discord[discord.gg]. We are more active there on finding giveaways, small or large, and there are daily raffles you can participate.
Posted by: xSicKxBot - 06-17-2022, 01:45 AM - Forum: Lounge
- No Replies
Crisis Core: Final Fantasy 7 Reunion Coming To Consoles And PC
During the Final Fantasy VII 25th Anniversary Celebration livestream, Square Enix announced the return of Crisis Core: Final Fantasy VII, which will be ported/remastered and launch on all consoles and PC this winter.
Crisis Core: Final Fantasy VII is an action-RPG and prequel to the original FFVII release. The game follows Zack Fair--best friend of FFVII protagonist Cloud Strife--during his time as a mercenary for the Shinra Electric Power Company.
His legacy, gave life to Final Fantasy VII──
Crisis Core ─Final Fantasy VII─ Reunion, featuring updated 3D models, full voiceovers and new music arrangements, launches this Winter on PS5, PS4, Nintendo Switch, Xbox Series X|S, Xbox One and Steam. #CCFF7R#FFVII25thpic.twitter.com/aMOiDXFkku
— FINAL FANTASY VII REMAKE (@finalfantasyvii) June 16, 2022
This remaster marks the first time in 14 years Crisis Core will be playable on modern consoles, as there have been no other ports of the game since its original launch for the Sony PSP in March 2008.
You are on a mission to repair an ancient clocktower built into the trunk of a colossal tree. Inside, you find a pair of gloves that allow you to turn anything you do into a looping clockwork automaton.
These clones can do everything you can do, from planting to cutting to throwing items through the air.
Create an interconnected system out of your own clones. Grow plants, harvest resources, and work together to save the clocktower!
[Fixed] ModuleNotFoundError: No module named ‘xmltodict’
Rate this post
Quick Fix: Python raises the ImportError: No module named 'xmltodict' when it cannot find the library xmltodict. The most frequent source of this error is that you haven’t installed xmltodict explicitly with pip install xmltodict. Alternatively, you may have different Python versions on your computer, and xmltodict is not installed for the particular version you’re using.
Problem Formulation
You’ve just learned about the awesome capabilities of the xmltodict library and you want to try it out, so you start your code with the following statement:
import xmltodict
This is supposed to import the Pandas library into your (virtual) environment. However, it only throws the following ImportError: No module named xmltodict:
>>> import xmltodict

Traceback (most recent call last): File "<pyshell#6>", line 1, in <module> import xmltodict

ModuleNotFoundError: No module named 'xmltodict'
Solution Idea 1: Install Library xmltodict
The most likely reason is that Python doesn’t provide xmltodict in its standard library. You need to install it first!
To fix this error, you can run the following command in your Windows shell:
$ pip install xmltodict
This simple command installs xmltodict in your virtual environment on Windows, Linux, and MacOS. It assumes that your pip version is updated. If it isn’t, use the following two commands in your terminal, command line, or shell (there’s no harm in doing it anyways):
Note: Don’t copy and paste the $ symbol. This is just to illustrate that you run it in your shell/terminal/command line.
Solution Idea 2: Fix the Path
The error might persist even after you have installed the xmltodict library. This likely happens because pip is installed but doesn’t reside in the path you can use. Although pip may be installed on your system the script is unable to locate it. Therefore, it is unable to install the library using pip in the correct path.
To fix the problem with the path in Windows follow the steps given next.
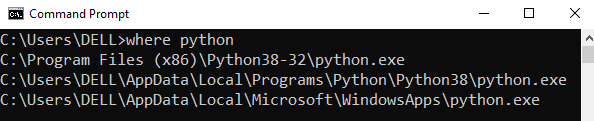
Step 1: Open the folder where you installed Python by opening the command prompt and typing where python
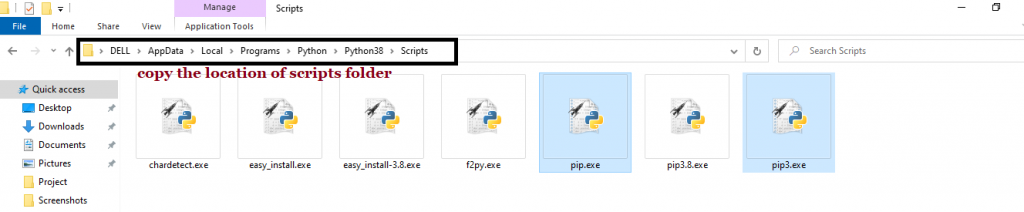
Step 2: Once you have opened the Python folder, browse and open the Scripts folder and copy its location. Also verify that the folder contains the pip file.
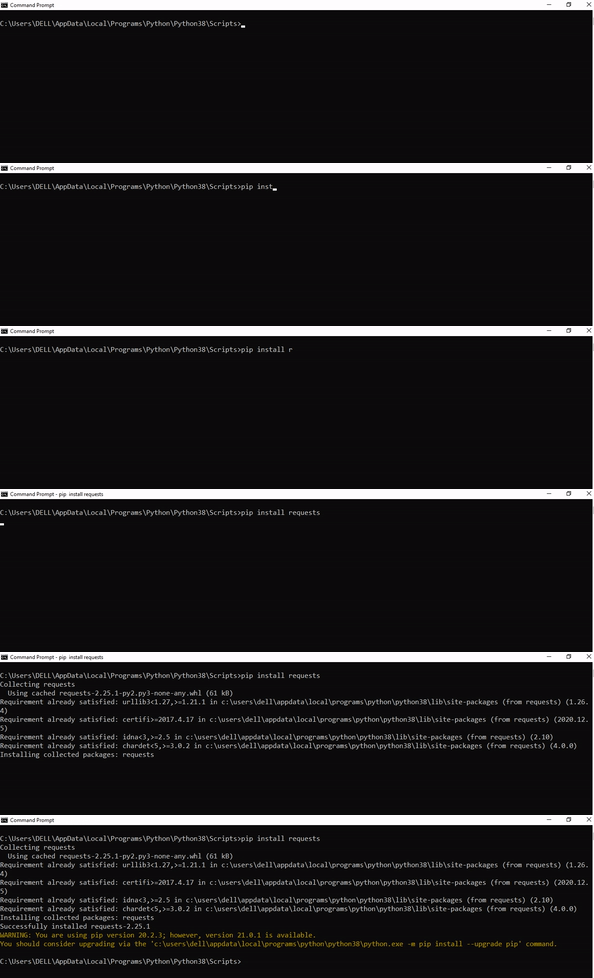
Step 3: Now open the Scripts directory in the command prompt using the cd command and the location that you copied previously.
Step 4: Now install the library using pip install xmltodict command. Here’s an analogous example:
After having followed the above steps, execute our script once again. And you should get the desired output.
Other Solution Ideas
The ModuleNotFoundError may appear due to relative imports. You can learn everything about relative imports and how to create your own module in this article.
You may have mixed up Python and pip versions on your machine. In this case, to install xmltodict for Python 3, you may want to try python3 -m pip install xmltodict or even pip3 install xmltodict instead of pip install xmltodict
If you face this issue server-side, you may want to try the command pip install --user xmltodict
If you’re using Ubuntu, you may want to try this command: sudo apt install xmltodict
You can also check out this article to learn more about possible problems that may lead to an error when importing a library.
Understanding the “import” Statement
import xmltodict
In Python, the import statement serves two main purposes:
Search the module by its name, load it, and initialize it.
Define a name in the local namespace within the scope of the import statement. This local name is then used to reference the accessed module throughout the code.
What’s the Difference Between ImportError and ModuleNotFoundError?
What’s the difference between ImportError and ModuleNotFoundError?
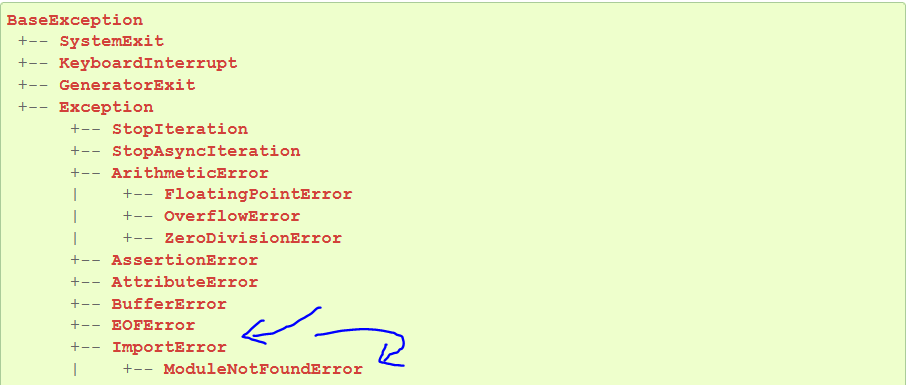
Python defines an error hierarchy, so some error classes inherit from other error classes. In our case, the ModuleNotFoundError is a subclass of the ImportError class.
You can see this in this screenshot from the docs:
You can also check this relationship using the issubclass() built-in function:
Specifically, Python raises the ModuleNotFoundError if the module (e.g., xmltodict) cannot be found. If it can be found, there may be a problem loading the module or some specific files within the module. In those cases, Python would raise an ImportError.
If an import statement cannot import a module, it raises an ImportError. This may occur because of a faulty installation or an invalid path. In Python 3.6 or newer, this will usually raise a ModuleNotFoundError.
Related Videos
The following video shows you how to resolve the ImportError:
How to Fix “ModuleNotFoundError: No module named ‘xmltodict’” in PyCharm
If you create a new Python project in PyCharm and try to import the xmltodict library, it’ll raise the following error message:
Traceback (most recent call last): File "C:/Users/.../main.py", line 1, in <module> import xmltodict

ModuleNotFoundError: No module named 'xmltodict' Process finished with exit code 1
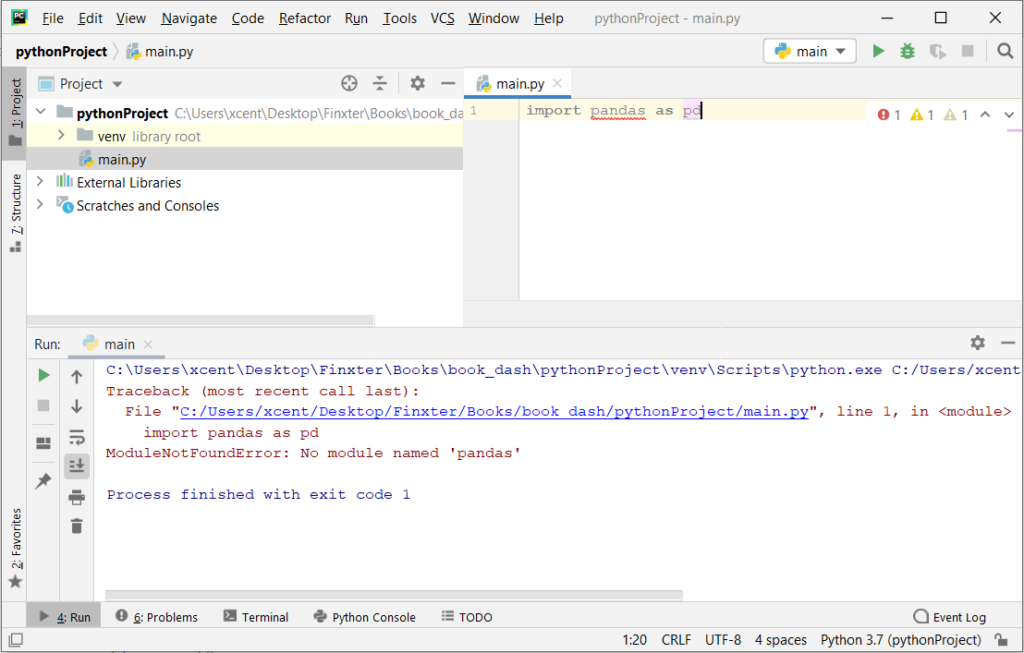
The reason is that each PyCharm project, per default, creates a virtual environment in which you can install custom Python modules. But the virtual environment is initially empty—even if you’ve already installed xmltodict on your computer!
Here’s a screenshot exemplifying this for the pandas library. It’ll look similar for xmltodict.
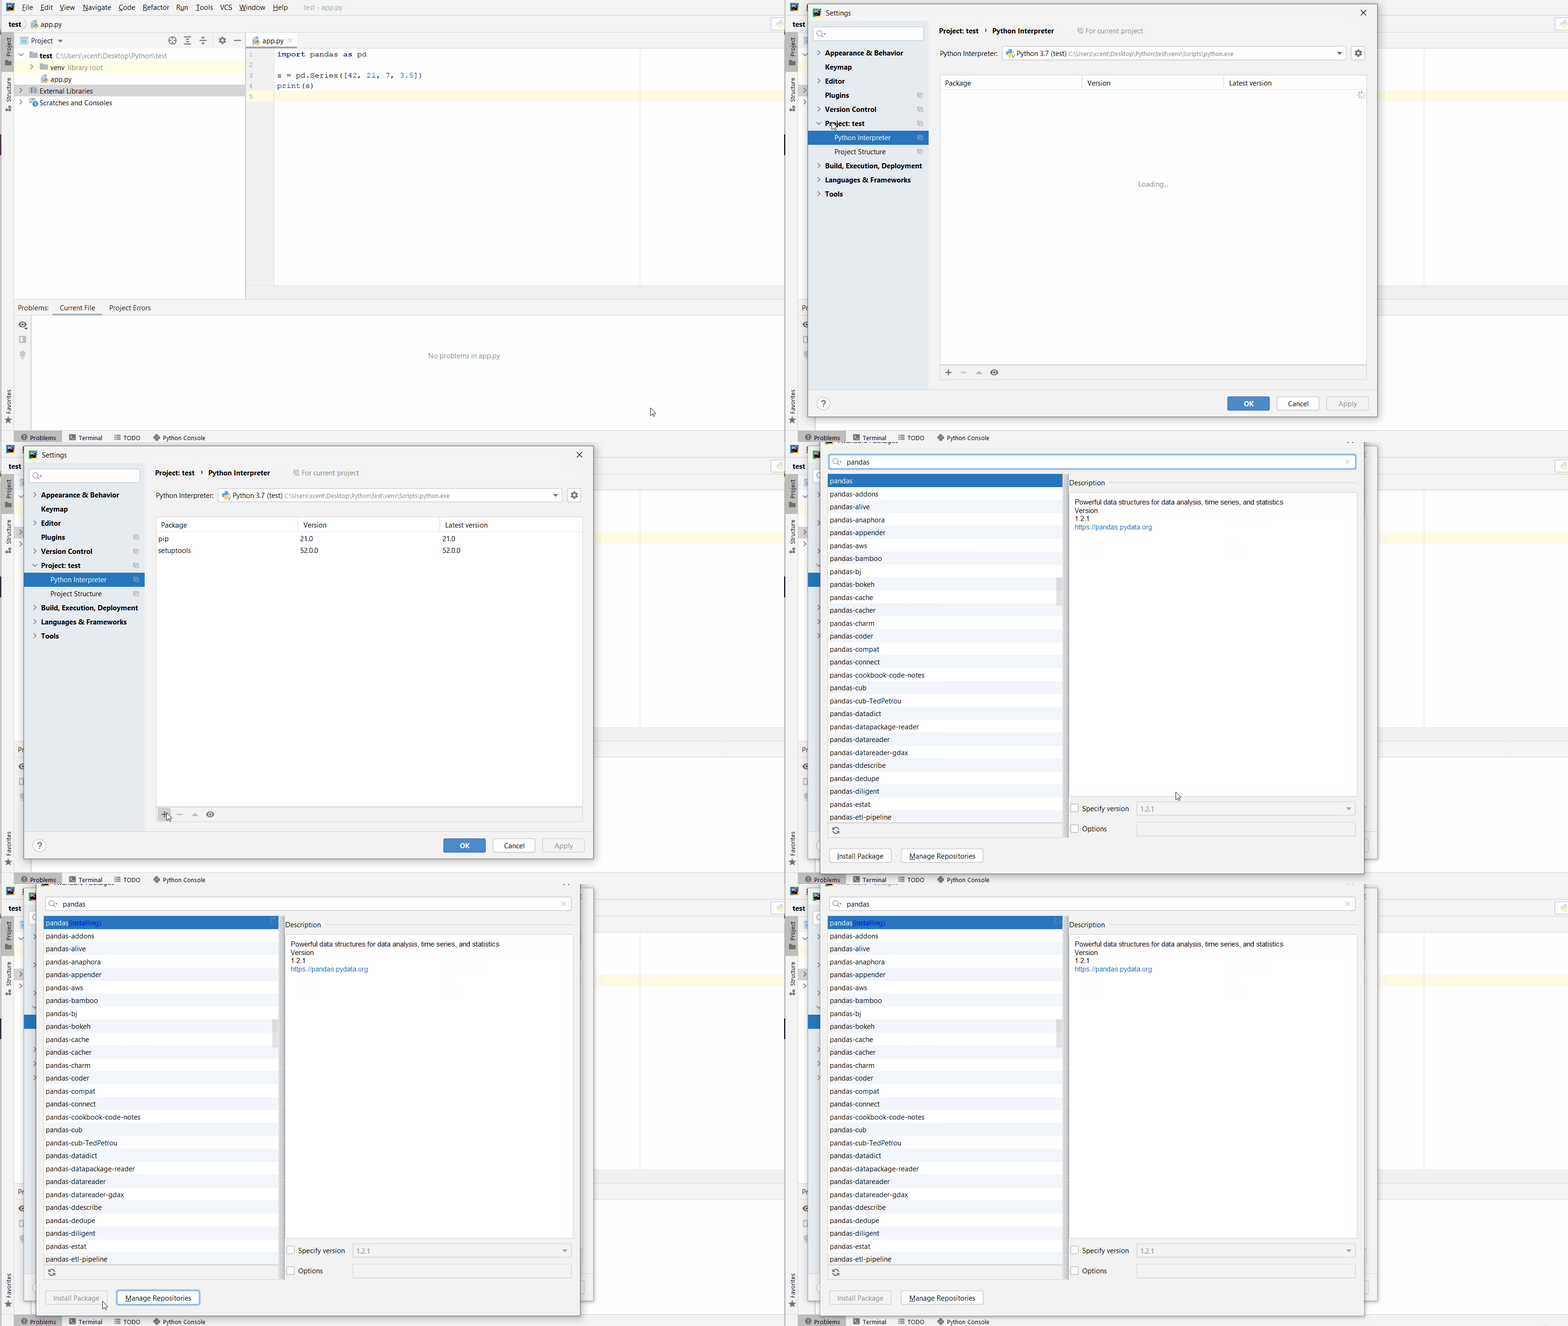
The fix is simple: Use the PyCharm installation tooltips to install Pandas in your virtual environment—two clicks and you’re good to go!
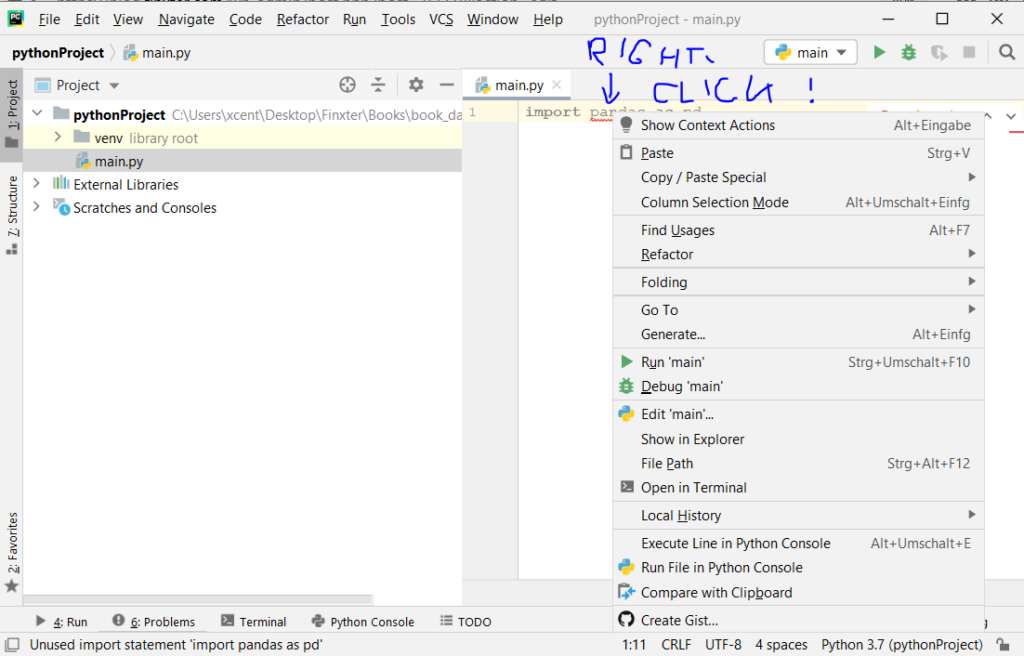
First, right-click on the pandas text in your editor:
Second, click “Show Context Actions” in your context menu. In the new menu that arises, click “Install Pandas” and wait for PyCharm to finish the installation.
The code will run after your installation completes successfully.
As an alternative, you can also open the Terminal tool at the bottom and type:
[freebies.indiegala.com] Lemmings meets Lost Vikings. The newest FREEbie is a hardcore classic which will be challenging your brain & fingers with mind boggling puzzles.
Super Gear Bundle | 6 Steam Games | 94% OFF
[www.indiegala.com] It's time to kick this summer into gear with a super selection of indie games: Forgotten Fields, Heads Will Roll, PROJECTIONS, Wordeous, Mad Restaurant People & Super Gear Quest.



 Note: Before continuing, we recommend you possess, at minimum, a basic knowledge of

 Learn More: Learn everything you need to know to reproduce this step in the