Welcome, Guest
You have to register before you can post on our site.

Username
  

Password


Search Forums

(Advanced Search)

Forum Statistics
» Members: 20,946
» Latest member: blackopsdlc
» Forum threads: 22,003
» Forum posts: 22,970

Full Statistics

Online Users
There are currently 1698 online users.
» 0 Member(s) | 1692 Guest(s)
Applebot, Baidu, Bing, Facebook, Google, Yandex

Latest Threads
[WoW Retail News] Comment...
Forum: World of Warcraft
Last Post: xSicKxBot

» Replies: 0
» Views: 11
How to unlock Maya Aguina...
Forum: PC Discussion
Last Post: xSicKxBot

» Replies: 0
» Views: 15
[Steam Release] The Unive...
Forum: New Game Releases
Last Post: xSicKxBot

» Replies: 0
» Views: 19
[DevBlog MS] Creating a m...
Forum: C#, Visual Basic, & .Net Frameworks
Last Post: xSicKxBot

» Replies: 0
» Views: 19
[WoW Retail News] Fixed C...
Forum: World of Warcraft
Last Post: xSicKxBot

» Replies: 0
» Views: 21
[PS.Blog] Fading Echo mak...
Forum: Sony Discussion
Last Post: xSicKxBot

» Replies: 0
» Views: 19
[Steam Release] Cowbots a...
Forum: New Game Releases
Last Post: xSicKxBot

» Replies: 0
» Views: 23
[Dev News] September Free...
Forum: Game Development
Last Post: xSicKxBot

» Replies: 0
» Views: 18
Marvel Rivals Venom guide...
Forum: PC Discussion
Last Post: xSicKxBot

» Replies: 0
» Views: 23
[WoW Retail News] Midnigh...
Forum: World of Warcraft
Last Post: xSicKxBot

» Replies: 0
» Views: 26

 
  [Tut] How to Initialize Multiple Variables to the Same Value in Python?
Posted by: xSicKxBot - 06-30-2022, 05:29 PM - Forum: Python - No Replies

How to Initialize Multiple Variables to the Same Value in Python?

Rate this post

Summary: To initialize multiple variables to the same value in Python you can use one of the following approaches:

  • Use chained equalities as: var_1 = var_2 = value
  • Use dict.fromkeys

This article will guide you through the ways of assigning multiple variables with the same value in Python. Without further delay, let us dive into the solutions right away.

Method 1: Using Chained Equalities


You can use chained equalities to declare the variables and then assign them the required value.

Syntax: variable_1 = variable_2 = variable_3 = value 

Code:

x = y = z = 100
print(x)
print(y)
print(z)
print("All variables point to the same memory location:")
print(id(x))
print(id(y))
print(id(z))

Output:

100
100
100
All variables point to the same memory location:
3076786312656
3076786312656
3076786312656

It is evident from the above output that each variable has been assigned the same value and each of them point to the same memory location.

Method 2: Using dict.fromkeys


Approach: Use the dict.fromkeys(variable_list, val) method to set a specific value (val) to a list of variables (variable_list).

Code:

variable_list = ["x", "y", "z"]
d = dict.fromkeys(variable_list, 100)
for i in d: print(f'{i} = {d[i]}') print(f'ID of {i} = {id(i)}')

Output:

x = 100
ID of x = 2577372054896
y = 100
ID of y = 2577372693360
z = 100
ID of z = 2577380842864

Discussion: It is evident from the above output that each variable assigned holds the same value. However, each variable occupies a different memory location. This is on account that each variable acts as a key of the dictionary and every key in a dictionary is unique. Thus, changes to a particular variable will not affect another variable as shown below:

variable_list = ["x", "y", "z"]
d = dict.fromkeys(variable_list, 100)
print("Changing one of the variables: ")
d['x'] = 200
print(d)

Output:

{'x': 200, 'y': 100, 'z': 100}

Conceptual Read:

fromkeys() is a dictionary method that returns a dictionary based on specified keys and values passed within it as parameters.

Syntax: dict.fromkeys(keys, value)
➡ keys is a required parameter that represents an iterable containing the keys of the new dictionary.
➡ value is an optional parameter that represents the values for all the keys in the new dictionary. By default, it is None.

Example:

k = ('key_1', 'key_2', 'key_3')
my_dictionary = dict.fromkeys(k, 0)
print(my_dictionary) # OUTPUT: {'key_1': 0, 'key_2': 0, 'key_3': 0}

Related Question


Let’s address a frequently asked question that troubles many coders.

Problem: I tried to use multiple assignment as show below to initialize variables, but I got confused by the behavior, I expect to reassign the values list separately, I mean b[0] and c[0] equal 0 as before.

a=b=c=[0,3,5]
a[0]=1
print(a)
print(b)
print©

Output:

a = b = c = [0, 3, 5]
a[0] = 1
print(a)
print(b)
print©

But, why does the following assignment lead to a different behaviour?

a = b = c = 5
a = 3
print(a)
print(b)
print©

Output:

3
5
5

Question Source: StackOverflow

Solution


Remember that everything in Python is treated as an object. So, when you chain multiple variables as in the above case all of them refer to the same object. This means, a , b and c are not different variables with same values rather they are different names given to the same object.


Thus, in the first case when you make a change at a certain index of variable a, i.e, a[0] = 1. This means you are making the changes to the same object that also has the names b and c. Thus the changes are reflected for b and c both along with a.

Verification:

a = b = c = [1, 2, 3]
print(a[0] is b[0]) # True

To create a new object and assign it, you must use the copy module as shown below:

import copy
a = [1, 2, 3]
b = copy.deepcopy(a)
c = copy.deepcopy(a)
a[0] = 5
print(a)
print(b)
print©

Output:

[5, 2, 3]
[1, 2, 3]
[1, 2, 3]

However, in the second case you are rebinding a different value to the variable a. This means, you are changing it in-place and that leads to a now pointing at a completely different value at a different location. Here, the value being changed is an interger and integers are immutable.

Follow the given illustration to visualize what’s happening in this case:


Verification:

a = b = c = 5
a = 3
print(a is b)
print(id(a))
print(id(b))
print(id©)

Output:

False
2329408334192
2329408334256
2329408334256

It is evident that after rebinding a new value to the variable a, it points to a different memory location, hence it now refers to a different object. Thus, changing the value of a in this case means we are creating a new object without touching the previously created object that was being referred by a, b and c.

Python One-Liners Book: Master the Single Line First!


Python programmers will improve their computer science skills with these useful one-liners.

Python One-Liners

Python One-Liners will teach you how to read and write “one-liners”: concise statements of useful functionality packed into a single line of code. You’ll learn how to systematically unpack and understand any line of Python code, and write eloquent, powerfully compressed Python like an expert.

The book’s five chapters cover (1) tips and tricks, (2) regular expressions, (3) machine learning, (4) core data science topics, and (5) useful algorithms.

Detailed explanations of one-liners introduce key computer science concepts and boost your coding and analytical skills. You’ll learn about advanced Python features such as list comprehensionslicinglambda functionsregular expressionsmap and reduce functions, and slice assignments.

You’ll also learn how to:

  • Leverage data structures to solve real-world problems, like using Boolean indexing to find cities with above-average pollution
  • Use NumPy basics such as arrayshapeaxistypebroadcastingadvanced indexingslicingsortingsearchingaggregating, and statistics
  • Calculate basic statistics of multidimensional data arrays and the K-Means algorithms for unsupervised learning
  • Create more advanced regular expressions using grouping and named groupsnegative lookaheadsescaped characterswhitespaces, character sets (and negative characters sets), and greedy/nongreedy operators
  • Understand a wide range of computer science topics, including anagramspalindromessupersetspermutationsfactorialsprime numbersFibonacci numbers, obfuscationsearching, and algorithmic sorting

By the end of the book, you’ll know how to write Python at its most refined, and create concise, beautiful pieces of “Python art” in merely a single line.

Get your Python One-Liners on Amazon!!


https://www.sickgaming.net/blog/2022/06/...in-python/

Print this item

  [Tut] How to Add Custom Field to Product in WooCommerce
Posted by: xSicKxBot - 06-30-2022, 05:29 PM - Forum: PHP Development - No Replies

How to Add Custom Field to Product in WooCommerce

by Vincy. Last modified on June 29th, 2022.

WooCommerce is the best among the top eCommerce software which is free. It is based on WordPress platform. Setting up a shopping cart is quite easy with WooCommerce.

In previous articles, we have seen some WooCommerce-based code for the following utilities.

The WooCommerce product showcase displays the information that meets the customer demand. Sometimes preliminary details cannot convey all and let the customer identify their destiny.

This is something that needs adding additional information using custom-field integration. WooCommerce plugins support adding custom fields to products via the admin interface.

We will see those options below and their usage methodologies of them.

Why a WooCommerce shop admin needs Custom Fields


Before adding custom fields to a product, learn why a WooCommerce shop needs this.

Because, some of the shops have a routine product gallery with usual data like title, image and price. In that case, the custom fields are not required.

The below list shows the advantages of this custom fields feature on a WooCommerce shop.

  • To add product metadata that is for displaying additional information about products.
  • To allow customers to provide more specifications on the products to purchase.
  • To add user-friendly interactive fields to save their effort on giving customizations.
  • To add promotions, offers, discounts and all.
  • To support end-user to specify a delivery date, time and place.
  • To apply tax, and shipping by toggling the custom switch.

Types of custom fields creation supported by WooCommerce plugins


The available WooCommerce plugins can add two types of custom fields for products.

  1. Data fields – The field accepts information to be displayed on the UI.
  2. Add-on fields – Fields that collect data from the user on the storefront.

1. Data fields – The field accepts information to be displayed on the UI


This custom field is for showing more information apart from the regular title, price and all. This will help to show product metadata about features, version, rating and all.

For example, a monitor, to show extra information like,

Brand Dell
Model Dell 20H
Screen Size 23
Features HDMI, Anti-glare

2. Add-on fields – Fields that collect data from the user on the storefront


This type of custom field is about creating options for the customer to interact with. It is to allow adding more specifications or customization on the pursued product.

It is for adding personalized information by the customers on the product purchase. Example,

  • A multi-option field to select the size or color of a T-shirt.
  • A text field to collect a brand name to be engraved on a purchased pen.

Methods of adding custom fields display in WooCommerce


  1. Using WooCommerce plugins.
  2. Adding code to display custom fields for products.

Method 1: Using the plugin


We have taken three plugins to support adding custom fields to a product in a WooCommerce shop. Those are having advanced features and are also easy to set up.

  1. Advanced Product Fields for WooCommerce
  2. Product Addons for WooCommerce
  3. Advanced Custom Fields

1. Advanced Product Fields for WooCommerce


This plugin is used for adding additional fields to the WooCommerce product page. It helps to embed product add-on fields to allow customers to personalize the order.

Look into the plugin details and prerequisites below.

Version 4.5 or higher
Active installations 20,000+
PHP version 5.6 or higher
Last updated 2 weeks ago

Features

  • The custom product field selected on the product page can be carried over to the cart and checkout pages. It is persistent on the entire flow until the order receipt.
  • Smooth product field builder in the backend with a seamless experience.
  • It has the option to add multiple prices to manipulate the base price of the products on selection.
  • It supports all possible interactive fields with the show hide option.
  • It allows products and custom-field mapping interfaces to control the visibility.
  • WooCommerce tax figure customization is possible.
  • Multi-lingual in translation-ready themes.

Steps to use

Download this plugin from the official WordPress repository. Then install and activate it for the WooCommerce shop. If you are new to WordPress, then see here how to set up a plugin.

  1. Go to Product -> Add New via the WooCommerce admin menu.
  2. Click “Custom fields” under the “Product data” panel.
  3. Configure “Field group layout” settings. It is to specify the position of the label or a field note if any. Also, it helps to mark a field as mandatory.
  4. Select “Add the first field” or “Add field” and specify field type, label, and all.
  5. Add conditional rules to add dependencies between fields to be displayed.

This is the WooCommerce admin interface to add the custom fields for products. I have added the Size option for the product as a ratio group.
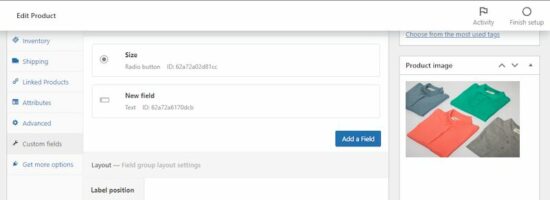
advanced product field setting

This will show the added custom field on the product front end as a radio option.
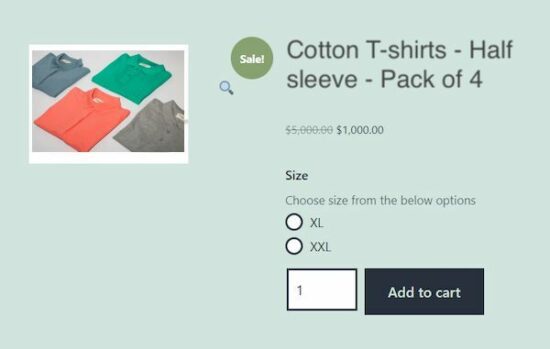
advanced product field output

2. Product Addons for WooCommerce


This plugin says the purpose clearly by its name itself. Yes, it is to add more add-on fields to let the customer interact with the shop to personalize the purchase.

An easy custom form builder allows for building a field group for the WooCommerce shop pages. Have a look at the version and other details below.

WordPress Version 4.0 or higher
Active installations 30,000+
PHP version 5.6 or higher
Last updated at 3 weeks ago

Download this plugin from the WordPress repository linked. The plugin provides a drag-and-drop interface to build custom field groups for products.

Features

  • Capable of personalizing the purchase order.
  • It saves the customer’s personalized data via a custom field added for products in the backend.
  • For builder helps to design a group of the custom fields.
  • Allows more types of fields like text, number and email fields, combo fields and all.
  • In the base version, it allows adding <p> and <h*> tags to display product meta in the front end.

Steps to use

There are a few steps to add and display a custom field on a product page of a WooCommerce theme.

  1. Go to Products->Custom Product Addons via the WordPress admin menu.
  2. Add a new form of product custom fields group and publish it.
  3. Go to Products and open a new or edit product panel.
  4. Choose “Custom Product Options” from the Product data group.
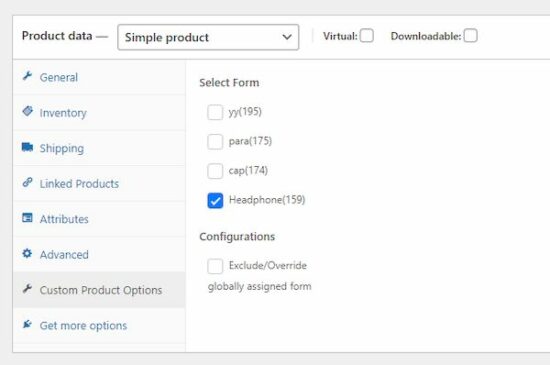
  5. Check the form to add a mapping between custom fields and products.

See the following two screenshots to add custom fields and map them for the product.
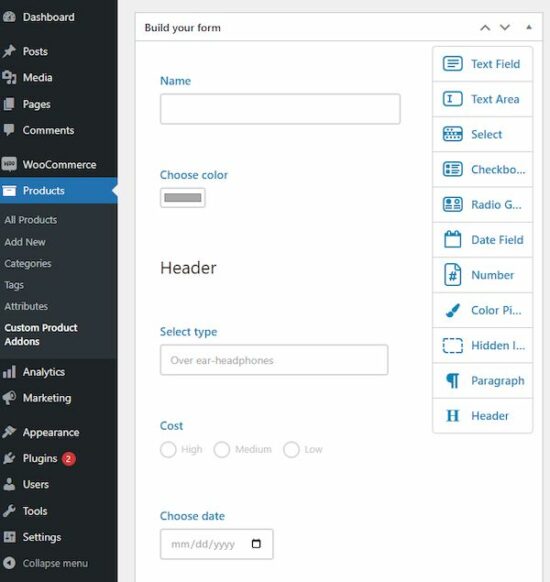
product addons settings

product addons mapping

Then, the WooCommerce shop will show the custom fields on the single product page.
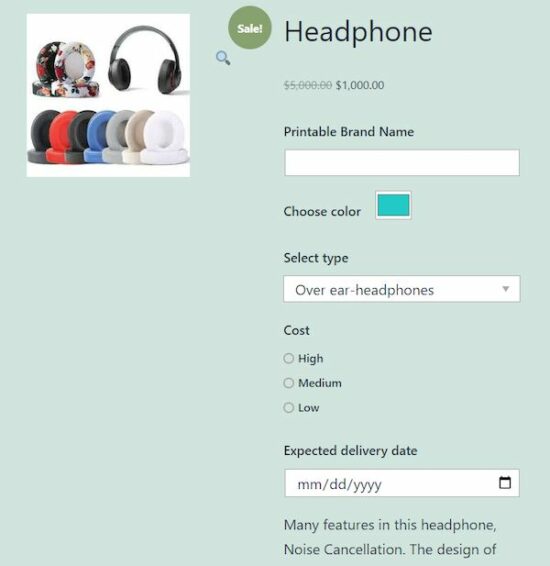
product addons output

3. Advanced Custom Fields


It supports full control of the WordPress edit screen and custom form data.

WordPress Version 4.7 or higher
Active Installations 2+ million
PHP Version 5.6 or higher
Last updated 6 days ago

The simple and intuitive plugin has powerful functions and over 30 field types

Features

  • It provides powerful functions to customize and add custom fields for the product
  • Good and simple backend interface to add custom field group on a need basis.
  • Supports 30+ field types to set more data apart from the standard custom product fields.

Steps to customize

Download or install via admin to enable this plugin before going to read the below steps.

  1. Add and customize the field group.
  2. Add form fields into the group.
  3. Add data for the custom fields on the product page.
  4. Display the product information on the front end.

Step 1: Add and customize field group

Go to Custom Fields via the admin menu. Add a new field group and specify the UI location and other settings.

It helps to set states and styles to add and show the custom fields on a product page. It manages the relative position and alignment of the field on the UI.

Fields can also be mapped for posts, products, pages and more.

Step 2: Add form fields into the group

The field add interface allows the following data to enter. For combo fields, it asks to enter multiple options to the loaded.

  • label, name, type.
  • Field notes or helps text.
  • If the field is required or not.
  • Place holder and default value.
  • Content to prepend or append.
  • Character restriction, Rules.
  • Field wrapper classes or ids.

Step 3: Add data for the custom fields based on products

If the custom field group is mapped for the location of product pages, then the add/edit page will show it.

Add the data for the custom fields which will be displayed on the WooCommerce product at the shop.

##image

Step 4: Display the product information on the front-end

Then display the custom fields data on the product single page at the front-end.

In this plugin, we need to add a simple shortcode to display the custom fields on the product page.

The [acf field=”<field-id or slug>”] shortcode is used for displaying the custom field group.

There are a couple of functions in WordPress to display the fields for a WooCommerce product.

<php
the_field("<field-id or slug>");
?>

or

<php
$customFieldGroup = get_field("<field-id or slug>");
echo $customFieldGroup;
?>

Method 2: Adding custom fields via the program


Thus, we have seen how to add product custom fields in a WooCommerce platform using plugins. If you want to implement the same without using plugins, it’s very simple with a few steps.

These steps render the custom fields on the WooCommerce product page. After collecting the user inputs in the product page, the custom code will display them on the cart page.

Steps to implement this method by adding custom code are listed below.

  1. Add a custom field in the product data panel on the WooCommerce admin.
  2. Save added custom field data into cart metadata.
  3. Display an input field in a product single page.
  4. Passing the values on the cart and checkout pages.

Add this custom code in the WordPress active theme’s function.php file.

1. Adding custom fields in the product data panel


Create code for displaying custom fields in the WooCommerce product data panel. The woocommerce_product_options_general_product_data hook is used to call this code.

/* Add product meta field for the WooCommerce admin */
function woocommerce_custom_select_dropdown(){ $select = woocommerce_wp_select(array( 'id' => '_select_color', 'label' =>__('Select color', 'woocommerce'), 'options' => array( 'Black' => __('Black','woocommerce'), 'Blue' => __('Blue','wooocommerce'), 'Pink'=> __('Pink','woocommerce') ), ));
}
add_action('woocommerce_product_options_general_product_data', 'woocommerce_custom_select_dropdown');

This example adds a dropdown as a custom field for products. So, it uses the woocommerce_wp_select function to set the following parameters.

  • id
  • label
  • description
  • desc_tip
  • options

There are similar functions to add other types of form fields. For example,

  • woocommerce_wp_textarea_input
  • woocommerce_wp_checkbox
  • woocommerce_wp_hidden_input

2. Save the user input in the custom fields to cart metadata.


Then, another action hook is added to save the custom field value on the product meta. This will be called on saving the product details. It calls the woocommerce_process_product_meta action and hooks the handler.

/* Save custom field data for the product */
function woocommerce_product_custom_fields_save($post_id)
{ $woocommerce_select_color_field = $_POST['_select_color']; if (!empty($woocommerce_select_color_field)) { update_post_meta($post_id, '_select_color', esc_attr($woocommerce_select_color_field)); }
}
add_action('woocommerce_process_product_meta', 'woocommerce_product_custom_fields_save');

3. Display an input field in a product single page


In this section, it prepares an add-on field HTML if the product meta is not empty.

First, the admin chooses and saves the product color option. Then this code will add a dropdown field on the product single page.

It reads the current product meta with the reference of the global post object. Then, it fetches the product meta by the custom field id.

In the WooCommerce product page, this custom field is added before the cart button. It is because of hooking the action woocommerce_before_add_to_cart_button to call this handler.

/* Show add-on field based on the saved custom field */
function woocommerce_display_select_option_value()
{ global $post; $product = wc_get_product($post->ID); $select_option_title_field = $product->get_meta('_select_color'); if ($select_option_title_field) { printf('
<div><select name="color_option" class="input-text text">
<option value="Default Color">Default Color</option>
<option value="' . $select_option_title_field . '">' . $select_option_title_field . '</option> </select></div>', esc_html($select_option_title_field)); }
}
add_action('woocommerce_before_add_to_cart_button', 'woocommerce_display_select_option_value');

4. Display the selected option in the cart and checkout pages


The following filter hooks handle the functions to display the selected custom option. It has the cart and checkout pages as its target to render the UI component.

This code is triggered on loading the cart item data. It calls the filter hook woocommerce_add_cart_item_data and displays the selected custom field value.

It adds the data into the cart item array which will be later used in the checkout page UI.

/* Display selected option in the cart */
function woocommerce_add_custom_field_item_data($cart_item_data, $product_id)
{ if (! empty($_POST['color_option'])) { $cart_item_data['select_field'] = $_POST['color_option']; } return $cart_item_data;
}
add_filter('woocommerce_add_cart_item_data', 'woocommerce_add_custom_field_item_data', 10, 2);

This is to parse the cart item array and display the custom field value on the checkout page.

It uses the woocommerce_cart_item_name hook to do this change in the checkout UI.

/* Display selected option in the checkout */
function woocommerce_cart_display($name, $cart_item, $cart_item_key)
{ if (isset($cart_item['select_field'])) { $name .= sprintf('<p>%s</p>', esc_html($cart_item['select_field'])); } return $name;
}
add_filter('woocommerce_cart_item_name', 'woocommerce_cart_display', 10, 3);

Conclusion


Thus, we have seen both methods to add custom fields to products. It is with or without plugins to enable WooCommerce product custom fields.

I hope, this article gives a basic knowledge in this area. Also, it might help you to understand and replicate the steps to customize your shop.

↑ Back to Top



https://www.sickgaming.net/blog/2022/06/...ocommerce/

Print this item

  PC - Sonic Origins
Posted by: xSicKxBot - 06-30-2022, 05:29 PM - Forum: New Game Releases - No Replies

Sonic Origins


Relive the classic collected adventures of Sonic The Hedgehog, Sonic The Hedgehog 2, Sonic 3 & Knuckles, and Sonic CD in the newly remastered Sonic Origins! From the iconic Green Hill Zone to the treacherous Death Egg Robot, you'll speed down memory lane to thwart the sinister plans of Doctor Robotnik in polished high definition! This latest version includes new areas to explore, additional animations, and a brand new Anniversary mode! Explore the classic Sonic titles in high-resolution, with all-new opening and ending animations for each title! New Unlockables: Complete various missions to collect coins to unlock new content, challenges, and Special Stages through the Museum. Classic and Anniversary Mode. Choose to Spin Dash your way through the numerous zones in Classic mode with the game's original resolution and limited lives, or the new Anniversary mode with unlimited lives and revamped fullscreen resolution.

Publisher: Sega

Release Date: Jun 23, 2022


https://www.metacritic.com/game/pc/sonic-origins

Print this item

  News - Destiny 2's Nerf Gjallarhorn Goes On Sale On July 7, Looks Massive And Ornate
Posted by: xSicKxBot - 06-30-2022, 05:29 PM - Forum: Lounge - No Replies

Destiny 2's Nerf Gjallarhorn Goes On Sale On July 7, Looks Massive And Ornate

Bungie has revealed new details on its upcoming Nerf Gjallarhorn replica rocket launcher, and the good news is that this Destiny 2 toy looks like it'll be an ornate and adult-sized toy to proudly display on your shelf. The bad news is that the price has increased--now $185--for the Exotic rocket launcher toy, which will ship out in its own bespoke box.

As Bungie previously mentioned, preorders will go live on July 7 at 10 AM PT / 1 PM ET, and anyone who has acquired the digital version of the famed weapon in Destiny 2 will get first dibs on acquiring this collectible. From July 21, the remaining stock will be made available to the public. As a reminder, you'll need to own the Bungie 30th Anniversary DLC pack and have completed the Grasp of Avarice dungeon.

Unleash the foam wolves.

Continue Reading at GameSpot

https://www.gamespot.com/articles/destin...01-10abi2f

Print this item

  (Indie Deal) FREE ConflictCraft & FLASH Deals: Bungie, CK3, Sold Out
Posted by: xSicKxBot - 06-29-2022, 06:25 PM - Forum: Deals or Specials - No Replies

FREE ConflictCraft & FLASH Deals: Bungie, CK3, Sold Out

ConflictCraft FREEbie
[freebies.indiegala.com]
Your goals are to control all points on the map and destroy enemy bases while keeping a close eye on your resource management and defense of friendly units.

Crusader Kings III, Bungie & Sold Out Flash Sales
[www.indiegala.com]
[www.indiegala.com]
[www.indiegala.com]
Solo Deal: [www.indiegala.com]Virtual Fighting Championship (VFC)
https://www.youtube.com/watch?v=l8cAt9XxDDE
Stay Inside, Stay Safe and Enjoy Good Games.
Check out IndieGala on Twitter, YouTube & Facebook[www.facebook.com]


https://steamcommunity.com/groups/indieg...1684424258

Print this item

  PC - Symphony of War: The Nephilim Saga
Posted by: xSicKxBot - 06-29-2022, 05:48 PM - Forum: New Game Releases - No Replies

Symphony of War: The Nephilim Saga


Enter Tahnra, a land savaged by war. You, a fresh academy graduate with humble beginnings, will grow to lead a grand army against a corrupt adversary. Gather heroes, form bonds, and lead your force in turn-based battles. Make use of tactics, terrain, morale and more to bring peace to the land!

Publisher: Freedom Games

Release Date: Jun 10, 2022


https://www.metacritic.com/game/pc/symph...hilim-saga

Print this item

  News - Money In The Bank 2022 Match Card, How To Watch, Start Time, And Predictions
Posted by: xSicKxBot - 06-29-2022, 05:48 PM - Forum: Lounge - No Replies

Money In The Bank 2022 Match Card, How To Watch, Start Time, And Predictions

WWE's second biggest party of the summer, Money in the Bank, is right around the corner, taking place on July 2. The Saturday WWE PPV will feature numerous championship matches, including both Bianca Beliar and Ronda Rousey defending their titles in the wrestling ring. Here's everything you need to know about the upcoming event and how to watch it.

Coming to MGM Grand Garden Arena--although originally set to take place at Allegiant Stadium--in Las Vegas, Nevada, Money in the Bank is WWE's annual PPV featuring two matches where six contestants battle it out for a WWE championship contract, which is hanging above the ring, which you need a ladder to grab.

Per usual, the PPV will air at 8 PM ET, but what does that mean for the rest of the people around the world? Check out the handy-dandy start time table below.

Continue Reading at GameSpot

https://www.gamespot.com/articles/money-...01-10abi2f

Print this item

  (Indie Deal) Wunder Gate Bundle & Quantic Dream Sale
Posted by: xSicKxBot - 06-27-2022, 05:21 AM - Forum: Deals or Specials - No Replies

Wunder Gate Bundle & Quantic Dream Sale

Wunder Gate Bundle | 6 Steam Games | 93% OFF
[www.indiegala.com]
The Wunder Gate Bundle is LIVE! Uncertainty turns into serendipity with this wonderful indie selection: SHUT IN, Wunderling DX, Gate to Site 8, Zom Tom, Firelight Fantasy: Vengeance, 3D PUZZLE - Farm House.

https://www.youtube.com/watch?v=b-HyCq7Efjk
Quantic Dream Sale, all titles 60% OFF
[www.indiegala.com]
Happy Hour: Dream Beats Bundle
[indiegala.com]
What better way to relax than listening to some tunes with your friends? The Dream Beats Bundle is about to end, but not before bringing you the chance to grab a few extra copies for your pals during the Happy Hour.


https://steamcommunity.com/groups/indieg...1681050704

Print this item

  News - Chris Pratt Declares His Mario Voice Is "Unlike Anything You've Ever Heard"
Posted by: xSicKxBot - 06-27-2022, 05:21 AM - Forum: Lounge - No Replies

Chris Pratt Declares His Mario Voice Is "Unlike Anything You've Ever Heard"

Echoing similar remarks from a producer of the upcoming Super Mario movie made last fall, actor Chris Pratt--who will voice the titular plumber--said in a recent interview that his portrayal will be "unlike anything you've ever heard." Speaking with Variety to promote his upcoming Amazon Prime Video series The Terminal List, Pratt also touched briefly on the Nintendo film.

"I worked really closely with the directors on trying out a few things and landed on something that I'm really proud of and can't wait for people to see and hear," Pratt said. "It's an animated voiceover narrative. It's not a live-action movie. I'm not gonna be wearing a plumber suit running all over. I'm providing a voice for an animated character, and it is updated and unlike anything you've heard in the Mario world before."

In November, Illumination CEO Chris Meledandri called Pratt's voice for Mario as "Phenomenal," adding that he "can't wait for people to hear it." Meledandri, who is Italian-American, also told Deadline this week that, "When people hear Chris Pratt's performances, the criticism [against Pratt as a non-Italian person] will evaporate, maybe not entirely… people love to voice opinions, as they should."

Continue Reading at GameSpot

https://www.gamespot.com/articles/chris-...01-10abi2f

Print this item

  [Tut] Top 6 Mobile App Development Career Paths in 2023
Posted by: xSicKxBot - 06-26-2022, 11:53 AM - Forum: Python - No Replies

Top 6 Mobile App Development Career Paths in 2023

Rate this post

Mobile app development is a massive skill in the 21st century. In fact, the revenue of the mobile app market worldwide is mobile app revenue in 2022 is $437 billion USD. (Statista)

A mobile app developer is a programmer who focuses on software creation for mobile devices such as smartphones or wearables.

Most mobile app developers create smartphone apps for the Android, macOS, or Windows mobile operating system.

This article will show you the five areas of focus you could pursue to become a mobile app developer.

#1 – Android App Developer


An Android app developer is a programmer who focuses on software creation for mobile devices such as smartphones or wearables using the Android operating system.

How much does an Android App Developer make per year?

Figure: Average Income of an Android App Developer in the US by Source.

The average annual income of an Android App Developer in the United States is between $85,000 and $126,577 with an average of $106,923 and a statistical median of $107,343 per year.

? Learn More: I’ve written a full guide on this career path and published it on the Finxter blog here.

#2 – iOS App Developer


An iOS app developer is a programmer who focuses on software creation for Apple mobile devices such as iPhones or wearables such as Apple Watches. Most mobile app developers create smartphone apps for the iOS or watchOS mobile operating systems using the Swift programming language.

How much does an iOS App Developer make per year?

iOS developer income by source (United States)

The average annual income of an iOS Developer in the United States is between $83,351 and $145,000 with an average of $110,331 and a statistical median of $111,716 per year.

? Learn More: I’ve written a full guide on this career path and published it on the Finxter blog here.


#3 – Firebase Developer


Firebase is a Google-based platform to create mobile and web applications easily. Firebase developers are programmers who create mobile apps with Firebase

The average annual income of a Firebase Developer is approximately $80,000 according to PayScale (source).

? Learn More: I’ve written a full guide on this career path and published it on the Finxter blog here.

#4 – Flutter Developer


A Flutter Developer developer creates, edits, analyzes, debugs, and supervises the development of Android mobile apps written in the Flutter programming framework using the Dart programming language.

The average income of a Flutter developer in the US is $112,125 per year or $57.50 per hour. Entry-level Flutter developers start with approximately $100,000 per year. Experienced developers make up to $159,900 per year. (source)

? Learn More: I’ve written a full guide on this career path and published it on the Finxter blog here.

#5 – Kotlin Developer


A Kotlin Developer is an Android app programmer using the Kotlin programming language.

Kotlin is JVM compatible and, thus, fully compatible with Java. That’s why it’s often used as an alternative to Java when developing Android applications.

The average annual income of a Kotlin Developer is $102,000 according to PayScale and averages between $113,000 to $147,000 per year according to Ziprecruiter.

? Learn More: I’ve written a full guide on this career path and published it on the Finxter blog here.

#6 – Swift Developer


A Swift developer is a programmer who creates software and mobile applications for the Swift programming language for iOS, iPadOS, macOS, tvOS, and watchOS. (Source)

The average annual income of a Swift Developer is between $93,000 (25th percentile) and $114,500 (75th percentile) according to Ziprecruiter (source).

? Learn More: I’ve written a full guide on this career path and published it on the Finxter blog here.

Bonus #7 – Alexa Developer


Alexa is the cloud-based voice service distributed and sold by Amazon. It is available on hundreds of millions of devices and from third-party device manufacturers.

An Alexa developer creates voice applications, so-called Alexa Skills, that run on the Alexa mobile device using the Alexa developer environment.

The average income of an Alexa skill developer in the US is $88,617 per year according to ZipRecruiter. This is approximately $42 per hour, $1,704 per week, or $7,385 per month.

Conclusion


A mobile app developer is a programmer who focuses on software creation for mobile devices such as smartphones or wearables. Most mobile app developers create smartphone apps for the Android, macOS, or Windows mobile operating system.

This article has shown you six main areas of focus. The technologies presented here overlap significantly but I hope reading this article has given you an initial glimpse into the world of mobile app development.


https://www.sickgaming.net/blog/2022/06/...s-in-2023/

Print this item