Lucy is afraid of the forest, just like any other child: every night, the echoing roars rob her of her sleep. Not even her dreams are a safe place where she could play.
People disappearing is nothing uncommon in the village, but this time, Lucy is old enough to investigate on her own. Or so she thinks.
Children of Silentown is a point & click adventure game telling a mysterious and endearing story. Explore the town and its dangerous surroundings, meet its quirky inhabitants, solve puzzles and master minigames.
Accompany Lucy on her adventure to get to the bottom of what is haunting the strange Silentown... if you dare.
“Machine Learning is about finding patterns in the data” explains Joel Lucas, a data scientist at TailTarget. Joel specializes in Deep Learning, a sub category of Machine Learning that includes defining and modeling data to get the right answers. He shows a demo where the program was trained to writ...
Posted by: xSicKxBot - 01-09-2023, 07:54 AM - Forum: Python
- No Replies
Block Websites Using Python in Windows
Rate this post
Recently I came up with an idea to block certain websites because I didn’t want my little brother to surf certain sites while he was using my laptop. Being a smart kid, he knew ways of uninstalling chrome extensions that I used to block websites. That is when I came up with the idea of creating my own website blocker script. He wouldn’t have any clue what actually happened in the backend.
Project Description
Thus, in this project, we are going to create a website blocker with the help of Python. Our script will bring up a window where we can enter the name of the websites that we want to block and then we can use the block button in the window to block those websites. We will also create another script that will unblock the websites that we previously blocked. The unblock script will be a simple command line script that will help you unblock the previously blocked websites.
Note that we will be working with the hosts file of our system to block and unblock the websites. Simply put, the hosts file is a system file which has the capability to override DNS and redirect URLs or IP addresses to different locations. In our case, we will simply redirect the websites to be blocked to our local ip address, i.e. ‘127.0.0.1’ .
So, without further ado let us dive into our fun project.
Step 1: Import the Necessary Libraries
All we need is the Tkinter Module to create our GUI blocker application. You can install Tkinter using the pip installer on your terminal:
Tk() allows you to create an empty GUI window where you can add labels and buttons,
The geometry() function will allow you to specify a width and height of the window.
resizable(0,0) allows you to set a fixed size for the window.
The title() function allows you to set the title of the window.
The Label() widget allows you to display more lines of text which can only be seen but cannot be modified by the user.
Let’s explore the different parameters that I used in the Label widget.
root – This is the name which use to refer our window.
text – Used to specify the text that we want to display on the label.
font – This determines the type of font our label text will appear in.
pack – Used to organize the widget in a block.
Text() is used to create a widget for multi-line text areas. Let’s understand some of the parameters used within Text() –
wrap = WORD allows you to break a line after the occurrence of the last word.
padx allows you to specify the padding around the text. This means, it allows you to put an extra bit of space on right and left ends of the text widget.
pady allows you to specify the padding on top and bottom side of the text widget.
Step 3: Define the Host Address and IP Address
Since we want to block the websites on our system, hence you need to add them to the system host file. To do so, you will need to specify the host address and the IP address.
Now, we need to create the function that will allow us to block a certain website. Therefore, as soon as you feed in the website name and click on the block button on the application, the website will be blocked immediately. If the website is already present within the host file then the application window will display a message that the website is already blocked.
Code:
def Blocker(): website_lists = Websites.get(1.0, END) Website = list(website_lists.split(",")) with open(host_path, 'r+') as host_file: file_content = host_file.read() for website in Website: if website in file_content: Label(root, text='Already Blocked', font='arial 12 bold').place(x=200, y=200) pass else: host_file.write(ip_address + " " + website + '\n') Label(root, text=" Blocked ", font='arial 12 bold').place(x=230, y=200)
Explanation:
website_lists will store all the websites entered to be blocked by the user. Note that the get function used will allow you to fetch the websites entered within the text widget of the application.
Open up the system host file in the read and write mode (r+).
We then check the contents of the host file and if a website is already present within the file then we ask the widget to display a message -” Already Blocked!”. Otherwise, we simply go ahead and the website to the host file and then display the message – “Blocked”.
That’s it. All that remains to be done is to create a block button for our application.
Step 5: Creating the Block Button
We need a button that triggers the Blocker function as soon as it s pressed. Thus, our next step is to create the block button and attach the Blocker function to this button.
Button() function allows you to create a button on the application.
The command parameter is used to call the Blocker function as soon as the button is clicked by the user.
The activebackground parameter is used to set a background color for the button when it is clicked.
Note that we have already discussed all the other parameters used within the Button function previously in step 2.
The place function allows you to align or place the button at a particular position in the application.
root.mainloop() is the Tkinter method that tells Python to run the Tkinter event loop. The mainloop method listens to events like button clicks or keypresses, and halts any code that comes after it from executing until you close the window where you called the method.
Putting It All Together
Woohoo!!! We have successfully created our “Website Blocker” application. Finally, when you put everything together, this is how the complete script looks like –
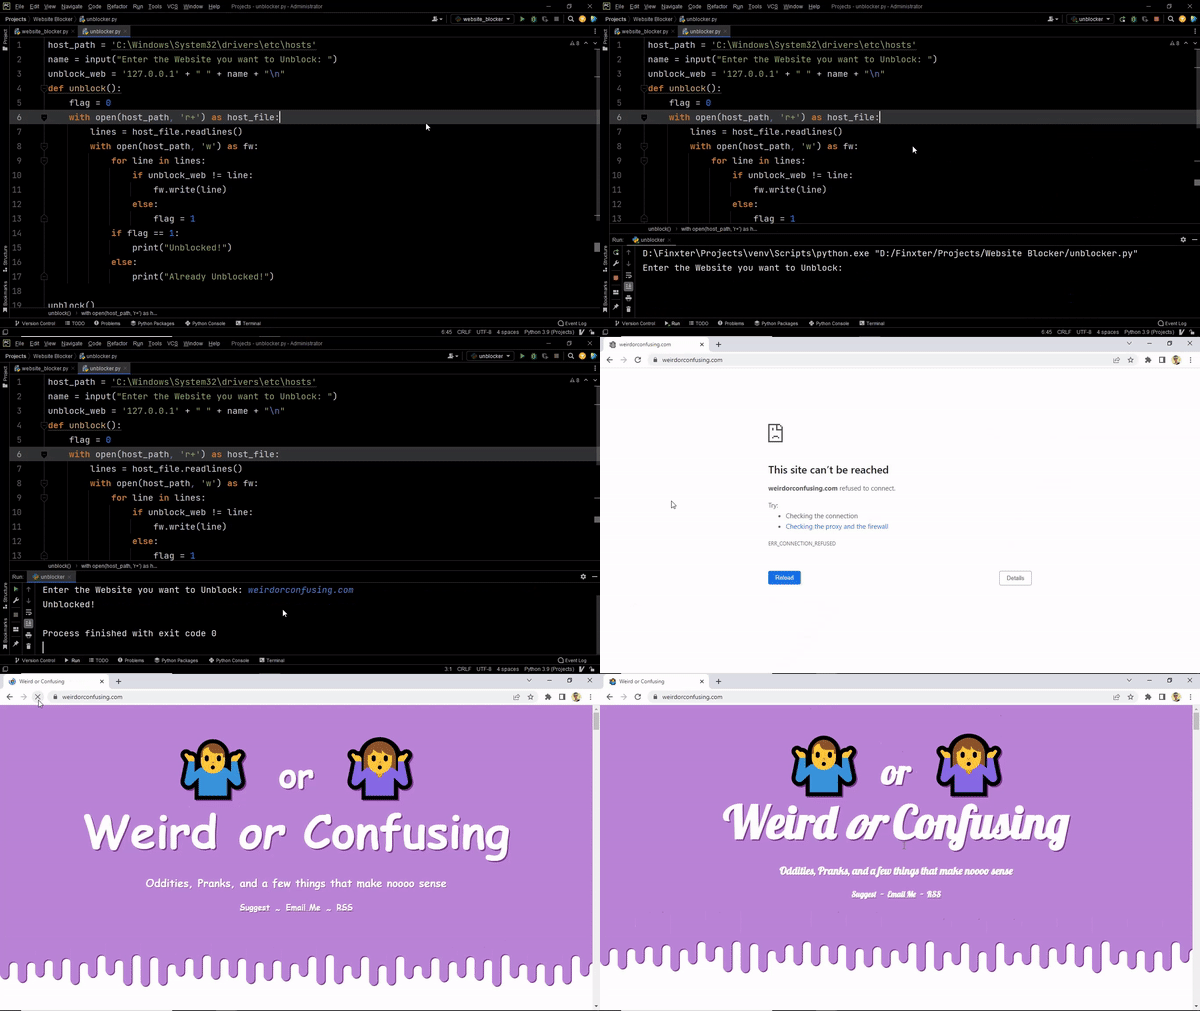
Once you have successfully blocked the required websites, what if you want to unblock them later on? That’s exactly what the next script will do.
The idea is to replicate the above process, the only difference in this case is we will remove the webiste name from the hosts file now.
Code:
host_path = 'C:\Windows\System32\drivers\etc\hosts'

name = input("Enter the Website you want to Unblock: ")

unblock_web = '127.0.0.1' + " " + name + "\n"

def unblock(): flag = 0 with open(host_path, 'r+') as host_file: lines = host_file.readlines() with open(host_path, 'w') as fw: for line in lines: if unblock_web != line: fw.write(line) else: flag = 1 if flag == 1: print("Unblocked!") else: print("Already Unblocked!") unblock()
Output:
Conclusion
There we go! We have our complete application. This can be extremely handy if you wish to block or unblock websites from your system. I hope this project added some value and helped you in your coding quest. Stay tuned and subscribe for more interesting projects and tutorials.
Posted by: xSicKxBot - 01-09-2023, 07:54 AM - Forum: Lounge
- No Replies
Stranger Things Star Noah Schnapp Comes Out As Gay On TikTok
Noah Schnapp, the young actor who plays the closeted gay teenager Will Byers on Netflix's Stranger Things, has come out in real life as gay. Posting to TikTok on Thursday, the 18-year-old Schnapp wrote that friends and family were supportive.
"When I finally told my friends and family I was gay after being scared in the closet for 18 years and all they said was 'we know'," Schnapp said.
The star added a lip-synch video over the quote "you know what it never was? That serious. It was never that serious. Quite frankly, will never be that serious" with the text "I guess I'm more similar to Will than I thought."
Looking for an alternative to heavy web servers and the deployment of WAR files to deploy microservices? Spring Boot is one of the ways you can easily create stand-alone applications that will get you up and run quickly. You can create Java applications that start using java -jar. There is no need f...
Hacking Network File System (NFS) – A TryHackMe Walkthrough
5/5 – (1 vote)
OBJECTIVE
NFS (network file system) is a file system that enables file sharing between computers of different operating systems (Windows/Linux/Mac).
In this practice box from TryHackMe, we will hack into NFS and exploit a misconfiguration (No-root Squash) to obtain root access and find our final root.txt flag.
WHAT IS NO-ROOT SQUASH?
No-root Squash is an uncommon configuration (some might say a misconfiguration) on the NFS file system.
When enabled, it allows remote users to change file permissions on any file and also to add a SETUID bit to effectively run programs as the root user. Normally it is disabled to protect against hackers, and all root-created files are assigned to an unprivileged owner named nfsnobody.
Recommended: If you are interested in learning more technical details about how this works, I’d recommend this article on no_root_squash and other configuration options when using NFS.
ENUMERATION
We’ll start with a standard Nmap scan of all ports with the -p- flag:
nmap $targetIP -p-
The scan shows an nfs service running on port. Let’s find out what directories are mountable with the command:
showmount -e $targetIP
(-e for exports)
Let’s go ahead and mount the /home directory to our target machine. I’m using Parrot OS virtual machine with a Mate desktop environment running in Gnome Boxes. We can mount the nfs directory directly to our local filesystem with the command:
mount -t nfs $targetIP:/home /mount
(-t indicates filetype)
And now we can continue further enumeration by poking around the filesystem.
cd /mount

ls -la
We find a user folder in the home directory, cappuccino and a hidden directory .ssh. Inside the directory there is an id_rsa file that holds a private ssh key.
INITIAL FOOTHOLD – USER CAPPUCCINO
After copying the id_rsa over to our target machine, we can ssh into cappuccino’s account with this command:
ssh -i id_rsa cappuccino@$targetIP
ENUMERATING PRIVILEGE ESCALATION ATTACK VECTORS WITH LINPEAS
Now that we have our initial foothold, we can grab a copy of the well-known script linpeas.sh from the official git repo and use it to automate the enumeration of attack vectors for privilege escalation on the target machine. We’ll navigate to the /mount folder and use the command wget on our attack machine for this:
Before running the sh program from our target machine, we need to add execute permissions to the file from our attack machine.
The beauty of mounting NFS file systems in Linux is evident here as we can easily add permissions to linpeas.sh from our attack machine to set up the program to be executable on the target machine.
chmod +x linpeas.sh
Now that linpeas.sh is located in the /home folder of the target machine, we can run it to start the automated enumeration:
./linpeas.sh
This will dump a long text file full of details about the target machine. The most interesting things for privilege escalation are highlighted in yellow with red text.
Scrolling through the results, we quickly find the no_root_squash listed under NFS. We will now move forward and exploit this misconfiguration, allowing us to escalate privileges to the root user.
EXPLOITING NO_ROOT_SQUASH
First, let’s grab the bash executable for Ubuntu Server 18.04 from the link on TryHackMe.
Riot Games has announced Lotus, the ninth map to be introduced in Valorant. In addition to introducing a new map, Episode 6 Act 1, set to go live on January 10, will feature a new battle pass and Araxys skin line.
Lotus will be a three-site map similar to Haven and is set in Omega Earth's India, specifically in the Western Ghats. The map will also have inspired traditional Indian step wells and rock-cut Dravidian architecture. Players will also be able to utilize new mechanics such as rotating doors, destructible doors/walls, and a silent drop on Lotus.
Lotus will be the ninth map in Valorant.
The new battle pass will cost 1,000 VP, amounting to $10. Players can earn free rewards such as the 9 Lives Classic Gun Skin, Big Announcement Gun Buddy, PlayZilla Dan Card, and the Shock Heart Spray. Those who purchase the battle pass can earn items such as the Venturi Vandal, Venturi Knife, Rift Rider Card, Perfectly Roasted Spray, and Folded Wish Gun Buddy.
#JavaEE 8 Update session at #JavaOnehttps://t.co/5P7E7b92Og pic.twitter.com/gPCZCyzon4 — Java (@java) September 2, 2016 The Java Trove: explore libraries that will improve your productivity. #Java @aalmiray https://t.co/B7WIuRUjRi pic.twitter.com/kCbqmuE0kj — Java (@java) August 31, 2016 Check out t...
Posted by: xSicKxBot - 01-07-2023, 04:33 AM - Forum: Python
- No Replies
Strategic Investing with Python: Ensuring Your Kids Have $70k at 21
5/5 – (2 votes)
As a parent, planning for your children’s future is one of the most important things you can do.
To ensure they have the best possible start in life, I’ve been looking into ways to invest money to provide them with a lump sum of $70k when they reach 21. But I don’t want to spend that much money at once when they turn 21.
So what to do?
In this blog post, I’ll be exploring how Python helped me figure out a simple investment plan, so I can give my kids a nice nest egg without needing to spend a lot of our (parents’) money at once.
Result: I need to set up a savings plan contributing $90 per month for 21 years in a vehicle earning 9% per year (e.g., S&P500 ETF), so my kids get a $70k nest egg when they start into their own lives.
Here’s the Python code — I’ll explain it in a moment:
import matplotlib.pyplot as plt

import numpy as np # Define initial investment value, investment return, and monthly contributions

initial_investment = 1000

investment_return = 0.09

monthly_contributions = [30,60,90]

num_years = 21 # Create list of portfolio values over time for each savings rate

portfolio_values = []

for contribution in monthly_contributions: portfolio = [initial_investment] portfolio_value = initial_investment for i in range(1,num_years-1): portfolio_value = portfolio_value * (1 + investment_return) + contribution * 12 portfolio.append(portfolio_value) portfolio_values.append(portfolio) # Plot portfolio values over time

time = np.arange(1,num_years)

for i in range(len(monthly_contributions)): plt.plot(time, portfolio_values[i], label='$' + str(monthly_contributions[i]) + '/m')

plt.title('Portfolio Value over Time')

plt.xlabel('Time (years)')

plt.ylabel('Portfolio Value ($)') # Add end value labels

for i in range(len(monthly_contributions)): plt.text(num_years-3, portfolio_values[i][-1], '$' + str(int(portfolio_values[i][-1]*1.3))) plt.legend()

plt.show()
Result:
This code snippet plots the value of a portfolio for different monthly contributions over a period of 21 years.
You specify the
initial investment value,
investment return,
number of years, and
monthly contributions.
Then, you create a list to store the portfolio values over time for each monthly contribution.
You calculate the portfolio values by multiplying the previous value of the portfolio by the investment return plus the contribution for each month. You repeat this calculation over the number of years minus one, taking the initial investment into account.
You use Matplotlib to plot the portfolio values. The x-axis is the time in years and the y-axis is the portfolio value in dollars.
You add a title and labels to the plot. You also add the end value for each of the portfolios to the plot with a text label. Finally, you display the plot.
Action Steps
Copy the code into your own Python script.
Figure out your (base) investment goals for your kids or yourself. What do you need to accomplish? What would be your dream outcome?
Change the input values until you’re happy with your results.





 Recommended: If you are interested in learning more technical details about how this works, I’d recommend


