Hello everyone, I have here a list of games that should work pretty universally across windows PC's. Mostly thought of as LAN games but you could setup a VPN and make it available to anyone who connects to your VPN. You could see some being used with hamachi which is also just a type of vpn or tunnel connection. Now that we have a brief introduction, let's begin.
Number 1:
Cod4-Cod7or8?
These games are iffy which versions you use that work for LAN/WAN.
Plutonium offers working LAN files for World at War, Black Ops 1, Black ops 2, and Modern Warfare 3.
You can go through their site if you want https://plutonium.pw/
You will need to sign up to connect to their servers anyways.
But there's work arounds that keep LAN available even if they go down. So good to keep in mind and keep backups.
IW4X it's a MW2 crack with extra stuff like new gamemodes weapons maps etc
Cod ghost, Advanced warfare and mw2(2009) with xlabs Mwr with h1
Number 2:
Diablo II (2): Lord of Destruction
1 of my favorites, easiest to use. I love that it is a direct play game. Can copy all the files directly to new PC and play from there. Or have files hosted on server and play from any pc that has folder mounted to it. Well onto the next point. LAN works well with this version. up to 8 players can join also. Lot's of fun, can be kind of grindy though. Should work with VPN pretty easily also. Can be found on most torrent sites.
Number 3:
Age of Empires 2: HD
Pretty simple base empire building game. Control armies with satellite view of the map and send units anywhere immediately. Not turn based like civilization.
Number 4:
Civilization 3-4
Turn based civilization building game. Control entire countries. With 2+ people the game can get kind of long unless the others know how to play. Can be real fun if you like in depth strategy games. Civ3 has a max lan multiplayer of 8. Civ4 I think has 4. Not sure about civ2
Number 5:
Counter Strike 1.6
It's a classic ofc CS 1.6 has lan and is very easy with direct play to change user names and connect to each other. Use to do play it in high school off thumb drives. Definitely a classic. Can host up to 32 players also. BIG lobbies.
Notable Mentions: (Other games I found across reddit they claimed worked and I want to keep track of for later testing, if you know more please comment more below so we can add to the list!)
Left 4 Dead 1 and 2 (Back 4 Blood | the next l4d)
Age of Empires 2: HD
Earth 2150
Battlefield 2
Battlefield 1942
Battlefiled bad company 2. from nosteam multiplayer.
BattleField 3/4
Retrocycles
Warcraft 3
Medal of Honor: Allied Assault
The Battle of Middle Earth
Divinity: Original Sin 2
Grim Dawn
Barony
Starbound
Borderlands 1
Borderlands 2
Borderlands 3
It takes two
Portal 2
Escape from Tarkov
7 days to die
Monster hunter world
Stardew Valley
Factorio
The forest
farming simulator 19/22
sea of thieves (use a fake xbox account when you are playing multiplayer cracks that require them. online-fix.me, read the megathread. )
forza horizon 4/5 online-fix.me, read the megathread
raft
Resident Evil 5 and 6, only for two people
Evil Dead
halo MCC
GTFO
TRINE series amazing platformer with up to 3 player coop
worm wwd
risk of rain 2
terraria (Reported Working: Razer 1.4.2.1 | found on crackhub)
pummel party
golf simulator
monopoly
Phasmophobia
Forewarned ( Online-fix.me )
Splinter cell chaos theory
Don't starve together
Dying light
Street of rouge
Payday 2
Human fall flat
Sniper elite 4
valheim
Goldberg emulator. used in titles such as Monster Hunter World to enable LAN multiplayer. an alternative is the SSE.
cs.rin.ru/forum
Steam unblocked can help you out.
I'll mention a few other sites that will point you in the right direction and fill this out more later.
Hope this helps for the time being.
nosteamgames.ro
Good list of multiplayer games to choose from!
Counter-Strike: Global Offensive MP-SP
Call of Duty: Modern Warfare 2 MP-SP
Call of Duty: Modern Warfare 3 MP-SP
Call of Duty 4: Modern Warfare MP-SP
Call of Duty: Black Ops SP-MP-ZM online
Counter-Strike Source MP-SP
Grand Theft Auto San Andreas MP-SP
Grand Theft Auto IV MP-SP
Battlefield: Bad Company 2 MP-SP
Call of Duty 5: World at War MP-SP
Call of Duty 2 MP-SP
Left 4 Dead 1 MP-SP
Left4Dead 2 MP-SP
Killing Floor MP-SP
Halo 2 MP-SP
Grand Theft Auto Vice City MP-SP
(From nostream website)
All free to play multiplayer 1 way or another.
New features in Red Hat CodeReady Studio 12.13.0.GA and JBoss Tools 4.13.0.Final for
JBoss Tools 4.13.0 and Red Hat CodeReady Studio 12.13 for Eclipse 2019-09 are here and waiting for you. In this article, I’ll cover the highlights of the new releases and show how to get started.
JBoss Tools or Bring-Your-Own-Eclipse (BYOE) CodeReady Studio requires a bit more.
This release requires at least Eclipse 4.13 (2019-09), but we recommend using the latest Eclipse 4.13 2019-09 JEE Bundle because then you get most of the dependencies pre-installed.
Once you have installed Eclipse, you can either find us on the Eclipse Marketplace under “JBoss Tools” or “Red Hat CodeReady Studio.”
For JBoss Tools, you can also use our update site directly:
Our main focus for this release was improvements for container-based development and bug fixing. Eclipse 2019-06 itself has a lot of new cool stuff, but I’ll highlight just a few updates in both Eclipse 2019-06 and JBoss Tools plugins that I think are worth mentioning.
Red Hat OpenShift
OpenShift Container Platform 4.2 support
With the new OpenShift Container Platform (OCP) 4.2 now available (see the announcement), even if this is a major shift compared to OCP 3, Red Hat CodeReady Studio and JBoss Tools are compatible with this major release in a transparent way. Just define your connection to your OCP 4.2 based cluster as you did before for an OCP 3 cluster, and use the tooling!
CodeReady Containers 1.0 Server Adapter
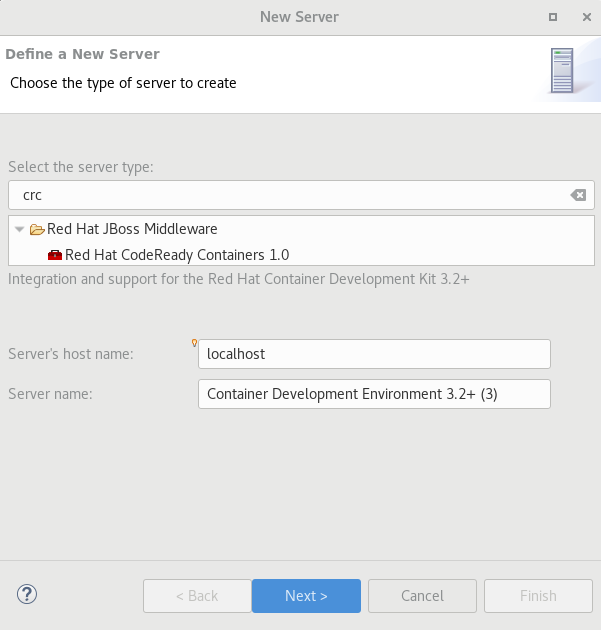
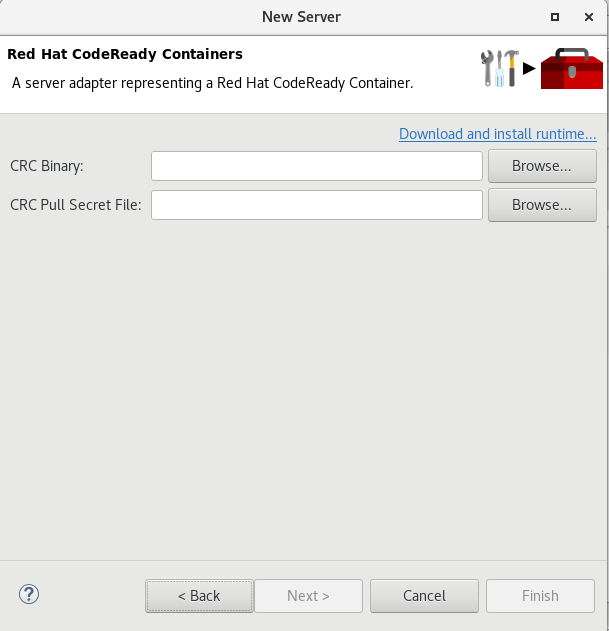
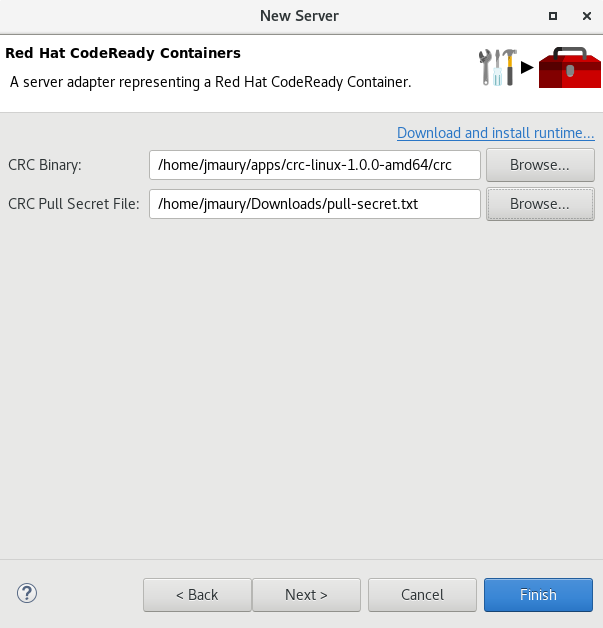
A new server adapter has been added to support the next generation of CodeReady Containers 1.0. Although the server adapter itself has limited functionality, it is able to start and stop the CodeReady Containers virtual machine via its crc binary. Simply hit Ctrl+3 (Cmd+3 on OSX) and type new server, which will bring up a command to set up a new server.
Enter crc in the filter textbox.
You should see the Red Hat CodeReady Containers 1.0 server adapter.
Select Red Hat CodeReady Containers 1.0 and click Next.
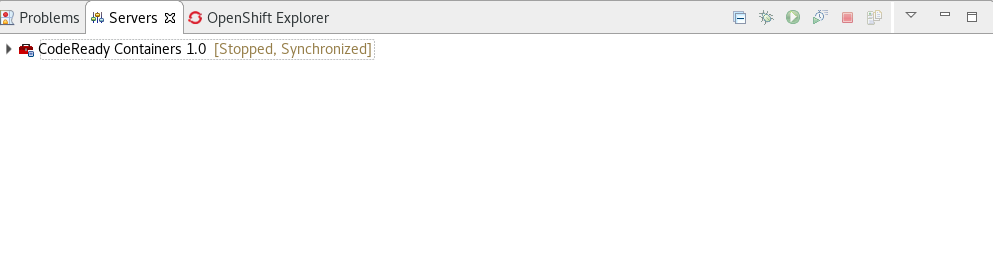
Once you’re finished, a new CodeReady Containers server adapter will then be created and visible in the Servers view.
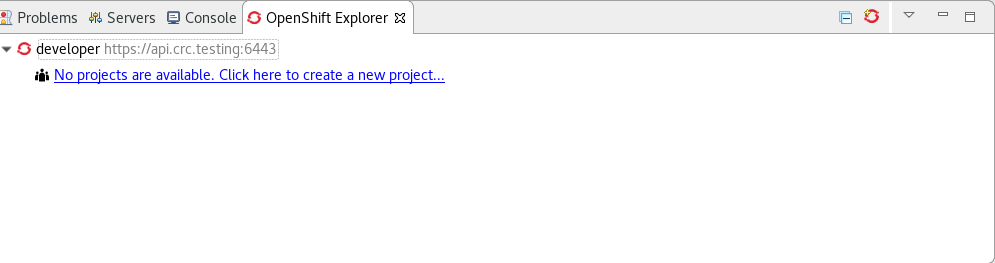
Once the server is started, a new OpenShift connection should appear in the OpenShift Explorer view, allowing the user to quickly create a new Openshift application and begin developing their AwesomeApp in a highly replicatable environment.
Server tools
Wildfly 18 Server Adapter
A server adapter has been added to work with Wildfly 18. It adds support for Java EE 8 and Jakarta EE 8.
EAP 7.3 Beta Server Adapter
A server adapter has been added to work with EAP 7.3 Beta.
Hibernate Tools
Hibernate Runtime Provider Updates
A number of additions and updates have been performed on the available Hibernate runtime providers.
The Hibernate 5.4 runtime provider now incorporates Hibernate Core version 5.4.7.Final and Hibernate Tools version 5.4.7.Final.
The Hibernate 5.3 runtime provider now incorporates Hibernate Core version 5.3.13.Final and Hibernate Tools version 5.3.13.Final.
Platform
Views, Dialogs and Toolbar
Quick Search
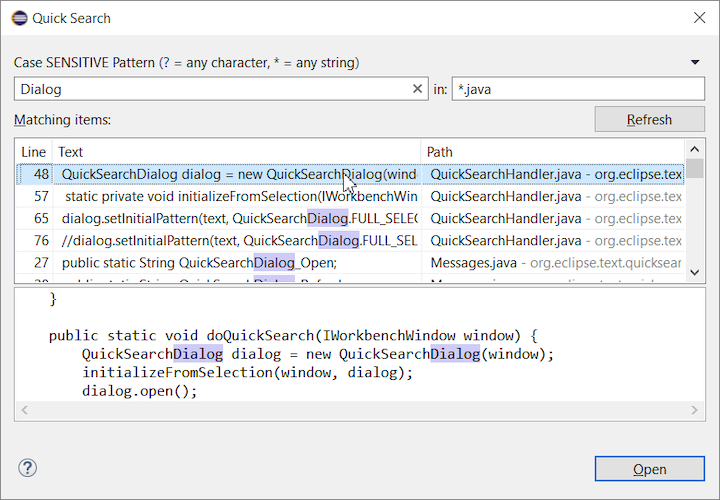
The new Quick Search dialog provides a convenient, simple and fast way to run a textual search across your workspace and jump to matches in your code. The dialog provides a quick overview showing matching lines of text at a glance. It updates as quickly as you can type and allows for quick navigation using only the keyboard. A typical workflow starts by pressing the keyboard shortcut Ctrl+Alt+Shift+L (or Cmd+Alt+Shift+L on Mac). Typing a few letters updates the search result as you type. Use Up-Down arrow keys to select a match, then hit Enter to open it in an editor.
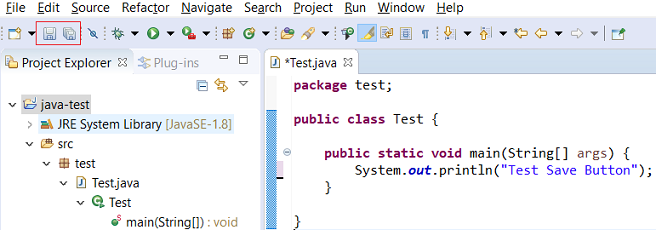
Save editor when Project Explorer has focus
You can now save the active editor even when the Project Explorer has focus. In cases where an extension contributes Saveables to the Project Explorer, the extension is honored and the save action on the Project Explorer will save the provided saveable item instead of the active editor.
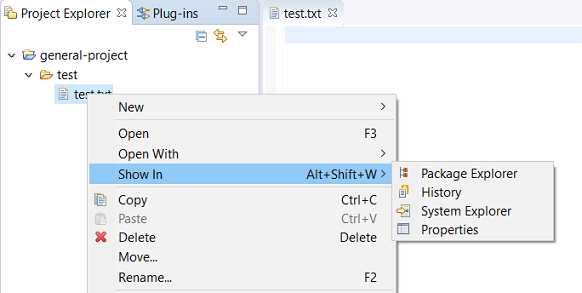
“Show In” context menu available for normal resources
The Show In context menu is now available for an element inside a resource project on the Project Explorer.
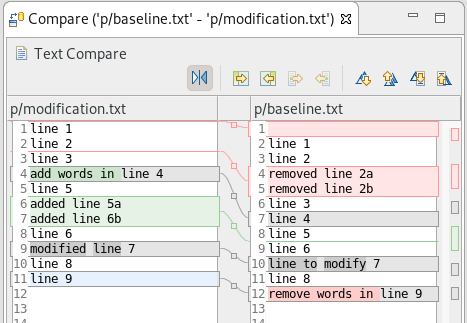
Show colors for additions and deletions in Compare viewer
In simple cases such as a two-way comparison or a three-way comparison with no merges and conflicts, the Compare viewer now shows different colors, depending on whether text has been added, removed, or modified. The default colors are green, red, and black, respectively.
The colors can be customized through usual theme customization approaches, including using related entries in the Colors and Fonts preference page.
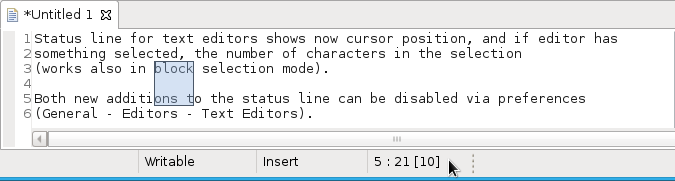
Editor status line shows more selection details
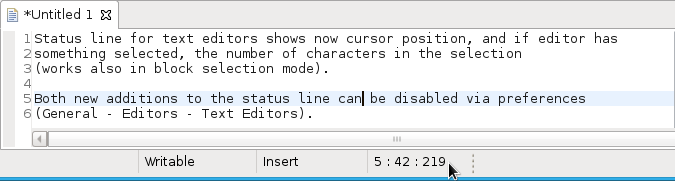
The status line for Text Editors now shows the cursor position, and when the editor has something selected, it shows the number of characters in the selection as well. This also works in the block selection mode.
These two new additions to the status line can be disabled via the General > Editors > Text Editors preference page.
Shorter dialog text
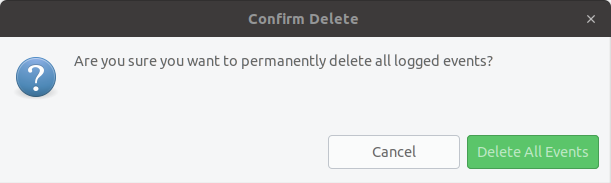
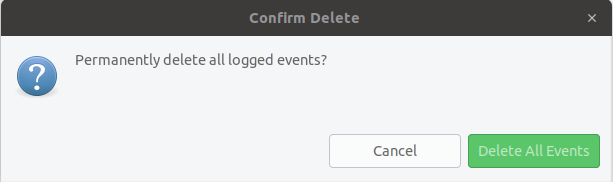
Several dialog texts have been shortened. This allows you to capture important information faster.
Previously:
Now:
Close project via middle-click
In the Project Explorer, you can now close a project using middle-click.
Debug
Improved usability of Environment tab in Launch Configurations
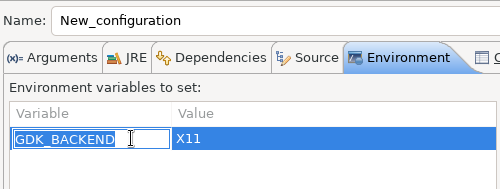
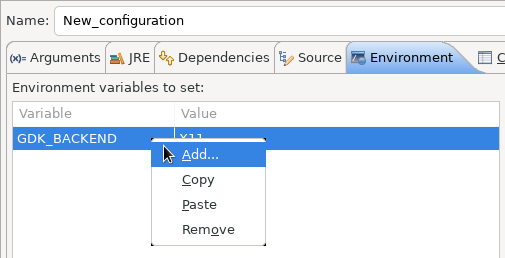
In the Environment tab of the Launch Configuration dialog, you can now double-click on an environment variable name or value and start editing it directly from the table.
Right-clicking on the environment variable table now opens a context menu, allowing for quick addition, removal, copying, and pasting of environment variables.
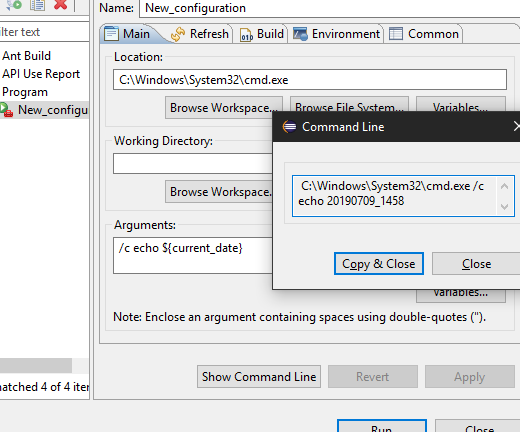
Show Command Line for external program launch
The External Tools Configuration dialog for launching an external program now supports the Show Command Line button.
Preferences
Close editors automatically when reaching 99 open editors
The preference to close editors automatically is now enabled by default. It will be triggered when you have opened 99 files. If you continue to open editors, old editors will be closed to protect you from performance problems. You can modify this setting in the Preferences dialog via the General > Editors > Close editors automatically preference.
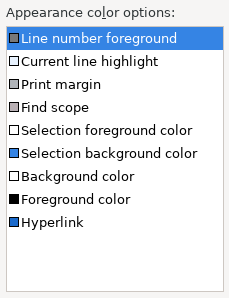
In-table color previews for Text Editor appearance color options
You can now see all the colors currently being used in Text Editors from the Appearance color options table, located in the Preferences > General > Editors > Text Editor page.
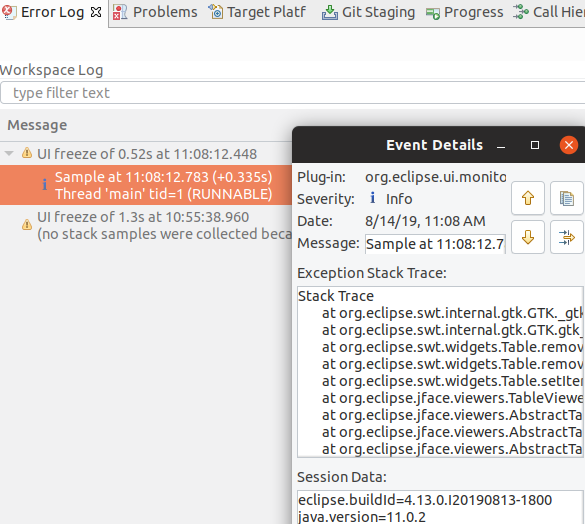
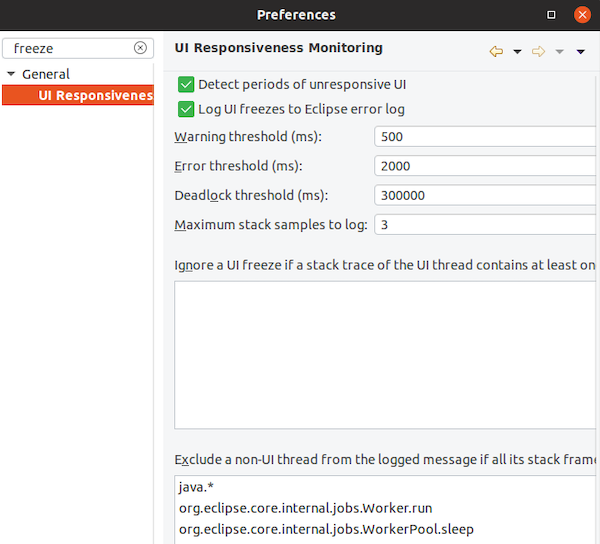
Automatic detection of UI freezes in the Eclipse SDK
The Eclipse SDK has been configured to show stack traces for UI freezes in the Error Log view by default for new workspaces. You can use this information to identify and report slow parts of the Eclipse IDE.
You can disable the monitoring or tweak its settings via the options in the General > UI Responsiveness Monitoring preference page as shown below.
Themes and Styling
Start automatically in dark theme based on OS theme
On Linux and Mac, Eclipse can now start automatically in dark theme when the OS theme is dark. This works by default, that is on a new workspace or when the user has not explicitly set or changed the theme in Eclipse.
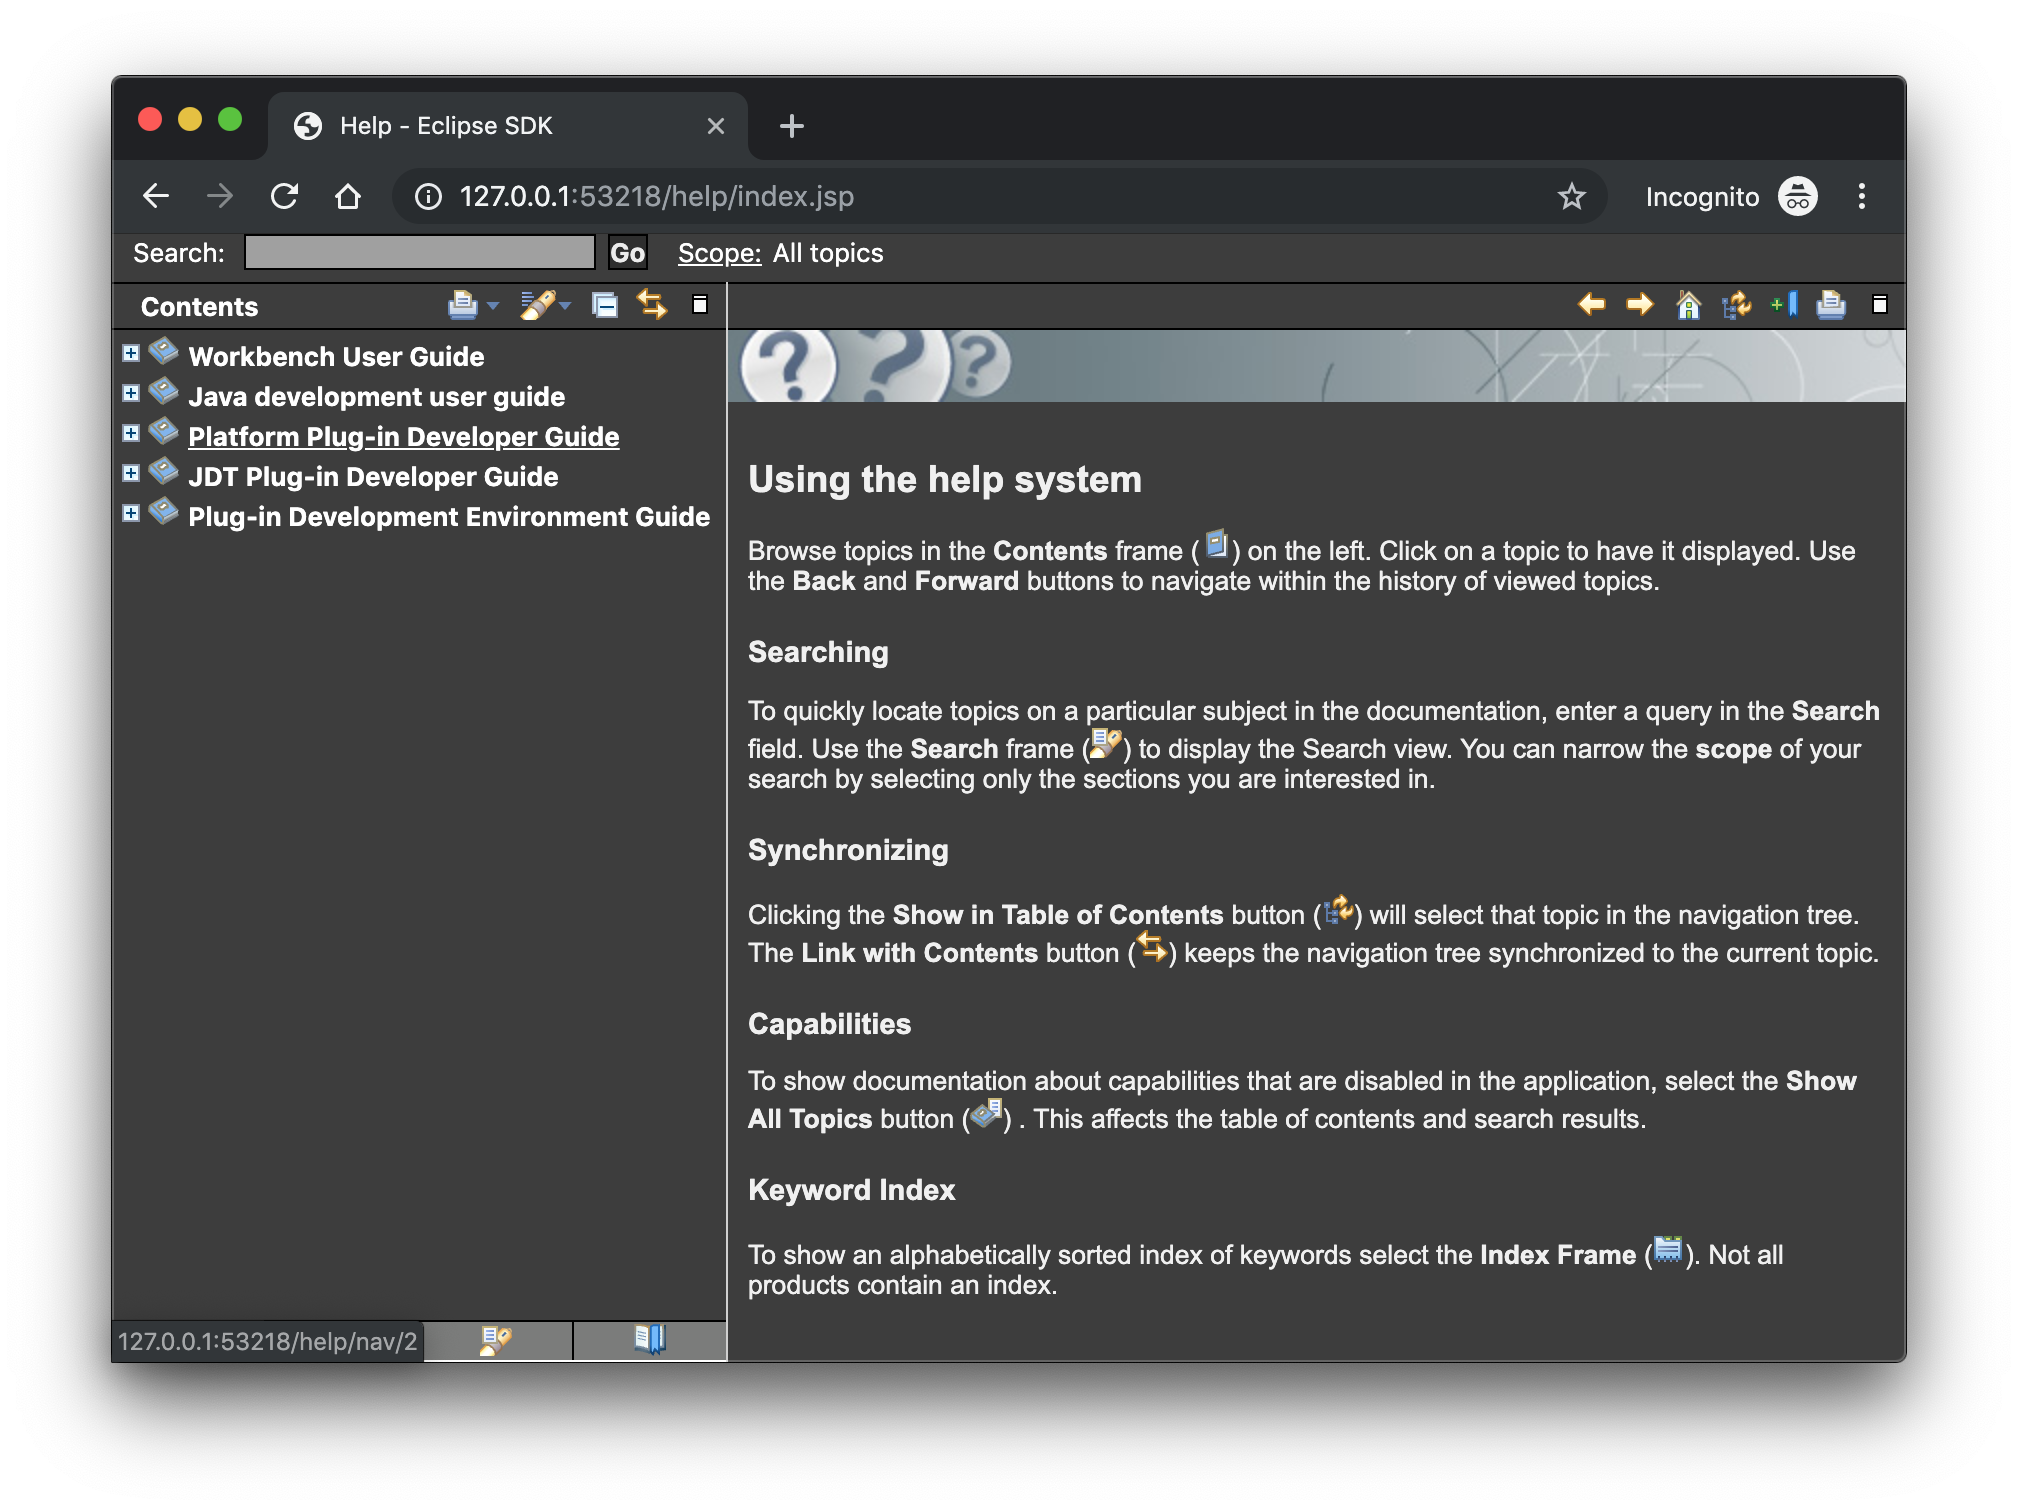
Display of Help content respects OS theme
More and more operating systems provide a system-wide dark theme. Eclipse now respects this system-wide theme setting when the Eclipse help content is displayed in an external browser. A prerequisite for this is a browser that supports the prefers-color-scheme CSS media query.
As of the time of writing, the following browser versions support it:
Firefox version 67
Chrome version 76
Safari version 12.1
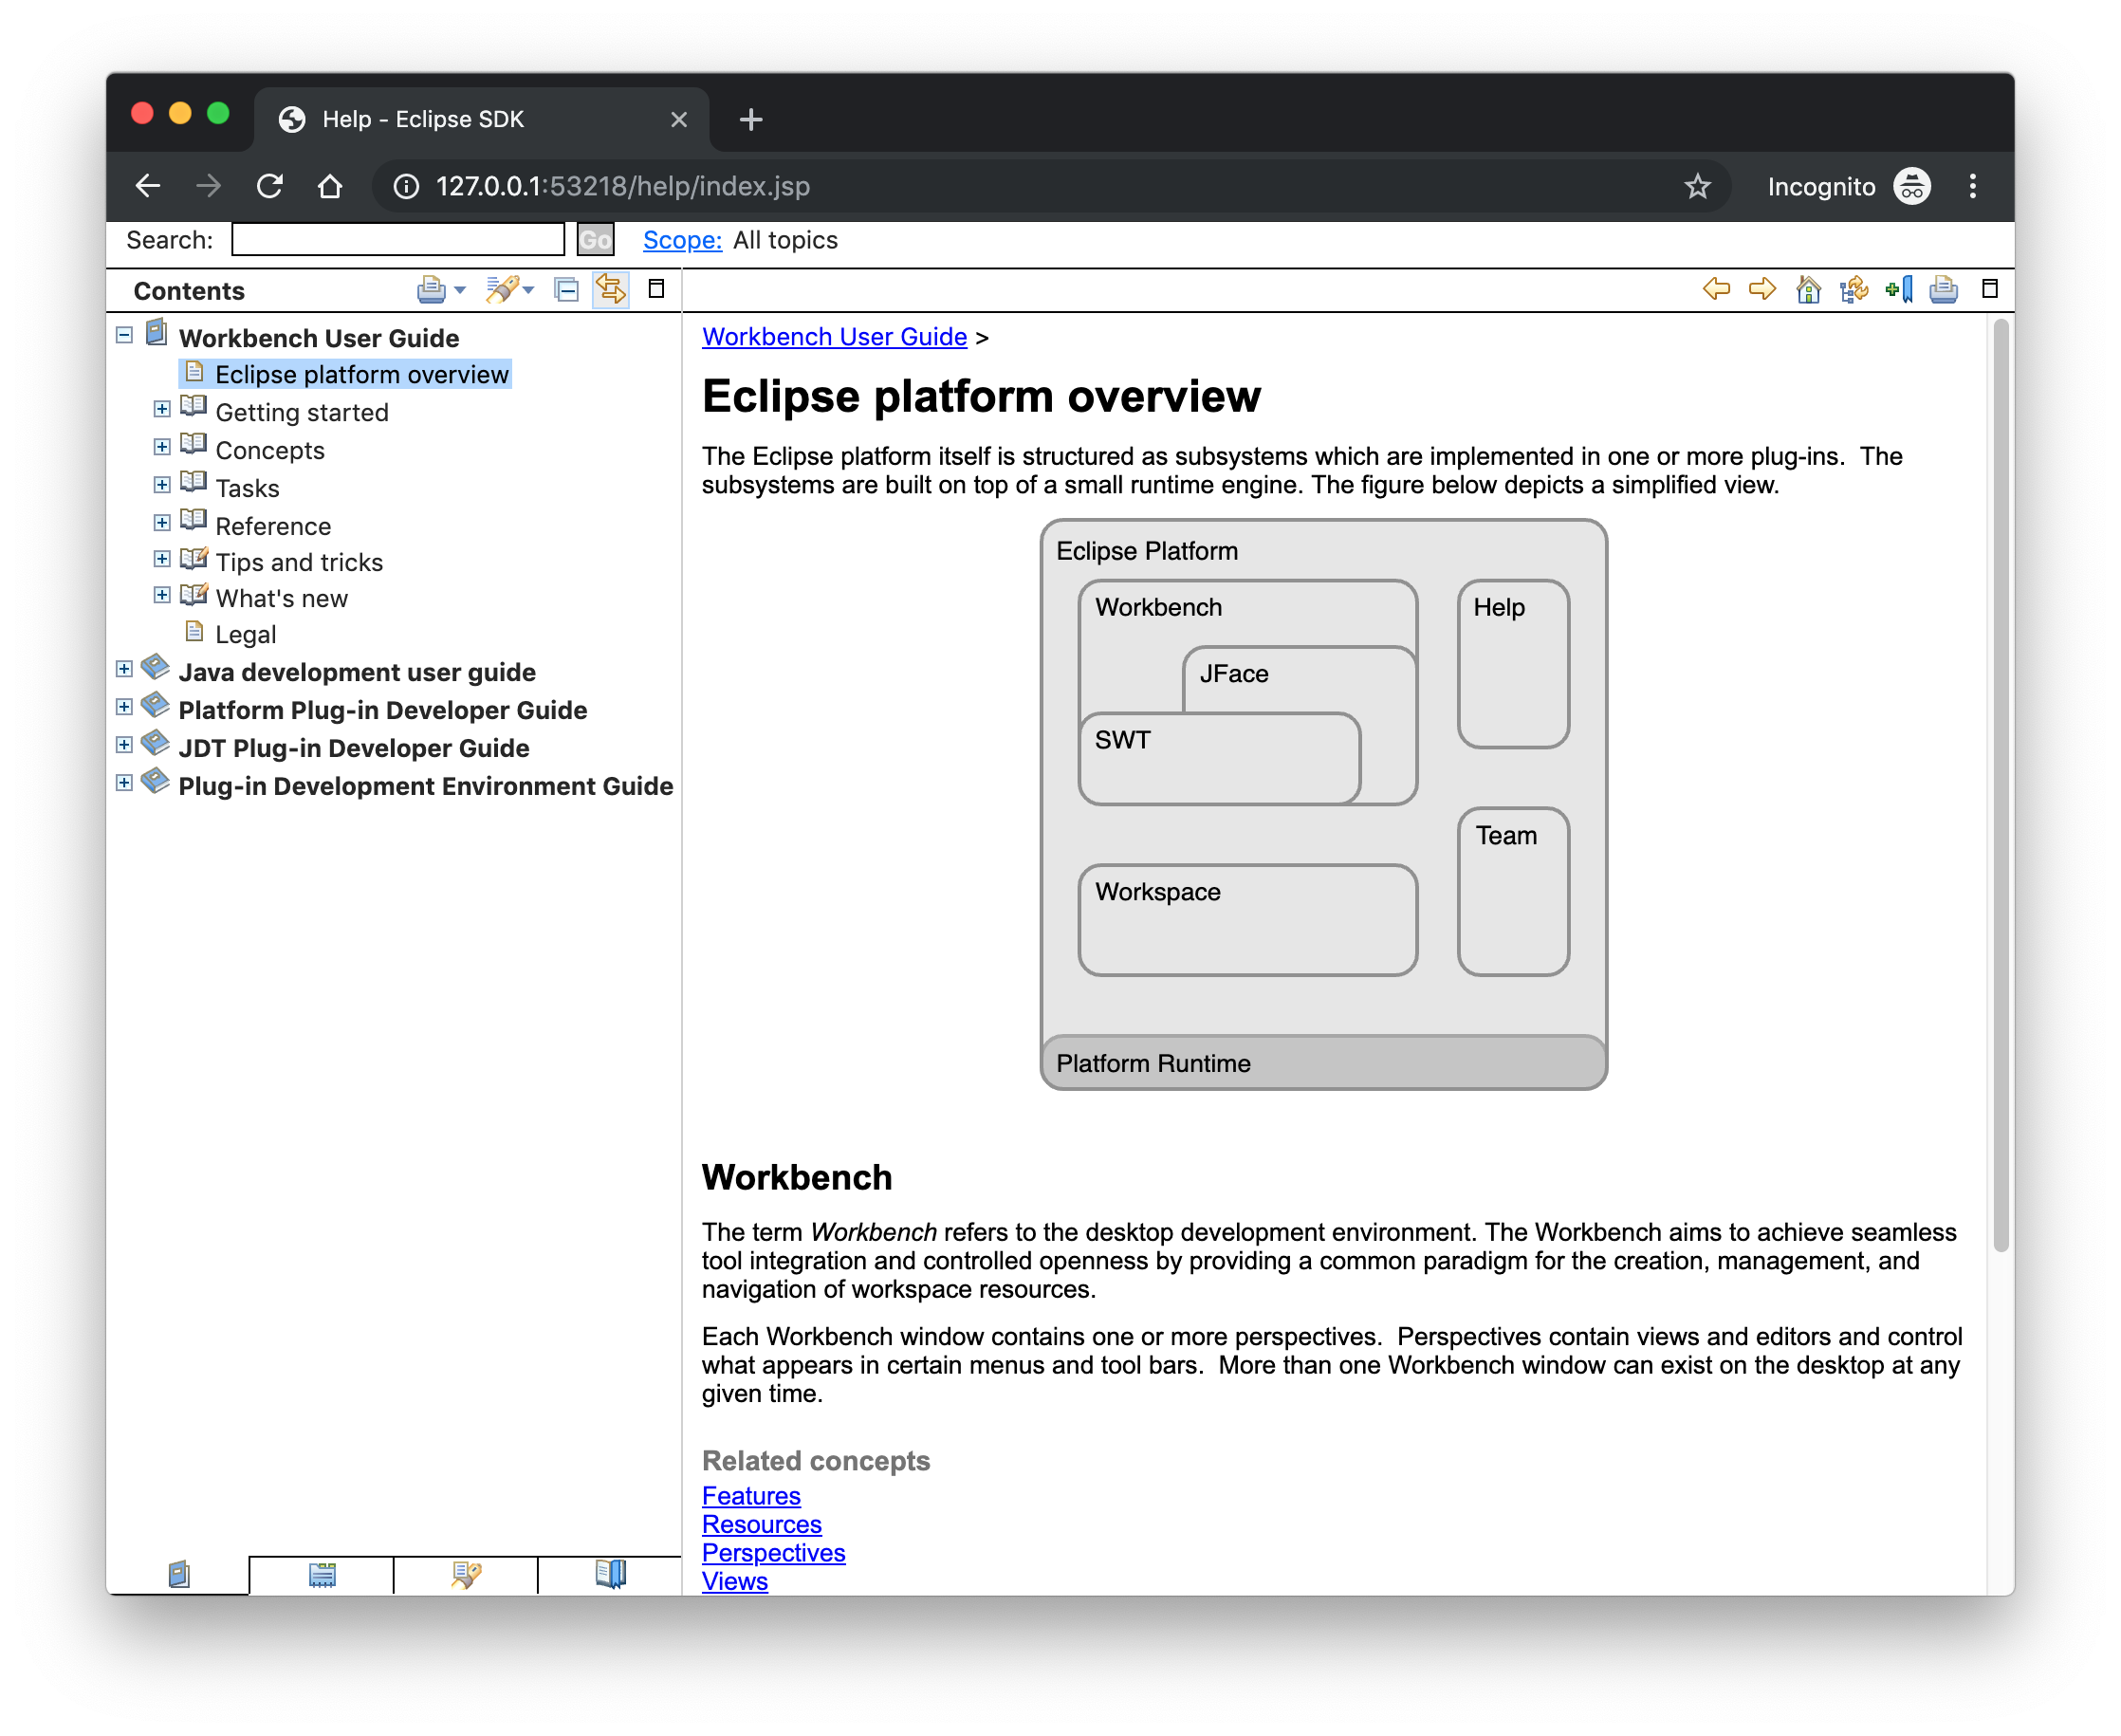
Help content uses high-resolution icons.
The Help System, as well as the help content of the Eclipse Platform, the Java Development Tooling, and the Plug-in Development Environment, now uses high-resolution icons. They are now crisp on high-resolution displays and also look much better in the dark theme.
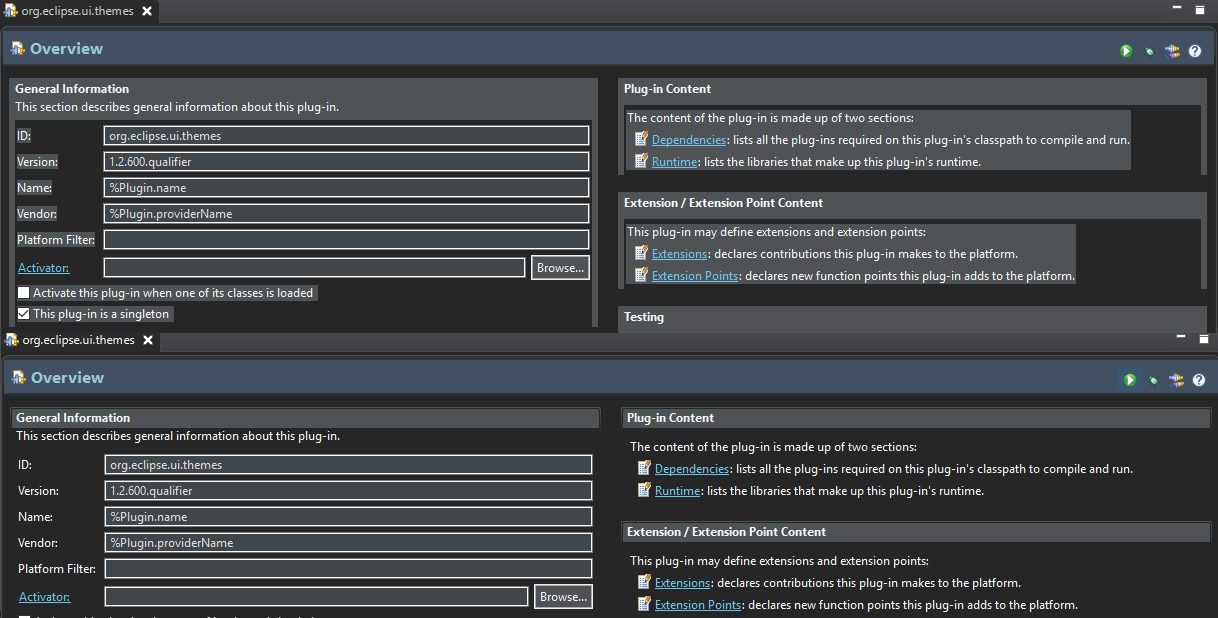
Improved dark theme on Windows
Labels, Sections, Checkboxes, Radio Buttons, FormTexts, and Sashes on forms now use the correct background color in the dark mode on windows.
General Updates
Interactive performance
Interactive performance has been further improved in this release and several UI freezes have been fixed.
Show key bindings when command is invoked
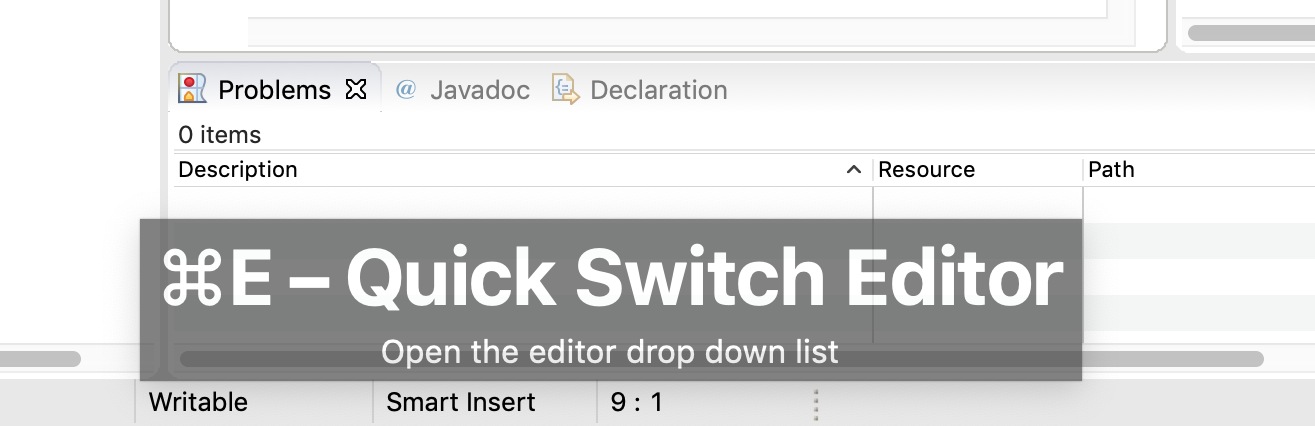
For presentations, screencasts, and learning purposes, it is very helpful to show the corresponding key binding when a command is invoked. When the command is invoked (via a key binding or menu interaction) the key binding, the command’s name and description are shown on the screen.
You can activate this in the Preferences dialog via the Show key binding when command is invoked checkbox on the General > Keys preference page. To toggle this setting quickly, you can use the Toggle Whether to Show Key Binding command (e.g., via the quick access).
Java Developement Tools (JDT)
Java 13 Support
Java 13 is out, and Eclipse JDT supports Java 13 for 4.13 via Marketplace.
The release notably includes the following Java 13 features:
JEP 354: Switch Expressions (Preview).
JEP 355: Text Blocks (Preview).
Please note that these are preview language features; hence, the enable preview option should be on. For an informal introduction of the support, please refer to Java 13 Examples wiki.
Java Views and Dialogs
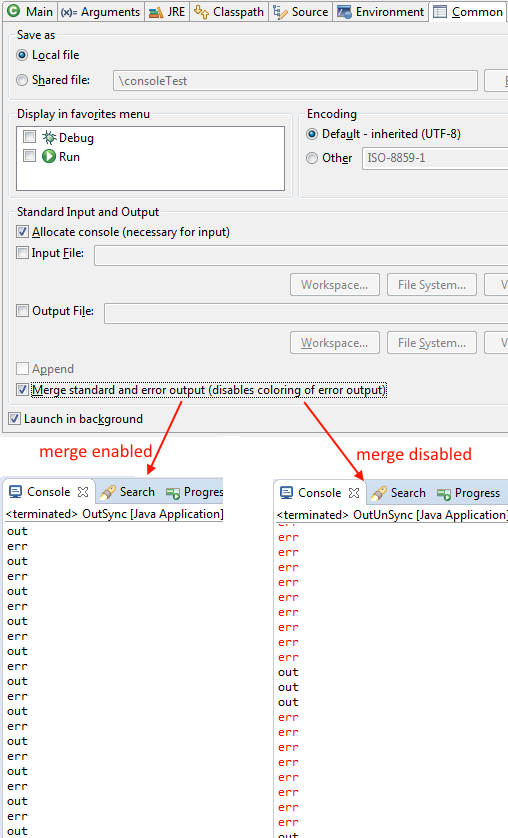
Synchronize standard and error output in console
The Eclipse Console view currently can not ensure that mixed standard and error output is shown in the same order as it is produced by the running process. For Java applications, the launch configuration Common tab now provides an option to merge standard and error output. This ensures that standard and error output is shown in the same order it was produced but also disables the individual coloring of error output.
Java Editor
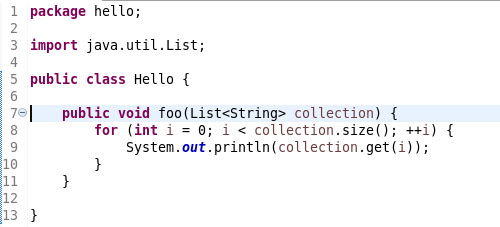
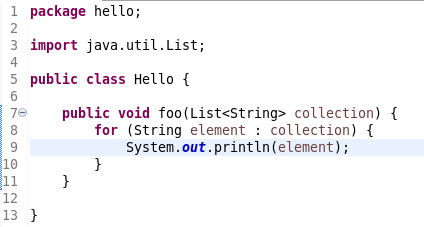
Convert to enhanced ‘for’ loop using Collections
The Java quickfix/cleanup Convert to enhanced ‘for’ loop is now offered on for loops that are iterating through Collections. The loop must reference the size method as part of the condition and if accessing elements in the body, must use the get method. All other Collection methods other than isEmpty invalidate the quickfix being offered.
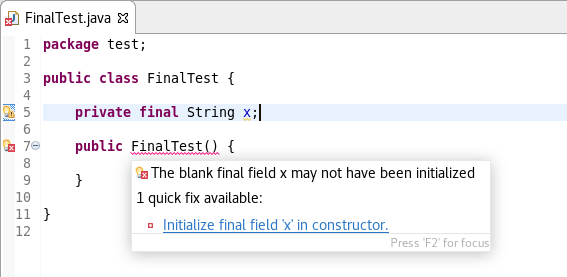
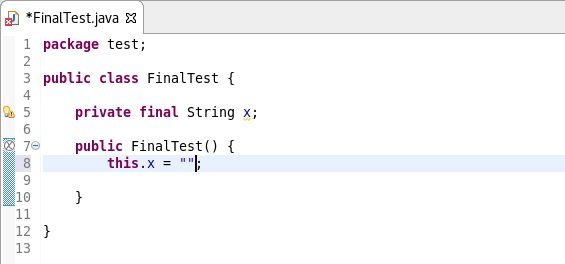
Initialize ‘final’ fields
A Java quickfix is now offered to initialize an uninitialized final field in the class constructor. The fix will initialize a String to the empty string, a numeric base type to 0, and, for class fields, it initializes them using their default constructor if available or null if no default constructor exists.
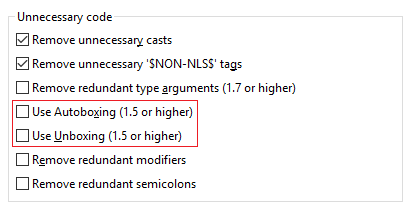
Autoboxing and Unboxing
Use Autoboxing and Unboxing when possible. These features are enabled only for Java 5 and higher.
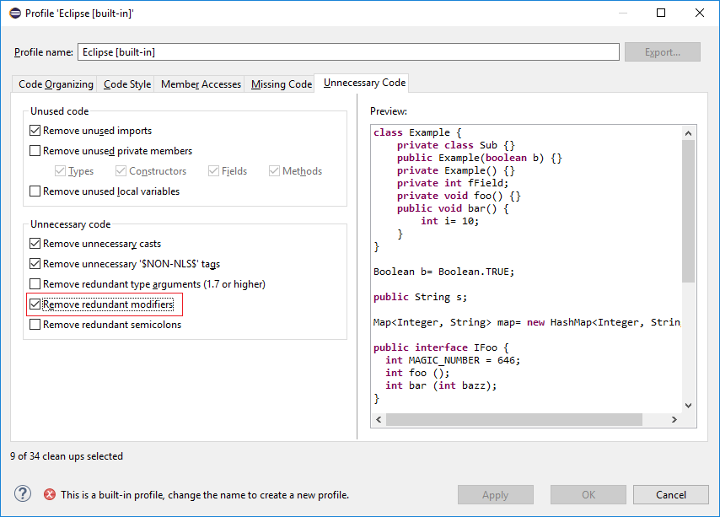
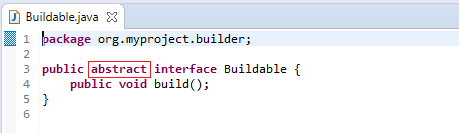
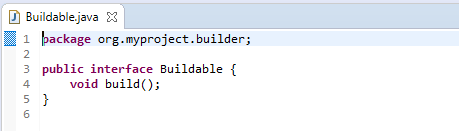
Improved redundant modifier removal
The Remove redundant modifier now also removes useless abstract modifier on the interfaces.
For the given code:
You get this:
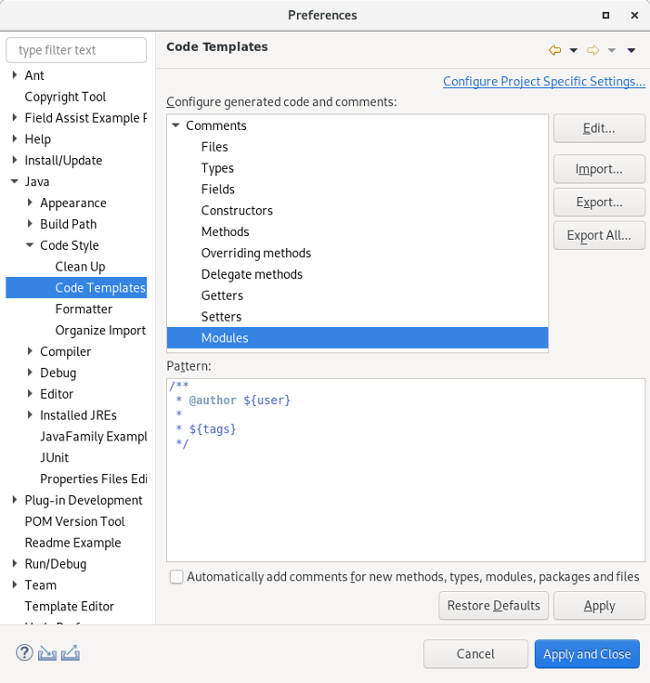
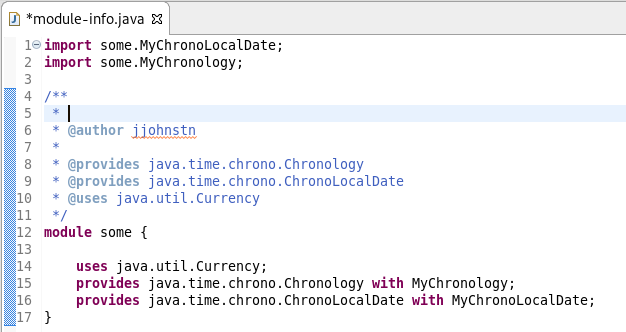
Javadoc comment generation for module
Adding a Javadoc comment to a Java module (module-info.java) will result in automatic annotations being added per the new module comment preferences.
The $(tags) directive will add @uses and @provides tags for all uses and provides module statements.
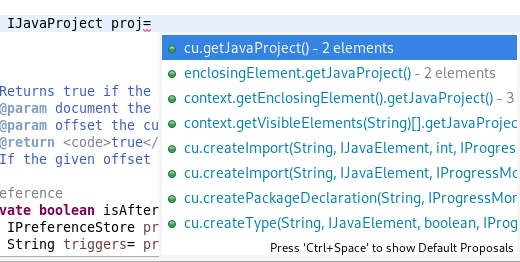
Chain Completion Code Assist
Code assist for “Chain Template Proposals” will be available. These will traverse reachable local variables, fields, and methods, to produce a chain whose return type is compatible with the expected type in a particular context.
The preference to enable the feature can be found in the Advanced sub-menu of the Content Assist menu group (Preferences > Java > Editor > Content Assist > Advanced).
Java Formatter
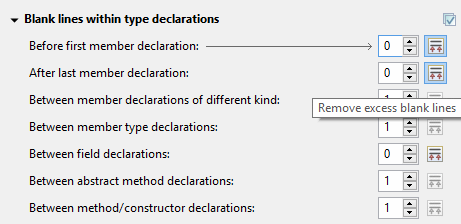
Remove excess blank lines
All the settings in the Blank lines section can now be configured to remove excess blank lines, effectively taking precedence over the Number of empty lines to preserve setting. Each setting has its own button to turn the feature on, right next to its number control. The button is enabled only if the selected number of lines is smaller than the Number of empty lines to preserve; otherwise, any excess lines are removed anyway.
Changes in blank lines settings
There’s quite a lot of changes in the Blank lines section of the formatter profile.
Some of the existing subsections and settings are now phrased differently to better express their function:
The Blank lines within class declarations subsection is now Blank lines within type declaration.
Before first declaration is now Before first member declaration.
Before declarations of the same kind is now Between member declarations of different kind.
Before member class declarations is now Between member type declarations.
Before field declarations is now Between field declarations.
Before method declarations is now Between method/constructor declarations.
More importantly, a few new settings have been added to support more places where the number of empty lines can be controlled:
After last member declaration in a type (to complement previously existing Before first member declaration setting).
Between abstract method declarations in a type (these cases were previously handled by Between method/constructor declarations).
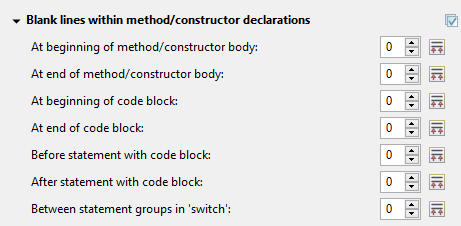
At end of method/constructor body (to complement previously existing At beginning of method/constructor body setting).
At beginning of code block and At end of code block.
Before statement with code block and After statement with code block.
Between statement groups in ‘switch.’
Most of the new settings have been put in a new subsection Blank lines within method/constructor declarations.
JUnit
JUnit 5.5.1
JUnit 5.5.1 is here and Eclipse JDT has been updated to use this version.
Debug
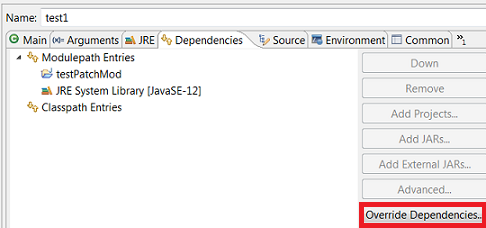
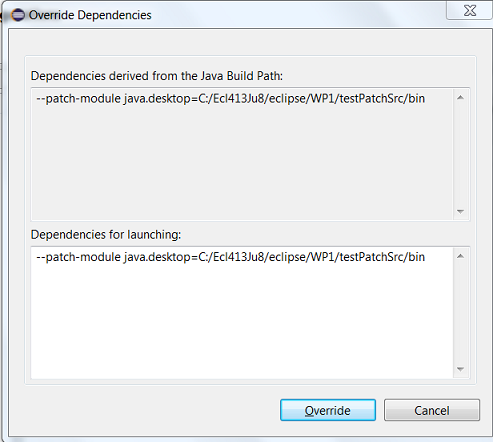
Enhanced support for –patch-module during launch
The Java Launch Configuration now supports patching of different modules by different sources during the launch. This can be verified in the Override Dependencies… dialog in the Dependencies tab in a Java Launch Configuration.
Java Build
Full build on JDT core preferences change
Manually changing the settings file .settings/org.eclipse.jdt.core.prefs of a project will result in a full project build, if the workspace auto-build is on. For example, pulling different settings from a git repository or generating the settings with a tool will now trigger a build. Note that this includes timestamp changes, even if actual settings file contents were not changed.
For the 4.13 release, it is possible to disable this new behavior with the VM property: -Dorg.eclipse.disableAutoBuildOnSettingsChange=true. It is planned to remove this VM property in a future release.
And more…
You can find more noteworthy updates in on this page.
What is next?
Having JBoss Tools 4.13.0 and Red Hat CodeReady Studio 12.13 out we are already working on the next release for Eclipse 2019-12.
Greatness is not about overnight success but multiple periods of repeatable habits. It is not about being better than someone else but about being dependable, disciplined and earned.
Many people want to be great but do not want to put in the effort over a sustained period of time to get there.
Success comes from hard work, consistency and intentional inputs that lead to expected outputs. The best way to achieve this is to focus on small wins consistently rather than trying to achieve perfection. By doing small things a great number of times, one can achieve greatness.
Continuous improvement and developing a habit of progression are essential to achieving greatness. Stop speculating and start taking action, focusing on tangible progress and developing repeatable habits to transform into greatness.
Throughout our lives, we encounter various levels of success and failure. As we accumulate more experiences, it’s natural to wonder which ones were genuinely great and why.
Surprisingly, it’s often not the sudden, dramatic achievements that stand out, but the incremental, sustained efforts that lead to significant achievements over time.
In other words, greatness is not about overnight successes but about periods of repeatable habits.
This article seeks to explore the true nature of greatness, the importance of consistency, and the process of building a habit of progression to rise above mediocrity and achieve lasting success.
The Foundations of Greatness
Before delving into the heart of the article, let’s establish two fundamental principles:
Greatness is not instantaneous.
Greatness is earned.
The following story tries to establish those.
Story Warren Buffett
One of the most clear examples of a person achieving greatness through compounding effort and habits over a long time is Warren Buffett. Warren Buffett is one of the most successful investors in the world, known for his disciplined approach to investment and his philosophy of buying and holding.
Buffett started investing when he was just 11 years old and learned about the power of compounding at a very young age. He was not an overnight success. His wealth and success have grown slowly and steadily over the decades, thanks to his consistent investment habits and the magic of compound interest.
Buffett’s investing principles involve patience, long-term thinking, and a focus on fundamentals, including the quality of the business, its management, and its potential for long-term profitability. This strategy allowed him to make consistent, measured investment decisions, often going against popular trends.
He is known for reading extensively, up to 500 pages per day, to increase his knowledge and understanding of different businesses and industries. This is a habit he developed early in life and has maintained throughout his career.
Additionally, he has been a strong advocate of living frugally and prioritizing saving and investing over excessive consumption. He still lives in the same house in Omaha, Nebraska, that he bought in 1958 for $31,500.
Buffett’s consistent investment strategies and frugal lifestyle habits, sustained over several decades, have allowed his wealth to compound and grow exponentially. As of my last knowledge cut-off in September 2021, Warren Buffett’s net worth was approximately $100 billion, making him one of the wealthiest people in the world. This success story is a testament to the power of compounding effort, disciplined habits, and long-term thinking.
Becoming great starts with acknowledging that you’re not already great and recognizing that greatness is not achieved in a single moment or through a stroke of luck. Instead, greatness is a reflection of consistent effort put in over time.
Additionally, greatness is not about being better than others. It’s about being reliable, disciplined, and continuous progress towards mastery.
In short, greatness is earned through hard work persisted over a long period.
The Role of Consistency in Achieving Greatness
One common misconception is that success or notoriety is achieved through flashy and unconventional methods.
This idea arises from the media’s focus on outliers – events or personalities that deviate from the norm. This portrayal can mislead people into aspiring for notoriety solely for the sake of it, or believing that the success of these outliers is solely due to their unorthodox approaches.
In reality, the most reliable and effective path to success is through consistency. Consistency may not be the easiest way to achieve success, but it provides a higher level of certainty and a more predictable outcome rather than relying on a lucky break or being “discovered.”
Check out the following example that beautifully illustrates these considerations.
The Art Class – Quantity vs Quality
James Clear, the author of “Atomic Habits,” provides an insightful example highlighting the importance of consistency.
A study in a photography class divided students into two groups – “quantity” and “quality.”
The quantity group would be graded based on the number of photographs they submitted, while the quality group would be graded on the excellence of a single image.
Surprisingly, the best photographs were produced by the quantity group. Rather than merely theorizing about perfection, they consistently tested and refined their skills through practice.
Developing a Habit of Progression
The journey to greatness requires the development of a habit of progression. In other words, you need to become accustomed to consistently improving even when faced with obstacles or setbacks. The key here is to ensure that your habits and efforts are focused on the right inputs, as consistency in the wrong direction will still lead you astray.
Nothing goes up into the right forever. Greatness is achieved when pushing forward with action when you doubt your future success the most.
If you’re struggling to identify the right path forward, try creating more opportunities for optimization. Instead of making significant life changes annually, be open to trying new things monthly or even weekly. Test various options and, when you’ve found a path that seems to work, double down.
Simple algorithm: Do more of what works.
Remember, the objective is not perfection but rather continuous and incremental improvements. Learn to be satisfied with being “good” at something and then working towards making those “good” habits second nature.
In time, these small, sustained efforts will be what sets you apart from those who merely aspire to greatness without putting in the necessary work.
Maintaining Patience and Perspective
Another key ingredient in achieving greatness is patience.
Recognize that progress may be slow, and that’s okay. In most cases, significant changes happen incrementally and often without fanfare. The key is to stay dedicated to your practice and improvement, even during periods where it feels like you’re not making any headway.
Additionally, avoid the temptation of getting bogged down in the search for an optimal plan or strategy.
While it’s essential to learn from your experiences and make informed decisions, it’s also crucial not to become paralyzed by the desire for a perfect approach. Focus instead on taking action, learning from the results and iterating your tactics accordingly.
The Power of Repeated Small Wins
One powerful strategy for achieving greatness is to accumulate small, consistent wins.
Rather than aiming for grandiose accomplishments, aim for reliable successes that you can build upon over time. These small and often unremarkable successes might not make headlines, but they add up and compound to significant achievements in the long run.
The Story of British Athlete Sir Chris Hoy
Sir Chris Hoy, one of Britain’s most successful Olympians, is an excellent example of how small, consistent wins can lead to greatness. Hoy didn’t burst onto the scene as an unstoppable force. Instead, his success was built slowly and steadily over time through disciplined training and continuous improvement.
Born in Edinburgh, Scotland, in 1976, Hoy was always athletic but did not start competitive cycling until his late teens. His early career was marked by consistent performances and modest successes, but he was not an immediate superstar.
Hoy’s approach to training emphasized incremental improvements. He followed a principle called the “aggregation of marginal gains,” which was popularized by Dave Brailsford, the British Cycling performance director. The idea was simple: find a 1% margin for improvement in everything you do. Instead of looking for one area to improve by 100%, Brailsford and Hoy sought hundreds of areas to improve by 1%, accumulating small, consistent wins.
From adjusting his training routines and optimizing his sleep patterns to tweaking the ergonomics of his bike, Hoy focused on these marginal gains. These small changes might not have made headlines, but they added up and compounded over time into significant improvements in performance.
The result? Hoy became one of the most decorated cyclists in history. He has six Olympic gold medals and eleven World Championship titles to his name. He was knighted by Queen Elizabeth II for his services to cycling.
Sir Chris Hoy’s story encapsulates the power of small, consistent wins.
His approach underscores the idea that the best things in life and the most successful endeavors are not usually the result of miraculous events, but rather of carefully planned and executed strategies born from dedication, consistency, and gradual improvement.
His story highlights that focusing on the process and developing the right habits can help achieve and sustain greatness.
Remember, the best things in life and the most successful endeavors are typically not miraculous events but carefully planned and executed strategies born from dedication, consistency, and gradual improvement.
By focusing on the process and developing the right habits, you’ll forge yourself into the person who can not only reach but also sustain greatness.
The Pursuit of Greatness …
… is not about achieving sudden, monumental successes but rather about embracing the power of consistency and adopting habits that foster continuous improvement and progression.
By staying focused on the process, learning from your experiences, and remaining patient, you’ll set yourself apart from those who only dream of greatness without ever putting in the work.
Remember: greatness is simply good, repeated consistently over time. By cultivating this mindset and dedicating yourself to the process, you’ll discover the true essence of greatness and see it reflected in your own accomplishments.
QR code (Quick Response code) is a machine-readable pictorial format containing black and white squares. It is used for storing information like URLs, product ID, etc. It is a type of matrix barcode or a two-dimensional barcode.
It is a convenient form of storing and retrieving simple data and has become even more popular with the advent of smartphones. The camera in the smartphone can act as a reader and read the QR code and help to decipher the data stored in it.
This article gives many examples if you want a solution to generate QR codes in PHP. There are a lot of PHP libraries available to generate QR codes. This article uses the PHP QR code library.
1. Quick example
This quick example returns the QR code to the browser in one line. It produces the output as a PNG stream.
<?php

require_once __DIR__ . '/vendor/phpqrcode/qrlib.php'; // Displays QR Code image to the browser

QRcode::png('PHP QR Code :)');
Installing PHP QR code library
Download the latest library version and extract it into your application vendor folder. The source code downloadable in this article has the library.
All the examples in this article have the code to include the suitable library file to use its feature.
In a previous article, we have seen code for a PHP QR code generator using the tc-lib-barcode library.
2. Display the QR code using an HTML image
To display the QR code using an HTML image tag, link the HTML image source to the PHP file that returns the QR code PNG data.
The generate.php file returns the QR code in the below code using the PHP QrCode library. The HTML image refers to this file to show the QR code in the browser.
show-qr-code-in-HTML-img/generate.php
<?php

require_once __DIR__ . '/vendor/phpqrcode/qrlib.php'; // Displays QR Code image to the browser

QRcode::png('PHP QR Code :)');

<?php

require_once __DIR__ . '/../vendor/phpqrcode/qrlib.php'; // outputs image as PNG that can be refered to a HTML image 'src'

QRcode::png('PHP QR Code :)');

?>
show-qr-code-in-HTML-img/view.php
<img src="generate.php" />
2. Passing arguments to the QR code generator
Passing parameters to a QR code generator helps to perform dynamic processing about the parameter.
For example, we can pass a contact id to retrieve contact information to bundle it with the QR code output.
This example shows how to send parameters and process them in the QR generator.
The view.php file prepares the QR code parameter in PHP. Then, it sends it to the generate.php in query. This URL with the QR code parameter is specified to an HTML image source.
show-qr-code-in-html-img/view.php
<?php

// initialize PHP parameter to send to the QR code generator

$QRParameter = 1234;

?>

<img src="generate.php?id=<?php echo $QRParameter; ?>" />
In this generate.php file, it does simple manipulation to the passed argument. It prefixes a string with the GET parameter received and bundles the manipulated line to the QR code PNG.
show-qr-code-in-html-img/generate.php
<?php

if (empty($_GET['id'])) { echo "<b>ERROR:</b> Bad request. Required parameters are missing."; exit;

} else { require_once __DIR__ . '/../vendor/phpqrcode/qrlib.php'; $inputString = $_GET['id']; // Do not return anything to the browser ob_start("callback"); // Process the input string $codeText = 'DEMO - ' . $inputString; // end of processing $debugLog = ob_get_contents(); ob_end_clean(); // outputs QR code as a PNG data QRcode::png($codeText);

}

?>
3. Save the QR code on the server
This example saves the generated QR code on the server.
It defines the QR code data and the png file name suffix in an array. Then, it uses them while creating the target to save the QR code.
4. Configure QR code ECC Level, Zoom factor, and Frame size
The PHP QRCode Library defines constants for different ECC levels, Zoom factor, and Frame size. These factors are used for the following purposes when generating a QR code.
This program creates QR codes in L, M, Q, and H levels with appropriate QR constants.
ECC level is the allowed percentage of damage without affecting reading data.
Zoom factor is the allowed resolution that can be changed based on the use cases.
Silent zone Frame size – The silent or quiet zone frame size varies based on different matrices. Setting the QR code above or equal to 4 blocks is recommended.
qr-code-ecc-level.php
<?php

require_once __DIR__ . '/vendor/phpqrcode/qrlib.php';

require_once __DIR__ . '/vendor/phpqrcode/qrconst.php'; $qrContent = 'Demo data to bundle into a QR code'; $target = "uploads/ecc-level/"; // generating QR code in the 4 ECC level

QRcode::png($qrContent, $target . 'l.png', QR_ECLEVEL_L);

QRcode::png($qrContent, $target . 'm.png', QR_ECLEVEL_M);

QRcode::png($qrContent, $target . 'q.png', QR_ECLEVEL_Q);

QRcode::png($qrContent, $target . 'h.png', QR_ECLEVEL_H); ?>

<img src="<?php echo $target; ?>l.png" />

<img src="<?php echo $target; ?>m.png" />

<img src="<?php echo $target; ?>q.png" />

<img src="<?php echo $target; ?>h.png" />
This program adds the zoom factor 1 to 4 with the QR_ECLEVEL_L ECC constant.
qr-code-pixel-zoom-factor.php
<?php

require_once __DIR__ . '/vendor/phpqrcode/qrlib.php'; $qrContent = 'Demo data to bundle into a QR code with zoom factor'; $target = "uploads/pixel-zoom-qr-code/"; // generating QR code with 4 ECC level and zoom factor

QRcode::png($qrContent, $target . 'l_1.png', QR_ECLEVEL_L, 1);

QRcode::png($qrContent, $target . 'l_2.png', QR_ECLEVEL_L, 2);

QRcode::png($qrContent, $target . 'l_3.png', QR_ECLEVEL_L, 3);

QRcode::png($qrContent, $target . 'l_4.png', QR_ECLEVEL_L, 4); ?>

<img src="<?php echo $target; ?>l_1.png" />

<img src="<?php echo $target; ?>l_2.png" />

<img src="<?php echo $target; ?>l_3.png" />

<img src="<?php echo $target; ?>l_4.png" />
This program creates QR codes with all these factors ECC, Zoom, and Frame constants of the library.
silent-zone-frame-size.php
<?php

require_once __DIR__ . '/vendor/phpqrcode/qrlib.php'; $qrContent = 'Demo data to bundle into a QR code with frame size'; $target = "uploads/pixel-zoom-qr-code/"; // generating // frame config values below 4 are not recommended !!!

QRcode::png($qrContent, $target . 'l_3_4.png', QR_ECLEVEL_L, 3, 4);

QRcode::png($qrContent, $target . 'l_3_6.png', QR_ECLEVEL_L, 3, 6);

QRcode::png($qrContent, $target . 'l_3_10.png', QR_ECLEVEL_L, 3, 10); // displaying

?>

<img src="<?php echo $target; ?>l_3_4.png" />

<img src="<?php echo $target; ?>l_3_6.png" />

<img src="<?php echo $target; ?>l_3_10.png" />
5. Add phone, email, and contact info to a QR code
This section has PHP examples to create QR codes to attach contact information. It prepares the QR code content with the “tel:”. “sms:” and “mail:” links and attaches it to the QR code.
[www.indiegala.com] The beloved and critically acclaimed Ghostbusters video game is back! Join the Ghostbusters team, fight monsters, capture ghosts, search for artifacts and have a blast destroying almost everything around you in this Remastered version of the third-person adventure Ghostbusters: The Video Game. https://www.youtube.com/watch?v=CUHjGQy0XDs&ab_channel=SaberInteractive
The Whisperer - Free GOG Game Login / Register Visit the store page of The Whisperer https://www.gog.com/game/the_whisperer Click Add to cart Click Check out now Verify that the price is 0 Click Pay for your order now Thats it, the game will be added to your account
Let’s! Revolution! is a colorful roguelite puzzle mashup about stopping a narcissistic King from ruining your world. Flip tiles to uncover the hidden path to the King. Use deductive reasoning to avoid his cronies or take them all down in strategic turn-based combat.
Quarkus: Modernize “helloworld” JBoss EAP quickstart, Part 1
Quarkus is, in its own words, “Supersonic subatomic Java” and a “Kubernetes native Java stack tailored for GraalVM & OpenJDK HotSpot, crafted from the best of breed Java libraries and standards.” For the purpose of illustrating how to modernize an existing Java application to Quarkus, I will use the Red Hat JBoss Enterprise Application Platform (JBoss EAP) quickstarts helloworld quickstart as sample of a Java application builds using technologies (CDI and Servlet 3) supported in Quarkus.
It’s important to note that both Quarkus and JBoss EAP rely on providing developers with tools based—as much as possible—on standards. If your application is not already running on JBoss EAP, there’s no problem. You can migrate it from your current application server to JBoss EAP using the Red Hat Application Migration Toolkit. After that, the final and working modernized version of the code is available in the https://github.com/mrizzi/jboss-eap-quickstarts/tree/quarkus repository inside the helloworld module.
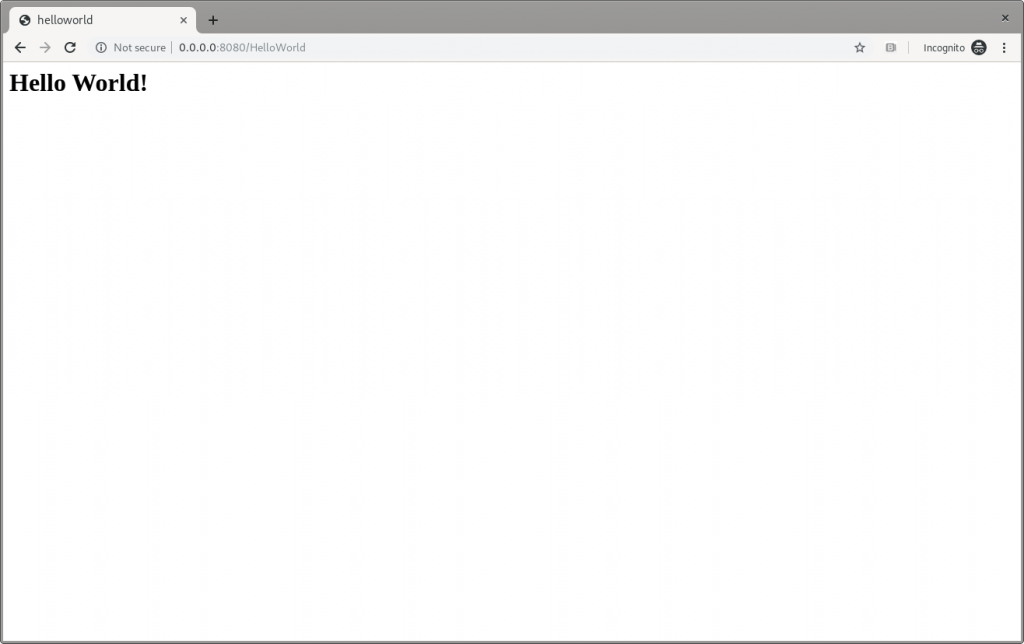
The name of the quickstart is a strong clue about what this application does, but let’s follow a scientific approach in modernizing this code, so first things first: Try the application as it is.
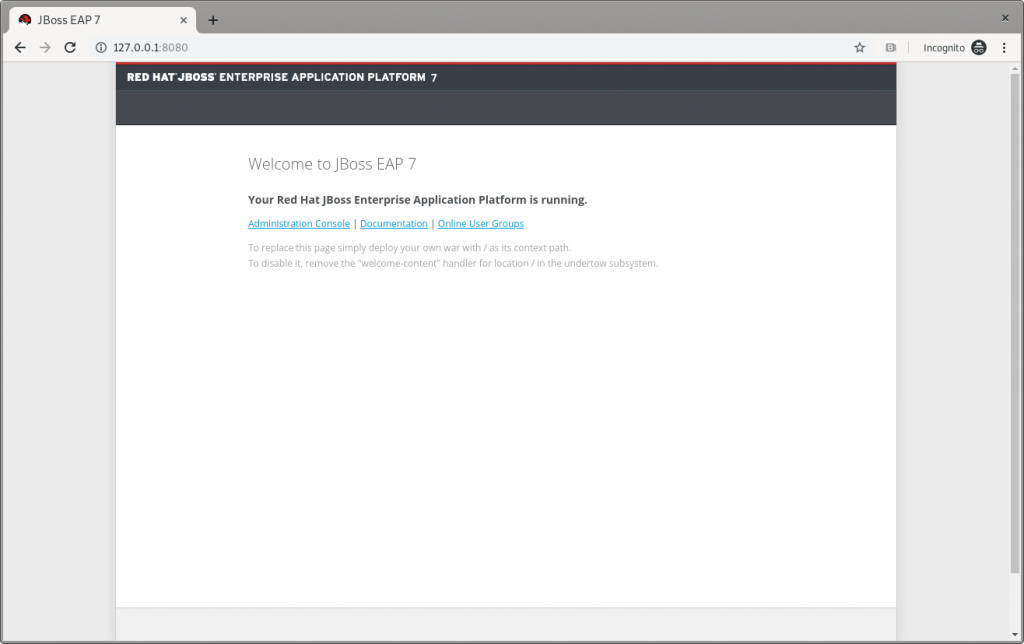
Deploy helloworld
Open a terminal and navigate to the root of the JBoss EAP directory EAP_HOME (which you can download).
Start the JBoss EAP server with the default profile by typing the following command:
$ EAP_HOME/bin/standalone.sh
Note: For Windows, use the EAP_HOME\bin\standalone.bat script.
After a few seconds, the log should look like:
[org.jboss.as] (Controller Boot Thread) WFLYSRV0025: JBoss EAP 7.2.0.GA (WildFly Core 6.0.11.Final-redhat-00001) started in 3315ms - Started 306 of 527 services (321 services are lazy, passive or on-demand)
Following instructions from Build and Deploy the Quickstart, deploy the helloworld quickstart and execute (from the project root directory) the command:
$ mvn clean install wildfly:deploy
This command should end successfully with a log like this:
[INFO] ------------------------------------------------------------------------ [INFO] BUILD SUCCESS [INFO] ------------------------------------------------------------------------ [INFO] Total time: 8.224 s
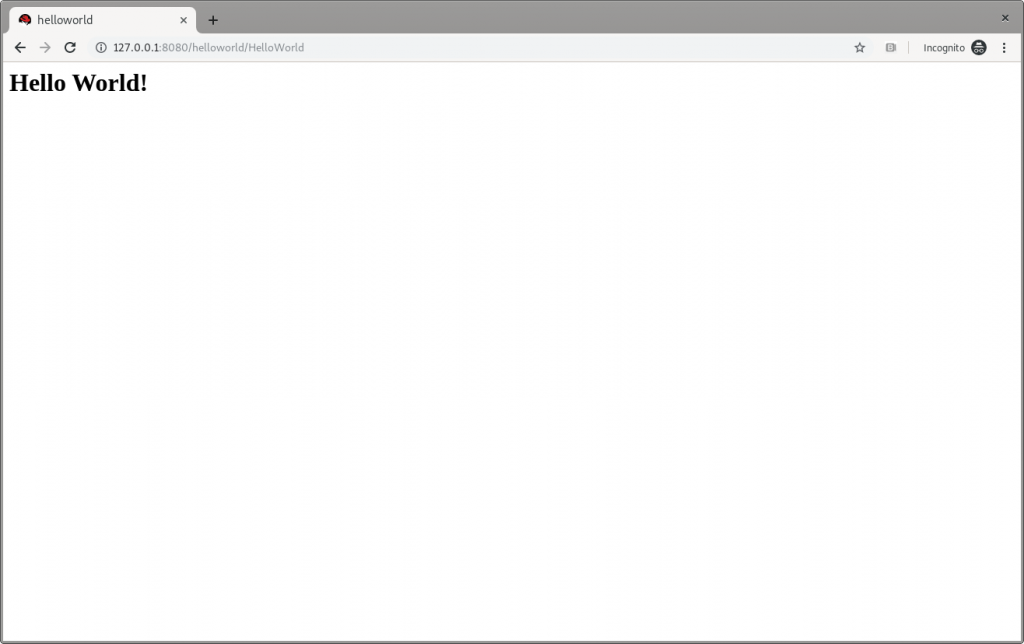
The helloworld application has now been deployed for the first time in JBoss EAP in about eight seconds.
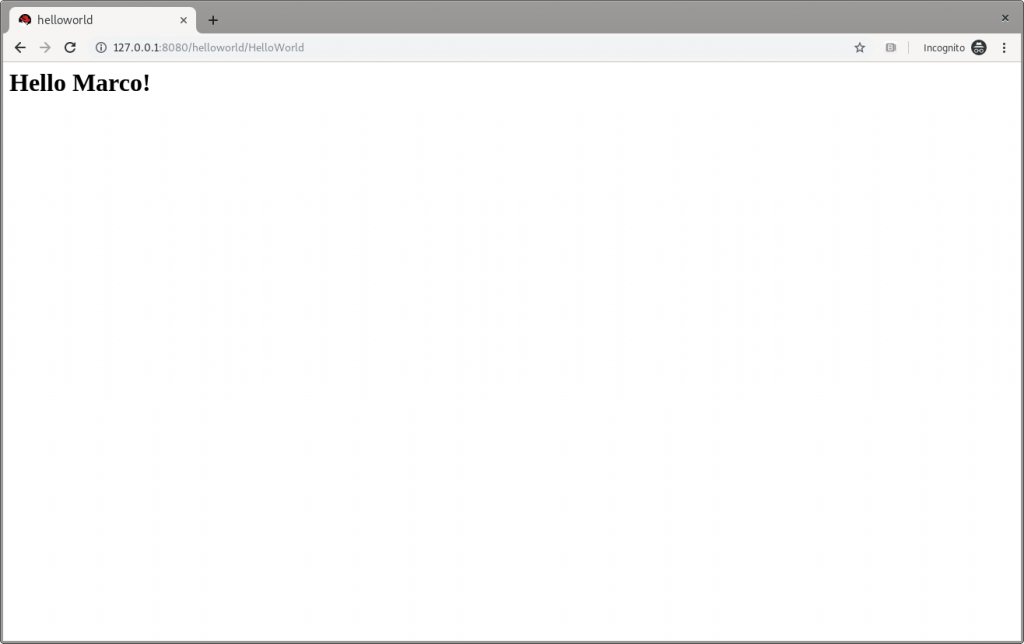
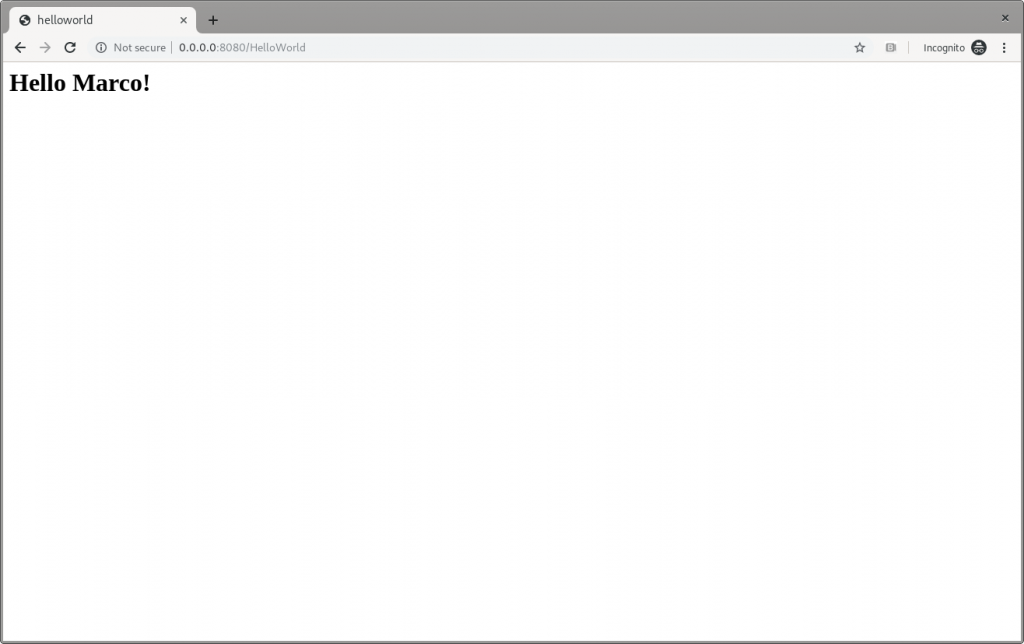
and then refresh the web page in the browser to check the message displayed changes, as shown in Figure 3:
Figure 3: JBoss EAP’s Hello Marco.
Undeploy helloworld and shut down
If you want to undeploy (optional) the application before shutting down JBoss EAP, run the following command:
$ mvn clean install wildfly:undeploy
To shut down the JBoss EAP instance, enter Ctrl+C in the terminal where it’s running.
Let’s modernize helloworld
Now we can leave the original helloworld behind and update it.
Create a new branch
Create a new working branch once the quickstart project finishes executing:
$ git checkout -b quarkus 7.2.0.GA
Change the pom.xml file
The time has come to start changing the application. starting from the pom.xml file. From the helloworld folder, run the following command to let Quarkus add XML blocks:
The property <quarkus.version> to define the Quarkus version to be used.
The <dependencyManagement> block to import the Quarkus bill of materials (BOM). In this way, there’s no need to add the version to each Quarkus dependency.
The quarkus-maven-plugin plugin responsible for packaging the application, and also providing the development mode.
The native profile to create application native executables.
Further changes required to pom.xml, to be done manually:
Move the <groupId> tag outside of the <parent> block, and above the <artifactId> tag. Because we remove the <parent> block in the next step, the <groupId> must be preserved.
Remove the <parent> block: The application doesn’t need the JBoss parent pom anymore to run with Quarkus.
Add the <version> tag (below the <artifactId> tag) with the value you prefer.
Remove the <packaging> tag: The application won’t be a WAR anymore, but a plain JAR.
Change the following dependencies:
Replace the javax.enterprise:cdi-api dependency with io.quarkus:quarkus-arc, removing <scope>provided</scope> because—as stated in the documentation—this Quarkus extension provides the CDI dependency injection.
Replace the org.jboss.spec.javax.servlet:jboss-servlet-api_4.0_spec dependency with io.quarkus:quarkus-undertow, removing the <scope>provided</scope>, because—again as stated in the documentation—this is the Quarkus extension that provides support for servlets.
Remove the org.jboss.spec.javax.annotation:jboss-annotations-api_1.3_spec dependency because it’s coming with the previously changed dependencies.
Note that the above mvn io.quarkus:quarkus-maven-plugin:0.23.2:create command, besides the changes to the pom.xml file, added components to the project. The added file and folders are:
The files mvnw and mvnw.cmd, and .mvn folder: The Maven Wrapper allows you to run Maven projects with a specific version of Maven without requiring that you install that specific Maven version.
The docker folder (in src/main/): This folder contains example Dockerfile files for both native and jvm modes (together with a .dockerignore file).
The resources folder (in src/main/): This folder contains an empty application.properties file and the sample Quarkus landing page index.html (more in the section “Run the modernized helloworld“).
Run helloworld
To test the application, use quarkus:dev, which runs Quarkus in development mode (more details on Development Mode here).
Note: We expect this step to fail as changes are still required to the application, as detailed in this section.
Now run the command to check if and how it works:
$ ./mvnw compile quarkus:dev [INFO] Scanning for projects... [INFO] [INFO] ----------------< org.jboss.eap.quickstarts:helloworld >---------------- [INFO] Building Quickstart: helloworld quarkus [INFO] --------------------------------[ war ]--------------------------------- [INFO] [INFO] --- maven-resources-plugin:2.6:resources (default-resources) @ helloworld --- [INFO] Using 'UTF-8' encoding to copy filtered resources. [INFO] Copying 2 resources [INFO] [INFO] --- maven-compiler-plugin:3.1:compile (default-compile) @ helloworld --- [INFO] Nothing to compile - all classes are up to date [INFO] [INFO] --- quarkus-maven-plugin:0.23.2:dev (default-cli) @ helloworld --- Listening for transport dt_socket at address: 5005 INFO [io.qua.dep.QuarkusAugmentor] Beginning quarkus augmentation INFO [org.jbo.threads] JBoss Threads version 3.0.0.Final ERROR [io.qua.dev.DevModeMain] Failed to start quarkus: java.lang.RuntimeException: io.quarkus.builder.BuildException: Build failure: Build failed due to errors [error]: Build step io.quarkus.arc.deployment.ArcProcessor#validate threw an exception: javax.enterprise.inject.spi.DeploymentException: javax.enterprise.inject.UnsatisfiedResolutionException: Unsatisfied dependency for type org.jboss.as.quickstarts.helloworld.HelloService and qualifiers [@Default] - java member: org.jboss.as.quickstarts.helloworld.HelloWorldServlet#helloService - declared on CLASS bean [types=[javax.servlet.ServletConfig, java.io.Serializable, org.jboss.as.quickstarts.helloworld.HelloWorldServlet, javax.servlet.GenericServlet, javax.servlet.Servlet, java.lang.Object, javax.servlet.http.HttpServlet], qualifiers=[@Default, @Any], target=org.jboss.as.quickstarts.helloworld.HelloWorldServlet] at io.quarkus.arc.processor.BeanDeployment.processErrors(BeanDeployment.java:841) at io.quarkus.arc.processor.BeanDeployment.init(BeanDeployment.java:214) at io.quarkus.arc.processor.BeanProcessor.initialize(BeanProcessor.java:106) at io.quarkus.arc.deployment.ArcProcessor.validate(ArcProcessor.java:249) at sun.reflect.NativeMethodAccessorImpl.invoke0(Native Method) at sun.reflect.NativeMethodAccessorImpl.invoke(NativeMethodAccessorImpl.java:62) at sun.reflect.DelegatingMethodAccessorImpl.invoke(DelegatingMethodAccessorImpl.java:43) at java.lang.reflect.Method.invoke(Method.java:498) at io.quarkus.deployment.ExtensionLoader$1.execute(ExtensionLoader.java:780) at io.quarkus.builder.BuildContext.run(BuildContext.java:415) at org.jboss.threads.ContextClassLoaderSavingRunnable.run(ContextClassLoaderSavingRunnable.java:35) at org.jboss.threads.EnhancedQueueExecutor.safeRun(EnhancedQueueExecutor.java:2011) at org.jboss.threads.EnhancedQueueExecutor$ThreadBody.doRunTask(EnhancedQueueExecutor.java:1535) at org.jboss.threads.EnhancedQueueExecutor$ThreadBody.run(EnhancedQueueExecutor.java:1426) at java.lang.Thread.run(Thread.java:748) at org.jboss.threads.JBossThread.run(JBossThread.java:479) Caused by: javax.enterprise.inject.UnsatisfiedResolutionException: Unsatisfied dependency for type org.jboss.as.quickstarts.helloworld.HelloService and qualifiers [@Default] - java member: org.jboss.as.quickstarts.helloworld.HelloWorldServlet#helloService - declared on CLASS bean [types=[javax.servlet.ServletConfig, java.io.Serializable, org.jboss.as.quickstarts.helloworld.HelloWorldServlet, javax.servlet.GenericServlet, javax.servlet.Servlet, java.lang.Object, javax.servlet.http.HttpServlet], qualifiers=[@Default, @Any], target=org.jboss.as.quickstarts.helloworld.HelloWorldServlet] at io.quarkus.arc.processor.Beans.resolveInjectionPoint(Beans.java:428) at io.quarkus.arc.processor.BeanInfo.init(BeanInfo.java:371) at io.quarkus.arc.processor.BeanDeployment.init(BeanDeployment.java:206) ... 14 more
It failed. Why? What happened?
The UnsatisfiedResolutionException exception refers to the HelloService class, which is a member of the HelloWorldServlet class (java member: org.jboss.as.quickstarts.helloworld.HelloWorldServlet#helloService). The problem is that HelloWorldServlet needs an injected instance of HelloService, but it can not be found (even if the two classes are in the very same package).
It’s time to return to Quarkus guides to leverage the documentation and understand how @Inject—and hence Contexts and Dependency Injection (CDI)—works in Quarkus, thanks to the Contexts and Dependency Injection guide. In the Bean Discovery paragraph, it says, “Bean classes that don’t have a bean defining annotation are not discovered.”
Looking at the HelloService class, it’s clear there’s no bean defining annotation, and one has to be added to have Quarkus to discover the bean. So, because it’s a stateless object, it’s safe to add the @ApplicationScoped annotation:
@ApplicationScoped public class HelloService {
Note: The IDE should prompt you to add the required package shown here (add it manually if need be):
Please, pay attention to the fact that the ./mvnw compile quarkus:dev command is still running, and we’re not going to stop it. Now, try to apply the same—very trivial—change to the code and see how Quarkus improves the developer experience:
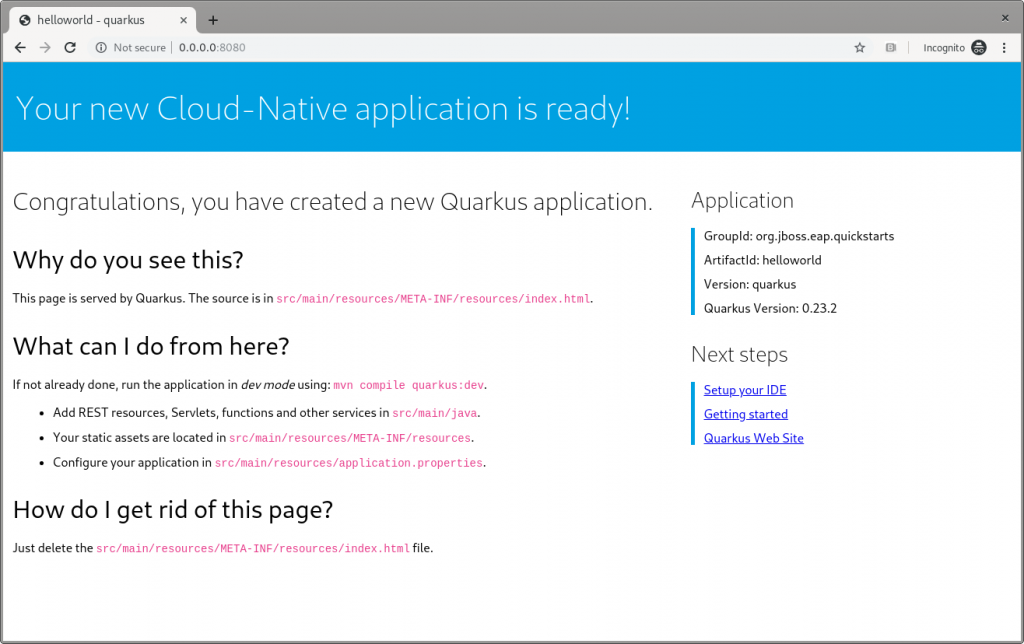
Save the file, and then refresh the web page to check that Hello Marco appears, as shown in Figure 6:
Figure 6: The Quarkus dev Hello Marco page.
Take time to check the terminal output:
INFO [io.qua.dev] (vert.x-worker-thread-3) Changed source files detected, recompiling [/home/mrizzi/git/forked/jboss-eap-quickstarts/helloworld/src/main/java/org/jboss/as/quickstarts/helloworld/HelloWorldServlet.java] INFO [io.quarkus] (vert.x-worker-thread-3) Quarkus stopped in 0.003s INFO [io.qua.dep.QuarkusAugmentor] (vert.x-worker-thread-3) Beginning quarkus augmentation INFO [io.qua.dep.QuarkusAugmentor] (vert.x-worker-thread-3) Quarkus augmentation completed in 232ms INFO [io.quarkus] (vert.x-worker-thread-3) Quarkus 0.23.2 started in 0.257s. Listening on: http://0.0.0.0:8080 INFO [io.quarkus] (vert.x-worker-thread-3) Profile dev activated. Live Coding activated. INFO [io.quarkus] (vert.x-worker-thread-3) Installed features: [cdi] INFO [io.qua.dev] (vert.x-worker-thread-3) Hot replace total time: 0.371s
Refreshing the page triggered the source code change detection and the Quarkus automagic “stop-and-start.” All of this executed in just 0.371 seconds (that’s part of the Quarkus “Supersonic Subatomic Java” experience).
Build the helloworld packaged JAR
Now that the code works as expected, it can be packaged using the command:
$ ./mvnw clean package
This command creates two JARs in the /target folder. The first is helloworld-<version>.jar, which is the standard artifact built from the Maven command with the project’s classes and resources. The second is helloworld-<version>-runner.jar, which is an executable JAR.
Please pay attention to the fact that this is not an uber-jar, because all of the dependencies are copied into the /target/lib folder (and not bundled within the JAR). Hence, to run this JAR in another location or host, both the JAR file and the libraries in the /lib folder have to be copied, considering that the Class-Path entry of the MANIFEST.MF file in the JAR explicitly lists the JARs from the lib folder.
To create an uber-jar application, please refer to the Uber-Jar Creation Quarkus guide.
Run the helloworld packaged JAR
Now, the packaged JAR can be executed using the standard java command:
$ java -jar ./target/helloworld-<version>-runner.jar INFO [io.quarkus] (main) Quarkus 0.23.2 started in 0.673s. Listening on: http://0.0.0.0:8080 INFO [io.quarkus] (main) Profile prod activated. INFO [io.quarkus] (main) Installed features: [cdi]
As done above, open the http://0.0.0.0:8080 URL in a browser, and test that everything works.
Build the helloworld quickstart-native executable
So far so good. The helloworld quickstart ran as a standalone Java application using Quarkus dependencies, but more can be achieved by adding a further step to the modernization path: Build a native executable.
Install GraalVM
First of all, the tools for creating the native executable have to be installed:
As stated in the Building a Native Executable—Producing a native executable Quarkus guide, “Let’s now produce a native executable for our application. It improves the startup time of the application and produces a minimal disk footprint. The executable would have everything to run the application including the ‘JVM’ (shrunk to be just enough to run the application), and the application.”
To create the native executable, the Maven native profile has to be enabled by executing:
$ ./mvnw package -Pnative
The build took me about 1:10 minutes and the result is the helloworld-<version>-runner file in the /target folder.
Run the helloworld native executable
The /target/helloworld-<version>-runner file created in the previous step. It’s executable, so running it is easy:
$ ./target/helloworld-<version>-runner INFO [io.quarkus] (main) Quarkus 0.23.2 started in 0.006s. Listening on: http://0.0.0.0:8080 INFO [io.quarkus] (main) Profile prod activated. INFO [io.quarkus] (main) Installed features: [cdi]
As done before, open the http://0.0.0.0:8080 URL in a browser and test that everything is working.
Next steps
I believe that this modernization, even of a basic application, is the right way to approach a brownfield application using technologies available in Quarkus. This way, you can start facing the issues and tackling them to understand and learn how to solve them.
In part two of this series, I’ll look at how to capture memory consumption data in order to evaluate performance improvements, which is a fundamental part of the modernization process.
[Oracle Blog] Micronaut Framework 4: Faster, More Cloud Native, Better Than Ever
Micronaut® framework 4 is here! And it's faster, more cloud native, and better than ever! Oracle is thrilled to share some notable features in Micronaut framework 4 developed in collaboration with the Micronaut Foundation.





 Recommended Reading:


 In short, greatness is earned through hard work persisted over a long period.


 The Story of British Athlete Sir Chris Hoy