Welcome, Guest
You have to register before you can post on our site.

Username
  

Password


Search Forums

(Advanced Search)

Forum Statistics
» Members: 20,965
» Latest member: Cut
» Forum threads: 22,502
» Forum posts: 23,486

Full Statistics

Online Users
There are currently 1422 online users.
» 1 Member(s) | 1417 Guest(s)
Applebot, Baidu, Bing, Google, SickProdigy

Latest Threads
[WoW Retail News] New Twi...
Forum: World of Warcraft
Last Post: xSicKxBot

» Replies: 0
» Views: 1
How to get the Ice Staff ...
Forum: PC Discussion
Last Post: xSicKxBot

» Replies: 0
» Views: 3
[WoW Retail News] Preserv...
Forum: World of Warcraft
Last Post: xSicKxBot

» Replies: 0
» Views: 22
How to unlock TR2 in Blac...
Forum: PC Discussion
Last Post: xSicKxBot

» Replies: 0
» Views: 26
[WoW Retail News] New Owl...
Forum: World of Warcraft
Last Post: xSicKxBot

» Replies: 0
» Views: 29
[WoW Retail News] Four Ne...
Forum: World of Warcraft
Last Post: xSicKxBot

» Replies: 0
» Views: 37
Where to Download WoW 3.3...
Forum: World of Warcraft
Last Post: vaan984

» Replies: 3
» Views: 1,329
How to unlock Cypher 091 ...
Forum: PC Discussion
Last Post: xSicKxBot

» Replies: 0
» Views: 39
How to Remux Video Contai...
Forum: Home Servers & Self-Hosting
Last Post: SickProdigy

» Replies: 0
» Views: 37
[WoW Retail News] Win a S...
Forum: World of Warcraft
Last Post: xSicKxBot

» Replies: 0
» Views: 45

 
  [Oracle Blog] 30 New Java Champions Confirmed in 2018
Posted by: xSicKxBot - 01-25-2020, 08:50 AM - Forum: Java & JVM Languages - No Replies

30 New Java Champions Confirmed in 2018

Java Champions have had an incredibly busy 2018. They have supported their communities by giving over 1400 talks at conferences and user group meetings in over 60 countries.


The efforts of these community experts sharing their knowledge around the would influence countless others, professional engineers and students new to the craft to think in new ways, apply new solutions to problems and enhance, not only the commerce of the organizations they work for but also their own professional growth.


We have also welcomed 30 new Java Champions to the program in 2018, including new members from countries as diverse as Japan, India, South Africa, and New Zealand.

  • Alberto Salazar
  • Alex Theedom
  • Bethan Palmer
  • Christoph Engelbert
  • Claus Ibsen
  • Daniel Bryant
  • Donald Raab
  • Ivan St. Ivanov
  • Jean-Francois Arcand
  • Jim Manico
  • Jonathan Giles
  • Jose Diaz
  • Julien Dubois
  • Ken Fogel
  • Koichi Sakata
  • Mala Gupta
  • Mani Sarkar
  • Michael Hunger
  • Michael Minella
  • Michael Simons
  • Miroslav Wengner
  • Nikhil J. Nanivadekar
  • Nitsan Wakart
  • Rafael Chinelato Del Nero
  • Rahman Usta
  • Ray Tsang
  • Roy van Rijn
  • Shin Tanimoto
  • Tomasz Nurkiewicz
  • Victor Orozco
  • Viktor Klang


The full bios of these and all other Java Champions may be found here

Information about the Java Champions Program can be found here 


https://blogs.oracle.com/java/30-new-jav...ed-in-2018

Print this item

  [Tut] Python Regex Flags
Posted by: xSicKxBot - 01-25-2020, 08:50 AM - Forum: Python - No Replies

Python Regex Flags

In many functions, you see a third argument flags. What are they and how do they work?

Flags allow you to control the regular expression engine. Because regular expressions are so powerful, they are a useful way of switching on and off certain features (e.g. whether to ignore capitalization when matching your regex).

For example, here’s how the third argument flags is used in the re.findall() method:

re.findall(pattern, string, flags=0)

So the flags argument seems to be an integer argument with the default value of 0. To control the default regex behavior, you simply use one of the predefined integer values. You can access these predefined values via the re library:


Syntax Meaning
re.ASCII If you don’t use this flag, the special Python regex symbols \w, \W, \b, \B, \d, \D, \s and \S will match Unicode characters. If you use this flag, those special symbols will match only ASCII characters — as the name suggests.
re.A Same as re.ASCII
re.DEBUG If you use this flag, Python will print some useful information to the shell that helps you debugging your regex.
re.IGNORECASE If you use this flag, the regex engine will perform case-insensitive matching. So if you’re searching for [A-Z], it will also match [a-z].
re.I Same as re.IGNORECASE
re.LOCALE Don’t use this flag — ever. It’s depreciated—the idea was to perform case-insensitive matching depending on your current locale. But it isn’t reliable.
re.L Same as re.LOCALE
re.MULTILINE This flag switches on the following feature: the start-of-the-string regex ‘^’ matches at the beginning of each line (rather than only at the beginning of the string). The same holds for the end-of-the-string regex ‘$’ that now matches also at the end of each line in a multi-line string.
re.M Same as re.MULTILINE
re.DOTALL Without using this flag, the dot regex ‘.’ matches all characters except the newline character ‘\n’. Switch on this flag to really match all characters including the newline character.
re.S Same as re.DOTALL
re.VERBOSE To improve the readability of complicated regular expressions, you may want to allow comments and (multi-line) formatting of the regex itself. This is possible with this flag: all whitespace characters and lines that start with the character ‘#’ are ignored in the regex.
re.X Same as re.VERBOSE

How to Use These Flags?


Simply include the flag as the optional flag argument as follows:

import re text = ''' Ha! let me see her: out, alas! he's cold: Her blood is settled, and her joints are stiff; Life and these lips have long been separated: Death lies on her like an untimely frost Upon the sweetest flower of all the field. ''' print(re.findall('HER', text, flags=re.IGNORECASE))
# ['her', 'Her', 'her', 'her']

As you see, the re.IGNORECASE flag ensures that all occurrences of the string ‘her’ are matched—no matter their capitalization.

How to Use Multiple Flags?


Yes, simply add them together (sum them up) as follows:

import re text = ''' Ha! let me see her: out, alas! he's cold: Her blood is settled, and her joints are stiff; Life and these lips have long been separated: Death lies on her like an untimely frost Upon the sweetest flower of all the field. ''' print(re.findall(' HER # Ignored', text, flags=re.IGNORECASE + re.VERBOSE))
# ['her', 'Her', 'her', 'her']

You use both flags re.IGNORECASE (all occurrences of lower- or uppercase string variants of ‘her’ are matched) and re.VERBOSE (ignore comments and whitespaces in the regex). You sum them together re.IGNORECASE + re.VERBOSE to indicate that you want to take both.


https://www.sickgaming.net/blog/2020/01/...gex-flags/

Print this item

  [Tut] How to Integrate 2Checkout Payment Gateway using PHP
Posted by: xSicKxBot - 01-25-2020, 08:50 AM - Forum: PHP Development - No Replies

How to Integrate 2Checkout Payment Gateway using PHP

Last modified on November 27th, 2019 by Vincy.

Sales, revenue, ROI are the key metrics to measure a business growth. The payment gateway is a sensitive factor that affects these metrics directly. It is the first and foremost item on the checklist for any eCommerce business.

There are many Payment Gateway providers. PayPal being the popular provider and 2Checkout is catching out fast. Earlier I wrote about how to integrate PayPal checkout in ecommerce website. In this payment gateway integration series, now it is time to see about 2Checkout.
2Checkout Payment Gateway Integration using-php PHP

2Checkout is one of the best payment gateway provider to support card payments. It works similar to Stripe payment gateway. Card payments has less friction and will enable to increase the conversion rate in your eCommerce business.

2Checkout is growing everyday in popularity. It is available in more than 180 countries and used by 17,000 firms.

To integrate 2Checkout to your ecommerce application there are few simple steps. I have described those steps in this article to make your job easier.

Also, we will see the card validator script, payment request-response handlers and more.

What is inside?


  1. Existing payment gateway methods supporting card payment
  2. Advantages of 2Checkout payment
  3. File structure
  4. Steps to integrate 2Checkout payment gateway using PHP
  5. Database script
  6. Go live
  7. 2Checkout Payment gateway example output

Existing payment gateway methods supporting card payment


I have been writing about payment gateways for a while We have already seen many types of payment gateway integration using PHP. I already written tutorials for CCAvenue, PayPal, Stripe, SagePay and Authorize.Net.

2Checkout, Stripe, CCAvenue are some of the examples for the methods supporting card-payments. There are many methods like InstaMojo, Cashfree, EBS and Paytm support card-payments.

Advantages of 2Checkout payment


  • Easy to integrate using payment API libraries in PHP, PYTHON and more languages.
  • It allows customers to opt for a variety of payment methods via PayPal account or debit/credit cards.
  • 2Checkout is a secured fraud-proof for selling products or subscription plans online.
  • It provides a localized buying experience for the customer.
  • It supports many currencies that supports global payments.
  • Integratable with the eCommerce tools like Shopify, Bigcommerce.

File structure


This image shows the file structure of the 2Checkout payment gateway PHP example. The root files index.php, payment.php, return.php are in a sequential flow during the payment.

While running this example, it lands with the index.php to show the payment form. Form targets payment.php that processes payment and redirects to the return page.

The redirect URL will have the payment response status parameter. It helps to create a response HTML on the return page.

The assets folder has the CSS, JS created for this example. TwoCheckoutService.php contains the library includes to verify card details and process payment.

You can see all the third-party components in the vendor directory.
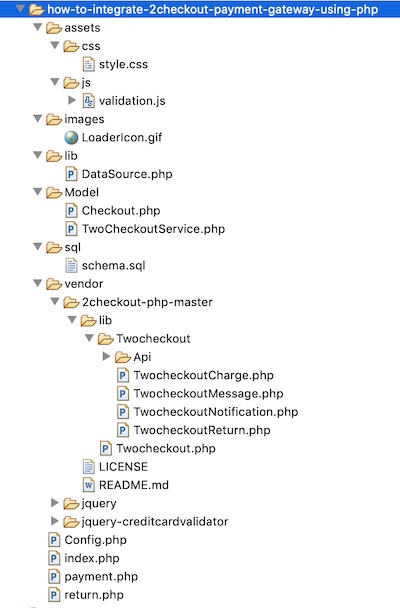
2Checkout Payment File Structure

Steps to integrate 2Checkout payment gateway using PHP


  1. Download the 2Checkout payment API library in PHP.
  2. Create a 2Checkout account and generate API keys.
  3. Create a payment form to collect the card details from the customer.
  4. Generate payment API token and transfer the card details in a secure way.
  5. Verify card details and process charges with 2Checkout Payment API.

Step 1: Download 2Checkout payment gateway


2Checkout payment API library has many features. It helps to manage purchase flow, orders, invoices, billing and more. It simplifies the integration process and reduces the developer’s effort.

Download the 2Checkout payment API library from GitHub. And then, put it into your application vendor directory.

While integrating Stripe Billing, we saw how to integrate third-party API for payment.

Include the TwoCheckout.php service before verifying card details and process payments. This file includes all other library dependencies. It handles card validation and charges on the server-side.

In this example, the Checkout.php use this library file to perform the payment operations.

Step 2: Creating 2Checkout sandbox account and generate API keys


2Checkout provides a sandbox environment to check payment flow using the API functions.

This is a common practice to go with a sandbox mode for testing purposes. Then we can go live after verifying the payment flow with this mode.

Let us create a 2Checkout sandbox account via the developer console. By logging into the console, we can get our API keys.

  1. Register and log in to the 2Checkout sandbox account.
  2. Select the API menu from the header and click the Start Integrating button.
  3. Go to the Settings tab to get the API keys.
  4. Copy the Publishable Key and Private Key in the key generation section of the page.
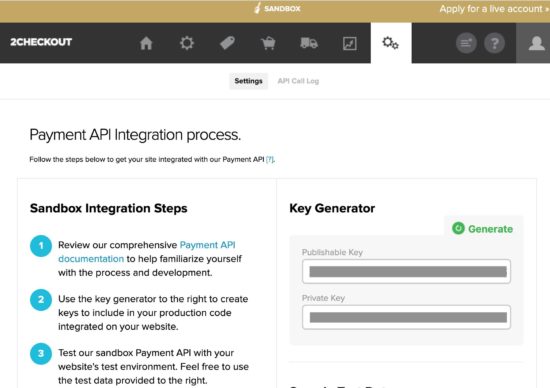
2Checkout Payment API Keys

Click the Generate button if you are not able to see the API keys.

I have added the keys and seller account id in the application config name Config.php.

After configuring the API keys, use the test data to make the payment in the sandbox mode. You can get the test data from the API page as shown below.
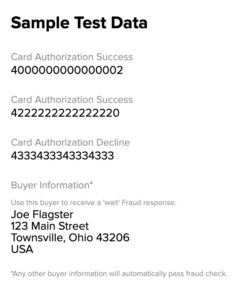
2Checkout Sandbox Card Details

Step 3: Create 2Checkout payment form in HTML


This form contains input fields to get the basic credit card details from the buyer. Those are the cardholder’s name and email, card number, CVC, card expiry tenure.

It will also ask the billing address from the buyer.

In this payment form, it has hidden fields for keeping the seller account id and product price, code.

<?php namespace Phppot; use Phppot\Config; require_once "Config.php"; $productCode = "WWPS235"; ?> <html> <head> <meta name="viewport" content="width=device-width, initial-scale=1"> <link href="./assets/css/style.css" rel="stylesheet" type="text/css"> <title>2checkout-payment-gateway-integration-using-PHP</title> </head> <body> <div id="formContainer"> <?php $productDetail = Config::productDetail(); $itemName = $productDetail[$productCode]["itemName"]; $itemPrice = $productDetail[$productCode]["itemPrice"]; ?> <div class="product-row"> <p class="product"><?php echo $itemName; ?></p> <div class="price float-right"><?php echo $itemPrice; ?> <?php echo Config::CURRENCY; ?> </div> </div> <form id="paymentForm" novalidate method="post" action="payment.php"> <input type="hidden" id="itemNumber" name="itemNumber" value="<?php echo $productCode; ?>" /> <input type="hidden" id="itemPrice" name="itemPrice" value="<?php echo $itemPrice; ?>" /> <input type="hidden" id="seller_id" value="<?php echo Config::SELLER_ID; ?>" /> <input type="hidden" id="publishable_key" value="<?php echo Config::PUBLISHABLE_KEY; ?>" /> <div class="field-row col2 float-left"> <label>Card Holder Name</label> <input type="text" class="demoInputBox required" name="cardHolderName" id="cardHolderName"> </div> <div class="field-row col2 float-right"> <label>Email</label> <input type="email" class="demoInputBox required" name="cardHolderEmail" id="cardHolderEmail"> </div> <div class="field-row"> <label>Card Number</label> <input type="text" class="demoInputBox required" name="cardNumber" id="cardNumber"> </div> <div class="field-row col2 float-left"> <label>Expiry Month / Year</label> <br /> <select name="expiryMonth" id="expiryMonth" class="demoSelectBox required"> <?php $months = Config::monthArray(); $count = count($months); for ($i = 0; $i < $count; $i ++) { $monthValue = $i + 1; if (strlen($i) < 2) { $monthValue = "0" . $monthValue; } ?> <option value="<?php echo $monthValue; ?>"><?php echo $months[$i]; ?></option> <?php } ?> </select> <select name="expiryYear" id="expiryYear" class="demoSelectBox required"> <?php for ($i = date("Y"); $i <= 2030; $i ++) { $yearValue = substr($i, 2); ?> <option value="<?php echo $yearValue; ?>"><?php echo $i; ?></option> <?php } ?> </select> </div> <div class="field-row"> <label>CVV</label><br /> <input type="text" name="cvv" id="cvv" class="demoInputBox cvv-input required"> </div> <p class="sub-head">Billing Address:</p> <div class="field-row col2 float-left"> <label>Address Line1</label> <input type="text" class="demoInputBox required" name="addressLine1" id="addressLine1"> </div> <div class="field-row col2 float-right"> <label>Address Line2</label> <input type="email" class="demoInputBox" name="addressLine2" id="addressLine2"> </div> <div class="field-row col2 float-left"> <label>Country</label> <input type="text" class="demoInputBox required" name="country" id="country"> </div> <div class="field-row col2 float-right"> <label>State</label> <input type="text" class="demoInputBox required" name="state" id="state"> </div> <div class="field-row col2 float-left"> <label>City</label> <input type="text" class="demoInputBox required" name="city" id="city"> </div> <div class="field-row col2 float-right"> <label>Zip</label> <input type="text" class="demoInputBox required" name="zip" id="zip"> </div> <div class="clear-float"> <input id="token" name="token" type="hidden" value=""> <input type="button" id="submit-btn" class="btnAction" value="Send Payment"> <div id="loader"> <img alt="loader" src="./images/LoaderIcon.gif" /> </div> </div><div id="error-message"></div> </form> </div> </body> </html> 

Javascript for credit card validation


Most of the fields are mandatory. The form validation script helps to verify user’s input before payment.

I have used the jQuery CreditCardValidator script to validate the card details. It will check the card number format, CVC, card expiration and more.

Note: To pass the card validation, any three-digit code for CVC and a future date for card expiry.

function validate() { var valid = true; $(".demoInputBox").css('background-color', ''); var message = ""; var cardHolderNameRegex = /^[a-z ,.'-]+$/i; var cvvRegex = /^[0-9]{3,3}$/; var cardHolderName = $("#cardHolderName").val(); var cardHolderEmail = $("#cardHolderEmail").val(); var cardNumber = $("#cardNumber").val(); var cvv = $("#cvv").val(); $(".required").each(function() { if($(this).val()=='') { $(this).css('background-color', '#FFFFDF'); valid = false; } }); if(!valid) { message += "<div> Highlighted fields are required.</div>"; } if (cardHolderName != "" && !cardHolderNameRegex.test(cardHolderName)) { message += "<div>Card Holder Name is invalid</div>"; $("#cardHolderName").css('background-color', '#FFFFDF'); valid = false; } if (!cardHolderEmail.match( /^([\w-\.]+@([\w-]+\.)+[\w-]{2,4})?$/)) { message += "<div>Email is invalid</div>"; $("#cardHolderEmail").css('background-color', '#FFFFDF'); valid = false; } if (cardNumber != "") { $('#cardNumber').validateCreditCard(function(result) { if (!(result.valid)) { message += "<div>Card Number is Invalid</div>"; $("#card-number").css('background-color', '#FFFFDF'); valid = false; } }); } if (cvv != "" && !cvvRegex.test(cvv)) { message += "<div>CVV is Invalid</div>"; $("#cvv").css('background-color', '#FFFFDF'); valid = false; } if (message != "") { $("#error-message").show(); $("#error-message").html(message); $("#submit-btn").show(); $("#loader").hide(); } return valid; } 

Step 4: 2Checkout JS to request token


This HTML code contains the 2co.js include at the end. This JS script is for getting TCO token by hitting the API’s tokenRequestURL. 

This request requires card details with seller account id, sandbox publishable key. It also specifies the name of the success/error callback functions.

The success callback gets the token and includes it to the HTML form. f anything went wrong, the error-callback handles the case and acknowledge the customer.

This token helps to authenticate the request before processing the payment. Without this token, the payment request will return error by saying unauthorized.

<!-- jQuery library --> <script src="vendor/jquery/jquery-3.2.1.min.js"></script> <script src="vendor/jquery-creditcardvalidator/jquery.creditCardValidator.js"></script> <script src="./assets/js/validation.js"></script> <!-- 2Checkout JavaScript library --> <script src="https://www.2checkout.com/checkout/api/2co.min.js"></script> <script> // A success callback of TCO token request var success = function (data) { // Set the token in the payment form $('#paymentForm #token').val(data.response.token.token); $("#error-message").hide(); $("#error-message").html(""); // Submit the form with TCO token $('#paymentForm').submit(); }; // A Error callback of TCO token request. var error = function (data) { var errorMsg = ""; if (data.errorCode === 200) { tokenRequest(); } else { errorMsg = data.errorMsg; $("#error-message").show(); $("#error-message").html(errorMsg); $("#submit-btn").show(); $("#loader").hide(); } }; function tokenRequest() { var valid = validate(); if (valid == true) { $("#submit-btn").hide(); $("#loader").css("display", "inline-block"); var args = { sellerId: $('#seller_id').val(), publishableKey: $('#publishable_key').val(), ccNo: $("#cardNumber").val(), cvv: $("#cvv").val(), expMonth: $("#expiryMonth").val(), expYear: $("#expiryYear").val() }; // Request 2Checkout token TCO.requestToken(success, error, args); } } $(function () { TCO.loadPubKey('sandbox'); $("#submit-btn").on('click', function (e) { tokenRequest(); return false; }); }); </script> 

Step 5: Verify card details and process charges with 2Checkout payment API


After submitting the tokenized form data, then PHP will handle the payment process. There are two major steps during the payment process authorization and charging card.

The payment.php file is the endpoint that verifies payment and charges the card. The below code states how to receive payment form data and request payment.

Before processing payment, this PHP code inserts order into the database table. In this step, it saves the product, currency, customer and billing data into the database.

After placing the order, the inserOrder method will return a unique reference ID. This refers to the merchantOrderId parameter while charging the card.

With a success response, it will update the transaction id and payment status in the order table.

In case of error, the error message returned by the API will acknowledge the customers.

<?php use Phppot\Config; use Phppot\Model\Checkout; session_start(); require_once 'Config.php'; // Check if token is not empty if (! empty($_POST['token'])) { $token = $_POST['token']; $currency = Config::CURRENCY; // Card information $card_num = $_POST['cardNumber']; $card_cvv = $_POST['cvv']; $card_exp_month = $_POST['expiryMonth']; $card_exp_year = $_POST['expiryYear']; // Customer information $customerDetail['name'] = $_POST['cardHolderName']; $customerDetail['email'] = $_POST['cardHolderEmail']; $billingAddress['addrLine1'] = $_POST['addressLine1']; $billingAddress['addrLine2'] = $_POST['addressLine2']; $billingAddress['city'] = $_POST['city']; $billingAddress['state'] = $_POST['state']; $billingAddress['zipCode'] = $_POST['zip']; $billingAddress['country'] = $_POST['country']; // Product information $product['itemNumber'] = $_POST["itemNumber"]; $product['itemPrice'] = $_POST["itemPrice"]; require_once 'Model/Checkout.php'; $checkout = new Checkout(); $orderID = $checkout->insertOrder($customerDetail, $billingAddress, $product); require_once 'Model/TwoCheckoutService.php'; $twoCheckoutService = new TwoCheckoutService(); $twoCheckoutService->verifyAuthentication(); $successMessage = ""; $errorMessage = ""; $paymentResponse = $twoCheckoutService->chargeCard($orderID, $token, $currency, $customerDetail, $billingAddress, $product['itemPrice']); if (! empty($paymentResponse["charge"])) { $charge = $paymentResponse["charge"]; if ($charge['response']['responseCode'] == 'APPROVED') { $transactionId = $charge['response']['transactionId']; $status = $charge['response']['responseCode']; $checkout->updatePayment($transactionId, $status, $orderID); header("Location: return.php?status=success&itemNumber=".$orderID); } else { $_SESSION["transaction_error"] = "Payment is waiting for approval."; header("Location: return.php?status=transaction_failed"); } } else if($paymentResponse["message"]) { if(!empty($paymentResponse["message"])) { $_SESSION["transaction_error"] = $paymentResponse["message"]; } header("Location: return.php?status=transaction_failed"); } } else { header("Location: return.php?status=invalid_token"); } ?> 

Model/Checkout.php


<?php /** * Copyright © 2019 Phppot * * Distributed under MIT license with an exception that, * you don’t have to include the full MIT License in your code. * In essense, you can use it on commercial software, modify and distribute free. * Though not mandatory, you are requested to attribute this URL in your code or website. */ namespace Phppot\Model; use Phppot\DataSource; use Phppot\Config; class Checkout { private $ds; function __construct() { require_once __DIR__ . './../lib/DataSource.php'; $this->ds = new DataSource(); } /** * to get the member record based on the subscription_key * * @param string $subscriptionKey * @return array result record */ public function getOrder($orderId) { $query = 'SELECT * FROM tbl_order where id = ?'; $paramType = 'i'; $paramValue = array( $orderId ); $result = $this->ds->select($query, $paramType, $paramValue); return $result; } public function insertOrder($customerDetail, $billingAddress, $product) { $current_time = date("Y-m-d H:i:s"); $query = 'INSERT INTO tbl_order (name, email, item_code, item_price, currency, address_line_1, address_line_2, country, state, city, zip, create_at) VALUES (?, ?, ?, ?, ?, ?, ?, ?, ?, ?, ?, ?)'; $paramType = 'sssissssssss'; $paramValue = array( $customerDetail["name"], $customerDetail["email"], $product["itemNumber"], $product["itemPrice"], Config::CURRENCY, $billingAddress['addrLine1'], $billingAddress['addrLine2'], $billingAddress['country'], $billingAddress['state'], $billingAddress['city'], $billingAddress['zipCode'], $current_time ); $insertStatus = $this->ds->insert($query, $paramType, $paramValue); return $insertStatus; } public function updatePayment($transactionId, $paymentStatus, $orderID) { $query = "UPDATE tbl_order set txn_id = ?, payment_status = ? WHERE id = ?"; $paramType = 'ssi'; $paramValue = array( $transactionId, $paymentStatus, $orderID ); $this->ds->execute($query, $paramType, $paramValue); } } 

Model/TwoCheckoutService.php


<?php use Phppot\Config; require_once("vendor/2checkout-php-master/lib/Twocheckout.php"); class TwoCheckoutService { function verifyAuthentication() { Twocheckout::verifySSL(false); // Set API key Twocheckout::privateKey(Config::PRIVATE_KEY); // PRIVATE_KEY defined in config.php Twocheckout::sellerId(Config::SELLER_ID); // SELLER_ID defined in config.php Twocheckout::sandbox(true); } function chargeCard($orderID, $token, $currency, $customerDetail, $billingAddress, $itemPrice) { $successMessage = ""; $errorMessage = ""; try { // an array is created with customer sale parameters and passed it in auth() function of Twocheckout_Charge class for authorization. $charge = Twocheckout_Charge::auth(array( "merchantOrderId" => $orderID, "token" => $token, "currency" => $currency, "total" => $itemPrice, "billingAddr" => array( "name" => $customerDetail['name'], "addrLine1" => $billingAddress['addrLine1'], "city" => $billingAddress['city'], "state" => $billingAddress['state'], "zipCode" => $billingAddress['zipCode'], "country" => $billingAddress['country'], "email" => $customerDetail['email'] ) )); $paymentResponse = array( "message" => "", "charge" => $charge ); } catch (Twocheckout_Error $e) { $paymentResponse = array( "message" => $e->getMessage(), "charge" => "" ); } return $paymentResponse; } } 

Config.php


<?php namespace Phppot; class Config { const CURRENCY = 'USD'; const SELLER_ID = ''; const PUBLISHABLE_KEY = ''; const PRIVATE_KEY = ''; public function productDetail() { $product = array( 'WWPS235' => array( "itemName" => 'Kindle Paperwhite (10th gen) - 6" 8GB, WiFi', 'itemPrice' => '130.00' ) ); return $product; } public function monthArray() { $months = array( 'January', 'February', 'March', 'April', 'May', 'June', 'July ', 'August', 'September', 'October', 'November', 'December' ); return $months; } } 

Database script


This is a SQL with the CREATE statement of the tbl_order table. Import this script for your PHP environment to run this example.

-- -- Table structure for table `tbl_order` -- CREATE TABLE `tbl_order` ( `id` int(11) NOT NULL, `name` varchar(25) COLLATE utf8_unicode_ci NOT NULL, `email` varchar(25) COLLATE utf8_unicode_ci NOT NULL, `item_code` varchar(25) COLLATE utf8_unicode_ci NOT NULL, `item_price` float(10,2) NOT NULL, `currency` varchar(10) COLLATE utf8_unicode_ci NOT NULL, `address_line_1` text COLLATE utf8_unicode_ci NOT NULL, `address_line_2` text COLLATE utf8_unicode_ci NOT NULL, `country` varchar(255) COLLATE utf8_unicode_ci NOT NULL, `city` varchar(255) COLLATE utf8_unicode_ci NOT NULL, `state` varchar(255) COLLATE utf8_unicode_ci NOT NULL, `zip` varchar(20) COLLATE utf8_unicode_ci NOT NULL, `txn_id` varchar(50) COLLATE utf8_unicode_ci NOT NULL, `payment_status` varchar(10) COLLATE utf8_unicode_ci NOT NULL, `create_at` datetime NOT NULL, `edit_at` datetime NOT NULL DEFAULT CURRENT_TIMESTAMP ON UPDATE CURRENT_TIMESTAMP ); ALTER TABLE `tbl_order` ADD PRIMARY KEY (`id`); ALTER TABLE `tbl_order` MODIFY `id` int(11) NOT NULL AUTO_INCREMENT, AUTO_INCREMENT=110; 

Go Live


After testing the payment flow in the Sandbox mode, we can move to production mode.

To go live, change the mode from sandbox to production in the following line.

TCO.loadPubKey('production');

Replace all the test API keys with the live keys in the application config. Also, disable the sandbox mode by setting it as false as shown below.

Twocheckout::privateKey('production-private-key'); Twocheckout::sellerId('production-seller-id'); Twocheckout::sandbox(false); 

2Checkout Payment Form Output


The below screenshot shows the 2Checkout payment form. Most of the form fields are mandatory and so validated by JavaScript before payment.

The product name and price above the form are from the config. We can link your product database to display this information.
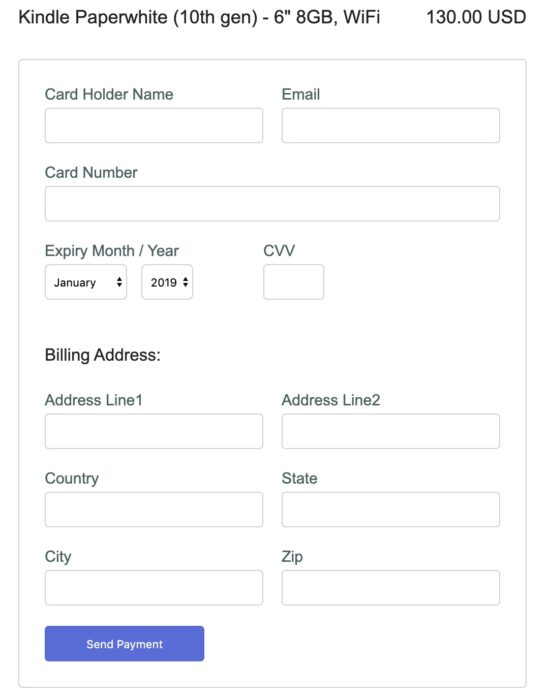
2Checkout Payment Form Output

This screenshot shows the success response. The table shown in this screenshot has the basic details about the order placed.
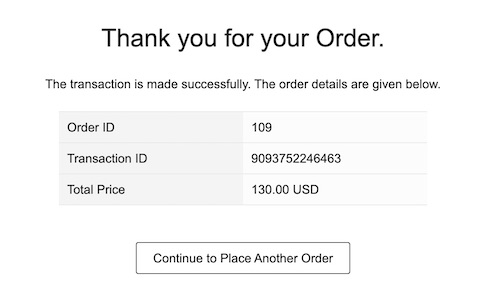
2Checkout Success Response

Download

↑ Back to Top


https://www.sickgaming.net/blog/2019/11/...using-php/

Print this item

  (Indie Deal) Bundles & Sales Round-up
Posted by: xSicKxBot - 01-25-2020, 08:50 AM - Forum: Deals or Specials - No Replies

Bundles & Sales Round-up

Bundle Round-up
Sale Round-up
Techland Winter Sale, up to -75% [www.indiegala.com]
Humongous Entertainment Winter Sale [www.indiegala.com]
Retroism Winter Sale, up to -90% [www.indiegala.com]
Dharker Studio Winter Sale, up to -85% [www.indiegala.com]
Van Helsing Franchise Sale, all titles -75% [www.indiegala.com]
Cherry Kiss Adult Sale, up to -67%[www.indiegala.com]
Freebies round-up
Affliction[freebies.indiegala.com]
Disgraced[freebies.indiegala.com]

Check out IndieGala on Twitter, YouTube & Facebook[www.facebook.com]


https://steamcommunity.com/groups/indieg...3838043676

Print this item

  (Free Game Key) [ENDED] Headsnatchers - Free Steam Game
Posted by: xSicKxBot - 01-25-2020, 08:50 AM - Forum: Deals or Specials - No Replies

[ENDED] Headsnatchers - Free Steam Game

Visit the giveaway page

https://www.humblebundle.com/store/headsnatchers-free-game/?partner=gfg

Create an account, subscribe to their newsletter and get the game, afterwards click on the preview email button to access the key page, scroll down to get the key and reveal it.

We are welcoming everyone to join our discord server (link below). We are more active there on finding giveaways, small or large.

?GrabFreeGames.com ?Twitter ?Steam Curator ?Facebook[fb.me]?Discord[discord.gg]
❤️Support us: ✔️HumbleBundle Partner[www.humblebundle.com] Epic Tag: GrabFreeGames ✌


https://steamcommunity.com/groups/GrabFr...5981463242

Print this item

  Tiled 1.3.2 Released
Posted by: xSicKxBot - 01-25-2020, 08:50 AM - Forum: Game Development - No Replies

Tiled 1.3.2 Released

Tiled, the open source map editing software, just released version 1.3.2.  Along side that release was a development snapshot with new features that will be available in the next release.  If you want learn Tiled we have an in-depth tutorial series available here.

Details of the 1.3.2 release:

  • Fixed initialization of selected layers (#2719)
  • Fixed stamp action shortcuts not being configurable (#2684)
  • Fixed the tileset view to respect the ‘wheel zooms by default’ preference
  • Fixed insertion position when using drag-n-drop to rearrange layers
  • Fixed displayed layer data format in Properties
  • Fixed repeating of export when map is saved by a custom command (#2709)
  • Fixed issue when multiple worlds are loaded that use pattern matching
  • Issues view can now be hidden by clicking the status bar counters
  • macOS: Fixed black toolbar when enabling OpenGL rendering (#1839)
  • Windows: Fixed context menus activating first item on release (#2693)
  • Windows installer: Include the ‘defoldcollection’ plugin (#2677)
  • Windows installer: Signed by SignPath
  • libtiled: Avoid inheriting Properties from QVariantMap (#2679)
  • docs: Added some notes to Python and JavaScript pages (#2725)
  • Updated Qt from 5.12.5 to 5.12.6
  • Updated Finnish translation (by Tuomas Lähteenmäki and odamite)
  • Updated part of Italian translation (by Katia Piazza)

As well as details from the developmental release:

Tinting Layers

Layers can now be tinted by multiplying their pixels with a color. This way you can darken or colorize your graphics in various ways without needing to set up separate images for it! The new “Tint Color” property is supported on tile layers, object layers and image layers, and is inherited from group layers.

Object Alignment

Ever since tile objects were added as a feature, their alignment has been inconsistent with the other shapes. Whereas a rectangle had its origin in the top-left, tile objects had their origin in the bottom-left (or even bottom-center, on isometric maps). While useful in some contexts, this inconsistency has annoyed many people over the years.

Now, a new tileset property specifies which alignment to use for tile objects using that tileset. If you set it to top-left, the tile objects will align consistently with the other objects. But of course you could also choose for bottom-center or center alignment depending on your needs.

Object Reference Properties

This change is a big step towards the Connecting Objects feature, which is planned for Tiled 1.4. You can now choose “object” as the type when adding a custom property, and the property will be interpreted as a reference to an object on the map, referring to it by its unique ID. A special dialog makes it easy to search for the object you want to refer to and the name of the referenced object will be displayed.

Tiled is available as a free download for Mac, Windows and Linux here.  The source code for Tiled is available on GitHub.

GameDev News


<!–

–>


https://www.sickgaming.net/blog/2020/01/...-released/

Print this item

  Mobile - The Weekender: License Holder Edition
Posted by: xSicKxBot - 01-25-2020, 08:50 AM - Forum: New Game Releases - No Replies

The Weekender: License Holder Edition

I thought this week might turn out to be quite interesting after the explosive news regarding Carcassonne (see below), but things seemed to settle down quite quickly. As you’ll read below though, that wasn’t the only franchise that will be changing the guard!

We’ve also caught up on a few reviews this week and then I had a bit of a moment regarding Black Desert Mobile. I’m sorry.

Meanwhile, in the world of mobile games…

New App Releases


It’s another dud weak in terms of releases, however a couple of things caught our eye…

Retro Bowl (iOS & Android)


We didn’t spot this in time last week, but we wanted to give a quick shout out to Retro Bowl. It’s from the developers of New Star Soccer and is themed around the American NFL. You pick your favourite team and manage all aspects of their existence both on and off the pitch.

It’s a ‘free-to-try’ game in the sense that you get to play five games for free before being prompted to pay for the full game, which costs $0.99/£0.99.


Tetris is Dead? Long Live Tetris?


Echoing the news we heard about Carcassonne earlier in the week, it seems EA’s stable of mobile Tetris games are also being replaced by a new upstart. The AAA games publisher was responsible for Tetris 2011, Tetris Premium and Tetris Blitz – these games are still available on iOS but have vanished from Google Play.

We’re unsure at this time if Android users are still able to download the game if they’ve had it downloaded previously, or whether existing downloads still work. The developers have stated officially the games will be retired on April 20th, 2020. At this point even iOS users won’t be able to play them, regardless if they’ve got them on a device or not.

This is where the new challenger comes in. A company called N3TWORK INC. has now released a new free Tetris app on both iOS and Android.

Nu Tetris

They’ve only done one game before – a free-to-play fantasy match-3 puzzle/RPG called Legendary: Game of Heroes RPG, as well as an Apple Watch game called Mafia Watch. That’s nice, I guess? It’s a shame this latest shut-down is more draconian than Carcarsonne but it depends on the terms of the license deal they have.

Best App Updates


On the bright side, there’s a couple of cool and interesting app updates to cover this week. Let’s take a look…

Star Traders: Frontiers


Our 2019 GOTY Winner is still proving it’s worth with another sizable update this week. The main focus is improving how Interdictors fare in battles, as well as adding in three new specialist ships that specialise in anti-craft warfare (‘crafts’ are fighters, bombers etc…)

There’s also been some further tweaks to various talents, as well as an overhaul of the Frontier Liner starting ship. Lovely stuff.

Out There: The Alliance Update


When Out There launched on Nintendo Switch it did so as Out There: Omega The Alliance, an exclusive version of the game that came with goodies like a new ending, new spaceships and achievements. Developer Mi-Clos did reassure everyone though back in November that this content would be coming to other platforms, and now it’s finally out as a free update on mobile. If you haven’t played in a while now might be a great chance to dive back in. We’ve included the Nintendo Switch trailer so you can see what the new edition will look like.


App Sales


  • As a reminder from Monday’s report, TheCodingMonkey’s Carcassonne as well as the other games they’ve made are currently on sale to mark the (upcoming) shutdown of their version of the iOS game. It’s currently half price.
  • To celebrate the big Alliance update (above), Out There is down to just $0.99 on iOS and Android.
  • Football Manager 2020 Mobile & Touch are discounted for the first time since launch – roughly 25% cheaper.
  • Continuing on the sports theme, NBA 2K20 is down to $1.99 on iOS and Android. Not its cheapest price ($0.99) but close enough.
  • We only reviewed it last week, but Dragon Castle: The Board Game is on sale again. The second time since launch and the cheapest price to date.
  • Our 2018 GOTY Winner, Meteorfall, is currently $1.99 again.
  • Everyone’s favourite game XCOM: Enemy Within is also down to $1.99

Seen anything else you liked? Played any of the above? Let us know in the comments!


https://www.sickgaming.net/blog/2020/01/...r-edition/

Print this item

  AppleInsider - Apple to attend meeting promoting easy access to health data
Posted by: xSicKxBot - 01-25-2020, 08:50 AM - Forum: Apple Mac & macOS - No Replies

Apple to attend meeting promoting easy access to health data


An Apple representative is slated to attend a meeting on Monday held by the Carin Alliance, a nonpartisan group currently advocating to push through government policy that would allow fast, easy access to patient health information.

Ricky Bloomfield, Apple’s clinical and health informatics lead, is scheduled to join a meeting at which attendees will discuss efforts to support a Department of Health and Human Services initiative on medical data interoperability, CNBC reports.

Proposed by the HHS in 2019, the proposal would modify rules governing access to health information, allowing patients to more easily obtain and share personal data. These provisions must first pass muster with the Office of Management and Budget, which is where the Carin Alliance comes in.

According to a press release (PDF link), the group seeks to “rapidly advance the ability for consumers and their authorized caregivers to easily get, use, and share their digital health information when, where, and how they want to achieve their goals.” At the upcoming meeting, advocates will ask the OMB to release rule changes proposed by the Centers for Medicare & Medicaid Services (CMS) and Office of the National Coordinator for Health IT (ONC), as well as the 21st Century Cures Act: Interoperability, Information Blocking, and the ONC Health IT Certification Program. The group cites consensus reached during a public comment period.

Those in favor of the policy modifications seek to modernize America’s health records system. Existing systems silo data and limit cooperative exchange between health care providers. Currently, patients looking to switch doctors or facilities, or share data with others, are typically required to request hard copies of medical histories. Data is often stored on physical media like CDs that are not easily transferrable. Others are denied access altogether, the report notes.

Proponents of the rule changes argue barriers that inhibit free movement between doctors and health institutions are proving detrimental to public health. Opposing voices, like medical records giant Epic, actively urge customers, like hospitals, to fight the proposals out of supposed concern for patient privacy.

Along with Apple’s Bloomfield, more than 40 representatives from major medical and tech companies, including Microsoft, will take part in the gathering either in person or by phone, according to an attendee list released Friday (PDF link).

Bloomfield is a physician with a background in mobile technology who currently serves as pediatric hospitalist at Stanford Children’s Health and an adjunct clinical assistant professor at Stanford University School of Medicine. He is currently working on technologies that allow users to carry health information on iPhone, the report said.

Apple has long been an advocate of making health data portable and in 2018 launched the Health Records feature on iOS. Built into the Health app, Health Records enables iPhone users to securely store and share medical data from participating healthcare providers. The effort debuted with support from 39 medical groups, later expanding to 75 backers in less than six months. Most recently, veterans gained access to the feature when the U.S. Department of Veterans Affairs integrated support for Health Records in November.


https://www.sickgaming.net/blog/2020/01/...alth-data/

Print this item

  Microsoft - Microsoft Translator adds Irish Gaelic to its family of languages
Posted by: xSicKxBot - 01-25-2020, 08:50 AM - Forum: Windows - No Replies

Microsoft Translator adds Irish Gaelic to its family of languages

Microsoft Translator adds Irish as a new language.

Irish language support

Our ongoing mission to break down language barriers continues with Irish: Today, we have added Irish Gaelic to Microsoft Translator. Irish Gaelic, usually referred to as the Irish Language or just Irish, and commonly known in Irish itself as Gaeilge (pronounced “gwael-guh”), is the latest addition to the Microsoft Translator family of languages. This brings Irish to all scenarios powered by Microsoft Translator, including Custom Translator, which helps customers to build translation systems for domain-specific terminology and style.

Neural machine translation technology has recently achieved impressive quality gains, characterized by highly fluent and accurate output, even for low-resourced languages such as Gaeilge. Using deep learning, we have iteratively refined our machine translation models. With today’s release, our commitment to deliver high-quality machine translation for Gaeilge moves to the next stage, as we prepare to continuously improve translation quality based on feedback from our users.

The Irish Language 


Irish is an official language of the country of Ireland, and also has official status in the European Union. It is classified as a Celtic language, a family of languages that includes Welsh, Scottish Gaelic, Breton, Manx, and Cornish, first appearing over 2,500 years ago. Irish is spoken as a first language in a number of regions of Ireland and taught in all schools across the country.

Professor Andy Way, head of the MT-team at the ADAPT Research Centre Ireland, shared his support by stating” We are very pleased to hear of the launch of Microsoft’s new neural MT system for Irish.” His colleague, Dr. Teresa Lynn, Research Fellow specializing in Irish language technology at ADAPT, added “Microsoft’s launch of their Irish-language NMT system is wholly complementary to the work we have been doing in the ADAPT over the past few years towards improving Irish machine translation in public administration. With this new release, the wider Irish language community now have the opportunity to enjoy the benefits of advanced language technology.” Likewise, Cllr. Peter Kavanagh, Green Party Irish Language Spokesperson and Co-founder of Pop Up Gaeltacht, said “It’s very positive to see Microsoft launching an Irish language machine translation engine.”

Irish Gaelige is available now, or in the next few days, on all Microsoft Translator apps, add-ins, Office, Translator for Bing, and through the Azure Cognitive Services Translator API for businesses and developers.

What you can do with Microsoft Translator


Translate real-time conversations, menus and street signs, websites, documents, and more using the Translator app for Windows, iOS, Android and the web. Use the Microsoft Translator Text and Speech API, both members of the Azure Cognitive Services family, to help globalize your business and customer interactions. Create a more inclusive classroom for both students and parents with live captioning and cross-language understanding.

For more information on Microsoft Translator please visit: https://www.microsoft.com/translator/.

Go raibh míle maith agaibh go léir!


https://www.sickgaming.net/blog/2020/01/...languages/

Print this item

  Fedora - Thunderbolt – how to use keyboard during boot time
Posted by: xSicKxBot - 01-25-2020, 08:49 AM - Forum: Linux, BSD & Unix - No Replies

Thunderbolt – how to use keyboard during boot time

Problem statement


Imagine you bought a new laptop with a shiny new USB-C docking station. You install fresh Fedora, encrypt your hard drive because laptop is a travel equipment and you do not want to travel around with non-ecrypted hard drive. You finish the installation, close the lid because you have external monitor, reboot the machine, and finally you would like to enter the LUKS password using the external keyboard attached using USB 2.0 to the USB-C docking station but it does not work!

The keyboard does not respond at all. So you open the lid, try the built-in keyboard which works just fine and once the machine boots the external keyboard works just fine as well. What is the problem?

What is this Thunderbolt anyway and why would anyone want it?


Thunderbolt is a hardware interface to connect peripherals such as monitors, external network cards [1] or even graphic cards [1]. The physical connector is the same as USB-C, but there is usually a label with a little lightning right next to the port to differentiate “plain” USB-C from Thunderbolt ports.


Of course it comes with very high transmission speed to support such demanding peripherals, but it also comes with a certain security risks. To achieve transmission speed like this, Thunderbolt uses Direct Memory Access (DMA) for the peripheral devices. As the name suggests, this method allows the external device to read and write memory directly without talking to the running operating system.

I guess you can already spot the problem here. If some stranger is walking around my laptop (even with the screen locked), is it really possible to just attach a device and read content of my computer memory? Let’s discuss it in more detail.

User facing solution for Thunderbolt security


In the recent versions, Gnome settings include a tab for Thunderbolt device configuration. You can enable and disable DMA access for external devices and you can also verify identity of the devices.


bolt is the component responsible for managing thunderbolt devices. See man 8 boltd for more information.

CLI tools


Of course it is possible to control the same via command line. I suggest you to read man boltctl or check the upstream repository directly: https://gitlab.freedesktop.org/bolt/bolt

Pre-boot support – solution to the keyboard problem


In pre-boot environment, the situation is slightly different. The userspace service responsible for device verification is not yet running so if a device is to be allowed, the firmware must to it. In order to enable this feature go to your BIOS and look for “support in pre boot environment”. For example this is how it looks on a Lenovo laptop:


Once you enable this feature, bolt will add any verified device to a list of allowed devices. The next time you boot your machine, you should be able to use your external keyboard.

Run boltctl a look for “bootacl”. Make sure that the list of allowed devices contains the one you wish to use.


Also note the “security: secure” line. If you see anything else, for instance “security: user” I recommend to reconfigure BIOS.

Technical details of the pre-boot support


There is one unfortunate technical detail about this solution. Thunderbolt support different security levels. For running Fedora, I recommend you to use “secure” level to verify that the device is indeed the one that it claims to be by using a per-device key generated by the host and stored in the device. Firmware, on the other hand, will only use “user” level which uses simple UUID that is provided by the device. The difference is that a malicious device could claim to be a different one by providing the same UUID as a legitimate one. Anyway this should not be a problem as the memory does not contain any sensitive data yet.

You can find more technical details in this blog post: https://christian.kellner.me/2019/02/11/thunderbolt-preboot-access-control-list-support-in-bolt/

Conclusion


As you can see, in recent enough Fedora version the solution is a simple switch in BIOS. So if you are still opening your laptop during boot, go ahead and configure it so you don’t have to do it next time. Meanwhile check that the default security level is “secure” instead of “user” [5].

Sources:


[1] https://www.intel.com/content/www/us/en/products/docs/io/thunderbolt/thunderbolt-technology-developer.html

[2] https://christian.kellner.me/2019/02/11/thunderbolt-preboot-access-control-list-support-in-bolt/

[3] https://gitlab.freedesktop.org/bolt/bolt

[4] https://wiki.gnome.org/Design/Whiteboards/ThunderboltAccess

[5] https://christian.kellner.me/2019/02/27/thunderclap-and-linux/


https://www.sickgaming.net/blog/2020/01/...boot-time/

Print this item