Posted on Leave a comment

Machine Learning Engineer — Income and Opportunity

Before we learn about the money, let’s get this question out of the way:

What Is Machine Learning?

Let’s have a look at the definition:

Machine learning (ML) is a subfield of artificial intelligence (AI) that focuses on the automatic creation of models from training data that predict outcomes accurately. The automatic creation of an ML model based on existing data is called training, whereas the prediction on new input data is called inference.

Due to the great performance of machine learning models on real-world problems such as self-driving cars, robotics, and natural language processing, the “subfield” ML became more and more important in recent years and started to penetrate into all areas of computing and even previously non-computing related fields.

This is an interesting video that explains the core ideas of machine learning in different levels of complexity:

Now that you know about what it is, let’s have a look at what it earns next!

Annual Income

How much does a Machine Learning Engineer make per year?

Figure: Average Machine Learning Engineer Income

The average annual income of a Machine Learning Engineer in the United States is between $112,000 and $157,000 with a median of $131,000 per year according to multiple data sources such as Indeed, Glassdoor, Salary.com, and Payscale.

Here’s a quick overview of the raw income data:

  • Indeed.com estimates the average annual income of a machine learning engineer to be $117,457 per year in the US.
  • Salary.com estimates the average annual income of a machine learning engineer to be $145,297 per year in the US.
  • Sandiego.edu estimates the average annual income of a machine learning engineer to be $146,085 per year in the US.
  • Glassdoor.com estimates the average annual income of a machine learning engineer to be $131,001 per year in the US.
  • PayScale.com estimates the average annual income of a machine learning engineer to be $112,266 per year in the US.
  • Salary.com estimates the average annual income of a machine learning engineer to be $122,817 per year in the US.
  • Talent.com estimates the average annual income of a machine learning engineer to be $140,000 per year in the US.
  • ZipRecruiter.com estimates the average annual income of a machine learning engineer to be $157,676 per year in the US.
Source Annual Income
Indeed.com $117,457
Salary.com $145,297
Sandiego.edu $146,085
Glassdoor.com $131,001
PayScale.com $112,266
Salary.com $122,817
Talent.com $140,000
ZipRecruiter.com $157,676
Table: Average Annual Income of a Machine Learning Engineer in the US by Source.

Let’s have a look at the hourly rate of Machine Learning Engineers next!

Hourly Rate

Machine Learning Engineers are well-paid on freelancing platforms such as Upwork or Fiverr.

If you decide to go the route as a freelance Machine Learning Engineer, you can expect to make between $15 and $125 per hour on Upwork (source). Assuming an annual workload of 2000 hours, you can expect to make between $30,000 and $250,000 per year.

⚡ Note: Do you want to create your own thriving coding business online? Feel free to check out our freelance developer course — the world’s #1 best-selling freelance developer course that specifically shows you how to succeed on Upwork and Fiverr!

Industry Demand

But is there enough demand? Let’s have a look at Google trends to find out how interest evolves over time (source):

Yes indeed! You can build your whole career on Machine Learning based on this data.

Work Description

So, you may wonder: Machine Learning Engineer – what’s the definition?

Machine Learning Engineer Definition: A Machine Learning Engineer creates, edits, analyzes, debugs, models, and supervises the development of machine learning models using programming languages such as Python or C++ and machine learning libraries such as Keras or TensorFlow.

Related Article:

Learning Path, Skills, and Education Requirements

Do you want to become a Machine Learning Engineer? Here’s a step-by-step learning path I’d propose to get started with Machine Learning:

You can find many additional computer science courses on the Finxter Computer Science Academy (flatrate model).

But don’t wait too long to acquire practical experience!

Even if you have little skills, it’s best to get started as a freelance developer and learn as you work on real projects for clients — earning income as you learn and gaining motivation through real-world feedback.

🚀 Tip: An excellent start to turbo-charge your freelancing career (earning more in less time) is our Finxter Freelancer Course. The goal of the course is to pay for itself!

You can find more job descriptions for coders, programmers, and computer scientists in our detailed overview guide:

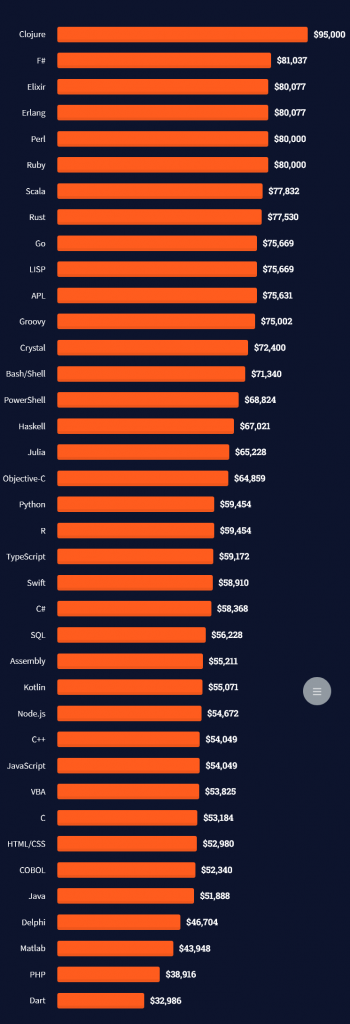
The following statistic shows the self-reported income from 9,649 US-based professional developers (source).

💡 The average annual income of professional developers in the US is between $70,000 and $177,500 for various programming languages.

Question: What is your current total compensation (salary, bonuses, and perks, before taxes and deductions)? Please enter a whole number in the box below, without any punctuation. If you are paid hourly, please estimate an equivalent weekly, monthly, or yearly salary. (source)

The following statistic compares the self-reported income from 46,693 professional programmers as conducted by StackOverflow.

💡 The average annual income of professional developers worldwide (US and non-US) is between $33,000 and $95,000 for various programming languages.

Here’s a screenshot of a more detailed overview of each programming language considered in the report:

Here’s what different database professionals earn:

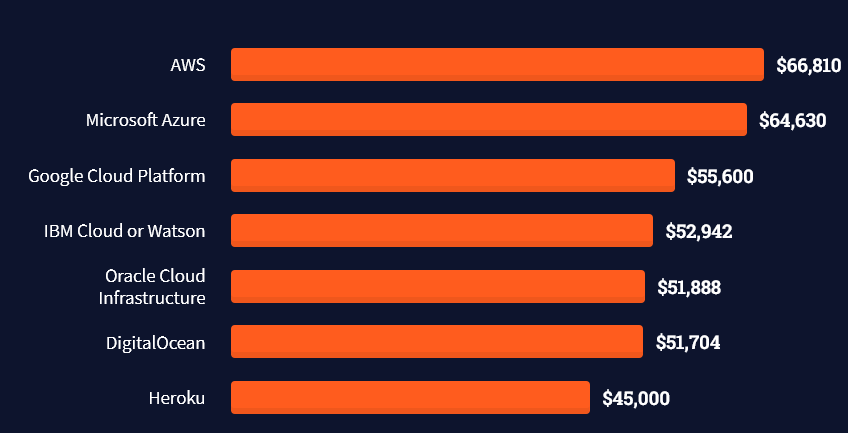
Here’s an overview of different cloud solutions experts:

Here’s what professionals in web frameworks earn:

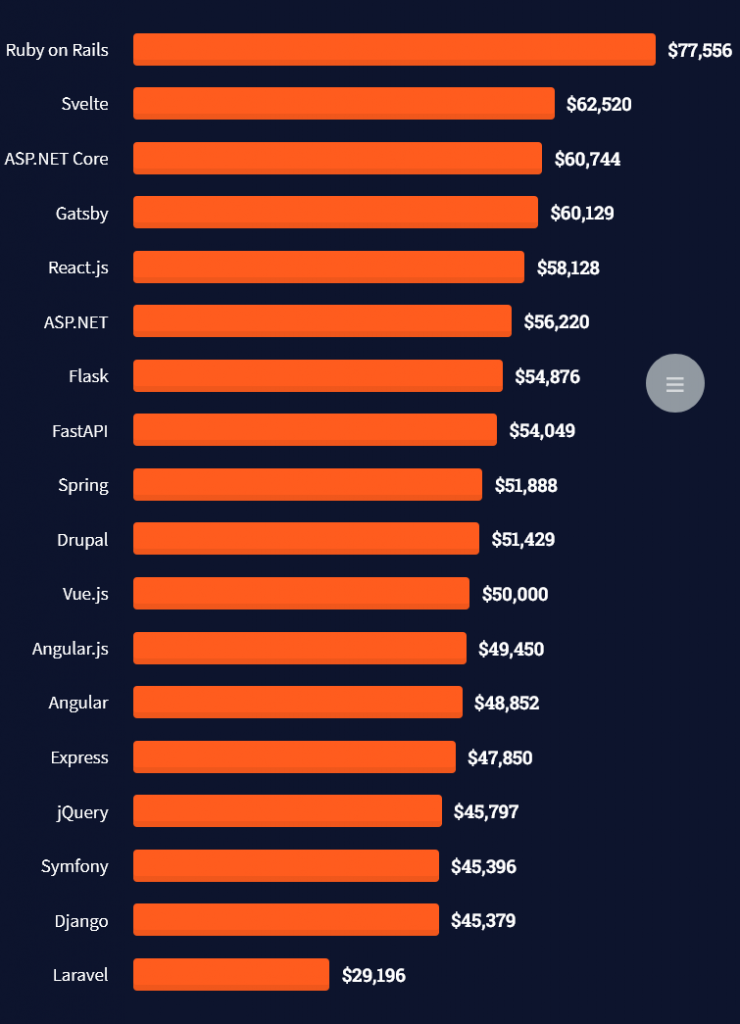
There are many other interesting frameworks—that pay well!

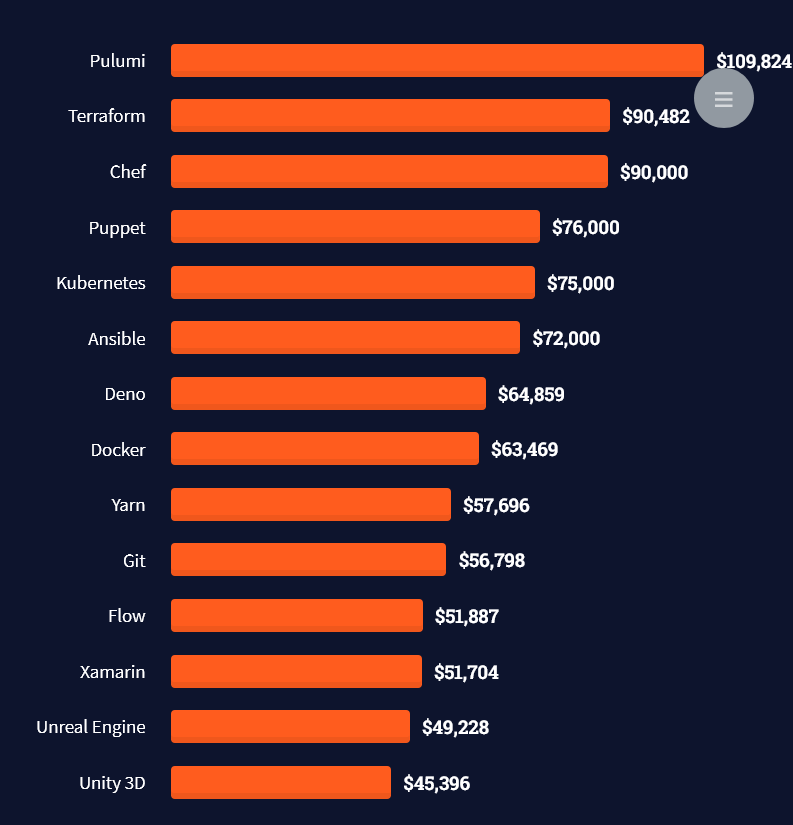
Look at those tools:

Okay, but what do you need to do to get there? What are the skill requirements and qualifications to make you become a professional developer in the area you desire?

Let’s find out next!

General Qualifications of Professionals

StackOverflow performs an annual survey asking professionals, coders, developers, researchers, and engineers various questions about their background and job satisfaction on their website.

Interestingly, when aggregating the data of the developers’ educational background, a good three quarters have an academic background.

Here’s the question asked by StackOverflow (source):

Which of the following best describes the highest level of formal education that you’ve completed?

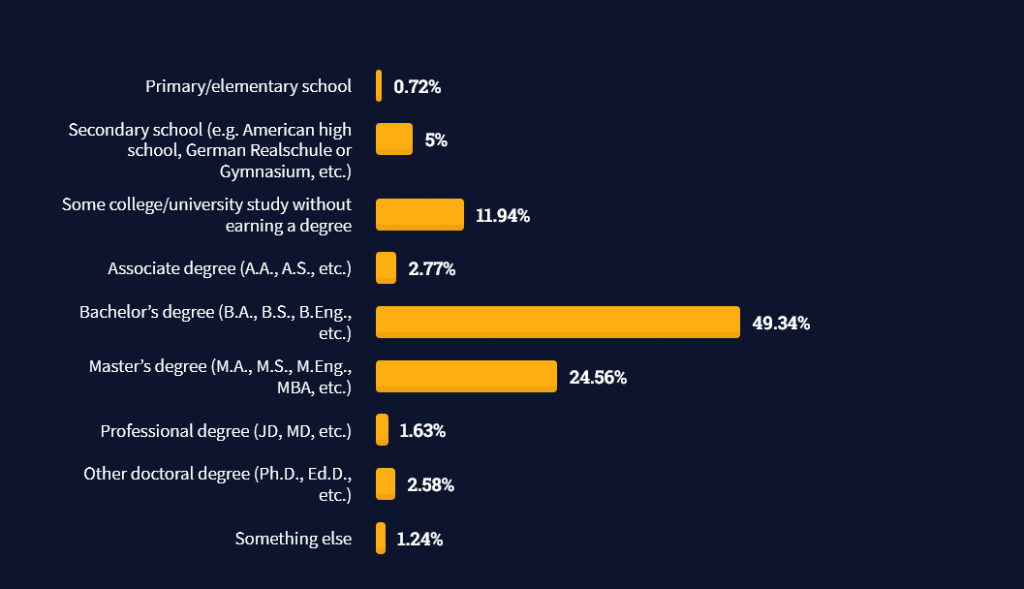
However, if you don’t have a formal degree, don’t fear! Many of the respondents with degrees don’t have a degree in their field—so it may not be of much value for their coding careers anyways.

Also, about one out of four don’t have a formal degree and still succeeds in their field! You certainly don’t need a degree if you’re committed to your own success!

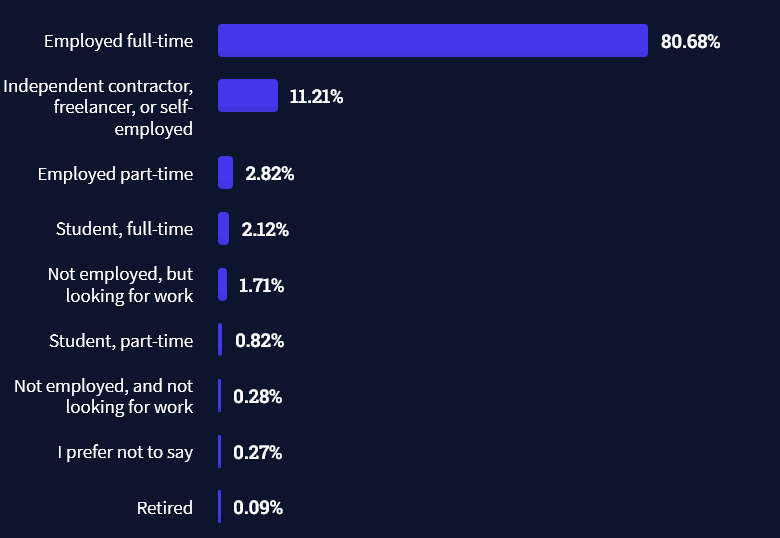
Freelancing vs Employment Status

The percentage of freelance developers increases steadily. The fraction of freelance developers has already reached 11.21%!

This indicates that more and more work will be done in a more flexible work environment—and fewer and fewer companies and clients want to hire inflexible talent.

Here are the stats from the StackOverflow developer survey (source):

Do you want to become a professional freelance developer and earn some money on the side or as your primary source of income?

Resource: Check out our freelance developer course—it’s the best freelance developer course in the world with the highest student success rate in the industry!

Other Programming Languages Used by Professional Developers

The StackOverflow developer survey collected 58000 responses about the following question (source):

Which programming, scripting, and markup languages have you done extensive development work in over the past year, and which do you want to work in over the next year?

These are the languages you want to focus on when starting out as a coder:

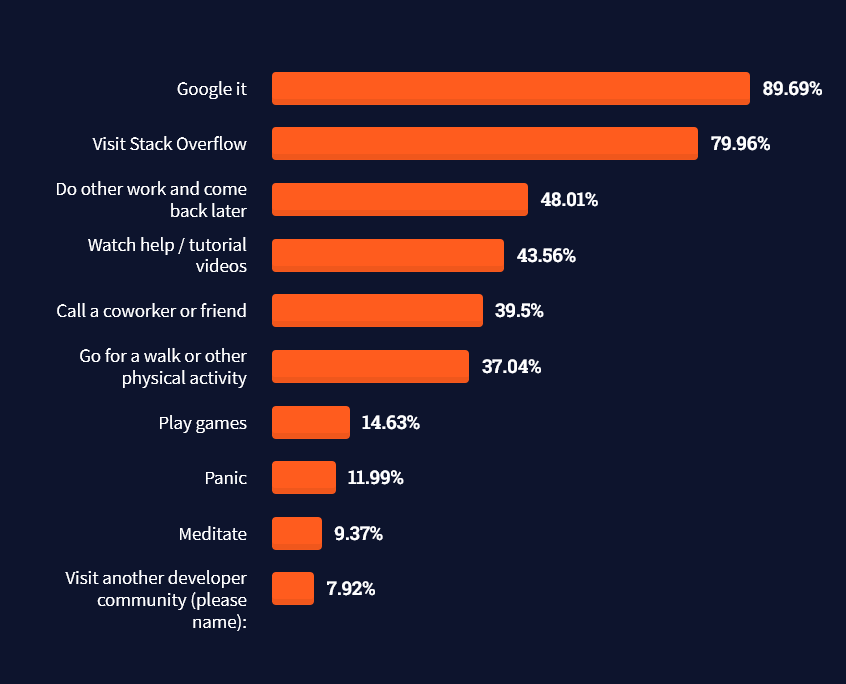
And don’t worry—if you feel stuck or struggle with a nasty bug. We all go through it. Here’s what SO survey respondents and professional developers do when they’re stuck:

What do you do when you get stuck on a problem? Select all that apply. (source)

To get started with some of the fundamentals and industry concepts, feel free to check out these articles:

Where to Go From Here?

Enough theory. Let’s get some practice!

Coders get paid six figures and more because they can solve problems more effectively using machine intelligence and automation.

To become more successful in coding, solve more real problems for real people. That’s how you polish the skills you really need in practice. After all, what’s the use of learning theory that nobody ever needs?

You build high-value coding skills by working on practical coding projects!

Do you want to stop learning with toy projects and focus on practical code projects that earn you money and solve real problems for people?

🚀 If your answer is YES!, consider becoming a Python freelance developer! It’s the best way of approaching the task of improving your Python skills—even if you are a complete beginner.

If you just want to learn about the freelancing opportunity, feel free to watch my free webinar “How to Build Your High-Income Skill Python” and learn how I grew my coding business online and how you can, too—from the comfort of your own home.

Join the free webinar now!

Posted on Leave a comment

Get Key by Value in The Dictionary

Problem Statement: How to get a key by its value in a dictionary in Python

Example:

# Given dictionary
employee = {"Sam": 1010, "Bob": 2020, "Rob": 3030} # Some Way to extract the Key 'Bob' using its value 2020

We have a clear idea about the problem now. So without further delay, let us dive into the solutions to our question.

Solution 1: Using dict.items()

Approach: One way to solve our problem and extract the key from a dictionary by its value is to use the dict.items(). The idea here is to create a function  that takes the provided value as an input and compares it to all the values present in the dictionary. When we get the matching value, we simply return the key assigned to the value.

Solution:

# Given dictionary
employee = {"Sam": 1010, "Bob": 2020, "Rob": 3030} # Function that fetches key from value
def get_key(v): for key, value in employee.items(): # return the key which matches the given value if v == value: return key return "The provided key is not present in the dictionary" # Passing the keys to the function
print("Employee ID - 2020 \nName - ", get_key(2020))

Output:

Employee ID - 2020 Name - Bob

Note: dict.items() is a dictionary method in Python that returns a view object. The returned view object contains a list of tuples that comprises the key-value pairs in the dictionary. Any changes made to the dictionary will also be reflected in the view object.

Example: The following example demonstrates how the dict.items() method works.

# Given dictionary
employee = {"Sam": 1010, "Bob": 2020, "Rob": 3030}
item = employee.items()
employee['Tom'] = '4040'
print(item)

Output:

dict_items([('Sam', 1010), ('Bob', 2020), ('Rob', 3030), ('Tom', '4040')])

Solution 2: Using keys(), values() and index()

Approach: Another workaround to solve our problem is to extract the keys and values of the dictionary separately in two different lists with the help of the keys() and values() methods. Then find the index/position of the given value from the list that stores the values with the help of the index() method. Once the index is found, you can easily locate the key corresponding to this index from the list that stores all the keys.

Solution: Please follow the comments within the code to get an insight of the solution.

# Given dictionary
employee = {"Sam": 1010, "Bob": 2020, "Rob": 3030}
# store all the keys in a list
key = list(employee.keys())
# store all the values in another list
val = list(employee.values())
# find the index of the given value (2020 in this case)
loc = val.index(2020)
# Use the index to locate the key
print(key[loc])

Output:

Bob

Note:

  • keys() is a dictionary method that returns a view object that contains the keys of the dictionary in a list.
  • values() is a dictionary method that returns a view object consisting of the values in the dictionary within a list.
  • The index() method is used to return the index of the specified item in a list. The method returns only the first occurrence of the matching item.

Example:

employee = {"Sam": 1010, "Bob": 2020, "Rob": 3030}
li = ['Lion', 'Dog', 'Cat', 'Mouse', 'Dog']
key = list(employee.keys())
val = list(employee.values())
loc = li.index('Dog')
print(f"Keys: {key}")
print(f"Values: {val}")
print(f"Index: {loc}")

Output:

Keys: ['Sam', 'Bob', 'Rob']
Values: [1010, 2020, 3030]
Index: 1

Solution 3: Interchanging the Keys and Values

Approach: The given problem can be resolved using a single line of code. The idea is to use a dictionary comprehension that reverses the keys and values. This means the keys in the original dictionary become the values in the newly created dictionary while the values in the original dictionary become the keys in the newly created dictionary. Once you have interchanged the keys and values, you can simply extract the key by its value.va

Solution:

employee = {"Sam": 1010, "Bob": 2020, "Rob": 3030}
res = dict((val, key) for key, val in employee.items())
print("Original Dictionary: ", employee)
print("Modified Dictionary: ", res)
# using res dictionary to find out the required key from employee dictionary
print(res[2020])

Output:

Original Dictionary: {'Sam': 1010, 'Bob': 2020, 'Rob': 3030}
Modified Dictionary: {1010: 'Sam', 2020: 'Bob', 3030: 'Rob'}
Bob

Explanation:

  • employee dictionary has Name and Employee ID as Key-Value pairs.
  • res dictionary interchanges the keys and values of the employee dictionary. Therefore, res now has Employee ID and Name as Key-Value pairs.
  • Since we need to extract the name corresponding to an Employee ID. We can simply get that from the res dictionary with the help of the key which in this case is the Employee ID.

Solution 4: Using zip()

Considering that the values in the given dictionary are unique, you can solve the problem with a single line of code. The idea is to use the keys() and values() dictionary methods to extract the keys and values from the dictionary and then tie them together with the help of the zip() method to produce a dictionary.

employee = {"Sam": 1010, "Bob": 2020, "Rob": 3030}
name = dict(zip(employee.values(), employee.keys()))[2020]
print(f'Name: {name} \nEmployee ID: 2020')

Output:

Name: Bob Employee ID: 2020

Solution 5: Using Pandas

We can also opt to use the Pandas DataFrame to get the key by its value. In this approach, first, we will convert the given dictionary into a data frame.  Further, we can name the column with the keys as “key” and the columns with the values as “value“. To get the key by the given value, we have to return the value from the ‘key‘ column from the row where the value of the ‘value‘ column is the required value.

Example:

# Importing the pandas module
import pandas as pd # Given dictionary
employee = {"Sam": 1010, "Bob": 2020, "Rob": 3030}
# list to store the keys from the dictionary
key = list(employee.keys())
# list to store the values from the dictionary
val = list(employee.values())
# Converting the dictionary into a dataframe
df = pd.DataFrame({'key': key, 'value': val})
print("The data frame:")
print(df)
# Given Value
v = 2020
print("The given value is", v)
# Searching for the key by the given value
k = (df.key[df.value == v].unique()[0])
print("The key associated with the given value is:", k)

Output:

The data frame: key value
0 Sam 1010
1 Bob 2020
2 Rob 3030
The given value is 2020
The key associated with the given value is: Bob

Note: df.key[df.value == v].unique()[0]) –> We have to use the unique method in this line to avoid the index from getting printed. While using the panda’s data frame, the output is not in the string format, but it is a pandas series object type. Hence, we need to convert it using the unique or sum() method. Without the unique method, the output will also consider the index of the data frame column.

Conclusion

That’s all about how to get a key by the value in the dictionary. I hope you found it helpful. Please stay tuned and subscribe for more interesting tutorials. Happy Learning!

Posted on Leave a comment

‘Pip’ Is Not Recognized As An Internal Or External Command [FIXED]

Many factors could lead to the error: ‘pip’ is not recognized as an internal or external command. Two of the most common ones are Python’s or pip’s incorrect installation and lacking path in the system environment variables.

This tutorial deeply explains the concept of environment variables, system paths, and pip’s way of storing packages to enable you to track the source of the error comfortably.

It then takes you through a step-by-step way to solve the error. Apart from Windows, you will see how to solve related errors in Linux. What is more? Read on to find out.

What Are Environment Variables?

Understanding environment variables is one the most crucial steps to solving pip’s errors.

A computing environment is a platform consisting of the operating system and the processor. On the other hand, a variable is a place for storing a value. The variable can be binary, text, number, filename, or any other data type. It gets its name during creation and can be displayed, updated, and deleted.

The combination of a computing environment and variable is an environment variable, a dynamic value affecting the behavior of a computer process. A computer process is an instance of a program.

# Determine the value of a variable
echo %VARIABLE% # in Windows
echo $VARIABLE # in Linux # display
%VARIABLE% # in Windows
env # command for printing all environment variables OR
printenv # show a single environment variable in Linux.

Features Of Environment Variables

  • They can be created, read, edited, and deleted.
  • Each process has its set of environment variables. A newly created process inherits its parent’s same runtime environment.
  • Environment variables occur in scripts and the command line.
  • Shell scripts and batch files use environment variables to communicate data and processes to child processes or temporarily store data.
  • A running process can access the environment variables for configuration reasons.
  • A collection of environment variables behave like an associative array, with keys and values in strings.
  • Environment variables may differ depending on the operating system.
  • Windows stores the default environment variable values in the registry and sets them in the AUTOEXEC.BAT file.

Examples Of Environment Variables

Here are the typical environment variables that interact with pip.

PATH

The path variable lists the directory where your system searches executables. It enables you to view the location of a directory without typing the full path.

In Windows, the path variables are stored in C:\Windows or C:\Windows\System32. In Linux, they originate from the user’s bin or sbin file.

HOME

It shows the default path to the user’s home directory. For instance, HOME//APPDATA stores app settings in Windows. In Linux, the settings are found in HOME/{.App Name}.

In Windows, the misplaced APPDATA lands in the USERPROFILE environment variable, which should instead be used for dialogs to allow a user to choose between folders. LOCALAPPDATA stores local app settings.

TEMP

It stores temporary processes.

Now that you understand how environment variables play a massive in package working, you should find out specific ways to solve pip’s errors.

Solution 1: Ensure Pip Is Installed Correctly And Up-to-date

Windows

Pip packages are stored in Python’s installation directory. For instance, installing Python in C:\Python\ stores the default library in C:\Python\Lib\, while the third-party packages reside in C:\Python\Lib\site-packages.

If you install a specific Python version as a stand-alone, pip packages reside in APPDATA.

C:\Users\<username>\AppData\Roaming\Python\Python<version-subversion>\site-packages\ # the version can be 310 for Python 3.10 or 38 for Python 3.8

If you install a pip package that does not use a specific location, it lands in Scripts.

C:\Python310\Scripts\ 

Pip gets installed by default when you install most Python 3 versions. You can confirm the installation by checking the pip’s version or help command.

pip -V
# OR
pip help

You should get pip’s version version, installation folder, and Python version running it.

pip 22.0.4 from C:\Users\<username>\AppData\Local\Programs\Python\Python310\lib\site-packages\pip (python 3.10)

Otherwise, you could get an error,

'pip' is not recognized as an internal or external command

OR

Python is not recognized as an internal or external command, operable program or batch file.

if you try running python.

python

If you run the above commands without seeing Python, pip, or the installed package, you should download Python.

Install pip as a stand-alone package if pip is still unavailable after installing Python. Download get-pip, and run the following command on the command prompt.

python get-pip.py

Lastly, you can upgrade the pip version and check if the error persists.

python -m pip install --upgrade pip

If the problem is still not solved, try adding Python to the system path variable, as explained in solution 2 of this tutorial.

Linux

The usr is one of the most crucial folders in Linux. It stores information like user binaries, libraries, documentation, and header files. It is where packages that pip manages get installed.

Say we want to install Python 3.10 on Ubuntu 20.04. We can do that by downloading Python from the source or using the deadsnakes custom PPA as follows.

# Update the system, ensuring the required packages are installed.
sudo apt update && sudo apt upgrade -y # Install the required dependency needed to add the custom PPAs.
sudo apt install software-properties-common -y # Add the deadsnakes PPA to the list of APT package manager sources.
sudo add-apt-repository ppa:deadsnakes/ppa # Download Python 3.10
sudo apt install python3.10 # Confirm successful installation
python3.10 --version

The next step is to locate pip.

# pip
pip --version
# OR
pip -V
pip list -v # pip3
pip3 -V
pip list -v

Either way, you may get the following errors.

# pip
Command 'pip' not found, but can be installed with:
sudo apt install python3-pip # pip3
Command 'pip3' not found, but can be installed with:
sudo apt install python3-pip

You get a similar error when you try installing a package.

# pip
pip install django
Command 'pip' not found, but can be installed with:
sudo apt install python3-pip # pip3
pip3 install django
Command 'pip3' not found, but can be installed with:
sudo apt install python3-pip

Let’s install pip.

sudo apt install python3-pip

Solution 2: Add The Path Of Pip Installation To The PATH System Variable

You can use the terminal or the GUI.

setx PATH "%PATH%;C:\Python<version-subversion>\Scripts" # For example
setx PATH "%PATH%;C:\Python310\Scripts" # for Python 3.10

To use the GUI,

  1. copy to the full path of the system variable: C:\<username>\steve\AppData\Local\Programs\Python\Python310\Scripts
  2. Type Edit the Environment Variables on the search bar.
  3. On the pop-up window, click on the Advanced tab followed by Environment Variables.

4. You are presented with two boxes. Highlight path on the first box followed by the Edit button below the box.

5. Click on New, paste the script path you had copied earlier, followed by OK on the bottommost part of the screen.

Conclusion

You have learned the leading causes of the error, “‘pip’ is not recognized as an internal or external command,” while installing packages and two typical ways to correct it.

You can check whether your installation was successful and whether the pip is updated and lies in the correct path. Otherwise, you can take the most appropriate step, as explained in this tutorial.

Please stay tuned and subscribe for more interesting discussions.

Posted on Leave a comment

How to Sort a List of Tuples by Second Value

In this article, you’ll learn how to sort a list of tuples by the second value in Python.

To make it more fun, we have the following running scenario:

BridgeTech is a bridge restoration company. They have asked you to sort and return the Top 10 elements from the Periodic Table based on the ‘Atomic Radius’ in descending order.

The atomic radius of a chemical element is a measure of the size of its atom, usually the mean or typical distance from the center of the nucleus to the outermost isolated electron.

Wikpedia

Click here to download the Periodic Table. Save this file as periodic_table.csv and move it to the current working directory.

💬 Question: How would you write the Python code to accomplish this task?

We can accomplish this task by one of the following options:


Preparation

Before any data manipulation can occur, one (1) new library will require installation.

  • The Pandas library enables access to/from a DataFrame.

To install this library, navigate to an IDE terminal. At the command prompt ($), execute the code below. For the terminal used in this example, the command prompt is a dollar sign ($). Your terminal prompt may be different.

$ pip install pandas

Hit the <Enter> key on the keyboard to start the installation process.

If the installation was successful, a message displays in the terminal indicating the same.


Feel free to view the PyCharm installation guide for the required library.


Add the following code to the top of each code snippet. This snippet will allow the code in this article to run error-free.

import numpy as np
from operator import itemgetter

💡 Note: The operator library is built-in to Python and does not require installation.


Method 1: Use Sort and a Lambda

To sort a list of tuples based on the second element, use sort() and lambda in the one-liner expression tups.sort(key=lambda x: x[1], reverse=True).

Here’s an example:

df = pd.read_csv('periodic_table.csv', usecols=['Name', 'AtomicRadius'])
tups = [tuple(x) for x in df.values.tolist()]
tups.sort(key=lambda x: x[1], reverse=True)
print(tups[0:10])

The CSV file is read in preparation, and two (2) columns save to a DataFrame. The DataFrame then converts to a list of tuples (tups) using List Comprehension.

We are ready to sort!

A lambda is passed as a parameter to sort() indicating the sort element (x[1]), and the sort order is set to descending (reverse=True). The results save to tups.

To complete the process, slicing is performed, and the Top 10 elements are sent to the terminal.

Output

[('Francium', 348.0), ('Cesium', 343.0), ('Rubidium', 303.0), ('Radium', 283.0), ('Potassium', 275.0), ('Barium', 268.0), ('Actinium', 260.0), ('Strontium', 249.0), ('Curium', 245.0), ('Californium', 245.0)]

Method 2: Use Sort & Itemgetter

To sort a list of tuples by the second element, use the sort() and itemgetter() functions in the expression tuples.sort(key=itemgetter(1), reverse=True).

Here’s an example:

df = pd.read_csv('periodic_table.csv', usecols=['Name', 'AtomicRadius'])
tups = [tuple(x) for x in df.values.tolist()]
tups.sort(key=itemgetter(1), reverse=True)
print(tups[0:10])

The CSV file is read in preparation, and two (2) columns save to a DataFrame. The DataFrame then converts to a List of Tuples (tups) using List Comprehension.

We are ready to sort!

The sort() function passes a key (itemgetter(n)) where n is the sort element (itemgetter(1)), and the sort order is set to descending (reverse=True).

The results save to tups.

To complete the process, slicing is performed, and the Top 10 elements are sent to the terminal.

💡 Note: The itemgetter() function is slightly faster than a lambda. Use itemgetter if speed and memory are a factor.


Method 3: Use Sorted & Lambda

To sort a list of tuples by the second element, combine the functions sorted() and lambda in the expression sorted(tups, key=lambda x:(x[1]), reverse=True) and assign the resulting sorted list to the original variable tups.

Here’s an example:

df = pd.read_csv('periodic_table.csv', usecols=['Name', 'AtomicRadius'])
tups = [tuple(x) for x in df.values.tolist()]
tups = sorted(tups, key=lambda x:(x[1]), reverse=True)
print(tups[0:10])

The CSV file is read in preparation, and two (2) columns save to a DataFrame. The DataFrame then converts to a List of Tuples (tups) using List Comprehension.

We are ready to sort!

A lambda is passed as a parameter to sorted(), indicating the sort element (x[1]), and the sort order is set to descending (reverse=True). The results save to tups.

To complete the process, slicing is performed, and the Top 10 elements are sent to the terminal.


Method 4: Use Bubble Sort

To sort a List of Tuples by the second element, you can also modify a sorting algorithm from scratch such as Bubble Sort to access the second (or n-th) tuple value as a basis for sorting.

Here’s an example:

df = pd.read_csv('periodic_table.csv', usecols=['Name', 'AtomicRadius'])
tups = [tuple(x) for x in df.values.tolist()] def sort_tuples_desc(tups, idx): length = len(tups) for i in range(0, length): for j in range(0, length-i-1): if (tups[j][idx] < tups[j + 1][idx]): tmp = tups[j] tups[j] = tups[j+1] tups[j+1] = tmp return tups
print(sort_tuples_desc(tups, 1)[0:10])

The CSV file is read in preparation, and two (2) columns save to a DataFrame. The DataFrame then converts to a List of Tuples (tups) using List Comprehension.

We are ready to sort!

A sort function sort_tuples_desc is created and passed two (2) parameters: a List of Tuples (tups), and the sort element (idx). Then, the infamous Bubble Sort is performed on the elements.

This function returns a List of Tuples sorted in descending order.

To complete the process, slicing is performed, and the Top 10 elements are sent to the terminal.


Summary

These four (4) methods of sorting a List of Tuples based on the second element should give you enough information to select the best one for your coding requirements.

Good Luck & Happy Coding!


Posted on Leave a comment

Writing a List to a File in Python

Problem Statement: How to write a list to a file with Python?

Mostly Python programmers use persistent storage systems like databases or files to store serialized data structures like arrays, lists, and dictionaries. It is because databases and files are reusable, i.e. after analyzing the given data, we can store it in the file, and later that data can be read to use in an application. There are many different ways to write a list to the file in Python. Let’s look at some of them:

Method 1- Using Read And Write

Python facilitates us with standard methods used to read the data from the file and to write the data to a file. While dealing with single lines, we can use the read() and write() methods, respectively. Suppose we have the following list of strings and we have to store each string in a file using Python:

colors = ["red", "black", "white", "yellow", "blue"]

To write the list in to file, we have to follow the steps given below:

  • Firstly, open the file in write mode by passing the file path and access mode “w” to the open() function.
  • Next, we have to use the “for” loop to iterate the list. In each iteration, we will get a list item that we need to write in the file using the write() method.
  •  After iterating through the whole list, we need to ensure that we have closed the file. For that, we use the close() method.

Let’s visualize the above demonstration with the help of the following snippet:

# List of colours
colors = ["red", "black", "white", "yellow", "blue"]
# Opening the file in write mode
file = open('colors.txt', 'w')
# Writing the list to the file
for color in colors: file.write(color + '\n')
# Closing the file
file.close()

Output:

red black white yellow blue

Note: The ‘\n‘ character is used for a new line at the end of each item in the list.

Let’s have a look at a situation that demonstrates how we can read the list from the file:

Example:

# Empty list that will read from the file
colors = []
# Opening the file in read mode
with open(r'colors.txt', 'r') as file: for color in file: x = color[:-1] colors.append(x)
print(colors)

Output:

["red", "black", "white", "yellow", "blue"]

Recommended Read: How to Read a File Line-By-Line and Store Into a List?

Method 2- Using Writelines() Method

While dealing with multiple lines, we have to use the readlines() and writelines() file methods in Python.  Hence we can write the entire list into a file using the writelines() method.

Example:

# List of colours
colors = ["red", "black", "white", "yellow", "blue"]
# Opening the file in write mode
with open('colors.txt', 'w') as file: # Writing the entire list to the file file.writelines("\n" % color for color in colors)

Output:

red black white yellow blue

⦿ The following example shows how to use readlines() to read the entire list from a file in Python:

Example:

# Empty list that will read from the file
colors = []
# Opening the file in read mode
with open(r'colors.txt', 'r') as file: colors = [color.rstrip() for color in file.readlines()]

Output:

["red", "black", "white", "yellow", "blue"]

Method 3- Using The Pickle Module

Pickle is a module in Python that is used to serialize or de-serialize an object structure. We can use this module to serialize a list for later use in the same file.  The dump() method from the module is used to write the list into a file and it takes the reference of the file and list as its parameters. The method stores the list efficiently as a binary data stream. As it uses a binary stream, the file can even be opened in binary writing mode (wb).  Using the module, we can convert any object like a list or dictionary into a character stream. The character stream has the information to reconstruct the object in the future.

Approach: To write a list into the file, we have to first import the pickle module at the start of the program. Then we will use the access mode to open the file. The open() function checks if the file exists or not and if it exists, it gets truncated. The function creates a new one if the file doesn’t already exist. Further, the dump() method converts the object and writes it into the file.

Example:

# Importing the pickle module
import pickle
# Writing the list to the binary file
def writel(a): # Storing the list in binary file (wb) mode with open('file', 'wb') as fp: pickle.dump(colors, fp) print('Completed the process of writing the list into a binary file')
# Reading the list to memory
def readl(): # Reading the list in binary file (rb) mode with open('sample', 'rb') as fp: n = pickle.load(fp) return n
# List of colors
colors = ["red", "black", "white", "yellow", "blue"]
# Calling the writel method
writel(colors)
color = readl()
# Printing the list
print(color)

Output:

Completed the process of writing the list into a binary file ["red", "black", "white", "yellow", "blue"]

Method 4- Using The Json Module

We can use the JSON module to convert the list into a JSON format and then write it into a file using the JSON dump() method. Generally, when we execute a GET request, we will receive a response in JSON format. We can then store the JSON response in a file for any future use.

# Importing the JSON module
import JSON
def writel(a): with open("colors.json", "w") as fp: json.dump(a, fp) print('Completed the process of writing json data into json file')
# Reading the list to memory
def readl(): with open('colors.json', 'rb') as fp: n = json.load(fp) return n
# List of colors
colors = ["red", "black", "white", "yellow", "blue"]
writel(colors)
color = readl()
# Printing the list
print(color)

Output:

Completed the process of writing json data into json file ["red", "black", "white", "yellow", "blue"]

Conclusion

That’s all about how to write a list to a file with Python. I hope you found it helpful. Please stay tuned and subscribe for more interesting articles. Happy learning!

Recommended: Correct Way to Write line To File in Python

Authors: Rashi Agarwal and Shubham Sayon

Posted on Leave a comment

How to Count the Occurrences of a List Element

In this article, you’ll learn how to count the occurrences of a selected List element in Python.

To make it more fun, we have the following running scenario:

A Teacher from Orchard Elementary would like a script created for the 4th-grade students called “Count-Me“. She would like this script to do the following:

  • First, generate and display 10 random numbers on a single line.
  • Next, generate and display one (1) random number to find.
  • Prompt for the total occurrences found.
  • Display a message validating the solution.

💬 Question: How would we write the Python code to accomplish this task?

We can accomplish this task by one of the following options:

  • Method 1: Use NumPy and count()
  • Method 2: Use operator countOf()
  • Method 3: Use a For Loop
  • Method 4: Use a Counter()

Preparation

Before any data manipulation can occur, one (1) new library will require installation.

  • The NumPy library supports multi-dimensional arrays and matrices in addition to a collection of mathematical functions.

To install this library, navigate to an IDE terminal. At the command prompt ($), execute the code below. For the terminal used in this example, the command prompt is a dollar sign ($). Your terminal prompt may be different.

$ pip install numpy

Hit the <Enter> key on the keyboard to start the installation process.

If the installation was successful, a message displays in the terminal indicating the same.


Feel free to view the PyCharm installation guide for the required library.


Add the following code to the top of each code snippet. This snippet will allow the code in this article to run error-free.

import numpy as np
import random
import operator
from collections import Counter

💡 Note: The counter and collections libraries are built-in to Python and do not require installation.


Method 1: Use NumPy and count()

To count the total occurrences of an element inside a List, this example will use NumPy and the count() function.

the_list = list(np.random.choice(20, 20))
dup_num = the_list[random.randint(0, 19)]
dup_count = the_list.count(dup_num) try: print(the_list) check = int(input(f'How man times does the number {dup_num} appear in the list? ')) if check == dup_count: print(f'Correct! The answer is {check}.') else: print(f'Sorry! Try again!')
except ValueError: print(f'Incorrect value. Bye')

The previous code snippet performs the following steps:

  • Our first line generates and saves 20 random numbers to the_list.
  • Next, dup_num is created by generating and saving one (1) random number from the_list.
  • Finally, we determine how many occurrences of dup_num were found using count().
  • The result saves to dup_count.

Inside the try statement, the_list is output to the terminal.

The user is prompted to enter the total number of occurrences. To confirm, the user presses the <Enter> key. The value entered is then compared to dup_count, and a message indicates the outcome.

💡 Note: Click here for details on the try/except statement.


Method 2: Use operator countOf()

To count the total occurrences of a specified element inside a List, this example will use the countOf() function.

the_list = [random.randrange(0, 20) for num in range(20)]
dup_num = the_list[random.randint(0, 19)]
dup_count = operator.countOf(the_list, dup_num) try: print(the_list) check = int(input(f'How man times does the number {dup_num} appear in the list? ')) if check == dup_count: print(f'Correct! The answer is {check}.') else: print(f'Sorry! Try again!')
except ValueError: print(f'Incorrect value. Bye')

This code snippet performs the following steps:

  • Our first line generates and saves 20 random numbers to the_list.
  • Next, dup_num is created by generating and saving one (1) random number from the_list.
  • Finally, we determine how many occurrences of dup_num were found using operator.countOf().
  • The result saves to dup_count.

Inside the try statement, the_list is output to the terminal.

The user is prompted to enter the total number of occurrences. To confirm, the user presses the <Enter> key.

The value entered is then compared to dup_count, and a message indicates the outcome.


Method 3: Use a For Loop

To count the total occurrences of a specified element inside a List, this example will use the For Loop.

the_list = [random.randrange(0, 20) for num in range(20)]
dup_num = the_list[random.randint(0, 19)] dup_count = 0
for i in the_list: if i == dup_num: dup_count += 1 try: print(the_list) check = int(input(f'How man times does the number {dup_num} appear in the list? ')) if check == dup_count: print(f'Correct! The answer is {check}.') else: print(f'Sorry! Try again!')
except ValueError: print(f'Incorrect value. Bye')

The previous code snippet performs the following steps:

  • Our first line generates and saves 20 random numbers to the_list.
  • Next, dup_num is created by generating and saving one (1) random number from the_list.
  • Finally, a For Loop is instantiated. Upon each Loop, the element is matched against dup_num.
  • If found, dup_count is increased by one (1).

Inside the try statement, the_list is output to the terminal.

The user is prompted to enter the total number of occurrences. To confirm, the user presses the <Enter> key.

The value entered is then compared to dup_count, and a message indicates the outcome.


Method 4: Counter()

To count the total occurrences of a specified element inside a List, this example will use the Counter() initializer method.

the_list = [random.randrange(0, 20) for num in range(20)]
dup_num = the_list[random.randint(0, 19)]
d = Counter(the_list)
dup_count = d[dup_num] try: print(the_list) check = int(input(f'How man times does the number {dup_num} appear in the list? ')) if check == dup_count: print(f'Correct! The answer is {check}.') else: print(f'Sorry! Try again!')
except ValueError: print(f'Incorrect value. Bye')

The previous code snippet performs the following steps:

  • Our first line generates and saves 20 random numbers to the_list.
  • Next, dup_num is created by generating and saving one (1) random number from the_list.
  • Finally, a For Loop is instantiated. Upon each Loop, an element is matched against dup_num.
  • If found, dup_count is increased by one (1).

Inside the try statement, the_list is output to the terminal.

The user is prompted to enter the total number of occurrences. To confirm, the user presses the <Enter> key.

The value entered is then compared to dup_count, and a message indicates the outcome.


Summary

These four (4) methods of counting occurrences of a specified element inside a List should give you enough information to select the best one for your coding requirements.

Good Luck & Happy Coding!


Posted on Leave a comment

How to Create Word Clouds Using Python?

You may have already learned how to analyze quantitative data using graphs such as bar charts and histograms.

But do you know how to study textual data?

One way to analyze textual information is by using a word cloud:

Figure 0: Word cloud you’ll learn how to create in this article.

There are many ways to create word clouds, but we will use the WordCloud library in this blog post. WordCloud is a Python library that makes word clouds from text files.

What Are Word Clouds?

💬 Definition: A word cloud (also known as a tag cloud) is a visual representation of the words that appear most frequently in a given text. They can be used to summarize large bodies of text or to visualize the sentiment of a document.

A word cloud is a graphical representation of text data in which the size of each word is proportional to the number of times it appears in the text.

They can be used to visualize the most critical words in a document quickly or to get an overview of the sentiment of a piece of text.

There are word clouds apps such as Wordle, but in this blog post, we will show how to create word clouds using the Python library WordCloud.

What’s the WordCloud Library in Python?

The WordCloud library is open source and easy to use to create word clouds in Python.

It allows you to create word clouds in various formats, including PDF, SVG, and image files.

In addition, it provides several options for customizing your word clouds, including the ability to control the font, color, and layout.

You can install it using the following command in your terminal (without the $ symbol):

$ pip install wordcloud

Related Article:

Where Are Word Clouds Used?

Word clouds are a fun and easy way to visualize data.

By displaying the most common words in a given text, they can provide insights into the overall themes and tone of the text.

  • Word clouds can be used for various purposes, from educational to marketing.
  • They can use word clouds for vocabulary building and text analysis in the classroom.
  • You can also use word clouds to generate leads or track customer sentiment.
  • For businesses, word clouds can be used to create marketing materials, such as blog posts, infographics, and social media content.
  • Word clouds can also monitor customer feedback or identify negative sentiment.
  • Students can also use word Clouds to engage in an analysis of a piece of text. By visually highlighting the most important words, Word Clouds can help students to identify the main ideas and make connections between different concepts.

Pros of Word Clouds

The advantages of using word clouds are:

First, you can use them to summarize a large body of text quickly and easily. Identifying the most frequently used words in a text can provide a quick overview of the main points.

Second, with word clouds, you can quickly visualize the sentiment in a document. The size and placement of words in the Word Cloud can give you insights into the overall tone of the document. This tool is handy when analyzing a large body of text, such as customer feedback or reviews.

Third, word clouds can be a valuable tool for identifying the most critical keywords in a text. By analyzing the distribution of words, you can quickly identify which terms are most prominent. The word clouds can be beneficial when monitoring changing trends or assessing the overall importance.

Fourth, word clouds can be used to create designs that incorporate both visual and textual elements. By blending words and images, word clouds can add another layer of meaning to an already exciting design.

How to Create Word Clouds in Python?

We will be using Disneyland reviews downloaded from Kaggle to create a word cloud data visualization. 

You can download the file from here.

In this file, we will be focussing on the Review_Text column for creating a word cloud. You can ignore other columns.

First, you have to install the WordCloud Python library. You can do this by running the following command in a terminal:

pip install wordcloud

Once you have installed WordCloud, you must import pandas, matplotlib.pyplot, and wordcloud libraries.

import pandas as pd
from wordcloud import WordCloud, STOPWORDS
import matplotlib.pyplot as plt

The pandas library reads the Disneyland reviews CSV file into a data frame.

We will show you the use of STOPWORDS in the upcoming section.

The data frame variable “df” stores the data from the disneylandreviews.csv file with the following command.

df = pd.read_csv("/Users/mohamedthoufeeq/Downloads/DisneylandReviews.csv")

Now run the program and see the output.

You get the following Unicode decode error.

UnicodeDecodeError: 'utf-8' codec can't decode byte 0xf4 in position 121844: invalid continuation byte

The Unicode decode error means that the string could not be properly decoded into UTF-8. This can happen when a file is downloaded from the Kaggle, and it is not in the correct encoding format.

To solve this problem, you need to specify the encoding format for the file. You can type the following command in a terminal:

df = pd.read_csv("/Users/mohamedthoufeeq/Downloads/DisneylandReviews.csv",encoding='ISO-8859-1')

The encoding = 'ISO-8859-1' tells pandas that the file is in the ISO-8859-1 encoding format.

Next, create a word cloud using the WordCloud Python library.

wordcloud = WordCloud().generate(['Review_Text'])

In this above code, WordCloud().generate() is used to create a word cloud object.

The generate() function takes a list of strings as input. The list we are interested in is Review_Text which contains reviews about Disney Land. The words from the review you want to appear in your word cloud.

Go ahead and run the code.

You get again following error.

TypeError: expected string or bytes-like object

The type error means that the word cloud object expects a string or a bytes-like object. But the data type is Pandas series.

To solve this, You have to type following command

wordcloud = WordCloud().generate(' '.join(df['Review_Text']))

The above command converts the series to strings data type.

plt.imshow(wordcloud)

The plt.imshow() call will create a word cloud image in 2D.

Then remove the axis with the following command:

plt.axis("off")

The "off" parameter removes the axis from the plot.

Finally, the below commands displays the image of the word cloud.

plt.show()

Once run the program you will see a word cloud image as shown below:

Figure 1. 

The word "Park" is bigger, representing that this word appears more in reviews.

But there are words such as "Disneyland", "went", "will", "park", "go", "day", and "One" that are unrelated for analysis.

So we can exclude them from the word cloud with the following command using the stopwords parameter.

STOPWORDS.update(['Disneyland', 'went','will,'go',"park", "day","one"])
wordcloud = WordCloud(stopwords = STOPWORDS).generate(' '.join(df['Review_Text']))

STOPWORDS will remove all the defined words from the text before creating the word cloud. The word cloud function inserts the STOPWORDS parameter.

Now re-run the program, and you will get the following word cloud image.

Figure 2. 

Before we can analyze the words, let us see how to customize the words’ appearance.

You can also customize the appearance of your word cloud by changing the font size and background color.

The maximum font size can be set with the max_font_size option, and the minimum font size can be set with the min_font_size option. The background color of the word cloud can be set with the background_color option.

wordcloud = WordCloud(min_font_size = 10, max_font_size = 70, stopwords = STOPWORDS, background_color="white").generate(' '.join(df['Review_Text']))

The code sets the font size to a minimum of 10 points and a maximum of 70 points, and the background color to white.

Re-run the program, and you will get the following word cloud image.

Figure 3. 

Also, you can set the maximum amount of words to be generated using the max_words parameter.

wordcloud = WordCloud(min_font_size = 5, max_font_size = 100, max_words = 1000, stopwords = STOPWORDS, background_color="white").generate(' '.join(df['Review_Text']))

The above code sets the maximum number of words generated in the word cloud to 1000. Also, change the font size to 5 and 100.

Re-run the program, and you will get the following word cloud.

Figure 4. 

As you can see, when you increase the number of words to 1000, the words that are repeated more in the reviews are shown in a larger size.

This makes it easier to find out which words are prominent. In this word cloud, you can see that "ride" is the largest word.

You set width and height  of the word cloud image.

wordcloud = WordCloud(width=350, height=350, min_font_size=5, max_font_size=100, max_words=1000, stopwords=STOPWORDS, background_color="white").generate(' '.join(df['Review_Text']))

The above code sets the width and height of the word cloud to 350.

Re-run the program, and you will get the following word cloud image.

Figure 5. 

Now let’s analyze the word cloud to get some insights.

The word "ride" appears large in the word cloud as it is the most frequent word in the text. Most people like to ride in Disneyland, which is reflected in the word cloud. 

Next, the word "attraction" is also popular. It shows that people are attracted to the rides and attractions in Disneyland. 

Also, the word "time" appears frequently. The word indicates that people spend a lot of time in Disneyland. 

Staffs of Disney land were very lovely. It is reflected in the word cloud as the word "nice" appears frequently. From the reviews, we can see that there are more queues and people are waiting for a long time, which is also reflected in the word cloud.

The words "lines" and "queue" are also more prominent words in the text.

But the word "hotel" is not popular in the text and represents that people do not prefer to stay in the hotel and go back home after spending the whole day in Disneyland.

💬 Exercise: You can get more insights by analyzing the word cloud data. Try it out!

Summary

Word clouds are a great way to summarize large bodies of text or visualize a document’s sentiment.

Word clouds are a great way to understand large bodies of text and can be used for various purposes.

This blog post showed how to create word clouds using the Python library WordCloud.

We also discussed how to customize the appearance of the word cloud and analyzed the word cloud data to get insights into the text.

What do you use?


Posted on Leave a comment

How to Color a Scatter Plot by Category using Matplotlib in Python

Problem Formulation

Given three arrays:

  • The first two arrays x and y of length n contain the (x_i, y_i) data of a 2D coordinate system.
  • The third array c provides categorical label information so we essentially get n data bundles (x_i, y_i, c_i) for an arbitrary number of categories c_i.

💬 Question: How to plot the data so that (x_i, y_i) and (x_j, y_j) with the same category c_i == c_j have the same color?

Solution: Use Pandas groupby() and Call plt.plot() Separately for Each Group

To plot data by category, you iterate over all groups separately by using the data.groupby() operation. For each group, you execute the plt.plot() operation to plot only the data in the group.

In particular, you perform the following steps:

  1. Use the data.groupby("Category") function assuming that data is a Pandas DataFrame containing the x, y, and category columns for n data points (rows).
  2. Iterate over all (name, group) tuples in the grouping operation result obtained from step one.
  3. Use plt.plot(group["X"], group["Y"], marker="o", linestyle="", label=name) to plot each group separately using the x, y data and name as a label.

Here’s what that looks like in code:

import pandas as pd
import matplotlib.pyplot as plt # Generate the categorical data
x = [1, 2, 3, 4, 5, 6]
y = [42, 41, 40, 39, 38, 37]
c = ['a', 'b', 'a', 'b', 'b', 'a'] data = pd.DataFrame({"X": x, "Y": y, "Category": c})
print(data) # Plot data by category
groups = data.groupby("Category")
for name, group in groups: plt.plot(group["X"], group["Y"], marker="o", linestyle="", label=name) plt.legend()
plt.show()

Before I show you how the resulting plot looks, allow me to show you the data output from the print() function. Here’s the output of the categorical data:

 X Y Category
0 1 42 a
1 2 41 b
2 3 40 a
3 4 39 b
4 5 38 b
5 6 37 a

Now, how does the colored category plot look like? Here’s how:

If you want to learn more about Matplotlib, feel free to check out our full blog tutorial series:

Posted on Leave a comment

How to Use Pandas Rolling – A Simple Illustrated Guide

This article will demonstrate how to use a pandas dataframe method called rolling().

What does the pandas.DataFrame.rolling() method do?

In short, it performs rolling windows calculations.

It is often used when working with time-series data or signal processing. I will shortly dive into a few practical examples to clarify what this means in practice.

The method will be given a parameter that specifies how big the window the desired calculations should be performed in.

A simple example of using time series data could be that each row of a pandas dataframe represents a day with some values.

Let’s say that the desired window size is five days. The rolling method is given a five as input, and it will perform the expected calculation based on steps of five days. 

Before an example of this, let’s see the method, its syntax, and its parameters.  

pandas.DataFrame.rolling()

Dataframe.rolling(window, min_periods=None, center=False, win_type=None, on=None, axis=0, closed=None, method=’single’)

Let’s dive into the parameters one by one:

window

window: int, offset, or BaseIndexer subclass

This is the size of the moving window.

If an integer, the fixed number of observations is used for each window.

If an offset, the time period of each window. Each window will be variable-sized based on the observations included in the time period. This is only valid for datetime-like indexes.

If a BaseIndexer subclass, the window boundaries are based on the defined get_window_bounds() method. Additional rolling keywords argument, namely min_periods, center, and closed will be passed to get_window_bounds().

min_periods

min_periods: int, default None

This is the minimum number of observations in the window required to have a value.

Otherwise, the result is assigned np.nan.

  • For a window that is specified by an offset, min_periods will default to 1.
  • For a window specified by an integer, min_periods will default to the size of the window. 

center

center: bool, default False

If False, set the window labels as the right edge of the window index. If True, set the window labels as the center of the window index. 

win_type

win_type: str, default None

If None, all points are evenly weighted.

If a string, it must be a valid window function from scipy.signal

Some of the Scipy window types require additional parameters to be passed in the aggregation function.

The additional parameters must match the keywords specified in the Scipy window type method signature. 

on

on: str, optional

For a Dataframe, a column label or index level on which to calculate the rolling window, rather than the Dataframes index.

The provided integer column is ignored and excluded from the result since an integer index is not used to calculate the rolling window. 

axis

axis: int or str, default 0

If 0 or 'index', roll across the rows. If 1 or 'columns', roll across the columns. 

closed

closed: str, default None

  • If 'right', the first point in the window is excluded from calculations.
  • If 'left', the last point in the window is excluded from calculations.
  • If 'both', then no points in the window are excluded from the calculations.
  • If 'neither', the first and last points in the window are excluded from the calculations.

Default None means 'right'.

method

method: str {'single', 'table'}, default 'single'

Execute the rolling operation per single column or row for 'single' or over the entire object for 'table'.

This argument is only implemented when specifying engine='numba' in the method call. 


This part was obtained from the official pandas documentation

Data

The data I will be working with for this tutorial is historical data for a stock, the amazon stock.

I use the python package yfinance to import the data. I will use data starting from 2021-04-01 and running one year forward in time.

The data only includes trading days, i.e., days when the stock market was open.

# Get the stock data from Yahoo finance
AmazonData1y = yfinance.Ticker("AMZN").history(period='1y', actions=False, end='2022-04-01')
display(AmazonData1y.head(20))

The resulting dataframe contains data about the opening price, the highest price, the lowest price, the closing price, and the trading volume for each day. 

Calculating moving averages

The first calculations using the rolling method I will do are some different moving averages values. They are often applied in stock analysis.

💡 A moving average value is a statistic that captures the average change in a data series over time. (source)

Let’s calculate the moving averages for seven days and 15 days for the stock closing price and add those values as new columns to the existing amazon dataframe.

They are named 'MA7' and 'MA15'.

# Calculating the 7 and 15 day moving averages based on closing price
# and adding them as new columns
AmazonData1y['7MA'] = AmazonData1y['Close'].rolling(7).mean()
AmazonData1y['15MA'] = AmazonData1y['Close'].rolling(15).mean() display(AmazonData1y.head(20))

Since there is no data before 2021-04-01, no seven-day moving average can be calculated before 2021-04-13 and no 15-day moving average before 2021-04-23

Calculating the Sum of Trading Volume

Let’s now instead use the rolling method to calculate the sum of the volume from the last five trading days to spot if there was any spike in volume.

It is done in the same way as for the moving average, but here the sum() method is used together with the rolling method instead of the mean() method.

I will also add this as a new column to the existing Amazon dataframe. 

# Calculating 5 day volume using rolling
AmazonData1y['5VOL'] = AmazonData1y['Volume'].rolling(5).sum() display(AmazonData1y.head(20))

This metric might not be the most useful but it is a good way to explain how you could use the rolling method together with the sum() method. 

Using rolling() with Aggregation

If combining the rolling() method with the aggregation method agg(), it is easy to perform rolling calculations on multiple columns simultaneously.

Say that I would like to find the highest high and the lowest low for the last seven days. 

# Performing rolling calculations on multiple columns at the
# same time using .agg()
SevenHighAndLow = AmazonData1y.rolling(7).agg({'High': 'max', 'Low': 'min'}) display(SevenHighAndLow.head(20))

Plotting the Values

This part will be included to visualize the value calculated. It’s a bit more appealing than simply just looking at columns of a dataframe. 

First, let’s plot the calculated moving averages values alongside the closing price. 

# Plotting the closing price with the 7 and 15 day moving averages
AmazonData1y.plot(y=['Close', '7MA', '15MA'], kind='line', figsize=(14,12)) plt.title('Closing price, 7MA and 15MA', fontsize=16)
plt.xlabel('Date')
plt.ylabel('Stock price($)')
plt.show()

And then the accumulated 5 day volume alongside the closing price. 

# Plotting the closing price alongside the 5 day volume
AmazonData1y.plot(y=['Close', '5VOL'], secondary_y='5VOL', kind='line', ylabel='Stock Price ($)', figsize=(14,12)) plt.title('Closing price and 5 day accumulated volume', fontsize=16)
plt.xlabel('Date')
plt.ylabel('Volume')
plt.show()

Summary

This was a short tutorial on applying the rolling() method on a pandas dataframe using some statistics.

The goal of this article was to demonstrate some simple examples of how the rolling() method works, and I hope that it did accomplish that goal.

The rolling() method can be used for most statistics calculations, so try and explore it using other methods than those used for this article. 


Posted on Leave a comment

A Simple Guide to Get Absolute Path in Python

What’s the Absolute Path of a File?

The absolute path (i.e., full path) is just what it sounds like — it’s the exact path to, and location of, the file entered as your function’s parameter, within the hierarchical structure on your machine.

The absolute path always starts at the root directory with no regard for your current working directory (CWD).

That’s it!  So let’s get into some code.

Import Python Module to Get Absolute Path

With more than 200 core modules Python can do amazing things. 

But, this can also make it seem daunting to the beginner.  As we go through this one aspect, it should become much more clear to you how you can navigate your way around and find the specific tool for your project.

I have included some links and examples to help get you started.

We will be using the built-in os module, so we need to import that first.

import os

We could just write the code for the absolute path here and then dissect the output, but I want to give you a deeper look at what’s available to you in Python.

In order to get the absolute path in Python, we first check the output of the dir() statement on the os module:

print(dir(os))

This simple code will give us the directory for the os module.

Output:

# Output:
['DirEntry', 'F_OK', 'MutableMapping', 'O_APPEND', 'O_BINARY', 'O_CREAT', 'O_EXCL', 'O_NOINHERIT', 'O_RANDOM', 'O_RDONLY', 'O_RDWR', 'O_SEQUENTIAL', 'O_SHORT_LIVED', 'O_TEMPORARY', 'O_TEXT', 'O_TRUNC', 'O_WRONLY', 'P_DETACH', 'P_NOWAIT', 'P_NOWAITO', 'P_OVERLAY', 'P_WAIT', 'PathLike', 'R_OK', 'SEEK_CUR', 'SEEK_END', 'SEEK_SET', 'TMP_MAX', 'W_OK', 'X_OK', '_AddedDllDirectory', '_Environ', '__all__', '__builtins__', '__cached__', '__doc__', '__file__', '__loader__', '__name__', '__package__', '__spec__', '_check_methods', '_execvpe', '_exists', '_exit', '_fspath', '_get_exports_list', '_putenv', '_unsetenv', '_wrap_close', 'abc', 'abort', 'access', 'add_dll_directory', 'altsep', 'chdir', 'chmod', 'close', 'closerange', 'cpu_count', 'curdir', 'defpath', 'device_encoding', 'devnull', 'dup', 'dup2', 'environ', 'error', 'execl', 'execle', 'execlp', 'execlpe', 'execv', 'execve', 'execvp', 'execvpe', 'extsep', 'fdopen', 'fsdecode', 'fsencode', 'fspath', 'fstat', 'fsync', 'ftruncate', 'get_exec_path', 'get_handle_inheritable', 'get_inheritable', 'get_terminal_size', 'getcwd', 'getcwdb', 'getenv', 'getlogin', 'getpid', 'getppid', 'isatty', 'kill', 'linesep', 'link', 'listdir', 'lseek', 'lstat', 'makedirs', 'mkdir', 'name', 'open', 'pardir', 'path', 'pathsep', 'pipe', 'popen', 'putenv', 'read', 'readlink', 'remove', 'removedirs', 'rename', 'renames', 'replace', 'rmdir', 'scandir', 'sep', 'set_handle_inheritable', 'set_inheritable', 'spawnl', 'spawnle', 'spawnv', 'spawnve', 'st', 'startfile', 'stat', 'stat_result', 'statvfs_result', 'strerror', 'supports_bytes_environ', 'supports_dir_fd', 'supports_effective_ids', 'supports_fd', 'supports_follow_symlinks', 'symlink', 'sys', 'system', 'terminal_size', 'times', 'times_result', 'truncate', 'umask', 'uname_result', 'unlink', 'urandom', 'utime', 'waitpid', 'walk', 'write']

You can see that it gives us a list of ALL the sub-modules and methods available to us. The 'path' sub-module in the output is the one we use to get the absolute path next.

Next, we combine the os module and the path sub-module to get a directory of the methods and functions we have available.

print(dir(os.path)) # os + .path 

(If you are very new to Python, the hash in front of the highlighted section creates a comment)

Output:

# Output:
['__all__', '__builtins__', '__cached__', '__doc__', '__file__', '__loader__', '__name__', '__package__', '__spec__', '_abspath_fallback', '_get_bothseps', '_getfinalpathname', '_getfinalpathname_nonstrict', '_getfullpathname', '_getvolumepathname', '_nt_readlink', '_readlink_deep', 'abspath', 'altsep', 'basename', 'commonpath', 'commonprefix', 'curdir', 'defpath', 'devnull', 'dirname', 'exists', 'expanduser', 'expandvars', 'extsep', 'genericpath', 'getatime', 'getctime', 'getmtime', 'getsize', 'isabs', 'isdir', 'isfile', 'islink', 'ismount', 'join', 'lexists', 'normcase', 'normpath', 'os', 'pardir', 'pathsep', 'realpath', 'relpath', 'samefile', 'sameopenfile', 'samestat', 'sep', 'split', 'splitdrive', 'splitext', 'stat', 'supports_unicode_filenames', 'sys']

It gives us another list of Python tools, and I want to highlight the string name abspath.  Can you see how we are building the code as we go?

💡 Hint: os + .path + .abspath

If you want more information on any one of these tools for the os module you can find it HERE.

Now, let’s get to the absolute path

Using the abspath() Function

💡 To get the absolute path of a filename in Python, use the os.path.abspath(filename) function call.

I have included all of the code here with the filename entered as the parameter in the abspath() method.

import os
os.path.abspath('Demo_abspath') # Enter file name as a string

For a comprehensive tutorial on string data types, check out this video:

 Output for this code:

'C:\\Users\\tberr\\FinxterProjects1\\Demo_abspath’

As we can see, this returns the Absolute Path for the current directory in the Jupyter Notebook that I’m using to write and test my code.  It is returned as a string data type.

  • 'C:\\Users\\tberr\\FinxterProjects1\\Demo_abspath'

I’m on a Windows machine and here we have the root directory.

  • 'C:\\Users\\tberr\\FinxterProjects1\\Demo_abspath'

Users, then my username are the next two steps.

  • 'C:\\Users\\tberr\\FinxterProjects1\\Demo_abspath'

The folder in my Jupyter notebook that the file is in.

  • 'C:\\Users\\tberr\\FinxterProjects1\\Demo_abspath'

And finally,the file name entered into the function.

Python Absolute Path vs Relative Path

Now that you understand a bit about absolute path in Python, we should take a look at the relative path, which does take the CWD (current working directory) into consideration.

First let’s get the CWD.

print(os.getcwd())

Output:

'C:\Users\tberr\FinxterProjects1'

We get everything except the file itself, which in this simple example is the relative path.

print(os.path.relpath('Demo_abspath'))

Output:

'Demo_abspath'

So, why not just use the absolute path?  As I’ve said, this is a very simple example.  When we get into deeply nested directories, the absolute path can get very complicated.

This is where the relative path becomes very useful (and can save you some typing!).

Summary

Use the os.path.abspath() function to get the absolute path without regard to the cwd.

Use os.path.relpath() function to get the relative path to the file with regard to the cwd.

I hope this article was helpful and gave you a beginners introduction to abspath() and the os module in Python.  I was hooked on Python my first day.  So maybe this will inspire you to dig deeper and explore all the amazing things Python can do –  and you’ll be hooked too!