In this tutorial, you’ll learn the runtime complexity of different Python operations.
Then, you’ll learn how to calculate the complexity of your own function by combining the complexity classes of its constituents. This is called “static analysis”
The tutorial is loosely based on (source) but it extends it significantly with more practical examples, interactive snippets, and explanatory material.
Introducing Big-O
Definition: The complexity of an operation (or an algorithm for that matter) is the number of resources that are needed to run it (source). Resources can be time (runtime complexity) or space (memory complexity).
So, how can you measure the complexity of an algorithm? In most cases, the complexity of an algorithm is not static. It varies with the size of the input to the algorithm or the operation.
For example, the list method list.sort() has one input argument: the list object to be sorted. The runtime complexity is not constant, it increases with increasing size of the list. If there are more elements to be sorted, the runtime of the algorithm increases.
Complexity Function
Given input size n, you can describe the complexity of your algorithm with a function of the input n → f(n) that defines the number of “resource units” (e.g., time, memory) needed to finish it (worst-case or average-case).
Say, you’ve got three implementations to sort a list: implementation_1, implementation_2, implementation_3.
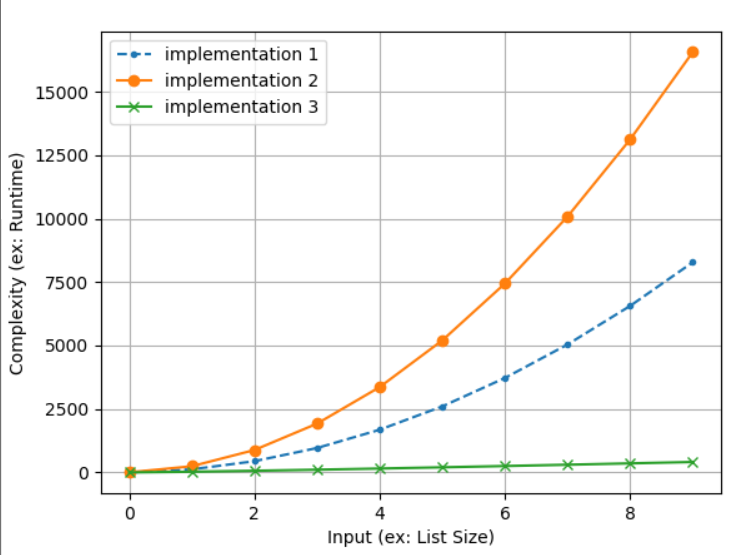
The figure shows the three complexity functions. The x axis measures the input size (in our example, it would be the list size). The y axis measures the complexity with respect to this input.
implementation_1has a quadratic complexity function f(n) = n².implementation_2has a quadratic complexity function f(n) = 2n².implementation_3has a logarithmic complexity function f(n) = n log(n).
You can see the code we used to generate this plot here:
import matplotlib.pyplot as plt
import math implementation_1 = [n**2 for n in range(1, 100, 10)]
implementation_2 = [2*n**2 for n in range(1, 100, 10)]
implementation_3 = [n*math.log(n) for n in range(1, 100, 10)] plt.plot(implementation_1, '--.', label='implementation 1')
plt.plot(implementation_2, '-o', label='implementation 2')
plt.plot(implementation_3, '-x', label='implementation 3') plt.legend()
plt.xlabel('Input (ex: List Size)')
plt.ylabel('Complexity (ex: Runtime)')
plt.grid()
plt.show()
Of course, it’s good to waste as little resources as possible so the logarithmic complexity function is superior to the quadratic complexity functions.
Big-O Notation
For large inputs, the runtime behavior will be dominated by the part of the complexity function that grows fastest. For example, a quadratic runtime complexity function f(n) = 1000n² + 100000n + 999 will be much better than a cubic runtime complexity function g(n) = 0.1n³.
Why? Because sooner or later the function g(n) will produce much higher values than f(n) as the input size n increases.
In fact, you can argue that the only important part of a complexity function is the part that grows fastest with increasing input size.
This is exactly what’s the Big-O notation is all about:
The Big O notation characterizes functions according to their growth rates: different functions with the same growth rate may be represented using the same O notation. (wiki)
Roughly speaking, you remove everything but the fastest-growing term from the complexity function. This allows you to quickly compare different algorithms against each other.
To show this, have a look at our two examples:
- Complexity function f(n) = 1000n² + 100000n + 999 grows like O(n²).
- Complexity function g(n) = 0.1n³ grows like O(n³).
By reducing the complexity function to its asymptotic growth, you can immediately see that the former is superior to the latter in terms of runtime complexity—without being distracted by all the constant factors in front of the constituents or the constituents with smaller asymptotic growth.
Examples Big-O of Complexity Functions
So, here are a few examples of complexity functions and their asymptotic growth in Big-O notation:
| Complexity Function | Asymptotic Growth |
|---|---|
| f(n) = 10000 | O(1) |
| f(n) = n + 1000000 | O(n) |
| f(n) = 33n + log(n) | O(n log(n)) |
| f(n) = 33n + 4n * log(n) | O(n log(n)) |
| f(n) = n² + n | O(n²) |
| f(n) = 1000n² + 100000n + 999 | O(n²) |
| f(n) = 0.000000001n³ + 4n² + 100000n + 999 | O(n³) |
| f(n) = n * n³ + 33n | O(n³) |
You can see that the asymptotic growth of a function (in Big-O notation) is dominated by the fastest-growing term in the function equation.
Python Complexity of Operations
Let’s explore the complexity of Python operations—classified by the data structure on which you perform those operations. A great coder will always use the data structure that suits their needs best.
In general, the list data structure supports more operations than the set data structure as it keeps information about the ordering of the elements—at the cost of higher computational complexity.
Python List Complexity
Assume that the length of the data type is defined as n (that is—n = len(data_type)). You can now categorize the asymptotic complexity of the different complexity functions as follows:
| Operation | Example | Complexity |
|---|---|---|
| Index | l[i] |
O(1) |
| Store | l[i] = 42 |
O(1) |
| Length | len(l) |
O(1) |
| Append | l.append(42) |
O(1) |
| Pop | l.pop() |
O(1) |
| Clear | l.clear() |
O(1) |
| Slicing | l[a:b] |
O(b-a) |
| Extend | l1.extend(l2) |
O(len(l1)+len(l2)) |
| Constructor | list(iter) |
O(len(iter)) |
| Equality | l1 == l2 |
O(n) |
| Slice Assign | l[a:b] = ... |
O(n) |
| Delete | del l[i] |
O(n) |
| Remove | l.remove(...) |
O(n) |
| Membership | x in l / x not in l |
O(n) |
| Copy | l.copy() |
O(n) |
| Pop | l.pop(0) |
O(n) |
| Min | min(l) |
O(n) |
| Max | max(l) |
O(n) |
| Reverse | l.reverse() |
O(n) |
| Iterate | for x in l: |
O(n) |
| Sort | l.sort() |
O(n log(n)) |
| Multiply | l*k |
O(n k) |
Tuples are similar as lists—with a few exceptions: you cannot modify a tuple because they are immutable.
Let’s consider another important data structure:
Python Set Complexity
Assume that the length of the data type is defined as n (that is—n = len(data_type)). If there are two sets in a single operation such as s1 == s2, the lengths are given by the variables n1 and n2. You can now categorize the asymptotic complexity of the different complexity functions as follows:
| Operation | Example | Complexity |
|---|---|---|
| Length | len(s) |
O(1) |
| Add | s.add(42) |
O(1) |
| Membership | 42 in s / 42 not in s |
O(1) |
| Remove | s.remove(42) |
O(1) |
| Pop | s.pop() |
O(1) |
| Clear | s.clear() |
O(1) |
| Constructor | set(iter) |
O(n) |
| Equality | s1 == s2 / s1 != s2 |
O(min(n1, n2)) |
| Union | s1 | s2 |
O(n1+n2) |
| Intersection | s1 & s2 |
O(min(n1, n2)) |
| Difference | s1 - s2 |
O(n2) |
| Symmetric Difference | s1 ^ s2 |
O(n1) |
| Iteration | for x in s: |
O(n) |
| Copy | s.copy() |
O(n) |
I highlighted the set operations that are more efficient than the corresponding list operations. The reason for those being O(1) rather than O(n) is that the list data structure also maintains the ordering of the elements—which incurs additional overhead.
Python Dictionary Complexity
Now, have a look at the time complexity of Python dictionary operations:
| Operation | Example | Complexity |
|---|---|---|
| Index (Get) | dict[k] |
O(1) |
| Store | dict[k] = v |
O(1) |
| Length | len(dict) |
O(1) |
| Delete | del dict[key] |
O(1) |
| Pop | dict.pop(k) |
O(1) |
| Clear | dict.clear() |
O(1) |
| Keys | dict.keys() |
O(1) |
| Construction | dict(...) |
O(n) |
| Iteration | for k in dict: |
O(n) |
Most operations are O(1) because Python dictionaries share multiple properties of Python sets (such as fast membership operation).
Composing Complexity Classes
Now, you know the complexity of different operations. But how do you obtain the complexity of your algorithm?
The concept is simple: you break the big problem (knowing the complexity of the whole algorithm) into a series of smaller problems (knowing the complexity of individual operations).
Then, you recombine the individual operation’s complexities to obtain the solution to the big problem.
How? Let’s start with a small example: you first get a list from a dictionary of list values. Then you sort the list:
d = {1: [3, 1, 2, 4], 2: [4, 4, 1, 9]} lst = d.get(1)
lst.sort()
print(lst)
# [1, 2, 3, 4]
Try it yourself in our interactive code shell (click “run” to execute the code):
You have four operations in the code snippet. Let’s annotate each operation with a complexity class.
# Operation 1: Dictionary Creation --> O(n)
d = {1: [3, 1, 2, 4], 2: [4, 4, 1, 9]} # Operation 2: Dictionary Get --> O(1)
lst = d.get(1) # Operation 3: List Sorting --> O(n log n)
lst.sort() # Operation 4: Print List --> O(n)
print(lst)
Knowing the complexity classes of the different operations, you can recombine it as follows:
O(n) + O(1) + O(n log n) + O(n)
(1) = O(n + 1 + n log n + n)
(2) = O(n log n + 2n + 1)
(3) = O(n log n)
You see in Equation (1) what you could call the “chain rule of complexity analysis”: O(f(n)) + O(g(n)) = O(f(n) + g(n)).
You can see in Equation (3) that the Big-O notation focuses only on the largest growing term. In our case, O(n log n) grows faster than O(2n).
Here are two important examples of Big-O recombination:
O(f(n)) + O(f(n)) = O(f(n) + f(n)) = O(2f(n)) = O(f(n). In other words, Executing an operation a constant (fixed) number of times, doesn’t change the overall complexity of the algorithm.O(f(n) + g(n)) = O(f(n))if the complexity functionf(n)grows faster thang(n). An example isO(n³ + 1000n³) = O(n³).
In programming, you can also have conditional execution:
if condition: f(n)
else: g(n)
You can recombine the complexity class of the overall code snippet as follows: O(max(f(n), g(n)). Roughly speaking, (if the condition can be true), the complexity of the conditional execution is the maximum of both blocks f(n) or g(n).
Example:
if lst: lst.sort()
else: lst = [1, 2, 3, 4]
The complexity is O(n log n) because it grows faster than O(n) — the complexity of the block in the else statement.
Another possibility is to repeatedly execute a certain function (e.g., in a for loop).
If you repeat function f(n) m times, the computational complexity is m * O(f(n)) = O(m f(n)). If m is a constant, the computational complexity simplifies to O(f(n)).
Where to Go From Here?
Enough theory, let’s get some practice!
To become successful in coding, you need to get out there and solve real problems for real people. That’s how you can become a six-figure earner easily. And that’s how you polish the skills you really need in practice. After all, what’s the use of learning theory that nobody ever needs?
Practice projects is how you sharpen your saw in coding!
Do you want to become a code master by focusing on practical code projects that actually earn you money and solve problems for people?
Then become a Python freelance developer! It’s the best way of approaching the task of improving your Python skills—even if you are a complete beginner.
Join my free webinar “How to Build Your High-Income Skill Python” and watch how I grew my coding business online and how you can, too—from the comfort of your own home.