Posted on Leave a comment

Python One Line X

This is a running document in which I’ll answer all questions regarding the single line of Python code. If you want to check out my book “Python One-Liners” and become a one-liner wizard—be my guest! 😉

Let’s get started!

Python One Line If Without Else

Python One Line If Else

Python One Line Elif

Python One Line Function

Python One Line For Loop

Python One Line For Loop If

Python One Line For Loop Lambda

Python One Line While Loop

Python One Line HTTP Web Server

Want to create your own webserver in a single line of Python code? No problem, just use this command in your shell:

$ python -m http.server 8000

The terminal will tell you:

Serving HTTP on 0.0.0.0 port 8000

To shut down your webserver, kill the Python program with CTRL+c.

This works if you’ve Python 3 installed on your system. To check your version, use the command python --version in your shell.

You can run this command in your Windows Powershell, Win Command Line, MacOS Terminal, or Linux Bash Script.

You can see in the screenshot that the server runs on your local host listening on port 8000 (the standard HTTP port to serve web requests).

Note: The IP address is NOT 0.0.0.0—this is an often-confused mistake by many readers. Instead, your webserver listens at your “local” IP address 127.0.0.1 on port 8000. Thus, only web requests issued on your computer will arrive at this port. The webserver is NOT visible to the outside world.

Python 2: To run the same simple webserver on Python 2, you need to use another command using SimpleHTTPServer instead of http:

$ python -m SimpleHTTPServer 8000
Serving HTTP on 0.0.0.0 port 8000 ...

If you want to start your webserver from within your Python script, no problem:

import http.server
import socketserver PORT = 8000 Handler = http.server.SimpleHTTPRequestHandler with socketserver.TCPServer(("", PORT), Handler) as httpd: print("serving at port", PORT) httpd.serve_forever()

You can execute this in our online Python browser (yes, you’re creating a local webserver in the browser—how cool is that)!

This code comes from the official Python documentation—feel free to read more if you’re interested in setting up the server (most of the code is relatively self-explanatory).

Source: Python One-Liner Webserver HTTP

Python One Line Webshell

Python One Line Write String to File

Python One Line Quine

Python One Line Quicksort

In this one-liner tutorial, you’ll learn about the popular sorting algorithm Quicksort. Surprisingly, a single line of Python code is all you need to write the Quicksort algorithm!

Problem: Given a list of numerical values (integer or float). Sort the list in a single line of Python code using the popular Quicksort algorithm!

Example: You have list [4, 2, 1, 42, 3]. You want to sort the list in ascending order to obtain the new list [1, 2, 3, 4, 42].

Short answer: The following one-liner solution sorts the list recursively using the Quicksort algorithm:

q = lambda l: q([x for x in l[1:] if x <= l[0]]) + [l[0]] + q([x for x in l if x > l[0]]) if l else []

You can try it yourself using the following interactive code shell:

Now, let’s dive into some details!

The following introduction is based on my new book “Python One-Liners” (Amazon Link) that teaches you the power of the single line of code (use it wisely)!

Python One-Liners

Introduction: Quicksort is not only a popular question in many code interviews – asked by Google, Facebook, and Amazon – but also a practical sorting algorithm that is fast, concise, and readable. Because of its beauty, you won’t find many introduction to algorithm classes which don’t discuss the Quicksort algorithm.

Overview: Quicksort sorts a list by recursively dividing the big problem (sorting the list) into smaller problems (sorting two smaller lists) and combining the solutions from the smaller problems in a way that it solves the big problem. In order to solve each smaller problem, the same strategy is used recursively: the smaller problems are divided into even smaller subproblems, solved separately, and combined. Because of this strategy, Quicksort belongs to the class of “Divide and Conquer” algorithms.

Algorithm: The main idea of Quicksort is to select a pivot element and then placing all elements that are larger or equal than the pivot element to the right and all elements that are smaller than the pivot element to the left. Now, you have divided the big problem of sorting the list into two smaller subproblems: sorting the right and the left partition of the list. What you do now is to repeat this procedure recursively until you obtain a list with zero elements. This list is already sorted, so the recursion terminates.

The following Figure shows the Quicksort algorithm in action:

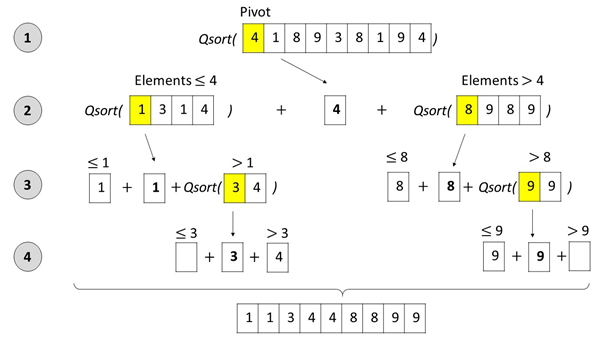
Figure: The Quicksort algorithm selects a pivot element, splits up the list into (i) an unsorted sublist with all elements that are smaller or equal than the pivot, and (ii) an unsorted sublist with all elements that are larger than the pivot. Next, the Quicksort algorithm is called recursively on the two unsorted sublists to sort them. As soon as the sublists contain maximally one element, they are sorted by definition – the recursion ends. At every recursion level, the three sublists (left, pivot, right) are concatenated before the resulting list is handed to the higher recursion level.

You create a function q which implements the Quicksort algorithm in a single line of Python code – and thus sorts any argument given as a list of integers.

## The Data
unsorted = [33, 2, 3, 45, 6, 54, 33] ## The One-Liner
q = lambda l: q([x for x in l[1:] if x <= l[0]]) + [l[0]] + q([x for x in l if x > l[0]]) if l else [] ## The Result
print(q(unsorted))

What is the output of this code?

## The Result
print(q(unsorted))
# [2, 3, 6, 33, 33, 45, 54]

Python One Line With Statement

Python One Line Exception Handling

Python One Line Try Except

Python One Line Execute

Python One Line Reverse Shell

Python One Line Read File

Python One Line Return If

Python One Line Regex Match

Python One Line Recursion

Python One Line Regex

Python One Line Read File to List

Python One Line Read Stdin

Python One Line Replace

Python One Line Ternary

Ternary (from Latin ternarius) is an adjective meaning “composed of three items”. (source) So, literally, the ternary operator in Python is composed of three operands.

Syntax: The three operands are written in an intuitive combination ... if ... else ....

<On True> if <Condition> else <On False>
Operand Description
<On True> The return expression of the operator in case the condition evaluates to True
<Condition> The condition that determines whether to return the <On True> or the <On False> branch.
<On False> The return expression of the operator in case the condition evaluates to False
Operands of the Ternary Operator

Let’s have a look at a minimum example in our interactive code shell:

Exercise: Run the code and input your age. What’s the output? Run the code again and try to change the output!

Python One Line Two For Loops

Python One Line True False

Python One Line Too Long

Python One Line Two Commands

Python One Line To Multiple Line

Python One Line URL Decode

Python One Line Or

Python One Line Object

Python One Line Open File

Python One Line Print

Python One Line Print For Loop

Python One Line Print If

Python One Line Print List

Python One Line Parse JSON

Python One Line Pretty Print JSON

Python One Line Array Filter

Python One Line Append

Python One Line And Or

Python One Line Conditional Assignment

Python One Swap

Python One Line Sum

Python One Line Sort

Python One Line Semicolon

Python One Line Dictionary

Python One Line Function Definition

Python One Line Def

Python One Line Docstring

Python One Line Dict Comprehension

Python One Line Double For Loop

Python One Line Download File

Python One Line For Loop Append

Python One Line Generator

Python One Line FizzBuzz

Python One Line HTTP Get

Python Global in One Line

Python One Line Hello World

Python One Line Comment

Python One Line Class

Python Define Two Variables in One Line

Python Define Multiple Variables in One Line

Python One Line If (Not) None

Python One Line Map

Posted on Leave a comment

How to Create a List of Dictionaries in Python?

Problem: Say, you have a dictionary {0: 'Alice', 1: 'Bob'} and you want to create a list of dictionaries with copies of the original dictionary: [{0: 'Alice', 1: 'Bob'}, {0: 'Alice', 1: 'Bob'}, {0: 'Alice', 1: 'Bob'}].

d = {0: 'Alice', 1: 'Bob'} dicts = [{**d} for _ in range(3)]
print(dicts)
# [{0: 'Alice', 1: 'Bob'}, {0: 'Alice', 1: 'Bob'}, {0: 'Alice', 1: 'Bob'}]

You use list comprehension with a “throw-away” loop variable underscore _ to create a list of 3 elements. You can change the value 3 if you need more or fewer elements in your list.

The expression {**d} unpacks all (key, value) pairs from the original dictionary d into a new dictionary. For more information about the unpacking operator, see this Finxter blog tutorial.

The resulting list contains copies of the original dictionary. If you change one, the others won’t see that change:

dicts[0][2] = 'Frank'
print(dicts)
# [{0: 'Alice', 1: 'Bob', 2: 'Frank'}, {0: 'Alice', 1: 'Bob'}, {0: 'Alice', 1: 'Bob'}]

Only the first dictionary in the list contains the new key value pair (2: 'Frank') which proves that the dictionaries don’t point to the same object in memory. This would be the case if you’d use the following method of copying a list with a single dictionary:

d2 = {0: 'Alice', 1: 'Bob'} dicts2 = [d2] * 3
print(dicts2)
# [{0: 'Alice', 1: 'Bob'}, {0: 'Alice', 1: 'Bob'}, {0: 'Alice', 1: 'Bob'}]

The method looks right but all three dictionaries are essentially the same:

dicts2[0][2] = 'Frank'
print(dicts2)
# [{0: 'Alice', 1: 'Bob', 2: 'Frank'}, {0: 'Alice', 1: 'Bob', 2: 'Frank'}, {0: 'Alice', 1: 'Bob', 2: 'Frank'}]

If you change one, you change all.

You can see this effect yourself in the following memory visualizer tool:

Exercise: change the method to the correct one so that the change affects only the first dictionary!

Related articles: How to create a Python list?

Where to Go From Here?

Enough theory, let’s get some practice!

To become successful in coding, you need to get out there and solve real problems for real people. That’s how you can become a six-figure earner easily. And that’s how you polish the skills you really need in practice. After all, what’s the use of learning theory that nobody ever needs?

Practice projects is how you sharpen your saw in coding!

Do you want to become a code master by focusing on practical code projects that actually earn you money and solve problems for people?

Then become a Python freelance developer! It’s the best way of approaching the task of improving your Python skills—even if you are a complete beginner.

Join my free webinar “How to Build Your High-Income Skill Python” and watch how I grew my coding business online and how you can, too—from the comfort of your own home.

Join the free webinar now!

Posted on Leave a comment

Zip With List Output Instead of Tuple | Most Pythonic Way

Short answer: Per default, the zip() function returns a zip object of tuples. To obtain a list of lists as an output, use the list comprehension statement [list(x) for x in zip(l1, l2)] that converts each tuple to a list and stores the converted lists in a new nested list object.

Intermediate Python coders know the zip() function. But if you’re like me, you’ve often cursed the output of the zip function: first of all, it’s a zip object (and not a list), and, second, the individual zipped elements are tuples. But what if you need a list of lists as output? This article will show you the most Pythonic way of doing this.

Problem: Given a number of lists l1, l2, .... How ot zip the i-th elements of those lists together and obtain a list of lists?

Example: Given two lists [1, 2, 3, 4] and ['Alice', 'Bob', 'Ann', 'Liz'] and you want the list of lists [[1, 'Alice'], [2, 'Bob'], [3, 'Ann'], [4, 'Liz']].

l1 = [1, 2, 3, 4]
l2 = ['Alice', 'Bob', 'Ann', 'Liz']
# ... calculate result ...
# Output: [[1, 'Alice'], [2, 'Bob'], [3, 'Ann'], [4, 'Liz']]

Here’s a quick overview of our solutions:

Exercise: Create a new list l3 and change the four methods to zip together all three lists (instead of only two).

Method 1: Generator Expression

The first method uses a generator expression and converts the resulting iterable to a list using the list() constructor.

l1 = [1, 2, 3, 4]
l2 = ['Alice', 'Bob', 'Ann', 'Liz'] # Method 1
zipped = list(list(x) for x in zip(l1, l2)) print(zipped)
# [[1, 'Alice'], [2, 'Bob'], [3, 'Ann'], [4, 'Liz']]

This is efficient but not the most concise way of accomplishing this task.

Method 2: List Comprehension

A better way is to use list comprehension which is like a generator expression but it creates a list directly without the need to convert an iterable to a list (as in Method 1).

l1 = [1, 2, 3, 4]
l2 = ['Alice', 'Bob', 'Ann', 'Liz'] # Method 2:
zipped = [list(x) for x in zip(l1, l2)] print(zipped)
# [[1, 'Alice'], [2, 'Bob'], [3, 'Ann'], [4, 'Liz']]

Method 3: For Loop and Zip

Coders who don’t like list comprehension and generator expressions (or, who don’t understand these beautiful Python features) often use a simple for loop. In the loop body, you convert each tuple in the zip object to a list and append this list to the nested list zipped.

l1 = [1, 2, 3, 4]
l2 = ['Alice', 'Bob', 'Ann', 'Liz'] # Method 3:
zipped = []
for t in zip(l1, l2): zipped.append(list(t)) print(zipped)
# [[1, 'Alice'], [2, 'Bob'], [3, 'Ann'], [4, 'Liz']]

This method is readable but less concise.

Method 4: For Loop and Indexing

This method is often used by coders who know neither the zip() method, nor list comprehension, nor generator expressions: loop over all indices and append a new list obtained by grouping the i-th elements to the list.

l1 = [1, 2, 3, 4]
l2 = ['Alice', 'Bob', 'Ann', 'Liz'] # Method 4:
zipped = []
for i in range(len(l1)): zipped.append([l1[i], l2[i]]) print(zipped)
# [[1, 'Alice'], [2, 'Bob'], [3, 'Ann'], [4, 'Liz']]

However, this method is least Pythonic, lengthy, and it works only for equally-sized lists.

Exercise: What happens if the first list has more elements than the second list?

Method 5: Zip() + Map() + List()

A functional way of solving this problem is the map() function that applies a function to each element of an iterable and returns a map object. You can pass the list() constructor to the map() function to convert each tuple in the zip object to a list. You can then convert the map object to a list.

l1 = [1, 2, 3, 4]
l2 = ['Alice', 'Bob', 'Ann', 'Liz'] # Method 5
print(list(map(list,zip(l1, l2))))
# [[1, 'Alice'], [2, 'Bob'], [3, 'Ann'], [4, 'Liz']]

I don’t recommend this method because functional programming may be difficult to understand for many beginner coders. Guido van Rossum, the creator of Python, disliked functional programming as well.

Discussion

The most Pythonic way to create a list of lists by zipping together multiple lists is the list comprehension statement [list(x) for x in zip(l1, l2)]. List comprehension is fast, efficient, concise, and readable. You can also extend it to the general case by adding more lists to the zip function: [list(x) for x in zip(l1, l2, l3, ..., ln)]. The zip() function is also robust against lists of different lengths. In this case, the elements up to the maximal index of the shortest list are zipped.

Where to Go From Here?

Enough theory, let’s get some practice!

To become successful in coding, you need to get out there and solve real problems for real people. That’s how you can become a six-figure earner easily. And that’s how you polish the skills you really need in practice. After all, what’s the use of learning theory that nobody ever needs?

Practice projects is how you sharpen your saw in coding!

Do you want to become a code master by focusing on practical code projects that actually earn you money and solve problems for people?

Then become a Python freelance developer! It’s the best way of approaching the task of improving your Python skills—even if you are a complete beginner.

Join my free webinar “How to Build Your High-Income Skill Python” and watch how I grew my coding business online and how you can, too—from the comfort of your own home.

Join the free webinar now!

Posted on Leave a comment

Create a List of Random Numbers — The Most Pythonic Way

Do you want to initialize a list with some random numbers? In this article, I’ll show you four different way of accomplishing this—along with a short discussion about “the most Pythonic way”.

Problem: Given an integer n. Create a list of n elements in a certain interval (example interval: [0, 20]).

# n = 5 --> [2, 3, 1, 4, 3]
# n = 3 --> [10, 12, 1]
# n = 10 --> [8, 2, 18, 10, 4, 19, 5, 9, 8, 1]

Solution: Here’s a quick overview on how you can create a list of random numbers:

  • Method 1: [random.random() for _ in range(10)] to create a list of random floats.
  • Method 2: [random.randint(0, 999) for _ in range(10)] to create a list of random ints.
  • Method 3: randlist = []; for _ in range(10): randlist.append(random.randint(0, 99)) to create a list of random ints.
  • Method 4: randlist = random.sample(range(20), 10) to create a list of random ints.

You can try those yourself in our interactive code shell:

Exercise: Change the interval of each method to [0, <your age>] and run the code.

Method 1: List Comprehension to Random Float List [0, 1]

List comprehension is a compact way of creating lists. The simple formula is [expression + context].

  • Expression: What to do with each list element?
  • Context: What elements to select? The context consists of an arbitrary number of for and if statements.
# Method 1: List Comprehension Random Float List [0, 1]
import random
randlist = [random.random() for _ in range(10)]

In my Python shell, the result is the following:

print(randlist)
# [0.06472744987876633, 0.011889634172418173, 0.70189711954834, 0.030063483145627568, 0.22255082691969674, 0.26704646386061337, 0.3242939534531408, 0.1781476583083168, 0.5367990394305883, 0.7621210982784024]

In the code, you first import the random module.

Then, you create a list of random floats by repeatedly calling random.random() that generates a random float number between 0 and 1 each time it is called.

You call it ten times as defined in the context part for _ in range(10). Note that the underscore serves as a “throw-away” variable as you don’t actually need it to create the list.

Also note that the list comprehension statement evaluates the expression multiple times—and not only once in the beginning. That’s why all the numbers in the list are different.

You can easily extend the creation of floats in a larger interval by multiplying the randomly created float with a constant: [random.random() * 999 for _ in range(10)] would create a list of random floats in the interval [0, 999].

If you struggle with understanding list comprehension, watch my explainer video:

Using list comprehension to generate a list of random numbers is readable, concise, and efficient. Were it not for the fourth method, I’d consider this to be the most Pythonic way to create a list of random floats.

Method 2: List Comprehension to Random Integer List [0, 999]

Just for the sake of completeness, here’s the list comprehension statement that creates a list of random integers in the interval [0, 999]:

# Method 2: List Comprehension Random Int List [0, 999]
import random
randlist = [random.randint(0, 999) for _ in range(10)]

In my Python shell, the result is the following:

print(randlist)
# [298, 218, 58, 260, 485, 192, 588, 615, 42, 499]

You use the random.randint(0, 999) function to create a random integer value between start value 0 and end value 999, so all created integers are in the interval [0, 999].

This is a very Pythonic and readable way to create a list of random integers. You can stop reading right away and use it in your own code.

Method 3: For Loop Random Int List [0, 99]

An alternative that’s often used by non-Python coders is to use a simple for loop that does the same thing as list comprehension (but demanding more space):

# Method 3: For Loop Random Int List [0, 99]
import random
randlist = []
for _ in range(10): randlist.append(random.randint(0, 99))

In my Python shell, the result is the following:

print(randlist)
# [19, 35, 0, 13, 36, 15, 13, 65, 41, 99]

Again, you use the throw-away underscore variable as the random number is not a function of a loop variable. Each two calls to the random.randint() function are independent.

I’d consider this the least Pythonic way to solve this problem.

Method 4: random.sample()

Finally, we arrive at the most Pythonic way to solve this problem: stand on the shoulders of giants and use existing built-in functionality. The random.sample() method takes a “universe” from which the random numbers are drawn and a list size n—and draws n random numbers from your universe.

# Method 4: random.sample()
import random
# Generate 10 random numbers between 0 and 20 (included)
randlist = random.sample(range(20), 10)

In my Python shell, the result is the following:

print(randlist)
# [1, 3, 0, 14, 7, 9, 13, 4, 12, 8]

You use the universe range(20) of the first 20 integer numbers 0, …, 19 and draw 10 random elements from the universe. Note that per default, no duplicates are allowed. If the universe is small than the list size n, an error is thrown:

ValueError: Sample larger than population or is negative

Discussion

In this tutorial, you’ve learned four methods to solve the problem of creating a list of random numbers. Objectively, the most Pythonic way to accomplish this is the fourth method: use the random.sample() function as it’s implemented to do exactly this.

But subjectively, I’d use the first or second method based on list comprehension to create a list of random floats or integers.

Why? Because I’m lazy and knowing the random.random() and random.randint() functions is already enough to solve the problem effectively. In practice, I don’t want to waste too much energy trying to remember code functions that do neither improve readability, nor efficiency of my code.

Where to Go From Here?

Enough theory, let’s get some practice!

To become successful in coding, you need to get out there and solve real problems for real people. That’s how you can become a six-figure earner easily. And that’s how you polish the skills you really need in practice. After all, what’s the use of learning theory that nobody ever needs?

Practice projects is how you sharpen your saw in coding!

Do you want to become a code master by focusing on practical code projects that actually earn you money and solve problems for people?

Then become a Python freelance developer! It’s the best way of approaching the task of improving your Python skills—even if you are a complete beginner.

Join my free webinar “How to Build Your High-Income Skill Python” and watch how I grew my coding business online and how you can, too—from the comfort of your own home.

Join the free webinar now!

Posted on Leave a comment

How to Create a Python List of Size n?

To create a list of n placeholder elements, multiply the list of a single placeholder element with n. For example, use [None] * 5 to create a list [None, None, None, None, None] with five elements None. You can then overwrite some elements with index assignments. In the example, lst[2] = 42 would result in the changed list [None, None, 42, None, None].

Let’s play with an interactive code shell before you’ll dive into the detailed solution!

Exercise: Initialize the list with n=20 placeholder elements -1 and run the code.


Next, you’ll learn about the more formal problem and dive into the step-by-step solution.

Problem: Given an integer n. How to initialize a list with n placeholder elements?

# n=0 --> []
# n=1 --> [None]
# n=5 --> [None, None, None, None, None]

Solution: Use the list concatenation operation *.

n = 5
lst = [None] * n
print(lst)
# [None, None, None, None, None]

You can modify the element n as you like. In subsequent operations, you can overwrite all placeholder None list elements using simple index assignment operations:

lst[0] = 'Alice'
lst[1] = 0
lst[2] = 42
lst[3] = 12
lst[4] = 'hello'
print(lst)
# ['Alice', 0, 42, 12, 'hello']

However, there’s a small problem if you want to create a list with mutable objects (such as a list of lists):

lst = [[]] * n
print(lst)
# [[], [], [], [], []] lst[2].append(42) print(lst)
# [[42], [42], [42], [42], [42]]

Changing one list element changes all list elements because all list elements refer to the same list object in memory:

The solution is to use list comprehension (see my detailed blog tutorial on list comprehension for a complete guide):

lst = [[] for _ in range(n)]
print(lst)
# [[], [], [], [], []] lst[2].append(42)
print(lst)
# [[], [], [42], [], []]

In the following visualization, you can see how each element now refers to an independent list object in memory:

Exercise: Run the visualization and convince yourself that only one element is modified! Why is this the case?

Where to Go From Here?

Enough theory, let’s get some practice!

To become successful in coding, you need to get out there and solve real problems for real people. That’s how you can become a six-figure earner easily. And that’s how you polish the skills you really need in practice. After all, what’s the use of learning theory that nobody ever needs?

Practice projects is how you sharpen your saw in coding!

Do you want to become a code master by focusing on practical code projects that actually earn you money and solve problems for people?

Then become a Python freelance developer! It’s the best way of approaching the task of improving your Python skills—even if you are a complete beginner.

Join my free webinar “How to Build Your High-Income Skill Python” and watch how I grew my coding business online and how you can, too—from the comfort of your own home.

Join the free webinar now!

Posted on Leave a comment

Python SymPy — A Short Primer

What’s SymPy Anyway?

SymPy is a Python library for symbolic computation. So instead of approximating the result of the square root of 2, it keeps the square root intact—using a symbolic representation. This helps in further processing and can lead to situations where Python has introduced a floating point precision error without need. Here’s a basic example:

import sympy print(sqrt(3))
# sqrt(3)

The result is NOT an approximated square root of 3 like in the math package:

import math print(math.sqrt(3))
# 1.7320508075688772

An Interactive Example

You can try it yourself in the interactive code shell:

(Just click the image to create your own code!)

How to Install SymPy?

To install SymPy in Python, simply run the following command in your shell:

pip install sympy

This works for all major operating systems (MacOS, Windows, Linux). A preliminary is to have the pip package manager installed.

(Confused by all the libraries, modules, pip, and virtual environments? Read the ultimate library guide on my blog.)

To check whether it has installed correctly, simply run the following command in your Python shell:

>>> help(sympy)
Help on package sympy: NAME sympy DESCRIPTION SymPy is a Python library for symbolic mathematics. It aims to become a full-featured computer algebra system (CAS) while keeping the code as simple as possible in order to be comprehensible and easily extensible. SymPy is written entirely in Python. It depends on mpmath, and other external libraries may be optionally for things like plotting support. See the webpage for more information and documentation: https://sympy.org PACKAGE CONTENTS abc algebras (package) assumptions (package)

The output validates that the sympy package has installed correctly.

Where to Go From Here?

Enough theory, let’s get some practice!

To become successful in coding, you need to get out there and solve real problems for real people. That’s how you can become a six-figure earner easily. And that’s how you polish the skills you really need in practice. After all, what’s the use of learning theory that nobody ever needs?

Practice projects is how you sharpen your saw in coding!

Do you want to become a code master by focusing on practical code projects that actually earn you money and solve problems for people?

Then become a Python freelance developer! It’s the best way of approaching the task of improving your Python skills—even if you are a complete beginner.

Join my free webinar “How to Build Your High-Income Skill Python” and watch how I grew my coding business online and how you can, too—from the comfort of your own home.

Join the free webinar now!

Posted on Leave a comment

How to Sort a List of Tuples? – Most Pythonic Way!

Did you already try to sort a list of tuples? And when you saw the result,
it wasn’t quiet what you expected? Well, this happend to me when I went deeper
into Python and I suppose, it also happend to you, since you are looking for
a solution. This defenitely shows that you are an advanced Python programmer already!

Quick Answer

Use Python’s built-in sorted() function or call the method sort() on the list
you want to sort. Both of them have an optional parameter key which accepts a
function. Pass a function here which computes a key-value from each tuple in the list to sort
the tuples by their computed key-values.
Example for sorting a list of tuples by their second entry:

lst = [(1, 2), (2, 3), (0, 3)]
lst.sort(key=lambda x: x[1])

How to Sort a List of Tuples by Any Element or Custom Value?

Let’s first frame our problem in more detail: We have a list of tuples which we want to sort by
their second element or sum of elements or anything else which is not the first element of the list.
The default behavior of both, sort() and sorted(), is taking the first entry of each tuple to
sort the list of tuples. This is what may lead to surprises for beginners.

Suppose, we want to sort a list of items like this one:

items = [ ("apple", 1.5), ("pear", 2.3), ("egg", 0.5), ("cherry", 0.2),
]

We could either sort the tuples by their first element which is the name, or by their second element, the item’s price. To achieve this, we could write a custom sort function. But this wouldn’t be very pythonic.
Instead we want to use the built-in functions which Python provides. Therefore we have to options:

  1. call sort() on the list (items.sort())
  2. use sorted() to sort the list (sorted_items = sorted(items))

The difference between the two options is that the first one sorts the list in place and the second one creates a new list instance and adds the sorted items to this new instance. So in both cases you end up with a sorted list. If you need to preserve the list’s initial state use sorted(), in any other case you should prefer calling sort() directly on the list. In both cases the list will be sorted by Python’s default: Each tuple’s first entry.
To override the default behavior we use the optional parameter key which is provided by both sort() and sorted(). The parameter key expects a function which can compute a value from a tuple. It is very common to use a lambda to override the default behavior. If you are not yet familiar with Python’s lambdas read all the background knowledge in this article.

To sort the list items by the tuples’ second entry we write:

items.sort(key=lambda x: x[1])

or if you want to preserve the initial order of the items:

new_list = sorted(items, key=lambda x: x[1])

Our key function takes a tuple x and returns it’s second entry, thus, the final ordering of the list
will only take into account each tuple’s second entry.
We could also write:

items.sort(key=lambda x: sum(x))

to sort the tuples by the sum of their entries. Of course, this is not applicable for our example, since the entries of our tuples are strings and integers.

Finally, it is also important to be aware of Python’s default behavior for sorting lists of tuples.
It doesn’t make sense to write:

items.sort(key=lambda x: x[0])

because this is just what the default behavior does.

To sum it all up, watch this video:

Conclusion

Python provides everything you need to sort lists of tuples easily without writing custom sorting functions. All you need to do is define the key-function which computes a value for each tuple by which they should be sorted.

Posted on Leave a comment

Python Tuple to Integer

You have a tuple of integers—but you want a single integer. What can you do?

Problem: Given a tuple of values.

t = (1, 2, 3)

Your goal is to convert it to a single integer value.

There are multiple ways of accomplishing this (dependent on what exactly you want to do). Let’s get a quick overview in our interactive Python shell:

Exercise: Modify method 2 to calculate the average and round to the next integer!

Let’s dive into each of the method.

Method 1: sum()

The first way of converting a tuple to an integer, simply sum up all values. The sum() function is built-in in Python and you can use it on any iterable:

The syntax is sum(iterable, start=0):

Argument Description
iterable Sum over all elements in the iterable. This can be a list, a tuple, a set, or any other data structure that allows you to iterate over the elements.
Example: sum([1, 2, 3]) returns 1+2+3=6.
start (Optional.) The default start value is 0. If you define another start value, the sum of all values in the iterable will be added to this start value.
Example: sum([1, 2, 3], 9) returns 9+1+2+3=15.

Here’s how you can use the sum() function to sum over all values in an iterable (such as a tuple):

# Method 1: sum()
t = (1, 2, 3)
i = sum(t)
print(i)
# 6

In this case, it calculates 1+2+3=6. You can learn more about the sum() function on this Finxter blog article.

But what if you want to use all tuple values as digits of a larger integer value?

Method 2: str() + list comprehension + join()

List comprehension is a compact way of creating lists. The simple formula is [expression + context].

  • Expression: What to do with each list element?
  • Context: What elements to select? The context consists of an arbitrary number of for and if statements.

You can use it in combination with the sum() function to calculate the integer 123 from the tuple (1, 2, 3)—by using the tuple values as digits of the larger integer.

# Method 2: str() + list comprehension + join()
t = (1, 2, 3)
i = ''.join(str(x) for x in t)
print(int(i))
# 123

Well, to be frank, we didn’t even use list comprehension here—the correct term for str(x) for x in t is “generator expression”. The difference to list comprehension is that it creates a generator instead of a list.

If you like functional programming, you may like the following method:

Method 3: str() + map() + join()

The map() function creates a new iterable from an iterable by applying a function to each element of the original iterable:

You can pass the str() function into the map() function to convert each tuple element to a string.

Then, you can join all strings together to a big string. After converting the big string to an integer, you’ve successfully merged all tuple integers to a big integer value.

# Method 3: str() + map() + join()
t = (1, 2, 3)
i = ''.join(map(str, t))
print(i)
# 123

There are many details to the string.join() method. You can read the detailed tutorial on the Finxter blog. Here’s the short version:

The string.join(iterable) method concatenates all the string elements in the iterable (such as a list, string, or tuple) and returns the result as a new string. The string on which you call it is the delimiter string—and it separates the individual elements. For example, '-'.join(['hello', 'world']) returns the joined string 'hello-world'.

Method 4: Multiple Assignments

If you simply want to get multiple integers by assigning the individual tuple values to integer variables, just use the multiple assignment feature:

# Method 4: multiple assignments
t = (1, 2, 3)
a, b, c = t
print(a)
print(b)
print(c) '''
1
2
3 '''

Variables a, b, and c have the values 1, 2, and 3, respectively.

Where to Go From Here?

Enough theory, let’s get some practice!

To become successful in coding, you need to get out there and solve real problems for real people. That’s how you can become a six-figure earner easily. And that’s how you polish the skills you really need in practice. After all, what’s the use of learning theory that nobody ever needs?

Practice projects is how you sharpen your saw in coding!

Do you want to become a code master by focusing on practical code projects that actually earn you money and solve problems for people?

Then become a Python freelance developer! It’s the best way of approaching the task of improving your Python skills—even if you are a complete beginner.

Join my free webinar “How to Build Your High-Income Skill Python” and watch how I grew my coding business online and how you can, too—from the comfort of your own home.

Join the free webinar now!

Posted on Leave a comment

Python List max()

Do you want to find the maximum of a Python list? This article gives you everything you need to know to master the max() function in Python.

Description

Python’s built-in max() function returns the maximum element of a list or its generalization (an iterable).

Syntax

The syntax of the max() function is as follows:

max(list, default=obj, key=func)

Arguments

Argument Description
list The list or iterable from which you get the maximum value.
default If the iterable is empty, returns this default object.
key A function that associated a weight to each element in the iterable based on which the maximum is calculated.

Return Value

The return value of the max(list) function is a single element from the list that is the maximum of all elements. If the list is empty, the default object is returned, if explicitly defined. If not, a ValueError is thrown.

Examples

Let’s consider four examples that show how the arguments play together:

Exercise: Guess the output of the four print statements in the code. Run the code. How many did you guess right?

Maximum of List of Lists

Original article: How to Find the Maximum of a List of Lists?

To find the maximal list in a list of lists, you need to make two lists comparable. How? With the key argument of the max() function. The key argument is a function that takes one input (a list) and returns one output (a numerical value). The list with the largest numerical value is returned as the maximum of the list of lists.

Problem: Say you have a list of lists (nested list) and you want to find the maximum of this list. It’s not trivial to compare lists—what’s the maximum among lists after all? To define the maximum among the inner lists, you may want to consider different objectives.

  1. The first element of each inner list.
  2. The i-th element of each inner list.
  3. The sum of inner list elements.
  4. The maximum of inner list elements.
  5. The minimum of inner list elements.

Example: Given list of lists [[1, 1, 1], [0, 2, 0], [3, 3, -1]]. Which is the maximum element?

  1. The first element of each inner list. The maximum is [3, 3, -1].
  2. The i-th element of each inner list (i = 2). The maximum is [1, 1, 1].
  3. The sum of inner list elements. The maximum is [3, 3, -1].
  4. The maximum of inner list elements. The maximum is [3, 3, -1].
  5. The minimum of inner list elements. The maximum is [3, 3, -1].

So how do you accomplish this?

Solution: Use the max() function with key argument.

Let’s study the solution code for our different versions of calculating the maximum “list” of a list of lists (nested list).

lst = [[1, 1, 1], [0, 2, 0], [3, 3, -1]] # Maximum using first element
print(max(lst, key=lambda x: x[0]))
# [3, 3, -1] # Maximum using third element
print(max(lst, key=lambda x: x[2]))
# [1, 1, 1] # Maximum using sum()
print(max(lst, key=sum))
# [3, 3, -1] # Maximum using max
print(max(lst, key=max))
# [3, 3, -1] # Maximum using min
print(max(lst, key=min))
# [1, 1, 1]

Try it yourself in our interactive code shell:

Related articles:

Where to Go From Here?

Enough theory, let’s get some practice!

To become successful in coding, you need to get out there and solve real problems for real people. That’s how you can become a six-figure earner easily. And that’s how you polish the skills you really need in practice. After all, what’s the use of learning theory that nobody ever needs?

Practice projects is how you sharpen your saw in coding!

Do you want to become a code master by focusing on practical code projects that actually earn you money and solve problems for people?

Then become a Python freelance developer! It’s the best way of approaching the task of improving your Python skills—even if you are a complete beginner.

Join my free webinar “How to Build Your High-Income Skill Python” and watch how I grew my coding business online and how you can, too—from the comfort of your own home.

Join the free webinar now!

Posted on Leave a comment

What Does “if __name__ == ‘__main__’” Do in Python?

Today, let’s discuss something that’s all over the place in many code bases: what does if __name__ == '__main__' do in Python?

If you are learning Python programming step by step, you would have bumped into the above piece of code snippet somewhere. Even if you have not, I am sure you will soon come across it, and this might feel like a jerk in your so far smooth journey of learning Python programming. I have been there. I was going through a book on Python programming when I first saw this piece of code, and I thought—wait a minute, did I miss anything on my way up to here? Then I went back, revising the last few pages to figure out what I missed, and this loop went on for a while before I finally sat down to face the demon, and honestly, I smiled when I figured it out, it is that simple. Maybe, we learn this way. We go back and forth, keep jumping, and then one day, the magic happens. The only thing that works is not giving up. 

Today I will try to make this understanding simple for you in a way that will hopefully bring a smile to your face if you have been in the loop of getting a hint of what it is and then keep forgetting.

To understand what is if __name__ == __main__ used for we will dive into some code examples first to understand what __name__ and __main__ are. Then we will cement the learning through another example. So be patient and go through the article carefully. The code snippets may look a little confusing but wait until we explain and see what is happening exactly.

What are __name__ and __main__?

Let us start with __name__. Simply put, __name__ is a special variable that is built-in in Python. 

In Python, we can run code as a source file or, in other words, a python code that runs on its own (read – not imported from some separate Python source file). This sentence may be confusing at the moment, but let us explore this further.

Look at the code snippet below. It is a simple python file with just one line:

print(f" First Module's Name : {__name__}")

Simply put, we are asking Python to print the value that __name__ variable has at this moment. Notice there is no import statement or even any other line of code above it. 

                                                   Figure 1

Check the output in Figure 2 below. We run the above lines of code and find the output 

First Module’s Name : __main__

                                                    Figure 2

We import module1.py into module2.py and ask Python to return the second module’s name (second because this is the second python code we are running) stored in __name__ variable again.

                                                    Figure 3

Interestingly, in Figure 5 below, we have the output 

First Module’s Name : module1

Second Module’s Name : __main__

                                                    Figure 4

The above information summarised simply can be explained as follows. Python starts executing the first line of code found in a Python file, but before it runs anything to show the output, Python defines some special variables. __name__ is one such variable. When the source file is executed on its own i.e, not being imported from some other source code, the __name__ variable is set to value __main__, and hence the output we got in Figure 3 was First Module’s Name : __main__. If you import the file from some other module (as in the code snippet from Figure 4), the value of __name__ variable is set to the name of the module it is imported from. Hence the output in Figure 5.

Now let us look at the sequence of execution.

  1. module1.py in Figure 1 is executed,
  2. Variable __name__ is set to the value __main__
  3. __main__ module is executed, and the output is First Module’s Name : __main__ 
  4. Module2.py in Figure 4 is executed,
  5. Variable __name__ is set to the value module1
  6. module1 is the block of code in module1.py which is executed, and the output is First Module’s Name : module1 
  7. Next, we move on to line 3 in module2.py, the name value is reset to __main__, because this is a fresh piece of code in module2.py, and the output is Second Module’s Name : __main__

Using if __name__ == ‘__main__’

But let’s think only concerning the code in module2.py. In the real world, with module2.py I would not like to print the output from module1.py rather only import some functionality and get output for the lines of code written in module2.py i.e. Second Module’s Name : __main__

But how can we do it? There has to be a way because this seems more logical that way. Refer to the code snippet below in Figure 6.

                                                     Figure 5

So, we will define a function main(), and put the print statement from module1.py inside the main function. Now we use this small trick of using the statement if __name__ == ‘__main__’ and put the main function inside this if statement. Now let’s look at the execution sequence of our program.

  1. We have a main() function where we ask to print the name of the first module stored in the __name__ variable. From the above example, we know the value stored in the __name__ variable is __main__
  2. In line 7, we say if the value in __name__ variable is equal to __main__, only then go ahead and execute the main() function.
  3. Now running the modified module1.py, we can see the output as First Module’s Name : __main__ as expected. Refer to the first output in Figure 7 
  4. Now when we run module2.py, we get the output as Second Module’s Name : __main__

Notice how the output for module2.py has changed now. Although we have imported module1 in our module2.py program, the program in module1.py doesn’t run. Why? Because the value stored in the __name__ variable at this moment is module1 and not __main__. So, using a main() function and if __name__ == ‘__main__’ has put restrictions on execution of lines of code in module1.py as it would only execute module1.py only if __name__ == ‘__main__’

                                                     Figure 6

Putting it all into a real-world example

We now take a more generic example, which would make more sense of all we have discussed above.

  • Have a look at the below code snippet from cubes.py in Figure 8. In line 1 and line 2, we have a function cube(), which takes num as an argument. The function cubes(num) returns the cube of a given number.
  • On line 4, we use a for loop which iterates over a list of numbers from 0 to 9.
  • On line 5, we use the cubes(num) function with i as input to display the cube, as shown in figure 9. Simple enough.

                                                     Figure 7

                                                     Figure 8

In the code snippet from modules.py below in Figure 10, we import cube(num) function from cubes.py and try to print cube of 10 in line 3. Logically, we are trying to use the function cube(num), which returns a cube of any given input number.

                                       Figure 9

However, look at the output below. We have the output of both the programs cubes.py and modules.py. This is not what we intended or wanted to do. 

                                                     Figure 10

Remember the explanation from above where we used if __name__ == ‘__main__’ to limit the execution of code from modules1.py. Let us try and implement the same idea and see if that works here.

In the code snippet from cubesModified.py in Figure 11, we put the for loop and the print statement from cubes.py in the main() function. And again, we use the statement if __name__ == ‘__main__’ to execute code from cubesModified.py only when the value of __name__ variable equals to __main__.

                                                     Figure 11

We run cubesModified.py and get the output as below and per our expectation.

                                                      Figure 12

However, now when we run modulesModified.py where we import cube(num) function from cubesModified.py, it only executes the code from our modulesModified.py as shown in Figure 15, and the output is 1000 because the value stored in the __name__ variable in cubesModified and not __main__.

                                                      Figure 13

                                                      Figure 14

I hope this explanation helps you with a better understanding of what does if __name__ == ‘__main__’. Go ahead and play around with the code in the code editor and cement your understanding. Best of Luck!!

Author

This article is contributed by Finxter Abhigyan Ojha. You can find his Upwork profile here.