Short answer: Per default, the zip() function returns a zip object of tuples. To obtain a list of lists as an output, use the list comprehension statement [list(x) for x in zip(l1, l2)] that converts each tuple to a list and stores the converted lists in a new nested list object.
Intermediate Python coders know the zip() function. But if you’re like me, you’ve often cursed the output of the zip function: first of all, it’s a zip object (and not a list), and, second, the individual zipped elements are tuples. But what if you need a list of lists as output? This article will show you the most Pythonic way of doing this.
Problem: Given a number of lists l1, l2, .... How ot zip the i-th elements of those lists together and obtain a list of lists?
Example: Given two lists [1, 2, 3, 4] and ['Alice', 'Bob', 'Ann', 'Liz'] and you want the list of lists [[1, 'Alice'], [2, 'Bob'], [3, 'Ann'], [4, 'Liz']].
This is efficient but not the most concise way of accomplishing this task.
Method 2: List Comprehension
A better way is to use list comprehension which is like a generator expression but it creates a list directly without the need to convert an iterable to a list (as in Method 1).
Coders who don’t like list comprehension and generator expressions (or, who don’t understand these beautiful Python features) often use a simple for loop. In the loop body, you convert each tuple in the zip object to a list and append this list to the nested list zipped.
This method is often used by coders who know neither the zip() method, nor list comprehension, nor generator expressions: loop over all indices and append a new list obtained by grouping the i-th elements to the list.
However, this method is least Pythonic, lengthy, and it works only for equally-sized lists.
Exercise: What happens if the first list has more elements than the second list?
Method 5: Zip() + Map() + List()
A functional way of solving this problem is the map() function that applies a function to each element of an iterable and returns a map object. You can pass the list() constructor to the map() function to convert each tuple in the zip object to a list. You can then convert the map object to a list.
I don’t recommend this method because functional programming may be difficult to understand for many beginner coders. Guido van Rossum, the creator of Python, disliked functional programming as well.
Discussion
The most Pythonic way to create a list of lists by zipping together multiple lists is the list comprehension statement [list(x) for x in zip(l1, l2)]. List comprehension is fast, efficient, concise, and readable. You can also extend it to the general case by adding more lists to the zip function: [list(x) for x in zip(l1, l2, l3, ..., ln)]. The zip() function is also robust against lists of different lengths. In this case, the elements up to the maximal index of the shortest list are zipped.
Where to Go From Here?
Enough theory, let’s get some practice!
To become successful in coding, you need to get out there and solve real problems for real people. That’s how you can become a six-figure earner easily. And that’s how you polish the skills you really need in practice. After all, what’s the use of learning theory that nobody ever needs?
Practice projects is how you sharpen your saw in coding!
Do you want to become a code master by focusing on practical code projects that actually earn you money and solve problems for people?
Then become a Python freelance developer! It’s the best way of approaching the task of improving your Python skills—even if you are a complete beginner.
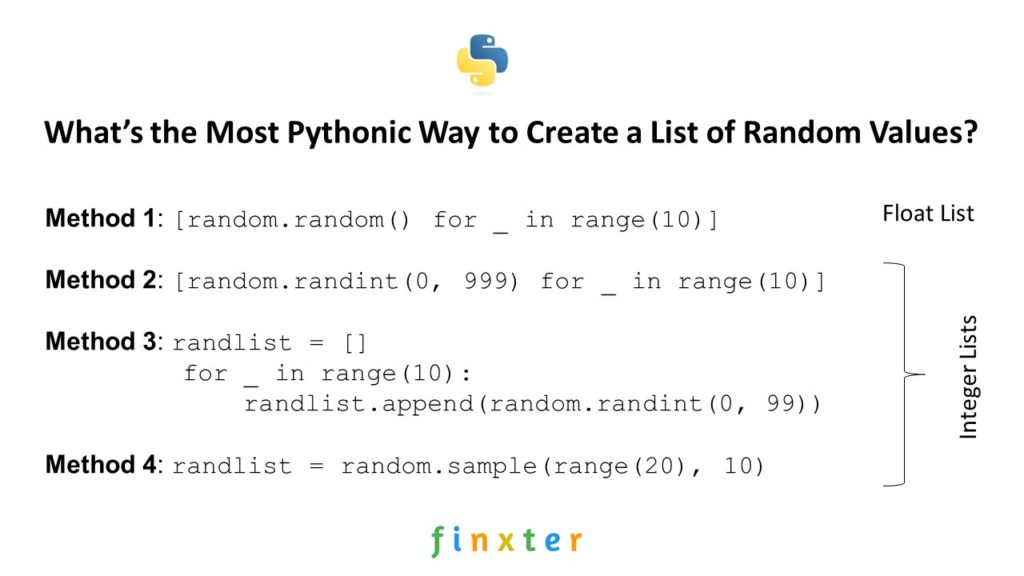
Do you want to initialize a list with some random numbers? In this article, I’ll show you four different way of accomplishing this—along with a short discussion about “the most Pythonic way”.
Problem: Given an integer n. Create a list of n elements in a certain interval (example interval: [0, 20]).
Then, you create a list of random floats by repeatedly calling random.random() that generates a random float number between 0 and 1 each time it is called.
You call it ten times as defined in the context part for _ in range(10). Note that the underscore serves as a “throw-away” variable as you don’t actually need it to create the list.
Also note that the list comprehension statement evaluates the expression multiple times—and not only once in the beginning. That’s why all the numbers in the list are different.
You can easily extend the creation of floats in a larger interval by multiplying the randomly created float with a constant: [random.random() * 999 for _ in range(10)] would create a list of random floats in the interval [0, 999].
If you struggle with understanding list comprehension, watch my explainer video:
Using list comprehension to generate a list of random numbers is readable, concise, and efficient. Were it not for the fourth method, I’d consider this to be the most Pythonic way to create a list of random floats.
Method 2: List Comprehension to Random Integer List [0, 999]
Just for the sake of completeness, here’s the list comprehension statement that creates a list of random integers in the interval [0, 999]:
# Method 2: List Comprehension Random Int List [0, 999]
import random
randlist = [random.randint(0, 999) for _ in range(10)]
You use the random.randint(0, 999) function to create a random integer value between start value 0 and end value 999, so all created integers are in the interval [0, 999].
This is a very Pythonic and readable way to create a list of random integers. You can stop reading right away and use it in your own code.
Method 3: For Loop Random Int List [0, 99]
An alternative that’s often used by non-Python coders is to use a simple for loop that does the same thing as list comprehension (but demanding more space):
# Method 3: For Loop Random Int List [0, 99]
import random
randlist = []
for _ in range(10): randlist.append(random.randint(0, 99))
Again, you use the throw-away underscore variable as the random number is not a function of a loop variable. Each two calls to the random.randint() function are independent.
I’d consider this the least Pythonic way to solve this problem.
Method 4: random.sample()
Finally, we arrive at the most Pythonic way to solve this problem: stand on the shoulders of giants and use existing built-in functionality. The random.sample() method takes a “universe” from which the random numbers are drawn and a list size n—and draws n random numbers from your universe.
# Method 4: random.sample()
import random
# Generate 10 random numbers between 0 and 20 (included)
randlist = random.sample(range(20), 10)
You use the universe range(20) of the first 20 integer numbers 0, …, 19 and draw 10 random elements from the universe. Note that per default, no duplicates are allowed. If the universe is small than the list size n, an error is thrown:
ValueError: Sample larger than population or is negative
Discussion
In this tutorial, you’ve learned four methods to solve the problem of creating a list of random numbers. Objectively, the most Pythonic way to accomplish this is the fourth method: use the random.sample() function as it’s implemented to do exactly this.
But subjectively, I’d use the first or second method based on list comprehension to create a list of random floats or integers.
Why? Because I’m lazy and knowing the random.random() and random.randint() functions is already enough to solve the problem effectively. In practice, I don’t want to waste too much energy trying to remember code functions that do neither improve readability, nor efficiency of my code.
Where to Go From Here?
Enough theory, let’s get some practice!
To become successful in coding, you need to get out there and solve real problems for real people. That’s how you can become a six-figure earner easily. And that’s how you polish the skills you really need in practice. After all, what’s the use of learning theory that nobody ever needs?
Practice projects is how you sharpen your saw in coding!
Do you want to become a code master by focusing on practical code projects that actually earn you money and solve problems for people?
Then become a Python freelance developer! It’s the best way of approaching the task of improving your Python skills—even if you are a complete beginner.
To create a list of n placeholder elements, multiply the list of a single placeholder element with n. For example, use [None] * 5 to create a list [None, None, None, None, None] with five elements None. You can then overwrite some elements with index assignments. In the example, lst[2] = 42 would result in the changed list [None, None, 42, None, None].
Let’s play with an interactive code shell before you’ll dive into the detailed solution!
Exercise: Initialize the list with n=20 placeholder elements -1 and run the code.
Next, you’ll learn about the more formal problem and dive into the step-by-step solution.
Problem: Given an integer n. How to initialize a list with n placeholder elements?
n = 5
lst = [None] * n
print(lst)
# [None, None, None, None, None]
You can modify the element n as you like. In subsequent operations, you can overwrite all placeholder None list elements using simple index assignment operations:
In the following visualization, you can see how each element now refers to an independent list object in memory:
Exercise: Run the visualization and convince yourself that only one element is modified! Why is this the case?
Where to Go From Here?
Enough theory, let’s get some practice!
To become successful in coding, you need to get out there and solve real problems for real people. That’s how you can become a six-figure earner easily. And that’s how you polish the skills you really need in practice. After all, what’s the use of learning theory that nobody ever needs?
Practice projects is how you sharpen your saw in coding!
Do you want to become a code master by focusing on practical code projects that actually earn you money and solve problems for people?
Then become a Python freelance developer! It’s the best way of approaching the task of improving your Python skills—even if you are a complete beginner.
SymPy is a Python library for symbolic computation. So instead of approximating the result of the square root of 2, it keeps the square root intact—using a symbolic representation. This helps in further processing and can lead to situations where Python has introduced a floating point precision error without need. Here’s a basic example:
import sympy print(sqrt(3))
# sqrt(3)
The result is NOT an approximated square root of 3 like in the math package:
import math print(math.sqrt(3))
# 1.7320508075688772
An Interactive Example
You can try it yourself in the interactive code shell:
(Just click the image to create your own code!)
How to Install SymPy?
To install SymPy in Python, simply run the following command in your shell:
pip install sympy
This works for all major operating systems (MacOS, Windows, Linux). A preliminary is to have the pip package manager installed.
To check whether it has installed correctly, simply run the following command in your Python shell:
>>> help(sympy)
Help on package sympy: NAME sympy DESCRIPTION SymPy is a Python library for symbolic mathematics. It aims to become a full-featured computer algebra system (CAS) while keeping the code as simple as possible in order to be comprehensible and easily extensible. SymPy is written entirely in Python. It depends on mpmath, and other external libraries may be optionally for things like plotting support. See the webpage for more information and documentation: https://sympy.org PACKAGE CONTENTS abc algebras (package) assumptions (package)
The output validates that the sympy package has installed correctly.
Where to Go From Here?
Enough theory, let’s get some practice!
To become successful in coding, you need to get out there and solve real problems for real people. That’s how you can become a six-figure earner easily. And that’s how you polish the skills you really need in practice. After all, what’s the use of learning theory that nobody ever needs?
Practice projects is how you sharpen your saw in coding!
Do you want to become a code master by focusing on practical code projects that actually earn you money and solve problems for people?
Then become a Python freelance developer! It’s the best way of approaching the task of improving your Python skills—even if you are a complete beginner.
Did you already try to sort a list of tuples? And when you saw the result, it wasn’t quiet what you expected? Well, this happend to me when I went deeper into Python and I suppose, it also happend to you, since you are looking for a solution. This defenitely shows that you are an advanced Python programmer already!
Quick Answer
Use Python’s built-in sorted() function or call the method sort() on the list you want to sort. Both of them have an optional parameter key which accepts a function. Pass a function here which computes a key-value from each tuple in the list to sort the tuples by their computed key-values. Example for sorting a list of tuples by their second entry:
How to Sort a List of Tuples by Any Element or Custom Value?
Let’s first frame our problem in more detail: We have a list of tuples which we want to sort by their second element or sum of elements or anything else which is not the first element of the list. The default behavior of both, sort() and sorted(), is taking the first entry of each tuple to sort the list of tuples. This is what may lead to surprises for beginners.
Suppose, we want to sort a list of items like this one:
We could either sort the tuples by their first element which is the name, or by their second element, the item’s price. To achieve this, we could write a custom sort function. But this wouldn’t be very pythonic. Instead we want to use the built-in functions which Python provides. Therefore we have to options:
call sort() on the list (items.sort())
use sorted() to sort the list (sorted_items = sorted(items))
The difference between the two options is that the first one sorts the list in place and the second one creates a new list instance and adds the sorted items to this new instance. So in both cases you end up with a sorted list. If you need to preserve the list’s initial state use sorted(), in any other case you should prefer calling sort() directly on the list. In both cases the list will be sorted by Python’s default: Each tuple’s first entry. To override the default behavior we use the optional parameter key which is provided by both sort() and sorted(). The parameter key expects a function which can compute a value from a tuple. It is very common to use a lambda to override the default behavior. If you are not yet familiar with Python’s lambdas read all the background knowledge in this article.
To sort the list items by the tuples’ second entry we write:
items.sort(key=lambda x: x[1])
or if you want to preserve the initial order of the items:
new_list = sorted(items, key=lambda x: x[1])
Our key function takes a tuple x and returns it’s second entry, thus, the final ordering of the list will only take into account each tuple’s second entry. We could also write:
items.sort(key=lambda x: sum(x))
to sort the tuples by the sum of their entries. Of course, this is not applicable for our example, since the entries of our tuples are strings and integers.
Finally, it is also important to be aware of Python’s default behavior for sorting lists of tuples. It doesn’t make sense to write:
items.sort(key=lambda x: x[0])
because this is just what the default behavior does.
To sum it all up, watch this video:
Conclusion
Python provides everything you need to sort lists of tuples easily without writing custom sorting functions. All you need to do is define the key-function which computes a value for each tuple by which they should be sorted.
You have a tuple of integers—but you want a single integer. What can you do?
Problem: Given a tuple of values.
t = (1, 2, 3)
Your goal is to convert it to a single integer value.
There are multiple ways of accomplishing this (dependent on what exactly you want to do). Let’s get a quick overview in our interactive Python shell:
Exercise: Modify method 2 to calculate the average and round to the next integer!
Let’s dive into each of the method.
Method 1: sum()
The first way of converting a tuple to an integer, simply sum up all values. The sum() function is built-in in Python and you can use it on any iterable:
The syntax is sum(iterable, start=0):
Argument
Description
iterable
Sum over all elements in the iterable. This can be a list, a tuple, a set, or any other data structure that allows you to iterate over the elements. Example: sum([1, 2, 3]) returns 1+2+3=6.
start
(Optional.) The default start value is 0. If you define another start value, the sum of all values in the iterable will be added to this start value. Example: sum([1, 2, 3], 9) returns 9+1+2+3=15.
Here’s how you can use the sum() function to sum over all values in an iterable (such as a tuple):
# Method 1: sum()
t = (1, 2, 3)
i = sum(t)
print(i)
# 6
But what if you want to use all tuple values as digits of a larger integer value?
Method 2: str() + list comprehension + join()
List comprehension is a compact way of creating lists. The simple formula is [expression + context].
Expression: What to do with each list element?
Context: What elements to select? The context consists of an arbitrary number of for and if statements.
You can use it in combination with the sum() function to calculate the integer 123 from the tuple (1, 2, 3)—by using the tuple values as digits of the larger integer.
# Method 2: str() + list comprehension + join()
t = (1, 2, 3)
i = ''.join(str(x) for x in t)
print(int(i))
# 123
Well, to be frank, we didn’t even use list comprehension here—the correct term for str(x) for x in t is “generator expression”. The difference to list comprehension is that it creates a generator instead of a list.
If you like functional programming, you may like the following method:
Method 3: str() + map() + join()
The map() function creates a new iterable from an iterable by applying a function to each element of the original iterable:
You can pass the str() function into the map() function to convert each tuple element to a string.
Then, you can join all strings together to a big string. After converting the big string to an integer, you’ve successfully merged all tuple integers to a big integer value.
# Method 3: str() + map() + join()
t = (1, 2, 3)
i = ''.join(map(str, t))
print(i)
# 123
The string.join(iterable) method concatenates all the string elements in the iterable (such as a list, string, or tuple) and returns the result as a new string. The string on which you call it is the delimiter string—and it separates the individual elements. For example, '-'.join(['hello', 'world']) returns the joined string 'hello-world'.
Method 4: Multiple Assignments
If you simply want to get multiple integers by assigning the individual tuple values to integer variables, just use the multiple assignment feature:
# Method 4: multiple assignments
t = (1, 2, 3)
a, b, c = t
print(a)
print(b)
print(c) '''
1
2
3 '''
Variables a, b, and c have the values 1, 2, and 3, respectively.
Where to Go From Here?
Enough theory, let’s get some practice!
To become successful in coding, you need to get out there and solve real problems for real people. That’s how you can become a six-figure earner easily. And that’s how you polish the skills you really need in practice. After all, what’s the use of learning theory that nobody ever needs?
Practice projects is how you sharpen your saw in coding!
Do you want to become a code master by focusing on practical code projects that actually earn you money and solve problems for people?
Then become a Python freelance developer! It’s the best way of approaching the task of improving your Python skills—even if you are a complete beginner.
Do you want to find the maximum of a Python list? This article gives you everything you need to know to master the max() function in Python.
Description
Python’s built-in max() function returns the maximum element of a list or its generalization (an iterable).
Syntax
The syntax of the max() function is as follows:
max(list, default=obj, key=func)
Arguments
Argument
Description
list
The list or iterable from which you get the maximum value.
default
If the iterable is empty, returns this default object.
key
A function that associated a weight to each element in the iterable based on which the maximum is calculated.
Return Value
The return value of the max(list) function is a single element from the list that is the maximum of all elements. If the list is empty, the default object is returned, if explicitly defined. If not, a ValueError is thrown.
Examples
Let’s consider four examples that show how the arguments play together:
Exercise: Guess the output of the four print statements in the code. Run the code. How many did you guess right?
To find the maximal list in a list of lists, you need to make two lists comparable. How? With the key argument of the max() function. The key argument is a function that takes one input (a list) and returns one output (a numerical value). The list with the largest numerical value is returned as the maximum of the list of lists.
Problem: Say you have a list of lists (nested list) and you want to find the maximum of this list. It’s not trivial to compare lists—what’s the maximum among lists after all? To define the maximum among the inner lists, you may want to consider different objectives.
The first element of each inner list.
The i-th element of each inner list.
The sum of inner list elements.
The maximum of inner list elements.
The minimum of inner list elements.
Example: Given list of lists [[1, 1, 1], [0, 2, 0], [3, 3, -1]]. Which is the maximum element?
The first element of each inner list. The maximum is [3, 3, -1].
The i-th element of each inner list (i = 2). The maximum is [1, 1, 1].
The sum of inner list elements. The maximum is [3, 3, -1].
The maximum of inner list elements. The maximum is [3, 3, -1].
The minimum of inner list elements. The maximum is [3, 3, -1].
So how do you accomplish this?
Solution: Use the max() function with key argument.
Let’s study the solution code for our different versions of calculating the maximum “list” of a list of lists (nested list).
lst = [[1, 1, 1], [0, 2, 0], [3, 3, -1]] # Maximum using first element
print(max(lst, key=lambda x: x[0]))
# [3, 3, -1] # Maximum using third element
print(max(lst, key=lambda x: x[2]))
# [1, 1, 1] # Maximum using sum()
print(max(lst, key=sum))
# [3, 3, -1] # Maximum using max
print(max(lst, key=max))
# [3, 3, -1] # Maximum using min
print(max(lst, key=min))
# [1, 1, 1]
To become successful in coding, you need to get out there and solve real problems for real people. That’s how you can become a six-figure earner easily. And that’s how you polish the skills you really need in practice. After all, what’s the use of learning theory that nobody ever needs?
Practice projects is how you sharpen your saw in coding!
Do you want to become a code master by focusing on practical code projects that actually earn you money and solve problems for people?
Then become a Python freelance developer! It’s the best way of approaching the task of improving your Python skills—even if you are a complete beginner.
Today, let’s discuss something that’s all over the place in many code bases: what does if __name__ == '__main__' do in Python?
If you are learning Python programming step by step, you would have bumped into the above piece of code snippet somewhere. Even if you have not, I am sure you will soon come across it, and this might feel like a jerk in your so far smooth journey of learning Python programming. I have been there. I was going through a book on Python programming when I first saw this piece of code, and I thought—wait a minute, did I miss anything on my way up to here? Then I went back, revising the last few pages to figure out what I missed, and this loop went on for a while before I finally sat down to face the demon, and honestly, I smiled when I figured it out, it is that simple. Maybe, we learn this way. We go back and forth, keep jumping, and then one day, the magic happens. The only thing that works is not giving up.
Today I will try to make this understanding simple for you in a way that will hopefully bring a smile to your face if you have been in the loop of getting a hint of what it is and then keep forgetting.
To understand what is if __name__ == __main__ used for we will dive into some code examples first to understand what __name__ and __main__ are. Then we will cement the learning through another example. So be patient and go through the article carefully. The code snippets may look a little confusing but wait until we explain and see what is happening exactly.
What are __name__ and __main__?
Let us start with __name__. Simply put, __name__ is a special variable that is built-in in Python.
In Python, we can run code as a source file or, in other words, a python code that runs on its own (read – not imported from some separate Python source file). This sentence may be confusing at the moment, but let us explore this further.
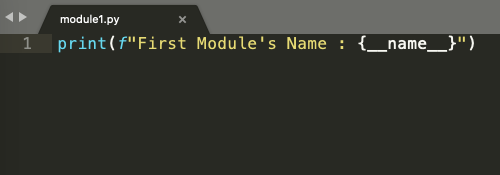
Look at the code snippet below. It is a simple python file with just one line:
print(f" First Module's Name : {__name__}")
Simply put, we are asking Python to print the value that __name__ variable has at this moment. Notice there is no import statement or even any other line of code above it.
Figure 1
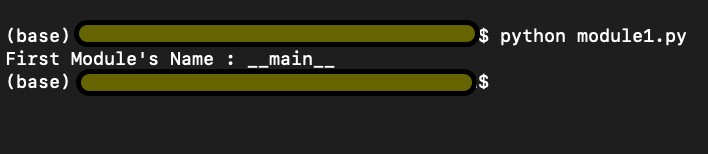
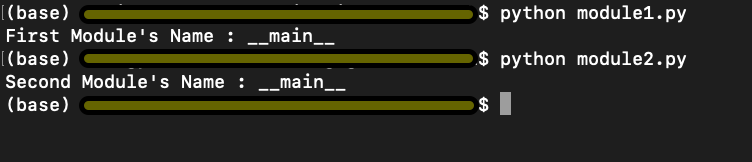
Check the output in Figure 2 below. We run the above lines of code and find the output
First Module’s Name : __main__
Figure 2
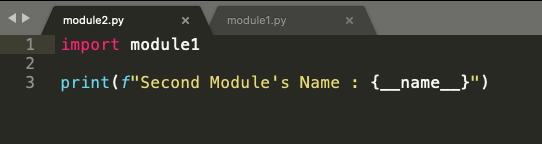
We import module1.py into module2.py and ask Python to return the second module’s name (second because this is the second python code we are running) stored in__name__variable again.
Figure 3
Interestingly, in Figure 5 below, we have the output
First Module’s Name : module1
Second Module’s Name : __main__
Figure 4
The above information summarised simply can be explained as follows. Python starts executing the first line of code found in a Python file, but before it runs anything to show the output, Python defines some special variables. __name__ is one such variable. When the source file is executed on its own i.e, not being imported from some other source code, the __name__ variable is set to value __main__, and hence the output we got in Figure 3 was First Module’s Name : __main__. If you import the file from some other module (as in the code snippet from Figure 4), the value of __name__ variable is set to the name of the module it is imported from. Hence the output in Figure 5.
Now let us look at the sequence of execution.
module1.py in Figure 1 is executed,
Variable __name__ is set to the value __main__
__main__ module is executed, and the output is First Module’s Name : __main__
Module2.py in Figure 4 is executed,
Variable __name__ is set to the value module1
module1 is the block of code in module1.py which is executed, and the output is First Module’s Name : module1
Next, we move on to line 3 in module2.py, the name value is reset to __main__, because this is a fresh piece of code in module2.py, and the output is Second Module’s Name : __main__
Using if __name__ == ‘__main__’
But let’s think only concerning the code in module2.py. In the real world, with module2.py I would not like to print the output from module1.py rather only import some functionality and get output for the lines of code written in module2.py i.e. Second Module’s Name : __main__
But how can we do it? There has to be a way because this seems more logical that way. Refer to the code snippet below in Figure 6.
Figure 5
So, we will define a function main(), and put the print statement from module1.py inside the main function. Now we use this small trick of using the statement if __name__ == ‘__main__’ and put the main function inside this if statement. Now let’s look at the execution sequence of our program.
We have a main() function where we ask to print the name of the first module stored in the __name__ variable. From the above example, we know the value stored in the __name__ variable is __main__
In line 7, we say if the value in __name__ variable is equal to __main__, only then go ahead and execute the main() function.
Now running the modified module1.py, we can see the output as First Module’s Name : __main__ as expected. Refer to the first output in Figure 7
Now when we run module2.py, we get the output as Second Module’s Name : __main__
Notice how the output for module2.py has changed now. Although we have imported module1 in our module2.py program, the program in module1.py doesn’t run. Why? Because the value stored in the __name__ variable at this moment is module1 and not __main__. So, using a main() function and if __name__ == ‘__main__’ has put restrictions on execution of lines of code in module1.py as it would only execute module1.py only if __name__ == ‘__main__’
Figure 6
Putting it all into a real-world example
We now take a more generic example, which would make more sense of all we have discussed above.
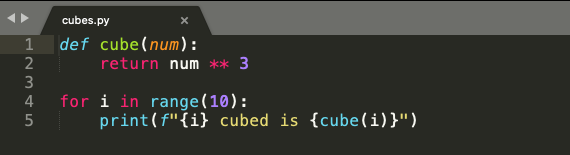
Have a look at the below code snippet from cubes.py in Figure 8. In line 1 and line 2, we have a function cube(), which takes num as an argument. The function cubes(num) returns the cube of a given number.
On line 4, we use a for loop which iterates over a list of numbers from 0 to 9.
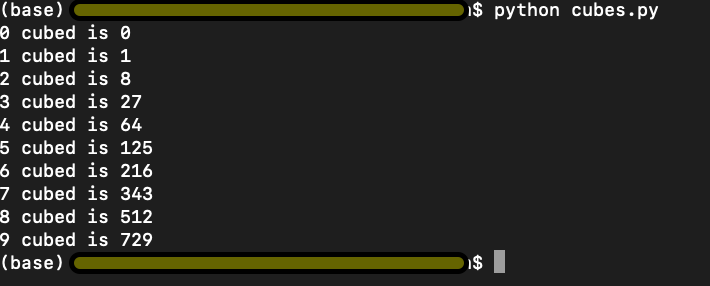
On line 5, we use the cubes(num) function with i as input to display the cube, as shown in figure 9. Simple enough.
Figure 7
Figure 8
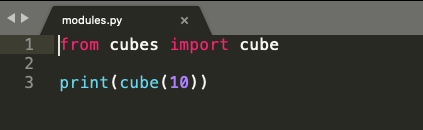
In the code snippet from modules.py below in Figure 10, we import cube(num) function from cubes.py and try to print cube of 10 in line 3. Logically, we are trying to use the function cube(num), which returns a cube of any given input number.
Figure 9
However, look at the output below. We have the output of both the programs cubes.py and modules.py. This is not what we intended or wanted to do.
Figure 10
Remember the explanation from above where we used if __name__ == ‘__main__’ to limit the execution of code from modules1.py. Let us try and implement the same idea and see if that works here.
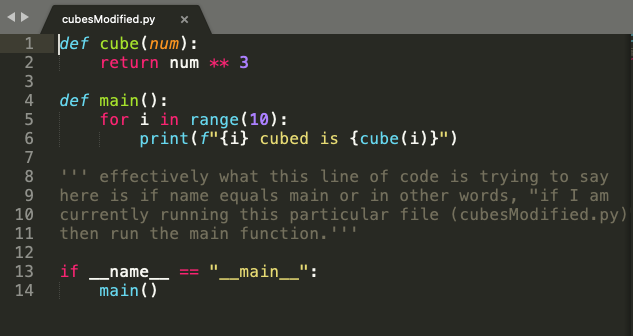
In the code snippet from cubesModified.py in Figure 11, we put the for loop and the print statement from cubes.py in the main() function. And again, we use the statement if __name__ == ‘__main__’ to execute code from cubesModified.py only when the value of __name__ variable equals to __main__.
Figure 11
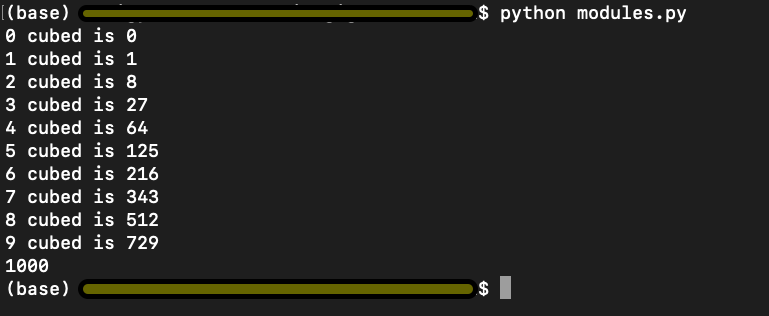
We run cubesModified.py and get the output as below and per our expectation.
Figure 12
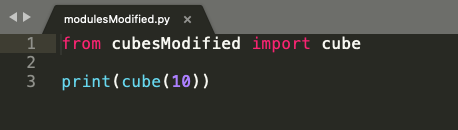
However, now when we run modulesModified.py where we import cube(num) function from cubesModified.py, it only executes the code from our modulesModified.py as shown in Figure 15, and the output is 1000 because the value stored in the __name__ variable in cubesModified and not __main__.
Figure 13
Figure 14
I hope this explanation helps you with a better understanding of what does if __name__ == ‘__main__’. Go ahead and play around with the code in the code editor and cement your understanding. Best of Luck!!
Summary: To convert a dictionary to a list of tuples, use the dict.items() method to obtain an iterable of (key, value) pairs and convert it to a list using the list(...) constructor: list(dict.items()). To modify each key value pair before storing it in the list, you can use the list comprehension statement [(k', v') for k, v in dict.items()] replacing k' and v' with your specific modifications.
In my code projects, I often find that choosing the right data structure is an important prerequisite to writing clean and effective code. In this article, you’ll learn the most Pythonic way to convert a dictionary to a list.
Problem: Given a dictionary of key:value pairs. Convert it to a list of (key, value) tuples.
Example: Given the following dictionary.
d = {'Alice': 19, 'Bob': 23, 'Carl': 47}
You want to convert it to a list of (key, value) tuples:
[('Alice', 19), ('Bob', 23), ('Carl', 47)]
You can get a quick overview of the methods examined in this article next:
Exercise: Change the data structure of the dictionary elements. Does it still work?
Let’s dive into the methods!
Method 1: List of Tuples with dict.items() + list()
The first approach uses the dictionary method dict.items() to retrieve an iterable of (key, value) tuples. The only thing left is to convert it to a list using the built-in list() constructor.
The variable t now holds a list of (key, value) tuples. Note that in many cases, it’s not necessary to actually convert it to a list, and, thus, instantiate the data structure in memory. For example, if you want to loop over all (key, value) pairs in the dictionary, you can do so without conversion:
for k,v in d.items(): s = str(k) + '->' + str(v) print(s) '''
Alice->19
Bob->23
Carl->47 '''
Using the items() method on the dictionary object is the most Pythonic way if everything you want is to retrieve a list of (key, value) pairs. However, what if you want to get a list of keys—ignoring the values for now?
Method 2: List of Keys with dict.key()
To get a list of key values, use the dict.keys() method and pass the resulting iterable into a list() constructor.
d = {'Alice': 19, 'Bob': 23, 'Carl': 47} # Method 2
t = list(d.keys())
print(t)
# ['Alice', 'Bob', 'Carl']
Similarly, you may want to get a list of values.
Method 3: List of Values with dict.values()
To get a list of key values, use the dict.values() method and pass the resulting iterable into a list() constructor.
d = {'Alice': 19, 'Bob': 23, 'Carl': 47} # Method 3
t = list(d.values())
print(t)
# [19, 23, 47]
But what if you want to modify each (key, value) tuple? Let’s study some alternatives.
Method 4: List Comprehension with dict.items()
List comprehension is a compact way of creating lists. The simple formula is [expression + context].
Expression: What to do with each list element?
Context: What elements to select? The context consists of an arbitrary number of for and if statements.
You can use list comprehension to modify each (key, value) pair from the original dictionary before you store the result in the new list.
d = {'Alice': 19, 'Bob': 23, 'Carl': 47} # Method 4
t = [(k[:3], v-1) for k, v in d.items()]
print(t)
# [('Ali', 18), ('Bob', 22), ('Car', 46)]
You transform each key to a string with three characters using slicing and reduce each value by one.
Method 5: zip() with dict.keys() and dict.values()
However, there’s no benefit compared to just using the dict.items() method. However, I wanted to show you this because the zip() function is frequently used in Python and it’s important for you to understand it.
Method 6: Basic Loop
The last method uses a basic for loop—not the worst way of doing it! Sure, a Python pro would use the most Pythonic ways I’ve shown you above. But using a basic for loop is sometimes superior—especially if you want to be able to customize the code later (e.g., increasing the complexity of the loop body).
d = {'Alice': 19, 'Bob': 23, 'Carl': 47} # Method 6
t = []
for k, v in d.items(): t.append((k,v))
print(t)
# [('Alice', 19), ('Bob', 23), ('Carl', 47)]
A single-line for loop or list comprehension statement is not the most Pythonic way to convert a dictionary to a Python list if you want to modify each new list element using a more complicated body expression. In this case, a straightforward for loop is your best choice!
To become successful in coding, you need to get out there and solve real problems for real people. That’s how you can become a six-figure earner easily. And that’s how you polish the skills you really need in practice. After all, what’s the use of learning theory that nobody ever needs?
Practice projects is how you sharpen your saw in coding!
Do you want to become a code master by focusing on practical code projects that actually earn you money and solve problems for people?
Then become a Python freelance developer! It’s the best way of approaching the task of improving your Python skills—even if you are a complete beginner.
Problem: Given are two lists l1 and l2. You want to perform either of the following:
1. Boolean Comparison: Compare the lists element-wise and return True if your comparison metric returns True for all pairs of elements, and otherwise False.
2. Difference: Find the difference of elements in the first list but not in the second.
Let’s discuss the most Pythonic ways of accomplishing these problems. We start with five ways to perform the Boolean comparison and look at five ways to perform the simple difference, next.
Boolean Comparison
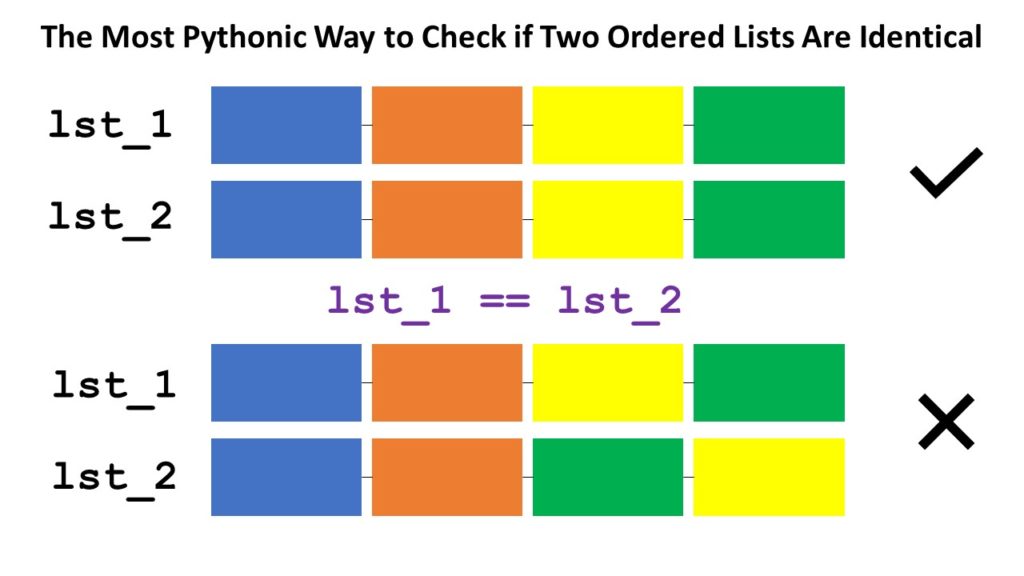
Short answer: The most Pythonic way to check if two ordered lists l1 and l2 are identical, is to use the l1 == l2 operator for element-wise comparison. If all elements are equal and the length of the lists are the same, the return value is True.
Problem: Given are two lists l1 and l2. You want to perform Boolean Comparison: Compare the lists element-wise and return True if your comparison metric returns True for all pairs of elements, and otherwise False.
Let’s discuss the most Pythonic ways of solving this problem. Here’s a quick interactive code overview:
Exercise: Glance over all methods and run the code. What questions come to mind? Do you understand each method?
Read on to learn about each method in detail!
Method 1: Simple Comparison
Not always is the simplest method the best one. But for this particular problem, it is! The equality operator == compares a list element-wise—many Python coders don’t know this!
The following method is what you’d see from a coder coming from another programming language or from a beginner who doesn’t know about the equality operator on lists (see Method 1).
# 2. Simple For Loop
def method_2(l1, l2): for i in range(min(len(l1), len(l2))): if l1[i] != l2[i]: return False return len(l1) == len(l2) l1 = [1, 2, 3, 4, 5]
l2 = [1, 2, 3]
print(method_2(l1, l2))
# False
In the code, you iterate over all indices from 0 to the last position of the smallest list as determined by the part min(len(l1), len(l2)). You then check if both elements at the same position are different. If they are different, i.e., l1[i] != l2[i], you can immediately return False because the lists are also different.
If you went through the whole loop without returning False, the list elements are similar. But one list may still be longer! So, by returning len(l1) == len(l2), you ensure to only return True if (1) all elements are equal and (2) the lists have the same length.
A lot of code to accomplish such a simple thing! Let’s see how a better coder would leverage the zip() function to reduce the complexity of the code.
Method 3: zip() + For Loop
The zip function takes a number of iterables and aggregates them to a single one by combining the i-th values of each iterable into a tuple for every i.
Let’s see how you can use the function to make the previous code more concise:
# 3. Zip + For Loop
def method_3(l1, l2): for x, y in zip(l1, l2): if x != y: return False return len(l1) == len(l2) l1 = [1, 2, 3, 4, 5]
l2 = [1, 2, 3]
print(method_3(l1, l2))
# False
Instead of iterating over indices, you now iterate over pairs of elements (the ones zipped together). If the lists have different sizes, the remaining elements from the longer list will be skipped. This way, element-wise comparison becomes simpler and no elaborate indexing schemes are required. Avoiding indices by means of the zip() function is a more Pythonic way for sure!
You first create an iterable of Boolean values using the generator expression x == y for x, y in zip(l1, l2).
Then, you sum up over the Boolean values (another trick of pro coders) to find the number of elements that are the same and store it in variable num_equal.
Finally, you compare this with the length of both lists. If all three values are the same, both lists have the same elements and their length is the same, too. They are equal!
# 4. Sum + Zip + Len
def method_4(l1, l2): num_equal = sum(x == y for x, y in zip(l1, l2)) return num_equal == len(l1) == len(l2) l1 = [1, 2, 3, 4, 5]
l2 = [1, 2, 3]
print(method_4(l1, l2))
# False print(method_4([1, 2], [1, 2]))
# True
From the methods except the first one using the == operator, this is the most Pythonic way due to the use of efficient Python helper functions like zip(), len(), and sum() and generator expressions to make the code more concise and more readable.
You could also write this in a single line of code!
sum(x == y for x, y in zip(l1, l2)) == len(l1) == len(l2)
# 5. map() + reduce() + len()
from functools import reduce
def method_5(l1, l2): equal = map(lambda x, y: x == y, l1, l2) result = reduce(lambda x, y: x and y, equal) return result and len(l1) == len(l2) l1 = [1, 2, 3, 4, 5]
l2 = [1, 2, 3]
print(method_5(l1, l2))
# False print(method_5([1, 2, 3], [1, 2, 3]))
# True
The map() function combines all pairs of elements to Boolean values (are the two elements equal?). The reduce() function combines all Boolean values performing an and operation. Sure, you can also use the more concise variant using the all() function:
Method 6: map() + all()
This is the same as the previous method—but using the all() function instead of reduce() to combine all Boolean values in a global and operation.
# 6. map() + all()
def method_6(l1, l2): result = all(map(lambda x, y: x == y, l1, l2)) return result and len(l1) == len(l2) l1 = [1, 2, 3, 4, 5]
l2 = [1, 2, 3]
print(method_5(l1, l2))
# False print(method_5([1, 2, 3], [1, 2, 3]))
# True
If you want to learn something new every day, join my free Python email series for continuous improvement in Python and computer science.
Short answer: The most Pythonic way to compute the difference between two lists l1 and l2 is the list comprehension statement [x for x in l1 if x not in set(l2)]. This works even if you have duplicate list entries, it maintains the original list ordering, and it’s efficient due to the constant runtime complexity of the set membership operation.
What’s the best way to compute the difference between two lists in Python?
a = [5, 4, 3, 2, 1]
b = [4, 5, 6, 7] # a - b == [3, 2, 1]
# b - a == [6, 7]
Let’s have an overview in the following interactive code shell:
Exercise: Run the code and think about your preferred way!
Let’s dive into each of the methods to find the most Pythonic one for your particular scenario.
This approach is elegant because it’s readable, efficient, and concise.
However, there are some unique properties to this method which you should be aware of:
The result is a set and not a list. You can convert it back to a list by using the list(...) constructor.
All duplicated list entries are removed in the process because sets cannot have duplicated elements.
The order of the original list is lost because sets do not maintain the ordering of the elements.
If all three properties are acceptable to you, this is by far the most efficient approach as evaluated later in this article!
However, how can you maintain the order of the original list elements while also allow duplicates? Let’s dive into the list comprehension alternative!
Method 2: List Comprehension
List comprehension is a compact way of creating lists. The simple formula is [expression + context].
Expression: What to do with each list element?
Context: What elements to select? The context consists of an arbitrary number of for and if statements.
You can use list comprehension to go over all elements in the first list but ignore them if they are in the second list:
# Method 2: List Comprehension
print([x for x in a if x not in set(b)])
# [3, 2, 1]
We used a small but effective optimization of converting the second list b to a set first. The reason is that checking membership x in b is much faster for sets than for lists. However, semantically, both variants are identical.
Here are the distinctive properties of this approach:
The result of the list comprehension statement is a list.
The order of the original list is maintained.
Duplicate elements are maintained.
If you rely on these more powerful guarantees, use the list comprehension approach because it’s the most Pythonic one.
Method 3: Simple For Loop
Surprisingly, some online tutorials recommend using a nested for loop (e.g., those guys):
# Method 3: Nested For Loop
d = []
for x in a: if x not in b: d.append(x)
print(d)
# [3, 2, 1]
In my opinion, this approach would only be used by absolute beginners or coders who come from other programming languages such as C++ or Java and don’t know essential Python features like list comprehension. You can optimize this method by converting the list b to a set first to accelerate the check if x not in b by a significant margin.
To become successful in coding, you need to get out there and solve real problems for real people. That’s how you can become a six-figure earner easily. And that’s how you polish the skills you really need in practice. After all, what’s the use of learning theory that nobody ever needs?
Practice projects is how you sharpen your saw in coding!
Do you want to become a code master by focusing on practical code projects that actually earn you money and solve problems for people?
Then become a Python freelance developer! It’s the best way of approaching the task of improving your Python skills—even if you are a complete beginner.