Posted on Leave a comment

Creating Toon Water for the Web: Part 2

Welcome back to this three-part series on creating stylized toon water in PlayCanvas using vertex shaders. In Part 1, we covered setting up our environment and water surface. This part will cover applying buoyancy to objects, adding water lines to the surface, and creating the foam lines with the depth buffer around the edges of objects that intersect the surface. 

I made some small changes to my scene to make it look a little nicer. You can customize your scene however you like, but what I did was:

  • Added the lighthouse and the octopus models.
  • Added a ground plane with color #FFA457
  • Added a clear color for the camera of #6CC8FF.
  • Added an ambient color to the scene of #FFC480 (you can find this in the scene settings).

Below is what my starting point now looks like.

The scene now includes an octopus and a ligthouse

Buoyancy 

The most straightforward way to create buoyancy is just to create a script that will push objects up and down. Create a new script called Buoyancy.js and set its initialize to:

Now, in the update, we increment time and rotate the object:

Apply this script to your boat and watch it bobbing up and down in the water! You can apply this script to several objects (including the camera—try it)!

Texturing the Surface

Right now, the only way you can see the waves is by looking at the edges of the water surface. Adding a texture helps make motion on the surface more visible and is a cheap way to simulate reflections and caustics.

You can try to find some caustics texture or make your own. Here’s one I drew in Gimp that you can freely use. Any texture will work as long as it can be tiled seamlessly.

Once you’ve found a texture you like, drag it into your project’s asset window. We need to reference this texture in our Water.js script, so create an attribute for it:

And then assign it in the editor:

The water texture is added to the water script

Now we need to pass it to our shader. Go to Water.js and set a new parameter in the CreateWaterMaterial function:

Now go into Water.frag and declare our new uniform:

We’re almost there. To render the texture onto the plane, we need to know where each pixel is along the mesh. Which means we need to pass some data from the vertex shader to the fragment shader.

Varying Variables

A varying variable allows you to pass data from the vertex shader to the fragment shader. This is the third type of special variable you can have in a shader (the other two being uniform and attribute). It is defined for each vertex and is accessible by each pixel. Since there are a lot more pixels than vertices, the value is interpolated between vertices (this is where the name “varying” comes from—it varies from the values you give it).

To try this out, declare a new variable in Water.vert as a varying:

And then set it to gl_Position after it’s been computed:

Now go back to Water.frag and declare the same variable. There’s no way to get some debug output from within a shader, but we can use color to visually debug. Here’s one way to do this:

The plane should now look black and white, where the line separating them is where ScreenPosition.x is 0. Color values only go from 0 to 1, but the values in ScreenPosition can be outside this range. They get automatically clamped, so if you’re seeing black, that could be 0, or negative.

What we’ve just done is passed the screen position of every vertex to every pixel. You can see that the line separating the black and white sides is always going to be in the center of the screen, regardless of where the surface actually is in the world.

Challenge #1: Create a new varying variable to pass the world position instead of the screen position. Visualize it in the same way as we did above. If the color doesn’t change with the camera, then you’ve done this correctly.

Using UVs 

The UVs are the 2D coordinates for each vertex along the mesh, normalized from 0 to 1. This is exactly what we need to sample the texture onto the plane correctly, and it should already be set up from the previous part.

Declare a new attribute in Water.vert (this name comes from the shader definition in Water.js):

And all we need to do is pass it to the fragment shader, so just create a varying and set it to the attribute:

Now we declare the same varying in the fragment shader. To verify it works, we can visualize it as before, so that Water.frag now looks like:

And you should see a gradient, confirming that we have a value of 0 at one end and 1 at the other. Now, to actually sample our texture, all we have to do is:

And you should see the texture on the surface:

Caustics texture is applied to the water surface

Stylizing the Texture

Instead of just setting the texture as our new color, let’s combine it with the blue we had:

This works because the color of the texture is black (0) everywhere except for the water lines. By adding it, we don’t change the original blue color except for the places where there are lines, where it becomes brighter. 

This isn’t the only way to combine the colors, though.

Challenge #2: Can you combine the colors in a way to get the subtler effect shown below?

Water lines applied to the surface with a more subtle color

Moving the Texture

As a final effect, we want the lines to move along the surface so it doesn’t look so static. To do this, we use the fact that any value given to the texture2D function outside the 0 to 1 range will wrap around (such that 1.5 and 2.5 both become 0.5). So we can increment our position by the time uniform variable we already set up and multiply the position to either increase or decrease the density of the lines in our surface, making our final frag shader look like this:

Foam Lines & the Depth Buffer

Rendering foam lines around objects in water makes it far easier to see how objects are immersed and where they cut the surface. It also makes our water look a lot more believable. To do this, we need to somehow figure out where the edges are on each object, and do this efficiently.

The Trick

What we want is to be able to tell, given a pixel on the surface of the water, whether it’s close to an object. If so, we can color it as foam. There’s no straightforward way to do this (that I know of). So to figure this out, we’re going to use a helpful problem-solving technique: come up with an example we know the answer to, and see if we can generalize it. 

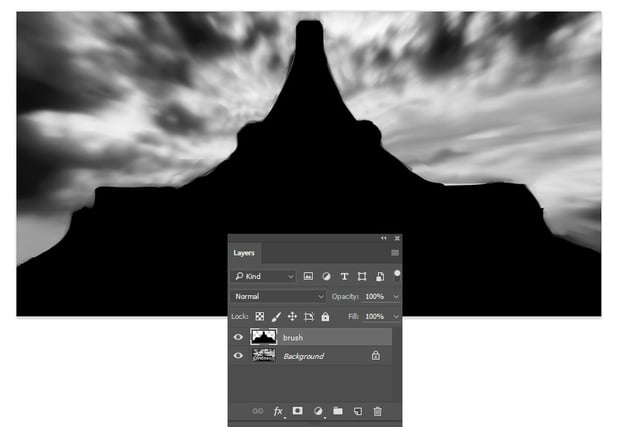
Consider the view below.

Lighthouse in water

Which pixels should be part of the foam? We know it should look something like this:

Lighthouse in water with foam

So let’s think about two specific pixels. I’ve marked two with stars below. The black one is in the foam. The red one is not. How can we tell them apart inside a shader?

Lighthouse in water with two marked pixels

What we know is that even though those two pixels are close together in screen space (both are rendered right on top of the lighthouse body), they’re actually far apart in world space. We can verify this by looking at the same scene from a different angle, as shown below.

Viewing the lighthouse from above

Notice that the red star isn’t on top of the lighthouse body as it appeared, but the black star actually is. We can tell them apart using the distance to the camera, commonly referred to as “depth”, where a depth of 1 means it’s very close to the camera and a depth of 0 means it’s very far.  But it’s not just a matter of the absolute world distance, or depth, to the camera. It’s the depth compared to the pixel behind.

Look back to the first view. Let’s say the lighthouse body has a depth value of 0.5. The black star’s depth would be very close to 0.5. So it and the pixel behind it have similar depth values. The red star, on the other hand, would have a much larger depth, because it would be closer to the camera, say 0.7. And yet the pixel behind it, still on the lighthouse, has a depth value of 0.5, so there’s a bigger difference there.

This is the trick. When the depth of the pixel on the water surface is close enough to the depth of the pixel it’s drawn on top of, we’re pretty close to the edge of something, and we can render it as foam. 

So we need more information than is available in any given pixel. We somehow need to know the depth of the pixel that it’s about to be drawn on top of. This is where the depth buffer comes in.

The Depth Buffer

You can think of a buffer, or a framebuffer, as just an off-screen render target, or a texture. You would want to render off-screen when you’re trying to read data back, a technique that this smoke effect employs.

The depth buffer is a special render target that holds information about the depth values at each pixel. Remember that the value in gl_Position computed in the vertex shader was a screen space value, but it also had a third coordinate, a Z value. This Z value is used to compute the depth which is written to the depth buffer. 

The purpose of the depth buffer is to draw our scene correctly, without the need to sort objects back to front. Every pixel that is about to be drawn first consults the depth buffer. If its depth value is greater than the value in the buffer, it is drawn, and its own value overwrites the one in the buffer. Otherwise, it is discarded (because it means another object is in front of it).

You can actually turn off writing to the depth buffer to see how things would look without it. You can try this in Water.js:

You’ll see how the water will always be rendered on top, even if it is behind opaque objects.

Visualizing the Depth Buffer

Let’s add a way to visualize the depth buffer for debugging purposes. Create a new script called DepthVisualize.js. Attach this to your camera. 

All we have to do to get access to the depth buffer in PlayCanvas is to say:

This will then automatically inject a uniform into all of our shaders that we can use by declaring it as:

Below is a sample script that requests the depth map and renders it on top of our scene. It’s set up for hot-reloading. 

Try copying that in, and comment/uncomment the line this.app.scene.drawCalls.push(this.command); to toggle the depth rendering. It should look something like the image below.

Boat and lighthouse scene rendered as a depth map

Challenge #3: The water surface is not drawn into the depth buffer. The PlayCanvas engine does this intentionally. Can you figure out why? What’s special about the water material? To put it another way, based on our depth checking rules, what would happen if the water pixels did write to the depth buffer?

Hint: There is one line you can change in Water.js that will cause the water to be written to the depth buffer.

Another thing to notice is that I multiply the depth value by 30 in the embedded shader in the initialize function. This is just to be able to see it clearly, because otherwise the range of values are too small to see as shades of color.

Implementing the Trick

The PlayCanvas engine includes a bunch of helper functions to work with depth values, but at the time of writing they aren’t released into production, so we’re just going to set these up ourselves.

Define the following uniforms to Water.frag:

Define these helper functions above the main function:

Pass some information about the camera to the shader in Water.js. Put this where you pass other uniforms like uTime:

Finally, we need the world position for each pixel in our frag shader. We need to get this from the vertex shader. So define a varying in Water.frag:

Define the same varying in Water.vert. Then set it to the distorted position in the vertex shader, so the full code would look like:

Actually Implementing the Trick

Now we’re finally ready to implement the technique described at the beginning of this section. We want to compare the depth of the pixel we’re at to the depth of the pixel behind it. The pixel we’re at comes from the world position, and the pixel behind comes from the screen position. So grab these two depths:

Challenge #4: One of these values will never be greater than the other (assuming depthTest = true). Can you deduce which?

We know the foam is going to be where the distance between these two values is small. So let’s render that difference at each pixel. Put this at the bottom of your shader (and make sure the depth visualization script from the previous section is turned off):

Which should look something like this:

A rendering of the depth difference at each pixel

Which correctly picks out the edges of any object immersed in water in real time! You can of course scale this difference we’re rendering to make the foam look thicker/thinner.

There are now a lot of ways in which you can combine this output with the water surface color to get nice-looking foam lines. You could keep it as a gradient, use it to sample from another texture, or set it to a specific color if the difference is less than or equal to some threshold.

My favorite look is setting it to a color similar to that of the static water lines, so my final main function looks like this:

Summary

We created buoyancy on objects floating in the water, we gave our surface a moving texture to simulate caustics, and we saw how we could use the depth buffer to create dynamic foam lines.

To finish this up, the next and final part will introduce post-process effects and how to use them to create the underwater distortion effect.

Source Code

You can find the finished hosted PlayCanvas project here. A Three.js port is also available in this repository.

Posted on Leave a comment

Interactive Storytelling: Linear Storytelling

In the last article we saw where the need for storytelling comes from, which is something intrinsic to humankind, and we said that telling a story means basically to convey a message in order to obtain a response in our listener. 

We also started to examine the tools that we, as game designers, have available to learn how to tell stories. Finally, we mentioned the birth of interactive stories, typical of videogames. 

However, in order to thoroughly address this issue, we have to take a step back and start analysing the classic narrative (or passive narrative).

Passive Narrative

In the past, storytelling has traditionally been considered as a one-way relationship: the author of a story chooses a medium (book, theatrical play, movie, etc.) and uses it to tell a story that will be passively received by the audience.

But is it really like that?

Leaving aside the fact that in ancient times attempts were made to directly engage the public during theatrical performances (such as in experimental Greek theatre), passive narrative must actually be considered, more correctly, a two-stage narrative.

Because, if it is true that the author tells us a story to convey a message and to generate a response in us, then two different stages must be taken into account: reception and elaboration.

The greek theatre was often experimental
The Greek theatre was often experimental.

Whenever we assist a story, we are passive, it’s true. For example, while watching a movie in the theater, we’re usually sitting in the dark, in silence, ready to just “live” the experience that the director and the authors have prepared for us. This first stage, reception, is one-way: the author tells, we listen. We become receivers of the message from the author.

However, it’s not unusual to go out of the theater and talk about what we just watched, maybe with our friends or our partner. We comment on the movie, discuss our personal opinions (“I liked it”, “I got bored”, etc.), and often elaborate on the scenes, underlining the details we were most impressed by.

Therefore, we analyse the parts of the message from the author that were etched in our brains, the ones that have generated most of a response in us.

It doesn’t matter what kind of movie we just watched; this kind of after reception interaction happens anyway: whether it’s a comedy, drama, documentary or action movie, the second stage, the elaboration one, always happens. Even if we went to the movie by ourselves, we would think about particular scenes and elaborate on them.

The length and intensity of this stage, clearly, can vary depending on how much we liked the movie (that is to say, depending on how much the message from the author managed to create a response in us).

The most famous franchises in the world are the ones that push their fans to wonder and speculate, for example, in between movies, about a character’s origins that haven’t been revealed yet. Thousands of Twitter messages, Facebook groups, YouTube videos, and Reddit threads, for example, have been created by fans after watching Star Wars Episode VII, proposing theories dealing with the mystery of Rey’s parents.

For two years Star Wars fans talked everyday about the Reys character for Episode VII
For two years, Star Wars fans talked every day about Rey’s character for Episode VII

When we develop a passion for a story that excites us, it usually happens that we dedicate ten or a hundred times as much time to the second stage compared to the first one.

Let’s ask ourselves: why does this second stage even exist? Why does reading a book, closing it, putting it on our nightstand and forgetting about it not seem to be enough? Why do we want, instead, be directly involved, letting the suspension of disbelief make us live the responses that the author wants to create in us? And then why do we keep trying to interact with that story, reliving and analysing specific parts?

The keyword here is precisely interaction: it is one of the needs of humankind. Without going into too much detail about a complex field such as the human psyche (a field that, however, is increasingly being studied by game designers and authors of movies and books because it is obviously extremely useful in order to calibrate our messages and get exactly the desired responses), one of the fundamental parts of human personality is the ego. And it’s precisely our ego that makes us want to be in the center of the story, or pushes us to discover some contact points between the characters in a story and ourselves. It’s our ego that lets us relate to the characters and make our reactions to the story we’re being told so powerful that they become able to actually affect our reality.

Without the ego, we wouldn’t be moved by reading a dramatic book.

At the same time, the ego leads us to not want to play just a minor role in the story—that is to say, to be just a passive audience.

Without the ego we wouldnt be moved by reading a dramatic book
Without the ego, we wouldn’t be moved by reading a dramatic book

We want, by instinct, to be at the center of the scene (and let’s say that we are also living in a time in which society and technology push us in this direction). Thus, if we can’t edit the story while it’s being told to us, we wish to interact with it anyway, at a later stage.

One of the first authors who understood this mechanism was David Lynch. Perhaps one of the most important authors of the modern era, he is certainly the father of TV series as we know them today. In 1990, when David Lynch began telling the story of an unknown (and fictional) town in the northern United States, Twin Peaks, he was following a hunch: he created a mystery that engaged viewers all over the world and led them to look for a solution. 

The dreamlike puzzle created by Lynch and Frost (the other author of Twin Peaks) kept viewers glued to that story for two and a half years (and later for 30 solid years, because the fans never gave up on that unsolved mystery until the release of a very long-awaited third season just last year). The story brought viewers to interact among themselves: they shared theories and possible scenarios. For the first time in the history of television, the second stage became actually important and, clearly, contributed to the success of Lynch’s work.

Then how can we call this experience passive if, sometimes, the second stage lasts longer and is more intense than the first one?

Twin Peaks changed forever the way to tell stories on tv
Twin Peaks changed forever the way to tell stories on TV

You’ll agree with me that the definition is inadequate at least. However, it’s true that during the narration the audience is passive: throughout the duration of the transmission of the message from the author, whoever is receiving that message can only passively listen to it. The audience is not able to intervene in the events or shift their focus to minor details that look interesting to them. Furthermore, in the case of media such as cinema and theater, the audience doesn’t even have the chance to choose the narrative rhythm: the message from the author is shown in an unstoppable way, like a river in flood that overwhelms the viewers.

From this point of view, videogames are deeply different, and their interactive narration opens up countless possibilities that, before videogames became an established medium, used to be unthinkable.

The Evolution of Storytelling

It’s interesting to note how, looking at the videogame world, older media have always felt a little bit of envy. The authors of a movie or a TV series are clearly aware of how charming interaction can be for the audience, and they know that, generation after generation, classic storytelling is getting less and less appealing.

In the last 30 years, many attempts have been made to hybridize the classic nature of certain media, and some have been more successful than others.

One of the most famous attempts of this kind is the book series Choose Your Own Adventure: books where the story is made of forks in the road in which the reader/player can make choices and often fight against enemies or use a style of interaction very similar to that of tabletop role-playing games.

In the eighties all nerds like me read dozens of books like that
In the eighties all nerds (like me) read dozens of books like that

Another example is the eighties TV series Captain Power and the Soldiers of the Future that allowed players, using infra-red devices, to fight against the enemies on the screen and score points, and the player’s action figure reacted based on the results.

A legendary tagline
A legendary tagline

A recent example is the interactive episode of Puss in Boots, published on Netflix and designed for tablet: it’s a cartoon for children with choices to make and forks in the road in the story.

The diagram of the Puss in Boots branches on Netflix
The diagram of the Puss in Boots’ branches on Netflix

I’m really curious about what will happen in the future in this respect.

What about you?

Interactive Storytelling

Now that we have looked at traditional (to a certain extent, passive) storytelling, it’s time to go into the very subject of these articles: interactive storytelling.

First of all, let’s try to set things straight: are all games narrative?

To answer, let’s look at a few examples.

Chess is one of the oldest and most popular games in the world. It represents a conflict on a battlefield between two armies and, as many of you will know, chess and go are considered the most strategic games in the world.

However, is let’s simulate a battle enough to define chess as a narrative game?

No.

Because all the elements we highlighted as fundamental to narration are missing: the narrator is missing, and so is the message.

The same goes for videogames.

There are completely abstract games (like Tetris) and games in which storytelling is a simple expedient for the setting of the game. Consider Super Mario Bros, in its first version. There was a basic story (Bowser has kidnapped Princess Peach and Mario must save her). But there’s no actual storytelling, no narrator, no message.

The reason for Super Mario Bros success was certainly not caused by its narrative structure
The reason for the success of Super Mario Bros was certainly not its narrative structure

There are responses, but they are directly provoked by gameplay. In fact, taking away the story from Super Mario Bros doesn’t affect the user experience at all.

The lack of any actual storytelling, however, doesn’t invalidate the quality of the game. On the other hand, adding narration to the structure of the game as it is would probably burden the experience and ruin the perfect balance of the design.

Not for nothing, even though in more modern Super Mario games texts and cut-scenes have appeared, the story keeps working as a mere expedient, as a corollary to the gameplay.

When we as designers, therefore, start approaching the design of a new game, we have to ask ourselves a couple of questions:

  1. Does my story (my message) need interactive storytelling?
  2. How can interactive storytelling improve my story?

Answering these questions in the first place will let us understand if and how to include interactive storytelling in our game.

We may realise that a simple story used as an expedient is enough, or that the game doesn’t need a story at all! The assumption that any modern game should have interactive storytelling is a mistake we have to avoid.

If, instead, the answers are positive, then it’s time to learn how to master the art of interactive storytelling.

Linear Interactive Storytelling

The first kind of interactive storytelling that we are going to consider is the linear one. This definition might, at first sight, appear to be counterintuitive, but it’s actually the most common kind of interactive storytelling.

Videogames using this kind of storytelling allow the player to interact with the events, choosing the narrative rhythm (in the case, for example, of a quest that won’t proceed without the player’s intervention), choosing the order in which to go through the events (for example, when there are two parallel quests active at the same time and the player can decide which one to complete first), or setting the desired level of accuracy (for example, when reading documents and clues in a game is not mandatory but increases the player’s knowledge about the story or the game’s setting).

However, as much as the player feels free, the story is eventually going precisely how the author meant.

It’s as if the game designer had taken his message and split it into many different pieces to be put together by the player.

Developing this kind of interaction is clearly more complicated than classic storytelling: certain tricks of the trade commonly used in book-writing, for example, cannot be used here. 

Consider this game with a linear interactive storytelling (maybe one of the most famous in the world): The Secret of Monkey Island. It allows players, on a number of occasions, to explore the story and interact with it in the order and rhythm they prefer. There are at least two large open sections where players have multiple tasks to do, following their own hunches and preferences.

Probably the first game thanks to which I approached interactive storytelling

A more recent example is The Legend of Zelda: Breath of the Wild, in which the story is told through flashbacks but it is up to the player to decide which parts of the game will be handled first and thus which pieces of the puzzle will be put together first.

Each part of the story, however, had been written in order to coexist without contradicting or hindering each other.

There’s no need to deal with this kind of problem when writing a book.

In order to be sure to create a correct interaction, therefore, a game designer has to use certain tools.

When writing a book, one often takes notes and sketches diagrams. Not all authors, I know, take this approach. Some of them are way more spontaneous: they sit in front of the keyboard and start writing.

But when you’re dealing with interactive storytelling, the spontaneous approach is simply not feasible: outlining the story, using flow charts, creating tables and summaries about every character of the story is the necessary starting point.

All these documents, in fact, will be part of the Game Design Document (GDD), which contains all the elements of the game.

Writing this kind of story, without losing track or making mistakes, is definitely complicated. The more diagrams and notes you’ve got, the more you’ll limit the risk of mistakes.

But it won’t be enough.

When writers finish their work, they will usually hand it to a proofreader who will thoroughly read it and point out mistakes and inconsistencies in the text. Likewise, designers will have to entrust their work to a QA department, made of different people that will check the story and test in a systematic way all cases of interaction—looking for every possible loophole.

Conclusion

And yet… what if we want more? What if we want to give the players the freedom to affect the events and make their experience even more intimate and personal, providing each player with a different response?

In this case we would have to resort to non-linear interactive storytelling that, along with the direct method and the indirect method, will be the subject of the third and last article of this series.

Posted on Leave a comment

Unity Solution for Hitting Moving Targets

Final product image
What You’ll Be Creating

While developing games which involve an action element, we often need to figure out a way to collide with a moving target. Such scenarios can be typically called a ‘hitting a moving target’ problem. This is particularly prominent in tower defense games or missile command like games. We may need to create an AI or algorithm which could figure out the enemy’s motion and fire at it. 

Let’s see how we can solve this particular problem, this time in Unity.

1. The Missile Command Game

For this particular tutorial, we will consider a missile command game. In the game we have a turret on the ground which fires missiles at an incoming asteroid. We should not allow the asteroid to hit the ground. 

The game play is tap-based, where we need to tap to aim the turret. With human assistance, the game mechanics are pretty straightforward as the turret just needs to aim and fire. But imagine if the turret needs to automatically fire at incoming asteroids. 

The Challenges for Auto-Firing AI

The turret needs to find out how many asteroids are approaching the ground. Once it has a set of all approaching asteroids, it would then need to do a threat analysis to determine which one to target. A slow-moving asteroid is a lesser threat than a fast-moving one. Also, an asteroid which is closer to the ground is an imminent threat as well. 

These problems can be solved by comparing the speed and position of the incoming asteroids. Once we have determined which one to target, we reach the most complicated problem. When should the turret fire? At which angle should it fire? When should the missile set to explode after firing? The third question becomes relevant because the missile explosion can also destroy the asteroid and has a bigger radius of effect as well.

To simplify the problem, the turret can decide to fire right away. Then we need to only figure out the angle of firing and distance of detonation. Also, there may be the case where the asteroid has already passed the area where it could be hit, meaning there is no solution!

You should download the unity source provided along with this tutorial to see the solution in action. We will see how we derive that solution.

2. The Solution

We are going to do a little refresher of our high school mathematics in order to find the solution. It is very straightforward and involves solving a quadratic equation. A quadratic equation looks like axˆ2 + bx + c = 0, where x is the variable to be found and it occurs with the highest power of 2. 

Analysing the Problem

Let us try to represent our problem diagrammatically. 

diagram of the incoming asteroid and the predicted path of missile

The green line shows the predicted path to be followed by the asteroid. As we are dealing with uniform motion, the asteroid moves with constant velocity. Our turret will need to rotate and fire the missile along the blue path for it to collide with the asteroid at a future time.

For uniform motion, the distance travelled by an object is the product of time and the object’s speed, i.e. D = T x S, where D stands for the distance, T is the time taken to travel D, and S is the speed of travel. Assuming that our asteroid and the missiles would definitely collide, we can find the distance of the blue line followed by the missile in terms of time t. In the same time t, our asteroid will also reach the same position. 

Essentially, in the same time t, the asteroid will reach the collision position from its current position, and the missile will also reach the same collision position in the same time t. So at time t, both the asteroid and the missile would be at the same distance from the turret as they would be colliding with each other.

Enter Math

We can equate the distance from the turret to the asteroid and missile at this future time t in order to derive our quadratic equation with the variable t. Consider two points on a two-dimensional plane with coordinates (x1,y1) and (x2,y2). The distance D between them can be calculated using the equation below.

If we denote the turret position as (Tx,Ty), the missile speed as s and the unknown collision position as (X,Y), then the above equation can be rewritten as:

where t is the time taken for the missile to travel the distance D. Equating both, we get our first equation for unknowns X and Y with another unknown t.

We know that the asteroid also reaches the same collision spot (X,Y) in the same time t, and we have the following equations using the horizontal and vertical components of the asteroid’s velocity vector. If the velocity of the asteroid can be denoted by (Vx,Vy) and the current position as (Ax,Ay), then the unknown X and Y can be found as below.

Substituting these in the earlier equation gives us a quadratic equation with a single unknown t

Expanding and combining similar terms:

Representing the power of two as ˆ2 and the multiplication symbol as * may have made the above look like hieroglyphics, but it essentially boils down to the final quadratic equation axˆ2 + bx + c = 0, where x is the variable t, a is Vxˆ2 +Vyˆ2 - sˆ2, b is 2* (Vx*(Ax - Tx) + Vy*(Ay - Ty)), and c is (Ay - Ty)ˆ2 + (Ax - Tx)ˆ2. We used the equations below in the derivation.

Solving the Quadratic Equation

To solve a quadratic equation, we need to calculate the discriminant D using the formula:

If the discriminant is less than 0 then there is no solution, if it is 0 then there is a single solution, and if it is a positive number then there are two solutions. Solutions are calculated using the formulas given below.

Using these formulas, we can find values for the future time t when the collision will happen. A negative value for t means we have missed the opportunity to fire. The unknowns X and Y can be found by substituting the value of t in their respective equations.

Once we know the collision point, we can rotate our turret to fire the missile, which would definitely hit the moving asteroid after t secs.

3. Implementing in Unity

For the sample Unity project, I have used the sprite creation feature of the latest Unity version to create the necessary placeholder assets. This can be accessed with Create > Sprites > as shown below.

Implementing in Unity

We have a game script named MissileCmdAI which is attached to the scene camera. It holds the reference to the turret sprite, missile prefab, and asteroid prefab. I am using SimplePool by quill18 to maintain the object pools for missiles and asteroids. It can be found on GitHub. There are component scripts for missile and asteroid which are attached to their prefabs and handle their motion once released.

The Asteroids

Asteroids are randomly spawned at fixed height but random horizontal position and are hurled at a random horizontal position on the ground with a random speed. The frequency of asteroid spawning is controlled using an AnimationCurve. The SpawnAsteroid method in the MissileCmdAI script looks as below:

The Launch method in the Asteroid class is shown below.

As seen in the Update method, once the asteroid has traveled the predetermined distance to ground, deployDistance, it would return to its object pool. Essentially this means it has collided with the ground. It would do the same on the event of collision with the missile.

The Targeting

In order for the auto-targeting to work, we need to call the corresponding method frequently to find and target the incoming asteroid. This is done in the MissileCmdAI script in its Start method.

The FindTarget method loops through all the asteroids present in the scene to find the closest and fastest asteroids. Once found, it then calls the AcquireTargetLock method to apply our calculations.

AcquireTargetLock is where the magic happens as we apply our quadratic equation solving skills to find the time of collision t.

Once we find the point of impact, we can easily calculate the distance for the missile to travel in order to hit the asteroid, which is passed on through the deployDist variable onto the LockOn method of the missile. The missile uses this value to return to its object pool once it has travelled this distance the same way as the asteroid. Before this happens, it would have definitely hit the asteroid, and the collision events would have been triggered.

Conclusion

Once we implement it, the result looks almost magical. By reducing the aiPollTime value, we can make it an invincible AI turret which would shoot down any asteroid unless the asteroid speed becomes close to or higher than our missile speed. The derivation we followed can be used to solve a variety of similar problems which could be represented in the form of a quadratic equation. 

I would like you to experiment further by adding the effect of gravity to the motion of the asteroid and missile. This would change the motion to projectile motion, and the corresponding equations would change. Good luck.

Note also that Unity has an active economy. There are many other products that help you build out your project. The nature of the platform also makes it a great option from which you can better your skills. Whatever the case, you can see what we have available in the Envato Marketplace.

Posted on Leave a comment

Class Design in Games: Beyond RPGs

Classes are
everywhere. Once the domain of RPGs, now class systems have been
pushed into every type of game imaginable. We’re all familiar with the tropes of Warriors and Wizards in high fantasy, but what can we learn about class design from other games?

The first question we need to ask ourselves is, “What exactly is a
class?” The term is pretty loosely defined in gaming, and there are several correct answers. In an RPG like Dungeons &
Dragons, classes are defined by the rulebook and present a list of abilities your character can have access to. 

If you want to be a stealthy assassin or a shapeshifter, you need to choose an appropriate class. The thing
is, there are other choices you can make as well: choosing your race
(elf or dwarf) and background (criminal or noble) which also affect
your gameplay options. What exactly is the difference between race
and class? If your character can breathe fire because they’re a
half-dragon, is that any different from being able to shoot magic
flame from your hands? We really have to look at these things as variations on the class concept.

So when we’re
discussing classes, we’ll be talking about not just standard RPG classes and races, but Starcraft armies, Street Fighter characters, and even Mario Kart vehicles. It might seem odd to lump all of these in
the same box, but they all share something simple: a choice you make outside of the game which determines your gameplay options within the game.

Age of mythology image
Age of Mythology divides its classes into races, and then further as individual gods.

Why Use Classes?

So why even bother with
classes? What do they add to a game? There are a lot of reasons, but
one of the simplest is adding content. More classes = more ways to
play the game = more ways to have fun. When you look at World of
Warcraft, it’s not uncommon to see players with several high-level characters. 

Tails was so popular as an additional character in Sonic that they later added Knuckles, Shadow, Cream, and countless others. Dungeons &
Dragons has a multitude of classes available for players, spread out
throughout optional rulebooks. At an extreme level, some games exist
solely because of their variety of classes—imagine Smash Bros with Mario as the only character. Fighting games are fun
largely because of the way different characters interact, meaning that every matchup has different strategies.

Another reason
classes are useful is because they promote diversity. This is
especially important in competitive multiplayer games, where
(generally speaking) everyone wants to be the best. If you wanted to
make an MMO where players can assign points to their skills, you might think
that the playerbase would create a range of different character types. What inevitably
happens, though, as shown over and over by MMOs like Ultima Online, is that players gravitate towards “best
builds”. 

Generally, a small selection of players who are
experienced at the game will do the math and post optimal builds, and
everyone else will just copy that. This “copy others” attitude isn’t unique to MMOs (Magic: The Gathering players have debated for some time the pros and cons of “netdecking”), and any game where you can choose your skills will have at least some discussion on best builds.

Of course, creating classes
doesn’t stop the issue—World of Warcraft, despite having multiple classes, has plenty of build discussion—but it at least creates a little bit of
variety. Instead of having a single “generic tank build”, you might
have a choice of playing a warrior tank, paladin tank, or druid
tank. 

And lastly, it
reduces the gap between skilled and unskilled players. Being a new
player to a game can already be frustrating when everyone is better
than you, but if everyone is also using better characters then it
can feel doubly frustrating. New players might feel as if they are
being punished for their lack of knowledge,
whereas pro players might spend their time trying to find abusive
build combinations. 

New players also run the risk of “doing it wrong” by spending points on useless skills—the idea of “noob traps” is something we’ve discussed before. By forcing players into predesigned classes, you refocus the game back onto the gameplay, and away from character building.

So are there any
problems with classes? Well, obviously it can be a massive time investment. But from a design perspective, there’s really just one issue: class systems limit a player’s ability to experiment with fun builds or create specific ideas. Players love to be creative, and limiting that creativeness can limit the amount of fun to be had. 

For highly competitive games, it can be argued that “design your own” systems are an extremely dangerous idea, as all it takes is one overpowered combination to ruin the whole thing. But for some games, character creation is what makes the game fun in the first place.

Impossible Creatures image
Impossible Creatures, an RTS where players can fuse creatures together to create their own armies and engage in Mad Scientist combat. 

So, assuming we do want to add classes, how do we go about designing them? Well, it’s such an expansive concept that even if we limited ourselves to a
particular genre, we could write a novel and still only scratch the surface. So let’s focus instead on some general common issues that apply across the board.

Strict vs. Loose Class Design

The word “class” means
many things, so let’s introduce a new concept: the idea of strict and
loose classes.

  • A strict class is
    one that defines a player’s available skillset.
  • A loose class gives more limited powers or bonuses to certain playstyles.

Generally speaking,
the more complex a system is, the more likely it is to be
strict.

In Diablo 3, players can choose from classes like Barbarian, Monk, and Wizard. These classes have special abilities, and those abilities define what the character can do. Only the Monks have Cyclone Strike, and only Wizards have Hydra. The classes gain specific skills at specific levels, and can never learn skills from other classes. Diablo 3 is very firmly a strict system.

Compare to a game like Desktop Dungeons, which is a loose system. When a player chooses a class, it simply gives that player a minor advantage: Berserkers have 50% magic resistance. Priests deal double damage to undead. A Berserker can still do all the things a Priest does, but is better (or worse) in certain situations.

Obviously, there is no clear distinction between “strict” and “loose”, and there will be games which can be argued to be in either camp. Vampire: The Masquerade allows players to choose a clan, and although each clan has unique powers, these powers do not define the character and the game otherwise operates like a standard point-buy system. 

But what of other genres? Well, Hearthstone allows players to choose a class,
and this gives them a class ability they can use in game, such as producing minions or
drawing extra cards. Since this ability only gives a minor advantage in game, it counts as a “loose” class advantage.

However, Hearthstone also has
class cards which can only be used by certain classes. Cards like
Backstab or Sap are Rogue-only cards, but are theoretically useful
for every class. This limiting of cards means Hearthstone is “strict” class design, as every class will have a variety of options unavailable to other players.

So why does this all matter? Well, the stricter a game is, the more pronounced the
benefits of a class system are (as discussed above in “why use classes”). More variety between classes, fewer “noob traps”,
more fun for players. Additionally, strict design allows you to
create incredibly flavourful classes. In Hearthstone, playing
a priest feels like playing a priest (or at least, as close as you can
get in a card game). Each of the classes feels distinct, and this
distinctness allows the player to play the game in a variety of
different ways (hopefully finding one suitable to their playstyle).

The downside is, of
course, the same downside mentioned above—that the player is
limited to the playstyles defined by the developers. It doesn’t
really allow for exploration beyond that. And because each class has
a certain playstyle, there are times when you’re going to know how
the game will play out before the first move is made or card is
drawn. 

This can be pleasant (if you’re winning), or frustrating (if
not). If you struggle to beat rogues and continually get matched
against them, the game can become unfun very quickly. Depending on
what playstyles or meta is popular at the time, it might
mean playing a string of games against not just the same class, but
the same deck or character build—which can be pretty
underwhelming.

Mechanical design is
just one aspect of character creation, however. We need to ask what players want from their games, and there are several answers. For most new players, they’re not thinking about the mechanics behind each class—most often, they want to play the cool soul-stealing ninja, or the alien that eats face. This side of character design, which includes things like backstory and visual design, is often referred to as “fluff” or “flavour”. It’s an important part of the design process, but it’s enough of a topic by itself that we’ll have to leave it for another time.

The other question players most often ask is, “Well, what does it do?” Sometimes the answer is obvious, sometimes less so—but generally, the player will be trying to find a class which allows them to play the game in the way they want.

South Park Stick of Truth image
South Park’s “Jew” Class is a non-standard class with powerful lategame abilities.

Fulfilling a Role

Generally speaking, the purpose of a class is to allow the player to play the game in a way that they enjoy. Not everyone enjoys playing magic classes, so it’s important not to force players into roles they don’t enjoy. Of course, for multiplayer games, some players will be pressured into playing certain roles, but generally speaking players will play whatever is the most fun.

In certain games (like MMOs), the ability to fill a role becomes doubly important. If your party is planning to fight the Dragon Emperor, then you probably need to have a strategy. Typically, tank/damage/healer roles are primary, with other roles such as controller, leader, tracker and so forth dependent on the game. 

Because available party slots are generally limited, it’s important that your team is able to get the most out of its available party slots—all healer parties tend to do poorly. Players will want to choose roles that complement each other to maximise their chances of success, and this means giving the players the option to choose classes that they enjoy and feel are useful to the team.

Regardless of the game style, you want to create classes that allow for an enjoyable gameplay experience. The classes you design will determine how the game is played. If all your characters are swordsmen, then gameplay is going to be focused on close quarters fighting. If you add a single sniper to the game, then suddenly the whole dynamic changes—environment and cover suddenly become more important, and rushing around in the open is no longer a viable tactic. 

You need to understand what you want from your game, and the roles and abilities you have should promote that gameplay style. If you don’t want a role being fulfilled, then simply don’t add it to your game. Don’t like the idea of healers slowing down gameplay? Remove them. It’s your game, so there’s no reason you have to stick to “traditional” design roles.

Despite many games using the traditional tank/dealer/healer design, there are plenty of reasons to avoid it. The most obvious is that if you design your game around those classes as a central idea, anything which does not fit into those criteria is bad. Imagine a Warrior, Rogue and Cleric being joined by a Banker or Farmer. There’s no reason that players shouldn’t be allowed to play those alternative classes, but the chances are they have no place within the “holy trinity” framework. Classes not only have to be balanced with each other, but within the game itself.

Balancing the Classes

Sometimes, however, we can get obsessed with concepts like balance—making sure every class is fair to use. While for some games this is necessary, it’s not necessary for every single game. Bad classes can provide extra challenge, or a balancing factor for experienced players. The Binding of Isaac’s “The Lost” can fly, but dies in one hit. Street Fighter’s “Dan Hibiki” is a popular joke character. These “bad classes” are simply more options for players who choose to challenge themselves. Additionally, if every class is perfectly balanced, then what does it matter which one you choose? 

We should also ask what we’re balancing for. Do we balance based on win rates? Or how they compare for 1 on 1 combat? Some games, MMOs in particular, struggle to keep characters balanced between the PVE and PVP elements. In the Binding of Isaac, damage is often considered a “god stat” for characters—not only is it incredibly handy to be able to one-shot everything in sight, but the game rewards fast play with secret bosses and going unhurt with “devil items”, powerful items that serve to snowball a good character even further. The slower, tankier characters like Magdalene look fine on paper, but simply can’t compete with the bonuses that high-damage characters get. Whereas The Lost is an interesting character because of intentional difficulty, Magdalene is simply a boring character.

Binding of Isaac image
The Lost, one of the many characters from The Binding of Isaac.

League of Legends embraces this and uses an idea called “perfect imbalance” to keep gameplay fresh. The game is incredibly complex, and trying to balance over 130 characters is basically an impossible skill. Not only do the designers have to contend with how the characters interact, but every time a small change is made it could theoretically throw everything out of balance again. 

They try to ensure that no single character is overpowered, but there are plenty of “bad characters”—and due to the evolving of the game, sometimes characters which are seen as bad suddenly become viable. The complexity and ever-changing nature of the game mean that players are constantly forced to re-evaluate the best strategies, ensuring that gameplay is never “solved”.

“Solving” is a problem for many games. When you look at classes, sometimes you can put down all the abilities on paper and work out what exactly each class is capable of. What this means is that in team games, classes are often judged by a single metric: how much damage you can output, how quickly you can heal, or how quickly you can race to the end. Your character has one job, and the best character for that job is whoever has the highest numbers. This raises an interesting question: is it better to have a class that is exceptional at just one task, or to have a class that can do everything satisfactorily? 

Specialisation vs. Flexibility

When we create a
class, we should generally have a rough idea of what we want from it.
In an MMO, the perfect tank is basically a granite boulder—something
that will just sit there and soak up damage while the rest of the
team throws flaming death. This creates a sort of “arms race”
which means the most specialised characters are (almost always) the
best ones for the jobs.

The problem with
this is that if one character is the best at the job, every other
character is (by default) not the best—and why would you
intentionally play a bad character? This is a problem for MMOs who
are trying to juggle balancing dozens of character classes. Why play
a rogue if mages have better DPS? 

Imagine making a game, similar to Civilization, wherein you try to take over the world. You can achieve victory through political, military, or cultural might. You can also choose a race, and each race has a benefit: elves are better at politics, orcs are good at military, and so forth. Why would a military fan ever choose anything other than orcs? Also, if you’re playing against orcs, why would you invest into political defence? The specialisation of the races restricts your playstyle and forces you into certain options.

Civ 6 image
The races in Civilization IV encourage players to use certain tactics without forcing them down any particular avenue.

This is the biggest problem with specialised classes. If
specialisation is doing one thing well, then it means not doing
anything else. If choice is a core component of gameplay, then
doing the same thing over and over again is bad design. This is a
problem many games face, and it’s a problem especially with regards to
healing classes
.

So what’s the
solution? As we discussed in the healing article, you need to
make sure the player has a range of options available during the
game. It’s one of the most fundamental aspects of game design: keep
the player engaged. If the player doesn’t have to make any choices for their actions, then they’re not engaged, and that’s when things become boring.

So when you make your class, make sure they’re able to participate in the game at all
times. If you’re designing an RPG, make sure the classes all have
skills for both inside and outside of combat, rather than creating a “skill-monkey” character. If you’re
designing a game with multiple paths to victory, try to make sure each race has the option of winning in different ways. 

Allow players to adapt to the flow of the game, and if they realise they need to change tactics, allow them. The more specialised a class or race is, the more likely it
can only do one thing, and the more likely it is to get stuck doing that thing over and over again. Choice is important.

Soft and Hard
Counters

Players like to win. In a competitive, class-based game, players will generally choose the best class. Best is often subjective—it depends on the player’s skill, playstyle, the map, and even recent gameplay changes. For most players, “what is best” is really just “whatever beats your opponent”. 

For some games, this means trying to anticipate what your opponent is going to play. For CCGs like Magic and Hearthstone, players talk about “the meta“—what the most popular decks are and what cards your opponents are likely to be running. A player might choose to play a deck specifically to beat the meta, running cards that shut down certain decks. In magic, some deck archetypes can be entirely shut down by a single card, meaning that playing the meta can be an effective way to win.

In other games, players take turns “drafting” their characters. Knowing what your opponent has chosen means that the ability to choose a counter becomes especially important. The tactic of trying to pick
a character or class specifically to beat your opponents is known as
counterpicking.

Having counters in
games is generally a positive mechanic. It allows a certain amount of
self-balancing from the players themselves, as any player who uses an
overpowered class can expect to hit a higher share of
counter-classes. The existence of a meta-game allows players to discuss
the best tactics, the best counters to those tactics, and the best
way to play in the current environment.

The question is then
to what extent counters should be effective. Generally, counters
fall into the category of “soft counters” and “hard counters”.

Soft counters are
classes that have a slight bonus against certain character types. High mobility characters are generally a soft counter to snipers—although the sniper can win, they need to be skillful or lucky to stand a chance.

Team Fortress 2 image
Team Fortress 2s “Meet the Spy”. Some would argue whether the Spy is a soft or hard counter to the sniper, although it largely depends on the player’s skill and general awareness. 

Hard counters are
classes which completely obliterate another class with little to no
effort. Spearmen are often given as a hard counter to cavalry charges—although the cavalry could win, it’s more than likely not going to happen. The best answer here is to call in some archers.

So are soft counters or hard counters better for your game? Well, obviously it depends on what you’re aiming for, but for nearly every game out there the answer is simple: soft counters are better.

The reason for this
is simple: hard counters deny counterplay. Having a more difficult game
due to a counterpick is fine: being unable to do anything at all is bad.
Soft counters can generally be worked around, but hard counters leave
no room for creativity or tactical moves.

So can a hard counter
ever be acceptable design? Yes, under two scenarios:

  1. The player is
    able to change class midgame, allowing them to counter the counter.
  2. The player is
    part of a larger team and is able to “offload” the problem onto
    someone else.

That’s not to say
that hard counters are acceptable in these situations, but the
problem is less pronounced. The player still has some sort of choice available, and may be able to “avoid” the issue.

Boiling It All Down

So what can we take
away from all this? Really, class design isn’t all that complicated.
It comes down to a single idea:

Let the player play
the game in a way that they enjoy.

That’s it—the great
secret to class design. It doesn’t matter what sort of game you’re making, all that matters is that the players are having fun. 

The very essence of class design is, as we’ve said so many times, about choice. It’s about the player choosing to play something they enjoy, about being given meaningful choices throughout the game, and about how those choices interact with the challenges they face, be it enemy AI or other players.

And because new games often contain a world of information, it allows players to make choices more meaningful. A new player might be overwhelmed looking at 100 different statistics, but if you give them just a handful of choices—ask them which class they want to play—they can answer that easily. They don’t need to worry what the correct number of points to spend on vitality is; they simply pick a class and get stuck in.

Your class gives
players additional ways of playing your game, and in a way each class
is like making an entirely new game. As long as your class doesn’t stop other people having fun, it’s probably fine.

And remember, at the
end of the day, each game is different. There is no “correct” in game design, and there are no doubt many successful games that break some (or all) of these rules. Just try to consider them when designing your game, and don’t be afraid to break the mould and try something different. All of this is aimed at one simple idea: make your game fun.

Posted on Leave a comment

Creating a Simple 3D Physics Game Using Three.js and Physijs

Final product image
What You’ll Be Creating

In this tutorial, you’ll learn how to use Physi.js to add game physics to a 3D scene created using Three.js. We’ll create a simple game in which we drive a cart around collecting items, using basic physics shapes and physics constraints.

This tutorial will be building on top of the concepts shared in my previous Three.js tutorial. I would request you to read it if you are new to Three.js and to its 3D scene creation. 

Due to a technical limitation in hosting web worker based solutions on JSFiddle, we are unable to embed the interactive game in this tutorial page. Please use the provided source code to check out the working example on any cloud-based IDEs or by self-hosting.

1. 3D Physics on the Web

There are multiple frameworks and engines currently available which can be used to create 3D content for the web with physics. Some of those worth mentioning are Turbulenz, BabylonJS, PlayCanvas, and the obvious Unity WebGL build. But when it comes to popularity and ease of use, most people like to use Three.js for their experiments. As Three.js is a rendering engine and does not have integrated physics, we need to explore additional frameworks to add the physics capability.

A very popular JavaScript physics solution is Ammo.js, which is a direct port of Bullet physics. While directly using Ammo.js is possible, it is not very beginner friendly and has a lot of boilerplate code for each aspect. Also, as it is not manually written but ported using Emscripten, the code is not easy to understand. 

An alternative solution is to use Cannon.js or Physijs. The interesting thing with Physijs is that the focus is always on making things easier, which makes it the ideal choice for beginners. It is built based on Ammo.js and even has a Cannon.js branch. This tutorial uses Physijs and Three.js to build a working game prototype with physics capabilities. 

Yet another option, although oversimplified, would be to use the Whitestorm framework, which is a component-based framework based on Three.js and Physijs. 

2. Setting Up Physijs

We need to have the ammo.js, physi.js, physijs_worker.js and three.js files within our folder structure or coding environment to use Physijs. Physijs uses a web worker to use different threads for physics calculations. So the first step in the integration process is to set up the web worker as below.

At this point, the setup is complete, and we can start using the physics framework. Physijs has made sure that it followed the coding style of Three.js, and most of the concepts are simple replacements of the corresponding Three.js concept.

Basic Steps

Instead of THREE.Scene, we need to use Physijs.Scene.

There are multiple meshes available in Physijs which need to be used in place of THREE.Mesh. The available options are PlaneMesh, BoxMesh, SphereMesh, CylinderMesh, ConeMesh, CapsuleMesh, ConvexMesh, ConcaveMesh, and HeighfieldMesh.

We need to call the scene.simulate method to do the physics calculations either in the render method or within frequent intervals. Let me remind you that the physics calculations happen in a different thread and will not be in sync or as fast as the scene render loop. 

Even the next call to scene.simulate may happen while the previous calculations are still running. In order to make it properly in sync with the physics calculations, we could use the Physijs scene’s update event.

In order to register a collision on a Physijs mesh object named arbitrarily as cube, we can listen to the collision event.

Within the above method, this will refer to cube, while objCollidedWith is the object cube has collided with.

3. Example Game Prototype

For this tutorial, we will be creating a very simple physics-based game where we will use physics constraints to create a vehicle. The player can use arrow keys to drive the vehicle and collect a bouncing ball which randomly appears in the play area. 

Interestingly, Physijs already has a special vehicle feature which can be directly used for creating vehicles, but we won’t be using it.

The Game World

Our game world is a vast ground with walls on its four sides as below.

ground with walls

We use Physijs.BoxMesh for the ground and the four walls as shown in the code below.

Notice the usage of Physijs.createMaterial to create the necessary physics materials by passing a friction value and a restitution value. The friction value determines the grip on the ground, and the restitution value determines the bounciness. One important thing to note is that when we provide a mass value of 0, we create a stationary mesh object.

The Vehicle

We are going to create a special vehicle which has two connected parts. The front part, which has three wheels, acts as the engine, and the rear part, having two wheels, will act as a carriage. The carriage part is connected to the engine part using a hinge joint implemented using a Physijs.HingeContraint

The wheels use Physijs.DOFConstraint, which is a degree of freedom constraint to be attached to the vehicle’s body while retaining the ability to rotate independently. I would invite you to read the official documentation on the various constraints available in Physijs.

The engine body and carriage body are simple BoxMesh objects like the ground shown above, but with a definite mass value. They are connected to each other using a hinge joint, as shown in the following code. A hinge joint restricts the motion of the connected object like that of a normal door.

The second part of the code applies limits to the rotation of the hinge, which in this case is between -Math.PI/3 and Math.PI/3

The wheels use a degree of freedom constraint which can be used to set limits on both linear motion and angular motion in all three axes. A method addWheel is created for adding wheels, which takes in multiple parameters. 

The parameters are the position of the wheel, the weight of the wheel, whether the wheel is big or small, and the wheel reference object. The method returns a newly created DOFConstraint, which is used for driving the vehicle.

The big wheels need to be attached to the carriage, and the small wheels are attached to the engine. The wheels are given a damping value so that their angular velocity gets reduced when no external force is being applied. This makes sure that the vehicle slows down when we release the accelerator. 

We will explore the driving logic in a later section. Each wheel mesh along with the car meshes are assigned the name of cart for identification purposes during the collision call back. Each wheel constraint has different angular limits, which are set independently once they are created. For example, here is the code for the front middle wheel of the engine, car.wheel_fm, and the corresponding constraint, car.wheel_fm_constraint.

The Ball

The ball is a Physijs.SphereMesh object with a lower mass value of 20. We use the releaseBall method to position the ball randomly within our game area whenever it gets collected. 

One thing worth noticing is the fact that we need to override the position values set by the physics simulation in order to reposition our ball. For this, we use the __dirtyPosition flag, which makes sure that the new position is used for further physics simulation.

The ball gets collected when it collides with any part of the vehicle which happens in the onCollision listener method.

Driving the Vehicle

We add event listeners for the onkeydown and onkeyup events of the document, where we determine the keyCode to set the values of the corresponding wheel constraints. The theory is that the single front wheel of the engine controls the turning of our vehicle, and the two wheels on the rear of the engine control the acceleration and deceleration. The wheels on the carriage do not play any part in the driving.

The DOFConstraint uses the enableAngularMotor method to apply angular velocity on the wheel which turns the wheel based on the axis value provided as a parameter. Basically, we only turn the wheels, and the motion of the vehicle happens due to the frictional response of the ground, as in the real world.

the completed game

We are unable to embed the working game in this page as mentioned at the start of the tutorial. Please go through the complete source to understand how everything is wired together.

Conclusion

This is a very simple introduction to implementing physics in your Three.js 3D world. The Physijs documentation is sorely lacking, but there are many examples already available which are worth looking into. Physijs is a very beginner-friendly framework, like Three.js, when you consider the complexity that is present under the hood. 

JavaScript is clearly popular for game development as well as web development. It’s not without its learning curves, and there are plenty of frameworks and libraries to keep you busy, as well. If you’re looking for additional resources to study or to use in your work, check out what we have available in the Envato marketplace.

Hope this tutorial helps you get started in exploring the interesting world of 3D web game physics.

Posted on Leave a comment

Blender For beginners: Game Asset Creation

Blender logo

Blender for Beginners: Game Asset Creation

Aimed at beginners – or people who are new to Blender – this 5 hour video course will bring you all the way from learning to navigate in Blender to importing your own game asset in a popular game engine. In 8 well organized sections with 51 short videos you will get a complete introduction to Blender and how to create game assets.

Link:

https://cloud.blender.org/p/game-asset-creation/56041550044a2a00d0d7e069