In this article, you’ll learn how to print the contents of a List without surrounding brackets in Python.
To make it more fun, we have the following running scenario:
You are a student and need to memorize the first 10 elements in the Periodic Table. This data is currently saved in a List format. However, you would prefer it to display without brackets to remove any distractions.
Question: How would we write Python code to print a List without brackets?
We can accomplish this task by one of the following options:
This method uses join() to access each element of the List passed. Then print() lets join() know which separator to concatenate (append) to each element. The result is a String.
This code declares a List of the first 10 element names of the Periodic Table and saves them to periodic_els.
Next, join() passes periodic_els as an argument and accesses each element, adding the appropriate separator character(s) as indicated in the print statement (' / ').
Finally, the output is sent to the terminal as a String data type.
Output
H / He / Li / Be / B / C / N / O / F / Ne
If we modified the print statement to have a comma (',') as a separator, the output would be as follows:
If periodic_els contained integers instead of strings, it would need to be converted to a String data type first. Then, join() and map() are used to output the contents without brackets.
This code declares a List of the first 10 elements in the Periodic Table and saves them to periodic_els.
Next, periodic_els is converted to a String, and the iterable map() object is accessed. Then, each element is evaluated, and a separator character (‘, ‘) is placed between each element and concatenated.
Finally, the output is sent to the terminal as a String data type.
Output
1, 2, 3, 4, 5, 6, 7, 8, 9,10
Bonus: Strip quote characters from Method 3
This section expands on Method 3, where the resultant output contained quote characters (') surrounding each element. This can easily be removed by running the following code.
Data cleaning describes the process of turning messy data into clean datasets that can be used for research and data science purposes. For example, tidy data will be in a wide format: every column contains a variable, and every row contains one case. Also, data cleaning means getting rid of corrupt data with very little utility.
Most data in the real world is messy and unstructured or semi-structured. Working in data science, most of your time will be spent on cleaning and structuring data.
In research, data from surveys or experiments is mostly already structured into Excel or CSV tables.
In companies, data can be stored in databases, Excel files, or distributed all over the company. This data can be in emails, documents, folders, images, and note apps.
This study shows, that most companies are having problems handling unstructured or semi-structured data, and almost half of them don’t even know where their data is located.
Unstructured data includes videos, images, and text or speech messages. Unstructured data from the web is mainly acquired by web scraping.
Semi-structured data is data found in documents, emails, social media posts, and if acquired from the web, it can be in HTML, JSON, or any other web format.
Is Web Scraping Legal?
Important: Even though web scraping is possible does not mean it is always legal!
If the data is publicly available and not copyrighted, it is mostly safe to scrape. But also pay attention to data privacy laws and do not scrape personal data.
Scraping data from social media websites, for example, is mostly illegal, as it is not publicly available without logging in and contains personal data.
There are also many services to get data via an API. To be safe, refer to this guide about what is legal when web scraping:
The goal of data cleaning and cleaning unstructured or semi-structured data is to create tidy data with which you can work. Tidy data will be in a wide format: every column contains a variable, and every row contains one case.
To demonstrate both perspectives, this article is divided into two parts:
First, we will scrape, load, and wrangle some semi-structured data from the web.
Second, we will clean this data. This second step is also valid for structured data as it is about finding missing, outliers and duplicates.
I recommend doing an exploratory data analysis before or during cleaning data to get a good feeling of the data you have. You can easily combine exploring and cleaning.
import pandas as pd # pandas for data wrangling, cleaning, and analysis
import requests # for http requests
from bs4 import BeautifulSoup # html reading
The wiki page that holds the table we are looking for can be found here:
We pass this URL into requests. The table in the HTML page is within <table class> , and the tables in wiki pages are called wiki tables. We can check this by looking at the HTML page in our browser or the HTML text file later to confirm we pulled the right table.
With requests.get(url).text, we pull the HTML from the page.
BeautifulSoup will pull the data table from the HTML file and save us time. We will pass the url_response from our request into the html.parser. With soup.find() we can tell it to look exactly for the wikitable. The output also tells us the name of the table.
I will drop the columns of the metropolitan area and the urban area because I am just interested in the population of the actual city. This can be done in several ways.
The heading looks clean. Now we explore the dataset to find information to clean.
With df.info() and df.describe() we get a quick overview of the data we scraped.
cities.info()
Output:
cities.describe()
Output:
It is immediately clear that the city_density/km2 is not a float even though it is supposed to be numerical.
Inspecting the data frame, you might have already noticed that the columns contain numbers following numbers in brackets, like [12]. This turns this data into an object, so we will have to get rid of this.
However, this would not work if some of our data points do not have the brackets at the end or more than that. So we’ll use the slicing method str.partition() to cut the brackets from our numbers.
First, we make sure our object type is a string that we can work string operations on. Then we apply the str.partition() method and advise the function to cut off at the first bracket [.
The commas in the variable will prevent us from converting the string into a float, so we’ll remove the comma with str.replace() before turning the string to a float with s.astype('float') and assigning it back to our data frame.
The variable now shows up when we look at df.describe() and we’ll want the results rounded for better readability:
cities.describe().round(1)
Output:
Cleaning Structured Data in Python
Following the cleaning of the scraped data we can now use it like a structured data frame with data we collected or downloaded.
This also can be cleaned of missing data, outliers and duplicates but does not always need data wrangling. However, with a data frame with many strings the cleaning process also often involves a lot of string manipulation.
Important note:
If you want to apply machine learning algorithms to your data, do split your dataset before feature engineering and data transformation as this can create data leakage!
There didn’t seem to be duplicates in our df, as the size remained the same.
When dealing with missing values, we must decide how to handle them based on our data.
We can either
Drop missing values
Replace or impute the values
Leave missing values in the dataset
Transform the information that they’re missing into a new variable
First, we inspect our missing data. The function df.isnull() is a boolean function, that tells us for the whole data frame if data is missing or not.
We can sum it up to determine, how many values are missing in each column.
cities.isnull().sum()
Output:
We can drop rows with missing values completely.
This will cause us to lose useful information in other columns. But as the first row is completely empty anyway, we can drop this one.
The df.dropna() function has useful features that help us pick what missing data we want to remove. So, I just want to remove the one row, or all of them if there are more, with all missing values.
cities = cities.dropna(how='all')
This will look like this:
What is left are the missing values for 8 cities for population, area and density. We will replace those.
Of course, you can look up the data on Wikipedia and reinsert them. For the sake of the exercise and because most of the time it is not possible to look up missing data, we will not do this.
The dataset now contains the data of the 73 biggest cities in the world, using the average of these to impute the missing values in the other 8 is the only and closest guess we have. This does not create much more information but keeps us from losing other information from these 8 cities.
The alternative option would be to drop those 8 cities completely.
So, we’ll replace the missing values in the area column with the average area size of all the other cities. First, we create the mean of the city area sizes, then we fill the missing values in the column with this value.
Pandas has the right function for this: df.fillna()
We can check back our missing values and the description of our dataset.
cities.isnull().sum()
cities.describe().round(1)
There is still one value missing in our city definition. Let’s have a look at these categories.
cities['city_definition'].value_counts()
Output:
As we don’t know if the missing city is a municipality or a capital, we could just replace the missing value with the generic description of “city”, as we know they all are cities.
If you’d want to calculate the differences between these categories, it would be useful to categorize and merge these single entries into bigger categories.
For now, we will just replace the missing value with “city”, as I am more interested in the size of the cities than the category.
Info: For many statistical operations, missing values will be dropped by default and don’t create a problem. For machine learning algorithms missing values must be removed before modelling.
We can also create dummy variables (information is missing/ not missing) as the fact that the data is missing might be useful information. This way, the fact that they’re missing can be included in the data analysis process.
Visualization
Now we visualize our data and check for outliers with a seaborn scatterplot.
import seaborn as sns
sns.scatterplot(data=cities, x="city_population", y="city_area_km2", size="city_population")
Output:
The city in the right top corner is clearly an outlier, but not one we would want to remove or equalize as it is not a measurement error. It is just the biggest city (or metropolitan area) in the world!
Let’s find out which one it is with df.sort_values(), using ascending=False to sort the city population from high to low.
In this article, you’ll learn how to check a List for Duplicates in Python.
To make it more fun, we have the following running scenario:
The Finxter Academy has given you an extensive list of usernames. Somewhere along the line, duplicate entries were added. They need you to check if their Listcontains duplicates. For testing purposes, a small sampling of this List is used.
Question: How would we write Python code to check a List for duplicate elements?
We can accomplish this task by one of the following options:
Method 1: Use set() and List to return a Duplicate-FreeList
Method 2: Use set(), For loop and List to return a List of Duplicates found.
Method 3: Use a For loop to return Duplicates and Counts
Method 4: Use any() to check for Duplicates and return a Boolean
Method 1: Use set() and List to return a Duplicate-Free List
This method uses set()which removes any duplicate values (set(users)) to produce a Duplicate-Freeset(). This set is then converted to a List (list(set(users))).
This code declares a small sampling of Finxter usernames and saves them to users.
Next, set() is called and users is passed as an argument to the same. Then, the new set is converted to a List and saved to dup_free.
If dup_free was output to the terminal before converting to a List, the result would be a set(), which is not subscriptable. Meaning the elements are inaccessible in this format.
Note: An empty set will result if no argument is passed.
Method 2: Use set(), For loop, and List to return a List of Duplicates Found
This method uses set(), and a For loop to check for and return any Duplicates found (set(x for x in users if ((x in tmp) or tmp.add(x)))) to dups. The set() is then converted to a List (print(list(dups))).
Here’s an example:
users = ['AmyP', 'ollie3', 'shoeguy', 'kyliek', 'ollie3', 'stewieboy', 'csealker', 'shoeguy', 'cdriver', 'kyliek'] tmp = set()
dups = set(x for x in users if (x in tmp or tmp.add(x)))
print(list(dups))
This code declares a small sampling of Finxter usernames and saves them to users.
Next, a new empty set, tmp is declared. A For loop is then instantiated to check each element in users for duplicates. If a duplicate is found, it is appended to tmp. The results save to dups as a set().
Output
In this example, the set() was converted to a List and displays a List of Duplicates values found in the original List, users.
['kyliek', 'ollie3', 'shoeguy']
Method 3: Use a For loop to return Duplicates and Counts
This method uses a For loop to navigate through and check each element of users while keeping track of all usernames and the number of times they appear. A Dictionary of Duplicates, including the Usernames and Counts returns.
Here’s an example:
count = {}
dup_count = {}
for i in users: if i not in count: count[i] = 1 else: count[i] += 1 dup_count[i] = count[i]
print(dup_count)
This code declares two (2) empty sets, count and dup_count respectively.
A For loop is instantiated to loop through each element of users and does the following:
If the element i is not in count, then the count element (count[i]=1) is set to one (1).
If element i is found in count, it falls to else where one (1) is added to count (count[i]+=1) and then added to dup_count (dup_count[i]=count[i])
This code repeats until the end of users has been reached.
At this point, a Dictionary containing the Duplicates, and the number of times they appear displays.
Output
{'ollie3': 2, 'shoeguy': 2, 'kyliek': 2}
Method 4: Use Any to Check for Duplicate Values
This example uses any(), and passes the iterableusers to iterate and locate Duplicates. If found, True returns. Otherwise, False returns. Best used on small Lists.
users = ['AmyP', 'ollie3', 'shoeguy', 'kyliek', 'ollie3', 'stewieboy', 'csealker', 'shoeguy', 'cdriver', 'kyliek'] dups = any(users.count(x) > 1 for x in users)
print(dups)
This code declares a small sampling of Finxter usernames and saves them to users.
Next, any() is called and loops through each element of users checking to see if the element is a duplicate. If found, True is assigned. Otherwise, Falseis assigned. The result saves to dups and the output displays as follows:
Output
True
Method 5: Use List Comprehension to return a List of all Duplicates
This method uses List Comprehension to loop through users, checking for duplicates. If found, the Duplicates are appended to dups.
Here’s an example:
users = ['AmyP', 'ollie3', 'shoeguy', 'kyliek', 'ollie3', 'stewieboy', 'csealker', 'shoeguy', 'cdriver', 'kyliek'] dups = [x for x in users if users.count(x) >= 2]
print(dups)
This code declares a small sampling of Finxter usernames and saves them to users.
Next, List Comprehension extracts and displays duplicate usernames and save them to a List. The duplicate values are output to the terminal
Before we learn about the money, let’s get this question out of the way:
What is a Database Engineer?
A database engineer is responsible for providing the data infrastructure of a company or organization. This involves designing, creating, installing, configuring, debugging, optimizing, securing, and managing databases. Database engineers can either work as employees or as freelancers remotely or onsite.
What Does a Database Engineer Do?
As already indicated, a database engineer is responsible for providing the data infrastructure of a company or organization.
In particular, a database engineer has many responsibilities, such as the following 15 most popular activities performed by a database engineer today:
Creating a new database system.
Finding a database system tailored to the needs of an organization.
Designing the data models.
Accessing the data with scripting languages including SQL-like syntax.
Installing an existing database software system onsite.
Configuring a database system.
Optimizing a database management system for performance, speed, or reliability.
Consulting management regarding data management issues.
Keeping databases secure and providing proper access control to users.
Monitoring and managing an existing database system to keep it running smoothly.
Debugging potential bugs, errors, and security issues detected at runtime.
Testing and deploying a database system on a public cloud infrastructure such as AWS.
Handling distribution issues in the case of a distributed database management system.
Ensuring budget adherence when running on a public cloud and estimating costs for private database solutions.
Communicating and negotiating with salespeople (e.g., from Oracle).
These are only some of the most common activities frequently handled by database engineers.
Database Engineer vs Data Engineer
A database engineer is responsible for providing the data infrastructure of a company or organization. This involves designing, creating, installing, configuring, debugging, optimizing, securing, and managing databases. Database engineers can either work as employees or as freelancers remotely or onsite.
A data engineer prepares data to be used in data analytics and operations, essentially providing automated or semi-automated ways for data collection and creating pipelines that connect various data sources to database management systems such as the ones managed by a database engineer.
A data engineer focuses on filling data into a database system whereas a database engineer is focused on providing the database system in the first place. There are intersection points between data engineers and database engineers at the interface between data sources and data management.
Database Engineer vs Database Administrator
Database administrators perform a similar role to database engineers in that they are responsible for setting up, installing, configuring, securing, and managing a database management system.
The focus is more on the technical maintenance of existing systems than the theoretical development of new solutions.
But the lines between those two job descriptions are blurry and often overlap significantly.
Annual Income of Database Engineer (US)
How much does a Database Engineer make per year?
Question: How much does a Database Engineer in the US make per year?
Figure: Average Income of a Database Engineer in the US by Source. [1]
The average annual income of a Database Engineer in the United States is between $72,536 and $135,000, with an average of $103,652 and a statistical median of $106,589 per year.
This data is based on our meta-study of ten (10) salary aggregators sources such as Glassdoor, ZipRecruiter, and PayScale.
If you decide to go the route as a freelance Database Developer, you can expect to make between $30 and $130 per hour on Upwork (source). Assuming an annual workload of 2000 hours, you can expect to make between $60,000 and $260,000 per year.
Note: Do you want to create your own thriving coding business online? Feel free to check out our freelance developer course — the world’s #1 best-selling freelance developer course that specifically shows you how to succeed on Upwork and Fiverr!
But don’t wait too long to acquire practical experience!
Even if you have little skills, it’s best to get started as a freelance developer and learn as you work on real projects for clients — earning income as you learn and gaining motivation through real-world feedback.
Tip: An excellent start to turbo-charge your freelancing career (earning more in less time) is our Finxter Freelancer Course. The goal of the course is to pay for itself!
Related Video
You can find more job descriptions for coders, programmers, and computer scientists in our detailed overview guide:
The following statistic shows the self-reported income from 9,649 US-based professional developers (source).
The average annual income of professional developers in the US is between $70,000 and $177,500 for various programming languages.
Question: What is your current total compensation (salary, bonuses, and perks, before taxes and deductions)? Please enter a whole number in the box below, without any punctuation. If you are paid hourly, please estimate an equivalent weekly, monthly, or yearly salary. (source)
The following statistic compares the self-reported income from 46,693 professional programmers as conducted by StackOverflow.
The average annual income of professional developers worldwide (US and non-US) is between $33,000 and $95,000 for various programming languages.
Here’s a screenshot of a more detailed overview of each programming language considered in the report:
Here’s what different database professionals earn:
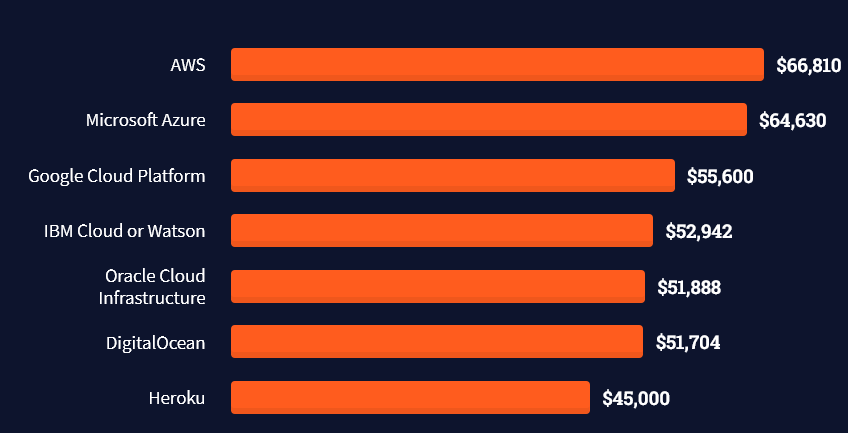
Here’s an overview of different cloud solutions experts:
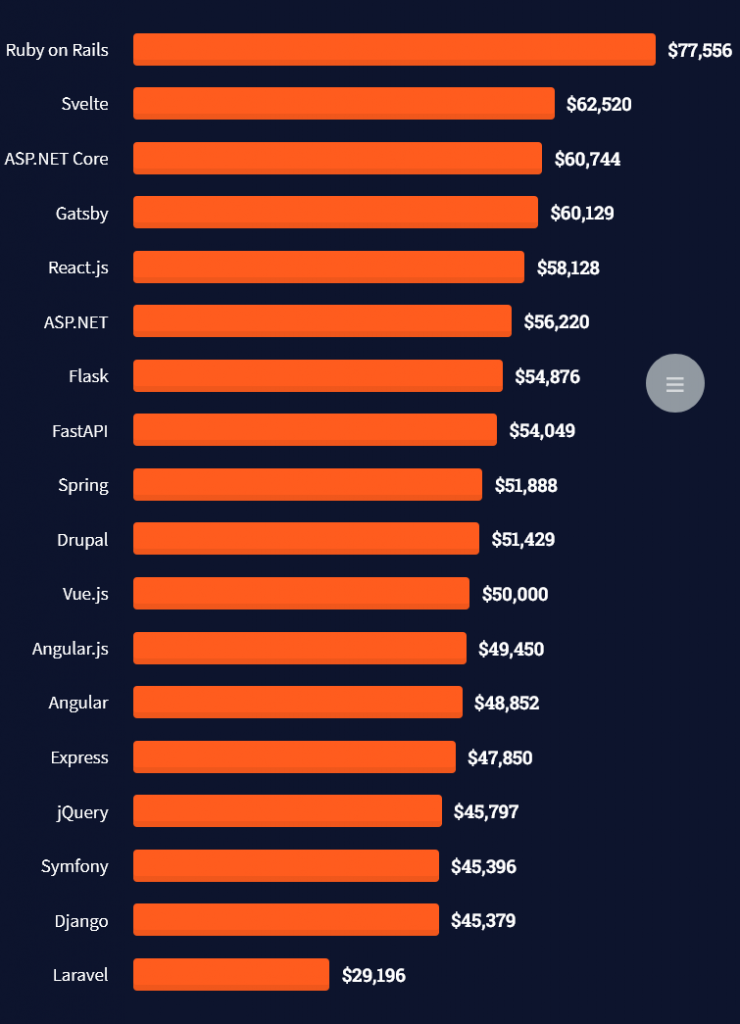
Here’s what professionals in web frameworks earn:
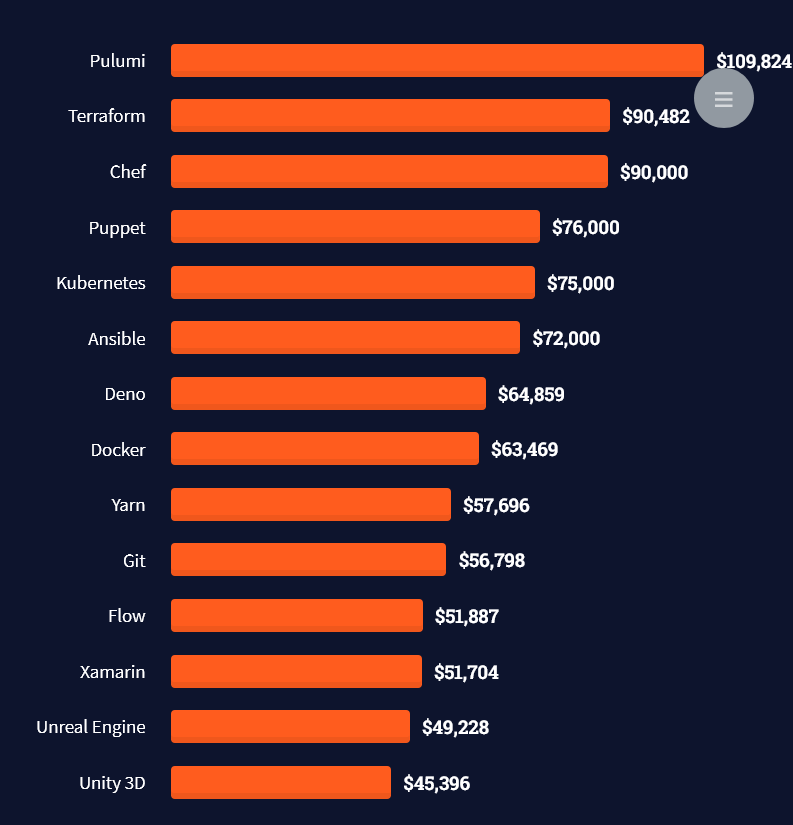
There are many other interesting frameworks—that pay well!
Look at those tools:
Okay, but what do you need to do to get there? What are the skill requirements and qualifications to make you become a professional developer in the area you desire?
Let’s find out next!
General Qualifications of Professionals
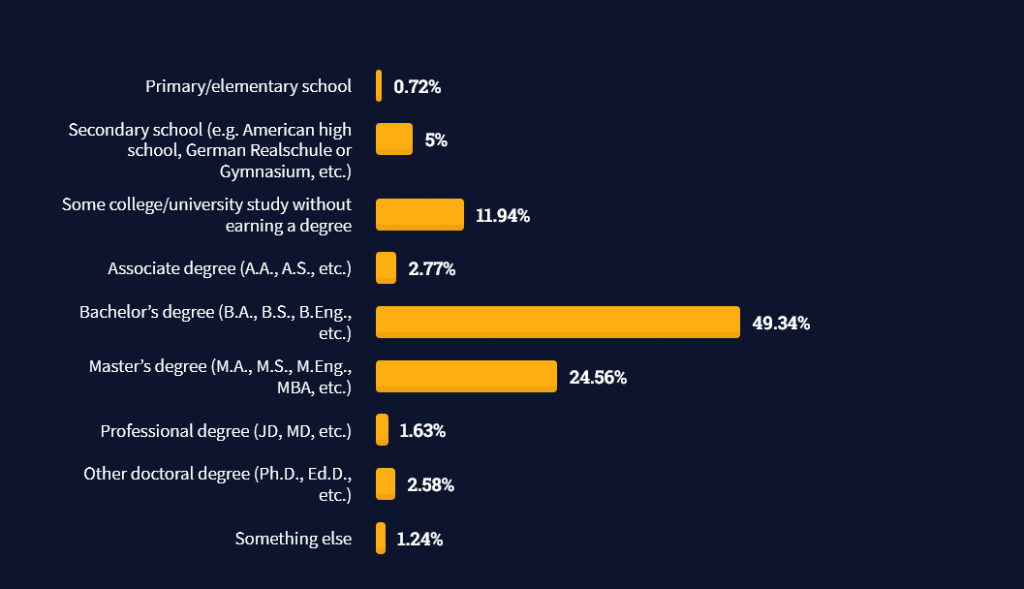
StackOverflow performs an annual survey asking professionals, coders, developers, researchers, and engineers various questions about their background and job satisfaction on their website.
Interestingly, when aggregating the data of the developers’ educational background, a good three quarters have an academic background.
Here’s the question asked by StackOverflow (source):
Which of the following best describes the highest level of formal education that you’ve completed?
However, if you don’t have a formal degree, don’t fear! Many of the respondents with degrees don’t have a degree in their field—so it may not be of much value for their coding careers anyways.
Also, about one out of four don’t have a formal degree and still succeeds in their field! You certainly don’t need a degree if you’re committed to your own success!
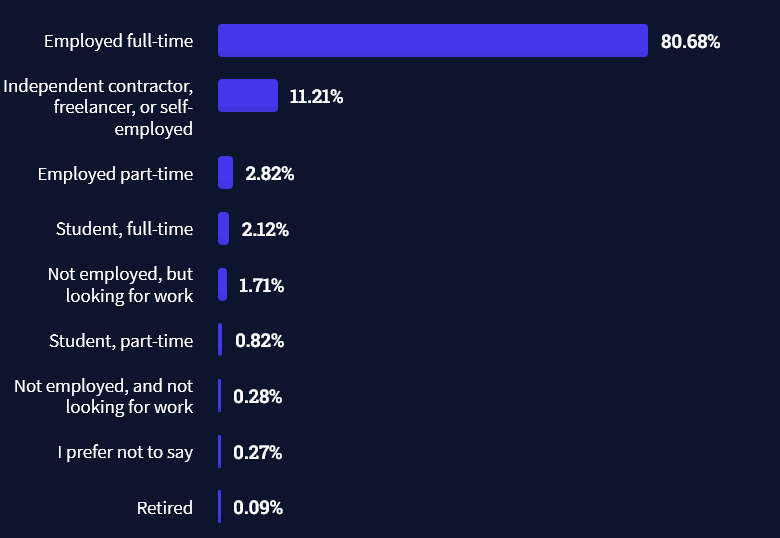
Freelancing vs Employment Status
The percentage of freelance developers increases steadily. The fraction of freelance developers has already reached 11.21%!
This indicates that more and more work will be done in a more flexible work environment—and fewer and fewer companies and clients want to hire inflexible talent.
Here are the stats from the StackOverflow developer survey (source):
Do you want to become a professional freelance developer and earn some money on the side or as your primary source of income?
Resource: Check out our freelance developer course—it’s the best freelance developer course in the world with the highest student success rate in the industry!
Other Programming Languages Used by Professional Developers
The StackOverflow developer survey collected 58000 responses about the following question (source):
Which programming, scripting, and markup languages have you done extensive development work in over the past year, and which do you want to work in over the next year?
These are the languages you want to focus on when starting out as a coder:
And don’t worry—if you feel stuck or struggle with a nasty bug. We all go through it. Here’s what SO survey respondents and professional developers do when they’re stuck:
What do you do when you get stuck on a problem? Select all that apply. (source)
Related Tutorials
To get started with some of the fundamentals and industry concepts, feel free to check out these articles:
Coders get paid six figures and more because they can solve problems more effectively using machine intelligence and automation.
To become more successful in coding, solve more real problems for real people. That’s how you polish the skills you really need in practice. After all, what’s the use of learning theory that nobody ever needs?
You build high-value coding skills by working on practical coding projects!
Do you want to stop learning with toy projects and focus on practical code projects that earn you money and solve real problems for people?
If your answer is YES!, consider becoming a Python freelance developer! It’s the best way of approaching the task of improving your Python skills—even if you are a complete beginner.
If you just want to learn about the freelancing opportunity, feel free to watch my free webinar “How to Build Your High-Income Skill Python” and learn how I grew my coding business online and how you can, too—from the comfort of your own home.
Question: Say you have an expression you want to execute using the exec() function. How to store the result of the expression in a Python variable my_result?
Before I show you the solution, let’s quickly recap the exec() function:
Recap Python exec()
Python’s exec() function executes the Python code you pass as a string or executable object argument.
This is called dynamic execution because, in contrast to normal static Python code, you can generate code and execute it at runtime.
This way, you can run programmatically-created Python code.
Without further ado, let’s learn how you can store the result of the exec() function in a Python variable:
Method 1: Define Variable in String Representation of Code
You can define a variable inside the exec() function that will then be added to the global namespace. Thus, you can access the defined variable in your code after the termination of the exec() expression!
Here’s how that works in a minimal example:
exec('my_result = 40 + 2')
print(my_result)
# 42
Variable my_result is only defined in the string expression passed into exec(). You can use it in the code like it was part of the original source code.
Method 2: How to Replace Value of a Variable in exec()
To replace a variable defined outside the exec() function call, you can simply do so using an f-string and pass the new value as the right-hand side of the assignment operator within the string representation of the code to be executed.
Here’s a minimal example where we overwrite the old_variable with the new string 'hello finxter' by using the expression:
Method 3: How to Replace Global Variable in exec()?
If you use the previous approach to replace a global variable defined outside the exec() expression that is called in a local context, the assignment operator will work on a local alias variable.
The global variable to be replaced will remain the same!
This can be seen in the following code example, where the global old_variable is not replaced with the new string 'hello finxter' because of the local scope of the function f that creates its own namespace with its own old_variable that overshadows the global old_variable.
old_variable = 'hello world'
new_string = 'hello finxter' def f(): # Replace old_old variable with new string 'hello finxter' exec(f'old_variable = "{new_string}"') f() print(old_variable)
# hello world
To overwrite a global variable within the exec() function, use the global keyword, followed by an empty space, the name of the global variable, a semicolon; to close the statement, and the expression to overwrite the global variable like so: exec(f'global old_variable; old_variable = "{new_string}"')
Let’s redirect the standard output and print directly to the variable!
This method assumes you have a print() statement within the expression passed into the exec() function such as shown in the following three examples:
exec('print(2+2)')
exec('print([1, 2, 3, 4] + [5, 6])')
exec('print(2+2*0)')
To get the output and store it in a variable my_result, you need to temporarily redirect the standard output to the variable.
The following code shows you how to accomplish exactly this:
# Step 1: Import libraries StringIO and sys
from io import StringIO
import sys # Step 2: Keep stdout in temporary variable
tmp = sys.stdout # Step 3: Capture standard output using a StringIO object
my_result = StringIO() # Step 4: Assign Standard Output Stream to StringIO object
sys.stdout = my_result # Step 5: Print to the standard output
expression = 'print(2+2)' # any exec() expression here
exec(expression) # Step 6: Clean up by redirecting stdout to Python shell
sys.stdout = tmp # Step 7: Get and print the string from stdout
print('VARIABLE:', my_result.getvalue())
# VARIABLE: 4
If you need some assistance understanding this whole idea of redirecting the standard output, have a look at our in-depth guide on the Finxter blog.
Note that this approach even works if you don’t have a print() statement in the original exec() expression because you can always artificially add the print() statement around the original expression like so:
Even if it’s a bit clunky, after applying this short trick, you can redirect the standard output and store the result of anyexec() expression in a variable.
Coders get paid six figures and more because they can solve problems more effectively using machine intelligence and automation.
To become more successful in coding, solve more real problems for real people. That’s how you polish the skills you really need in practice. After all, what’s the use of learning theory that nobody ever needs?
You build high-value coding skills by working on practical coding projects!
Do you want to stop learning with toy projects and focus on practical code projects that earn you money and solve real problems for people?
If your answer is YES!, consider becoming a Python freelance developer! It’s the best way of approaching the task of improving your Python skills—even if you are a complete beginner.
If you just want to learn about the freelancing opportunity, feel free to watch my free webinar “How to Build Your High-Income Skill Python” and learn how I grew my coding business online and how you can, too—from the comfort of your own home.
Question: Say you have an expression you want to execute using the eval() function. How to store the result of the expression in a Python variable my_result?
Before I show you the solution, let’s quickly recap the eval() function:
Recap Python eval()
Python eval(s) parses the string argument s into a Python expression, runs it, and returns the result of the expression.
Without further ado, let’s learn how you can store the result of the eval() function in a Python variable:
Method 1: Simple Assignment
The most straightforward way to store the result of an eval() expression in a Python variable is to assign the whole return value to the variable. For example, the expression my_result = eval('2+2') stores the result 4 in the variable my_result.
Here’s a minimal example:
my_result = eval('2+2')
print(my_result)
# 4
This simple approach may not always work, for example, if you have a print() statement in the expression.
Read on to learn how to fix this issue next and learn something new!
Method 2: Redirect Standard Output
This method assumes you have a print() statement within the expression passed into the eval() function such as shown in the following three examples:
eval('print(2+2)')
eval('print([1, 2, 3, 4] + [5, 6])')
eval('print(2+2*0)')
To get the output and store it in a variable my_result, you need to temporarily redirect the standard output to the variable.
The following code shows you how to accomplish exactly this:
# Step 1: Import libraries StringIO and sys
from io import StringIO
import sys # Step 2: Keep stdout in temporary variable
tmp = sys.stdout # Step 3: Capture standard output using a StringIO object
my_result = StringIO() # Step 4: Assign Standard Output Stream to StringIO object
sys.stdout = my_result # Step 5: Print to the standard output
expression = 'print(2+2)' # any eval() expression here
eval(expression) # Step 6: Clean up by redirecting stdout to Python shell
sys.stdout = tmp # Step 7: Get and print the string from stdout
print('VARIABLE:', my_result.getvalue())
# hello world
If you need some assistance understanding this whole idea of redirecting the standard output, have a look at our in-depth guide on the Finxter blog.
Note that this approach even works if you don’t have a print() statement in the original eval() expression because you can always artificially add the print() statement around the original expression like so:
Even if it’s a bit clunky, after applying this short trick, you can redirect the standard output and store the result of anyeval() expression in a variable.
Method 3: Use exec()
Using only Python’s eval() function, you cannot define variables inside the expression to be evaluated. However, you can define a variable inside the exec() function that will then be added to the global namespace. Thus, you can access the defined variable in your code after termination of the exec() expression!
Here’s how that works in a minimal example:
exec('my_result = 40 + 2')
print(my_result)
# 42
Variable my_result is only defined in the string expression passed into exec(), but you can use it in the code like it was part of the original source code.
Recap exec() vs eval()
Python’s exec() function takes a Python program, as a string or executable object, and runs it. The eval() function evaluates an expression and returns the result of this expression. There are two main differences:
exec() can execute all Python source code, whereas eval() can only evaluate expressions.
exec() always returns None, whereas eval() returns the result of the evaluated expression.
exec() can import modules, whereas eval() cannot.
You can learn more about the exec() function here:
Coders get paid six figures and more because they can solve problems more effectively using machine intelligence and automation.
To become more successful in coding, solve more real problems for real people. That’s how you polish the skills you really need in practice. After all, what’s the use of learning theory that nobody ever needs?
You build high-value coding skills by working on practical coding projects!
Do you want to stop learning with toy projects and focus on practical code projects that earn you money and solve real problems for people?
If your answer is YES!, consider becoming a Python freelance developer! It’s the best way of approaching the task of improving your Python skills—even if you are a complete beginner.
If you just want to learn about the freelancing opportunity, feel free to watch my free webinar “How to Build Your High-Income Skill Python” and learn how I grew my coding business online and how you can, too—from the comfort of your own home.
Question: How to redirect the standard output in Python and store it as a string in a variable?
This article will guide you through seven easy steps to solve this problem. As an overview, here’s the code in eight lines that stores the standard output in a variable my_result:
from io import StringIO
import sys
tmp = sys.stdout
my_result = StringIO()
sys.stdout = my_result
print('hello world') # output stored in my_result
sys.stdout = tmp
print(result.getvalue())
Let’s go over those steps one by one—we’ll examine the full code for copy&paste at the end of this article, so read on!
Step 1: Import libraries StringIO and sys
Import the two libraries StringIO and sys to access the standard output and store the string input-output stream.
from io import StringIO import sys
Both modules are part of the standard library, so there is no need to install them with pip!
Step 2: Keep stdout in temporary variable
We’ll overwrite the standard output to catch everything written to it. In order to reset your code to the normal state, we need to capture the original standard output stream by introducing a temporary variable.
tmp = sys.stdout
Step 3: Capture standard output using a StringIO object
Create a variable and assign a StringIO object to the variable to capture the standard output stream.
my_result = StringIO()
Now, this object can store everything printed to the standard output. But we have to connect it first to the stdout!
Step 4: Assign Standard Output Stream to StringIO object
Assign the StringIO object created in the previous step to the standard output that is captured with sys.stdout.
sys.stdout = my_result
Step 5: Print to the standard output
From this point onwards, anything that is printed using the print() statement by any function you call in your Python script is written in the StringIO object referred to by variable my_result.
The following exemplifies the print('hello world') statement but you can do anything here:
print('hello world')
Note: No output appears on the screen anymore because the standard output is now redirected to the variable.
Step 6: Clean up by redirecting stdout to Python shell
Are you ready with capturing the output in the variable? Clean up by redirecting the standard output stream from the variable to the screen again.
sys.stdout = tmp
Step 7: Get and print the string from stdout
At this point, your string from the standard output is stored in the StringIO object in the my_result variable. You can access it using the StringIO.getvalue() method.
print(result.getvalue())
Full Code
Here’s the full code snippet for ease of copy&paste:
Challenge: Get the size of the above image with PIL or any other Python library.
Method 1: Using img.size
Approach: To get the size of the image: ➢ open it up by calling the PIL function Image.open('image file path'). ➢ Then use the PIL property image.size on the opened image. This returns a tuple containing the width and height of the image in pixels. ➢ Unpack the tuple in two different variables to store the width and height individually.
Instead of using the img.size property, you can use the img.width and img.height properties to store/display the height and width of the image separately.
Here’s the code that demonstrates how you can use the width and height properties of the PIL library.
TRIVIA: PIL(Python Imaging Library) is a Python library that is used for image processing. It supports numerous image formats which include “jpeg”, “png”, “ppm”, “tiff”, “bmp”, “gif”, etc. It is an extremely useful library that provides a plethora of image editing capabilities like getting the size of an image, cropping an image, etc. The Image module of the PIL library is used to represent the PIL images.
To install the PIL, execute the following command in your terminal: pip install pillow
Method 2: Get Image Size Using Open-CV
Approach: To get the size of an image using OpenCV: ➢ Load the image from the specified path by calling OpenCV function imread('file_path'). ➢ Use the .shape property on this image. This returns a tuple consisting of the height, width in pixels, and the number of channels of the image. ➢ Unpack these values individually in three different variables and display the output accordingly.
pygame 2.1.2 (SDL 2.0.18, Python 3.9.10)
Hello from the pygame community. https://www.pygame.org/contribute.html
width: 640
height: 426
TRIVIA: pygame is a Python wrapper for the SDL library (Simple DirectMedia Layer). SDL allows cross-platform access to the system’s underlying multimedia hardware components, such as video, sound, keyboard, mouse, and joystick. Since both SDL and pygame facilitate us with a cross-platform nature, we can write game programs and create rich multimedia Python programs for almost every platform that is supported by them.
To install pygame, use the following pip command on your terminal: pip install pygame
▣ How to Get Image Size in Bytes?
Previously, we found out the size of the image, that is, the image dimensions (width and height). However, you may also need to find out the file size in bytes to decide how to use the image file. Hence, let us dive into the methods that will help us to find the image size in bytes.
Approach: Call the os.stat() method on the image file and then use the st_size property upon this image to get its size in bytes.
Code:
import os
print(os.stat('image.jpg').st_size) # 48297
◩ Using os.path.getsize
Approach:os.path.getsize() is a method of the os module that is used to get the size of a specified path. Pass the image path to this function to get the size of the image file in bytes.
Code:
import os
print(os.path.getsize('image.jpg')) # 48297
◩ Using PIL
Approach: Call the PIL function Image.open() to open the image and then use the len() method to find its length after reading the image.
Code:
from PIL import Image
img = Image.open('image.jpg')
print("File Size In Bytes:- "+str(len(img.fp.read())))
Bonus: Get the Size of an Image by Loading Image from an URL
The following code demonstrates how you can load an image from an URL and then get its size.
Code:
import requests
from PIL import Image
from io import BytesIO
header = {'User-Agent': 'Mozilla/5.0 (X11; CrOS x86_64 14588.98.0) AppleWebKit/537.36 (KHTML, like Gecko) ' 'Chrome/101.0.4951.59 Safari/537.36'}
res = requests.get("https://blog.finxter.com/wp-content/uploads/2022/05/sample_img.png", headers=header)
# create image from binary content
img = Image.open(BytesIO(res.content))
width, height = img.size
print(f'width:{width}, height:{height}')
Output:
width:867, height:489
Conclusion
We successfully unearthed the answer to numerous questions, including how to use different libraries to find the image size – dimensions as well as the size in bytes. I hope this tutorial helped you. Please subscribe and stay tuned for more interesting tutorials.
One of the most sought-after skills on Fiverr and Upwork is web scraping. Make no mistake: extracting data programmatically from websites is a critical life skill in today’s world that’s shaped by the web and remote work.
So, do you want to master the art of web scraping using Python’s BeautifulSoup?
If the answer is yes – this course will take you from beginner to expert in Web Scraping.
You can change your text to bold, italic, and underlined in Python. Not only can you play around with the style of your code but also change its color with the help of specific packages and modules in Python.
Interesting! Isn’t it?
There are different ways of doing this. By the end of this tutorial, you will be equipped with all the instruments to play around with the style of your code.
Problem Formulation: Given a string. How to print the string as underlined text in Python?
Method 1: Enclosing String in ANSI Escape Sequence ‘\x1B[3m’ and ‘\x1B[0m’
The most straightforward way to print underlined text in Python is to enclose a given string text in the special ANSI escape sequence like so: print("\x1B[4m" + text + "\x1B[0m").
Here’s a minimal example:
# Print Underlined Text
text = "abc"
underlined_text = "\x1B[4m" + text + "\x1B[0m"
print(underlined_text)
print(text)
You can try this yourself in our interactive Jupyter notebook:
Note that this escape sequence will not work in all editors and IDEs. For example, I made it work in Jupyter Notebooks but not in my IDLE shell.
Let’s dive into some further explanations to see why this works next.
Some terminals support the capacity to pass in unique escape sequences to modify the tone, color, and appearance of the content being printed.
These escape sequences are called ANSI escape sequences that got named after the ANSI standard that indicates their use.
Thus, you can utilize the built-in ANSI escape sequence to make the content or a specific text bold, underlined, italic, and even colored. To print the underlined text in Python using the ANSI escape sequence, we use: '\x1B[4m' + text + '\x1B[0m'.
'\x1B[4m' makes it underlined
'\x1B[1m' makes it bold
'\x1B[1;4m' makes it bold and underlined
'\x1B[0m' is the closing tag
So, you can chain together multiple text formatting specifiers by separating them with a semicolon. This is shown in the following example where the text is made bold and underlined:
Method 2: Make Text Bold and Underlined with Escape Sequence
Example 1: Escape-Sequence to print bold and underlined text for WindowsUsers
You may have to call the os.system() module if you are using a Windows OS to make the ANSI escape sequence work properly.
import os
os.system("color")
To make text bold and underlined, you can enclose the text in the escape sequence '\033[1;4m' and '\033[0m'.
'\x1B[1m' makes it bold
'\x1B[4m' makes it underlined
'\x1B[1;4m' makes it bold and underlined
'\x1B[0m' is the closing tag
# Print Bold and Underlined Text
print('\033[1;4m' + 'This text is bold and underlined' + '\033[0m')
Output:
NOTE: The code '\033[0m' is used to end the bold and underlined text format. If you forget to add the ANSI code sequence to enclose the specific line of code, the following statements will also be printed in underlined format because you didn’t close the formatted special text.
Method 3: Using The simple_color Package
This is one of the easiest methods to print underlined text in Python. The simple_colors package includes many colors like blue, black, green, magenta, red, yellow, and cyan.
You can also format your text in various styles like bold, dim, italic, bright, underlined, reverse and blink that are included in the package.
Since the simple_color package isn’t a part of Python’s standard library; you need to install it before utilizing it. To install the simple_color package, copy the following code on your terminal:
pip install simple-colors
or,
python -m pip install simple-colors
After you have successfully installed the module, you can follow the syntax given in the example below to customize/style your code.
Example: The following example demonstrates how you can add color, format, and make the text bold or even underline it using the simple_colors module.
from simple_colors import * # normal and colored text
print('Normal:', blue('Welcome Finxters!')) # print underlined and colored text
print('underlined: ', green('Welcome Finxter!', 'underlined')) # print italic and underlined and colored text
print('Italic and Underlined: ', red('Welcome Finxter!', ['italic', 'underlined']))
Output:
Amazing!
Method 4: Using termcolor Module
In Python, termcolor is a module utilized for the ANSII color formatting.
The module comes with various properties for various terminals and certain text formatting properties. It also includes various text colors like blue, red, and green and text highlights like on-magenta, on-cyan, and on-white.
Hence, we will use the boldproperty from the text attributes.
Note:termcolor module isn’t a part of Python’s standard library. Thus, you need to install it before utilizing it. To install the termcolor module copy the following code on your terminal:
pip install termcolor
After installing the module, let’s visualize how you can use it to print the text in bold format.
Example:
from termcolor import colored # Underlined Text
text = colored('Hello and Welcome to FINXTER!', attrs=['underline']) print(text) # Underlined + Blue Text
text2 = colored('This text will be printed in underlined and blue color', 'blue', attrs=['underline'])
print(text2)
Output:
Method 5: Create an HTML Object
Prompt_toolkit includes a print_formatted_text() function that is compatible (as much as possible) with the built-in print() function. It also supports colors and formatting.
HTML can be utilized to demonstrate that a string contains HTML based formatting. Thus, the HTML object recognizes the essential tags for bold, italic and underline: <b>, <i> and <u>.
from prompt_toolkit import print_formatted_text, HTML print_formatted_text(HTML('<b>This text is bold</b>'))
print_formatted_text(HTML('<i>This text is italic</i>'))
print_formatted_text(HTML('<u>This text is underlined</u>'))
Output:
Conclusion
We have finally conquered the art of printing bold texts in Python. Not only did we learn how to print bold texts, but we also learned how to style the code using colors and other formatting styles like underline and italics. I hope this article helped you.
Recursion in programming is a problem-solving concept.
In recursion, a function finds the solution by calling itself once or many times. This function call can be explicit or implicit.
Info: Recursion, according to (Tang 2013), is when a function or algorithm calls itself one or more times. These calls occur until the program meets a specified condition. When met, processing of repeated calls from the last one called to the first happens.
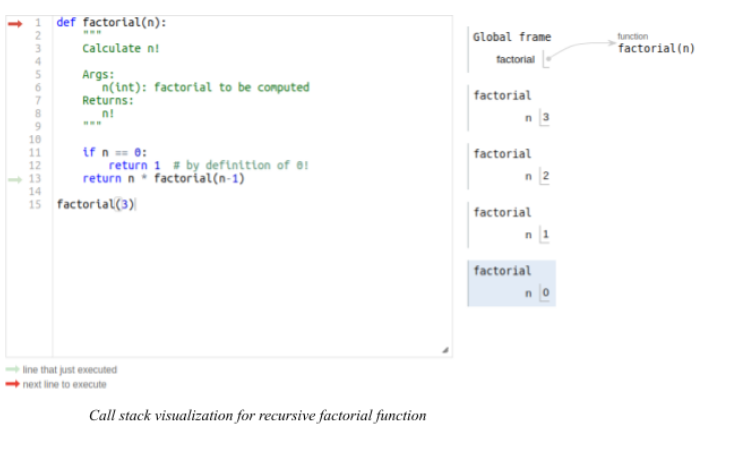
def factorial(n): """ Calculate n! Args: n(int): factorial to be computed Returns: n! """ if n == 0: return 1 return n * factorial(n-1) print(factorial(3))
# 6
In the highlighted line in the above snippet the factorial function calls itself. This function calls itself again and again.
This continues until the condition on line 10 is fulfilled.
Then, the previous function calls are evaluated up to the initial call. The condition n == 0 is a base case.
Info: A base case is very important in a recursive function since it defines the end of the recursive calls. If there exists a faulty base case or a non-existent one in a recursive function, the function calls would go on indefinitely, akin to an infinite while loop.
Recursion utilizes stacks in function calls. Hence, indefinite function calls lead to a C (programming language) stack overflow. This stack overflow, in turn, crashes Python. A size limit introduced to the python interpreter stack prevents potential stack overflow.
Or you just have a look at the screenshots taken from my execution flow:
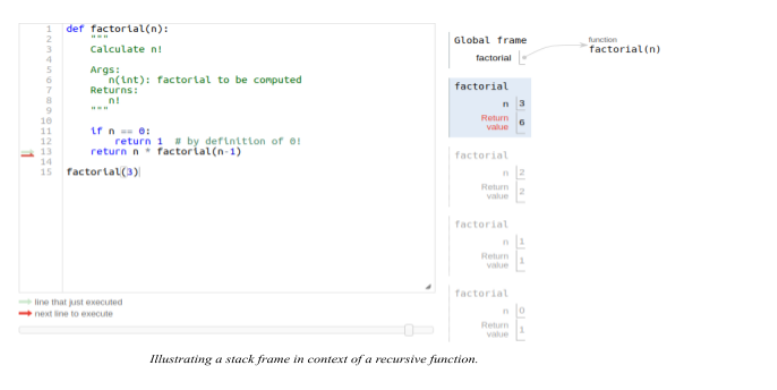
A stack frame from a recursive call is a data structure. It contains the variable of a function call parameters at the specific function call. It holds the state of the recursive function at an instance, with specific arguments.
As highlighted below, the return value of each successive call changes according to the argument passed into the recursive call.
When the argument is 0 the return value is 1. When the argument is 1 the return value is 1, and so on until the initial argument of 3, which has a return value of 6.
Types of Recursions
There are mainly two types of recursion. These types are direct and indirect recursion.
For direct recursion, the recursive call is explicitly declared (see code snippet below).
def direct_recursion(n): if n == 0: return 0 return direct_recursion(n-1)
direct_recursion(4)
Yet, in indirect recursion, the recursive function calls another function which in turn calls it.
For example, we define a new function named indirect_recursion(n). indirect_recursion(n) calls a function called other_function(3). Inside other_function(n) we call indirect_recursion(n) again.
This is a case of indirect recursion.
def indirect_recursion(n): if n == 0: return 0 return n - other_function(n-1) def other_function(n): if n > 0: n -= 2 return indirect_recursion(n) indirect_recursion(3)
Besides the above, there are other types of recursion.
There is also tail recursion and head recursion.
Head recursion, refers to when the recursive call is at the beginning of a function.
Tail as the name suggests refers to the scenario where the recursive call is the last line of the function.
In the direct recursion snippet above, the last line in the function is a sole recursive call.
This is an example of a tail-recursive function. Hence, tail recursion is a particular example of a direct recursion type.
Note, in our recursive factorial function, the last line contains the recursive call. But, it does not qualify to be tail-recursive. This is because the very last operation in that function is multiplication.
Tail call optimization
A tail call is not unique to recursive functions.
It refers to the last action that is finally performed by a function or a procedure.
As explained above, if the final action is recursive then the tail call can is a tail-recursion.
Some programming languages like scheme put in place tail call optimization. Tail call optimization ensures constant stack space usage. In (“Tail Call” 2022), tail call optimization, the call stack receives no more stack frames.
Since most of the current function state is no longer needed, hence replaced by the stack frame of the tail call.
As highlighted in the image illustration of a stack frame in the context of a recursive function. Instead of each call generating a new stack frame. This is achieved by modifying the current frame to align with the current argument. This is a powerful technique that allows for the conservation of memory.
Hence, preventing stack overflow in cases of tail recursion functions. As highlighted in this answer (Cronin 2008). The amount of space required for a recursive factorial function is constant for any value argument.
Tail Call Optimization in Python
By design, python, unlike languages like scheme, does not support tail call optimization.
This is true for all tail calls, including tail-recursive calls. The main reason for this is python’s emphasis on having complete debug information. This debug information relies on stack traces.
We lose debug info in discarded stacks by implementing tail call optimization. This renders stack trace useless.
Currently, Python, by default, allows for 1000 recursion calls. After exceeding these calls, Python raises a RecursionError: maximum recursion depth exceeded.
How to Get the Current Recursion Limit in Your System in Python?
The code listing below shows how to find out the current recursion limit in your system.
import sys
print(sys.getrecursionlimit())
The default is usually 1000 but it depends on the set-up one is running.
In my current set-up using Anaconda, the recursion limit is 3000.
Recursion limit refers to the number of function calls python allows when recursing.
How to Set the Recursion Limit in Python?
It is possible to change the recursion limit. By adding the following code we get rid of RecursionError if the solution lies within the set limit.
sys.setrecursionlimit(3500)
It is important to note that increasing the recursion limit does not change the C-stack size.
Hence, even with increasing the limit stack overflow might still occur since the limit is a safety measure to prevent stack overflow.
The better option might be refactoring the solution. For example, using an iterative solution using loops, and other built-in Python sequences.
References
Cronin, Kyle. 2008. “Answer to ‘What Is Tail Call Optimization?’” Stack Overflow. https://stackoverflow.com/a/310980.
“Sys — System-Specific Parameters and Functions — Python 3.10.4 Documentation.” n.d. Accessed April 26, 2022. https://docs.python.org/3/library/sys.html#sys.setrecursionlimit.
“Tail Call.” 2022. In Wikipedia. https://en.wikipedia.org/w/index.php?title=Tail_call&oldid=1082917459.
Tang, Daisy. 2013. “CS240: Data Structures & Algorithms I.” March 2013. https://www.cpp.edu/~ftang/courses/CS240/lectures/recursion.htm.

 Question: How would we write Python code to print a List without brackets?
 Note: We recommend trying different separating characters, including a space (

 Related Tutorial:


 Important: Even though web scraping is possible does not mean it is always legal!


 Note: Do you want to create your own thriving coding business online? Feel free to check out our


 Tip: An excellent start to turbo-charge your freelancing career (earning more in less time) is our
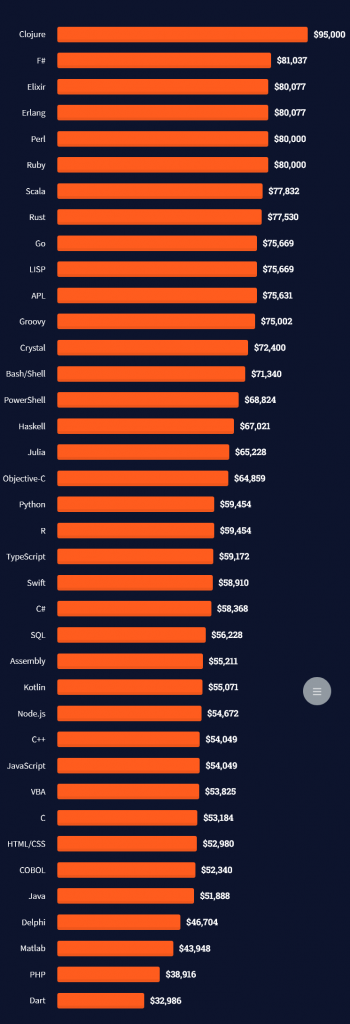


 Related Article:
 Try it yourself:
 Challenge: Get the size of the above image with PIL or any other Python library.
 TRIVIA: PIL(Python Imaging Library) is a Python library that is used for image processing. It supports numerous image formats which include “
 Note: Use the following command to install OpenCV:
  Bonus: Get the Size of an Image by Loading Image from an URL

 Problem Formulation: Given a string. How to print the string as


