Posted on Leave a comment

Top 11 DeFi Articles to Get Started in Crypto

5/5 – (1 vote)
  • DeFi (or “decentralized finance”) is a term used to refer to financial services transacted on public blockchains.
  • DeFi is permissionless and open to all. Transactions are routed through a decentralized network or blockchain.
  • DeFi applications provide many of the same services provided by traditional banks such as lending, borrowing, trading, to mention just a few.

To learn more about decentralized finance, check out these hand-picked articles.

Decentralized Finance (DeFi) (Ethereum.org)

This article provides a comprehensive look at decentralized finance on Ethereum.org (the official Ethereum website).

🌍 Link: https://ethereum.org/en/defi/

Ultimate DeFi Glossary (Ledger)

This is a list of decentralized finance terms to familiarize anyone with an interest in DeFi.

🌍 Link: https://www.ledger.com/academy/ultimate-defi-glossary

Why DeFi is the Future of Finance (ConsenSys) 

Find out why DeFi has the potential to usurp traditional finance (TradeFi).

This article explains how DeFi enables cheaper transactions and cheaper financing. Decentralized technology provides an opportunity to create innovative financial products without being hindered by legacy infrastructure.

🌍 Link: https://consensys.net/blog/metamask/metamask-institutional/why-defi-is-the-future-of-finance/

Most Popular DeFi Protocols

There are many DeFi protocols consisting of decentralized exchanges (DEXs), liquidity aggregators, margin trading platforms, asset management platforms, and lending platforms.

This article lists the most notable DeFi protocols such as Aave, yEarn, Compound, Uniswap, Maker DAO, etc.

🌍 Link: https://101blockchains.com/top-defi-protocols/

What is TVL and Why Does it Matter? (CoinTelegraph)

Total Value Locked up (TVL) is an indicator used by DeFi investors to assess the value of assets deposited within DeFi protocols.

Higher TVL indicates increased liquidity of a protocol, meaning the project is succeeding and attracting more participants.

🌍 Link: https://cointelegraph.com/explained/what-is-total-value-locked-tvl-in-crypto-and-why-does-it-matter

Exciting DeFi Projects Worth Watching In 2022 (Bitcoinist)

This article introduces promising DeFi projects that do not live on Ethereum.

  • Take for example Parallel Finance, a money market protocol for Polkadot and Kusama chains.
  • Ardana, a Decentralized Exchange (DEX) for the Cardano blockchain.
  • Or Centrifuge, a DeFi project aiming to enable tokenization of real-world assets.

🌍 Link: https://bitcoinist.com/4-exciting-defi-projects-worth-watching-in-2022/

Oracles in DeFi 101: A Deep Dive (Coin Market Cap)

Oracles provide real-world off-chain data to smart contracts. They are crucial to decentralized finance.

This article explains the value that Oracles provide, listing the major oracles used on the Ethereum blockchain.

🌍 Link: https://coinmarketcap.com/alexandria/article/oracles-in-defi-101-a-deep-dive-by-tellor

What is Yield Farming in Decentralized Finance (DeFi)? (Binance)

Read this article about yield farming to learn how to make more crypto with your crypto.

Yield farming involves lending out your cryptocurrency using smart contracts. Investors lock up cryptocurrency to get rewards. They use different strategies to maximize yield/ROI.

🌍 Link: https://academy.binance.com/en/articles/what-is-yield-farming-in-decentralized-finance-defi

The 5 Big Risk Vectors of DeFi (CoinDesk)

Being new technologies, DeFi protocols present risks. Five types of risks are highlighted: 

1. Intrinsic Protocol Risk, 2. Exogenous Risk, 3. Governance Risks, 4. Underlying Blockchain Risk, 5. Market Risk.

🌍 Link: https://www.coindesk.com/layer2/2022/02/03/the-five-big-risk-vectors-of-defi/

DeFi App Development Guide

Learn how to build a DeFi app. Read about development considerations such as level of decentralization, blockchain choice, crypto wallet integration, etc.

🌍 Link: https://topflightapps.com/ideas/how-to-build-a-defi-app/

Bonus: Build a DeFi Yield Farming dApp with Chainlink Price Feeds

🌍 Link: https://blog.chain.link/build-defi-yield-farming-application-with-chainlink/


Learn Solidity Course

Solidity is the programming language of the future.

It gives you the rare and sought-after superpower to program against the “Internet Computer”, i.e., against decentralized Blockchains such as Ethereum, Binance Smart Chain, Ethereum Classic, Tron, and Avalanche – to mention just a few Blockchain infrastructures that support Solidity.

In particular, Solidity allows you to create smart contracts, i.e., pieces of code that automatically execute on specific conditions in a completely decentralized environment. For example, smart contracts empower you to create your own decentralized autonomous organizations (DAOs) that run on Blockchains without being subject to centralized control.

NFTs, DeFi, DAOs, and Blockchain-based games are all based on smart contracts.

This course is a simple, low-friction introduction to creating your first smart contract using the Remix IDE on the Ethereum testnet – without fluff, significant upfront costs to purchase ETH, or unnecessary complexity.

Posted on Leave a comment

Python Tuple Comprehension Doesn’t Exist – Use This Instead

5/5 – (1 vote)

Python has list comprehension and dictionary comprehension as a concise way to create a list or a dictionary by modifying an existing iterable.

Python also has generator expressions that allow you to create an iterable by modifying and potentially filtering each element in another iterable and passing the result in a function, for instance.

Does Python have a tuple comprehension statement? And why or why not? And what to use instead if not?

This tutorial will answer all your questions but first, let’s repeat the three related concepts:

  • list comprehension,
  • dictionary comprehension,
  • generator expression

If you already know these concepts well, go ahead and skip right to the end of the tutorial! 🧑‍💻

List Comprehension

List comprehension is a compact way of creating lists. The simple formula is [expression + context].

  • Expression: What to do with each list element?
  • Context: What elements to select? The context consists of an arbitrary number of for and if statements.

The example [x+100 for x in range(3)] creates the list [100, 101, 102].

lst = [x for x in range(3)]
print(lst)
# [100, 101, 102]

💡 Learn More: List Comprehension in Python — A Helpful Illustrated Guide

Dictionary Comprehension

Dictionary Comprehension is a concise and memory-efficient way to create and initialize dictionaries in one line of Python code.

It consists of two parts: expression and context.

  • The expression defines how to map keys to values.
  • The context loops over an iterable using a single-line for loop and defines which (key,value) pairs to include in the new dictionary.

The following example shows how to use dictionary comprehension to create a mapping from women to man:

men = ['Bob', 'Frank', 'Pete']
women = ['Alice', 'Ann', 'Liz'] # One-Liner Dictionary Comprehension
pairs = {w:m for w, m in zip(women, men)} # Print the result to the shell
print(pairs)
# {'Bob': 'Alice', 'Frank': 'Ann', 'Pete': 'Liz'}

Also, watch the following video for a quick recap on dictionary comprehension:

💡 Learn More: Python Dictionary Comprehension: A Powerful One-Liner Tutorial

Set Comprehension

Set comprehension is a concise way of creating sets in Python using the curly braces notation {expression for element in context}.

For example, {x for x in range(10)} creates the set {0, 1, 2, 3, 4, 5, 6, 7, 8, 9}.

s = {x for x in range(10)}
print(s)
# {0, 1, 2, 3, 4, 5, 6, 7, 8, 9}

You can optionally add a condition to restrict the context in {expression for element in context if condition}.

For example, {x for x in range(10) if x>5} creates the set {6, 7, 8, 9}.

s = {x for x in range(10) if x>5}
print(s)
# {6, 7, 8, 9}

💡 Learn More: Python Set Comprehension

Generator Expression

A generator function is a Pythonic way to create an iterable without explicitly storing it in memory. This reduces memory usage of your code without incurring any additional costs.

The following generator expression shows how you can use a list-comprehension like statement but pass it into the sum() function that expects an iterable:

print(sum(random.random() for i in range(1000)))

The code consists of the following parts:

  • The print() function prints the result of the expression to the shell.
  • The sum() function sums over all values in the following iterable.
  • The generator expression random.random() for i in range(1000) generates 1000 random numbers and feeds them into the outer sum() function without creating all of them at once.

This way, we still don’t store the whole list of 1000 numbers in memory but create them dynamically.

There are two big advantages to using a generator:

  • (1) You don’t have to create a huge list first and store it in memory but generate the next element as you iterate over it.
  • (2) It’s shorter and more concise.

💡 Learn More: Python One Line Generator

Tuple Comprehension

Tuple comprehension such as (x+100 for x in range(3)) does not exist in Python for two main reasons:

  • Ambiguity: The expression (x+100 for x in range(3)) for tuple comprehension would be ambiguous because of the parentheses (...). It could also mean “create a generator expression and use the precedence as indicated by the parenthesis”. In that case, Python wouldn’t know if it should return a tuple or a generator. This is the main reason why tuple comprehension doesn’t exist.
  • Python Style: If you want to dynamically create a container data structure and fill it with values, you should use lists. Lists are for looping; tuples for structs. Lists are homogeneous; tuples heterogeneous. Lists for variable length.

Tuple Comprehension Alternatives

You can use the following alternatives instead of tuple comprehension:

  • tuple(x+100 for x in range(3)) creates the tuple (100, 101, 102) using a generator expression.
  • (1, *[x+100 for x in range(3)]) creates the tuple (1, 100, 101, 102) combining manual tuple creation with list comprehension.

You can find those two examples in the following code snippet:

# Tuple Comprehension Alternative 1
t = tuple(x+100 for x in range(3))
print(t)
# (100, 101, 102) # Tuple Comprehension Alternative 2
t = (1, *[x+100 for x in range(3)])
print(t)
# (1, 100, 101, 102) 

Where to Go From Here?

Enough theory. Let’s get some practice!

Coders get paid six figures and more because they can solve problems more effectively using machine intelligence and automation.

To become more successful in coding, solve more real problems for real people. That’s how you polish the skills you really need in practice. After all, what’s the use of learning theory that nobody ever needs?

You build high-value coding skills by working on practical coding projects!

Do you want to stop learning with toy projects and focus on practical code projects that earn you money and solve real problems for people?

🚀 If your answer is YES!, consider becoming a Python freelance developer! It’s the best way of approaching the task of improving your Python skills—even if you are a complete beginner.

If you just want to learn about the freelancing opportunity, feel free to watch my free webinar “How to Build Your High-Income Skill Python” and learn how I grew my coding business online and how you can, too—from the comfort of your own home.

Join the free webinar now!

Posted on Leave a comment

How to Add Two Lists Element-wise in Python

Rate this post

Summary: The most pythonic approach to add two lists element-wise is to use zip() to pair the elements at the same positions in both lists and then add the two elements. Here’s a quick look at the solution: [x + y for x, y in zip(li_1, li_2)]. An alternate proposition to this without using zip: [li_1[i]+li_2[i] for i in range(len(li_smaller))]


Problem Formulation

Problem Statement: Given two lists, how will you add the two lists element-wise?

Example: Consider that you have the following lists:

Input:
li_1 = [2,4,6]
li_2 = [1,3,5] Expected Output:
[3,7,11]

Challenge: How will you perform an element-wise addition of the two lists as shown below:

Solution 1: The Naive Approach

Approach:

  • The basic solution to this problem is to find out the length of the smaller list.
  • Then use a for loop to iterate across all the items of each list. Note that the range of iteration will be determined by the length of the smaller list.
  • In every iteration, select an element from each list with the help of its index and then add them up.
  • You can store the output generated in each iteration within another list and finally display the resultant list as an output.

Code:

# Given Lists
li_1 = [2, 4, 6]
li_2 = [1, 3, 5, 15]
res = [] # resultant list to store the output # Find the smaller list
li_smaller = li_1 if len(li_2) > len(li_1) else li_2 for i in range(len(li_smaller)): # add each item from each list one by one res.append(li_1[i] + li_2[i])
print(res)

Output:

[3, 7, 11]

The above solution can further be compressed with the help of a list comprehension, as shown below:

# Given Lists
li_1 = [2, 4, 6]
li_2 = [1, 3, 5, 15] # Find the smaller list
li_smaller = li_1 if len(li_2) > len(li_1) else li_2 res = [li_1[i]+li_2[i] for i in range(len(li_smaller))]
print(res)

Let’s try to understand the working principle behind the list comprehension used in the above snippet.

The first part is the expression. In the above snippet, li_1[i]+li_2[i] is the expression that denotes the element-wise addition of the two lists. The second part represents the context which represents the counter variable i that ranges from 0 until the length of the smaller list. It is basically keeping track of the index of each element in the lists.

Solution 2: Using zip and List Comprehension

Approach: A more pythonic solution to the given problem is to pass both the lists into the zip() method. This returns a tuple consisting of elements in pairs that are at the same position in each list. Once you get the pair of elements, you can simply add them up. All of this can be performed within a list comprehension.

Code:

li_1 = [2, 4, 6]
li_2 = [1, 3, 5, 15]
res = [x + y for x, y in zip(li_1, li_2)]
print(res) # OUTPUT: [3, 7, 11]

An advantage of using this approach over the previous solution is not only is it a more pythonic way of adding the two lists, but it also eliminates the necessity to explicitly find out the length of the smaller list in case the two lists have different lengths.

A Quick Recap to Zip():

The zip() function takes an arbitrary number of iterables and aggregates them to a single iterable, a zip object. It combines the i-th values of each iterable argument into a tuple. Hence, if you pass two iterables, each tuple will contain two values. If you pass three iterables, each tuple will contain three values. For example, zip together lists [1, 2, 3] and [4, 5, 6] to [(1,4), (2,5), (3,6)].
Read More: Python Zip — A Helpful Illustrated Guide

🎁Finding Sum of Two Lists Element-wise for list of lists

li = [[1, 2, 3], [4, 5, 6]]
res = [a + b for a, b in zip(*li)]
print(res) # [5, 7, 9]

Solution 3: Using map() and add()

Prerequisites:

💎 Python facilitates us with many predefined functions for numerous mathematical, logical, relational, bitwise etc operations. These functions are contained within the operator module. One such function is add(a,b), which returns the result of the addition of the two arguments, i.e., a+b.

💎 The map() function transforms one or more iterables into a new one by applying a “transformator function” to the i-th elements of each iterable. The arguments are the transformator function object and one or more iterables. If you pass n iterables as arguments, the transformator function must be an n-ary function taking n input arguments. The return value is an iterable map object of transformed, and possibly aggregated, elements.

Approach: Pass the input lists and the add() function within the built-in method map(). The add() method will simply add the elements of the two lists and then return an iterable. This iterable can then be converted to a list using the list constructor.

Code:

from operator import add
li_1 = [2, 4, 6]
li_2 = [1, 3, 5, 15]
res = list(map(add, li_1, li_2))
print(res)

Output:

[3, 7, 11]

🎁Finding Sum of Two Lists Element-wise for Unknown Number of Lists of Same Length

def sum_li(*args): return list(map(sum, zip(*args))) res = sum_li([1, 2, 3], [4, 5, 6], [7, 8, 9])
print(res) # [12, 15, 18]

Method 4: Using zip_longest from Itertools Module

Until now, all the solutions considered the length of the smaller list. What if you want to add the elements considering the length of the larger list. In other words, consider the following scenario:

Given:

li_1 = [2, 4, 6]
li_2 = [1, 3, 5, 15]

Expected Output:

[3, 7, 11, 15]

Approach: To deal with this scenario, you can use the zip_longest method of the itertools module. Not only will this method group the elements at the same position in each list, but it also allows you to take the remaining elements of the longer list into consideration.

  • Pass the two lists within the zip_longest() function and assign 0 the fillvalue parameter.
  • If all the items from the smaller list get exhausted, then the remaining values will be filled by the value that has been assigned to the fillvalue parameter.
  • Finally, perform the addition of elements at the same position that have been paired by the zip_longest method using the sum() function.

Code:

from itertools import zip_longest
li_1 = [2, 4, 6]
li_2 = [1, 3, 5, 15]
res = [sum(x) for x in zip_longest(li_1, li_2, fillvalue=0)]
print(res)

Output:

[3, 7, 11, 15]

Method 5: Using Numpy

If you have two lists that have the same length, then using Numpy can be your best bet. There are two ways of implementing the solution that you need. Let’s have a look at them one by one:

The + Operator

You can simply create two numpy arrays from the two lists and then find their sum using the + operator. Easy peasy!

import numpy as np
li_1 = [2, 4, 6]
li_2 = [1, 3, 5]
a = np.array(li_1)
b = np.array(li_2)
print(a+b) # [ 3 7 11]

numpy.add

The alternate formulation to the above solution is to use the numpy.add() method instead of directly using the + operator.

import numpy as np
li_1 = [2, 4, 6]
li_2 = [1, 3, 5]
res = np.add(li_1, li_2)
print(res) # [ 3 7 11]

Conclusion

Phew! We unearthed a wealth of solutions to the given problem. Please feel free to use any solution that suits you. Here’s a general recommendation to use the above approaches:

  • Using zip is probably the most pythonic approach when you have simple lists at your disposal.
  • In case you do not wish to use zip, you can simply use a list comprehension as discussed in the first solution.
  • For lists with different lengths, you may use the zip_longest method to solve your problem.

Happy learning! 🙂

Posted on Leave a comment

How to Convert List of Lists to Tuple of Tuples in Python?

5/5 – (1 vote)

💬 Question: Given a list of lists such as [[1, 2], [3, 4]]. How to convert it to a tuple of tuples such as ((1, 2), (3, 4))?

If you’re in a hurry, here’s the most Pythonic way to convert a nested list to a nested tuple:

Use a generator expression with the built-in tuple() function to convert a list of lists to a tuple of tuples like so: tuple(tuple(x) for x in my_list).

Here’s a graphic on how to convert back and forth between nested list and nested tuples:

Convert List of Lists to Tuple of Tuples in Python

But there’s more to it! Studying the different methods to achieve the same goal will make you a better coder. 🧑‍💻

So keep reading!

Method 1: Tuple Comprehension + tuple()

The recommended way to convert a list of lists to a tuple of tuples is using generator expression in combination with the built-in tuple() function like so: tuple(tuple(x) for x in my_list).

Here’s a concrete example:

lists = [[1, 2], [3, 4], [5, 6]]
tuples = tuple(tuple(x) for x in lists) print(tuples)
# ((1, 2), (3, 4), (5, 6))

Try It Yourself:

This approach is simple and effective. The generator expression defines how to convert each inner list (x in the example) to a new tuple element.

You use the constructor tuple(x) to create a new tuple from the list x.

Example Three Elements per Tuple

If you have three elements per list, you can use the same approach with the conversion:

lists = [[1, 2, 1], [3, 4, 3], [5, 6, 5]]
tuples = tuple(tuple(x) for x in lists) print(tuples)
# ((1, 2, 1), (3, 4, 3), (5, 6, 5))

You can see the execution flow in the following interactive visualization (just click the “Next” button to see what’s happening in the code):

Example Varying Number of List Elements

And if you have a varying number of elements per list, this approach still works beautifully:

lists = [[1], [2, 4, 3], [6, 5]]
tuples = tuple(tuple(x) for x in lists) print(tuples)
# ((1,), (2, 4, 3), (6, 5))

You see that an approach with generator expression is the best way to convert a list of lists to a tuple of tuples.

But are there any alternatives? Let’s have a look at a completely different approach to solve this problem:

Method 2: Map Function + list()

Use the map function that applies a specified function on each element of an iterable.

💡Side Note: Guido van Rossum, the creator of Python, didn’t like the map() function as it’s less readable and less efficient than the generator expression version (Method 1 in this tutorial). You can read about a detailed discussion on how exactly he argued on my blog article.

So, without further ado, here’s how you can convert a list of lists into a tuple of tuples using the map() function:

lists = [[1], [2, 4, 3], [6, 5]]
tuples = tuple(map(tuple, lists)) print(tuples)
# ((1,), (2, 4, 3), (6, 5))

Try it yourself:

Video tutorial on the map() function:

The first argument of the map() function is the tuple function name.

This tuple() function converts each element on the given iterable lists (the second argument) into a tuple.

The result of the map() function is an iterable too, so you need to convert it to a tuple before printing it to the shell because the default string representation of an iterable is not human-readable.

Method 3: Simple For Loop with append() and tuple()

To convert a list of lists to a tuple of tuples, first initialize an empty “outer” list and store it in a variable.

Then iterate over all lists using a simple for loop and convert each separately to a tuple.

Next, append each result to the outer list variable using the list.append() builtin method in the loop body.

Finally, convert the list of tuples to a list tuple of tuples using the tuple() function.

The following example does exactly that:

lists = [[1], [2, 4, 3], [6, 5]] tmp = []
for t in lists: tmp.append(tuple(t))
tuples = tuple(tmp) print(tuples)
# ((1,), (2, 4, 3), (6, 5))

Related Video Tutorial

Related Conversion Articles

Where to Go From Here?

Enough theory. Let’s get some practice!

Coders get paid six figures and more because they can solve problems more effectively using machine intelligence and automation.

To become more successful in coding, solve more real problems for real people. That’s how you polish the skills you really need in practice. After all, what’s the use of learning theory that nobody ever needs?

You build high-value coding skills by working on practical coding projects!

Do you want to stop learning with toy projects and focus on practical code projects that earn you money and solve real problems for people?

🚀 If your answer is YES!, consider becoming a Python freelance developer! It’s the best way of approaching the task of improving your Python skills—even if you are a complete beginner.

If you just want to learn about the freelancing opportunity, feel free to watch my free webinar “How to Build Your High-Income Skill Python” and learn how I grew my coding business online and how you can, too—from the comfort of your own home.

Join the free webinar now!

Posted on Leave a comment

How to Convert Tuple of Tuples to List of Lists in Python?

5/5 – (1 vote)

💬 Question: Given a tuple of tuples such as ((1, 2), (3, 4)). How to convert it to a list of lists such as [[1, 2], [3, 4]]?

If you’re in a hurry, here’s the most Pythonic way to convert a nested tuple to a nested list:

The list comprehension statement [list(x) for x in tuples] converts each tuple in tuples to a list and stores the results in a list of lists.

But there’s more to it! Studying the different methods to achieve the same goal will make you a better coder.

So keep reading!

Method 1: List Comprehension + list()

The recommended way to convert a tuple of tuples to a list of lists is using list comprehension in combination with the built-in list() function like so: [list(x) for x in tuples].

Here’s a concrete example:

tuples = ((1, 2), (3, 4), (5, 6))
lists = [list(x) for x in tuples] print(lists)
# [[1, 2], [3, 4], [5, 6]]

Try It Yourself:

This approach is simple and effective. List comprehension defines how to convert each tuple (x in the example) to a new list element. As each list element is a new list, you use the constructor list(x) to create a new list from the tuple x.

Example Three Elements per Tuple

If you have three elements per tuple, you can use the same approach with the conversion:

tuples = ((1, 2, 1), (3, 4, 3), (5, 6, 5))
lists = [list(x) for x in tuples]
print(lists)

You can see the execution flow in the following interactive visualization (just click the “Next” button to see what’s happening in the code):

Example Varying Number of Tuple Elements

And if you have a varying number of elements per tuple, this approach still works beautifully:

tuples = ((1,), (3, 3), (5, 6, 5))
lists = [list(x) for x in tuples] print(lists)
# [[1], [3, 3], [5, 6, 5]]

You see that an approach with list comprehension is the best way to convert a tuple of tuples to a list of lists.

But are there any alternatives?

Method 2: Use Asterisk and List Comprehension

A variant of the recommended way to convert a tuple of tuples to a list of lists is using list comprehension in combination with the unpacking asterisk operator * like so: [[*x] for x in tuples].

Here’s an example:

tuples = ((1,), (3, 3), (5, 6, 5))
lists = [[*x] for x in tuples] print(lists)
# [[1], [3, 3], [5, 6, 5]]

The unpacking operator [*x] takes all tuple elements from x and “unpacks” them in the outer list container [...]. For example, the expression [*(5, 6, 5)] yields the list [5, 6, 5].

Let’s have a look at a completely different approach to solve this problem:

Method 3: Map Function + list()

Use the map function that applies a specified function on each element of an iterable.

💡Side Note: Guido van Rossum, the creator of Python, didn’t like the map() function as it’s less readable and less efficient than the list comprehension version (Method 1 in this tutorial). You can read about a detailed discussion on how exactly he argued on my blog article.

So, without further ado, here’s how you can convert a tuple of tuples into a list ot lists using the map() function:

tuples = ((1,), (2, 3, 4), (5, 6, 7, 8))
lists = list(map(list, tuples)) print(lists)
# [[1], [2, 3, 4], [5, 6, 7, 8]]

Try it yourself:

Video tutorial on the map() function:

The first argument of the map() function is the list function name.

This list() function converts each element on the given iterable tuples (the second argument) into a list.

The result of the map() function is an iterable too, so you need to convert it to a list before printing it to the shell because the default string representation of an iterable is not human-readable.

Method 4: Simple For Loop with append() and list()

To convert a tuple of tuples to a list of lists, a simple three-liner is to first initialize an empty “outer” list and store it in a variable. Then iterate over all tuples using a simple for loop and convert each separately to a list and append each result to the outer list variable using the list.append() builtin method in the loop body.

The following example does exactly that:

tuples = ((1,), (2, 3, 4), (5, 6, 7, 8)) lists = []
for t in tuples: lists.append(list(t)) print(lists)
# [[1], [2, 3, 4], [5, 6, 7, 8]]

Related Video Tutorial

Related Conversion Articles

Where to Go From Here?

Enough theory. Let’s get some practice!

Coders get paid six figures and more because they can solve problems more effectively using machine intelligence and automation.

To become more successful in coding, solve more real problems for real people. That’s how you polish the skills you really need in practice. After all, what’s the use of learning theory that nobody ever needs?

You build high-value coding skills by working on practical coding projects!

Do you want to stop learning with toy projects and focus on practical code projects that earn you money and solve real problems for people?

🚀 If your answer is YES!, consider becoming a Python freelance developer! It’s the best way of approaching the task of improving your Python skills—even if you are a complete beginner.

If you just want to learn about the freelancing opportunity, feel free to watch my free webinar “How to Build Your High-Income Skill Python” and learn how I grew my coding business online and how you can, too—from the comfort of your own home.

Join the free webinar now!

Posted on Leave a comment

How to Calculate a Logistic Sigmoid Function in Python?

Rate this post

Summary: You can caculate the logistic sigmoid function in Python using:

  • The Math Module: 1 / (1 + math.exp(-x))
  • The Numpy Library: 1 / (1 + np.exp(-x))
  • The Scipy Library: scipy.special.expit(x)

Problem: Given a logistic sigmoid function:

enter image description here

If the value of x is given, how will you calculate F(x) in Python? Let’s say x=0.458.

Note: Logistic sigmoid function is defined as (1/(1 + e^-x)) where x is the input variable and represents any real number. The function returns a value that lies within the range -1 and 1. It forms an S-shaped curve when plotted on a graph.

Method 1: Sigmoid Function in Python Using Math Module

Approach: Define a function that accepts x as an input and returns F(x) as 1/(1 + math.exp(-x)).

Code:

import math def sigmoid(x): return 1 / (1 + math.exp(-x)) print(sigmoid(0.458)) # OUTPUT: 0.6125396134409151

Caution: The above solution is mainly intended as a simple one-to-one translation of the given sigmoid expression into Python code. It is not strictly tested or considered to be a perfect and numerically sound implementation. In case you need a more robust implementation, some of the solutions to follow might prove to be more instrumental in solving your case.

Here’s a more stable implementation of the above solution:

import math def sigmoid(x): if x >= 0: k = math.exp(-x) res = 1 / (1 + k) return res else: k = math.exp(x) res = k / (1 + k) return res print(sigmoid(0.458))

Note: exp() is a method of the math module in Python that returns the value of E raised to the power of x. Here, x is the input value passed to the exp() function, while E represents the base of the natural system of the logarithm (approximately 2.718282).

Method 2: Sigmoid Function in Python Using Numpy

The sigmoid function can also be implemented using the exp() method of the Numpy module. numpy.exp() works just like the math.exp() method, with the additional advantage of being able to handle arrays along with integers and float values.

Let’s have a look at an example to visualize how to implement the sigmoid function using numpy.exp()

import numpy as np def sigmoid(x): return 1 / (1 + np.exp(-x)) print(sigmoid(0.458)) # OUTPUT: 0.6125396134409151

Probably a more numerically stable version of the above implementation is as follows:

import numpy as np def sigmoid(x): return np.where(x < 0, np.exp(x) / (1 + np.exp(x)), 1 / (1 + np.exp(-x))) print(sigmoid(0.458)) # OUTPUT: 0.6125396134409151

#Example 2: Let’s have a look at an implementation of the sigmoid function upon an array of evenly spaced values with the help of a graph in the following example.

import numpy as np
import matplotlib.pyplot as plt def sigmoid(x): return np.where(x < 0, np.exp(x) / (1 + np.exp(x)), 1 / (1 + np.exp(-x))) val = np.linspace(start=-10, stop=10, num=200)
sigmoid_values = sigmoid(val)
plt.plot(val, sigmoid_values)
plt.xlabel("x")
plt.ylabel("sigmoid(X)")
plt.show()

Output:

Explanation:

  • Initially, we created an array of evenly spaced values within the range of -10 and 10 with the help of the linspace method of the Numpy module, i.e., val.
  • We then used the sigmoid function on these values. If you print them out, you will find that they are either extremely close to 0 or very close to 1. This can also be visualized once the graph is plotted.
  • Finally, we plotted the sigmoid function graph that we previously computed with the help of the function. The x-axis maps the values contained in val, while the y-axis maps the values returned by the sigmoid function.

Do you want to become a NumPy master? Check out our interactive puzzle book Coffee Break NumPy and boost your data science skills! (Amazon link opens in new tab.)

Coffee Break NumPy

Method 3: Sigmoid Function in Python Using the Scipy Library

Another efficient way to calculate the sigmoid function in Python is to use the Scipy libraries expit function.

Example 1: Calculating logistic sigmoid for a given value

from scipy.special import expit
print(expit(0.458)) # OUTPUT: 0.6125396134409151

Example 2: Calculating logistic sigmoid for multiple values

from scipy.special import expit
x = [-2, -1, 0, 1, 2]
for value in expit(x): print(value)

Output:

0.11920292202211755
0.2689414213699951
0.5
0.7310585786300049
0.8807970779778823

Recommended Read: Logistic Regression in Python Scikit-Learn

Method 4: Transform the tanh function

Another workaround to compute the sigmoid function is to transform the tanh function of the math module as shown below:

import math sigmoid = lambda x: .5 * (math.tanh(.5 * x) + 1)
print(sigmoid(0.458)) # OUTPUT: 0.6125396134409151

Since, mathematically sigmoid(x) == (1 + tanh(x/2))/2. Hence, the above implementation should work and is a valid solution. However, the methods mentioned earlier are undoubtedly more stable numerically and superior to this solution.

Conclusion

Well, that’s it for this tutorial. We have discussed as many as four ways of calculating the logistic sigmoid function in Python. Feel free to use the one that suits your requirements.

I hope this article has helped you. Please subscribe and stay tuned for more interesting solutions and tutorials. Happy learning!


TensorFlow – A Hands-On Introduction to Deep Learning and Neural Networks for Beginners

This course gives you a charming introduction into deep learning and neural networks using Google’s TensorFlow library for Python beginners.

Posted on Leave a comment

DelegateCall or Storage Collision Attack on Smart Contracts

5/5 – (1 vote)

The post is part 6 and continues our Smart Contract Security Series:

The DelegateCall attack or storage collision is expounded in this post.

Before you can grasp this exploit, you must first understand how Solidity saves state variables as explained here

We start with the differences between call and delegatecall in Solidity, followed by exploiting the vulnerability of the delegatecall using the proxy contracts (mostly in smart contract upgrades), and then a solution for the attack.

Let’s start the journey!

Call VS DelegateCall

Solidity supports two low-level interfaces for interaction or sending messages to the contract functions.

These interfaces operate on addresses rather than contract instances (using this keyword). The key differences are highlighted with an example.

Call

It allows you to call the code of the callee contract from the caller with the storage context of the callee.

In order to understand this confusing sentence, let’s consider two contracts A, and CallA, with the naming convention as below:

  • A is the callee,
  • CallA is the caller
// Callee
contract A
{ uint256 public x; function foo(uint256 _x) public { x = _x; }
} // Caller
contract CallA
{ uint256 public x; function callfoo(address _a) public { (bool success,) = _a.call(abi.encodeWithSignature("foo(uint256)", 15)); require(success, "Call was not successful"); }
}

To test, deploy the contracts on Remix, and when you execute the caller (CallA -> callfoo), you can verify that foo() gets called, and the value of ‘x‘ in the callee(A ->x) is set to 15.

💡 Note: It is also possible to send Ether and gas as part of the call using value and gas as params.

The above scenario is described in the figure as shown.

Fig: call flow

DelegateCall

It allows you to call the code of the callee contract from the caller with the storage context of the caller.

As previously mentioned, let’s consider two contracts A and DelegateCallA, with the naming convention as below:

  • A is the callee,
  • DelegateCallA is the caller
contract A
{ uint256 public x; function foo(uint256 _x) public { x = _x; }
} contract DelegateCallA
{ uint256 public x; function callfoo(address _a) public { (bool success,) = _a.delegatecall(abi.encodeWithSignature("foo(uint256)", 15)); require(success, "Delegate Call was not successful"); }
}

To test, deploy the contracts on Remix, and when you execute the caller (DelegateCallA -> ‘callfoo’), you can verify that foo() gets called and the value of ‘x‘ in the callee(A ->x) is still 0, while the value of x in the caller (DelegateCallA -> x) is 15.

Equipped with the above examples, it is evident that the delegatecall, executes in the caller’s context, while the call executes in the callee context.

A picture speaks a thousand words. The above scenario is in the below figure.

Fig: delegatecall flow

One use case of call is the transfer of Ether to a contract, and it passes all the gas to the receiving function, while the use cases of the delegatecall are when a contract invokes a library with public functions or uses a proxy contract to write smart upgradeable contracts.

Exploit with delegatecall

The most widely adopted technique to upgrade contracts is utilizing a proxy contract.

A proxy interposes the actual logical contract and the dapp interface. To update the logical contract with a new version (say V2), only the new deployed address of the logical contract is passed to the proxy.

This helps achieve minimal or no changes in the dapp/web3 interface, saving a lot of development time.

Fig: Contract upgrade with proxy

Let us write a quick and short proxy, and a logical contract (say V1). For the same, create a file DelegateCall.sol with Proxy and V1 contracts as below.

contract Proxy
{ uint256 public x; address public owner; address public logicalAddr; constructor(address _Addr) { logicalAddr = _Addr; owner = msg.sender; } function upgrade(address _newAddr) public { logicalAddr = _newAddr; } // To call any function of the logical contract fallback() external payable { (bool success, ) = logicalAddr.delegatecall(msg.data); require(success , " Error calling logical contract"); }
}

V1, This represents version 1 of the logical contract.

contract V1
{ uint256 public x; // abi.encodedWithSignature("increment_X()") = 0xeaf2926e function increment_X() public { x += 1; }
}

Compile, deploy and run the contracts in Remix with the constructor param in proxy as the address of the V1 contract.

You can observe that, when the abi.encodedWithSignature("increment_X()"))  is passed as calldata to Proxy (fallback() is triggered), the function increment_X() in V1 is called.

Abi encoding is calculated using the tool,

$ npm install web3-eth-abi

and then

const Web3EthAbi = require('web3-eth-abi'); > Web3EthAbi.encodeFunctionSignature("increment_X()") '0xeaf2926e'

As discussed above in delegatecall, the storage context of the caller (i.e., Proxy) is used, and the value of x in Proxy is incremented by 1.

So far, this is all good.

At some point in the future, it is decided to upgrade the V1 contract with new functionality, let’s call it V2.

Create a new contract V2

contract V2
{ uint256 public x; uint256 public y; function increment_X() public { x += 1; } // abi.encodedWithSignature("set_Y(uint256)", 10) //0x1675b4f5000000000000000000000000000000000000000000000000000000000000000a function set_Y(uint256 _y) public { y = _y; }
}

Compile and deploy V2.

Pass the address of V2, to upgrade() in Proxy as V2 is the new contract we need.

When abi.encodedWithSignature("set_Y(uint256)", 10)) is passed as calldata to proxy, the function increment_Y() in V2 is called.

The value of y is 10, but wait a minute, surprise, surprise!

As there is no y in the Proxy contract, and as the storage context of Proxy is used, it has overwritten the second param in Proxy (i.e., owner) with 10 (or 0x000000000000000000000000000000000000000A).

With the owner address changed, the attacker is now in complete control of all the contracts.

How to Prevent the Attack

The delegatecall is tricky to use, and erroneous usage might have disastrous consequences.

For example, possible solutions to the above problem can be

  1. If possible, avoid using additional storage variables or go stateless in the upgraded contract – V2.
  2. Mirror the storage layout in V2, in other words, the contract calling delegatecall and the contract being called must have the same storage layout.
  3. By implementing unstructured storage in proxy with the help of assembly code as in OpenZeppelins proxy and not having any storage variables in proxy apart from the logical contract address.

Outro

In this tutorial, we saw how delegatecall can lead to disastrous results with an incorrect understanding or usage.

While using delegatecall, it is vital to keep it in our minds that delegatecall keeps context intact (storage, caller, etc…).

Even though there are certain problems associated with delegatecall, it is very often used in many contracts such as OpenZeppelin, Solidity libraries, EIP2535 diamonds, and many more.

To conclude, use delegatecall, but with care!


Posted on Leave a comment

How to Overwrite the Previous Print to Stdout in Python?

Rate this post

Summary: The most straightforward way to overwrite the previous print to stdout is to set the carriage return ('\r') character within the print statement as print(string, end = "\r"). This returns the next stdout line to the beginning of the line without proceeding to the next line.


Problem Formulation

Problem Definition: How will you overwrite the previous print/output to stdout in Python?

Example: Let’s say you have the following snippet, which prints the output as shown below:

import time for i in range(10): if i % 2 == 0: print(i, end="\r") time.sleep(2)

Output:

Challenge: What we want to do is instead of printing each output in a newline, we want to replace the previous output value and overwrite it with the new output value on the same line, as shown below.

Expected Output

Method 1: Using Carriage Return (‘\r’) Character

Approach: The simplest solution to the given problem is to use the carriage return (‘\r‘) character within your print statement to return the stdout to the start of the same print line without advancing to the next line. This leads to the next print statement overwriting the previous print statement.

📌Note: Read here to learn more about the carriage return escape character.

Code:

import time for i in range(10): if i % 2 == 0: print(i, end="\r") time.sleep(2) 

Output:

That’s easy! Isn’t it? Unfortunately, this approach is not completely foolproof. Let’s see what happens when we execute the following snippet:

import time li = ['start', 'Processing result']
for i in range(len(li)): print(li[i], end='\r') time.sleep(2)
print('Terminate')

Output:

⚠print('Terminate') is unable to completely wipe out the previous output. Hence, the final output is erroneous.

Since we are executing each output generated by a print statement on top of the previous output, it is not possible to display an output properly on the same line if the following output has a shorter length than the output before.

FIX: To fix the above problem, instead of simply overwriting the output, we must clear the previous output before displaying the next output. This can be done with the help of the following ANSI sequence: “\x1b[2K“.

Code:

import time li = ['start', 'Processing result']
for i in range(len(li)): print(li[i], end='\r') time.sleep(2)
print(end='\x1b[2K') # ANSI sequence to clear the line where the cursor is located
print('Terminate')

Output:

Method 2: Clear Line and Print Using ANSI Escape Sequence

Approach: The idea here is to use an extra print statement instead of altering the end parameter of the print statement that is used to display the output. The extra print statement is used to move the cursor back to the previous line where the output was printed and then clear it out with the help of ANSI escape sequences.

Explanation:

  • Print a line that ends with a new line initially.
  • Just before printing the next output on the new line, perform a couple of operations with the help of ANSI escape sequences:
    1. Move the cursor up, i.e., to the previous output line using the escape sequence: ‘\033[1A‘.
    2. Clear the line using the escape sequence: ‘\x1b[2K
  • Print the next output.

Code:

import time UP = '\033[1A'
CLEAR = '\x1b[2K'
for i in range(10): if i % 2 == 0: print(i) time.sleep(2) print(UP, end=CLEAR)

Output:

Discussion: Though this code might look a little more complex than the previous approach, it comes with a major advantage of the neatness of output. You don’t have to worry about the length of the previous output. Also, the cursor does not visually hinder the output being displayed.

Here’s a handy guide to escape sequences with respect to cursor movements:

ESCAPE SEQUENCE CURSOR MOVEMENT
\033[<L>;<C>H Positions the cursor. Puts the cursor at line L and column C.
\033[<N>A Move the cursor up by N lines.
\033[<N>B Move the cursor down by N lines.
\033[<N>C Move the cursor forward by N columns.
\033[<N>D Move the cursor backward by N columns.
\033[2J Clear the screen, move to (0,0)
\033[K Erase the end of line.

Method 3: Using “\b” Character

Another way to overwrite the previous output line is to use the backspace character(“\b“) and write to the standard output.

Code:

import time
import sys for i in range(10): if i % 2 == 0: sys.stdout.write(str(i)) time.sleep(1) sys.stdout.write('\b') sys.stdout.flush()

Output:

Caution: Ensure that you properly flush the buffer as done in the above snippet. Otherwise, you might see that only the last result is displayed at the end of the script.

Bonus Read Ahead 👇

What is Carriage Return (\r) in Python?

Simply put, carriage return is an escape character just like \n. Carriage return is denoted as \r and it is basically used to shift the cursor to the beginning of a line or string instead of allowing it to move on to the next line.

Whenever you use the carriage return escape character ‘\r’, the content that comes after the \r will appear on top of your line and will keep replacing the characters of the previous string one by one until it occupies all the contents left after the \r in that string.

Example:

li = ['One', 'Two', 'Three']
for i in range(len(li)): print(li[i], end='\r') # OUTPUT-->Three

Conclusion

To sum things up, the easiest way to overwrite the previous print is to use the carriage return \r character within your print statement using the end parameter. To ensure that the previous output is completely erased before printing the new output, you can use the \x1b[2K ANSI escape sequence.

I hope this tutorial helped you. Here’s another interesting read that you may find useful: Python Print One Line List


  • One of the most sought-after skills on Fiverr and Upwork is web scraping. Make no mistake: extracting data programmatically from websites is a critical life skill in today’s world that’s shaped by the web and remote work.
  • So, do you want to master the art of web scraping using Python’s BeautifulSoup?
  • If the answer is yes – this course will take you from beginner to expert in Web Scraping.
Join the Web Scraping with BeautifulSoup Masterclass now, and master it by tomorrow!
Posted on Leave a comment

Tableau Developer — Income and Opportunity

5/5 – (6 votes)

Before we learn about the money, let’s get this question out of the way:

What is Tableau?

Figure: Example of a Tableau dashboard (source)

Let’s have a look at the definition inspired by the official Tableau website:

Tableau is a visual data analytics platform focused on the business analytics use case that helps you use data to solve problems. It is great to visualize data (e.g., using dashboards) and perform complex data analytics tasks with relatively simple-to-use operations.

I recommend you watch the following 10-minute video at 1.5x speed to get a first intuition of the platform quickly:

Here’s a screenshot of the video that shows the data analysis process relevant for Tableau:

And here’s a screenshot of all the subproducts of the Tableau platform—all of them may be a potential specialization for a Tableau Developer:

So, Tableau helps you accomplish all five steps of business process and business intelligence:

  1. Storing transactions
  2. Analyse data
    • Data preparation
    • Data analysis
  3. Sharing insights
  4. Making decisions
  5. Monitoring outcomes and results

What is a Tableau Developer?

A Tableau Developer analyzes data, develops software, and creates data visualizations using Tableau to make businesses more efficient and effective.

Tableau developers routinely generate Tableau dashboards, business intelligence (BI) reports, and data visualizations to improve decision making in a data-driven organization.

Now that you know about what it is, let’s have a look at what it earns next!

Annual Income of Tableau Developer (US)

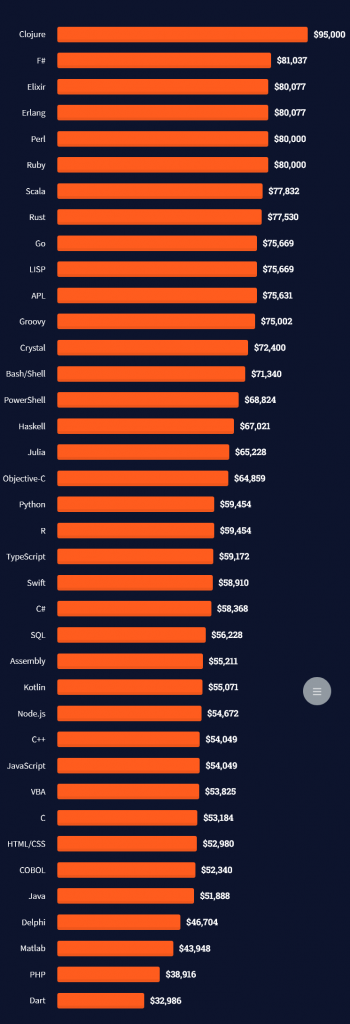
💬 Question: How much does a Tableau Developer in the US make per year?

Average Income of a Tableau Developer in the US by Source.
Figure: Average Income of a Tableau Developer in the US by Source. [1]

The expected annual income of a Tableau Developer in the United States is between $71,807 and $114,559, with an average annual income of $93,564 and a median income of $93,460 per year.

This data is based on our meta-study of 8 salary aggregators sources such as Glassdoor, ZipRecruiter, and PayScale.

Source Average Income
Glassdoor.com $97,578
ZipRecruiter.com $114,559
Talent.com $110,000
Indeed.com $105,000
PayScale.com $75,401
Comparably.com $71,807
Zippia.com $89,343
Salary.com $84,829
Table: Average Income of a Tableau Developer in the US by Source.

💡 Note: This is the most comprehensive salary meta-study of tableau developer income in the world, to the best of my knowledge!

To learn more about the income potential and opportunity in the broad data space, have a look at our full guide on the Finxter blog:

Let’s have a look at the hourly rate of tableau freelancers next!

Hourly Rate of Tableau Freelancers

Tableau Developers are well-paid on freelancing platforms such as Upwork or Fiverr.

If you decide to go the route as a freelance Tableau Developer, you can expect to make between $40 and $80 per hour on Upwork (source). Assuming an annual workload of 2000 hours, you can expect to make between $80,000 and $160,000 per year.

⚡ Note: Do you want to create your own thriving coding business online? Feel free to check out our freelance developer course — the world’s #1 best-selling freelance developer course that specifically shows you how to succeed on Upwork and Fiverr!

Industry Demand

But is there enough demand? Let’s have a look at Google trends to find out how interest evolves over time (source):

Tableau is now a Salesforce company. So, here’s the general interest in Salesforce for your reference:

Both trends look optimistic—up into the right!

Learning Path, Skills, and Education Requirements

Do you want to become a Tableau Developer? Here’s a step-by-step learning path I’d propose to get started with Tableau :

You can find many additional computer science courses on the Finxter Computer Science Academy (flatrate model).

But don’t wait too long to acquire practical experience!

Even if you have little skills, it’s best to get started as a freelance developer and learn as you work on real projects for clients — earning income as you learn and gaining motivation through real-world feedback.

🚀 Tip: An excellent start to turbo-charge your freelancing career (earning more in less time) is our Finxter Freelancer Course. The goal of the course is to pay for itself!

You can find more job descriptions for coders, programmers, and computer scientists in our detailed overview guide:

The following statistic shows the self-reported income from 9,649 US-based professional developers (source).

💡 The average annual income of professional developers in the US is between $70,000 and $177,500 for various programming languages.

Question: What is your current total compensation (salary, bonuses, and perks, before taxes and deductions)? Please enter a whole number in the box below, without any punctuation. If you are paid hourly, please estimate an equivalent weekly, monthly, or yearly salary. (source)

The following statistic compares the self-reported income from 46,693 professional programmers as conducted by StackOverflow.

💡 The average annual income of professional developers worldwide (US and non-US) is between $33,000 and $95,000 for various programming languages.

Here’s a screenshot of a more detailed overview of each programming language considered in the report:

Here’s what different database professionals earn:

Here’s an overview of different cloud solutions experts:

Here’s what professionals in web frameworks earn:

There are many other interesting frameworks—that pay well!

Look at those tools:

Okay, but what do you need to do to get there? What are the skill requirements and qualifications to make you become a professional developer in the area you desire?

Let’s find out next!

General Qualifications of Professionals

StackOverflow performs an annual survey asking professionals, coders, developers, researchers, and engineers various questions about their background and job satisfaction on their website.

Interestingly, when aggregating the data of the developers’ educational background, a good three quarters have an academic background.

Here’s the question asked by StackOverflow (source):

Which of the following best describes the highest level of formal education that you’ve completed?

However, if you don’t have a formal degree, don’t fear! Many of the respondents with degrees don’t have a degree in their field—so it may not be of much value for their coding careers anyways.

Also, about one out of four don’t have a formal degree and still succeeds in their field! You certainly don’t need a degree if you’re committed to your own success!

Freelancing vs Employment Status

The percentage of freelance developers increases steadily. The fraction of freelance developers has already reached 11.21%!

This indicates that more and more work will be done in a more flexible work environment—and fewer and fewer companies and clients want to hire inflexible talent.

Here are the stats from the StackOverflow developer survey (source):

Do you want to become a professional freelance developer and earn some money on the side or as your primary source of income?

Resource: Check out our freelance developer course—it’s the best freelance developer course in the world with the highest student success rate in the industry!

Other Programming Languages Used by Professional Developers

The StackOverflow developer survey collected 58000 responses about the following question (source):

Which programming, scripting, and markup languages have you done extensive development work in over the past year, and which do you want to work in over the next year?

These are the languages you want to focus on when starting out as a coder:

And don’t worry—if you feel stuck or struggle with a nasty bug. We all go through it. Here’s what SO survey respondents and professional developers do when they’re stuck:

What do you do when you get stuck on a problem? Select all that apply. (source)

To get started with some of the fundamentals and industry concepts, feel free to check out these articles:

Where to Go From Here?

Enough theory. Let’s get some practice!

Coders get paid six figures and more because they can solve problems more effectively using machine intelligence and automation.

To become more successful in coding, solve more real problems for real people. That’s how you polish the skills you really need in practice. After all, what’s the use of learning theory that nobody ever needs?

You build high-value coding skills by working on practical coding projects!

Do you want to stop learning with toy projects and focus on practical code projects that earn you money and solve real problems for people?

🚀 If your answer is YES!, consider becoming a Python freelance developer! It’s the best way of approaching the task of improving your Python skills—even if you are a complete beginner.

If you just want to learn about the freelancing opportunity, feel free to watch my free webinar “How to Build Your High-Income Skill Python” and learn how I grew my coding business online and how you can, too—from the comfort of your own home.

Join the free webinar now!

References

[1] The figure was generated using the following code snippet:

import matplotlib.pyplot as plt
import numpy as np
import math data = [97578, 114559, 110000, 105000, 75401, 71807, 89343, 84829] labels = ['Glassdoor.com', 'ZipRecruiter.com', 'Talent.com', 'Indeed.com', 'PayScale.com', 'Comparably.com', 'Zippia.com', 'Salary.com'] median = np.median(data)
average = np.average(data)
print(median, average)
n = len(data) plt.plot(range(n), [median] * n, color='black', label='Median: $' + str(int(median)))
plt.plot(range(n), [average] * n, '--', color='red', label='Average: $' + str(int(average)))
plt.bar(range(len(data)), data)
plt.xticks(range(len(data)), labels, rotation='vertical', position = (0,0.45), color='white', weight='bold')
plt.ylabel('Average Income ($)')
plt.title('Tableau Developer Annual Income - by Finxter')
plt.legend()
plt.show()
Posted on Leave a comment

Your Python Regex Pattern Doesn’t Match? Try This!

5/5 – (1 vote)

Problem Formulation

Say, you want to find a regex pattern in a given string. You know the pattern exists in the string. You use the re.match(pattern, string) function to find the match object where the pattern matches in the string.

💬 Problem: The Python regular expression pattern is not found in the string. The pattern doesn’t match anything, and, thus, the match object is None. How to fix this?

Here’s an example in which you’re searching for the pattern 'h[a-z]+' which should match the substring 'hello'.

But it doesn’t match! ⚡

import re my_string = 'hello world'
pattern = re.compile('h[a-z]+') match = re.match(pattern, my_string) if match: print('found!')
else: print('not found!')

Output:

not found!

Where is the bug? And how to fix it, so that the pattern matches the substring 'hello'?

💡 Learn More: Improve your regex superpower by studying character classes used in the example pattern 'h[a-z]+' by visiting this tutorial on the Finxter blog.

Solution: Use re.search() instead of re.match()

A common reason why your Python regular expression pattern is not matching in a given string is that you mistakenly used re.match(pattern, string) instead of re.search(pattern, string) or re.findall(pattern, string). The former attempts to match the pattern at the beginning of the string, whereas the latter two functions attempt to match anywhere in the string.

Here’s a quick recap of the three regex functions:

  • re.match(pattern, string) returns a match object if the pattern matches at the beginning of the string. The match object contains useful information such as the matching groups and the matching positions.
  • re.search(pattern, string) matches the first occurrence of the pattern in the string and returns a match object.
  • re.findall(pattern, string) scans string from left to right, searching for all non-overlapping matches of the pattern. It returns a list of strings in the matching order when scanning the string from left to right.

Thus, the following code uses re.search() to fix our problem:

import re my_string = 'hello world'
pattern = re.compile('h[a-z]+') match = re.search(pattern, my_string) if match: print('found!')
else: print('not found!')

Output:

found!

Finally, the pattern 'h[a-z]+' does match the string 'hello world'.

Note that you can also use the re.findall() function if you’re interested in just the string matches of your pattern (without match object). We’ll explain all of this — re.match(), re.search(), re.findall(), and match objects — in a moment but first, let’s have a look at the same example with re.findall():

import re my_string = 'hello world'
pattern = re.compile('h[a-z]+') match = re.findall(pattern, my_string) print(match)
# ['hello'] if match: print('found!')
else: print('not found!')

Output:

['hello']
found!

Understanding re.match()

The re.match(pattern, string) method returns a match object if the pattern matches at the beginning of the string. The match object contains useful information such as the matching groups and the matching positions. An optional argument flags allows you to customize the regex engine, for example to ignore capitalization.

Specification:

re.match(pattern, string, flags=0)

The re.match() method has up to three arguments.

  • pattern: the regular expression pattern that you want to match.
  • string: the string which you want to search for the pattern.
  • flags (optional argument): a more advanced modifier that allows you to customize the behavior of the function. Want to know how to use those flags? Check out this detailed article on the Finxter blog.

We’ll explore them in more detail later.

Return Value:

The re.match() method returns a match object. You may ask (and rightly so):

💡 Learn More: Understanding re.match() on the Finxter blog.

What’s a Match Object?

If a regular expression matches a part of your string, there’s a lot of useful information that comes with it: what’s the exact position of the match? Which regex groups were matched—and where?

The match object is a simple wrapper for this information. Some regex methods of the re package in Python—such as search()—automatically create a match object upon the first pattern match.

At this point, you don’t need to explore the match object in detail. Just know that we can access the start and end positions of the match in the string by calling the methods m.start() and m.end() on the match object m:

>>> m = re.search('h...o', 'hello world')
>>> m.start()
0
>>> m.end()
5
>>> 'hello world'[m.start():m.end()] 'hello'

In the first line, you create a match object m by using the re.search() method. The pattern 'h...o' matches in the string 'hello world' at start position 0.

You use the start and end position to access the substring that matches the pattern (using the popular Python technique of slicing).


Now that you understood the purpose of the match object, let’s have a look at the alternative to the re.match() function next! 🚀

Understanding re.search()

The re.search(pattern, string) method matches the first occurrence of the pattern in the string and returns a match object.

Specification:

re.search(pattern, string, flags=0)

The re.search() method has up to three arguments.

  • pattern: the regular expression pattern that you want to match.
  • string: the string which you want to search for the pattern.
  • flags (optional argument): a more advanced modifier that allows you to customize the behavior of the function. Want to know how to use those flags? Check out this detailed article on the Finxter blog.

We’ll explore them in more detail later.

Return Value:

The re.search() method returns a match object. You may ask (and rightly so):

💡 Learn More: Understanding re.search() on the Finxter blog.

Understanding re.findall()

The re.findall(pattern, string) method scans string from left to right, searching for all non-overlapping matches of the pattern. It returns a list of strings in the matching order when scanning the string from left to right.

re.findall() Visual Explanation

Specification:

re.findall(pattern, string, flags=0)

The re.findall() method has up to three arguments.

  • pattern: the regular expression pattern that you want to match.
  • string: the string which you want to search for the pattern.
  • flags (optional argument): a more advanced modifier that allows you to customize the behavior of the function. Want to know how to use those flags? Check out this detailed article on the Finxter blog.

We will have a look at each of them in more detail.

Return Value:

The re.findall() method returns a list of strings. Each string element is a matching substring of the string argument.

💡 Learn More: Understanding re.findall() on the Finxter blog.

Python Regex Course

Google engineers are regular expression masters. The Google search engine is a massive text-processing engine that extracts value from trillions of webpages.  

Facebook engineers are regular expression masters. Social networks like Facebook, WhatsApp, and Instagram connect humans via text messages

Amazon engineers are regular expression masters. Ecommerce giants ship products based on textual product descriptions.  Regular expressions ​rule the game ​when text processing ​meets computer science. 

If you want to become a regular expression master too, check out the most comprehensive Python regex course on the planet:


Now, this was a lot of theory! Let’s get some practice.

In my Python freelancer bootcamp, I’ll train you on how to create yourself a new success skill as a Python freelancer with the potential of earning six figures online.

The next recession is coming for sure, and you want to be able to create your own economy so that you can take care of your loved ones.

Check out my free “Python Freelancer” webinar now!

Join 20,000+ ambitious coders for free!