Depending on the problem your device has, you may have to leave it with the Genius Bar —and they may have to send it off to Apple. Make the process easier for yourself and for them plus protect your sensitive data by taking a few steps in advance.
Apple is still unrivalled at how easily you can bring devices in to a Genius Bar and have them repaired. Yet it’s hard enough getting one Genius Bar appointment so make sure you cut down the risk of having to book a second. Prepare your devices and take a few steps before you head into the Apple Store and you’ll make the whole process go as quickly and painlessly as possible.
Nothing will prepare you if the answer to your issue turns out to be an expensive repair. However, at least you will be able to hand over your device and know that you have all of your data safe. You’ll be able to know that even if Apple ends up completely replacing the device, you’ll be back up and working quickly.
You do have to go through a lot of steps before you can book a Genius Bar appointment.
Plus you may have a serious problem but the poor Apple Genius has been dealing with hundreds of them. Make their job easier, too.
[youtube https://www.youtube.com/watch?v=lL93ku6iuPw&w=560&h=315]
Devices
Some of what you should do varies depending on whether it’s a Mac, an iOS device or an Apple Watch that you’re having trouble with. However, several steps are the same.
Regardless of what device you have, make sure you know your Apple ID before you head to the store. That does mean knowing the password but also the email address. This sounds obvious but if you’re a longtime Apple user then you are likely to have several Apple IDs and we have spent a confused few minutes entering the right password for the wrong ID before.
Plus your Mac will have a different login password to your Apple ID and your iOS device will have a passcode. So get all of these ready. You may not know until you talk to the Genius whether the problem is something they can fix right in front of you or whether it’s going to take some time. If you have to leave the device with them, they will absolutely require the passwords to log in to it.
If it’s an iOS device that they’re going to send away or take apart, they’ll also need to know the passcode in order to disable the Find My iPhone security so that they can wipe the phone if needed.
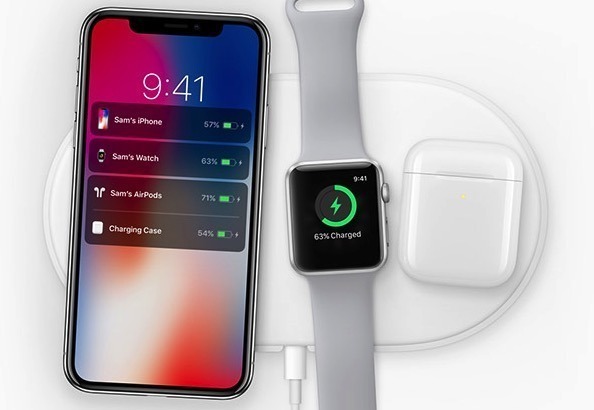
It’s called Find My iPhone but it actually locates all of your Apple devices
Apple also asks that you bring a sales receipt with you. We wouldn’t be bothered if we know the device is out of AppleCare or even if we just bought it at an Apple Store. If you got your device from anywhere else, though, bring the receipt just in case.
Next, you have to back up your data and the way you do that is slightly different depending on your device.
Mac specific
Don’t wait for a problem before you backup your Mac. If you haven’t already done so, though, cross your fingers that your Mac will work enough to let you back it up now.
You’re probably using a cloud service such as iCloud or Dropbox and that will mean some of your data is saved off the machine, but it won’t be anywhere near everything. So use something like Carbon Copy Cloner to make a clone copy of your hard drive.
It’s possible that the Mac you get back from an Apple repair won’t be the same Mac. If the problem wasn’t quite so serious, it’s still quite possible that the drive in the Mac won’t be the same one. And even if it still is, part of the repair process may have meant Apple had to wipe the drive.
Do create a clone backup of your drive using something like Carbon Copy Cloner but do it before you have problems
So if you have a clone copy on an external drive, you can plug that into your Mac when you get it back. You could be up and running again in no longer time than it takes to boot the Mac. Or you could use the same backup software to clone that external drive back on to the Mac’s own internal one.
Apple Watch and iOS
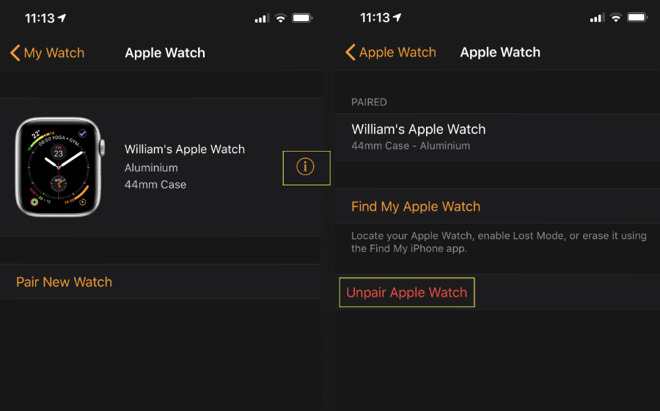
If you have an Apple Watch then whether the problem is with that or your iOS device, unpair them.
As well as making it easier for both you and Apple when your Watch or your iOS device is replaced, there’s an extra benefit. Unpairing your Apple Watch automatically backs it up. You can’t backup your Apple Watch data as easily as you can your Mac or iOS device but if you unpair one, that starts backing it up automatically.
Unpair your Apple Watch whether the problem is with that or with your iPhone
It’s not as if you store a lot of data on your Apple Watch, and it’s not as if changing to a new one means losing even all that activity information you’ve accrued. It does mean that swapping to a new one is faster, and with a few taps you’ll end up back with the same Faces and complications you like.
In comparison, your iOS device is already far more backed up than your Watch is. While you’re using that device, it’s being regularly backed up to iCloud. It’s still the case that an iCloud backup doesn’t save absolutely everything, but it’s no longer the case that you have to back it up to iTunes to get the rest.
Both iCloud and iTunes backups now do pretty much the same thing. What you could do, though, is make an extra copy of the data by backing up the iOS device to an external drive.
The real benefit of that, though, is to save space on your Mac’s internal hard drive. So if you’re not backing up to your Mac, this is an unnecessary extra step. Just make sure that you do backups to iCloud or iTunes.
Data is key
Some of your data is irreplaceable. Some of it is a royal pain to reinstall or redownload. And the some of it is sensitive.
We’re not paranoid about Apple service centers, we don’t remove 1Password or other password managers before we send something in for repair. Yet we will remove company documents, financial statements, and medical information.
Not only do we trust Apple’s service people, we also know they’re swamped and the last thing they care about is digging into your holiday snaps. However, we also know that drives get replaced and when they are, the old one has to go somewhere. Rather than examining the entire chain of companies that may be involved in disposing or repurposing drives, we remove sensitive data first.
That’s easy to do if you can start up your Mac or iOS device. Just copy the files off to somewhere else safe and erase the device.
If your Mac or iOS device is in such a bad state that you can’t even start it, though, you can look as if you’re stuck. However, there is still something you can do. You can wipe the entire device —and you can do it remotely.
This is a little bit of overkill if you’ve only taken your iPhone in to the Genius Bar because you couldn’t get it to set the clock to the right time zone. For more serious issues, though, go to iCloud.com, sign in with your Apple ID and wipe the whole device.
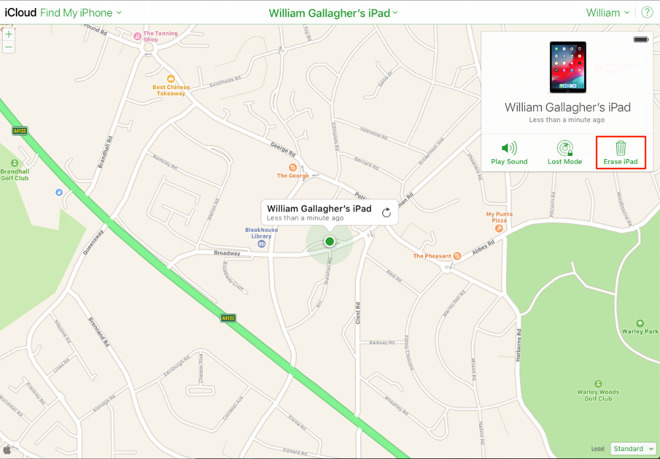
Use iCloud.com and you can remote-wipe your Macs and iOS devices
Whether it’s a Mac or an iOS device, you do it in the same way. On iCloud.com, you click on Find My iPhone. Despite the name, this actually finds all your Apple devices of any kind. You need to have turned on the Find My iPhone (or Mac or iPad) feature before but as long as you have, you will now see a map with the devices shown on it.
If the device is powered on and connected to the internet right now then you’ll see a dot for it with a description saying the location was updated “Less than a minute ago.”
When your device is in such need of repair that it can’t even switch on, you’ll still see it shown on Find My iPhone, just with the date it was last seen.
Whatever that date is, there will always be an I for Information button. Click on that and you can choose to erase the device.
Again, if the device is on and connected to the internet then this will happen right away. If it isn’t, then the next time the device powers up and gets online, it will be wiped.
Genius
You’re hopefully only going into the Store with one problem and the Geniuses are dealing with hundreds or even thousands. They know all of these steps, they know why you need to do it —and they also know that most people won’t have done any of them.
Consequently they will ask you whether you’ve got backups, whether you have your Apple ID details, whether you’ve unpaired the Watch and so on. All the way through they are hoping you’ll say yes because otherwise this is going to take a long time.
Be the person who has done everything. As well as making their job easier, you’ll get out of there faster. You’ll get out of there knowing that no matter what happens, your data is both safe and is going to be immediately available for you to get back to work.
Keep up with AppleInsider by downloading the AppleInsider app for iOS, and follow us on YouTube, Twitter @appleinsider and Facebook for live, late-breaking coverage. You can also check out our official Instagram account for exclusive photos.