During your career as a Pythonista, you will encounter situations where a Python script will need to be executed on a scheduled basis, such as daily, weekly, or monthly.
This article shows you how to accomplish this task using a .bat (batch) file.
Question: How would we write code to run a .bat (batch) file on a schedule?
We can accomplish this task by completing the following steps:
Create a Python Script
Create a .bat File
Execute a .bat File
Schedule a .bat File Using Windows Task Scheduler
Bonus: Schedule a Monthly .bat File
Create a Python Script
Let’s first start by creating a Python script that counts down from five (5) to one (1).
In the current working directory, create a Python file called counter.py. Copy and paste the code snippet below into this file and save it.
from time import sleep lift_off = 5 while lift_off > 0: print (f'Lift Off in {lift_off} seconds!') sleep(2) lift_off -= 1
The first line in the above code snippet imports the time library. This allows access to the sleep() function, which pauses the script between iterations.
Next, a while loop is instantiated and executes the code inside this loop until the value of lift_off is zero (0).
On each iteration, the following occurs:
A line of text is output to the terminal indicating the value of lift_off.
The script pauses for two (2) seconds.
The value of lift_off is decreased by one (1).
To confirm script runs successfully. Navigate to the command prompt and run the following:
python counter.py
The output from this script should be as follows:
Lift Off in 5 seconds!
Lift Off in 4 seconds!
Lift Off in 3 seconds!
Lift Off in 2 seconds!
Lift Off in 1 seconds!
Great! Now let’s create a .bat (Batch) file to run this script!
Create a .bat File
This section creates a .bat file that executes counter.py by calling this file inside the .bat file.
In the current working directory, create a Python file called counter.bat. Copy and paste the code snippet below into this file and save it.
@echo off "C:\Python\python.exe" "C:\PYTHON_CODE\counter.py"
The first line of the code snippet turns off any output to the terminal (except the code inside counter.py). For example, If the first line (@echo off) was removed and counter.bat was executed, the following would be output to the terminal.
C:\WORK> "C:\Python\python.exe" "C:\PYTHON_CODE\counter.py"
Lift Off in 5 seconds!
Lift Off in 4 seconds!
Lift Off in 3 seconds!
Lift Off in 2 seconds!
Lift Off in 1 seconds!
The following line of code specifies the following:
The location of the python.exe file on your computer.
The location of the python script to execute.
Let’s see if this works!
Note: It is best practice to ensure that the full paths to the python.exe and counter.py files are added.
Execute a .bat File
This section executes the .bat file created earlier. This code calls and executes the code inside the counter.py file.
To run the .bat file, navigate to the IDE, and click to select and highlight the counter.bat file. Then, press the F5 key on the keyboard to execute.
If successful, the output should be the same as running the counter.py file directly.
Lift Off in 5 seconds!
Lift Off in 4 seconds!
Lift Off in 3 seconds!
Lift Off in 2 seconds!
Lift Off in 1 seconds!
Perfect! Let’s schedule this to run Daily at a specified time.
Schedule a .bat File Using Windows Task Scheduler
This example uses Windows Task Scheduler to schedule a .bat file to run at a specified date/time.
To set up a Task Scheduler on Windows, navigate to the command prompt from Windows and run the following code:
taskschd.msc
Alternatively, click the Windows start button, search for, and select Task Scheduler.
Either of the above actions will display the Task Scheduler pop-up.
From the Actions area, click Create Basic Task. This action displays the Create a Basic Task Wizard pop-up.
From the Create a Basic Task pop-up, enter a Name and Description into the appropriate text boxes. Click the Next button to continue.
This action displays the Task Trigger pop-up. Select when to run the .bat file. For this example, Daily was chosen. Click the Next button to continue.
Since Daily was selected earlier, the Daily pop-up displays. Modify the fields to meet the desired date and time requirements. Click the Next button to continue.
This action displays the Action pop-up. Select Start a program. Click the Next button to continue.
This action displays the Start a Program pop-up. Browse to select the counter.bat file created earlier. Click the Next button to continue.
This action displays the Summary pop-up. If satisfied with the selections made earlier, click the Finish button to complete the setup.
Great! The task is now scheduled to run at the date/time specified.
View, Edit, or Delete a Scheduled Task
To view a list of Scheduled Tasks, navigate to the Task Scheduler pop-up and select Task Scheduler Library.
To delete a task, click to select the appropriate task from the list of scheduled events. Then click the Delete link on the right-hand side.
To edit a task, click to select the appropriate task from the list of scheduled events. Then click the Properties link on the right-hand side to display the Properties pop-up. From this pop-up, all of the above selections can be modified.
Click the OK button to confirm any changes and close the pop-up.
Note: We recommend you review the fields on each tab to learn more about scheduling tasks.
Bonus: Schedule a Monthly .bat File
This section reads in a CSV containing sales data. This data is then sorted and filtered based on the current month. This is scheduled to run on the first day of each month. To follow along, download the CSV file.
In the current working directory, create a Python file called sales.py. Copy and paste the code snippet below into this file and save it.
In the current working directory, create a Python file called sales.bat Copy and paste the code snippet below into this file and save it. Modify to meet your locations.
@echo off "C:\Python\python.exe" "C:\PYTHON_CODE\sales.py"
Let’s set up a Monthly schedule to run on the first day of each month by performing the following steps:
Start the Windows Task Scheduler.
From the Task Scheduler pop-up, select Create Basic Task from the Actions area.
From the Create a Basic Task pop-up, enter a Name and Description in the appropriate text boxes. Click the Next button to continue.
From the Task Trigger pop-up, select Monthly. Click the Next button to continue.
From the Monthly pop-up, complete the fields as outlined below:
A Start Date and Start Time.
From the Months dropdown, select each month that the report will run. For this example, all months were selected.
From the Days dropdown, select the day(s) of the month to run this report. For this example, 1 was selected.
Click the Next button to continue.
From the Action pop-up, select Start a Program. Click the Next button to continue.
From the Start a Program pop-up, click the Browse button to locate and select the sales.bat file.
From the Summary window click the Finish button.
This completes the configuration and activates the Scheduler to run on the specified day/time.
Summary
This article has shown you have to create and run a .bat file that executes a Python script on a scheduled basis.
Good Luck & Happy Coding!
Programming Humor – Python
“I wrote 20 short programs in Python yesterday. It was wonderful. Perl, I’m leaving you.” — xkcd
[www.indiegala.com] A one of a kind selection, games made with heart and mind brought to you by Whale Rock Games for the passionate gamers: Time Lock VR 2, The Divine Invasion, NeverSynth, SPACE ACCIDENT, Dofamine & Euphoria: Supreme Mechanics
To break a curse placed upon her, a young girl must venture into the haunted streets of her town at night to search for her lost memories while evading
the twisted spirits that lurk in the darkness.
[Fixed] Python ModuleNotFoundError: No Module Named ‘readline’
5/5 – (1 vote)
Quick Fix: Python raises the ImportError: No module named 'readline' when it cannot find the library readline. The most frequent source of this error is that you haven’t installed readline explicitly with pip install readline. Alternatively, you may have different Python versions on your computer, and readline is not installed for the particular version you’re using.
Attention: This module is depreciated, you may want to install gnureadline instead:
pip install gnureadline
Problem Formulation
You’ve just learned about the awesome capabilities of the readline library and you want to try it out, so you start your code with the following statement:
import readline
This is supposed to import the readline library into your (virtual) environment. However, it only throws the following ImportError: No module named readline:
>>> import readline

Traceback (most recent call last): File "<pyshell#6>", line 1, in <module> import readline

ModuleNotFoundError: No module named 'readline'
Solution Idea 1: Install Library readline
The most likely reason is that Python doesn’t provide readline in its standard library. You need to install it first!
To fix this error, you can run the following command in your Windows shell:
$ pip install readline
This simple command installs readline in your virtual environment on Windows, Linux, and MacOS. It assumes that your pip version is updated. If it isn’t, use the following two commands in your terminal, command line, or shell (there’s no harm in doing it anyways):
Note: Don’t copy and paste the $ symbol. This is just to illustrate that you run it in your shell/terminal/command line.
Solution Idea 2: Fix the Path
The error might persist even after you have installed the readline library. This likely happens because pip is installed but doesn’t reside in the path you can use. Although pip may be installed on your system the script is unable to locate it. Therefore, it is unable to install the library using pip in the correct path.
To fix the problem with the path in Windows follow the steps given next.
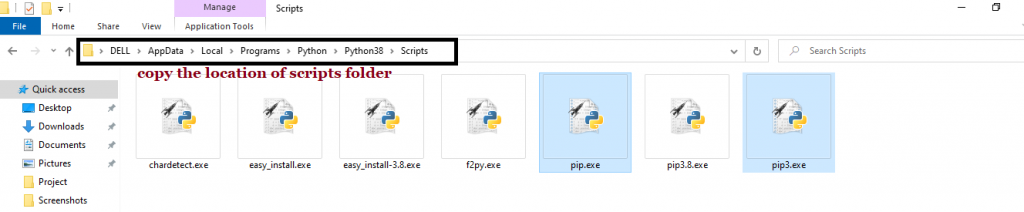
Step 1: Open the folder where you installed Python by opening the command prompt and typing where python
Step 2: Once you have opened the Python folder, browse and open the Scripts folder and copy its location. Also verify that the folder contains the pip file.
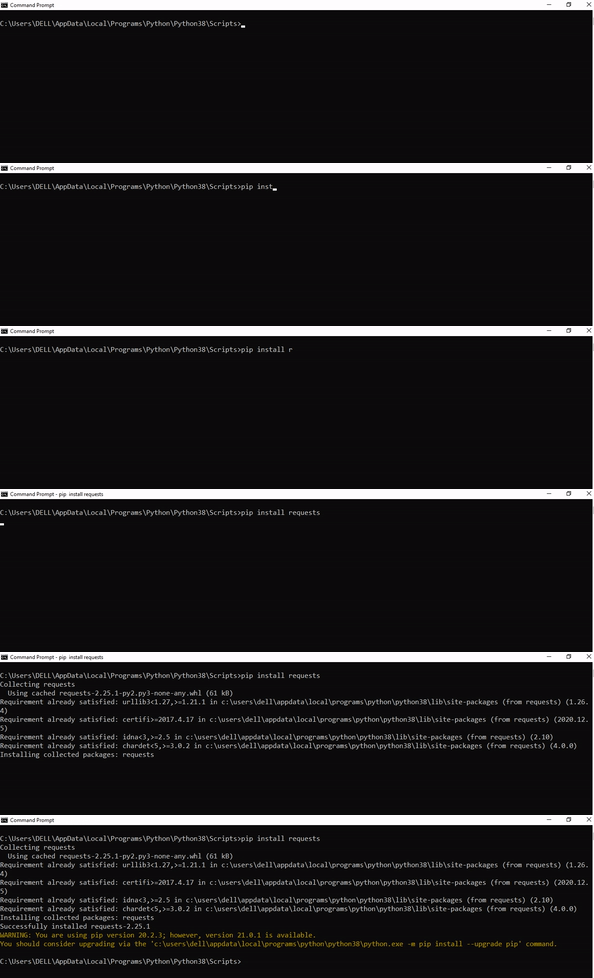
Step 3: Now open the Scripts directory in the command prompt using the cd command and the location that you copied previously.
Step 4: Now install the library using pip install readline command. Here’s an analogous example:
After having followed the above steps, execute our script once again. And you should get the desired output.
Other Solution Ideas
The ModuleNotFoundError may appear due to relative imports. You can learn everything about relative imports and how to create your own module in this article.
You may have mixed up Python and pip versions on your machine. In this case, to install readline for Python 3, you may want to try python3 -m pip install readline or even pip3 install readline instead of pip install readline
If you face this issue server-side, you may want to try the command pip install – user readline
If you’re using Ubuntu, you may want to try this command: sudo apt install readline
You can also check out this article to learn more about possible problems that may lead to an error when importing a library.
Understanding the “import” Statement
import readline
In Python, the import statement serves two main purposes:
Search the module by its name, load it, and initialize it.
Define a name in the local namespace within the scope of the import statement. This local name is then used to reference the accessed module throughout the code.
What’s the Difference Between ImportError and ModuleNotFoundError?
What’s the difference between ImportError and ModuleNotFoundError?
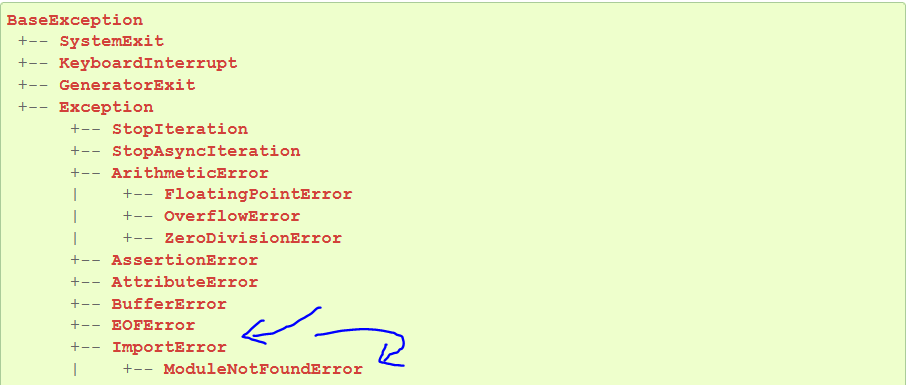
Python defines an error hierarchy, so some error classes inherit from other error classes. In our case, the ModuleNotFoundError is a subclass of the ImportError class.
You can see this in this screenshot from the docs:
You can also check this relationship using the issubclass() built-in function:
Specifically, Python raises the ModuleNotFoundError if the module (e.g., readline) cannot be found. If it can be found, there may be a problem loading the module or some specific files within the module. In those cases, Python would raise an ImportError.
If an import statement cannot import a module, it raises an ImportError. This may occur because of a faulty installation or an invalid path. In Python 3.6 or newer, this will usually raise a ModuleNotFoundError.
Related Videos
The following video shows you how to resolve the ImportError:
How to Fix “ModuleNotFoundError: No module named ‘readline’” in PyCharm
If you create a new Python project in PyCharm and try to import the readline library, it’ll raise the following error message:
Traceback (most recent call last): File "C:/Users/.../main.py", line 1, in <module> import readline

ModuleNotFoundError: No module named 'readline' Process finished with exit code 1
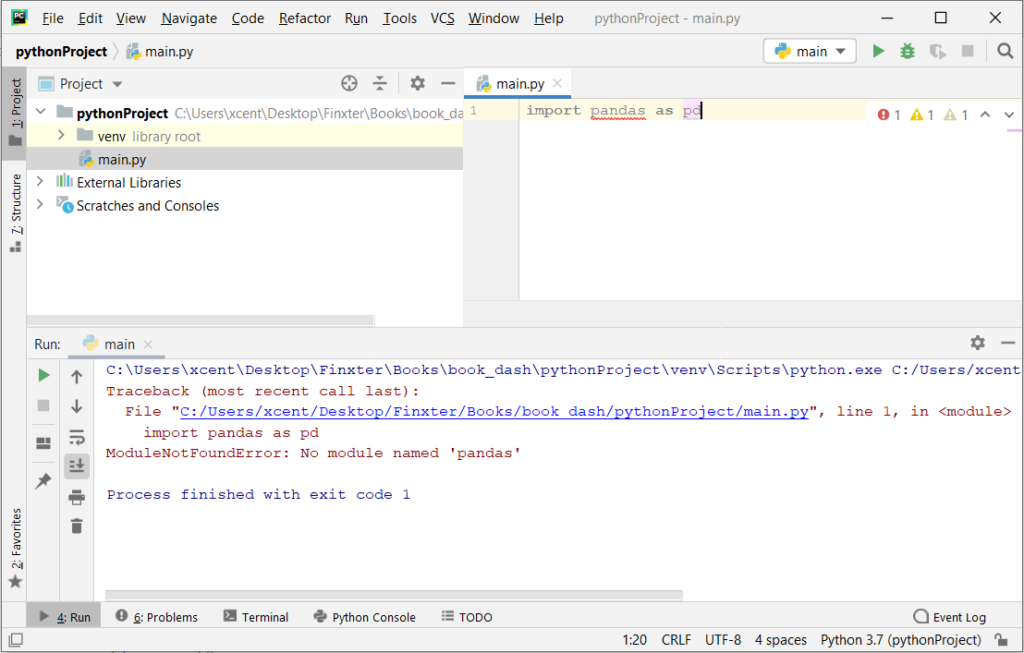
The reason is that each PyCharm project, per default, creates a virtual environment in which you can install custom Python modules. But the virtual environment is initially empty—even if you’ve already installed readline on your computer!
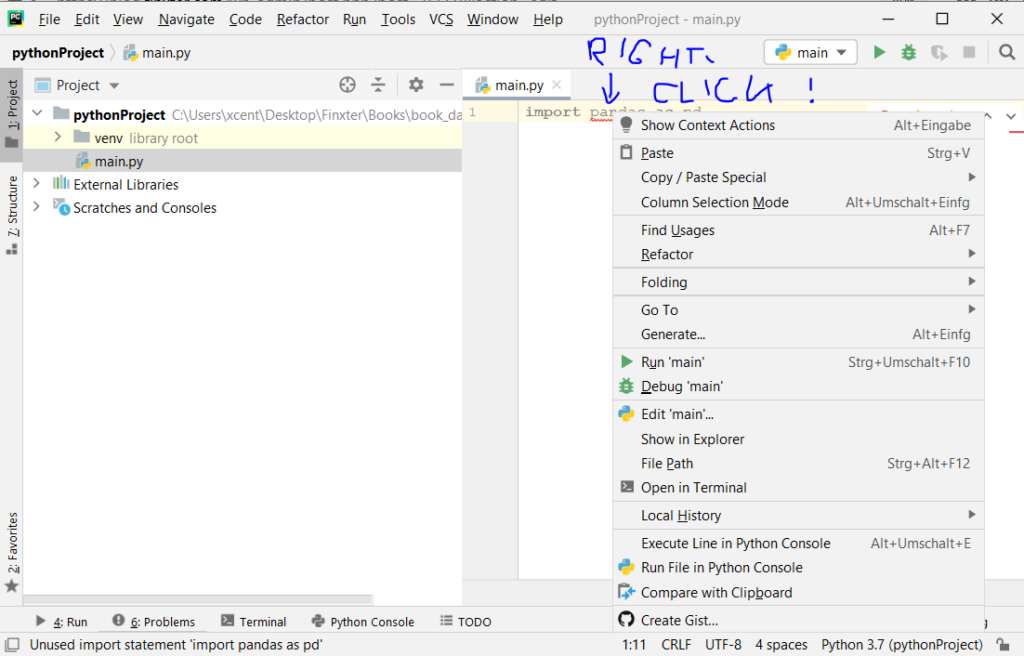
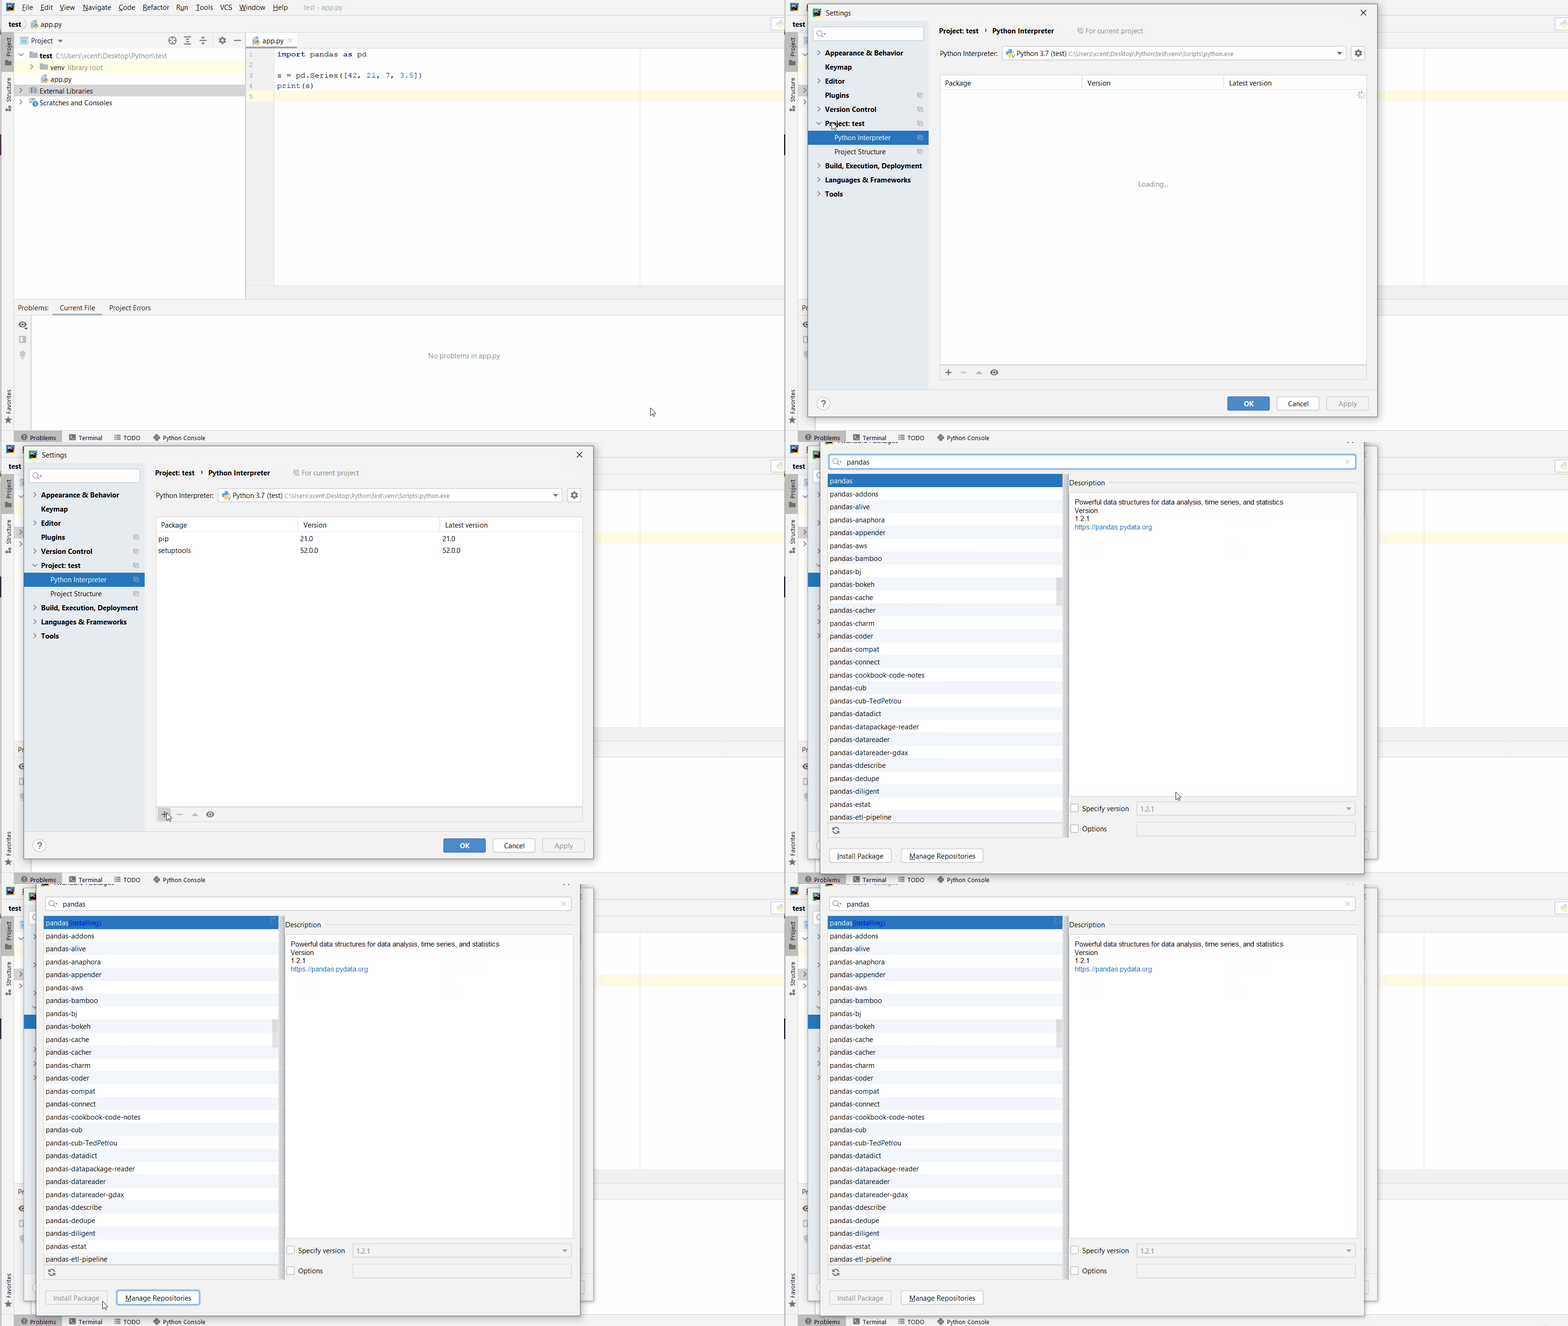
Here’s a screenshot exemplifying this for the pandas library. It’ll look similar for readline.
The fix is simple: Use the PyCharm installation tooltips to install Pandas in your virtual environment—two clicks and you’re good to go!
First, right-click on the pandas text in your editor:
Second, click “Show Context Actions” in your context menu. In the new menu that arises, click “Install Pandas” and wait for PyCharm to finish the installation.
The code will run after your installation completes successfully.
As an alternative, you can also open the Terminal tool at the bottom and type:
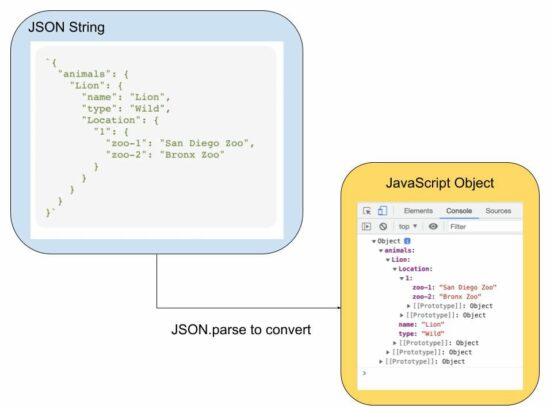
The source JSON string can be from many different resources. For example,
It can be stored in the database that is to be parsed.
It can be a response to an API.
The JSON string will contain many types of data like dates, functions and more.
The following examples give code to learn how to convert a JSON string that contains different types of data. In the previous article, we have seen how to convert a JavaScript object to JSON.
How the date in the JSON string will be converted
If the input JSON string contains date values, the JSON.parse() JS function results in a date string.
For example, the date in 2014-11-25 into Tue Nov 25 2014 05:30:00 GMT+0530.
It will be converted later into a JavaScript date object.
// JSON string with date to JavaScript object

const jsonString = '{"animal":"Lion", "birthdate":"2014-11-25", "zoo":"Bronx Zoo"}';

const jsObject = JSON.parse(jsonString);

jsObject.birthdate = new Date(jsObject.birthdate);

console.log(jsObject.birthdate);
Output:
Tue Nov 25 2014 05:30:00 GMT+0530
JSON input script with function to JavaScript object
If a JSON script contains a function as its value, the below code shows how to parse the input JSON. In an earlier tutorial, we have see many functions of JSON handling using PHP.
It applied JSON.parse as usual and get the scope of the function by using JavaScript eval(). The JavaScript object index gets the scope to access the function in the input JSON string.
Note: Using the JS eval() is a bad idea if you are working with sensitive data. So avoid using functions as a string inside a JS JSON input.
// JSON string with a function to JavaScript object and invoke the function

const jsonString = '{"animal":"Lion", "birthdate":"2014-11-25", "id":"function () {return 101;}"}';

const jsObject = JSON.parse(jsonString);

jsObject.id = eval("(" + jsObject.id + ")");

console.log(jsObject.id());

// also be aware that, when you pass functions in JSON it will lose the scope
JSON.parse reviver to convert the date string to a JavaScript object
In a previous example, we parsed the date as a string and then converted it into a Date object.
Instead of converting the resultant Date string into a Date object later, this program uses JSON.parse() with its reviver parameter.
The reviver parameter is a callback function created below to convert the input date into a Date object.
Using this method, the output Javascript object will include the date object as converted by the reviver method.
// JSON string with a date to JavaScript object using the reviver parameter of JSON.parse

const jsonString = '{"animal": "Lion", "birthdate": "2014-11-25", "zoo": "Bronx Zoo"}';

const jsObject = JSON.parse(jsonString, function(key, value) { if (key == "birthdate") { return new Date(value); } else { return value; }

}); jsObject.birthdate = new Date(jsObject.birthdate);

console.log(jsObject.birthdate);
The reviver parameter is optional while using the JSOM.parse function. The callback defined as a reviver will check each item of the input JSON string.
Tales Deals, Fear Fighters Bundle, Mile Morales Pre-Order
Fear Fighters Bundle | 8 Steam Games | 96% OFF
[www.indiegala.com] The scary season is gone, but we'll still fight fear with fun! A new indie collection brought to you by the Fear Fighters Bundle at only $0.99 in the first 24 hours!
Grab 2 Free Games At The Epic Games Store This Week
The Epic Games Store continues to give away free games each week, more than three years after the digital storefront launched its awesome weekly freebies program. Epic has confirmed that the free games program will continue through at least the end of 2022. Every Thursday at the same time 8 AM PT / 11 AM ET--Epic gives up between one and three free games. You merely need to create a free Epic account and enable two-factor authentication to start snagging freebies. At this point, Epic has given away well over 100 free games, and there's no sign that the program will stop any time soon. We keep this article up to date weekly to highlight both the current free games and next week's offerings.
This week's free game at Epic
Alba: A Wildlife Adventure
From now until November 17 at 8 AM PT / 11 AM ET, you can claim Alba - A Wildlife Adventure and Shadow Tactics: Blades of the Shogun. Alba is a lovely and heartwarming game about a young girl who explores a Mediterranean island where her grandparents live. Meanwhile, Shadow Tactics is a tactical-stealth game set in Japan. Like Alba, it holds an "Overwhelmingly Positive" user rating on Steam, so next week's freebies are definitely worth checking out.
Posted by: xSicKxBot - 11-11-2022, 12:43 AM - Forum: Python
- No Replies
Python | Split String and Keep Newline
Rate this post
Summary: Use 'given_string'.splitlines(True) to split the string and also keep the new line character.
Minimal Example:
text = 'abc\nlmn\nxyz'

print(text.splitlines(True)) # OUTPUT: ['abc\n', 'lmn\n', 'xyz']
Problem Formulation
Problem: Given a string. How will you split the string into a list of substrings and keep the new line character intact?
Example: Let’s have a look at a test case to understand the given problem.
# Input

text = """Sun

Earth

Moon""" # Expected Output:

['Sun\n', 'Earth\n', 'Moon']

OR

['Sun', '\n', 'Earth', '\n', 'Moon']
Without further ado, let us now dive into the different solutions for the given problem.
Method 1: Use splitlines(True)
Approach: The splitlines() method is used to split the string at all line breaks. If you pass True as a parameter within the splitlines method, then the resultant list includes the newline character along with the substring/item.
The re.split(pattern, string) method matches all occurrences of the pattern in the string and divides the string along the matches resulting in a list of strings between the matches. For example, re.split('a', 'bbabbbab') results in the list of strings ['bb', 'bbb', 'b']. Read more here – Python Regex Split.
Approach: Use re.split('(\W)', 'given_string') where the brackets() ensure the separators/delimiters are also stored in the list along with the word characters and \W is a special sequence that returns a match where it does not find any word characters in the given string. Here it is used to find the delimiters while splitting the string.
Code:
import re

text = """Sun

Earth

Moon"""

print(re.split('(\W)', text)) # OUTPUT: ['Sun', '\n', 'Earth', '\n', 'Moon']
Note: Instead of “\W” you are free to use any other expression that suits your needs however, make sure to enclose it within brackets to ensure that the newline characters (delimiter) are also included.
In case you do not want to include the separators as independent items, instead, you want to include them along with the split substrings/items, then you can simply split the given string using “\n” as the separator and then append or concatenate the newline character to each substring/item one by one except the last item. This is what you can do:-
import re

text = """Sun

Earth

Moon"""

res = re.split('\n', text)

output = []

for i in range(len(res)-1): output.append(res[i]+"\n")

output.append(res[-1])

print(output) # Alternate Formulation

res = [x+"\n" for x in re.split('\n', text)]

res[-1] = res[-1].strip('\n')

print(res) # OUTPUT: ['Sun\n', 'Earth\n', 'Moon']
Do you want to master the regex superpower? Check out my new book The Smartest Way to Learn Regular Expressions in Python with the innovative 3-step approach for active learning: (1) study a book chapter, (2) solve a code puzzle, and (3) watch an educational chapter video.
Approach: Use a list comprehension to split the given string using a for loop and the split() method and return each substring as an item and concatenate the separator (“new line character” in this case) along with the item. Note that the resultant list will have an extra “\n” character at the end. You can simply strip this new line character from the last element of the list.
Code:
text = """Sun

Earth

Moon"""

# split string and keep "\n"

res = [x+"\n" for x in text.split()]

# remove the extra "\n" character from the last item of the list res[-1] = res[-1].strip('\n')

print(res) # OUTPUT: ['Sun\n', 'Earth\n', 'Moon']
If you want the separator as an independent item in the list then go for the following expression –
text = """Sun

Earth

Moon"""

res = [u for x in text.split('\n') for u in (x, '\n')]

res.pop(-1)

print(res) # OUTPUT: ['Sun', '\n', 'Earth', '\n', 'Moon']
Conclusion
We have successfully solved the given problem using different approaches. I hope this article helped you in your Python coding journey. Please subscribe and stay tuned for more interesting articles.
But before we move on, I’m excited to present you my new Python book Python One-Liners (Amazon Link).
If you like one-liners, you’ll LOVE the book. It’ll teach you everything there is to know about a single line of Python code. But it’s also an introduction to computer science, data science, machine learning, and algorithms. The universe in a single line of Python!
The book was released in 2020 with the world-class programming book publisher NoStarch Press (San Francisco).
It needs to get confirmation from the user before permanently deleting the data.
This tutorial will explain more about this JavaScript basic concept with examples.
Quick example
This quick example shows the JS script to do the following.
It shows a confirm box with a consent message passed as an argument to the confirm() function.
It handles the yes or no options based on the user’s clicks on the OK or ‘cancel’ button of the confirm box.
if (confirm('Are you sure?')) { //action confirmed console.log('Ok is clicked.');

} else { //action cancelled console.log('Cancel is clicked.');

}
Key points of javascript confirm box.
The JavaScript confirm box is a consent box to let the user confirm or cancel the recent action.
The Javascript confirm() function accepts an optional message to be shown on the consent box.
It also displays the OK and ‘Cancel’ buttons to allow users to say yes or no about the confirmation consent.
This function returns a boolean true or false based on the button clicks on the confirm dialog box.
Syntax
confirm(message);
Example 2: Show JavaScript confirm box on a button click
This example connects the on-click event and the JS handler created for showing the confirm box.
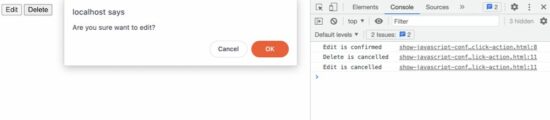
This JS code contains the HTML to display two buttons “Edit” and “Delete”. Each has the onClick attribute to call the JavaScript custom handler doAction().
This handler shows JavaScript confirm dialog and monitors the users’ option between yes and no. This program logs the user’s action based on the yes or no option.
<button onClick='doAction("Edit", "Are you sure want to edit?");'>Edit</button>
<button onClick='doAction("Delete", "Delete will permanently remove the record. Are you sure?");'>Delete</button>
<script> function doAction(action, message) { if (confirm(message)) { //If user say 'yes' to confirm console.log(action + ' is confirmed'); } else { //If user say 'no' and cancelled the action console.log(action + ' is cancelled'); }
};
</script>
Example 3: Call confirm dialog inline
This calls the confirm() function inline with the HTML onClick attribute.
Most of the time this inline JS of calling confirm dialog is suitable. For example, if no callback has to be executed based on the users’ yes or no option, this method will be useful.
In this example, it gets user confirmation to submit the form to the server side.
<form onSubmit='return confirm("Are you sure you want to send the data")'>
<input type="text" name="q" />
<input type="submit" name="submit" value="Send" />
</form>
Example 4: Pass confirm message using data attribute
This example contains a JS script to map the HTML button’s click event to show the confirmation dialog box.
It minimizes the effort of defining JS functions and calling them with the element to show the JavaScript confirmation.
It simplifies the number of lines in the code. It adds an on-click event listener for each button element shown in the HTML.
It uses JavaScript forEach to get the target button object for this event mapping. On each on-click event, it calls the confirm() function to show the dialog box.
<button data-confirm-message="Are you sure want to edit?">Edit</button>

<button data-confirm-message="Delete will permanently remove the record. Are you sure?">Delete</button>

<script> document.querySelectorAll('button').forEach(function(element) { element.addEventListener('click', function(e) { if(confirm(e.target.dataset.confirmMessage)) { console.log("confirmed"); } });

});

</script>
More about JavaScript confirm box
The JavaScript confirm box is a kind of dialog box. It requires user action to confirm or cancel a recently triggered action. It is the method of the JavaScript window object.
There are more functions in JavaScript to display the dialog with controls. Examples,
alert() – Alert box with an Okay option.
prompt() – Prompt dialog with an input option.
Note:
While displaying the JavaScript dialog box, it stops window propagations outside the dialog.
In general, displaying a dialog window on a web page is not good practice. It will create friction on the end-user side.
We have already seen a custom dialog using jQuery. Let us see how to display the jQuery confirm dialog in the next article. With custom dialog, it has the advantage of replacing the default button controls. Download
[www.indiegala.com] A new day, a new opportunity to explore the vast anime universe through videogames with a fresh new selection of titles: Project Heartbeat, Skautfold: Usurper, Jester / King, Neko Journey, My Inner Darkness Is A Hot Anime Girl!, Twilight Town: A Cyberpunk Day In Life.


 Question: How would we write code to run a
 Note: It is best practice to ensure that the full paths to the




 Attention: This module is depreciated, you may want to install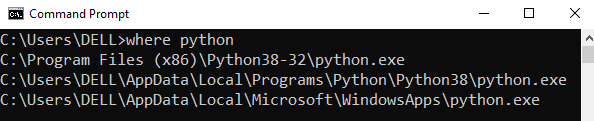






 Problem: Given a string. How will you split the string into a list of substrings and keep the new line character intact?
 Related Tutorial: