Welcome, Guest
You have to register before you can post on our site.

Username
  

Password


Search Forums

(Advanced Search)

Forum Statistics
» Members: 20,946
» Latest member: blackopsdlc
» Forum threads: 21,978
» Forum posts: 22,945

Full Statistics

Online Users
There are currently 1143 online users.
» 0 Member(s) | 1139 Guest(s)
Applebot, Baidu, Facebook, Google

Latest Threads
[WoW Retail News] Stat Sq...
Forum: World of Warcraft
Last Post: xSicKxBot

» Replies: 0
» Views: 13
BO6 & Warzone devs promis...
Forum: PC Discussion
Last Post: xSicKxBot

» Replies: 0
» Views: 14
I Thought Block Blast Was...
Forum: Lounge
Last Post: starfishmil

» Replies: 0
» Views: 17
[PS.Blog] Silent Hill: To...
Forum: Sony Discussion
Last Post: xSicKxBot

» Replies: 0
» Views: 13
[Steam Release] Good Comp...
Forum: New Game Releases
Last Post: xSicKxBot

» Replies: 0
» Views: 16
[DevBlog MS] Performance ...
Forum: C#, Visual Basic, & .Net Frameworks
Last Post: xSicKxBot

» Replies: 0
» Views: 23
[WoW Retail News] Over 20...
Forum: World of Warcraft
Last Post: xSicKxBot

» Replies: 0
» Views: 20
[WoW Retail News] Mythic ...
Forum: World of Warcraft
Last Post: xSicKxBot

» Replies: 0
» Views: 26
[Steam Release] Raft, 15%...
Forum: New Game Releases
Last Post: xSicKxBot

» Replies: 0
» Views: 22
Marvel Rivals Ace icon ex...
Forum: PC Discussion
Last Post: xSicKxBot

» Replies: 0
» Views: 25

 
  News - Today's Wordle Answer (#551) - December 22, 2022
Posted by: xSicKxBot - 12-27-2022, 04:26 PM - Forum: Lounge - No Replies

Today's Wordle Answer (#551) - December 22, 2022

Who doesn't enjoy a little Thursday Wordle action every now and again? We're quickly approaching the holiday weekend, but that doesn't mean Wordle is going easy on players. In fact, the answer on December 22 is one of the toughest this month has had to offer.

If you haven't started the Wordle just yet, then you can check out our list of recommended starting words. However, if you're already past the starting point, then you're likely looking for some hints. Luckily, we provide just that further down in this guide. We will also spell out the full answer for players looking to simply get out of today unscathed.

Today's Wordle Answer - December 22, 2022

We'll begin with a few hints that directly relate to today's Wordle answer, but don't give it away immediately.

Continue Reading at GameSpot

https://www.gamespot.com/articles/todays...01-10abi2f

Print this item

  PC - Wavetale
Posted by: xSicKxBot - 12-27-2022, 04:26 PM - Forum: New Game Releases - No Replies

Wavetale


Surf the waters of a submerged city! Unravel the past, save the islanders from mysterious sea monsters and discover secrets hidden under the surface.

Explore an open sea and the decaying archipelago of Strandville in Wavetale, a story-driven action-adventure game introducing you to fed-up fishermen, secretive hermits - and maybe a pirate or two. Traverse calm waters and surging waves as Sigrid, a young girl who befriends a mysterious shadow that provides her with the power to walk on water.

Speed through the waves, swing yourself from housetops with your net, and defeat an old nemesis to save the citizens of the islands. All with a bit of help from the shadows down below - and your cranky grandmother.

Publisher: Thunderful

Release Date: Dec 12, 2022


https://www.metacritic.com/game/pc/wavetale

Print this item

  [Oracle Blog] Java Recognized as the Favorite Programming Language
Posted by: xSicKxBot - 12-26-2022, 10:27 PM - Forum: Java Language, JVM, and the JRE - No Replies

Java Recognized as the Favorite Programming Language

2020 was a pretty special year for Java. On May 23rd, 2020, the developer community worldwide celebrated 25 years of Java. This memorable milestone was a celebration of 25 years of innovation and community participation. It serves as a reminder that the world is truly Moved by Java, as well as a con...


https://blogs.oracle.com/java/post/java-...g-language

Print this item

  [Tut] I Created a Counter Smart Contract with Ether.js — Here’s How
Posted by: xSicKxBot - 12-26-2022, 10:27 PM - Forum: Python - No Replies

I Created a Counter Smart Contract with Ether.js — Here’s How

5/5 – (1 vote)

One of the presiding JavaScript libraries for interacting with the Ethereum blockchain is ether.js.

The ether.js library, only 88 KB compressed in size, is remarkably smaller than the web3.js library. Because of that, web apps load more quickly if you use the ether.js API. This constantly improving library has already been popular among developers for its developer-friendly modules.

Today we will see how ether.js interacts with the blockchain and the smart contract. We will not go for the theoretical explanation of ether.js.

Instead, we will deal with some practical use cases of ether.js.

Interacting with the Blockchain


Connecting to blockchain:


We need to connect to a node first to interact with the blockchain.

Today we will use Infura, a powerful suite of high-availability blockchain APIs and developer tools. If you still need to make an account in Infura, then just sign up.

After signing in, click the “create new key” button to create a new project. Select the network as web3 API and enter the project name as you wish. A new page will open, and you need to move to the “get started with the web3 Ethereum” option. Just copy the main net link from there.


Then move to the visual studio code. Make a new folder and install node modules and ether.js.

npm init -y
npm install –-save ethers

Create a new javascript file for writing our codes. I am naming it as “etherBlockchain.js”.

Now import ether.js inside the javascript file.

const { ethers } = require("ethers");

Now to read data from the blockchain, we need to fix the provider.

const provider = new ethers.providers.JsonRpcProvider( "https://mainnet.infura.io/v3/3148ece387d84a40b4a8c883b07c33c0"
);

We have pasted the Infura URL as the parameter for JSON RPC provider. This will connect us with the Infura node.

Get the current block:


Using the Infura mainnet, we can get the current block number with the help of ether.js provider.

const interactBlockchain = async () => { const currentBlock = await provider.getBlockNumber(); console.log("You are using the block: ", currentBlock); };

We have created an async await function to identify the block number. getBlockNumber() method of the provider will help us to get the block number. In the vscode terminal, run the script.

node etherBlockchain.js

If everything runs fine, you should get the block number on the screen. Now to verify if it is genuine, visit the etherscan.io website. The current block number must be displayed under the Latest Blocks section.


Get the Balance:


To get the balance, we will use the provider.getBalance() method of ether.js. You need to put the address of any Ethereum account to get the balance of that account.

const balance = await provider.getBalance( "0xF977814e90dA44bFA03b6295A0616a897441aceC" );
console.log(“Account Balance: ”, balance);

All the codes should be kept inside the async await function.

When you run the script, you will get a BigNumber object as a return. Ethereum runs many operations on numbers outside the range of safe values to use in javascript.

? A BigNumber is an object which safely allows mathematical operations on numbers of any magnitude.

Reference: https://docs.ethers.org/v5/api/utils/bignumber/

You need to convert this big number object to a readable format to get the balance of the account.

We will use the formatEther method of the utils library of the ether.js to get the balance in ether.

const balanceInEther = ethers.utils.formatEther(balance);
console.log("Account balance in ether:", balanceInEther);

Now, if you run the script, you should get the account balance in ether.

This utils library of the ether.js is a vast one. You can do so many things with that.

Reference: https://docs.ethers.org/v5/api/utils/

Now to convert the balance in wei again, we will use this utils library.

const balanceInWei = ethers.utils.parseEther(balanceInEther);
console.log("Account balance in wei:", balanceInWei);

When you run the script, You will get the balance in wei.

In this way, you can run any query on the blockchain by using the methods of ether.js. We need to see how we can interact with a smart contract using ether.js.

Interacting with Smart Contracts


We have our simple smart contract ready for deployment on the Remix IDE.

I have made a simple Counter contract that will increase the count by ten whenever you call the increment function.

The getCount() method will return the count whenever you call the getCount() method. We will call those methods from the node terminal of vscode.

pragma solidity >= 0.5.0 < 0.9.0;
contract Counter { uint count = 0; function setCount(uint _count) public { count=_count; } function increment() public { count = count + 10; } function getCount() public view returns (uint) { return count; }
}

We need to deploy the smart contract in a blockchain.

We will use the Goerli testnet to deploy the contract, and the Metamask will be used to establish communication with the testnet.

We need some money on the goerli account to bear the Gas fee cost for the smart contract deployment. If you need to learn how to add the goerli test network on the Meatamask wallet and how to add some free goerli eth on the Metamask wallet, then watch some videos on youtube. It is very easy to add some free eth through the goerli faucet.

Now back to Remix IDE. After doing the compilation, you move to the “DEPLOY AND RUN TRANSACTIONS” section of the Remix IDE. Select the environment as “Injected Provider-Metamask”.


Now click on the deploy button. Metamask will pop up and ask to confirm the transaction. You can even check the transaction on the etherscan if you want.

We need the smart contract address and ABI afterward to create an instance of the smart contract on the node terminal.

For this part, we need to use React as the frontend. This frontend will establish a connection with Metamask. Open the command prompt and type the following to initiate a react app in your directory.

? Recommended: Learn to Build Smart Contracts in React with web3.js: Here’s How!

npx create-react-app ether_smart_contract

A react app on localhost:3000 must be running on your browser. Now, move to the app.js on vscode, clear the code, and import ether.js first.

import { ethers } from "ethers";

We need to use useEffect() hook of the react. Inside the useEffect, create an async await function to write the codes to call the smart contract.

Now again, call the provider; in this case, our provider would be Metamask.

const provider = new ethers.providers.Web3Provider(window.ethereum);

The test goerli network on our Metamask is using the Infura node. Hence, we don’t need to connect to the Infura network manually.

This is one of the privileges of using Metamask. With Metamask wallet, you can connect to different networks easily.


Difference between provider and signer:


We need to introduce a signer for our contract. What is the difference between the provider and the signer?

The provider is required whenever you are reading any data from blockchain or smart contract, but you are not changing the state of something on the smart contract; whenever you are changing the state of something on the smart contract, you need to use the signer.

Actually, when you write something on the smart contract, you are changing the state of something. Whenever you bring some change to the smart contract, you have to bear a cost for the transaction.

The signer will sign a transaction on your behalf to validate the transaction. Every time you click the confirm transaction button on the Metamask, a signer automatically signs a transaction on the backend and validates the transaction.

const signer = provider.getSigner();

Create two variables for the contract ABI and the contract address.

ContractAddress = “Input the contract address”;
ContractABI = “Input the contract ABI”;

Now we can create an instance of the smart contract with the help of contractABI and contractAddress.

const contract = new ethers.Contract( contractAddress, contractABI, signer );

This ethers. The contract method requires the contract address, contract ABI, and the signer as a parameter to create an instance of the smart contract.

Calling the constant methods:


Now our contract instance is ready. Using the contract instance, we can call the readable methods from the smart contracts.

const count = await contract.getCount();
console.log(count);

We have called the getCount() function of the smart contract, which returns a big number. We need to convert it to string. For that,

console.log("Current count is:", String(count));

Calling the non-constant methods:


Now we should get the count in a readable format. We can set the count as we desire by calling the setCount() method from the smart contract.

await contract.setCount(20);

The count must be set as 20. You can call the getCount() methods again to check the count.

Now, if we want to increment the count by ten, then we can call the increment() function with the help of contract.current() method.

const tx = await contract.connect(signer).increment();
await tx.wait();

As we change the blockchain state, we need to connect the signer to approve the transaction. We did it here.

The transaction will take some time to be mined on the blockchain. So, you have to wait a bit to see the count increase.

If you call the getCount() method again after some time, I hope you will see the count has increased by 10.

So that are some ways you can connect to a blockchain and query data from it. You have also seen the way smart contract interacts with ether.js. That’s all for today. Thanks for the reading.



https://www.sickgaming.net/blog/2022/12/...heres-how/

Print this item

  (Indie Deal) FREE Festive Potato | Gearbox, Scorn & Miles Morales Deals
Posted by: xSicKxBot - 12-26-2022, 10:26 PM - Forum: Deals or Specials - No Replies

FREE Festive Potato | Gearbox, Scorn & Miles Morales Deals

Potatoman Seeks the Troof FREEbie
[freebies.indiegala.com]
https://www.youtube.com/watch?v=CMRBuagwRb4
Gearbox Winter Sale & more, up to 91% OFF
[www.indiegala.com]
Don't forget you may get up to 3 extra BONUS games with each purchase. Read more here[www.indiegala.com].
https://www.youtube.com/watch?v=lEE4yZgphFk
[discord.gg]


https://steamcommunity.com/groups/indieg...0187164334

Print this item

  (Free Game Key) Encased - Epic Games - 24 hours only
Posted by: xSicKxBot - 12-26-2022, 10:26 PM - Forum: Deals or Specials - No Replies

Encased - Epic Games - 24 hours only

Encased - 24 hours only

To grab the game for free:
- Go to the store page of Encased
- https://store.epicgames.com/p/encased
- Click on the GET Button
- Verify that the price is zero
- Click on the Place Order Button
- That's it, the game will be added to you Epic Games Account

This game is free to keep if claimed by December 24, 2022 5:00 PM or in a day

We are welcoming everyone to join our discord[discord.gg]. We are more active there on finding giveaways, small or large, and there are daily raffles you can participate.

?GrabFreeGames.com ?Twitter ?Steam Curator ?Facebook[fb.me]?Discord[discord.gg]
❤️Support us: HumbleBundle Partner[www.humblebundle.com] Fanatical Affiliate[www.fanatical.com]


https://steamcommunity.com/groups/GrabFr...9241528423

Print this item

  News - Goat Simulator 3 Ad Includes GTA 6 Leaks, Gets DMCA Notice From Take-Two
Posted by: xSicKxBot - 12-26-2022, 10:26 PM - Forum: Lounge - No Replies

Goat Simulator 3 Ad Includes GTA 6 Leaks, Gets DMCA Notice From Take-Two

An ad for Goat Simulator 3 featured some trollish antics typical of the game itself, as it included gameplay from the massive GTA 6 leak that emerged earlier this year. It didn't take long for GTA publisher Take-Two to issue a DMCA notice to take down the video.

The ad, which is currently unavailable, featured a humorous overview of an NPC named Shaun, who describes his duties as walking around in circles, picking things up, and sitting on a bench. The GTA 6 clip comes late in the ad, when Shaun says that you can see him in some "footage that was leaked a couple of months ago."

The fact that the Goat Simulator developers responded to the original tweet with the memetic "I'm in danger" GIF from The Simpsons indicates that they probably knew what they were doing here. It remains to be seen if Take-Two will take further legal action beyond just this DMCA notice.

Continue Reading at GameSpot

https://www.gamespot.com/articles/goat-s...01-10abi2f

Print this item

  PC - Choo-Choo Charles
Posted by: xSicKxBot - 12-26-2022, 10:26 PM - Forum: New Game Releases - No Replies

Choo-Choo Charles


Navigate an open-world island in an old train, upgrade it over time, and use it to fight an evil spider train named Charles.

Publisher: Two Star Games

Release Date: Dec 09, 2022


https://www.metacritic.com/game/pc/choo-choo-charles

Print this item

  [Oracle Blog] 3 Ways GraalVM Enterprise Adds Value to Java SE Subscription
Posted by: xSicKxBot - 12-25-2022, 07:59 PM - Forum: Java Language, JVM, and the JRE - No Replies

3 Ways GraalVM Enterprise Adds Value to Java SE Subscription

Oracle Java SE Subscription now entitles customers to use Oracle GraalVM Enterprise at no additional cost.


https://blogs.oracle.com/java/post/3-way...bscription

Print this item

  [Tut] Automate Backup to Google Drive with Python
Posted by: xSicKxBot - 12-25-2022, 07:59 PM - Forum: Python - No Replies

Automate Backup to Google Drive with Python

4.5/5 – (2 votes)

Project Description


Every day I find myself in a position where I have to take daily backup of a certain folder named Reports and store it in my Google drive. This is an essential folder for me since I store all the necessary documents (especially reports). Hence, keeping a backup of this folder in the cloud gives me a cushion in case of any fault in my local system.

However, this involves a long and repetitive manual process wherein I have to sign in to my google account, navigate to the folder where I store my backup files and then copy and paste new files to this folder. This consumes some time, and I was thinking of automating the entire process. That is when I came up with a wonderful automation script that not only saved me all the hassle of manually backing up my files but also ensured that I could do so without the help of any fancy third-party software application.

So, this is what my script does –

  • It connects me to Google Drive automatically.
  • Uploads a fresh copy of my backup folder every time by replacing the old files.
  • The entire backup script is triggered every day at 12:00 AM, thereby ensuring that I do not have to run it manually on a daily basis.

Thus, in this article, I will guide you through implementing the same automated backup technique to store files from your local system to Google drive on a daily basis using Python. So, without further delay, let’s discover the power of Python automation through our project.

Step 1: Setting up Google Drive API


Before you start writing your script, it is essential to ensure that you have set up your Google Drive API properly. Simply put, the Drive API allows you to interact with Google Drive storage and supports several popular programming languages, such as Java, JavaScript, and Python.

  • Go ahead and log in to your GCP console using your gmail ID.
  • After logging in, create a new Project. Let’s name it FileBackup.

  • Now, you will need to configure and download the client configuration secrets JSON file. So, head over to APIs and Services ⮕ Select OAuth consent screen.

  • Select User Type as External and click Create.

  • Fill in the necessary App Information and click on Save and Continue.

  • No need to fill in Scopes for now and proceed to the next step by clicking on Save and Continue.
  • Add a Test User. Simply enter your email ID here, or you may choose to add another user. However, to keep things simple, I entered my email ID.

You are done with the first step. Now we need the Credentials that will authorise us when we talk to the Google Drive API from our script.

  • Click on Credentials CREATE CREDENTIALS ⮕ Select OAuth client ID.

  • Fill in the required details and click on Create.

  • A screen pops up, and you can see your client ID and secret. Download the JSON and make sure to store it in your Project folder with the name client_secrets.json.

The final step is to enable the Google Drive API so that you can communicate with it using the credentials from your script.

  • Select Enabled APIs and services ⮕ click ENABLE APIS AND SERVICES ⮕ Search Google Drive ⮕ Select the Google Drive API ⮕ Click on Enable

That’s it! You are now all set to communicate with the Google Drive API using your script to connect and store files in your Google Drive.

Step 2: Create the Automation Script


Now that everything is ready, we are now ready to write a program to generate daily backups on the cloud. To contact the API, you will need the help of the PyDrive library. So, go ahead and install it from your terminal as pip3 install PyDrive

After installing the PyDrive library, create a new file in your project directory and name it backup.py. This is our driver file.

  • First, import the necessary libraries and modules that will help you throughout the course of your script.
from pydrive.drive import GoogleDrive
from pydrive.auth import GoogleAuth
import os
  • Secondly, you need need to set up an authentication with google drive API. As soon as this code is executed, your default browser will open up and ask you for user permissions to access your drive contents.
    • IMPORTANT NOTE: Ensure that the client_secrets.json file is in the same directory as our Python file. Also, keep the json file a secret and take special care that it is not leaked online.
gauth = GoogleAuth()
gauth.LoadCredentialsFile("mycreds.txt")
if gauth.credentials is None: gauth.LocalWebserverAuth()
elif gauth.access_token_expired: gauth.Refresh()
else: gauth.Authorize()
gauth.SaveCredentialsFile("mycreds.txt")
drive = GoogleDrive(gauth)

Note that even after you have set up the pydrive and the google API such that my secret_client.json works, it will still require web authentication for G-Drive access every time you run your script. To deal with this issue, you need to make a minor adjustment so that your app doesn’t have to ask the client to authenticate every time you run the app. You just need to use LoadCredentialsFile and SaveCredentialsFile as we did in the code above. This way, you will need to provide access the first time you run your script and never again will Google ask you to authenticate it (unless, off course your access token expires).

  • Next, it is time to access the folder/file you want to backup from the local drive and store it in your Google Drive.
def upload_file_to_drive(): for x in os.listdir(path): file_list = drive.ListFile( {'q': "'16jhq7j-SWZmKF_vU0MmKNX' in parents and trashed = False"}).GetList() try: for file1 in file_list: if file1['title'] == os.path.join(path, x): file1.Delete() except: pass

Explanation: The key value pair 'q': "'16jhq7j-SWZmKF_vU0MmKNX' denotes the folder ID of the folder within your Google drive where you want to save the files. This is how you can get the folder ID of the required folder:


Simply copy it and paste it in your script.

A major problem here is whenever you copy the files and store them in your Google drive folder, the pre-existing files also get copied and duplicate files cover up the space unnecessarily. Thus, instead of simply copying the files blindly, you can opt to replace them instead. So, you can follow a two-step process – (i) Delete the pre-existing files (ii) Store a fresh copy of all the files in the folder. That is exactly what has been done in the above script.

Putting it all Together


  • All that remains to be done now is to put all the bits and pieces together to compile the entire code. So this is how the complete script looks like –
from pydrive.drive import GoogleDrive
from pydrive.auth import GoogleAuth
import os gauth = GoogleAuth()
gauth.LoadCredentialsFile("mycreds.txt")
if gauth.credentials is None: gauth.LocalWebserverAuth()
elif gauth.access_token_expired: gauth.Refresh()
else: gauth.Authorize()
gauth.SaveCredentialsFile("mycreds.txt")
drive = GoogleDrive(gauth)
path = r"C:\reports"
def upload_file_to_drive(): for x in os.listdir(path): file_list = drive.ListFile( {'q': "'16jhq7j-SWZmKF_vUehGalNf6Yr0MmKNX' in parents and trashed = False"}).GetList() try: for file1 in file_list: if file1['title'] == os.path.join(path, x): file1.Delete() except: pass f = drive.CreateFile({'parents': [{'id': '16jhq7j-SWZmKF_vUehGalNf6Yr0MmKNX'}]}) f.SetContentFile(os.path.join(path, x)) f.Upload() f = None upload_file_to_drive()

Output:


Schedule Regular Backup


One final task that needs to be taken care of is ensuring that the backup script runs at a particular time every day. There are different ways of doing this. You can use the schedule library in Python to do so within your script itself. However, using schedule has its own downside and it needs the script to keep on running.

Hence, I would suggest using the windows task scheduler. Windows Task Scheduler is built-in windows program that facilitates you with the ability to schedule and automate tasks in Windows by running scripts or programs automatically at a given moment.

  • Search for “Task Scheduler”.

  • Click Actions ⮕ Create Task

  • Give your task a Name

  • Then select Actions ⮕ New

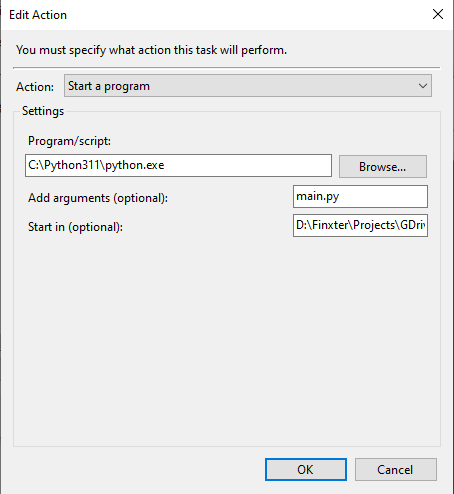
  • Find the Python Path using where python in the command line and copy the path from the command line.

  • Go to the folder where your Python script is actually located. Hold the Shift Key on your keyboard and right-click on the file and select Copy as path

  • In the "Add arguments (optional)” box, add the name of your Python file.
  • In the "Start in (optional)" box, paste the location of the Python file that you copied previously.

  • Click “OK”
  • Go to “Triggers” ⮕ Select “New”

  • Choose the repetition that you want. Here you can schedule Python scripts to run daily, weekly, monthly or just one time.
  • Click “OK”

Once, you have set this up, your trigger is now active and your Python script will run automatically every day.

Summary


Hurrah! You have successfully set up your automated backup script to take the necessary backups on a scheduled time every day without the need to do anything manually. I hope the complete walkthrough of the project helped you! Subscribe and stay tuned for more interesting projects in the future.


https://www.sickgaming.net/blog/2022/12/...th-python/

Print this item