Welcome, Guest
You have to register before you can post on our site.

Username
  

Password


Search Forums

(Advanced Search)

Forum Statistics
» Members: 20,946
» Latest member: blackopsdlc
» Forum threads: 21,976
» Forum posts: 22,943

Full Statistics

Online Users
There are currently 1258 online users.
» 0 Member(s) | 1252 Guest(s)
Applebot, Baidu, Bing, DuckDuckGo, Facebook, Google

Latest Threads
BO6 & Warzone devs promis...
Forum: PC Discussion
Last Post: xSicKxBot

» Replies: 0
» Views: 0
I Thought Block Blast Was...
Forum: Lounge
Last Post: starfishmil

» Replies: 0
» Views: 2
[Steam Release] Good Comp...
Forum: New Game Releases
Last Post: xSicKxBot

» Replies: 0
» Views: 9
[DevBlog MS] Performance ...
Forum: C#, Visual Basic, & .Net Frameworks
Last Post: xSicKxBot

» Replies: 0
» Views: 16
[WoW Retail News] Over 20...
Forum: World of Warcraft
Last Post: xSicKxBot

» Replies: 0
» Views: 13
[WoW Retail News] Mythic ...
Forum: World of Warcraft
Last Post: xSicKxBot

» Replies: 0
» Views: 19
[Steam Release] Raft, 15%...
Forum: New Game Releases
Last Post: xSicKxBot

» Replies: 0
» Views: 16
Marvel Rivals Ace icon ex...
Forum: PC Discussion
Last Post: xSicKxBot

» Replies: 0
» Views: 19
[WoW Retail News] Undocum...
Forum: World of Warcraft
Last Post: xSicKxBot

» Replies: 0
» Views: 20
[Steam Release] Factory T...
Forum: New Game Releases
Last Post: xSicKxBot

» Replies: 0
» Views: 25

 
  PC - Clash: Artifacts of Chaos
Posted by: xSicKxBot - 03-15-2023, 06:19 PM - Forum: New Game Releases - No Replies

Clash: Artifacts of Chaos


You play as Pseudo, a master of martial arts who lives as a recluse in the strange land of Zenozoik. When you cross paths with the Boy, a small creature whose mysterious powers have attracted the attention of Gemini, the Mistress of the Artifacts, you decide to protect him, unaware that much greater forces are involved.

Publisher: Nacon

Release Date: Mar 09, 2023


https://www.metacritic.com/game/pc/clash...s-of-chaos

Print this item

  (Indie Deal) FREE Spring Bonus, RE4 coming soon, DL2 Deal
Posted by: xSicKxBot - 03-14-2023, 07:30 PM - Forum: Deals or Specials - No Replies

FREE Spring Bonus, RE4 coming soon, DL2 Deal

Spring Bonus FREEbie
[freebies.indiegala.com]
https://www.youtube.com/watch?v=gTMwx9-rKe8&embeds_euri=https%3A%2F%2Fwww.indiegala.com%2F&feature=emb_imp_woyt
Sales ending soon
[www.indiegala.com]
Dying Light 2 Solo Deal
[www.indiegala.com]
https://www.youtube.com/watch?v=UwJAAy7tPhE&embeds_euri=https%3A%2F%2Fwww.indiegala.com%2F&feature=emb_imp_woyt


https://steamcommunity.com/groups/indieg...6105185314

Print this item

  [Tut] How I Built an OpenAI-Powered Web Assistant with Django
Posted by: xSicKxBot - 03-13-2023, 11:13 PM - Forum: Python - No Replies

How I Built an OpenAI-Powered Web Assistant with Django

5/5 – (1 vote)

Django is a backend web framework that makes it easy to build web pages quickly using Python. There is no better way to learn Django than by building projects. In this tutorial, I will show you how I built an Artificial Intelligence-powered web assistant using Django.

Set Up


To get started, we will create a directory where every file will live in. In the directory, we will create and activate a virtual environment. Then we will install the required Python libraries for the project. I am using an Ubuntu terminal, so a basic knowledge of the command line will be an added advantage going forward.

mkdir project && cd project
python3 -m venv .venv
source .venv/bin/activate

In the project directory, we create and activate a virtual environment using the source command. You can also replace the source command with a dot .. Let’s now install the modules we will be using.

pip install django tzdata openai

Creating Django Project


Once the installation is complete, run the following command in your Ubuntu terminal to create a Django project.

django-admin startproject webassistant .

This creates a folder with the name webassistant.

  • The . tells Django to create the project in the current directory.
  • The manage.py file is used to execute several Django commands.
  • The settings.py in the webassistant folder is the project’s settings. In it, we will register the Django apps we are about to create.
  • The urls.py is where we will let Django know what it should display to the user.

We now check to ensure that the installation went successfully. In your terminal run the following command:

python3 manage.py runserver

Once you have seen the above image, congrats! You have successfully installed Django. You can use control C to close the server.

Creating Django Apps


Back to your terminal, run the following command to create a Django app.

python3 manage.py startapp assistant

Use the ls command to see what’s inside the assistant folder.

ls assistant
__init__.py admin.py apps.py migrations models.py tests.py views.py

The __init__.py file found in both the webassistant and assistant folders enables the folders to be imported as a Python package. The views.py is where we code what we want the browser to be displayed to the user. These files are what concern our project. To know more about other files, check the documentation.

Next, we go to the settings.py file, in INSTALLED_APPS section to register the name of the app we just created. Use the nano command.

nano webassistant/settings.py

...
INSTALLED_APPS = [ 'django.contrib.admin', 'django.contrib.auth', 'django.contrib.contenttypes', 'django.contrib.sessions', 'django.contrib.messages', 'django.contrib.staticfiles', # custom app 'assistant',
]

We also open the project’s urls.py file to register the app-level URLs.

from django.contrib import admin
from django.urls import path, include urlpatterns = [ path('admin/', admin.site.urls), path('', include('assistant.urls')),
]

The path() function is used to map the URL to the appropriate view. The include() function adds the URL of the app to the project-level urls.py. The empty quote means the home URL, that is, what we see when we run the local server.

If you have read Django tutorials including this one, you are gradually becoming familiar with the process. That’s how it is done in every Django application.

Getting the API Key


We need an API key to enable the OpenAI model to perform web assistant tasks for us. To get the API key, we first have to create an account on the official website of OpenAI. Once you have completed the signup process, go to the OpenAI API reference where you will be directed to a page to generate your API key.

⭐ Recommended: OpenAI API – or How I Made My Python Code Intelligent

Make sure you keep the API key safe. Create a file in your app-level folder and call it key.py.

API_KEY = 'YOUR SECRET API KEY'

Just replace the text in quotes with your own generated API key.

Integrating the OpenAI Model


To integrate the API with our Django application, create a file called engine.py in the app’s folder and input the following python script.

# engine.py from .key import API_KEY
import openai openai.api_key = API_KEY def model(request): prompt = request.POST.get('prompt') response = openai.Completion.create( engine='text-davinci-003', temperature=0.5 prompt=prompt, max_tokens=1000, ) text = response.choices[0].text chats = {'prompt': prompt, 'response': text } return chats

We import the API key and the openai module. We use the openai.api_key to load the API key. Then, in the function, we requested to get the prompt, which is the question asked by the user. We then return the response generated by the model in form of a dictionary.

The temperature affects the randomness of the output, and it’s between 0 and 1. The AI model employed to generate predictions is the text_davinci_003. The max_tokens specifies the maximum number of tokens or pieces of words that can be generated by the model.

To learn more about the parameters, perhaps this article can be of help. We will now import the function in our views.py file.

from django.shortcuts import render, redirect
from .engine import model def home(request): try: if request.method == 'POST': context = model(request) return render(request, 'home.html', context) else: return render(request, 'home.html') except: return redirect('error') def error_handler(request): return render(request, 'error.html')

Two functions indicate two separate HTML files. In the first function, we use a try statement to check the block of code for errors. If no errors were found, the code under the try statement will execute. But if there were errors, the code under the except statement will be executed.

? Recommended: Python Try/Except Error Handling

The if statement checks if the request method is POST, if so, it will generate a response from the OpenAI model. But if otherwise, the else statement will be run in which no response will be generated.

The render() function renders or displays a response in the HTML files which we are yet to create. Notice that in the else statement, the render() function just renders the same homepage without the context because the request method was not POST. The redirect() function is used to redirect a user to another webpage.

Let’s now write a URL in the urls.py file to display our contents.

assistant/urls.py from django.urls import path
from .import views urlpatterns = [ path('', views.home, name='home'), path('error', views.error_handler, name='error_handler'),
]

The name argument is kind of an alias for the URL. So instead of writing long URLs, we can just reference them with the name given. Mostly used in HTML files.

Templates


We now want to render our templates. Create a folder named templates in the current directory. This is where we will keep our HTML files. Having created the folder, go to settings.py and let Django know that a templates folder is created.

In the settings.py file, scroll down to the ‘TEMPLATES’ section and add the following to DIRS.


TEMPLATES = [ { … 'DIRS': [os.path.join(BASE_DIR, 'templates')], … }
]

Be sure to import the os module. Then, create a file in the templates folder with the name base.html

<!DOCTYPE html>
<html lang="en">
<head> <meta charset="UTF-8"> <meta http-equiv="X-UA-Compatible" content="IE=edge"> <meta name="viewport" content="width=device-width, initial-scale=1.0"> <title>Web Assistant | {% block title %} {% endblock %}</title> <link href="https://cdn.jsdelivr.net/npm/bootstrap@5.3.0-alpha1/dist/css/bootstrap.min.css" rel="stylesheet">
</head>
<body> {% block content %} {% endblock %}
</body>
</html>

That’s our HTML boilerplate with bootstrap added to it for styling our web pages. Next is the home.html, the homepage that will inherit everything in the base.html template.

{% extends 'base.html' %}
{% block title %} Home {% endblock %}
{% block content %}
<div class="row justify-content-center my-4"> <div class="col-md-7 mt-4"> <div class="card"> <h1 class="card-header text-center">A.I WEB ASSISTANT</h1> <div class="card-body"> <pre>Hello, how can I help you?</pre> <form action="." method="POST"> <!-- this secures the form from malicious attacks during submission --> {% csrf_token %} <input class="form-control mb-2" required type="text" autofocus="autofocus" name="prompt" value="{{ prompt }}" id=""> <button class="btn btn-success fw-bold" type="submit"> GENERATE </button> </form> <hr> <pre> {{ response }} </pre> </div> </div> </div> </div>
</div>
{% endblock %}

Finally, the error.html will be displayed when an error occurs. It also inherits everything in the base.html.

{% extends 'base.html' %}
{% block title %} 404 {% endblock %}
{% block content %}
<div class="row justify-content-center my-4"> <div class="col-md-7 mt-4"> <h1>Page Not Found</h1> <p>Make sure you are connected to the internet or your query is correct</p> <a href="{% url 'home' %}" class="btn btn-secondary">Home</a> </div>
</div>
{% endblock %}

Certain things in these HTML files demand an explanation. Those strange syntaxes that begin with curly braces are Django templating language. When used with a block statement, it must end with an endblock statement. In base.html, we inserted the empty block statement in the title tag.

This makes it possible to override the home and error HTML files with a different word. But you can see the ‘Web Assistant’ remains the same in all files inheriting base.html.

The csrf_token is for security reasons. It’s compulsory. If you don’t add it, Django will throw an error. The prompt variable comes from the view.py file which in turn is imported from the engine.py file. The same applies to the response. Remember, we sent them here using the render() function.

The {% url 'home' %} syntax is Django’s way of displaying internal URLs. Go back to the app-level urls.py, you will see where we defined the name and this makes it possible to use it in HTML files.


Conclusion


Congrats on creating an AI-powered web assistant using Django. If you enjoy the tutorial, feel free to share it with others. Have a nice day.

⭐ Recommended: How I Created an URL Shortener App Using Django



https://www.sickgaming.net/blog/2023/03/...th-django/

Print this item

  [Tut] Python to .exe – How to Make a Python Script Executable?
Posted by: xSicKxBot - 03-13-2023, 01:31 AM - Forum: Python - No Replies

Python to .exe – How to Make a Python Script Executable?

5/5 – (1 vote)

I have a confession to make. I use Windows for coding Python.


This means that I often need to run my practical coding projects as Windows .exe files, especially if I work with non-technical clients that don’t know how to run a Python file.

In this tutorial, I’ll share my learnings on making a Python file executable and converting them to an .exe so that they can be run by double-click.

PyInstaller


To make a Python script executable as a .exe file on Windows, use a tool like pyinstaller. PyInstaller runs on Windows 8 and newer.

⭐ Pyinstaller is a popular package that bundles a Python application and its dependencies into a single package, including an .exe file that can be run on Windows without requiring a Python installation.

Here are the general steps to create an executable file from your Python script using Pyinstaller:

  1. Install Pyinstaller by opening a command prompt and running the command: pip install pyinstaller or pip3 install pyinstaller depending on your Python version.
  2. Navigate to the directory where your Python script is located in the command prompt using cd (command line) or ls (PowerShell).
  3. Run the command: pyinstaller --onefile your_script_name.py. This command creates a single executable file of your Python script with all its dependencies included.
  4. After the command completes, you can find the executable file in a subdirectory called dist.
  5. You can now distribute the executable file to users, who can run it on their Windows machines by double-clicking the .exe file.

What Does the –onefile Option Mean?


The --onefile file specifier is an option for Pyinstaller that tells it to package your Python script and all its dependencies into a single executable file.

By default, Pyinstaller will create a directory called dist that contains your script and a set of related files that it needs to run. However, using the --onefile option, Pyinstaller will generate a single .exe file, which is more convenient for the distribution and deployment of the application.

1-Paragraph Summary


To convert a Python file my_script.py to an executable my_script.exe using Pyinstaller, install Pyinstaller using pip install pyinstaller, navigate to the script directory in the command prompt, run pyinstaller --onefile my_script.py, then locate the executable file in the dist folder.

If you want to keep improving your coding skills, check out our free Python cheat sheets!


https://www.sickgaming.net/blog/2023/03/...xecutable/

Print this item

  (Indie Deal) Frontier Dev Deals, Crypto Deals, SF6 coming
Posted by: xSicKxBot - 03-13-2023, 01:30 AM - Forum: Deals or Specials - No Replies

Frontier Dev Deals, Crypto Deals, SF6 coming

Sales & Crypto Deals ending tomorrow
[www.indiegala.com]
[www.indiegala.com]
https://www.youtube.com/watch?v=GZud-p0QRvA
THQ Giveaways almost over
[www.indiegala.com]
[www.indiegala.com]
Gameplay Giveaway restocked with a new batch of Steam keys.
Pre-Purchase Stellaris: First Contact Story Pack[www.indiegala.com]
https://www.youtube.com/watch?v=MjGQJBZBKxI


https://steamcommunity.com/groups/indieg...6102879339

Print this item

  PC - The Legend of Heroes: Trails to Azure
Posted by: xSicKxBot - 03-13-2023, 01:30 AM - Forum: New Game Releases - No Replies

The Legend of Heroes: Trails to Azure


Sandwiched between two great powers, the city of Crossbel is the place where the Uroboros group carry out their biggest and darkest schemes. A mysterious drug is spreading its poison across the city, the mafia and the mercenary groups seem to have a role in the crimes. Add a break down to the political order to the mix, and you have complete chaos in your hands. The world becomes more real and the battles become more dangerous in Ao no Kiseki. Feel the rain patter on your skin and enemies creep up to you in the dark.

Publisher: NIS America

Release Date: Mar 14, 2023


https://www.metacritic.com/game/pc/the-l...s-to-azure

Print this item

  [Tut] PIP Install Django – A Helpful Illustrated Guide
Posted by: xSicKxBot - 03-12-2023, 05:27 AM - Forum: Python - No Replies

PIP Install Django – A Helpful Illustrated Guide

5/5 – (1 vote)

As a Python developer, I love using Django for web development. Its built-in features and clear code structure make building scalable and robust web applications fast and efficient. In fact, I used Django to build my own web app for Python testing and training.

Here’s how you can install Django:


pip install django

Alternatively, you may use any of the following commands to install django, depending on your concrete environment. One is likely to work!

? If you have only one version of Python installed:
pip install django ? If you have Python 3 (and, possibly, other versions) installed:
pip3 install django ? If you don't have PIP or it doesn't work
python -m pip install django
python3 -m pip install django
? If you have Linux and you need to fix permissions (any one):
sudo pip3 install django
pip3 install django
--user
? If you have Linux with apt
sudo apt install django ? If you have Windows and you have set up the py alias
py -m pip install django ? If you have Anaconda
conda install -c anaconda django ? If you have Jupyter Notebook
!pip install django
!pip3 install django

Let’s dive into the installation guides for the different operating systems and environments!

How to Install Django on Windows?


To install the updated Django framework on your Windows machine, run the following code in your command line or Powershell:

  • python3 -m pip install --upgrade pip
  • python3 -m pip install --upgrade django

Here’s the code for copy&pasting:

python3 -m pip install --upgrade pip
python3 -m pip install --upgrade django

I really think not enough coders have a solid understanding of PowerShell. If this is you, feel free to check out the following tutorials on the Finxter blog.

Related Articles:

How to Install Django on Mac?


Open Terminal (Applications/Terminal) and run:

  • xcode-select -install (You will be prompted to install the Xcode Command Line Tools)
  • sudo easy_install pip
  • sudo pip install django
  • pip install django

As an alternative, you can also run the following two commands to update pip and install the Django library:

python3 -m pip install --upgrade pip
python3 -m pip install --upgrade django

These you have already seen before, haven’t you?

Related Article:

How to Install Django on Linux?


To upgrade pip and install the Django library, you can use the following two commands, one after the other.

  • python3 -m pip install --upgrade pip
  • python3 -m pip install --upgrade django

Here’s the code for copy&pasting:

python3 -m pip install --upgrade pip
python3 -m pip install --upgrade django

How to Install Django on Ubuntu?


Upgrade pip and install the Django library using the following two commands, one after the other:

  • python3 -m pip install --upgrade pip
  • python3 -m pip install --upgrade django

Here’s the code for copy&pasting:

python3 -m pip install --upgrade pip
python3 -m pip install --upgrade django

How to Install Django in PyCharm?


The simplest way to install Django in PyCharm is to open the terminal tab and run the pip install django command.

This is shown in the following code:

pip install django

Here’s a screenshot of the two steps:

  1. Open Terminal tab in Pycharm
  2. Run pip install django in the terminal to install Django in a virtual environment.

As an alternative, you can also search for Django in the package manager.

However, this is usually an inferior way to install packages because it involves more steps.

How to Install Django in Anaconda?


You can install the Django package with Conda using the command conda install -c anaconda django in your shell or terminal.

Like so:

 conda install -c anaconda django 

This assumes you’ve already installed conda on your computer. If you haven’t check out the installation steps on the official page.

How to Install Django in VSCode?


You can install Django in VSCode by using the same command pip install django in your Visual Studio Code shell or terminal.

pip install django

If this doesn’t work — it may raise a No module named 'django' error — chances are that you’ve installed it for the wrong Python version on your system.

To check which version your VS Code environment uses, run these two commands in your Python program to check the version that executes it:

import sys
print(sys.executable)

The output will be the path to the Python installation that runs the code in VS Code.

Now, you can use this path to install Django, particularly for that Python version:

/path/to/vscode/python -m pip install django

Wait until the installation is complete and run your code using django again. It should work now!

? Recommended: Django Developer — Income and Opportunity

More Finxter Tutorials


Learning is a continuous process and you’d be wise to never stop learning and improving throughout your life. ?

What to learn? Your subconsciousness often knows better than your conscious mind what skills you need to reach the next level of success.

I recommend you read at least one tutorial per day (only 5 minutes per tutorial is enough) to make sure you never stop learning!

? If you want to make sure you don’t forget your habit, feel free to join our free email academy for weekly fresh tutorials and learning reminders in your INBOX.

Also, skim the following list of tutorials and open 3 interesting ones in a new browser tab to start your new — or continue with your existing — learning habit today! ?

Python Basics:

Python Dependency Management:

Python Debugging:

Fun Stuff:

Thanks for learning with Finxter!

Programmer Humor


❓ Question: How did the programmer die in the shower? ☠

Answer: They read the shampoo bottle instructions:
Lather. Rinse. Repeat.


https://www.sickgaming.net/blog/2023/03/...ted-guide/

Print this item

  PC - Figment 2: Creed Valley
Posted by: xSicKxBot - 03-12-2023, 05:27 AM - Forum: New Game Releases - No Replies

Figment 2: Creed Valley


Piano bridges, dancing plants and musical showdowns, ready to dive into The Mind? Nightmares have shattered the Moral Compass, making The Mind unable to function properly. Dusty and his ever-optimistic sidekick, Piper, must travel to Creed Valley, where The Mind's ideals are formed to restore peace.

Figment 2: Creed Valley is an action-adventure game set in the human mind. Nightmares are spreading chaos and have overrun once-peaceful lands. Join Dusty, The Mind's courage, as you make your way through puzzles, musical boss fights and unique environments.

Face your fears head-on.

Publisher: Bedtime Digital Games

Release Date: Mar 09, 2023


https://www.metacritic.com/game/pc/figme...eed-valley

Print this item

  [Tut] PeerBrain – A Decentralized P2P Social Brain Network App
Posted by: xSicKxBot - 03-11-2023, 09:48 AM - Forum: Python - No Replies

PeerBrain – A Decentralized P2P Social Brain Network App


https://www.sickgaming.net/blog/2023/03/...twork-app/

Print this item

  [Tut] Event Management System Project in PHP
Posted by: xSicKxBot - 03-11-2023, 09:47 AM - Forum: PHP Development - No Replies

Event Management System Project in PHP

by Vincy. Last modified on March 10th, 2023.

When managing events, the date and time come into the picture. So, the calendar component is the best to render events in a viewport. It is convenient compared to other views like card-view or list-view.

This example uses the JavaScript library FullCalendar to render and manage events. The events are from the database by using PHP and MySQL.

The following script gives you a simple event management system in PHP with AJAX. The AJAX handlers connect the PHP endpoint to manage events with the database.

In a previous tutorial, we have seen how to create a PHP event management system with Bootstrap.

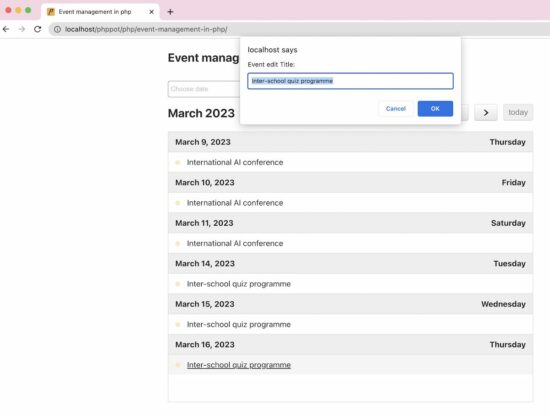
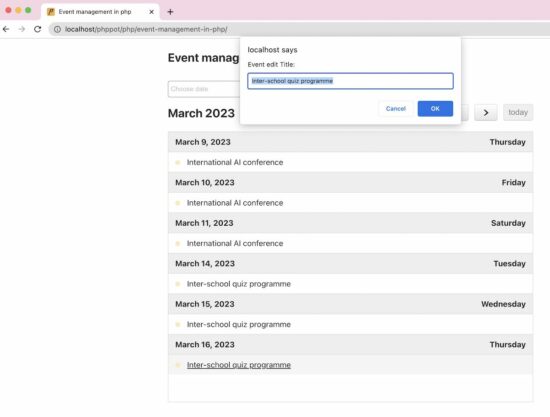
create edit delete events in php

Step 1: Create an HTML base with the FullCalendar library


The client-side script has the HTML with the required dependencies. This HTML uses CDN to import the JS and CSS. It uses the following libraries

  1. FullCalendar.
  2. MomentJS.
  3. jQuery and jQuery UI.

It has an empty DIV target that will display the calendar UI after initiating the FullCalendar JavaScript library class.

index.php

<!DOCTYPE html>
<html>
<head>
<title>Event management in php</title> <script type="text/javascript" src="https://cdnjs.cloudflare.com/ajax/libs/moment.js/2.22.2/moment.js"></script>
<script src="https://cdnjs.cloudflare.com/ajax/libs/jquery/3.3.1/jquery.min.js" type="text/javascript"></script>
<script src="https://cdnjs.cloudflare.com/ajax/libs/jqueryui/1.12.1/jquery-ui.min.js"></script>
<script src="https://cdnjs.cloudflare.com/ajax/libs/fullcalendar/3.9.0/fullcalendar.min.js"></script>
<script src="https://cdnjs.cloudflare.com/ajax/libs/fullcalendar/3.9.0/locale-all.js"></script>
<link href="https://cdnjs.cloudflare.com/ajax/libs/fullcalendar/3.9.0/fullcalendar.min.css" rel="stylesheet">
<link rel="stylesheet" href="//code.jquery.com/ui/1.13.2/themes/base/jquery-ui.css">
<link rel="stylesheet" href="assets/css/style.css">
<link rel="stylesheet" href="assets/css/form.css">
<script src="assets/js/event.js"></script>
<style>
.btn-event-delete { font-size: 0.85em; margin: 0px 10px 0px 5px; font-weight: bold; color: #959595;
}
</style>
</head> <body> <div class="phppot-container"> <h2>Event management in php</h2> <div class="response"></div> <div class="row"> <input type="text" name="filter" id="filter" placeholder="Choose date" /> <button type="button" id="button-filter" on‌Click="filterEvent();">Filter</button> </div> <div class="row"> <div id='calendar'></div> </div> </div>
</body>
</html>

Step 2: Create MySQL Structure in phpMyAdmin


This example creates a persistent event management system in PHP. The newly created or modified event data are permanently stored in the database.

This script has the CREATE STATEMENT and indexes of the tbl_events database. Do the following steps to set up this database in a development environment.

  1. Create a database and import the below SQL script into it.
  2. Configure the newly created database in config/db.php of this project.

Database script


sql/structure.sql

--
-- Database: `full_calendar`
-- -- -------------------------------------------------------- --
-- Table structure for table `tbl_events`
-- CREATE TABLE `tbl_events` ( `id` int(11) NOT NULL, `title` varchar(255) CHARACTER SET utf8 COLLATE utf8_bin DEFAULT NULL, `start` date DEFAULT NULL, `end` date DEFAULT NULL
) ENGINE=InnoDB DEFAULT CHARSET=latin1; --
-- Indexes for dumped tables
-- --
-- Indexes for table `tbl_events`
--
ALTER TABLE `tbl_events` ADD PRIMARY KEY (`id`); --
-- AUTO_INCREMENT for dumped tables
-- --
-- AUTO_INCREMENT for table `tbl_events`
--
ALTER TABLE `tbl_events` MODIFY `id` int(11) NOT NULL AUTO_INCREMENT;

Database configuration


db.php

<?php
$conn = mysqli_connect("localhost", "root", "", "full_calendar"); if (! $conn) { echo "Failed to connect to MySQL: " . mysqli_connect_error();
}
?>

Step 3: Initiate Fullcalendar and create listeners to manage events


This section initiates the JavaScript calendar library with suitable settings. For example, the below script enables the following directives to allow mouse events to make changes in the calendar.

  1. editable – It will enable event editing on the calendar by switching it on.
  2. droppable – It supports event drag and drops to change the date.
  3. eventResize – It supports inline extending or reducing the event period by resizing.
  4. eventLimit – It allows limiting the number of events displayed on a date instance.
  5. displayEventTime – It shows event time if added.

The Fullcalendar property “events” specifies the array of events rendered download. In this example, it has the PHP endpoint URL to read calendar events dynamically from the database.

This script maps the calendar event’s select, drag, drop, and resize with the defined AJAX handlers.

$(document).ready(function() { var calendar = $('#calendar').fullCalendar({ editable: true, eventLimit: true, droppable: true, eventColor: "#fee9be", eventTextColor: "#232323", eventBorderColor: "#CCC", eventResize: true, header: { right: 'prev, next today', left: 'title', center: 'listMonth, month, basicWeek, basicDay' }, events: "ajax-endpoint/fetch-calendar.php", displayEventTime: false, eventRender: function(event, element) { element.find(".fc-content").prepend("<span class='btn-event-delete'>X</span>"); element.find("span.btn-event-delete").on("click", function() { if (confirm("Are you sure want to delete the event?")) { deleteEvent(event); } }); }, selectable: true, selectHelper: true, select: function(start, end, allDay) { var title = prompt('Event Title:'); if (title) { var start = $.fullCalendar.formatDate(start, "Y-MM-DD HH:mm:ss"); var end = $.fullCalendar.formatDate(end, "Y-MM-DD HH:mm:ss"); addEvent(title, start, end); calendar.fullCalendar('renderEvent', { title: title, start: start, end: end, allDay: allDay }, true ); } calendar.fullCalendar('unselect'); }, eventClick: function(event) { var title = prompt('Event edit Title:', event.title); if (title) { var start = $.fullCalendar.formatDate(event.start, "Y-MM-DD HH:mm:ss"); var end = $.fullCalendar.formatDate(event.end, "Y-MM-DD HH:mm:ss"); editEvent(title, start, end, event); } }, eventDrop: function(event) { var title = event.title; if (title) { var start = $.fullCalendar.formatDate(event.start, "Y-MM-DD HH:mm:ss"); var end = $.fullCalendar.formatDate(event.end, "Y-MM-DD HH:mm:ss"); editEvent(title, start, end, event); } }, eventResize: function(event) { var title = event.title; if (title) { var start = $.fullCalendar.formatDate(event.start, "Y-MM-DD HH:mm:ss"); var end = $.fullCalendar.formatDate(event.end, "Y-MM-DD HH:mm:ss"); editEvent(title, start, end, event); } } }); $("#filter").datepicker();
});
function addEvent(title, start, end) { $.ajax({ url: 'ajax-endpoint/add-calendar.php', data: 'title=' + title + '&start=' + start + '&end=' + end, type: "POST", success: function(data) { displayMessage("Added Successfully"); } });
} function editEvent(title, start, end, event) { $.ajax({ url: 'ajax-endpoint/edit-calendar.php', data: 'title=' + title + '&start=' + start + '&end=' + end + '&id=' + event.id, type: "POST", success: function() { displayMessage("Updated Successfully"); } });
} function deleteEvent(event) { $('#calendar').fullCalendar('removeEvents', event._id); $.ajax({ type: "POST", url: "ajax-endpoint/delete-calendar.php", data: "&id=" + event.id, success: function(response) { if (parseInt(response) > 0) { $('#calendar').fullCalendar('removeEvents', event.id); displayMessage("Deleted Successfully"); } } });
}
function displayMessage(message) { $(".response").html("<div class='success'>" + message + "</div>"); setInterval(function() { $(".success").fadeOut(); }, 5000);
} function filterEvent() { var filterVal = $("#filter").val(); if (filterVal) { $('#calendar').fullCalendar('gotoDate', filterVal); $("#filter").val(""); }
}

Step 4: Create AJAX endpoints to create, render and manage event data


This section shows the PHP code for the AJAX endpoint. The Fullcalendar callback handlers call these endpoints via AJAX.

This endpoint receives the event title, start date, and end date. It processes the requested database operation using the received parameters.

ajax-endpoint/fetch-calendar.php

<?php
require_once "../config/db.php"; $json = array();
$sql = "SELECT * FROM tbl_events ORDER BY id"; $statement = $conn->prepare($sql);
$statement->execute();
$dbResult = $statement->get_result(); $eventArray = array();
while ($row = mysqli_fetch_assoc($dbResult)) { array_push($eventArray, $row);
}
mysqli_free_result($dbResult); mysqli_close($conn);
echo json_encode($eventArray);
?>

ajax-endpoint/add-calendar.php

<?php
require_once "../config/db.php"; $title = $_POST['title'];
$start = $_POST['start'];
$end = $_POST['end'];
$statement = $conn->prepare('INSERT INTO tbl_events (title,start,end) VALUES (?,?,?)');
$statement->bind_param('sss', $title, $start, $end);
$rowResult = $statement->execute();
if (! $rowResult) { $result = mysqli_error($conn);
}
?>

ajax-endpoint/edit-calendar.php

<?php
require_once "../config/db.php"; $id = $_POST['id'];
$title = $_POST['title'];
$start = $_POST['start'];
$end = $_POST['end'];
$statement = $conn->prepare('UPDATE tbl_events SET title = ?, start= ?, end=? WHERE id = ?');
$statement->bind_param('sssi', $title, $start, $end, $id);
$rowResult = $statement->execute();
mysqli_close($conn);
?>

ajax-endpoint/delete-calendar.php

<?php
require_once "../config/db.php"; $id = $_POST['id'];
$statement = $conn->prepare('DELETE from tbl_events WHERE id= ?');
$statement->bind_param('i', $id);
$rowResult = $statement->execute();
echo mysqli_affected_rows($conn);
mysqli_close($conn);
?>

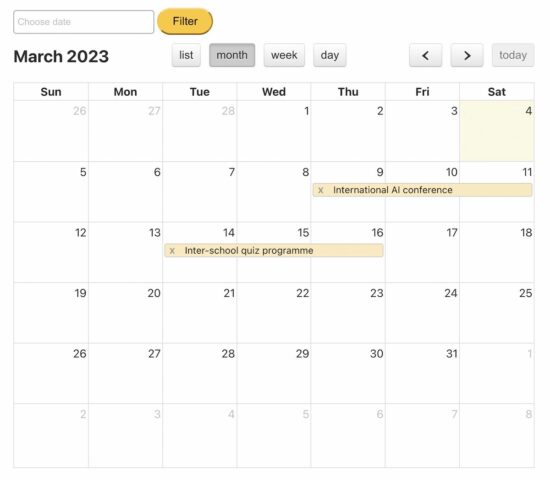
Event management calendar output


event management in php

Download

↑ Back to Top


https://www.sickgaming.net/blog/2023/03/...ct-in-php/

Print this item