Are you tired with the same old 2D plots? Do you want to take your plots to the next level? Well look no further, it’s time to learn how to make 3D plots in matplotlib.
In addition to import matplotlib.pyplot as plt and calling plt.show(), to create a 3D plot in matplotlib, you need to:
Import the Axes3D object
Initialize your Figure and Axes3D objects
Get some 3D data
Plot it using Axes notation and standard function calls
# Standard import

import matplotlib.pyplot as plt # Import 3D Axes from mpl_toolkits.mplot3d import axes3d # Set up Figure and 3D Axes fig = plt.figure()

ax = fig.add_subplot(111, projection='3d') # Get some 3D data

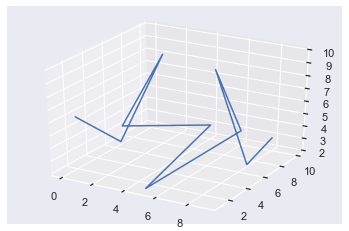
X = [0, 1, 2, 3, 4, 5, 6, 7, 8, 9]

Y = [2, 5, 8, 2, 10, 1, 10, 5, 7, 8]

Z = [6, 3, 9, 6, 3, 2, 3, 10, 2, 4] # Plot using Axes notation and standard function calls

ax.plot(X, Y, Z)

plt.show()
Awesome! You’ve just created your first 3D plot! Don’t worry if that was a bit fast, let’s dive into a more detailed example.
Try it yourself with our interactive Python shell. Just execute the code and look at the generated “plot.png” file:
If you are used to plotting with Figure and Axes notation, making 3D plots in matplotlib is almost identical to creating 2D ones. If you are not comfortable with Figure and Axes plotting notation, check out this article to help you.
Besides the standard import matplotlib.pyplot as plt, you must alsofrom mpl_toolkits.mplot3d import axes3d. This imports a 3D Axes object on which a) you can plot 3D data and b) you will make all your plot calls with respect to.
You set up your Figure in the standard way
fig = plt.figure()
And add a subplots to that figure using the standard fig.add_subplot() method. If you just want a single Axes, pass 111 to indicate it’s 1 row, 1 column and you are selecting the 1st one. Then you need to pass projection='3d' which tells matplotlib it is a 3D plot.
From now on everything is (almost) the same as 2D plotting. All the functions you know and love such as ax.plot() and ax.scatter() accept the same keyword arguments but they now also accept three positional arguments – X,Y and Z.
In some ways 3D plots are more natural for us to work with since we live in a 3D world. On the other hand, they are more complicated since we are so used to 2D plots. One amazing feature of Jupyter Notebooks is the magic command %matplotlib notebook which, if ran at the top of your notebook, draws all your plots in an interactive window. You can change the orientation by clicking and dragging (right click and drag to zoom in) which can really help to understand your data.
As this is a static blog post, all of my plots will be static but I encourage you to play around in your own Jupyter or IPython environment.
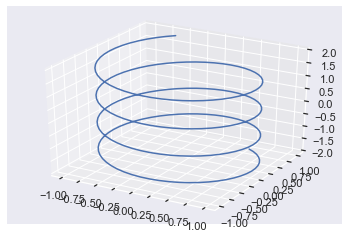
Here’s an example of the power of 3D line plots utilizing all the info above.
# Standard imports

import matplotlib.pyplot as plt

import numpy as np # Import 3D Axes from mpl_toolkits.mplot3d import axes3d # Set up Figure and 3D Axes fig = plt.figure()

ax = fig.add_subplot(111, projection='3d') # Create space of numbers for cos and sin to be applied to

theta = np.linspace(-12, 12, 200)

x = np.sin(theta)

y = np.cos(theta) # Create z space the same size as theta z = np.linspace(-2, 2, 200) ax.plot(x, y, z)

plt.show()
To avoid repetition, I won’t explain the points I have already made above about imports and setting up the Figure and Axes objects.
I created the variable theta using np.linspace which returns an array of 200 numbers between -12 and 12 that are equally spaced out i.e. there is a linear distance between them all. I passed this to np.sin() and np.cos() and saved them in variables x and y.
If you just plotted x and y now, you would get a circle. To get some up/down movement, you need to modify the z-axis. So, I used np.linspace again to create a list of 200 numbers equally spaced out between -2 and 2 which can be seen by looking at the z-axis (the vertical one).
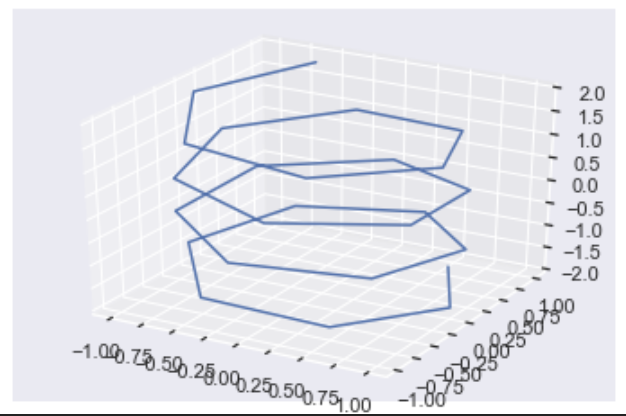
Note: if you choose a smaller number of values for np.linspace the plot is not as smooth.
For this plot, I set the third argument of np.linspace to 25 instead of 200. Clearly, this plot is much less smooth than the original and hopefully gives you an understanding of what is happening under the hood with these plots. 3D plots can seem daunting at first so my best advice is to go through the code line by line.
Matplotlib 3D Plot Scatter
Creating a scatter plot is exactly the same as making a line plot but you call ax.scatter instead.
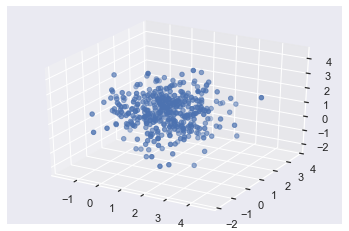
Here’s a cool plot that I adapted from this video. If you sample a normal distribution and create a 3D plot from it, you get a ball of points with the majority focused around the center and less and less the further from the center you go.
import random

random.seed(1) # Create 3 samples from normal distribution with mean and standard deviation of 1

x = [random.normalvariate(1, 1) for _ in range(400)]

y = [random.normalvariate(1, 1) for _ in range(400)]

z = [random.normalvariate(1, 1) for _ in range(400)] # Set up Figure and Axes

fig = plt.figure()

ax = fig.add_subplot(111, projection='3d') # Plot

ax.scatter(x, y, z)

plt.show()
First, I imported the python random module and set the seed so that you can reproduce my results. Next, I used three list comprehensions to create 3 x 400 samples of a normal distribution using the random.normalvariate() function. Then I set up the Figure and Axes as normal and made my plot by calling ax.scatter().
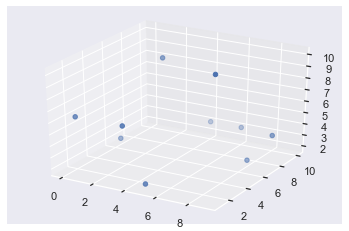
In this example, I plotted the same X, Y and Z lists as in the very first example. I want to highlight to you that some of the points are darker and some are more transparent – this indicates depth. The ones that are darker in color are in the foreground and those further back are more see-through.
If you plot this in IPython or an interactive Jupyter Notebook window and you rotate the plot, you will see that the transparency of each point changes as you rotate.
Matplotlib 3D Plot Rotate
The easiest way to rotate 3D plots is to have them appear in an interactive window by using the Jupyter magic command %matplotlib notebook or using IPython (which always displays plots in interactive windows). This lets you manually rotate them by clicking and dragging. If you right-click and move the mouse, you will zoom in and out of the plot. To save a static version of the plot, click the save icon.
It is possible to rotate plots and even create animations via code but that is out of the scope of this article.
Matplotlib 3D Plot Axis Labels
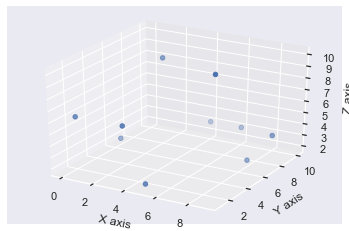
Setting axis labels for 3D plots is identical for 2D plots except now there is a third axis – the z-axis – you can label.
You have 2 options:
Use the ax.set_xlabel(), ax.set_ylabel() and ax.set_zlabel() methods, or
Use the ax.set() method and pass it the keyword arguments xlabel, ylabel and zlabel.
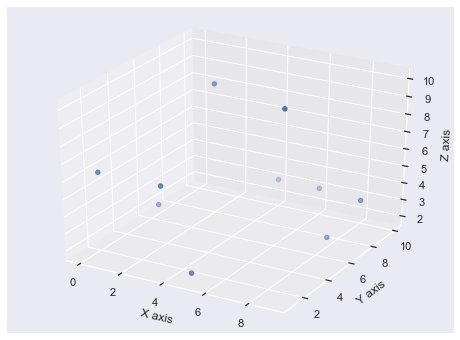
You may notice that the axis labels are not particularly visible using the default settings. You can solve this by manually increasing the size of the Figure with the figsize argument in your plt.figure() call.
One thing I don’t like about method 1 is that it takes up 3 lines of code and they are boring to type. So, I much prefer method 2.
# Set Figure to be 8 inches wide and 6 inches tall

fig = plt.figure(figsize=(8, 6))

ax = fig.add_subplot(111, projection='3d')

ax.scatter(X, Y, Z) # Method 2 - set all labels in one line of code!

ax.set(xlabel='X axis', ylabel='Y axis', zlabel='Z axis') plt.show()
Much better! Firstly, because you increased the size of the Figure, all the axis labels are clearly visible. Plus, it only took you one line of code to label them all. In general, if you ever use a ax.set_<something>() method in matplotlib, it can be written as ax.set(<something>=) instead. This saves you space and is nicer to type, especially if you want to make numerous modifications to the graph such as also adding a title.
Matplotlib 3D Plot Legend
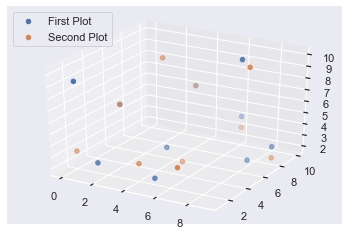
You add legends to 3D plots in the exact same way you add legends to any other plots. Use the label keyword argument and then call ax.legend() at the end.
import random random.seed(1)

fig = plt.figure()

ax = fig.add_subplot(111, projection='3d') # Plot and label original data

ax.scatter(X, Y, Z, label='First Plot') # Randomly re-order the data

for data in [X, Y, Z]: random.shuffle(data) # Plot and label re-ordered data

ax.scatter(X, Y, Z, label='Second Plot') ax.legend(loc='upper left')

plt.show()
In this example, I first set the random seed to 1 so that you can reproduce the same results as me. I set up the Figure and Axes as expected, made my first 3D plot using X, Y and Z and labeled it with the label keyword argument and an appropriate string.
To save me from manually creating a brand new dataset, I thought it would be a good idea to make use of the data I already had. So, I applied the random.shuffle() function to each of X, Y and Z which mixes the values of the lists in place. So, calling ax.plot() the second time, plotted the same numbers but in a different order, thus producing a different looking plot. Finally, I labeled the second plot and called ax.legend(loc='upper left') to display a legend in the upper left corner of the plot.
All the usual things you can do with legends are still possible for 3D plots. If you want to learn more than these basic steps, check out my comprehensive guide to legends in matplotlib.
Note: If you run the above code again, you will get a different looking plot. This is because you will start with the shuffled X, Y and Z lists rather than the originals you created further up inb the post.
Matplotlib 3D Plot Background Color
There are two backgrounds you can modify in matplotlib – the Figure and the Axes background. Both can be set using either the .set_facecolor('color') or the .set(facecolor='color') methods. Hopefully, you know by now that I much prefer the second method over the first!
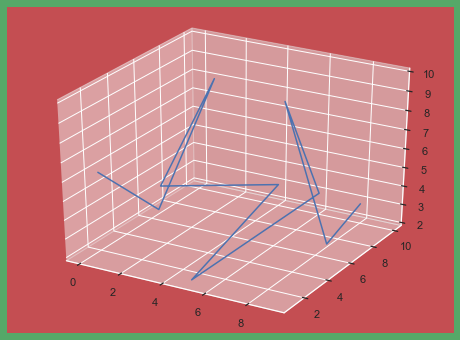
Here’s an example where I set the Figure background color to green and the Axes background color to red.
fig = plt.figure(figsize=(8, 6))

ax = fig.add_subplot(111, projection='3d')

ax.plot(X, Y, Z) # Axes color is red

ax.set(facecolor='r')

# Figure color is green

fig.set(facecolor='g')

plt.show()
The first three lines are the same as a simple line plot. Then I called ax.set(facecolor='r') to set the Axes color to red and fig.set(facecolor='g') to set the Figure color to green.
In an example with one Axes, it looks a bit odd to set the Figure and Axes colors separately. If you have more than one Axes object, it looks much better.
# Set up Figure and Axes in one function call

fig, axes = plt.subplots(nrows=2, ncols=2, figsize=(8, 6), subplot_kw=dict(projection='3d')) colors = ['r', 'g', 'y', 'b'] # iterate over colors and all Axes objects

for c, ax in zip(colors, axes.flat): ax.plot(X, Y, Z) # Set Axes color ax.set(facecolor=c) # Set Figure color

fig.set(facecolor='pink')

plt.show()
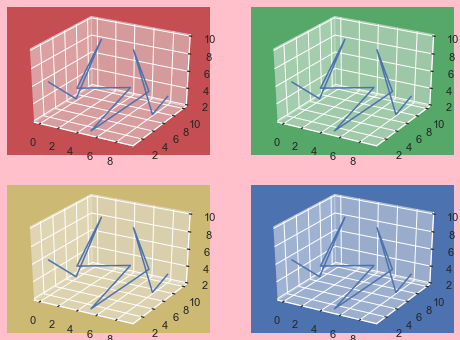
In this example, I used plt.subplots() to set up an 8×6 inch Figure containing four 3D Axes objects in a 2×2 grid. The subplot_kw argument accepts a dictionary of values and these are passed to add_subplot to make each Axes object. For more info on using plt.subplots() check out my article.
Then I created the list colors containing 4 matplotlib color strings. After that, I used a for loop to iterate over colors and axes.flat. In order to iterate over colors and axes together, they need to be the same shape. There are several ways to do this but using the .flat attribute works well in this case.
Finally, I made the same plot on each Axes and set the facecolors. It is clear now why setting a Figure color can be more useful if you create subplots – there is more space for the color to shine through.
Conclusion
That’s it, you now know the basics of creating 3D plots in matplotlib!
You’ve learned the necessary imports you need and also how to set up your Figure and Axes objects to be 3D. You’ve looked at examples of line and scatter plots. Plus, you can modify these by rotating them, adding axis labels, adding legends and changing the background color.
There is still more to be learned about 3D plots such as surface plots, wireframe plots, animating them and changing the aspect ratio but I’ll leave those for another article.
Where To Go From Here?
Do you wish you could be a programmer full-time but don’t know how to start?
Check out the pure value-packed webinar where Chris – creator of Finxter.com – teaches you to become a Python freelancer in 60 days or your money back!
It doesn’t matter if you’re a Python novice or Python pro. If you are not making six figures/year with Python right now, you will learn something from this webinar.
These are proven, no-BS methods that get you results fast.
This webinar won’t be online forever. Click the link below before the seats fill up and learn how to become a Python freelancer, guaranteed.
The 168th GalaQuiz will be LIVE soon, win up to $50 in GalaCredit!
[www.indiegala.com] The GalaQuiz will take place in less than 10 minutes from this announcement Today's GalaQuiz[www.indiegala.com] hints are up. The theme will be Animals Redux #3.
Posted by: xSicKxBot - 04-03-2020, 04:46 PM - Forum: Windows
- No Replies
Autonomous systems 101: Q&A about building intelligent control systems
The AI for Business and Technology blog is always looking for ways to help our readers understand how their businesses can benefit from the latest in artificial intelligence and technology. Today, we are talking with Microsoft Senior Applied AI Engineer Kingsuk Maitra. Kingsuk has a PhD in electrical engineering and now leads customer success engagements for autonomous systems at Microsoft.
Blog: Let’s start by figuring out what it is we’re talking about. What exactly is an autonomous system?
Kingsuk: Well, the basic idea of automation is to do repetitive tasks without human involvement, using an established pattern that is somewhat predictable. An autonomous system, on the other hand, is way more than automation because the system is also making informed and intuitive decisions with a substantive amount of knowledge and know-how.
If you expose an autonomous system to uncharted territory, it can make a recommendation to inform decision making, whereas strict automation wouldn’t be able to do anything without explicit human intervention. This essentially frees up human resources and ingenuity for making much more informed decisions. And it also gives you a lot more leverage and liberty and latitude when it comes to ensuring quality and preventing human errors.
Blog: How does an autonomous system learn to make these recommendations?
Kingsuk: Well, artificial intelligence at a very basic level allows a machine to learn from existing experience and existing data. Traditional machine learning is predicated on the availability of large quantities of data. But in the real-life scenarios where autonomous systems are critical to day-to-day operations, such as industrial control systems the environment is often uncertain, and data is sparse. It’s noisy, unstructured and messy, and there’s no easy way to collect a lot of data and methodically label it. So what you can do is model the environment where an autonomous system is supposed to make an impact, and then let the autonomous system explore that simulated environment while being supervised by an operator.
That’s the Microsoft approach, which incorporates machine teaching and reinforcement learning. Years of expertise and experience from a seasoned human operator in a particular vertical can be incorporated into the knowledge base through machine teaching, and that is layered on top of the inputs and signals from the low-fidelity simulator. The autonomous system learns by testing out various actions and being rewarded as it takes the correct action, which is reinforcement learning.
Intelligent control systems can help machinery and processes adapt to dynamic environments in real time.
Blog: What kinds of industries could use autonomous systems?
Kingsuk: This type of solution is scalable across multiple verticals, be it manufacturing, industrial automation, energy and many others. These verticals all have their own specialized simulators, and each of them has hundreds of years of research and billions of dollars in development that has gone into the discipline to make them very mature disciplines. So Microsoft’s point of view is that we are not offering a black box solution that is going to go in and disrupt everything they have known for all that time. What we are saying is we use AI to augment the human learning that already exists in those spaces, offering this one solution that can scale. We are not replacing anything, just adding to it.
And not only is this a way to find new solutions to existing problems, but it also offers the opportunity to solve problems that were previously thought unsolvable.
Blog: What’s one example of autonomous systems being applied?
One great example of this is new product introduction, or NPI, which is a complex problem. Most of the time, a new product has a long wish list of properties it needs to have, and the way it often works is a kind of educated guesswork. There might be 50 to 200 parameters, and a person uses heuristics and trial and error, working each parameter sequentially, and it takes several months in a best-case scenario.
With machine teaching and autonomous systems, you can optimize all those parameters, work simultaneously and in parallel and the whole process takes just weeks.
Not only does this save time but it reduces waste, which is better for the environment, and it allows the product to get to market quicker, when it is actually in demand. The market can change so quickly that something that was needed months earlier may no longer be needed.
We at Microsoft are also using this technology internally for power and efficiency optimization of our buildings, which will not only save money but will help us move toward our sustainability and carbon neutrality goals.
Magic The Gathering: Here's Another New Card From Ikoria: Lair of Behemoth
Recently, GameSpot had a big reveal for the upcoming Magic: The Gathering set Ikoria: Lair of Behemoth. We saw Snapdex, Apex of the Hunt, whose Godzilla Series Monster version is none other than King Caesar. Now, we have another reveal for the upcoming set.
Auspicious Starrix is a 6/6 creature from the upcoming set, which will launch in April and May. It utilizes the new Mutate mechanic, which allows you to combine creatures into one, unstoppable beast. Additionally, while using the Mutate mechanic, you exile permanent cards from your library, then put those permanents onto the battlefield. Check out the card below.
From the Ikoria: Lair of Behemoth set
"We wanted to go all out showing how awesome Godzilla in Magic would be, so we made sure to bring the new Mutate ability onto these cards," lead product designer of Ikoria: Lair of Behemoths Mike Turian explained to GameSpot. "Then when you combine Magic and Godzilla, there are so many evergreen abilities that fit perfectly so we mixed in those also. Who doesn’t want to have an amazing Godzilla that tramples over all of your opponent’s puny creatures?"
The Defold game engine is a free cross platform 2D focused game engine from King, we previously covered here and here as well as a video tutorial here. The Defold team recently released an update on the future roadmap of the Defold game engine.
iOS
We will continue to keep the iOS platform support up to date with the latest iOS versions and requirements. Specific iOS tasks in no particular order:
Metal
Apple has announced that OpenGL will be deprecated on iOS and macOS, but no date has been announced. We have worked during 2019 to add a new Vulkan based graphics backend. This work is nearing completion and it will allow us to use MoltenVK on iOS and macOS. MoltenVK is a Vulkan Portability implementation. It layers a subset of the high-performance, industry-standard Vulkan graphics and compute API over Apple’s Metal graphics framework, enabling Vulkan applications to run on iOS and macOS. We have worked together with members of the Khronos Group to benchmark our implementation and have received only a few points of improvement.
Sign in with Apple
Apple will require that apps that authenticate or set up user accounts must support Sign in with Apple (SIWA). The deadline is June 30, 2020. We will release SIWA support through a native extension in Q2 of 2020. The extension has been developed at King and has already been tested in production.
Storyboard launch screens
Apple will require that apps use Xcode storyboards as the app’s launch screen. The deadline is June 30, 2020. We will automatically create a launch screen storyboard from the launch images set in game.project.
Android
We will continue to keep the Android platform support up to date with the latest Android requirements. We are collaborating with the Android and Google Play partnership teams to identify important tasks. The top four tasks in order of priority are:
Billing
Google Play Billing is a service that lets you sell digital content on Android. We will add support for the new Billing API via the existing IAP extension.
Google Play Game Services
We will continue to improve on the existing Google Play Game Services extension to ensure that it supports all of the latest features of Google Play Game Services.
Android App Bundles
Android App Bundle is a publishing format that includes all your app’s compiled code and resources, and defers APK generation and signing to Google Play. Google Play uses your app bundle to generate and serve optimized APKs for each device configuration, so only the code and resources that are needed for a specific device are downloaded to run your app. We will initially add support for basic bundling of applications using Android App Bundles and then expand upon the feature as needed.
Google Play Instant
Google Play Instant enables native games to launch on devices running Android 5.0 (API level 21) or higher without being installed. By allowing users to run an instant game, known as providing an instant experience, you improve your game’s discovery, which helps drive more active users or installations.
HTML5
We will focus on increased performance and reduced application size on HTML5. We will when possible update to newer versions of Emscripten and WebAssembly to achieve this.
Desktop
On desktop our only identified focus area is to add the ability to run the engine loop while the window is in the background.
Editor
We will mainly focus on performance and stability improvements in the editor. In terms of new features we have identified the following (in no particular order):
Improved 3D support
In 2019 we added support for perspective cameras and made some improvements to how collision shapes were visualised. These changes made it easier to work with and place 3D models in a collection, but there are still many improvements to be made to scene navigation when working in a 3D.
Auto-tiling
While we did some minor improvements to the tilemap system in 2019 (better tile palette and interleaved layers) we have so far left out auto-tiling. Auto-tiling can really speed up tilemap editing and it is the next big feature to add for the tilemap editor.
Editor extensions
We plan to expand the existing system for editor scripts to allow for more complex operations and we will look at how to customize the UI and/or add new UI widgets using editor scripts.
GUI layouts and templates
The system with GUI layouts and templates where one or both involve value overrides is fairly complex and hard to work with from a code maintenance perspective. We plan to review the system and possibly simplify it.
Engine
In 2019 we made several changes to improve editor stability. Two examples of this were reduced ANRs on Android and a standardized application loop on iOS. In 2020 we will continue to identify and fix stability issues in the engine. Besides stability improvements we will also work on the following features (in no particular order):
Sound threading
Sound playback is currently done on the main thread together with the rest of the game loop. This can become a problem if loading large resources while playing sound, resulting in playback stutter. The solution is to do sound playback on a separate thread to avoid stutter when loading content.
Physics decoupling
Physics is currently running at the same rate as the rest of the game loop. We will try to decouple the physics simulation from the game loop by running the simulation on a separate thread and optionally with a different number of updates per second.
Spine as an extension
We will look into the possibility of using the official Spine runtime as an extension and a replacement for the existing custom made native Spine support. This will allow the use of newer versions of Spine, something that currently is not possible with the existing and custom Spine runtime.
Physics as an extension
We will look into the possibility of moving the Box2D and Bullet3D physics engines to a native extension. This will allow the community to update or replace the physics simulation with an update version or completely different implementation.
Live update
We’re very happy to see that the live update functionality is used in several different scenarios (from Android Expansion Files to Steam DLCs). We have with the help of the community identified several improvements and we plan to deliver the most critical improvements in 2020.
Mesh component
The custom mesh component will be released in Q2 of 2020.
Vulkan
We will release support for Vulkan on all systems where it is supported. On Android it will be used by default on newer devices. On iOS it will be used under the hood to be able to use MoltenVK (see iOS above).
Build server
The Defold build server for native extensions will be open sourced in Q2 of 2020 to allow developers to build locally or set up their own build servers to cut the dependency to the Defold provided build service.
You can learn more about the Defold Game engine roadmap in the video below. The tutorial mentioned in the video is open source and available here on Github.
That’s it! You should now be all set to use .NET 5 Preview2.
What’s new?
ASP.NET Core in .NET 5 Preview 2 doesn’t include any major new features just yet, but it does include plenty of minor bug fixes. We expect to announce new features in upcoming preview releases.
See the release notes for additional details and known issues.
Give feedback
We hope you enjoy this release of ASP.NET Core in .NET 5! We are eager to hear about your experiences with this latest .NET 5 release. Let us know what you think by filing issues on GitHub.
Apple News outage briefly impacted selected users [u]
By William Gallagher Friday, April 03, 2020, 03:40 am PT (06:40 am ET)
A small number of users worldwide were reporting that Apple News was down for a period of time on Friday morning, but there was no consistency to which territories were affected, and devices on the same network could be working.
These two iPhones are on the same network and using the same Apple ID. The iPad that the shot was taken with also has Apple News running, but it did take longer than usual to load.
Reports overnight claimed that the Apple News service was down, with users worldwide saying that the app wasn’t populated with stories, and then displaying an error message. That message said that the “feed is unavailable,” and recommended trying again later.
However, not only was Apple’s regular service status reporting no problems, Apple News is appearing as normal for most people.
More peculiarly, that included people who have multiple devices —one may have said the feed is unavailable, but the other showed the regular service. In some cases, the feed is taking longer than usual to appear.
In AppleInsider testing, the majority of iOS devices, and Macs, were all working correctly. In one test of four devices on the same network and with the same Apple ID, two worked perfectly, one was slow, and only one failed to load Apple News at all.
Update 7:00 A.M. Eastern time: Apple News appears to have been completely restored.
Neural TTS enables fluid, natural-sounding speech that matches the patterns and intonation of human voices, helping developers bring their solutions to life.
Today, we’re building upon our Neural Text to Speech (Neural TTS) capabilities in Azure Cognitive Services with new voice styles. With the new styles—newscast, customer service, and digital assistant—developers can tailor the voice of their apps and services to fit their brand or unique scenario.
Built on a powerful base model, our neural TTS voices are very natural, reliable, and expressive. Through transfer learning, the neural TTS model can learn different speaking styles from various speakers, enabling nuanced voices.
In addition to our new voice styles optimized for specific scenarios, we are also releasing new emotion styles. These styles allow you to adjust voices to express different emotions to fit the context, like cheerfulness or empathy. Let’s dive in.
Introducing Newscast, Customer Service, and Digital Assistant styles
Newscast
With neural TTS voices in the newscast style, your users can enjoy listening to news or articles in a professional tone that reflects what you might hear on TV or radio newscasts.
Hear Aria’s (English – Female) and Xiaoxiao’s (Chinese – Female) voices in the newscast style:
Text
Newscast style
Default
Heavy snow and strong winds hammered parts of the central U.S. on Thursday and began moving into the Great Lakes region, knocking out power to tens of thousands of people and creating hazardous travel conditions a day after pummeling Colorado.
现今,大批企业以数字化转型为战略目标,数字化转型可赋能企业重构竞争环境、满足客户期望、增强服务运营。为了真正实现“ being digital ”, 许多企业将人工智能视作实现数字化转型目标的首选技术工具之一。
Check out the newscast style in the Bing mobile app. When you search news with the voice search feature, you can hear news briefs using Aria’s newscast style voice.
You can also check out Xiaoxiao’s newscast style voice, which has been adopted in WeChat through the Microsoft Listening Docs app. In Microsoft Listening Docs, users can hear Xiaoxiao’s voice read out multiple document types such as Word, PowerPoint, Excel, as well as images. Users can easily generate audio content for online trainings, news podcasts and more, and share with their social circles.
Customer Service
The customer service style features a friendly and engaging tone and is suitable for scenarios involving customer support, such as an individual checking into their flight, making a restaurant reservation, or reporting a claim.
Hear Aria’s and Xiaoxiao’s voices in the customer service style:
Text
Customer Service style
Default
Alright, it’s going to be right in front of your door, within 30 minutes. Thanks for calling Pizza Loco! Have a great night!
客服:您好,欢迎致电智慧银行,我是您的智能客服晓晓,请问有什么可以帮您?
客户:你好,我想调整信用卡的额度。
客服:嗯,请稍等,我查询一下状态。请问您要调整到多少额度?
客户:帮我调到三万人民币吧。
客服:好的,已经给您变更成功,稍后您会收到短信提醒。
客户:好的,谢谢。
客服:感谢您的来电,祝您生活愉快,再见。
DigitalAssistant
Many customers have been using neural TTS voices for their digital assistant solutions. We are introducing two styles in this area: a chat style for more casual, conversational bots, and a more professional style for scenarios such as in-car digital assistants.
The chat style features a conversational tone, simulating casual dialogue.
Hear Aria’s voice in the chat style:
Style
Text
Chat style
Default
Chat
Oh, well that’s quite a change from California to Utah.
The assistant style features a friendly and helpful tone, which is suitable in scenarios such as smart speakers or in-car assistants. Use the digital assistant voice to hear the weather forecast, search for information, navigate directions, set reminders, and more.
Hear Xiaoxiao’s voice in the assistant style:
Text
Assistant style
Default
没听到你说话,请再说一次。
现在听的是:FM88.8,江苏音乐台的节目,滴滴叭叭早上好。
Bringing new emotions to Neural Text to Speech
To enable you to build nuanced voices for your unique scenario, Neural Text to Speech also offers different emotion styles. You can access cheerful and empathetic styles for Aria’s voice, lyrical style for Xiaoxiao’s voice—which sounds heartfelt and is optimized to read prose or poetry, and cheerful style for Francisca’s voice (Brazilian Portuguese).
Hear the new styles below:
Style
Text
Style
Default
Cheerful
Great, I hope she will like it!
A canadense postou uma música nova no seu perfil oficial do Twitter.
Empathetic
I want to let you know that you’re loved. I know things are hard right now and it’s OK. You don’t have to do this alone
These new voice styles are also available for customized brand voices through our Custom Neural Voice capability, allowing you to build a unique voice that can also benefit from our new scenario and emotion styles. As part of Microsoft’s commitment to designing AI responsibly, we have developed guidelines for customers in using Custom Neural Voice, in alignment with Microsoft’s principles for responsible innovation in AI. Learn more about the process for getting started with Custom Neural Voice here.
Get Started
Get started with the new neural TTS voice styles available in Azure Cognitive Services. Check out our documentation to learn more.
In Linux, dotfiles are hidden text files that are used to store various configuration settings for many such as Bash and Git to more complex applications like i3 or VSCode.
Most of these files are contained in the ~/.config directory or right in the home directory. Editing these files allows you to customize applications beyond what a settings menu may provide, and they tend to be portable across devices and even other Linux distributions. But one talking point across the Linux enthusiast community is how to manage these dotfiles and how to share them.
We will be showcasing a tool called Chezmoi that does this task a little differently from the others.
The history of dotfile management
If you search GitHub for dotfiles, what you will see are over 100k repositories after one goal: Store people’s dotfiles in a shareable and repeatable manor. However, other than using git, they store their files differently.
While Git has solved code management problems that also translates to config file management, It does not solve how to separate between distributions, roles (such as home vs work computers) secrets management, and per device configuration.
Because of this, many users decide to craft their own solutions, and the community has responded with multiple answers over the years. This article will briefly cover some of the solutions that have been created.
Experiment in an isolated environment
Do you want to try these below solutions quickly in a contained environment? Run:
$ podman run --rm -it fedora
… to create a Fedora container to try the applications in. This container will automatically delete itself when you exit the shell.
The install problem
If you store your dotfiles in Git repository, you will want to make it easy for your changes to automatically be applied inside your home directory, the easiest way to do this at first glance is to use a symlink, such as ln -s ~/.dotfies/bashrc ~/.bashrc. This will allow your changes to take place instantly when your repository is updated.
The problem with symlinks is that managing symlinks can be a chore. Stow and RCM (covered here on Fedora Magazine) can help you manage those, but these are not seamless solutions. Files that are private will need to be modified and chmoded properly after download. If you revamp your dotfiles on one system, and download your repository to another system, you may get conflicts and require troubleshooting.
Another solution to this problem is writing your own install script. This is the most flexible option, but has the tradeoff of requiring more time into building a custom solution.
The secrets problem
Git is designed to track changes. If you store a secret such as a password or an API key in your git repository, you will have a difficult time and will need to rewrite your git history to remove that secret. If your repository is public, your secret would be impossible to recover if someone else has downloaded your repository. This problem alone will prevent many individuals from sharing their dotfiles with the public world.
The multi-device config problem
The problem is not pulling your config to multiple devices, the problem is when you have multiple devices that require different configuration. Most individuals handle this by either having different folders or by using different forks. This makes it difficult to share configs across the different devices and role sets
How Chezmoi works
Chezmoi is a tool to manage your dotfiles with the above problems in mind, it doesn’t blindly copy or symlink files from your repository. Chezmoi acts more like a template engine to generate your dotfiles based on system variables, templates, secret managers, and Chezmoi’s own config file.
Getting Started with Chezmoi
Currently Chezmoi is not in the default repositories. You can download the current version of Chezmoi as of writing with the following command.
This will install the pre-packaged RPM to your system.
Lets go ahead and create your repository using:
$ chezmoi init
It will create your new repository in ~/.local/share/chezmoi/. You can easily cd to this directory by using:
$ chezmoi cd
Lets add our first file:
chezmoi add ~/.bashrc
… to add your bashrc file to your chezmoi repository.
Note: if your bashrc file is actually a symlink, you will need to add the -f flag to follow it and read the contents of the real file.
You can now edit this file using:
$ chezmoi edit ~/.bashrc
Now lets add a private file, This is a file that has the permissions 600 or similar. I have a file at .ssh/config that I would like to add by using
$ chezmoi add ~/.ssh/config
Chezmoi uses special prefixes to keep track of what is a hidden file and a private file to work around Git’s limitations. Run the following command to see it:
$ chezmoi cd
Do note that files that are marked as private are not actually private, they are still saved as plain text in your git repo. More on that later.
You can apply any changes by using:
$ chezmoi apply
and inspect what is different by using
$ chezmoi diff
Using variables and templates
To export all of your data Chezmoi can gather, run:
$ chezmoi data
Most of these are information about your username, arch, hostname, os type and os name. But you can also add our own variables.
Go ahead and run:
$ chezmoi edit-config
… and input the following:
[data] email = "fedorauser@example.com" name = "Fedora Mcdora"
Save your file and run chezmoi data again. You will see on the bottom that your email and name are now added. You can now use these with templates with Chezmoi. Run:
$ chezmoi add -T --autotemplate ~/.gitconfig
… to add your gitconfig as a template into Chezmoi. If Chezmoi is successful in inferring template correctly, you could get the following:
It will generate a file filled with the variables in our chezmoi config. You can also use the varibles to perform simple logic statements. One example is:
{{- if eq .chezmoi.hostname "fsteel" }}

# this will only be included if the host name is equal to "fsteel"

{{- end }}
Do note that for this to work the file has to be a template. You can check this by seeing if the file has a “.tmpl” appended to its name on the file in chezmoi cd, or by readding the file using the -T option
Keeping secrets… secret
To troubleshoot your setup, use the following command.
For GPG, you will need to add the following to your config using:
$ chezmoi edit-config
[gpg] recipient = "<Your GPG keys Recipient"
You can use:
$ chezmoi add --encrypt
… to add any files, these will be encrypted in your source respository and not exposed to the public world as plain text. Chezmoi will automatically decrypt them when applying.
We can also use them in templates. For example, a secret token stored in Pass (covered on Fedora Magazine). Go ahead and generate your secret.
In this example, it’s called “githubtoken”:
rwaltr@fsteel:~] $ pass ls Password Store └── githubtoken [rwaltr@fsteel:~] $
Next, edit your template, such as your .gitconfig we created earlier and add this lines.
token = {{ pass "githubtoken" }}
Then lets inspect using:
$ chezmoi cat ~/.gitconfig
[rwaltr@fsteel:~] $ chezmoi cat ~/.gitconfig This is Git's per-user configuration file. [user] name = Ryan Walter email = rwalt@pm.me token = mysecrettoken [rwaltr@fsteel:~] $
Now your secrets are properly secured in your password manager, your config can be publicly shared without risk!
Final notes
This is only scratching the surface. Please check out Chezmoi’s website for more information. The author also has his dotfiles public if you are looking for more examples on how to use Chezmoi.
The Super Mario LEGO Sets Could Be Arriving In North America This August
For a long time now, Nintendo fans have been crying out for themed LEGO sets based on their favourite video games. While Super Mario probably wasn’t the number one request, that’s how this collaboration between the two famous companies will begin.
Right now, apart from the initial reveal, there’s been nothing officially mentioned about a price or release date for these upcoming Mario themed sets. Now, though, GoNintendo has supposedly received a tip from a “Target Insider” about this new line. Here’s the full rundown:
According to Target’s internal systems, we can expect LEGO Super Mario to make its debut in August 2020. The listing right now says Aug. 1st, 2020, but we’re not sure if that’s placeholder. Along with that, the listing is for the starter set in particular, which is priced at $70. No details on what’s included in that, or if other sets will launch the same day.
Keep in mind, there is nothing concrete about this information, and it’s far from an official announcement. Still, an August launch sounds feasible – so we guess we’ll just have to wait and find out. In the meantime, you can learn more about this new LEGO theme in the original announcement post.
Does this Mario LEGO interest you? What other Nintendo sets would you like to see? Leave a comment down below.




 in GalaCredit!