03-20-2022, 05:33 AM
How to Make Online Photo Editing Effects like Blur Image, Sepia, Vintage
<div style="margin: 5px 5% 10px 5%;"><img src="https://www.sickgaming.net/blog/wp-content/uploads/2020/08/how-to-make-online-photo-editing-effects-like-blur-image-sepia-vintage.jpg" width="300" height="437" title="" alt="" /></div><div><p>Last modified on August 23rd, 2020.</p>
<p>Photo editing effects will turn graphical elements to be expressive. With suitable effects, you can use a simple image and convey an idea. For example, you can bring logo to the foreground by blurring the background image.</p>
<p>The effects like image blur, transparency, shadowing creates attractive visual effects. There are many different image effects available. In fact, hundreds of them are available.</p>
<p>Online photo editing tools use a variety of methods to apply the effects on a target image. For example, either a CSS filter property or a SVG filter primitive can create an image blur effect.</p>
<p>Most of the visual effects are achievable with HTML5 and CSS3 filter properties. We will see how to make photo editing effects to blur, apply sepia, and vintage effect on a target image.</p>
<p>I created a simple image editing tool to apply blur, sepia, and vintage effect on a target image. Following is a <strong>live preview</strong> of the tool.</p>
<p>I have added a jQuery slider to allow you fiddle with the image editing effects between a min-max range.</p>
<h2>What is inside?</h2>
<ol>
<li>Popular photo editing effects</li>
<li>Uses of image editing effects</li>
<li>About this example</li>
<li>File structure</li>
<li>Online photo editing UI to apply blur sepia effects</li>
<li>Managing image editing effects with jQuery slider</li>
<li>Blur image using CSS and SVG filter</li>
<li>How to apply sepia effect on an image</li>
<li>Applying various tones with vintage effects</li>
<li>Editing tool output with image Blur Sepia and Vintage effects</li>
</ol>
<h2>Popular photo editing effects</h2>
<p>You can use photo editing effects and manipulate images in an innovative way. They cause visual conversion on the UI graphics. You can add tones, brightness, shadow, themes, and lot more effects on a photo.</p>
<p>There is almost no limit to add effects on a photo. In a previous article, I gave an <a href="https://phppot.com/css/image-editor-move-scale-skew-rotate-and-spin-with-css-transform/">image-editing example with image transition effects</a>.</p>
<p>Below is a sample list of visual effects achievable with simple CSS.</p>
<ul>
<li>Grayscale</li>
<li>Blur</li>
<li>Brightness</li>
<li>Contrast</li>
<li>Opacity</li>
<li>Saturate</li>
<li>Sepia</li>
<li>Invert</li>
</ul>
<h2>Uses of image editing effects</h2>
<p>The photo editing may seem like a fun and easy job. But, it’s not true. Rather, it’s a real challenge to show your potential to give the best results.</p>
<p>I used some of the effects on the output of the image editing example scripts like <a href="https://phppot.com/jquery/simple-hover-fade-effect-using-jquery/">fade-in-out image background</a>.</p>
<p>Many of the image editing effects are most frequently required by the user. They are,</p>
<ul>
<li><em>Blur image</em> – to highlight something important in the foreground.</li>
<li><em>opacity</em> – to add transparency for the product labels displayed on the shop gallery images.</li>
<li><em>grayscale</em> – to <a href="https://phppot.com/jquery/remove-image-color-using-jquery/">remove the color of an image</a>.</li>
</ul>
<p>With CSS filter property, these effects can give a combined result on a target UI element.</p>
<h2>About this example</h2>
<p>This example handles blur, sepia and vintage effect on an image element.</p>
<p>For applying the blur and sepia effects, there is a jQuery slider handle above the image target. It will allow you to change the intensity.</p>
<p>This code will preview four vintage tones in a row. On clicking the preview, the editor panel will apply the appropriate vintage effect.</p>
<p>There is an option to reset the applied image editing effects. Blur is the default effect the slider handler events apply.</p>
<h2>File Structure</h2>
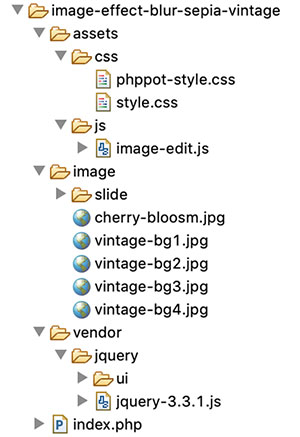
<p>This screenshot shows the file structure of the image editing example code. It’s a pure CSS jQuery example that provides image editing features.</p>
<p>There are <strong>no third-party plugins used</strong> to achieve the editing effects on this example.</p>
<p><img loading="lazy" class="alignnone size-full wp-image-11866" src="https://phppot.com/wp-content/uploads/2020/08/image-editing-file-structure.jpg" alt="Image Editing File Structure" width="300" height="437" srcset="https://phppot.com/wp-content/uploads/2020/08/image-editing-file-structure.jpg 300w, https://phppot.com/wp-content/uploads/20...06x300.jpg 206w" sizes="(max-width: 300px) 100vw, 300px"></p>
<p>I have rendered a static image as a target for applying the blur and more effects. You may <a href="https://phppot.com/jquery/jquery-ajax-image-upload/">include an image upload option</a> to render dynamic images.</p>
<h2>Online photo editing UI to apply blur sepia vintage effects</h2>
<p>This section shows the HTML of the online photo editing interface to allow image blur like effects.</p>
<p>The landing page has the complete HTML code for the image editing UI.</p>
<p>It shows the action buttons to choose the editing effects among blur, sepia and vintage.</p>
<p class="code-heading">index.php</p>
<pre class="prettyprint lang-php"><html>
<head>
<meta name="viewport" content="width=device-width, initial-scale=1">
<title>Image Effects Blur Sepia Vintage</title>
<link href="./assets/css/phppot-style.css" type="text/css" rel="stylesheet" />
<link href="./assets/css/style.css" type="text/css" rel="stylesheet" />
<link href="./vendor/jquery/ui/jquery-ui.min.css" type="text/css" rel="stylesheet" />
</head>
<body> <div class="phppot-container"> <div class="container"> <input type='button' value='Blur' class="btn action selected" /> <input type='button' id='btnSpin' value='Sepia' class="btn action" /> <input type='button' value='Vintage' class="btn" id="vintage" /><input type='button' value='Reset' class="btn" id="reset" /> <div id="vintage-slide"> <?php for ($i = 1; $i <= 4; $i ++) { ?> <img src="./image/slide/vintage-slide<?php echo $i; ?>.png" class="vintage-effect" id="vintage-effect<?php echo $i; ?>" data-slide="<?php echo $i; ?>" /> <?php } ?> </div> <div class="image-demo-box"> <div id="slider"> <div id="slider-handle" class="ui-slider-handle"></div> </div> <img src='./image/cherry-bloosm.jpg' id='image' /> <div class="overlay"></div> </div> </div> </div> <script src='./vendor/jquery/jquery-3.3.1.js' type='text/javascript'></script> <script src='./vendor/jquery/ui/jquery-ui.min.js' type='text/javascript'></script> <script src='./assets/js/image-edit.js'></script>
</body>
</html>
</pre>
<p>After selecting the action buttons, the slider control will supply the value of the selected editing effect.</p>
<p>The reset button helps revert back to the original state of the rendered image element.</p>
<h2>Managing image editing effects with jQuery slider</h2>
<p>This jQuery script initializes UI slider on document ready. It applies the selected effects on an image by clicking the blur, sepia, vintage buttons. On dragging the slider handle the value from the <em>ui.value</em> has the effect’s intensity.</p>
<p>On selecting each effect, the slider reset will happen to bring the handle to the <em>min</em> position.</p>
<p>The reset button will clear the applied photo effects on the image. It reverts the target image back to its original.</p>
<p class="code-heading">assets/js/image-edit.js</p>
<pre class="prettyprint lang-php">$(document).ready(function() { $("#slider").slider({ range : "min", min : 0, max : 100, slide : function(event, ui) { var val = ui.value; var action = $('.action.selected').val(); applyEffect(action, val); } }); $('.action').on('click', function() { resetSlider(); $('.btn').removeClass("selected"); $(this).addClass("selected"); }); $('#vintage').on('click', function() { $('.btn').removeClass("selected"); $(this).addClass("selected"); $("#slider").hide(); $("#vintage-slide").show(); vintage(1); }); $('.vintage-effect').on('click', function() { var val = $(this).data("slide") vintage(val); }); $('#reset').on('click', function() { resetSlider(); $('.btn').removeClass("selected"); $('.btn').first().addClass("selected"); }); });
function applyEffect(action, val) { if (action == 'Blur') { blur(val); } else if (action == 'Sepia') { sepia(val); }
}
function blur(val) { $("#image").css("filter", "blur(" + val + "px)");
}
function sepia(val) { $("#image").css("filter", "sepia(" + val + "%)");
}
function vintage(val) { $('.vintage-effect').removeClass("selected") $("#vintage-effect"+val).addClass("selected"); $(".overlay").show(); $(".overlay").css("background", "url('./image/vintage-bg"+val+".jpg')")
}
function resetSlider() { $("#slider").show(); $("#vintage-slide").hide(); $(".overlay").hide(); var options = $("#slider").slider('option'); $("#slider").slider("value", options.min); var action = $('.action.selected').val(); applyEffect(action, options.min);
}
</pre>
<h2>Blur image using CSS and SVG filter</h2>
<p>As shown in the above example, blur image action is possible with CSS filter function <em>blur()</em>. It accepts a value as its parameter to apply the blur filter on the target element.</p>
<p>The CSS in the below code will apply the blur effect on the image element of the HTML.</p>
<pre class="prettyprint lang-php"><style>
#image { margin: 50px auto; border: #f6f5f6 10px solid; width: 500px; filter: blur(10px);
}
</style>
<img src='./image/cherry-bloosm.jpg' id='image' />
</pre>
<p>This example has a slider’s drag event-based photo editing effects. So, the jQuery script manages the CSS filter property on dragging the slider handle.</p>
<h3>Blur image with SVG filter and CSS <em>url()</em> function</h3>
<p>In the below code, it shows yet another way to blur images HTML element. It uses CSS <em>url()</em> function to apply the blur effect.</p>
<p>The <em>url()</em> function accepts a path or a selector string to apply the filter via CSS.</p>
<p>This code has the svg with <fegaussianblur> filter primitive. The blur intensity will vary based on the <em>stdDeviation</em> attribute’s value.</p>
<pre class="prettyprint lang-php"><style>
#image{ filter:url('#blur');
}
</style>
<img src='./image/cherry-bloosm.jpg' id='image' />
<svg> <defs> <filter id="blur"> <feGaussianBlur in="SourceGraphic" stdDeviation="1,4" /> </filter> </defs>
</svg>
</pre>
<h2>How to apply sepia effect on an image</h2>
<p>Sepia is one of the photo editing effects used in this example to apply on a HTML image. It gives light reddish or brownish tones to monochromatic photos.</p>
<p>There is yet another CSS filter function <em>sepia()</em> to apply this effect on an image.</p>
<p>The CSS <em>sepia()</em> function may have a number or percentage as a parameter. All the below CSS styles are valid to create the <em>sepia()</em> effect.</p>
<pre class="prettyprint lang-php">filter:sepia(0);
filter:sepia(25%);
filter:sepia(0.3);
filter:sepia(1);
</pre>
<h2>Applying various tones with vintage effects</h2>
<p>The vintage effect on a photograph gives an ancient tone to the photo. It’s an art to giving a flimsy tone to the modern photo output.</p>
<p>In this example, I have used template films to create a vintage effect on an image. It uses four types of films as a background to add different tones to the image element.</p>
<p>There are plugins to convert photos with vintage effects. For getting a basic result, the combination of the basic photo editing effects may help.</p>
<h2>Editing tool output with image Blur Sepia and Vintage effects</h2>
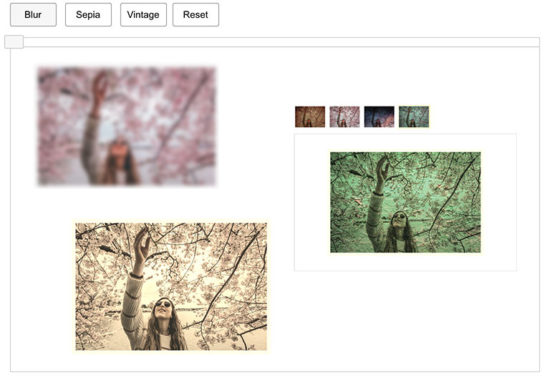
<p>In the below screenshot, I have shown all the three photo effects in a single output window.</p>
<p><img loading="lazy" class="alignnone size-large wp-image-11871" src="https://phppot.com/wp-content/uploads/2020/08/blur-sepia-vintage-effect-output-550x380.jpg" alt="Blur Sepia Vintage Effect- Output" width="550" height="380" srcset="https://phppot.com/wp-content/uploads/2020/08/blur-sepia-vintage-effect-output-550x380.jpg 550w, https://phppot.com/wp-content/uploads/20...00x207.jpg 300w, https://phppot.com/wp-content/uploads/20...output.jpg 768w" sizes="(max-width: 550px) 100vw, 550px"></p>
<h2>Conclusion</h2>
<p>We have seen how to apply three of the popular photo effects blur, sepia and vintage on an image. Though there are more possible effects, this example code is a very good beginning to achieve all.</p>
<p>I hope, applying effects with jQuery slider is more comfortable than any other type of input. I prefer slider whenever required to collect input between ranges.</p>
<p>Applying a creative combinational photo editing effects will give impressive results. Not only beautification but also helps to convey your thoughts via graphical representation. Rock on!</p>
<p><a class="download" href="https://phppot.com/downloads/image-effect-blur-sepia-vintage.zip">Download</a></p>
<p> <!-- #comments --> </p>
<div class="related-articles">
<h2>Popular Articles</h2>
</p></div>
<p> <a href="https://phppot.com/css/how-to-make-online-photo-editing-effects-like-blur-image-sepia-vintage/#top" class="top">↑ Back to Top</a> </p>
</div>
https://www.sickgaming.net/blog/2020/08/...a-vintage/