Create an account


Thread Rating:
  • 0 Vote(s) - 0 Average
  • 1
  • 2
  • 3
  • 4
  • 5
[Tut] ModuleNotFoundError: No Module Named OpenAI

#1
ModuleNotFoundError: No Module Named OpenAI

<div>
<div class="kk-star-ratings kksr-auto kksr-align-left kksr-valign-top" data-payload='{&quot;align&quot;:&quot;left&quot;,&quot;id&quot;:&quot;1170810&quot;,&quot;slug&quot;:&quot;default&quot;,&quot;valign&quot;:&quot;top&quot;,&quot;ignore&quot;:&quot;&quot;,&quot;reference&quot;:&quot;auto&quot;,&quot;class&quot;:&quot;&quot;,&quot;count&quot;:&quot;1&quot;,&quot;legendonly&quot;:&quot;&quot;,&quot;readonly&quot;:&quot;&quot;,&quot;score&quot;:&quot;5&quot;,&quot;starsonly&quot;:&quot;&quot;,&quot;best&quot;:&quot;5&quot;,&quot;gap&quot;:&quot;5&quot;,&quot;greet&quot;:&quot;Rate this post&quot;,&quot;legend&quot;:&quot;5\/5 - (1 vote)&quot;,&quot;size&quot;:&quot;24&quot;,&quot;width&quot;:&quot;142.5&quot;,&quot;_legend&quot;:&quot;{score}\/{best} - ({count} {votes})&quot;,&quot;font_factor&quot;:&quot;1.25&quot;}'>
<div class="kksr-stars">
<div class="kksr-stars-inactive">
<div class="kksr-star" data-star="1" style="padding-right: 5px">
<div class="kksr-icon" style="width: 24px; height: 24px;"></div>
</p></div>
<div class="kksr-star" data-star="2" style="padding-right: 5px">
<div class="kksr-icon" style="width: 24px; height: 24px;"></div>
</p></div>
<div class="kksr-star" data-star="3" style="padding-right: 5px">
<div class="kksr-icon" style="width: 24px; height: 24px;"></div>
</p></div>
<div class="kksr-star" data-star="4" style="padding-right: 5px">
<div class="kksr-icon" style="width: 24px; height: 24px;"></div>
</p></div>
<div class="kksr-star" data-star="5" style="padding-right: 5px">
<div class="kksr-icon" style="width: 24px; height: 24px;"></div>
</p></div>
</p></div>
<div class="kksr-stars-active" style="width: 142.5px;">
<div class="kksr-star" style="padding-right: 5px">
<div class="kksr-icon" style="width: 24px; height: 24px;"></div>
</p></div>
<div class="kksr-star" style="padding-right: 5px">
<div class="kksr-icon" style="width: 24px; height: 24px;"></div>
</p></div>
<div class="kksr-star" style="padding-right: 5px">
<div class="kksr-icon" style="width: 24px; height: 24px;"></div>
</p></div>
<div class="kksr-star" style="padding-right: 5px">
<div class="kksr-icon" style="width: 24px; height: 24px;"></div>
</p></div>
<div class="kksr-star" style="padding-right: 5px">
<div class="kksr-icon" style="width: 24px; height: 24px;"></div>
</p></div>
</p></div>
</div>
<div class="kksr-legend" style="font-size: 19.2px;"> 5/5 – (1 vote) </div>
</p></div>
<p class="has-pale-cyan-blue-background-color has-background"><strong>Quick Fix:</strong> Python raises the <code>ImportError: No module named 'openai'</code> when it cannot find the library <code>openai</code>. The most frequent source of this error is that you haven’t installed <code>openai</code> explicitly with <code>pip install openai</code>. Alternatively, you may have different <a rel="noreferrer noopener" href="https://blog.finxter.com/how-to-check-your-python-version/" data-type="post" data-id="1371" target="_blank">Python versions</a> on your computer, and <code>openai</code> is not installed for the particular version you’re using.</p>
<p>Before I dive into the tutorial, try out one of the following solutions (quick fix):</p>
<pre class="wp-block-preformatted"><code># &#x2705; Python 2 or Virtual Environment <strong>pip install openai</strong> # &#x2705; Python 3
<strong>pip3 install openai</strong> # &#x2705; Python 3.10
<strong>pip3.10 install openai</strong> # &#x2705; If you get a Permission Error
<strong>sudo pip3 install openai</strong> # &#x2705; If pip is not in your PATH environment variable
<strong>python -m pip install openai</strong> # &#x2705; Python 3 if pip is not in your PATH
<strong>python3 -m pip install openai</strong> # &#x2705; Python 3.10 if pip is not in your PATH
<strong>python3.10 -m pip install openai</strong> # &#x2705; Anaconda
<strong>conda install -c conda-forge openai</strong></code></pre>
<h2>Problem Formulation</h2>
<div class="wp-block-image">
<figure class="aligncenter size-full"><img loading="lazy" decoding="async" width="721" height="225" src="https://blog.finxter.com/wp-content/uploads/2023/02/image-409.png" alt="" class="wp-image-1170861" srcset="https://blog.finxter.com/wp-content/uploads/2023/02/image-409.png 721w, https://blog.finxter.com/wp-content/uplo...300x94.png 300w" sizes="(max-width: 721px) 100vw, 721px" /></figure>
</div>
<p>You’ve just learned about the awesome capabilities of the <code>openai</code> library and you want to try it out, so you start your code with the following statement:</p>
<pre class="EnlighterJSRAW" data-enlighter-language="python" data-enlighter-theme="" data-enlighter-highlight="" data-enlighter-linenumbers="" data-enlighter-lineoffset="" data-enlighter-title="" data-enlighter-group="">import openai</pre>
<p>This is supposed to import the OpenAI library into your <a rel="noreferrer noopener" href="https://blog.finxter.com/python-virtual-environments-with-venv-a-step-by-step-guide/" data-type="URL" data-id="https://blog.finxter.com/python-virtual-environments-with-venv-a-step-by-step-guide/" target="_blank">(virtual) environment</a>. However, it only throws the following <code>ImportError: No module named 'openai'</code>:</p>
<pre class="EnlighterJSRAW" data-enlighter-language="python" data-enlighter-theme="" data-enlighter-highlight="1,5" data-enlighter-linenumbers="" data-enlighter-lineoffset="" data-enlighter-title="" data-enlighter-group="">>>> import openai
Traceback (most recent call last): File "&lt;pyshell#6>", line 1, in &lt;module> import openai
ModuleNotFoundError: No module named 'openai'</pre>
<h2>Solution Idea 1: Install Library OpenAI</h2>
<div class="wp-block-image">
<figure class="aligncenter size-large"><img decoding="async" loading="lazy" width="1024" height="905" src="https://blog.finxter.com/wp-content/uploads/2023/02/image-410-1024x905.png" alt="" class="wp-image-1170862" srcset="https://blog.finxter.com/wp-content/uploads/2023/02/image-410-1024x905.png 1024w, https://blog.finxter.com/wp-content/uplo...00x265.png 300w, https://blog.finxter.com/wp-content/uplo...68x679.png 768w, https://blog.finxter.com/wp-content/uplo...ge-410.png 1339w" sizes="(max-width: 1024px) 100vw, 1024px" /></figure>
</div>
<p>The most likely reason is that Python doesn’t provide <code>openai</code> in its standard library. You need to install it first!</p>
<p>Before being able to import the OpenAI module, you need to install it using Python’s package manager <code>pip</code>. <a rel="noreferrer noopener" href="https://blog.finxter.com/how-to-install-pip-on-windows/" data-type="post" data-id="21552" target="_blank">Make sure pip is installed on your machine.</a></p>
<p>To fix this error, you can run the following command in your Windows shell:</p>
<pre class="EnlighterJSRAW" data-enlighter-language="generic" data-enlighter-theme="" data-enlighter-highlight="" data-enlighter-linenumbers="" data-enlighter-lineoffset="" data-enlighter-title="" data-enlighter-group="">$ pip install openai</pre>
<p>This simple command installs <code>openai</code> in your virtual environment on Windows, Linux, and MacOS. It assumes that your <code>pip</code> version is updated. If it isn’t, use the following two commands in your terminal, command line, or shell (there’s no harm in doing it anyways):</p>
<pre class="EnlighterJSRAW" data-enlighter-language="generic" data-enlighter-theme="" data-enlighter-highlight="" data-enlighter-linenumbers="" data-enlighter-lineoffset="" data-enlighter-title="" data-enlighter-group="">$ python -m pip install --upgrade pip
$ pip install openai</pre>
<p class="has-base-background-color has-background"><img src="https://s.w.org/images/core/emoji/14.0.0/72x72/1f4a1.png" alt="?" class="wp-smiley" style="height: 1em; max-height: 1em;" /> <strong>Note</strong>: Don’t copy and paste the <code>$</code> symbol. This just illustrates that you run it in your shell/terminal/command line. </p>
<h2>Solution Idea 2: Fix the Path</h2>
<div class="wp-block-image">
<figure class="aligncenter size-large"><img decoding="async" loading="lazy" width="1024" height="905" src="https://blog.finxter.com/wp-content/uploads/2023/02/image-411-1024x905.png" alt="" class="wp-image-1170865" srcset="https://blog.finxter.com/wp-content/uploads/2023/02/image-411-1024x905.png 1024w, https://blog.finxter.com/wp-content/uplo...00x265.png 300w, https://blog.finxter.com/wp-content/uplo...68x679.png 768w, https://blog.finxter.com/wp-content/uplo...ge-411.png 1339w" sizes="(max-width: 1024px) 100vw, 1024px" /></figure>
</div>
<p>The error might persist even after you have installed the <code>openai</code> library. This likely happens because <code>pip</code> is installed but doesn’t reside in the path you can use. Although <code>pip</code> may be installed on your system the script is unable to locate it. Therefore, it is unable to install the library using <code>pip</code> in the correct path.</p>
<p>To fix the problem with the path in Windows follow the steps given next. </p>
<p><strong>Step 1</strong>: Open the folder where you installed Python by opening the command prompt and typing <code>where python</code></p>
<figure class="wp-block-image size-large"><img decoding="async" loading="lazy" width="594" height="121" src="https://blog.finxter.com/wp-content/uploads/2021/04/image-35.png" alt="" class="wp-image-28221" srcset="https://blog.finxter.com/wp-content/uploads/2021/04/image-35.png 594w, https://blog.finxter.com/wp-content/uplo...300x61.png 300w" sizes="(max-width: 594px) 100vw, 594px" /></figure>
<p><strong>Step 2</strong>: Once you have opened the <code>Python</code> folder, browse and open the <code>Scripts</code> folder and copy its location. Also verify that the folder contains the <code>pip</code> file.</p>
<div class="wp-block-image">
<figure class="aligncenter size-large"><img decoding="async" loading="lazy" width="1024" height="212" src="https://blog.finxter.com/wp-content/uploads/2021/04/image-37-1024x212.png" alt="" class="wp-image-28224" srcset="https://blog.finxter.com/wp-content/uploads/2021/04/image-37-1024x212.png 1024w, https://blog.finxter.com/wp-content/uplo...300x62.png 300w, https://blog.finxter.com/wp-content/uplo...68x159.png 768w, https://blog.finxter.com/wp-content/uplo...age-37.png 1328w" sizes="(max-width: 1024px) 100vw, 1024px" /></figure>
</div>
<p><strong>Step 3</strong>: Now open the <code>Scripts</code> directory in the command prompt using the <code>cd</code> command and the location that you copied previously. </p>
<div class="wp-block-image">
<figure class="aligncenter size-large"><img decoding="async" loading="lazy" width="800" height="140" src="https://blog.finxter.com/wp-content/uploads/2021/04/image-38.png" alt="" class="wp-image-28225" srcset="https://blog.finxter.com/wp-content/uploads/2021/04/image-38.png 800w, https://blog.finxter.com/wp-content/uplo...300x53.png 300w, https://blog.finxter.com/wp-content/uplo...68x134.png 768w" sizes="(max-width: 800px) 100vw, 800px" /></figure>
</div>
<p><strong>Step 4</strong>: Now install the library using <code>pip install openai</code> command. Here’s an analogous example:</p>
<div class="wp-block-image">
<figure class="aligncenter size-large"><img decoding="async" loading="lazy" width="594" height="163" src="https://blog.finxter.com/wp-content/uploads/2021/04/pip-path.gif" alt="" class="wp-image-28226"/></figure>
</div>
<p>After having followed the above steps, execute our script once again. And you should get the desired output.</p>
<h2>Other Solution Ideas</h2>
<ul>
<li>The <code data-enlighter-language="generic" class="EnlighterJSRAW">ModuleNotFoundError</code> may appear due to <strong>relative imports</strong>. You can learn everything about relative imports and how to create your own module in <a rel="noreferrer noopener" href="https://blog.finxter.com/how-to-write-a-python-module-package/" data-type="URL" data-id="https://blog.finxter.com/how-to-write-a-python-module-package/" target="_blank">this article</a>. </li>
<li>You may have mixed up Python and pip versions on your machine. In this case, to install <code>openai</code> for Python 3, you may want to try <code>python3 -m pip install openai</code> or even <code>pip3 install openai</code> instead of <code>pip install openai</code></li>
<li>If you face this issue server-side, you may want to try the command <code>pip install --user openai</code></li>
<li>If you’re using Ubuntu, you may want to try this command: <code>sudo apt install openai</code> </li>
<li>You can check out our in-depth guide on <a rel="noreferrer noopener" href="https://blog.finxter.com/how-to-install-openai-in-python" data-type="URL" data-id="https://blog.finxter.com/how-to-install-openai-in-python" target="_blank">installing <code>openai</code> here</a>. </li>
<li>You can also check out <a rel="noreferrer noopener" href="https://blog.finxter.com/how-to-fix-importerror-cannot-import-name-x-in-python/" data-type="URL" data-id="https://blog.finxter.com/how-to-fix-importerror-cannot-import-name-x-in-python/" target="_blank">this article</a> to learn more about possible problems that may lead to an error when importing a library. </li>
</ul>
<h2>Understanding the “import” Statement</h2>
<pre class="EnlighterJSRAW" data-enlighter-language="python" data-enlighter-theme="" data-enlighter-highlight="" data-enlighter-linenumbers="" data-enlighter-lineoffset="" data-enlighter-title="" data-enlighter-group="">import openai</pre>
<p>In Python, the <code>import</code> statement serves two main purposes:</p>
<ul>
<li>Search the module by its name, load it, and initialize it.</li>
<li>Define a name in the local namespace within the scope of the <code>import</code> statement. This local name is then used to reference the accessed module throughout the code.</li>
</ul>
<h2>What’s the Difference Between ImportError and ModuleNotFoundError?</h2>
<p>What’s the difference between <code>ImportError</code> and <code>ModuleNotFoundError</code>? </p>
<p>Python defines an <a rel="noreferrer noopener" href="https://docs.python.org/3/library/exceptions.html#exception-hierarchy" data-type="URL" data-id="https://docs.python.org/3/library/exceptions.html#exception-hierarchy" target="_blank">error hierarchy</a>, so some error classes <a rel="noreferrer noopener" href="https://blog.finxter.com/inheritance-in-python-harry-potter-example/" data-type="post" data-id="2179" target="_blank">inherit</a> from other error classes. In our case, the <code>ModuleNotFoundError</code> is a subclass of the <code>ImportError</code> class.</p>
<p>You can see this in this screenshot from the <a href="https://docs.python.org/3/library/exceptions.html#exception-hierarchy" data-type="URL" data-id="https://docs.python.org/3/library/exceptions.html#exception-hierarchy" target="_blank" rel="noreferrer noopener">docs</a>:</p>
<div class="wp-block-image">
<figure class="aligncenter size-full"><img decoding="async" loading="lazy" width="906" height="385" src="https://blog.finxter.com/wp-content/uploads/2021/12/image-37.png" alt="" class="wp-image-77708" srcset="https://blog.finxter.com/wp-content/uploads/2021/12/image-37.png 906w, https://blog.finxter.com/wp-content/uplo...00x127.png 300w, https://blog.finxter.com/wp-content/uplo...68x326.png 768w" sizes="(max-width: 906px) 100vw, 906px" /></figure>
</div>
<p>You can also check this relationship using the <code><a href="https://blog.finxter.com/python-issubclass/" data-type="post" data-id="23648" target="_blank" rel="noreferrer noopener">issubclass()</a></code> built-in function:</p>
<pre class="EnlighterJSRAW" data-enlighter-language="python" data-enlighter-theme="" data-enlighter-highlight="" data-enlighter-linenumbers="" data-enlighter-lineoffset="" data-enlighter-title="" data-enlighter-group="">>>> issubclass(ModuleNotFoundError, ImportError)
True</pre>
<p>Specifically, Python raises the <code>ModuleNotFoundError</code> if the module (e.g., <code>openai</code>) cannot be found. If it can be found, there may be a problem loading the module or some specific files within the module. In those cases, Python would raise an <code>ImportError</code>.</p>
<p class="has-text-align-left has-black-color has-text-color has-background" style="background-color:#fff8e6">If an import statement cannot import a module, it raises an <span class="has-inline-color has-contrast-color"><code>ImportError</code></span>. This may occur because of a faulty installation or an invalid path. In <a href="https://blog.finxter.com/check-python-version-in-your-script-a-helpful-illustrated-guide/" data-type="post" data-id="9010" target="_blank" rel="noreferrer noopener">Python 3.6 or newer</a>, this will usually raise a <span class="has-inline-color has-contrast-color"><code>ModuleNotFoundError</code></span>.</p>
<h2>Related Videos</h2>
<p>The following video shows you how to resolve the <code>ImportError</code>:</p>
<figure class="wp-block-embed-youtube wp-block-embed is-type-video is-provider-youtube"><a href="https://blog.finxter.com/modulenotfounderror-no-module-named-openai/"><img src="https://blog.finxter.com/wp-content/plugins/wp-youtube-lyte/lyteCache.php?origThumbUrl=https%3A%2F%2Fi.ytimg.com%2Fvi%2F20sWJ2sImVo%2Fhqdefault.jpg" alt="YouTube Video"></a><figcaption></figcaption></figure>
<p>The following video shows you how to <a href="https://blog.finxter.com/how-to-call-a-function-from-another-file-in-python/" data-type="URL" data-id="https://blog.finxter.com/how-to-call-a-function-from-another-file-in-python/" target="_blank" rel="noreferrer noopener">import a function from another folder</a>—doing it the wrong way often results in the <code>ModuleNotFoundError</code>:</p>
<figure class="wp-block-embed-youtube wp-block-embed is-type-video is-provider-youtube"><a href="https://blog.finxter.com/modulenotfounderror-no-module-named-openai/"><img src="https://blog.finxter.com/wp-content/plugins/wp-youtube-lyte/lyteCache.php?origThumbUrl=https%3A%2F%2Fi.ytimg.com%2Fvi%2FL8N4mkq-tgo%2Fhqdefault.jpg" alt="YouTube Video"></a><figcaption></figcaption></figure>
<h2>How to Fix “ModuleNotFoundError: No module named ‘openai’” in PyCharm</h2>
<p>If you create a new Python project in <a rel="noreferrer noopener" title="PyCharm – A Simple Illustrated Guide" href="https://blog.finxter.com/pycharm-a-simple-illustrated-guide/" target="_blank">PyCharm </a>and try to import the <code>openai</code> library, it’ll raise the following error message:</p>
<pre class="EnlighterJSRAW" data-enlighter-language="raw" data-enlighter-theme="" data-enlighter-highlight="4" data-enlighter-linenumbers="" data-enlighter-lineoffset="" data-enlighter-title="" data-enlighter-group="">Traceback (most recent call last): File "C:/Users/.../main.py", line 1, in &lt;module> import openai
ModuleNotFoundError: No module named 'openai' Process finished with exit code 1</pre>
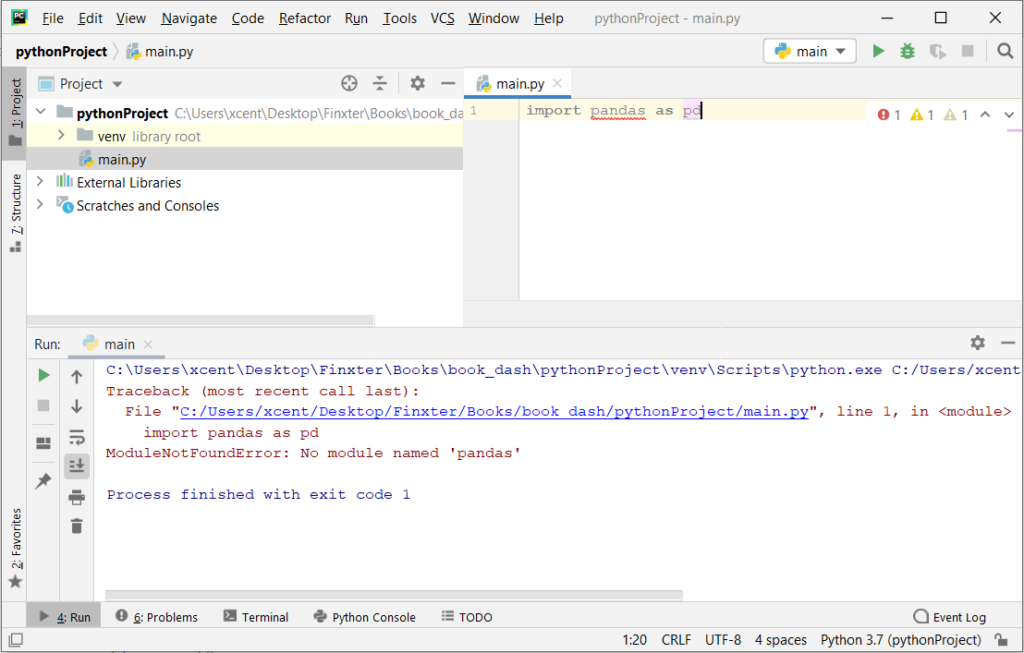
<p>The reason is that each PyCharm project, per default, creates a <a title="Python Virtual Environments with Conda — Why the Buzz?" rel="noreferrer noopener" href="https://blog.finxter.com/python-virtual-environments-conda/" target="_blank">virtual environment</a> in which you can install custom Python modules. But the virtual environment is initially empty—even if you’ve already installed <code>openai</code> on your computer!</p>
<p>Here’s a screenshot exemplifying this for the <code><a href="https://blog.finxter.com/pandas-quickstart/" data-type="post" data-id="16511" target="_blank" rel="noreferrer noopener">pandas</a></code> library. It’ll look similar for <code>openai</code>.</p>
<div class="wp-block-image">
<figure class="aligncenter size-large"><img decoding="async" loading="lazy" width="1024" height="653" src="https://blog.finxter.com/wp-content/uploads/2020/11/image-12-1024x653.png" alt="" class="wp-image-16587" srcset="https://blog.finxter.com/wp-content/uploads/2020/11/image-12-1024x653.png 1024w, https://blog.finxter.com/wp-content/uplo...00x191.png 300w, https://blog.finxter.com/wp-content/uplo...68x490.png 768w, https://blog.finxter.com/wp-content/uplo...150x96.png 150w, https://blog.finxter.com/wp-content/uplo...age-12.png 1108w" sizes="(max-width: 1024px) 100vw, 1024px" /></figure>
</div>
<p>The fix is simple: Use the <a rel="noreferrer noopener" href="https://blog.finxter.com/how-to-install-a-library-on-pycharm/" data-type="post" data-id="22469" target="_blank">PyCharm installation</a> tooltips to install OpenAI in your virtual environment—two clicks and you’re good to go!</p>
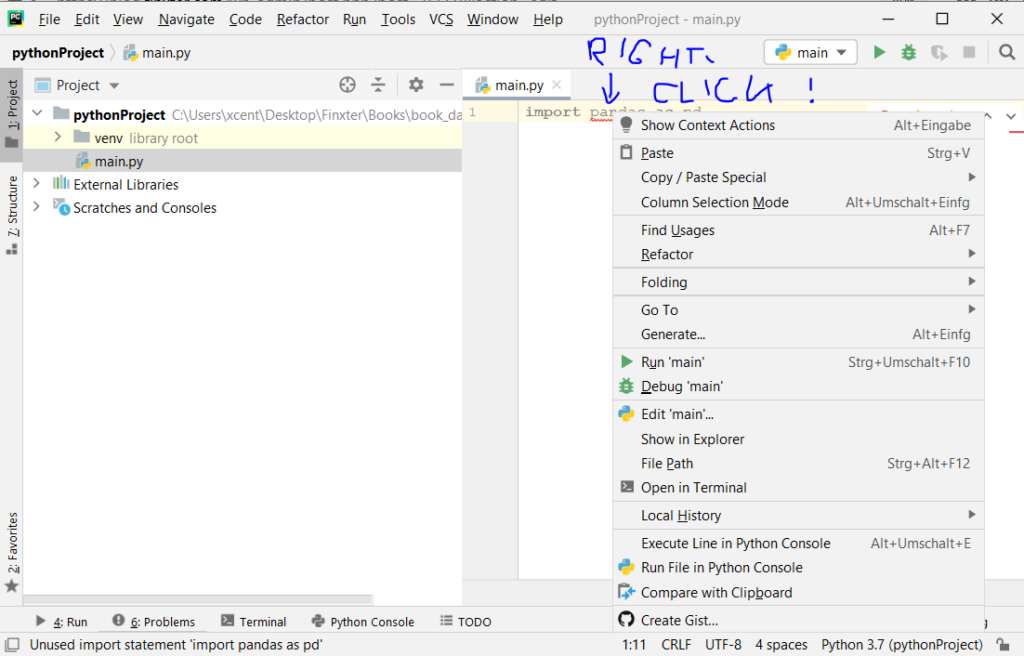
<p>First, right-click on the <code>openai</code> text in your editor:</p>
<div class="wp-block-image">
<figure class="aligncenter size-large"><img decoding="async" loading="lazy" width="1024" height="656" src="https://blog.finxter.com/wp-content/uploads/2020/11/image-14-1024x656.png" alt="" class="wp-image-16593" srcset="https://blog.finxter.com/wp-content/uploads/2020/11/image-14-1024x656.png 1024w, https://blog.finxter.com/wp-content/uplo...00x192.png 300w, https://blog.finxter.com/wp-content/uplo...68x492.png 768w, https://blog.finxter.com/wp-content/uplo...150x96.png 150w, https://blog.finxter.com/wp-content/uplo...age-14.png 1102w" sizes="(max-width: 1024px) 100vw, 1024px" /></figure>
</div>
<p>Second, click “<code>Show Context Actions</code>” in your context menu. In the new menu that arises, click “Install OpenAI” and wait for PyCharm to finish the installation. </p>
<p>The code will run after your installation completes successfully. </p>
<p>As an alternative, you can also open the <code>Terminal</code> tool at the bottom and type:</p>
<pre class="EnlighterJSRAW" data-enlighter-language="generic" data-enlighter-theme="" data-enlighter-highlight="" data-enlighter-linenumbers="" data-enlighter-lineoffset="" data-enlighter-title="" data-enlighter-group="">$ pip install openai</pre>
<p>If this doesn’t work, you may want to set the Python interpreter to another version using the following tutorial: <a rel="noreferrer noopener" href="https://www.jetbrains.com/help/pycharm/2016.1/configuring-python-interpreter-for-a-project.html" target="_blank">https://www.jetbrains.com/help/pycharm/2016.1/configuring-python-interpreter-for-a-project.html</a></p>
<p>You can also manually install a new library such as <code>openai</code> in PyCharm using the following procedure:</p>
<ul>
<li>Open <code><strong>File &gt; Settings &gt; Project</strong></code> from the PyCharm menu.</li>
<li>Select your current project.</li>
<li>Click the <code><strong>Python Interpreter</strong></code> tab within your project tab.</li>
<li>Click the small <code><strong>+</strong></code> symbol to add a new library to the project.</li>
<li>Now type in the library to be installed, in your example OpenAI, and click <code><strong>Install Package</strong></code>.</li>
<li>Wait for the installation to terminate and close all popup windows.</li>
</ul>
<p>Here’s an analogous example:</p>
<div class="wp-block-image">
<figure class="aligncenter size-large"><img decoding="async" src="https://media.giphy.com/media/VQoZIvOyP23tVvQlW0/source.gif" alt=""/></figure>
</div>
<p>Here’s a full guide on how to install a library on PyCharm. </p>
<ul>
<li><a href="https://blog.finxter.com/how-to-install-a-library-on-pycharm/" data-type="post" data-id="22469" target="_blank" rel="noreferrer noopener">How to Install a Library on PyCharm</a></li>
</ul>
</div>


https://www.sickgaming.net/blog/2023/02/...ed-openai/
Reply


Forum Jump:


Users browsing this thread:
2 Guest(s)

Forum software by © MyBB Theme © iAndrew 2016