An idyllic world that exists for the sake of letting people forget about the pain and problems of reality. In this world created by a sentient vocal program, ? (Mu), reality and fantasy has become blurred, allowing people to relive their high school years in bliss. Yet in this seemingly beautiful and perfect world, something is amiss. Escape from this false paradise with your fellow students and return to reality in The Caligula Effect: Overdose!
The story is set several years after Devil May Cry 4.
Legendary DMC action returns, made all the more stylish by the power modern gaming has to offer.
Behold stunning visuals built upon the technology that brought you Resident Evil 7 biohazard. High framerate graphics and flexible design give our creators what they need to offer fans the latest and greatest DMC experience.
Fantasy RPG Bonds Of The Skies Is Flying Onto Nintendo Switch
KEMCO has revealed that its fantasy RPG Bonds of the Skies is headed to the Switch. Pre-purchase options for the game are set to go live on the eShop tomorrow.
In this game, you’ll follow the story of Eil, who begins the adventure in the middle of his coming-of-age ceremony. During this event, his town is attacked by a demon and fully engulfed in flames, forcing Eil to partner up with Nogard (the little blue dragon) in order to save the day.
Bonds of the Skies actually launched on 3DS just a couple of years ago and releases on the PlayStation store today (hence the trailer above). We don’t have a release date or pricing for the Switch version just yet, but hopefully this information from the game’s press release will tide you over until then:
Form Partnerships with Grimoas! Through your adventure, you will come across different Grimoas. By partnering with Grimoas, Eil and his friends can use hidden powers. Strengthen the bonds with them to be victorious in battles!
Synchro Gauge and Special Skills You can set up to five mastered skills, so long as the total costs of the skills do not exceed the characters’ cost limit. In addition, when the Synchro Gauge with the Grimoas reaches 100%, you can use special skills, more powerful than normal!
Other Features – Turn-based battles with a pixelated dot animation – A vast variety of skills to master – Collect all the Grimoas and unleash the Synchro Skills! – A wide range of achievements, including quests to complete and items to collect
The pre-purchase period, set to begin tomorrow, will offer players the chance to get 10% off the full asking price. If you’re interested, make sure to keep an eye out for it appearing on the eShop tomorrow.
Did you play this one on 3DS? Ready to give it a chance on Switch? As ever, let us know in the comments.
The Python developers have released the first alpha of Python 3.8.0 and you can already try it out in Fedora! Test your Python code with 3.8 early to avoid surprises once the final 3.8.0 is out in October.
Install Python 3.8 on Fedora
If you have Fedora 29 or newer, you can install Python 3.8 from the official software repository with dnf:
$ sudo dnf install python38
As more alphas, betas and release candidates of Python 3.8 will be released, the Fedora package will receive updates. No need to compile your own development version of Python, just install it and have it up to date. New features will be added until the first beta.
Test your projects with Python 3.8
Run the python3.8 command to use Python 3.8 or create virtual environments with the builtin venv module, tox or with pipenv. For example:
$ git clone https://github.com/benjaminp/six.git Cloning into 'six'... $ cd six/ $ tox -e py38 py38 runtests: commands[0] | python -m pytest -rfsxX ================== test session starts =================== platform linux -- Python 3.8.0a1, pytest-4.2.1, py-1.7.0, pluggy-0.8.1 collected 195 items
$ python3.8
Python 3.8.0a1 (default, Feb 7 2019, 08:07:33)
[GCC 8.2.1 20181215 (Red Hat 8.2.1-6)] on linux
Type "help", "copyright", "credits" or "license" for more information.
>>> while not (answer := input('Say something: ')):
... print("I don't like empty answers, try again...")
...
Say something:
I don't like empty answers, try again...
Say something: Fedora
>>>
Posted by: xSicKxBot - 03-06-2019, 09:48 PM - Forum: Windows
- No Replies
18 best practices for human-centered AI design
Eighteen best practices for human-centered AI design
By Mihaela Vorvoreanu, Saleema Amershi, and Penny Collisson
Today we’re excited to share a set of Guidelines for Human-AI Interaction. These 18 guidelines can help you design AI systems and features that are more human-centered. Based on more than two decades of thinking and research, they have been validated through a rigorous study published in CHI 2019.
Why do we need guidelines for human-AI interaction?
While classic interaction guidelines hold with AI systems, attributes of AI services, including their accuracy, failure modalities, and understandability raise new challenges and opportunities. Consistency, for example, is a classic design guideline that advocates for predictable behaviors and minimizing unexpected changes. AI components, however, can be inconsistent because they may learn and adapt over time.
We need updated guidance on designing interactions with AI services that provide meaningful experiences, keeping the user in control and respecting users’ values, goals, and attention.
Why these guidelines?
AI-focused design guidance is blooming across UX conferences, the tech press, and within individual design teams. That’s exciting, but it can be hard to know where to start. We wanted to help with that, so…
We didn’t just make these up!They come from more than 20 years of work. We read numerous research papers, magazine articles, and blog posts. We synthesized a great deal of knowledge acquired across the design community into a set of guidelines that apply to a wide range of AI products, are specific, and are observable at the UI level.
We validated the guidelines through rigorous research. We tested the guidelines through three rounds of validation with UX and HCI experts. Based on their feedback, we iterated the guidelines until experts confirmed that they were clear and specific.
Let’s dive into the guidelines!
The guidelines are grouped into four categories that indicate when during a user’s interactions they apply: upon initial engagement with the system, during interaction, when the AI service guesses wrong, and over time.
Initially
1. Make clear what the system can do.
2. Make clear how well the system can do what it can do.
The guidelines in the first group are about setting expectations: What are the AI’s capabilities? What level of quality or error can a user expect? Over-promising can hurt perceptions of the AI service.
PowerPoint’s QuickStarter illustrates Guideline 1, Make clear what the system can do. QuickStarter is a feature that helps you build an outline. Notice how QuickStarter provides explanatory text and suggested topics that help you understand the feature’s capabilities.
During Interaction
3. Time services based on context.
4. Show contextually relevant information.
5. Match relevant social norms.
6. Mitigate social biases.
This subset of guidelines is about context. Whether it’s the larger social and cultural context or the local context of a user’s setting, current task, and attention, AI systems should take context into consideration.
AI systems make inferences about people and their needs, and those depend on context. When AI systems take proactive action, it’s important for them to behave in socially acceptable ways. To apply Guidelines 5 and 6 effectively, ensure your team has enough diversity to cover each other’s blind spots.
Acronyms in Word highlights Guideline 4, Show contextually relevant information. It displays the meaning of abbreviations employed in your own work environment relative to the current open document.
When Wrong
8. Support efficient dismissal.
9. Support efficient correction.
10. Scope services when in doubt.
11. Make clear why the system did what it did.
Most AI services have some rate of failure. The guidelines in this group recommend how an AI system should behave when it is wrong or uncertain, which will inevitably happen.
The system might not trigger when expected, or might trigger at the wrong time, so it should be easy to invoke (Guideline 7) and dismiss (Guideline 8). When the system is wrong, it should be easy to correct it (Guideline 9), and when it is uncertain, Guideline 10 suggests building in techniques for helping the user complete the task on their own. For example, the AI system can gracefully fade out, or ask the user for clarification.
Auto Alt Text automatically generates alt text for photographs by using intelligent services in the cloud. It illustrates Guideline 9, Support efficient correction, because automatic descriptions can be easily modified by clicking the Alt Text button in the ribbon.
Over Time
12. Remember recent interactions.
13. Learn from user behavior.
14. Update and adapt cautiously.
15. Encourage granular feedback.
16. Convey the consequences of user actions.
17. Provide global controls.
18. Notify users about changes.
The guidelines in this group remind us that AI systems are like getting a new puppy: they are long-term investments and need careful planning so they can learn and improve over time. Learning (Guideline 13) also means that AI systems change over time. Changes need to be managed cautiously so the system doesn’t become unpredictable (Guideline 14). You can help users manage inherent consistencies in system behavior by notifying them about changes (Guideline 18).
Ideas in Excel empowers users to understand their data through high-level visual summaries, trends, and patterns. It encourages granular feedback (Guideline 15) on each suggestion by asking, “Is this helpful?”
What’s next?
If you’d like some more ideas, stay tuned for another post on this work where we share some of the uses we’ve been working with at Microsoft. We’d love to hear about your experiences with the guidelines. Please share them in comments.
With thanks to our team who developed The Guidelines for Human-AI Interaction: Saleema Amershi, Dan Weld, Mihaela Vorvoreanu, Adam Fourney, Besmira Nushi, Penny Collisson, Jina Suh, Shamsi Iqbal, Paul Bennett, Kori Inkpen, Jaime Teevan, Ruth Kikin-Gil, and Eric Horvitz.
Thanks also to Ruth Kikin-Gil for her thoughtful collaboration, and for curating examples for this post.
Posted by: xSicKxBot - 03-06-2019, 09:48 PM - Forum: Windows
- No Replies
All-new ‘Inside Xbox’ coming March 12
Inside Xbox is back on Tuesday, March 12, at 2 p.m. PT / 5 p.m. ET with even more exclusive news, content, interviews and footage you won’t see anywhere else!
We’ll have some exciting news involving Halo: The Master Chief Collection! The hourlong episode will also feature DayZ, One Piece World Seeker and of course, Xbox Game Pass! Of course, there’s much more that we can’t reveal just yet, so be sure to tune in live on Mixer, Twitch, YouTube, Facebook, and Twitter on Tuesday, March 12th at 2 p.m PT / 5 p.m. ET.
The best apps for editing and redacting PDFs on your iPad or iPhone
The iPad and iPhone have always been great for reading PDFs, and lately Apple has added more tools for annotating them. Yet, there are third-party alternatives that are so exceptionally good that you need them whenever you’re working with PDFs.
Apple’s own tools make iPads and larger-screen iPhones exceptional for reading PDFs. If you add third-party apps, though, you can make iOS be the best way to edit, change and redact them too.
First, though, it’s still the case that getting a PDF onto your device in order to do any editing is sometimes clunky. There are ways to make that easier, however, and once you’ve got the PDF on your iPad, turning it around and sending it out to someone else is straightforward.
Getting PDFs into your editor
If you are sent a PDF over email or you download it from a website, the way to get that into your editing app is exactly the same as for simply reading it. You just tap on the Share icon in Safari. In Mail, you tap once to open the PDF and then again on the Share icon that appears.
In both cases you get Apple’s share sheet and can pick which app to send it too.
However, you can also AirDrop a PDF onto your iPad or iPhone and tell iOS to open it directly in your editor of choice.
It’s not the best-designed menu on iOS but through AirDrop you can send a PDF directly your preferred app
That’s very useful for sending over a single PDF but it’s less great when you want to load up your iOS device with many of them. There really isn’t a perfect way to put a bundle of PDFs to work on but the major PDF editing apps offer some options.
PDFpen and PDF Expert both let you open documents from iCloud Drive, for instance. They both let you connect to Dropbox to do the same thing, too.
PDF Expert goes further, however, in that it offers Wi-Fi transfer. Open PDF Expert on your iOS device and then on your Mac go to wifipfd.com where you’re shown a QR code. Point the iOS device at that code and you link the two machines. Thereafter, until you quit PDF Expert, close the browser window or move off the same Wi-Fi network, the two are connected.
PDF Expert offers a Wi-Fi Transfer option for getting documents onto your iOS device
You can upload PDFs from your Mac to this Safari page and they appear on PDF Expert for iOS’s Documents folder. You can create folders on either the Mac or the iPad/iPhone. On iOS you can also drag PDFs into those folders while on the Mac it’s a little less smooth. You have to go into the folder and then upload the PDFs into it.
It would be good to be able to upload entire folders at once but at least you can shift-click to select as many individual PDFs as you need.
Have you gathered that we like PDF Expert a lot? It also offers a “Nearby” option to let you browse through your Mac from your iOS device.
PDF Expert also offers a rather similar-sounding feature called Nearby. However, it’s a way for your iOS device to see your entire Mac, if it’s next to your iPad, and let you pick through the folders to whatever you need. When a folder on your Mac contains PDFs or images, you can view them in PDF Expert for iOS.
Then you can save images to PDF Expert as they are or choose Convert to PDF first.
Once you’ve got PDFs into any editing app, though, they tend to work the same way.
If you want to redact text, look elsewhere. If you need to change any of the actual contents of the PDF, then LiquidText is not for you.
LiquidText is little use for editing and redacting, but utterly marvellous at everything else
However, for marking up, for taking excerpts of important passages, and for squeezing sections of the PDF down so that you can just read the bits you want, LiquidText is astonishing. It’s a PDF editor but it isn’t. LiquidText is a research and reading and ideas tool that happens to be based on PDFs.
Other than LiquidText, though, PDF editing apps are all good enough that you’d be happy with any of them. There are differences, though.
One small exception
Hats off to Adobe for creating the entire idea of PDF, but hats back on for how poor its own apps can be. The Mac one has the ability to redact slightly more than you actually wanted, for instance, and the free iOS one is little more than an advert for an Adobe subscription.
It’s fair enough to have to pay for great software, but we’d like to know first that it is great. If you’ve already got an Adobe Creative Cloud subscription, you might as well use the iOS Adobe Acrobat app because you’re paying for it.
Acrobat is the most expensive of the iOS PDF editing apps, though, and it doesn’t earn that by being better. PDFpen and PDF Expert for iOS both beat it for features – though neither is quite complete.
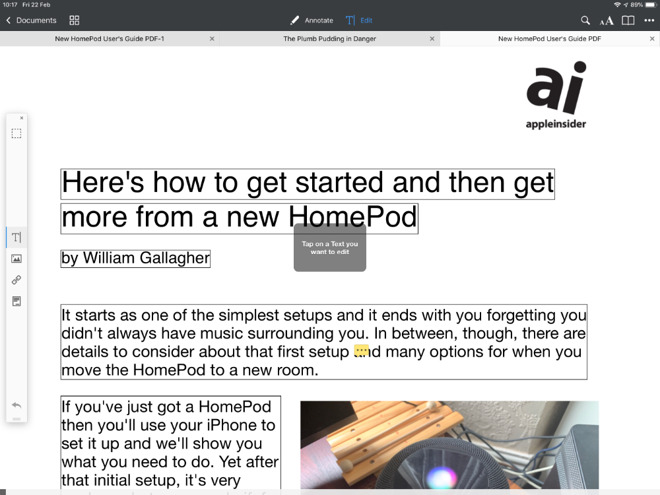
In PDF Expert, you tap the Edit button at the top of the screen and then the rather similar Text icon in the toolbar that appears. PDF Expert puts bounding boxes around every paragraph of text and if you tap anywhere on the page, you can directly type into the paragraph.
Tap the Edit button at the top of the screen, then the T-shaped one in the tool bar, and now you can edit whole paragraphs in PDF Expert
Similarly, tap the image button on that toolbar and you can resize or replace photos.
PDFpen needs fewer taps to get to changing text but it’s less obvious. There are editing tools at the top of the screen and two look like they’re for text. Tap either and you get three or four more options that also look like they could be for this editing.
However, to change text, you ignore all of these and instead press-and-hold on a word. No matter how much of a paragraph you want to change, you have to press on one word first. You get popup options that include Correct Text and if you tap on that, PDFpen lets you edit the entire line that the word is on.
PDFpen for iOS lets you press-and-hold on a word to bring up its Correct Text option
It’s the PDF format itself that limits editing like this as, always, if you need to make substantial changes you should go back to the app where you created the PDF. Still, PDF Expert’s ability to let you edit a whole paragraph is substantially better than PDFpen’s limit of one line at a time.
Redact
So PDF Expert has this superior editing feature and it also has more options for getting PDFs into the app. There is one more thing that it does well —it redacts.
Tap on Edit, tap on an icon that looks like a note and then you can swipe over any text you choose. This is true redaction, too. It does put a black highlight bar over where the text was, but it also removes it from the PDF.
If you open the PDF in another app, select all of the text and then copy/paste it into somewhere else, you won’t get the redacted part. Nicely, you won’t even get blank spaces where the redacted words used to be. All you get is the rest of the text, the non-redacted parts.
PDF Expert does this and, surprisingly, PDFpen does not.
However, PDFpen has an advantage in that you can OCR PDF documents —if you use a companion app.
PDFpen Scan+ ($6.99) lets you photograph a paper document and it will then OCR the text in it. You’ll rarely get fully accurate results but PDFpen Scan+ is very good at getting most of it. You then have a PDF plus what’s called the OCR layer. You can choose to see the original PDF or to be shown just what text has been scanned from it.
Then you can send that PDF over to PDFpen for editing. There’s something odd with this part we consistently found that sending to PDFpen meant we were automatically switched to that app, but the document never appeared.
You can, though, email the PDF and then tell Mail to open it in PDFpen —but then you can equally well email it into PDF Expert.
Look what you can do
PDF is going to go away someday. We used to have paper, now we have PDF documents that look like paper. In the future, we’ll surely just stop needing documents that look like we used to have them.
In the meantime, though, the tools for creating and editing them are now remarkably strong. Given how rarely we happen to need to scan actual paper documents anymore, we think PDF Expert leads the pack by a long way.
Yet if you do a lot of work with PDFs, it won’t break the bank to buy more than one app and that would increase what you can do with these documents on iOS.
Visual Studio 2019 (Preview 2 or later) with the ASP.NET and web development workload selected.
The latest Blazor extension from the Visual Studio Marketplace.
The Blazor templates on the command-line:
dotnet new -i Microsoft.AspNetCore.Blazor.Templates::0.8.0-preview-19104-04
You can find getting started instructions, docs, and tutorials for Blazor at https://blazor.net.
Upgrade to Blazor 0.8.0
To upgrade your existing Blazor apps to Blazor 0.8.0 first make sure you’ve installed the prerequisites listed above.
To upgrade a standalone Blazor 0.7.0 project to 0.8.0:
Update the Blazor packages and .NET CLI tool references to 0.8.0-preview-19104-04.
Replace any package reference to Microsoft.AspNetCore.Blazor.Browser with a reference to Microsoft.AspNetCore.Blazor.
Replace BlazorComponent with ComponentBase.
Update overrides of SetParameters on components to override SetParametersAsync instead.
Replace BlazorLayoutComponent with LayoutComponentBase
Replace IBlazorApplicationBuilder with IComponentsApplicationBuilder.
Replace any using statements for Microsoft.AspNetCore.Blazor.* with Microsoft.AspNetCore.Components.*, except leave Microsoft.AspNetCore.Blazor.Hosting in Program.cs
In index.html update the script reference to reference components.webassembly.js instead of blazor.webassembly.js
To upgrade an ASP.NET Core hosted Blazor app to 0.8.0:
Update the client-side Blazor project as described previously.
Remove any package reference to Microsoft.AspNetCore.App or Microsoft.AspNetCore.All
Upgrade any non-Blazor Microsoft.AspNetCore.* package references to version 3.0.0-preview-19075-0444
Remove any package reference to Microsoft.AspNetCore.Razor.Design
To enable JSON support, add a package reference to Microsoft.AspNetCore.Mvc.NewtonsoftJson and updateStartup.ConfigureServices to call services.AddMvc().AddNewtonsoftJson()
Upgrade the Microsoft.AspNetCore.Blazor.Server package reference to 0.8.0-preview-19104-04
Add a package reference to Microsoft.AspNetCore.Components.Server
In Startup.ConfigureServices simplify any call to app.AddResponseCompression to call the default overload without specifying WebAssembly or binary data as additional MIME types to compress.
In Startup.Configure add a call to app.UseBlazorDebugging() after the existing call to app.UseBlazor<App.Startup>()
Remove any unnecessary use of the Microsoft.AspNetCore.Blazor.Server namespace.
To upgrade a Blazor class library to 0.8.0:
Replace the package references to Microsoft.AspNetCore.Blazor.Browser and Microsoft.AspNetCore.Blazor.Build with references to Microsoft.AspNetCore.Components.Browser and Microsoft.AspNetCore.Components.Build and update the versions to 3.0.0-preview-19075-0444.
In the project file for the library change the project SDK from “Microsoft.NET.Sdk.Web” to “Microsoft.NET.Sdk.Razor”.
Server-side Blazor is now ASP.NET Core Razor Components in .NET Core 3.0
As was recently announced, server-side Blazor is now shipping as ASP.NET Core Razor Components in .NET Core 3.0. We’ve integrated the Blazor component model into ASP.NET Core 3.0 and renamed it to Razor Components. Blazor 0.8.0 is now built on Razor Components and enables you to host Razor Components in the browser on WebAssembly.
Upgrade a server-side Blazor project to ASP.NET Core Razor Components in .NET Core 3.0
If you’ve been working with server-side Blazor, we recommend upgrading to use ASP.NET Core Razor Components in .NET Core 3.0.
To upgrade a server-side Blazor app to ASP.NET Core Razor Components:
Update the client-side Blazor project as described previously, except replace the script reference to blazor.server.js with components.server.js
Update the ASP.NET Core app hosting the Razor Components to .NET Core 3.0 as described previously.
In the server project:
Upgrade the Microsoft.AspNetCore.Blazor.Server package reference to 0.8.0-preview-19104-04
Add a package reference to Microsoft.AspNetCore.Components.Server version 3.0.0-preview-19075-0444
Replace the using statement for Microsoft.AspNetCore.Blazor.Server with Microsoft.AspNetCore.Components.Server
Replace services.AddServerSideBlazor with services.AddRazorComponents and app.UseServerSideBlazor with app.UseRazorComponents.
In the Startup.Configure method add app.UseStaticFiles() just prior to calling app.UseRazorComponents.
Move the wwwroot folder from the Blazor app project to the ASP.NET Core server project
Switching between ASP.NET Core Razor Components and client-side Blazor
Sometimes it’s convenient to be able to switch between running your Razor Components on the server (ASP.NET Core Razor Components) and on the client (Blazor). For example, you might run on the server during development so that you can easily debug, but then publish your app to run on the client.
To update an ASP.NET Core hosted Blazor app so that it can be run as an ASP.NET Core Razor Components app:
Move the wwwroot folder from the client-side Blazor project to the ASP.NET Core server project.
In the server project:
Update the script tag in index.html to point to components.server.js instead of components.webassembly.js.
Add a call to services.AddRazorComponents<Client.Startup>() in the Startup.ConfigureServices method.
Add a call to app.UseStaticFiles() in the Startup.Configure method prior to the call to UseMvc.
Replace the call to UseBlazor with app.UseRazorComponents<Client.Startup>()
If you’re using dependency injection to inject an HttpClient into your components, then you’ll need to add an HttpClient as a service in your server’s Startup.ConfigureServices method.
Previously to get tooling support for Blazor projects you needed to install the Blazor extension for Visual Studio. Starting with Visual Studio 2019 Preview 2, tooling support for Razor Components (and hence Blazor apps) is already included without having to install anything else. The Blazor extension is now only needed to install the Blazor project templates in Visual Studio.
Runtime improvements
Blazor 0.8.0 includes some .NET runtime improvements like improved runtime performance on Chrome and an improved IL linker. In our performance benchmarks, Blazor 0.8.0 performance on Chrome is now about 25% faster. You can now also reference existing libraries like Json.NET from a Blazor app without any additional linker configuration:
There are a couple of known issues with this release that you may run into:
“It was not possible to find any compatible framework version. The specified framework ‘Microsoft.NETCore.App’, version ‘2.0.0’ was not found.”: You may see this error when building a Blazor app because the IL linker currently requires .NET Core 2.x to run. To work around this issue, either install .NET Core 2.2 or disable IL linking by setting the <BlazorLinkOnBuild>false</BlazorLinkOnBuild> property in your project file.
“Unable to generate deps.json, it may have been already generated.”: You may see this error when running a standalone Blazor app and you haven’t yet restored packages for any .NET Core apps. To workaround this issue create any .NET Core app (ex dotnet new console) and then rerun the Blazor app.
These issues will be addressed in a future Blazor update.
Future updates
This release of Blazor was primarily focused on first integrating Razor Components into ASP.NET Core 3.0 and then rebuilding Blazor on top of that. Going forward, we plan to ship Blazor updates with each .NET Core 3.0 update.
Blazor, and support for running Razor Components on WebAssembly in the browser, won’t ship with .NET Core 3.0, but we continue to work towards shipping Blazor some later date.
Give feedback
We hope you enjoy this latest preview release of Blazor. As with previous releases, your feedback is important to us. If you run into issues or have questions while trying out Blazor, file issues on GitHub. You can also chat with us and the Blazor community on Gitter if you get stuck or to share how Blazor is working for you. After you’ve tried out Blazor for a while please let us know what you think by taking our in-product survey. Click the survey link shown on the app home page when running one of the Blazor project templates:
If you want to consign your game to anonymity and a life of wandering aimlessly in the darkest depths of the App Store, then naming it Gem Rush should do the job nicely. To be fair, the horribly generic title is inherited from the physical board game, and in the world of tabletop games, the words ‘gem’ and ‘rush’ can actually be mentioned in the same breath without everyone’s eyes glazing over. Gem Rush does actually task the players with wandering dark depths. However, this is because the players are dwarves and we all know that they like nothing better than exploring underground caverns and collecting treasure.
Gem Rush is a game for one to seven players and can be played either cooperatively or competitively. At the start of the game, all of the players begin in the central cavern; the rest of the mine is unexplored. The starting cavern has several exits but to pass through one of them you will have to pay the correct combination of gems. Pass through an exit and the next room will be revealed. The dwarf who discovered the new room then has the option to rotate it to confirm its final orientation. Some exits will only require a single gem to pass through but score just one point. Other exits may require the player to spend half a dozen gems but the points rewarded will be far more impressive. The first person to reach the target score (which is usually twenty points but can be changed) is declared the winner.
You begin the game with four cards; each shows two different treasures, most of which will be coloured gems. You want to try and use your cards as efficiently as possible. If an exit requires a blue and a black gem, then playing a single card that shows both a blue and a black gem is the optimum way to go. You may have to spend two cards, one with a blue gem and one with a black but in this case, the other two depicted gems will be wasted.
Apart from gems, your cards may show other treasures. Diamond dust is a wild resource and can count as a gem of any other colour. Orichalcum has the potential to score extra points, whilst echoglass will copy the colour of another gem that was played at the same time. Finally, warp stones will let you immediately teleport and build at an exit of your choice.
All of the caverns have a special ability; some of these, like the mine carts, are free to use and let you rapidly move around the mine. Usually, your dwarf will have only three movement points, and later in the game when the mine expands in size, mine carts are an effective way of getting around. Most of the other special abilities will end your turn but they do offer ways of acquiring more gem cards. Some allow you to keep drawing from the deck until you uncover treasures of a specific type. Then there are rooms that require you to exchange treasures for different ones. Others are blind draws from the card deck and some are even more risky, causing you to draw a set number of cards and only keeping cards of a specific type.
This may mean that you end up empty-handed, which will have you knotting your beard in frustration. Overall, there are a wide variety of rooms and as the map expands you will have a satisfying range of options. The gem currency system is definitely more luck based than in a game like Splendor. There is certainly less opportunity for forward planning, but this unpredictability forms a big part of Gem Rush’s charm.
The cooperative game introduces a time limit, as at the end of each turn three cards are removed from the deck. This means that you have twenty-five turns to score as many points as possible. It works well enough; you can even invite AI players to help you out. However, it still feels like a missed opportunity to add some much-needed interaction to proceedings. Maybe if the players were allowed to swap cards or combine their abilities like in Pandemic it would have been more interesting.
The interface is very professional, allowing the user to spin and zoom the map to their heart’s content. It obligingly facilitates your actions; finding the quickest routes and automatically selecting the correct colours when you play echoglass cards. Graphically the game remains close to the board game. Discovering new caverns and watching the mine network grow in size feels very satisfying. The black gems can be difficult to make out and the icons are a little small. Thankfully, tapping on a card will bring up a full description of the room’s power so it isn’t really a big issue. The weedy music is more of a let down; it plays on a short loop and quickly becomes tedious. One glaring omission is that after the decent tutorial, you are left high and dry, as there isn’t a separate breakdown of the rules. I do not want to have to watch an entire tutorial just to clarify a single rule.
Even on the most difficult of the three levels, the AI doesn’t really put up that much of a fight. You will either want to play locally against friends or sign up to play online. Games can be either competitive or cooperative, and you will find an impressive range of options. You can choose to play real-time games with a range of different time limits. Or, you can play asynchronously with either twelve or twenty-four hour deadlines. It is just a pity that the online side of the game is so sparsely populated at the moment.
Gem Rush is easy to pick up and play, with games taking less than fifteen minutes to complete. The app has a comprehensive range of options and worked without any problems. Not many games have both cooperative and competitive modes of play, although some more content such as a campaign mode for the solo player would have been appreciated. The lack of player interaction and fairly high reliance on luck means that some turns can pass without you being able to accomplish anything. However, the game remains fun and satisfying with the last few turns growing increasingly tense.
Last year we took our first look at VRoid Studio, a 3D anime style character creator that had recently been translated to English. It works very similarly to Daz3D, Poser and MakeHuman, but is entirely dedicated to creating characters in the anime style. Using a simple set of sliders, you can quickly customize a character to your liking, much like defining your character in a video game. However you can also go much deeper, with integrated texture editing tools, hair creation tools, multiple animations and much more.
Previously however, VRoid had one major limitation… it could only produce female characters. This has now changed and male characters can be created as well, with their own set of gender specific animations defined. In the video below we go hands-on with the updated and more capable VRoid Studio.
You can download VRoid Studio here. The page is Japanese, so look for the following buttons and pick the appropriate operating system:
The download is a 0.5GB zip file, simply extract and run the executable within.