Sci-Fi Twin-Stick Shooter Hovership Havoc is Available Now on Xbox One
As developer and designer,I started working on Hovership Havoc almost four years ago. It was originally just a mini-game in a much larger project I was working on at the time. I decided to scale things down and focus on one of my mini-games which was a top-down space shooter. I was playing a lot of roguelite permadeath games at that time so I knew I wanted to add in some of those characteristics as well. I really like that you can play those types of games in short or long sessions, so that was something I wanted to accomplish with Hovership Havoc.
Hovership Havoc has four hoverships to choose from, each with their own stats and main weapon. Every hovership is equipped with a speed burst ability which is extremely useful in defeating small enemies and dodging enemy projectiles. You will encounter randomly dropped abilities throughout the levels like homing missiles, drones, flamethrower, shields, lasers, and many more sci-fi abilities. Destroyed enemies will drop XP that you can spend to upgrade your hovership stats and abilities.
After progressing through the levels, you will encounter the boss battles. The boss battles let you use all your upgrades and abilities that you may have picked up, but as a twist, you play the game from a third person perspective.
I wanted to build a game that was challenging without being frustrating or impossible to complete. That is why I added a permanent progression system. That way you can earn XP as you play, to upgrade your hovership before you start a new playthrough.
I’ve always been a huge Xbox fan so I’m extremely excited to finally achieve my goal of releasing Hovership Havoc on Xbox One. I hope you are ready to hop in a hovership and wreak some havoc!
Get a job: These teams and more are hiring Programmers and Engineers now!
Whether you’re just starting out, looking for something new, or just seeing what’s out there, the Gamasutra Job Board is the place where game developers move ahead in their careers.
Gamasutra’s Job Board is the most diverse, most active, and most established board of its kind in the video game industry, serving companies of all sizes, from indie to triple-A.
Here are just some of the many, many positions being advertised right now. If you’re a recruiter looking for talent, you can also post jobs here.
Location: Irvine, California
Amazon is all-in on games, and our mission is to be the most customer-obsessed company in the games industry. At Amazon Game Studios, we’re creating compelling games like New World, a sandbox MMO set on a supernatural continent in the 17th century, our multiplayer shooter Crucible, and our newly announced The Lord of the Rings MMO. Amazon Games is also delivering great game benefits to Prime members each month via Twitch Prime, and providing game developers of all sizes with the tools they need to succeed with Amazon Game Tech.
This role is contributing directly to one of the most ambitious games in the industry. New World is a sandbox MMO set on a supernatural continent during the 17th Century. In New World, players take on the role of settlers, crafting gear they need to survive in a lawless and haunted land of opportunity. As they gain in strength and coordination, players battle to explore, claim and conquer a savage wilderness, and the hordes of other players seeking to do the same.
Location: Bellevue, Washington
Sucker Punch Productions is looking for focused, collaborative, professional engineers to implement gameplay features for our upcoming project. We’re looking for bright, energetic, and talented individuals who share our love of video games and our passion for creating innovative and fun experiences.
Work for this position will be done primarily in C++, with some work done in our proprietary Scheme-based scripting language. This is a highly collaborative position. You’ll be working closely with our game design team during iteration on game play features.
Location: Los Angeles, California
At Iridium Studios, you’d be joining a small but dedicated group of game developers with a passion for role-playing games and complex, highly character-driven stories. As a gameplay engineer, you’d be the primary arbiter of the project, implementing features and integrating content in Unreal Engine 4. As cliche as it is, working well with others is paramount; work/life balance is emphasized, and we endeavor to ensure everyone contributes creatively.
Location: Irvine, California
At Amazon, we believe in ground-breaking games that can redefine the boundaries of player experience. We are looking for a Game AI Engineer to join the New World team at Amazon Game Studios, Orange County. New World is a Sandbox MMO set in an alternate version of the 17th Century.
As a Game AI Engineer you’ll be responsible for implementing and supporting gameplay centered on enemy characters. You will work with a team of designers and animators to bring New World to life. We’re looking for a creative problem solver with a passion for gaming, someone who enjoys a challenge and is a constant advocate for game quality.
Location: Chicago, Illinois
At Disbelief we value work-life balance, and want to create an alternative to the crunch-culture prevalent in game development. We also believe strongly in investing in our talent and our team. Disbelief is a place to puzzle out the solutions to cutting-edge problems in graphics and engine programming, but also a place where people can grow their careers and skill sets as valued members of a stable and close knit team.
Currently, we’re looking for a junior programmer. This opportunity is for a full-time position in Chicago, IL. Junior programmers at Disbelief are called on to develop and debug in a variety of areas from game play to core engine programming. You are expected to learn new systems and projects as you grow as a developer, with support and training from more senior members of the team. Most importantly, you will work to solve problems with the help of the team. We work with leading edge technologies to make them perform at the top of their capabilities, and we take pride in solving problems others can’t. We believe a diverse team is a stronger team, and we encourage marginalized programmers to apply.
Netflix's Ghost In The Shell Show Gets Wild New Trailer
While Shirow Masamune's manga series Ghost in the Shell has had many adaptations in the past, including a big-budget Hollywood movie, the latest installment in the saga it coming to Netflix. Titled Ghost in the Shell: SAC_2045, the movie is directed by Shinji Aramaki and Kenji Kamiyama.
Coming in April, this will be a very different take on the classic manga series, as SAC_2045 will feature 3D computer graphics, giving it a very distinct style compared to other anime movies and series. You can check out the full trailer for the new series below.
The series features Atsushi Nakanaka as Motoko Kusanagi, Akio Takatsuka as Bato, and Hirota Takaji as Togusa. The official synopsis for the series reads, "In the year 2045, after global capitalism has defaulted, Japan's elite Section 9 begins conducting covert cyber operations."
Additionally, a new poster for the series was released, featuring the members of Section 9, featuring Motoko front and center. Check it out for yourself below.
Ghost in the Shell: SAC_2045 poster from Netflix
Ghost in the Shell: SAC_2045 will hit Netflix this April.
Posted by: xSicKxBot - 01-28-2020, 05:01 AM - Forum: Python
- No Replies
Python Re Dot
You’re about to learn one of the most frequently used regex operators: the dot regex . in Python’s re library.
What’s the Dot Regex in Python’s Re Library?
The dot regex . matches all characters except the newline character. For example, the regular expression ‘…’ matches strings ‘hey’ and ‘tom’. But it does not match the string ‘yo\ntom’ which contains the newline character ‘\n’.
Let’s study some basic examples to help you gain a deeper understanding.
>>> import re

>>> >>> text = '''But then I saw no harm, and then I heard

Each syllable that breath made up between them.'''

>>> re.findall('B..', text)

['But']

>>> re.findall('heard.Each', text)

[]

>>> re.findall('heard\nEach', text)

['heard\nEach']

>>>
You first import Python’s re library for regular expression handling. Then, you create a multi-line text using the triple string quotes.
Let’s dive into the first example:
>>> re.findall('B..', text)

['But']
You use the re.findall() method. Here’s the definition from the Finxter blog article:
The re.findall(pattern, string) method finds all occurrences of the pattern in the string and returns a list of all matching substrings.
The first argument is the regular expression pattern ‘B..’. The second argument is the string to be searched for the pattern. You want to find all patterns starting with the ‘B’ character, followed by two arbitrary characters except the newline character.
The findall() method finds only one such occurrence: the string ‘But’.
The second example shows that the dot operator does not match the newline character:
>>> re.findall('heard.Each', text)

[]
In this example, you’re looking at the simple pattern ‘heard.Each’. You want to find all occurrences of string ‘heard’ followed by an arbitrary non-whitespace character, followed by the string ‘Each’.
But such a pattern does not exist! Many coders intuitively read the dot regex as an arbitrary character. You must be aware that the correct definition of the dot regex is an arbitrary character except the newline. This is a source of many bugs in regular expressions.
The third example shows you how to explicitly match the newline character ‘\n’ instead:
Naturally, the following relevant question arises:
How to Match an Arbitrary Character (Including Newline)?
The dot regex . matches a single arbitrary character—except the newline character. But what if you do want to match the newline character, too? There are two main ways to accomplish this.
You create a multi-line string. Then you try to find the regex pattern ‘o.p’ in the string. But there’s no match because the dot operator does not match the newline character per default. However, if you define the flag re.DOTALL, the newline character will also be a valid match.
An alternative is to use the slightly more complicated regex pattern [.\n]. The square brackets enclose a character class—a set of characters that are all a valid match. Think of a character class as an OR operation: exactly one character must match.
What If You Actually Want to Match a Dot?
If you use the character ‘.’ in a regular expression, Python assumes that it’s the dot operator you’re talking about. But what if you actually want to match a dot—for example to match the period at the end of a sentence?
Nothing simpler than that: escape the dot regex by using the backslash: ‘\.’. The backslash nullifies the meaning of the special symbol ‘.’ in the regex. The regex engine now knows that you’re actually looking for the dot character, not an arbitrary character except newline.
Here’s an example:
>>> import re

>>> text = 'Python. Is. Great. Period.'

>>> re.findall('\.', text)

['.', '.', '.', '.']
The findall() method returns all four periods in the sentence as matching substrings for the regex ‘\.’.
In this example, you’ll learn how you can combine it with other regular expressions:
>>> re.findall('\.\s', text)

['. ', '. ', '. ']
Now, you’re looking for a period character followed by an arbitrary whitespace. There are only three such matching substrings in the text.
In the next example, you learn how to combine this with a character class:
>>> re.findall('[st]\.', text)

['s.', 't.']
You want to find either character ‘s’ or character ‘t’ followed by the period character ‘.’. Two substrings match this regex.
Note that skipping the backslash is required. If you forget this, it can lead to strange behavior:
>>> re.findall('[st].', text)

['th', 's.', 't.']
As an arbitrary character is allowed after the character class, the substring ‘th’ also matches the regex.
[Collection] What Are The Different Python Re Quantifiers?
If you want to use (and understand) regular expressions in practice, you’ll need to know the most important quantifiers that can be applied to any regex (including the dot regex)!
So let’s dive into the other regexes:
Quantifier
Description
Example
.
The wild-card (‘dot’) matches any character in a string except the newline character ‘n’.
Regex ‘…’ matches all words with three characters such as ‘abc’, ‘cat’, and ‘dog’.
*
The zero-or-more asterisk matches an arbitrary number of occurrences (including zero occurrences) of the immediately preceding regex.
Regex ‘cat*’ matches the strings ‘ca’, ‘cat’, ‘catt’, ‘cattt’, and ‘catttttttt’.
?
The zero-or-one matches (as the name suggests) either zero or one occurrences of the immediately preceding regex.
Regex ‘cat?’ matches both strings ‘ca’ and ‘cat’ — but not ‘catt’, ‘cattt’, and ‘catttttttt’.
+
The at-least-one matches one or more occurrences of the immediately preceding regex.
Regex ‘cat+’ does not match the string ‘ca’ but matches all strings with at least one trailing character ‘t’ such as ‘cat’, ‘catt’, and ‘cattt’.
^
The start-of-string matches the beginning of a string.
Regex ‘^p’ matches the strings ‘python’ and ‘programming’ but not ‘lisp’ and ‘spying’ where the character ‘p’ does not occur at the start of the string.
$
The end-of-string matches the end of a string.
Regex ‘py$’ would match the strings ‘main.py’ and ‘pypy’ but not the strings ‘python’ and ‘pypi’.
A|B
The OR matches either the regex A or the regex B. Note that the intuition is quite different from the standard interpretation of the or operator that can also satisfy both conditions.
Regex ‘(hello)|(hi)’ matches strings ‘hello world’ and ‘hi python’. It wouldn’t make sense to try to match both of them at the same time.
AB
The AND matches first the regex A and second the regex B, in this sequence.
We’ve already seen it trivially in the regex ‘ca’ that matches first regex ‘c’ and second regex ‘a’.
Note that I gave the above operators some more meaningful names (in bold) so that you can immediately grasp the purpose of each regex. For example, the ‘^’ operator is usually denoted as the ‘caret’ operator. Those names are not descriptive so I came up with more kindergarten-like words such as the “start-of-string” operator.
We’ve already seen many examples but let’s dive into even more!
import re text = ''' Ha! let me see her: out, alas! he's cold: Her blood is settled, and her joints are stiff; Life and these lips have long been separated: Death lies on her like an untimely frost Upon the sweetest flower of all the field. ''' print(re.findall('.a!', text)) '''

Finds all occurrences of an arbitrary character that is

followed by the character sequence 'a!'.

['Ha!'] ''' print(re.findall('is.*and', text)) '''

Finds all occurrences of the word 'is',

followed by an arbitrary number of characters

and the word 'and'.

['is settled, and'] ''' print(re.findall('her:?', text)) '''

Finds all occurrences of the word 'her',

followed by zero or one occurrences of the colon ':'.

['her:', 'her', 'her'] ''' print(re.findall('her:+', text)) '''

Finds all occurrences of the word 'her',

followed by one or more occurrences of the colon ':'.

['her:'] ''' print(re.findall('^Ha.*', text)) '''

Finds all occurrences where the string starts with

the character sequence 'Ha', followed by an arbitrary

number of characters except for the new-line character. Can you figure out why Python doesn't find any?

[] ''' print(re.findall('n$', text)) '''

Finds all occurrences where the new-line character 'n'

occurs at the end of the string.

['n'] ''' print(re.findall('(Life|Death)', text)) '''

Finds all occurrences of either the word 'Life' or the

word 'Death'.

['Life', 'Death'] '''
In these examples, you’ve already seen the special symbol ‘\n’ which denotes the new-line character in Python (and most other languages). There are many special characters, specifically designed for regular expressions.
Related Re Methods
There are five important regular expression methods which you should master:
The re.findall(pattern, string) method returns a list of string matches. Read more in our blog tutorial.
The re.search(pattern, string) method returns a match object of the first match. Read more in our blog tutorial.
The re.match(pattern, string) method returns a match object if the regex matches at the beginning of the string. Read more in our blog tutorial.
The re.fullmatch(pattern, string) method returns a match object if the regex matches the whole string. Read more in our blog tutorial.
The re.compile(pattern) method prepares the regular expression pattern—and returns a regex object which you can use multiple times in your code. Read more in our blog tutorial.
The re.split(pattern, string) method returns a list of strings by matching all occurrences of the pattern in the string and dividing the string along those. Read more in our blog tutorial.
The re.sub(The re.sub(pattern, repl, string, count=0, flags=0) method returns a new string where all occurrences of the pattern in the old string are replaced by repl. Read more in our blog tutorial.
These seven methods are 80% of what you need to know to get started with Python’s regular expression functionality.
Where to Go From Here?
You’ve learned everything you need to know about the dot regex . in this regex tutorial.
Summary: The dot regex . matches all characters except the newline character. For example, the regular expression ‘…’ matches strings ‘hey’ and ‘tom’. But it does not match the string ‘yo\ntom’ which contains the newline character ‘\n’.
Want to earn money while you learn Python? Average Python programmers earn more than $50 per hour. You can certainly become average, can’t you?
Join the free webinar that shows you how to become a thriving coding business owner online!
How to Create Popup Contact Form Dialog using PHP and jQuery
Last modified on September 5th, 2019 by Vincy.
Contact form is an important element in your website. It encourages communication and acts as a bridge between you and your users. It allows users to post their feedback, comments, questions and more.
It helps you to get ideas and opinions that lead your business to growth. It is one among the important aspects that will decide your success.
There are many popup contact form plugins available online. These plugins help to add a contact form in your application with a modern outlook. You should choose them with care.
I have developed a light-weight contact form component named Iris. It is an interactive, integrative component. You can plug-in this component with your application without putting much effort. If you are searching for a secured simple contact form component, then Iris is the one you are looking for.
You should also read through the simple secure spam-free contact form. It details on the critical elements of a contact form and how they should be designed. It is a highly recommended read from me.
Developing a PHP contact form is a simple job. We have seen so many examples for creating a contact form in PHP. The simple contact form example has the basic code skeleton. It has minimal fields and a simple mail sending script.
Generally, the contact form has the name, email, message and more fields. The fields may vary based on the application’s nature or its purpose.
In some application there may be a lengthy contact form with elaborate list of fields phone, fax and more. But, sleek forms with minimal inputs encourage users to interact.
If you want to get more information, then make it via optional custom fields. Contact form with custom fields will help users who have no objection to give extra data.
In this article, we are going how to code for showing a PHP contact form as a popup dialog. I used the jQuery core to display a popup dialog with the contact form HTML.
There are various ways to allow users to contact you via your application interface. Contact form is one of a popular component of an application. It lets users contact the website owner or admin.
Generally, contact forms help the users to send their thoughts, doubts. Some of the main purposes of this contact form interface are here as listed below.
To collect feedback, comments from the users or customers.
For getting the advantages of user interaction with your application.
To receive user’s support request.
To allow users to send inquiries for paid services or customization.
While creating a contact form in your application, you have to remember the following. These points will help to create a safe contact for an interface for your application.
IMPORTANT – Read this!
Secure your platform from the bots. Yes! Internet is full of automated bots hungry for spreading spam.
Prevent abnormal frequent hits which may stress your server.
Ensure data sanitization before processing user data
Check request origin to prevent automated software to post the form data.
Validate on both client and server side.
No design is design. Do not thrust the UI upon the users, let its focus be on good communication and ease of use.
As the internet is an open world, it allows anonymous users. So, there is the possibility of malicious access. So, this kind of safety measures will reduce the risk.
It is not only applicable for the contact form but also for all the interfaces that get data from the end-user.
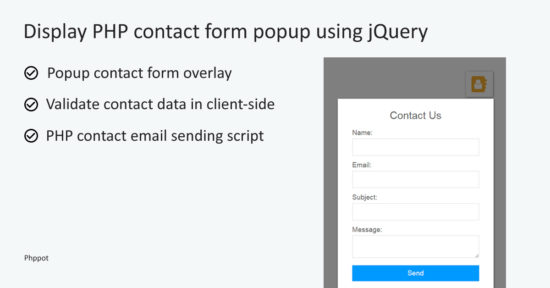
The contact form pops up to collect name, email, subject and message from the users. While running this example, the landing page will not show the popup on page load. Rather, it shows a clickable contact icon.
By clicking this icon, a contact form will popup with the name, email and more fields. For displaying the popup interface, I used jQuery library functions. It will add an overlay on top of the webpage while showing the popup.
In this example, all the contact details are mandatory. I have added a minimal validation script in JavaScript to validate the form data. This script is to check the availability of the contact data before posting it to the server-side.
When the user submits the form, the PHP code will receive the posted form data. Then, it processes the mail function with this contact information.
In this example, I have used the PHP mail function to send the contact email. If you want to send email using SMPT, the linked article has the code for implementing it.
Merits and demerits of a popup contact form dialog
There are both advantages and disadvantages of showing a popup contact form dialog.
The advantage is to let the user stay on his current page with any navigation or page refresh. The popup dialog interface will give a modern outlook for your application
Some web users hate popups. This is the main disadvantages. Also, it is a little bit of effort taking work to make a popup interface mobile friendly.
File Structure
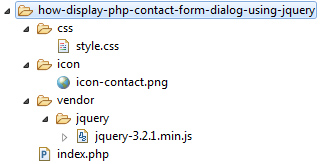
Below screenshot shows the file structure of this PHP contact form example. It shows the custom files and libraries used in this code.
It has a very minimal amount of dynamic code that is for sending the contact email. Other than that, it has more of the HTML, CSS, JavaScript code.
The index.php is the landing page which contains HTML to display clickable contact icon. It also has a hidden contact form container and a jQuery script to popup the form.
The vendor directory contains the jQuery library source.
This section is to learn how to create HTML to display the contact form interface in a jQuery popup.
It has the code to show the contact icon which popups contact form on its click event. The click event on the outside of the contact form layout will close the popup dialog.
I have added CSS and jQuery script to reflect the appropriate UI changes based on the user’s click action event. It helps to toggle the contact form popup dialog and acknowledge the user accordingly.
Below code shows the styles created for this PHP contact form UI. I have used very less CSS for this example to make it generic for any theme. You can override the below style to customize the form design for your website theme.
jQuery Script to show Contact form popup and validate form fields
Below script shows the jQuery callback function added for the document ready event.
It has two event handling functions. One is to show contact form popup dialog on the click event of the contact icon.
The other is to handle the form submit to validate contact data entered by the user.
The validation script focuses on minimalistic filter appliances. It helps to prevent users from sending the form with an empty data or with invalid data (email) format.
<script> $(document).ready(function () { $("#contact-icon").click(function () { $("#contact-popup").show(); }); //Contact Form validation on click event $("#contact-form").on("submit", function () { var valid = true; $(".info").html(""); $("inputBox").removeClass("input-error"); var userName = $("#userName").val(); var userEmail = $("#userEmail").val(); var subject = $("#subject").val(); var message = $("#message").val(); if (userName == "") { $("#userName-info").html("required."); $("#userName").addClass("input-error"); } if (userEmail == "") { $("#userEmail-info").html("required."); $("#userEmail").addClass("input-error"); valid = false; } if (!userEmail.match(/^([\w-\.]+@([\w-]+\.)+[\w-]{2,4})?$/)) { $("#userEmail-info").html("invalid."); $("#userEmail").addClass("input-error"); valid = false; } if (subject == "") { $("#subject-info").html("required."); $("#subject").addClass("input-error"); valid = false; } if (message == "") { $("#userMessage-info").html("required."); $("#message").addClass("input-error"); valid = false; } return valid; }); }); </script>
There are many ways of sending email in PHP. In this example, I used the in-built mail function to send the contact email.
Before sending the mail, we have to set the header, recipient, and the other parameters.
Below PHP script gets the posted contact form data using $_POST request array. In PHP, it sets the From data with mail header using the name, email posted via the form.
In this code, we can see the PHP filter_var() applied to sanitize the form data before processing.
Once the email sent, the PHP mail() function will return boolean true. If so, it shows a success message to the user.
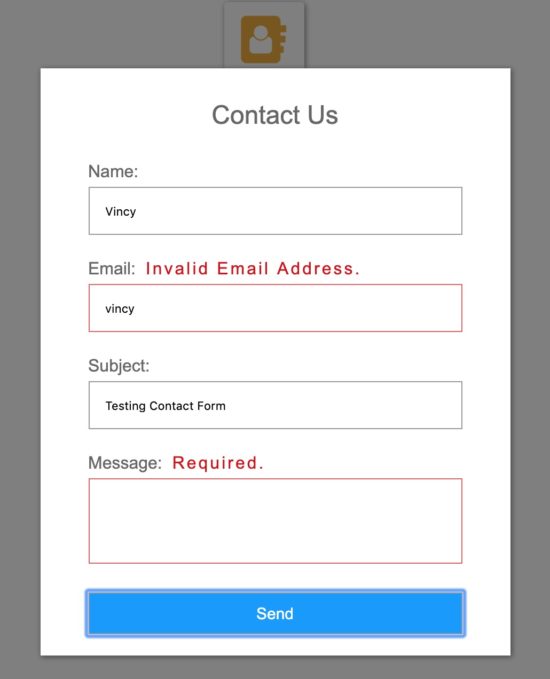
The figure shows the screenshot of the contact form popup dialog. You can see the clickable icon that is behind the overlay.
I have taken this screenshot by sending the form with an empty message and invalid email format. In the following screenshot, you can see the corresponding error message in the popup dialog. This is how this form alerts users about the improper data entered by them.
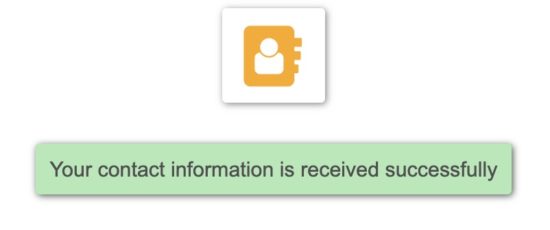
After sending the contact email, this message helps to acknowledge the user. This acknowledgment will toggle off the contact form popup.
Conclusion
Contact form in your application will help to gather information from the user. It will give you valuable feedback, ideas from the end-user to grow your business.
We have seen the advantages and disadvantages of having a popup contact form interface in an application. Also, we have seen lot of information about the purposes, basic need to integrate a contact form in an application.
The example code we have created for this article will reduce your effort to create a contact form for your application. It is a basic solution for the one who wants to deploy a medium to interact with the site users.
The 129th GalaQuiz will be LIVE soon, win up to $75 in GalaCredit!
[www.indiegala.com] The GalaQuiz will take place in less than 15 minutes from this announcement Today's GalaQuiz[www.indiegala.com] hints are up. The theme will be China. Celebrating early the upcoming Chinese New Year and the Lunar sales, and it will mainly cover general knowledge about one country. Get them all right and there will be a red envelope for you.
The Ursina Engine is a recently released open source Python based 3D game engine. The Ursina Engine is built on top of the well established Panda3D game engine (learn more here). Key features of the Ursina Engine include:
* hotreload code/textures/models while in-game * automatic import of .psd and .blend files * play in fullscreen while developing * easy to use mesh class for making procedural geometry * lots of included procedural 3D primitives
The Ursina Engine is available for Windows, Mac and Linux with the source code available on GitHub under the MIT license. To get started with the Ursina Engine you need to have Python 3.6 or later installed as well as the pip package manger and git. Once installed, simply run the command:
If you encounter a permissions error, add the –user parameter to the above line. From the examples, here is the code required to create an application and display a grid:
from ursina import* app =Ursina() r =8for i inrange(1, r): t = i/r s =4*i print(s) grid =Entity(model=Grid(s,s), scale=s, color=color.color(0,0,.8,lerp(.8,0,t)), rotation_x=90, position=(-s/2, i/1000, -s/2)) subgrid =duplicate(grid) subgrid.model =Grid(s*4, s*4) subgrid.color = color.color(0,0,.4,lerp(.8,0,t))EditorCamera() app.run()
You can learn more about the Ursina Engine in the video below.
Star Realms follow-up Epic releases next month – will be free-to-play
By Joe Robinson27 Jan 2020
As one card game closes its doors, another one sets to throw them wide open. Star Realms is a pretty popular deck-building card game in both physical and digital forms, and the same development company is currently working on a digital successor – Epic. It’s framed more as a traditional TCG than Star Realms ‘build-as-you-go’ mentality but you can see some similarities in terms of the design.
Successfully Kickstarted way back in 2017, this fantasy-style TCG will be releasing on February 18th, 2020.
What’s more, it will be completely free, up to a point. The principle activities you can do without needing to pay anything are:
No cost to download the app.
No cost to get new sets.
No cost or restrictions on online or offline casual play.
Every player will have every card in the game and be able to build any deck, any time.
You can own unlimited copies of every card.
Casual play vs. the AI and in the campaign.
Online matches, including Draft and other formats.
The only thing you will need to pay for are cosmetics, extras (like extra deck slots) and competitive play.
Existing players will be able to keep their username and any decks they’ve built, but they won’t be able Gold, Gems or Foil cards from their Alpha accounts.
Also, anyone who backed the game during the Kickstarter will be given extra stuff for free as compensation for the game going free-to-play. You can read the full details further down the announcement post here.
Build your own cloud with Fedora 31 and Nextcloud Server
Nextcloud is a software suite for storing and syncing your data across multiple devices. You can learn more about Nextcloud Server’s features from https://github.com/nextcloud/server.
This article demonstrates how to build a personal cloud using Fedora and Nextcloud in a few simple steps. For this tutorial you will need a dedicated computer or a virtual machine running Fedora 31 server edition and an internet connection.
Step 1: Configure the server
Start by updating your system and rebooting:
$ sudo -i

# dnf upgrade

# reboot
Next, disable SELinux by changing enforcing to disabled in /etc/selinux/config and then rebooting to activate the new setting:
# vi /etc/selinux/config

# reboot
If you don’t want to reboot right away, you can use the setenforce command to disable SELinux in the current session.
# setenforce 0
Alternatively, you can follow the directions here to configure SELinux to work with Nextcloud.
Step 2: Install the prerequisites
Before installing and configuring Nextcloud, a few prerequisites must be satisfied.
First, install Apache web server:
# dnf install httpd
Next, install PHP and some additional modules. Make sure that the PHP version being installed meets Nextcloud’s requirements:
Now that MariaDB is running on your server, you can run the mysql_secure_installation command to secure it:
# mysql_secure_installation NOTE: RUNNING ALL PARTS OF THIS SCRIPT IS RECOMMENDED FOR ALL MariaDB SERVERS IN PRODUCTION USE! PLEASE READ EACH STEP CAREFULLY! In order to log into MariaDB to secure it, we'll need the

current password for the root user. If you've just installed

MariaDB, and you haven't set the root password yet, the password

will be blank, so you should just press enter here. Enter current password for root (enter for none): <ENTER>

OK, successfully used password, moving on... Setting the root password ensures that nobody can log into

the MariaDB root user without the proper authorization. Set root password? [Y/n] <ENTER>

New password: Your_Password_Here

Re-enter new password: Your_Password_Here Password updated successfully! Reloading privilege tables... ... Success! By default, a MariaDB installation has an anonymous user,

allowing anyone to log into MariaDB without having to have

a user account created for them. This is intended only for

testing, and to make the installation go a bit smoother. You

should remove them before moving into a production environment. Remove anonymous users? [Y/n] <ENTER> ... Success! Normally, root should only be allowed to connect from 'localhost'. This ensures that someone cannot guess at the

root password from the network. Disallow root login remotely? [Y/n] <ENTER> ... Success! By default, MariaDB comes with a database named 'test' that

anyone can access. This is also intended only for testing, and

should be removed before moving into a production environment. Remove test database and access to it? [Y/n] <ENTER> - Dropping test database... ... Success! - Removing privileges on test database... ... Success! Reloading the privilege tables will ensure that all changes

made so far will take effect immediately. Reload privilege tables now? [Y/n] <ENTER> ... Success! Cleaning up... All done! If you've completed all of the above steps, your

MariaDB installation should now be secure. Thanks for using MariaDB!
Step 3: Install Nextcloud Server
Now that the prerequisites for your Nextcloud installation have been satisfied, download and unzip the Nextcloud archive:
Next, create a dedicated user and database for your Nextcloud instance:
# mysql -p

> create database nextcloud;

> create user 'nc_admin'@'localhost' identified by 'SeCrEt';

> grant all privileges on nextcloud.* to 'nc_admin'@'localhost';

> flush privileges;

> exit;
Step 4: Configure Nextcloud
Nextcloud can be configured using its web interface or from the command line.
I used the http protocol, but Nextcloud also works over https. I might write a follow-up about securing Nextcloud in a future article.
I disabled SELinux, but your server will be more secure if you configure it.
The recommend PHP memory limit for Nextcloud is 512M. To change it, edit the memory_limit variable in the /etc/php.ini configuration file and restart your httpd service.













 in GalaCredit!
 Win Steam Keys by beating the Gameplay Challenge.

